How to master a song from start to finish with Ozone
Audio mastering is the final stage of the audio production process where you polish your track and prepare it for distribution. Learn how to master a song from start to finish using the latest version of Ozone, with steps that will set you up for success.
Audio mastering is the final stage of the audio production process during which you polish your mix and prepare it for distribution. While mixing is the process of editing and sculpting the individual elements – or tracks and instruments – that comprise a mix of a song, mastering music involves making subtle corrections and enhancements to every element of a song, simultaneously.
In this article we’ll walk you through how to master a song and how you can use the latest in audio mastering software to optimize your workflow using
![]()
![]()
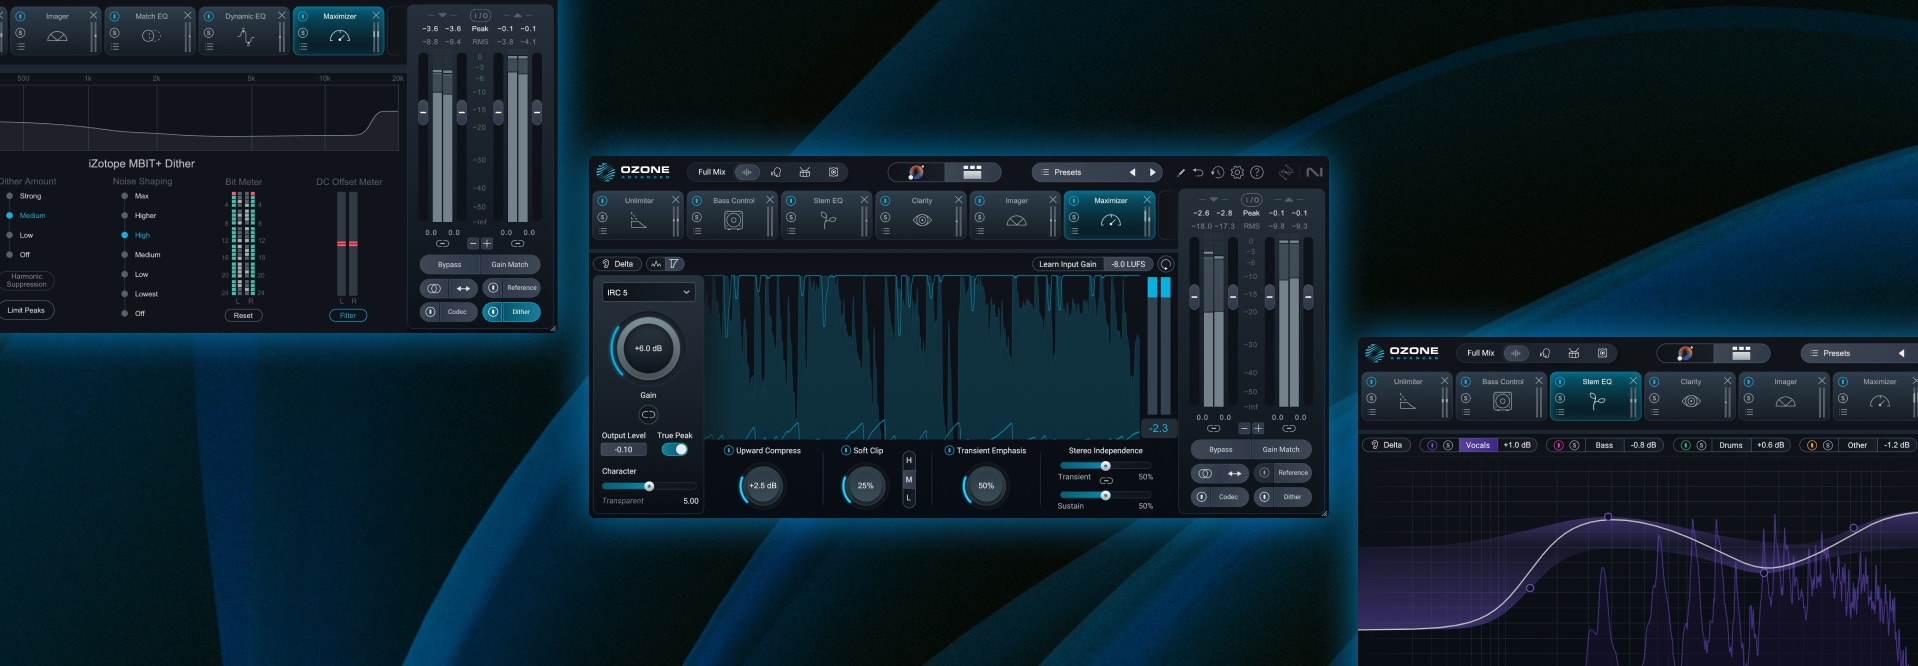
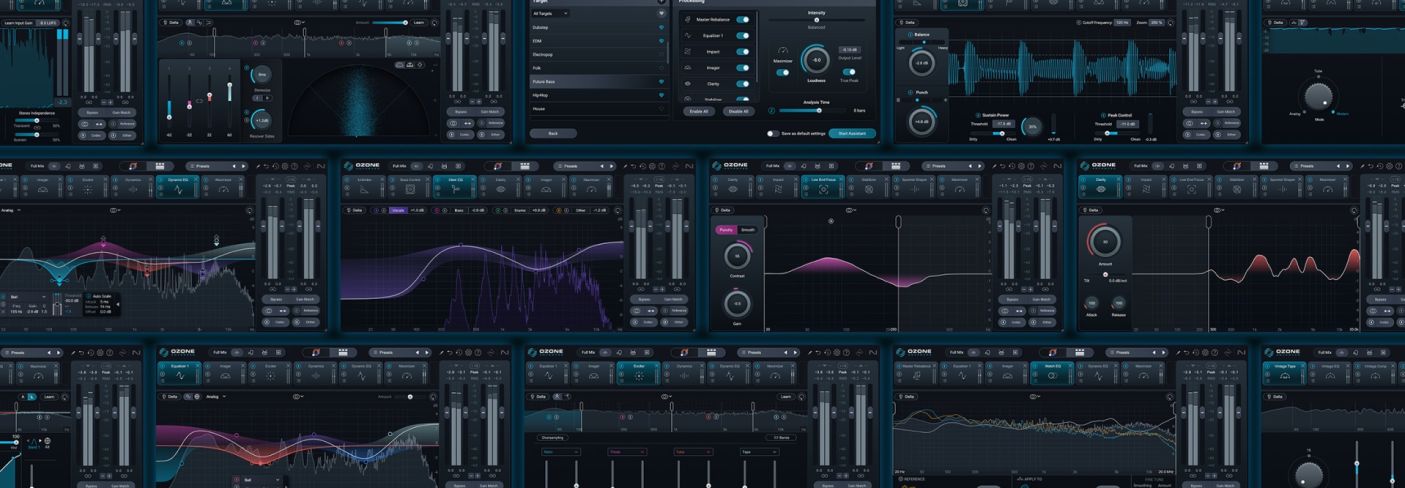
Ozone 12 Advanced
![]()
![]()
Tonal Balance Control 2
Mastered track
How to master a song
Mastering a song involves using tools like EQ, compression, limiting, and other specialized processors to ensure that a mix sounds loud, clear, and the best it possibly can on different types of speakers and listening environments. One of the goals of mastering is to produce music that sits alongside other professionally mastered songs on the market so that it doesn’t sound out of place when heard on the radio, TV, streaming platforms, or other mediums.
There are many approaches to mastering music, and we certainly can’t cover them all here. For that reason, we’ll focus on some of the most common steps to getting a great sound ,and how you can use the latest version of Ozone to streamline and speed up your audio mastering workflow.
1. Finish your mix
It may seem like a foregone conclusion to some, but finishing the mix and preparing it for audio mastering is the first step to set yourself up for success. The mix should sound balanced, dynamically consistent and engaging, and have enough headroom for the mastering stage. Mastering music is a subtle art. Minor changes can make or break an entire mix, so try to create a mix that already sounds the absolute best it can rather than expecting a mastering engineer to fix things later on.
Does your mix sound too narrow? Make sure you are employing panning and other stereo imaging techniques. Does the mix need to sound more cohesive? Make sure you’re using bus processing techniques to help glue things together.
Additionally, make sure you’ve used good gain staging techniques and that nothing is clipping. If you have plug-ins or channels clipping, they may introduce distortion into your mix that will get amplified during mastering. You also don’t need to use all of the available headroom on your master bus. Aim to keep your mix's maximum peak level below about -3 to -6 dBFS and keep your average level around -18 dBFS RMS (or momentary LUFS). These levels will work fine for mastering.. There are no absolutes here though, and the key takeaway is to avoid clipping, especially on the master.
You also want to ensure you’re happy with the level relationships between all the different elements of your mix before bouncing down to a stereo file. While there are some new tools in Ozone that allow you to reach inside a mix to adjust drums, vocals, bass, and other instruments individually – almost as if you were stem mastering – you won’t be able to change levels of any individual tracks without going back to the mixing stage of the audio production workflow.
2. Bounce down your stereo mix
Once you finish your mix, the next step is to export – a.k.a. bounce, or render – it as a stereo audio file. When doing so, bounce your track down using the same bit depth and sample rate settings you recorded with. So if you recorded in 24-bit at a 48kHz sample rate, bounce it at those same settings.
You can also bounce to 32-bit floating point if your workstation supports this for the ultimate in fidelity and flexibility. If you’re bouncing to 24-bit, you can use a flat, TPDF style dither, but if you use 32-bit float, dither is not yet required.
Also, make sure you’re bouncing your file to a lossless format like AIFF or WAV. Don’t export it as an MP3 or AAC, or you’ll lose some of the sonic details present in the original recording. Worse, the artifacts that are normally masked in an unaltered MP3 or AAC may start to sound very obvious and unpleasant once they’ve undergone a trip through mastering processors.
3. Start a new session and import your stereo mix and reference tracks
Next, you’ll want to create a new session in your workstation of choice and import your stereo mix. If you’re working on an EP or album you can use one track for each song, or you can set up a more advanced template that gives you a lot of flexibility for album mastering. You may also want to add reference tracks to your mastering session, or directly to Ozone. A reference track is a professionally produced song that’s representative of how you want your own track to sound.
Oftentimes, musicians will have songs, albums, or artists whose sound they want to emulate. Track referencing is a way for audio engineers to compare and contrast the song they are mixing or mastering to songs of a similar genre or style. It’s an efficient way to track your progress and produce consistent results.
Workflow tip: Add your reference tracks directly from Ozone
Ozone gives you multiple ways to work with reference tracks directly within the plugin. If you click on the “Reference” button below the I/O meters and faders you can add reference tracks in the Referencing Panel, set loop points, and audition them with the Reference power button.
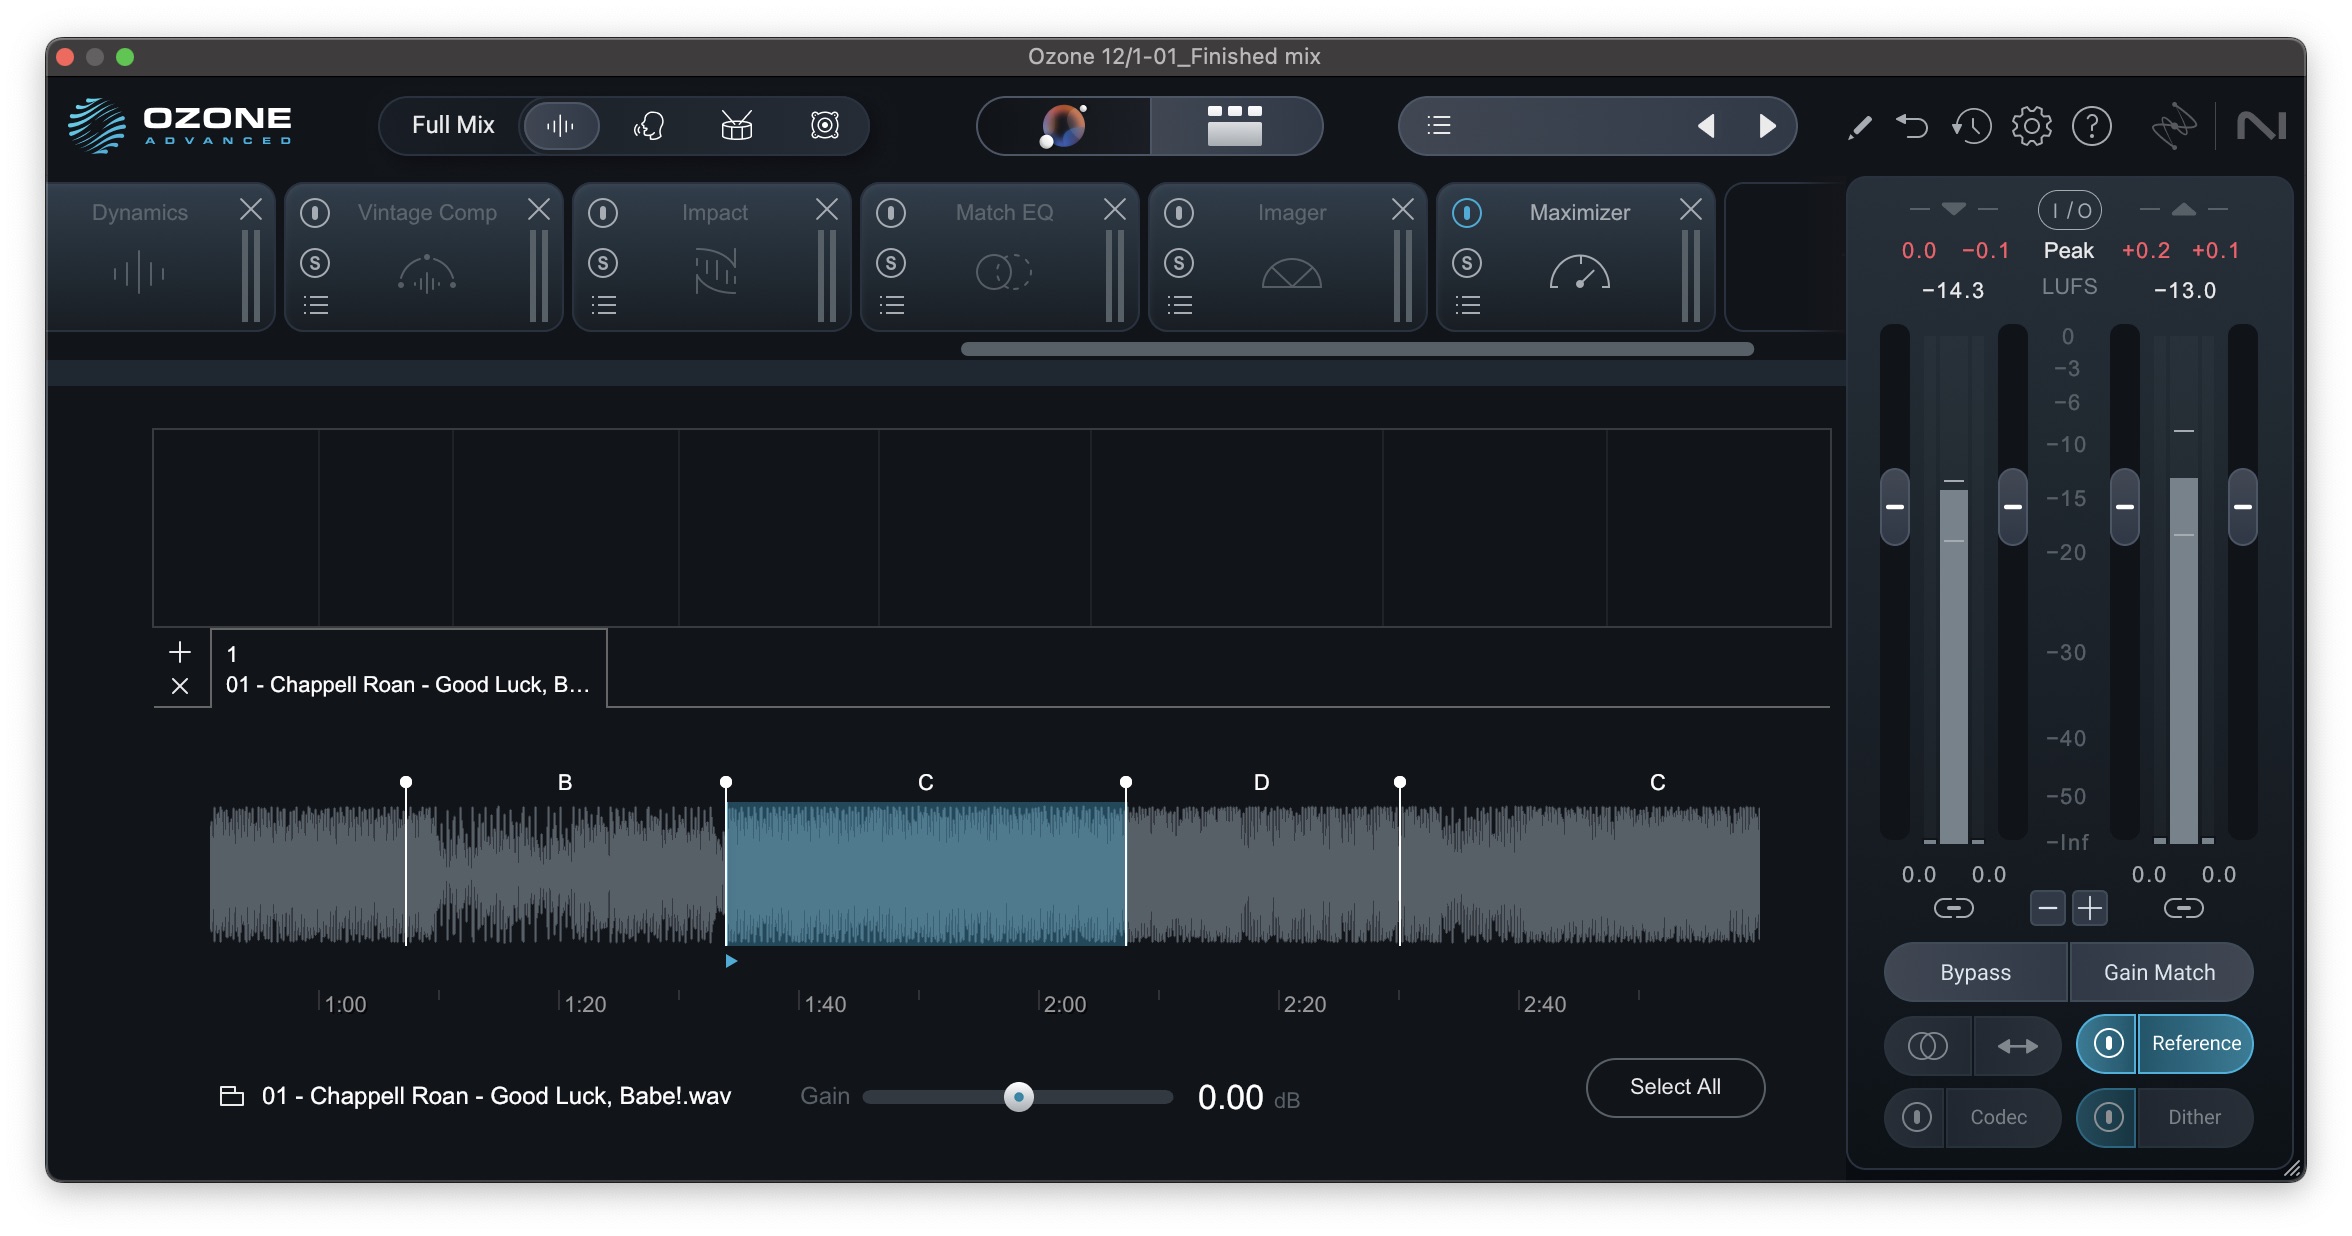
Using reference tracks in Ozone
In the Master Assistant view, you can also add reference targets by clicking the “+” next to Target and selecting a file. This will create a custom target for Ozone to work toward. If streaming is more your speed, you can use
![]()
![]()
Audiolens
4. Listen to the mix and take notes
If you’re new to mastering music, you may be wondering how to approach a mastering signal chain. What order should your effects be? Should you add an EQ or compressor first? Do you need special processing to upload your track to a streaming service?
There isn’t a one-size-fits-all signal chain for every track; each mix has its own needs. So, prior to applying any kind of processing, take the time to listen to your track carefully and take notes on anything that stands out. Taking notes will give you benchmarks to meet along the way, and give your mastering workflow a sense of direction.
If you’ve mainly been working on your mix on one set of speakers, listening on a few alternative playback systems can be helpful. A car, your favorite headphones, a smart speaker, or even a phone can offer valuable perspectives, but when it comes time to actually master, listen on the best speakers with the most even and full-range frequency response you can.
Regardless of your approach, the general philosophy is: make corrections first, then make enhancements. Without first correcting spectral and dynamic problems, you risk amplifying them when applying a limiter, which raises the level of the quietest parts of your signal.
As you read along, keep in mind that the following steps in this guide are processing solutions you can apply if the mix calls for it. Taken as a whole, this would be a very maximalist approach to mastering a song, but not every song calls for every technique in the book. In fact many may only call for one or two! Each section below also includes ways you can optimize and speed up your workflow with the many AI-powered features built into Ozone. For example…
Workflow tip: Let Master Assistant set up a signal chain for you
If you need direction on how to approach your mastering signal chain or if you’d simply like to speed up your mastering workflow, we recommend using Ozone’s Master Assistant. Master Assistant analyzes your track and uses complex reference metrics to effortlessly set up a signal chain that matches the tone, dynamics, width and even vocal level of your mix with that of your reference tracks or genre target selected from the tonal balance target library.
What’s more, the latest version of Master Assistant has gotten a major overhaul. Not only are there 25 new genre and subgenre targets to choose from, there’s also an all-new Custom mode that allows you to choose what modules to include and exclude, processing intensity, analysis time, loudness targets, and more. You can even save your preferred approach as the default settings.
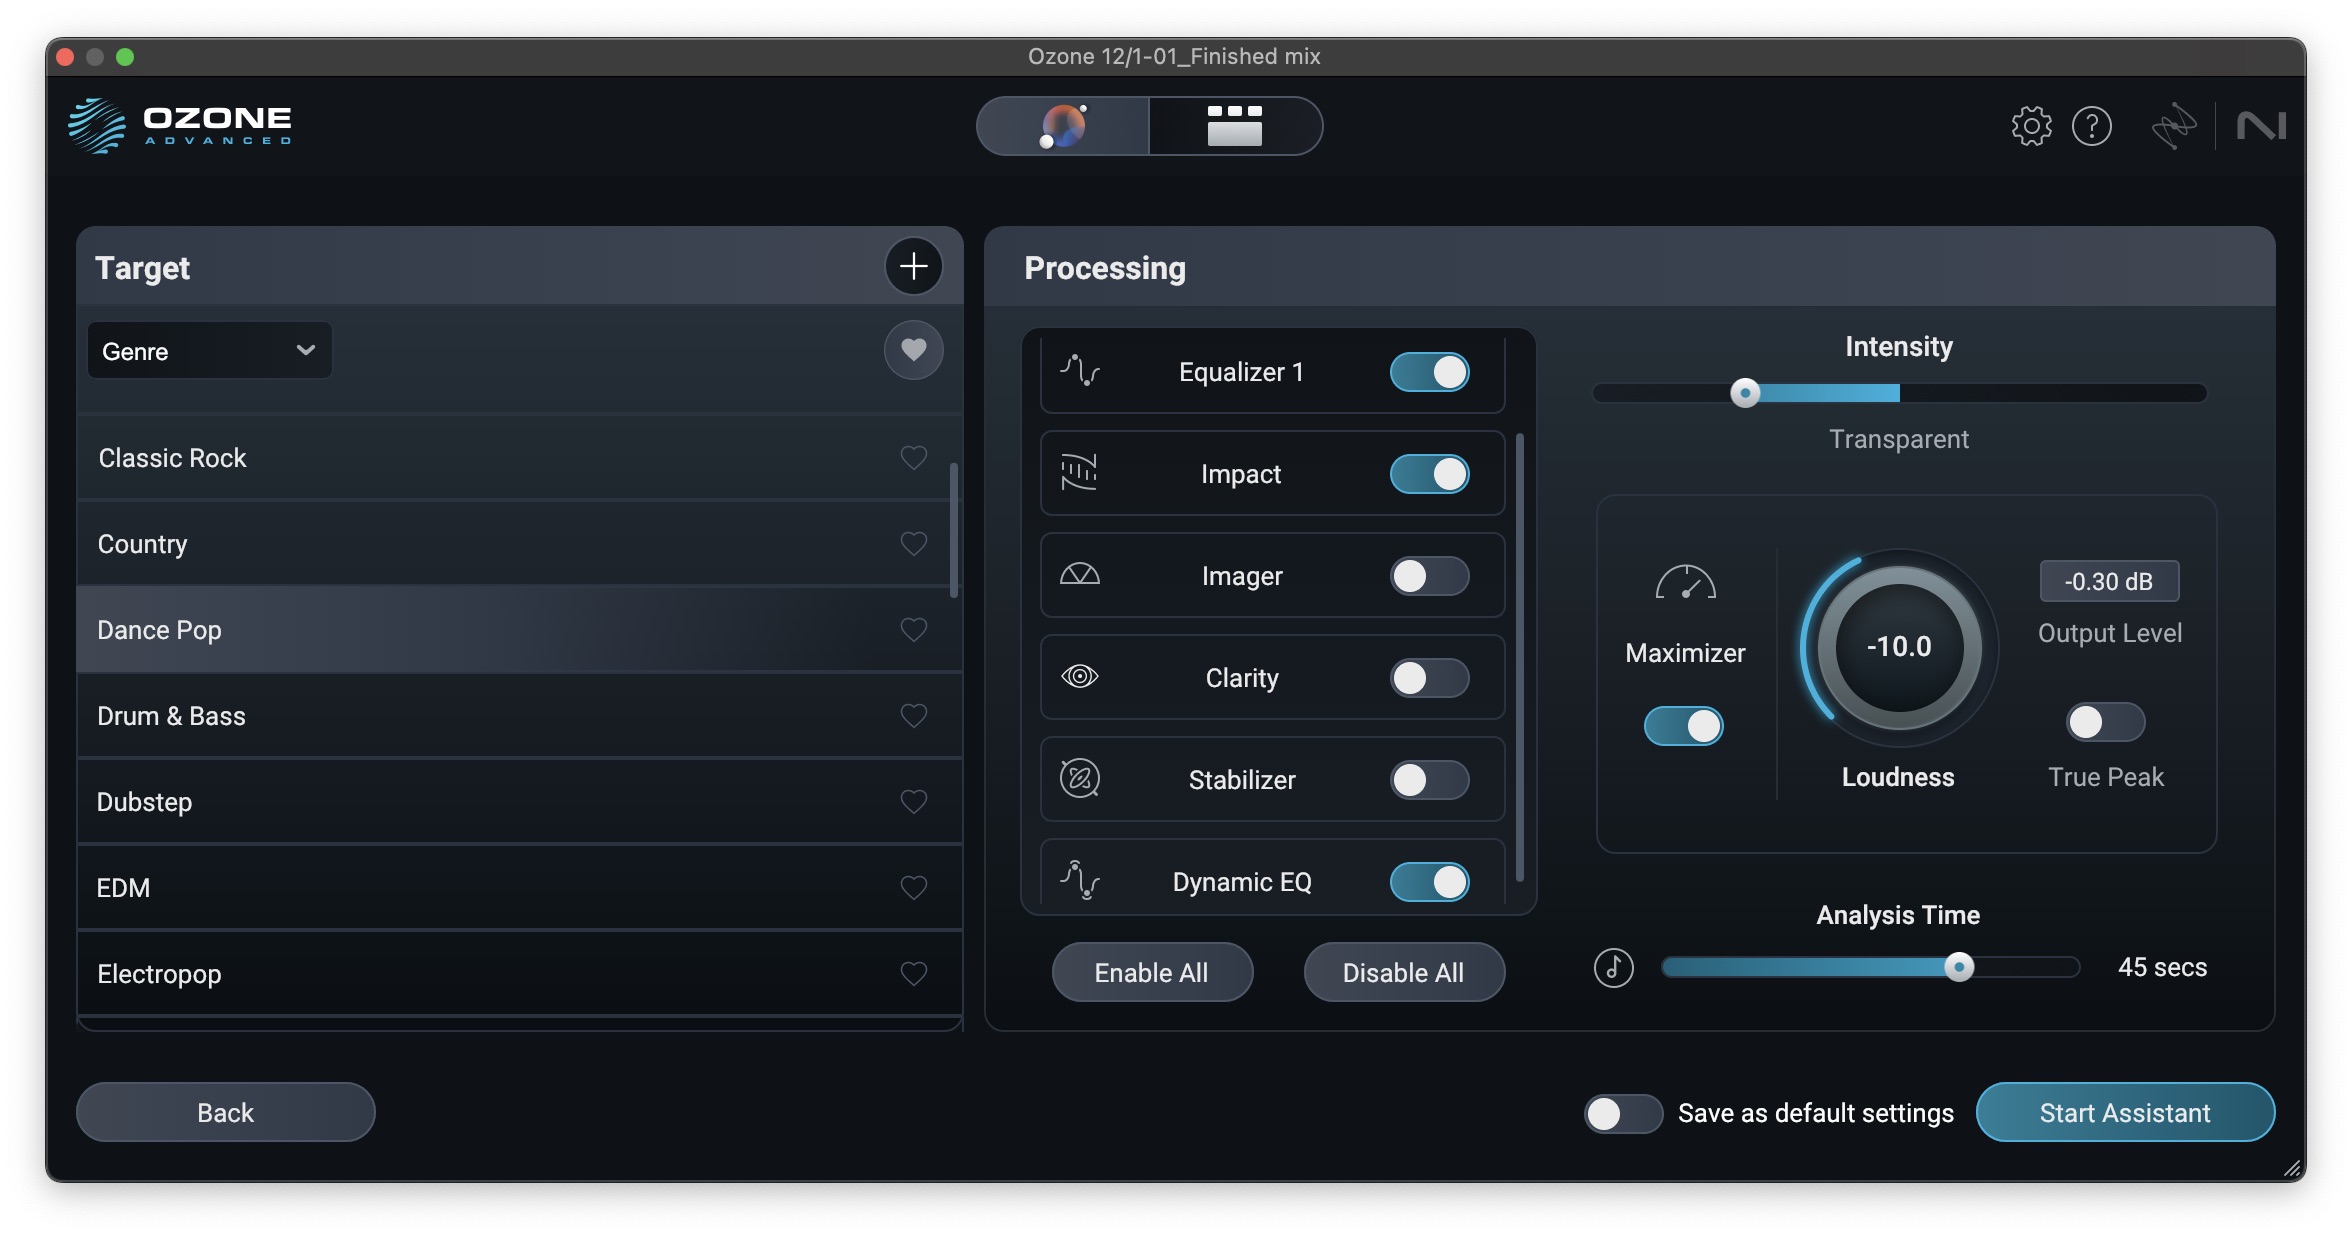
Master Assistant can set up a custom signal chain
Once either the Auto-Master or Custom analysis is run, you have access to intuitive controls that allow you to influence the main elements of your master: tonal balance and level, along with vocal balance, dynamics and width matching, plus macros for the Clarity and Stabilizer modules. Each control is a macro linked to multiple parameters in Ozone’s signal chain. This allows you to make goal-oriented changes that will get you a great sounding master quickly. If you ever need to make specific adjustments, simply switch over to the Detailed View for access to the signal chain and full module parameters.
How do you master a song correctly?
There’s no one way to master a song, but arguably, the correct way to approach it is to listen carefully, making some notes about what could improve the song. Then, use the fewest tools and steps possible to achieve those improvements. This could be as simple as an EQ dip in the lower-mids, a little level automation, and a limiter. Other times it might take everything but the kitchen sink. Ultimately, though, it should be an exercise in simplicity.
5. Limit the mix
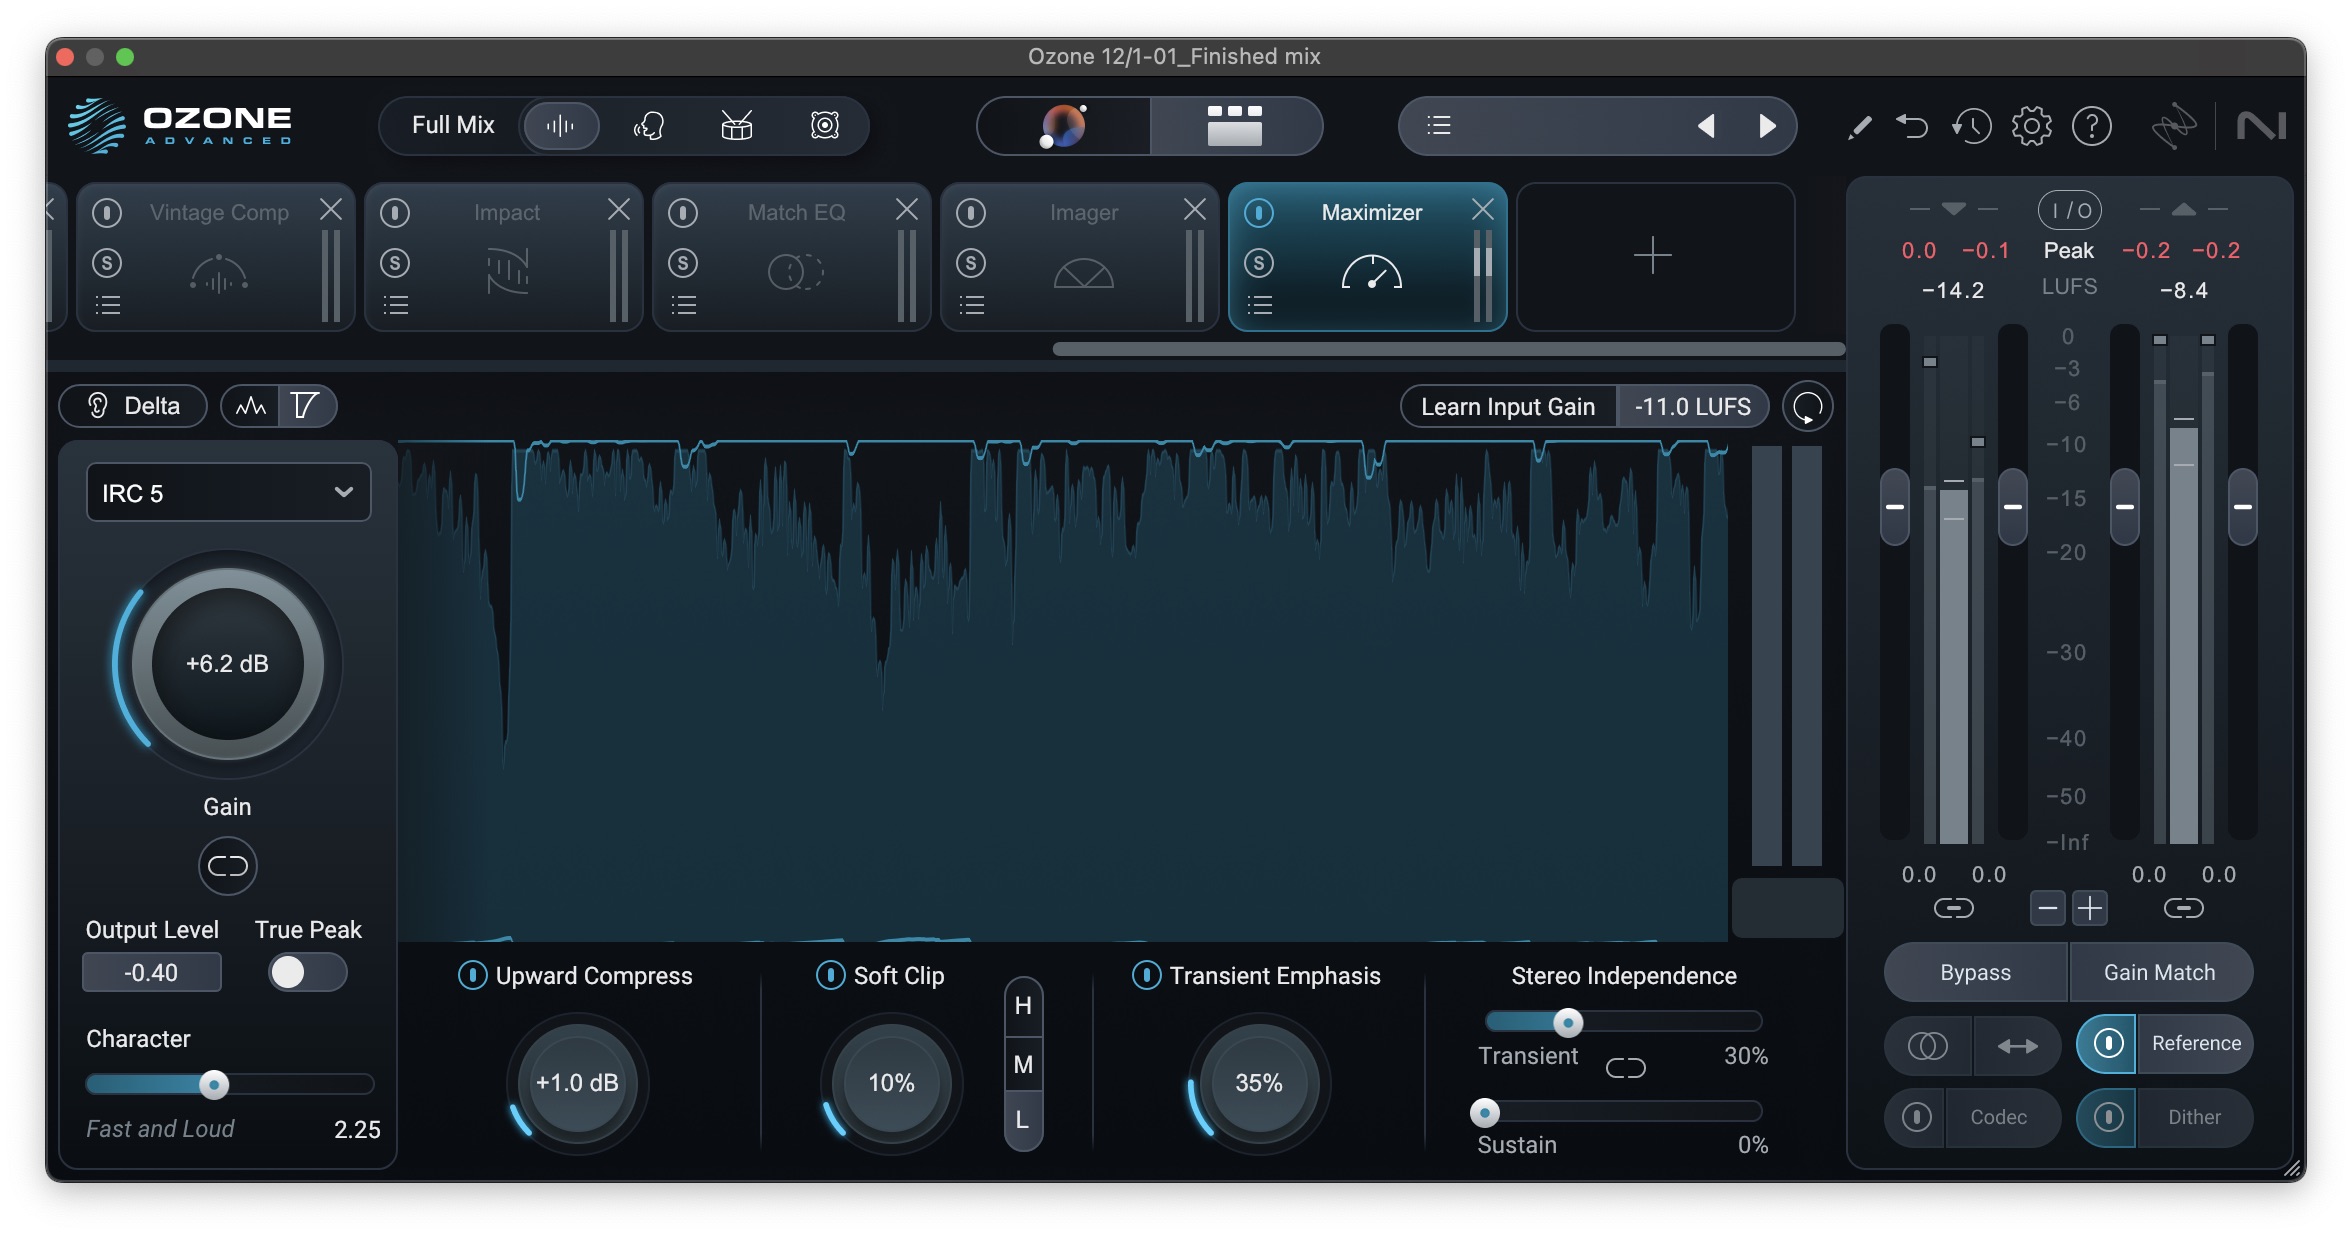
This comes as a surprise to many, but limiting is the first, and perhaps most essential step in mastering a song. A limiter allows you to increase the overall level of your song to commercial loudness while preventing the peaks from exceeding the clipping point of 0 dBfs. It’s essentially a compressor with an extreme, brick wall ratio (∞:1) that doesn’t allow any sound above the set threshold as you're increasing the level.
Start by setting the output level – sometimes called the ceiling – to a little below 0 dBFS. Somewhere between -1.0 to -0.3 often works well. Next, depending on your limiter, increase the gain, or lower the threshold until you get about 2–3 dB of gain reduction.
Some limiters, like Ozone Maximizer, allow you to link the input and output level so you can hear what the limiter is doing without increasing the apparent loudness. This makes it easier to tell when you’ve gone too far. Then, once you’ve found the sweet spot, you can turn off the gain linking and raise the output level back up to about -1.0 dBFS.
The reason you want to leave a little margin above the ceiling is because something known as True Peaks can often exceed the limiter threshold by a few fractions of a dB, and you want to avoid those going over the maximum digital level of 0 dBFS. There are two ways you can ensure this.
- Turn on True Peak limiting. This allows you to get your output level right up -0.1 dBFS, however True Peak limiting often softens transients a bit more – mainly because it’s necessarily doing more limiting – so you’ll likely need to use a bit less input gain.
- Use a True Peak meter, either in Ozone or something like Insight, and check to see what your maximum True Peak level is. Then increase your output gain until your maximum True Peak is about -0.1 dBTP.
What is the first step in mastering a song?
Limiting is often the first real processing step, even though it comes last in our chain. I could be a bit pedantic and say, “Finishing your mix!” or “Listening to the mix!”, and in a sense that’s not really wrong. However it’s also probably not what you’re really asking. So why limit first?
There are a few reasons. First, the way we perceive tonal balance is directly tied to the actual sound pressure level in the air, so we want to make sure we’re listening at the final level we want the song to be at to ensure we’re judging tonal changes we’re making accurately. Second, since we know limiting is going to need to be applied to some extent, it’s a good idea to work into and through it so you can hear its impact on the changes you’re making.
Setting the limiter to achieve the right level
Workflow tip: Use Unlimiter to restore dynamics
If you’re working on your own mixes, there’s no reason you shouldn’t be starting with a mix that hasn’t been crushed to death with limiting. If you are, you can just go back, bypass the limiter, and bounce at 32-bit float to prevent clipped overs. However, sometimes we receive mixes from others that already have a lot of limiting baked in.
This can be challenging to work with in mastering for a number of reasons, but up until now we’ve largely had to live with it. Sure, you can try multiband upward expansion, but there’s only so far that can take you, and how successful it is can depend a lot on the underlying music.
Enter the new Unlimiter module. Unlimiter is a novel, first-of-its-kind processor that allows you to remove limiting and restore the natural micro-dynamics of a mix. It was developed by training a neural net on both the before and after of heavily limited music, allowing it to reverse engineer how to restore the original dynamics to something that’s had limiting applied, and it can be a real lifesaver.
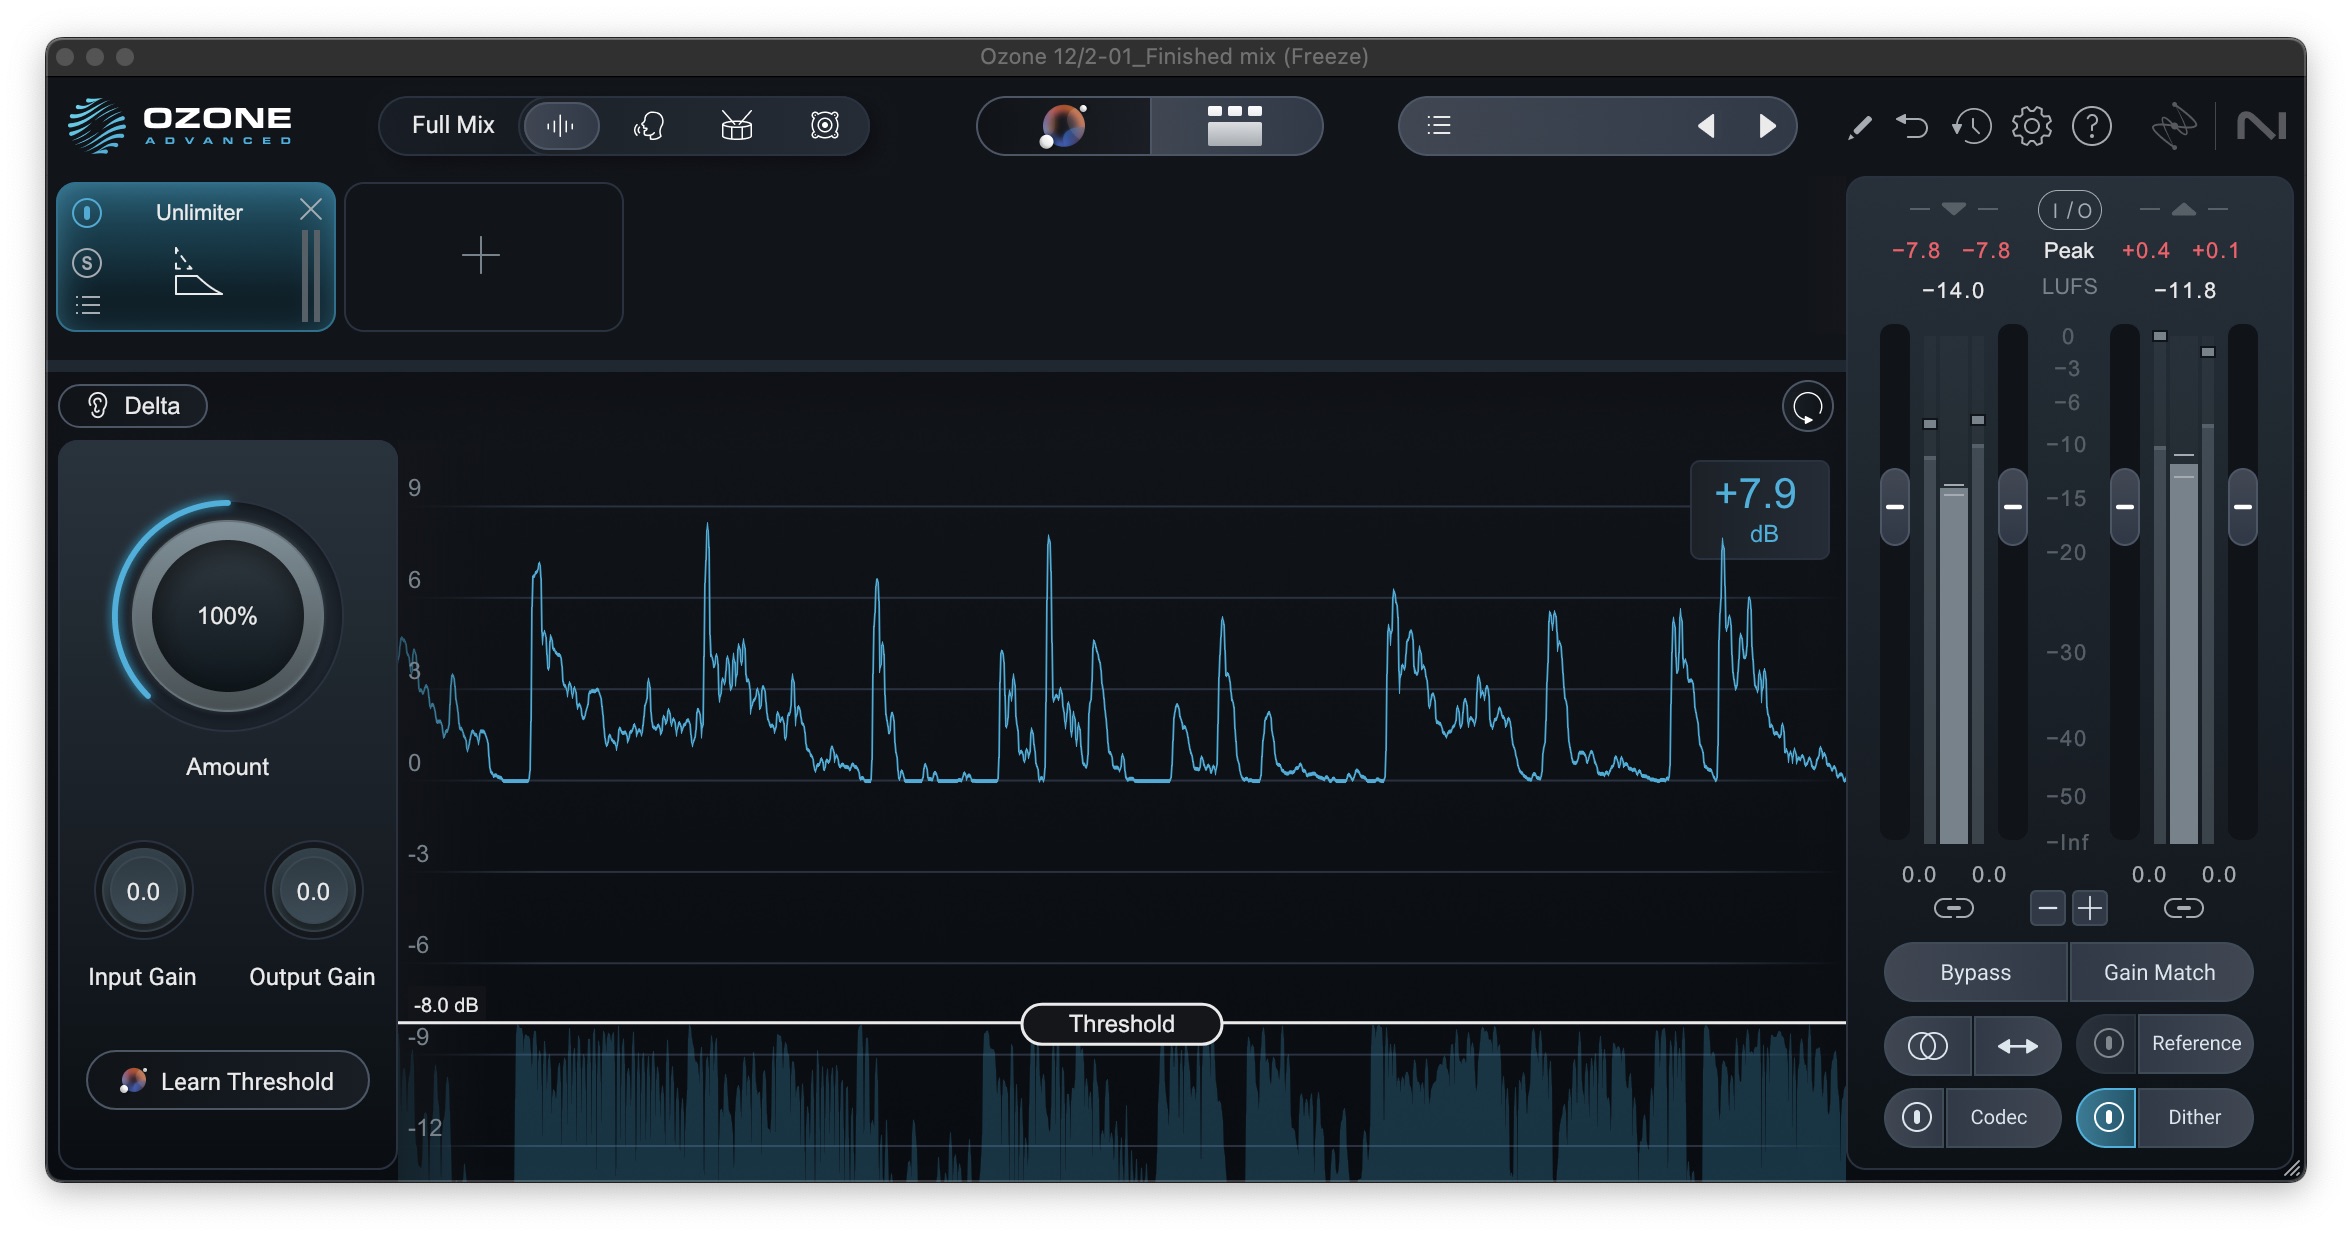
Using Unlimiter to restore dynamics
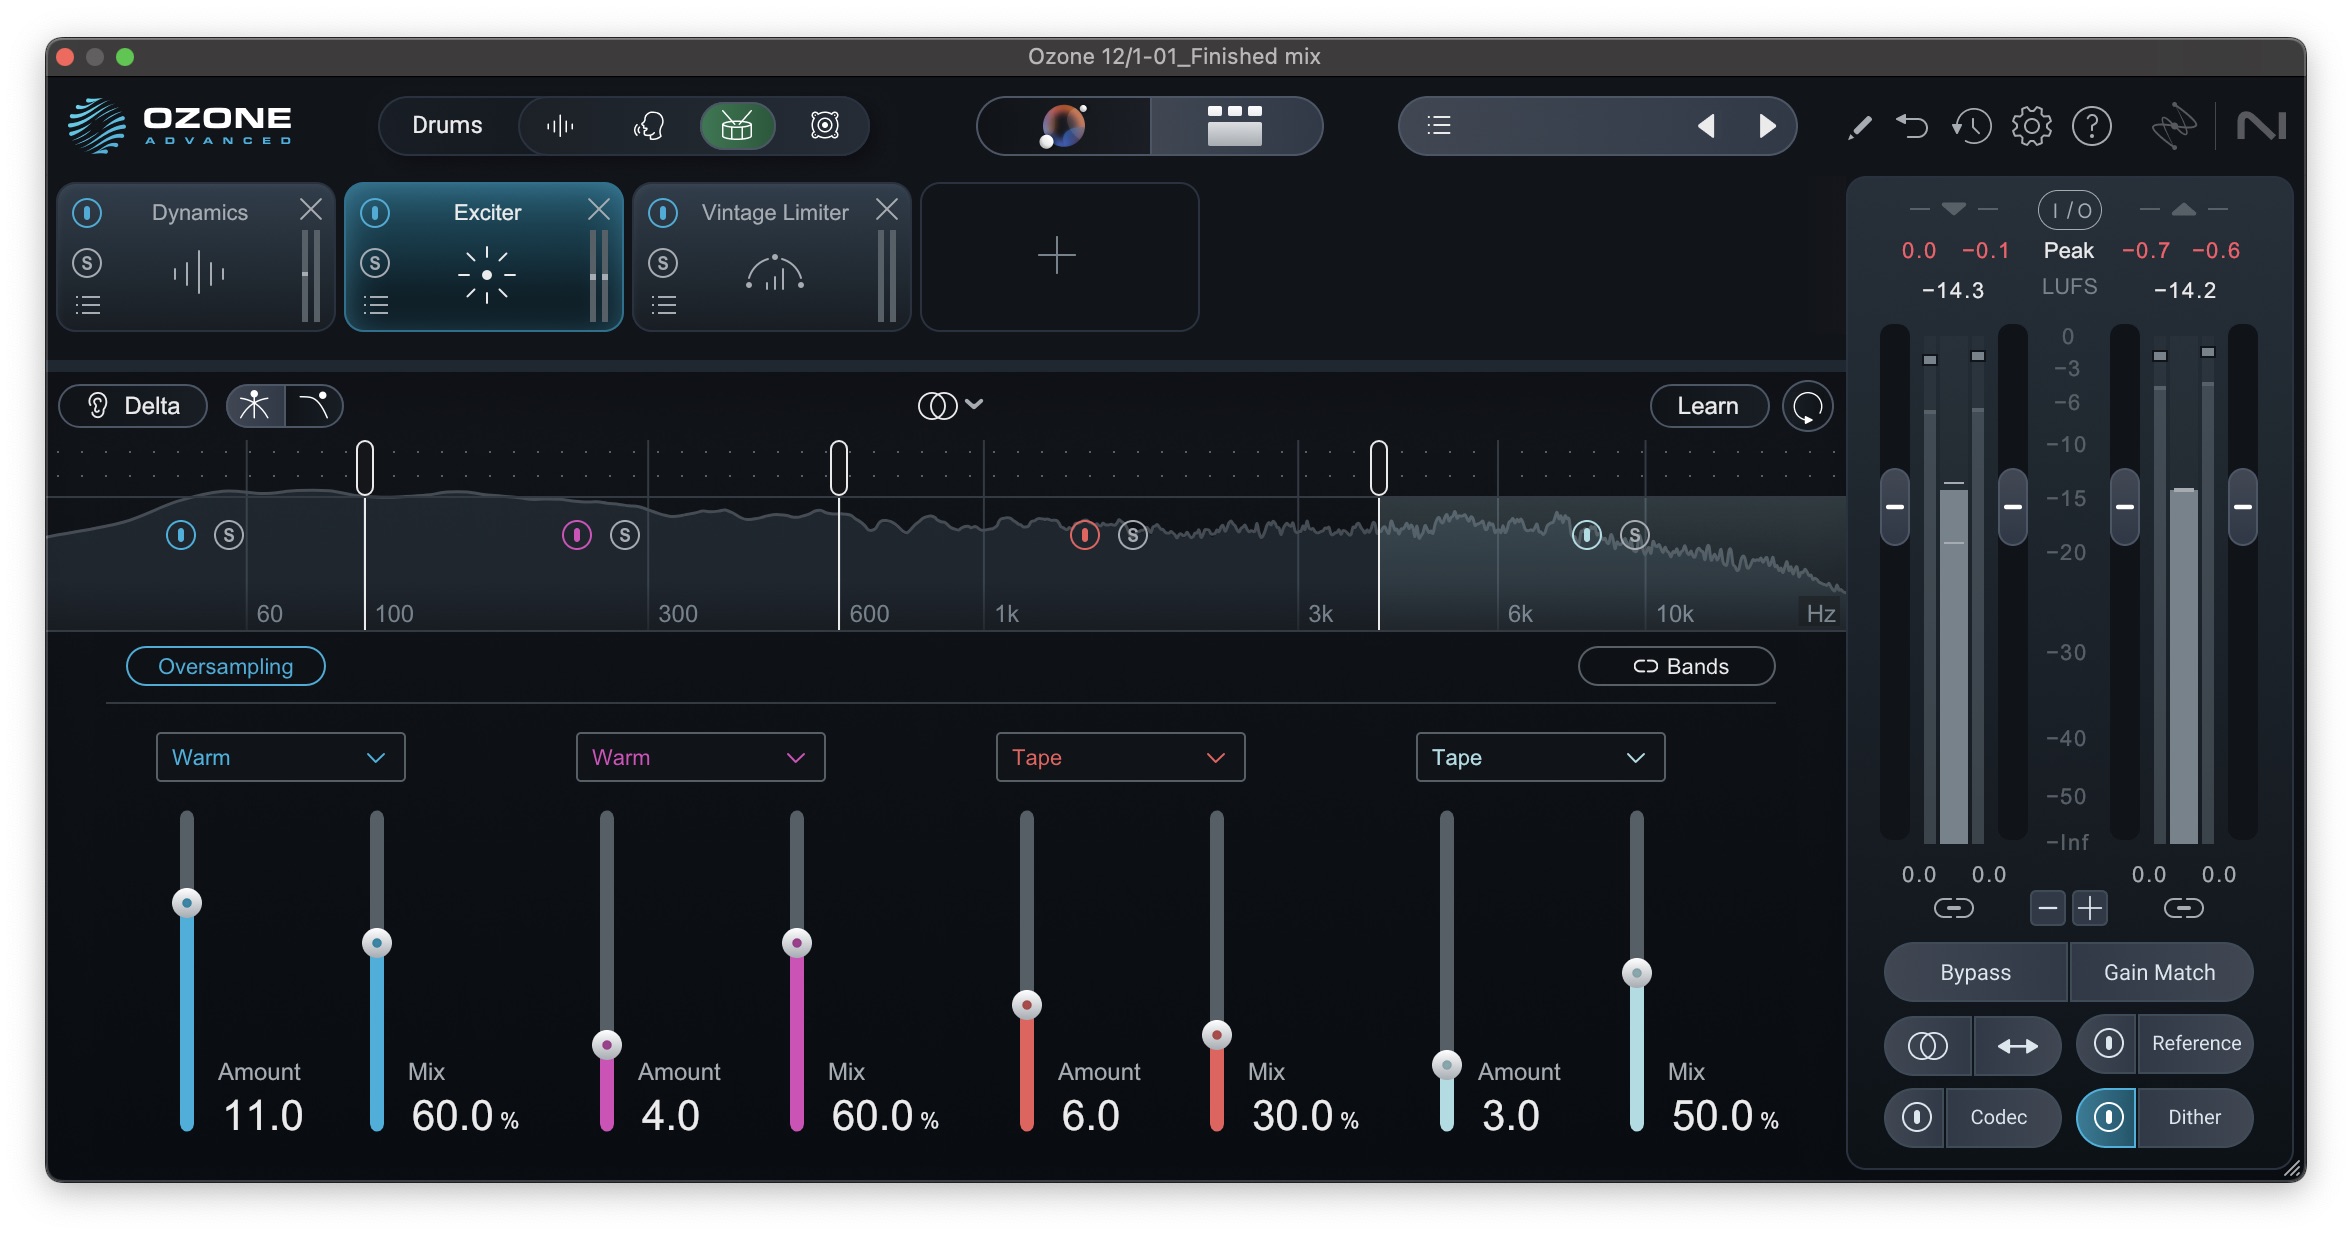
6. Make level corrections with Stem EQ if necessary
Maybe after applying basic loudness and EQ settings with Master Assistant, you notice the vocals feel a little soft, and you wish you could get a little more thump on your kick without also influencing the bass. If you had the mix session open, you could easily reach into the mixer and change the levels of individual instruments, and arguably, that’s still the best solution. With only a stereo track though, your options are limited, but sometimes – for reasons beyond our control – that’s the only option we have.
With the Stem EQ module, you can take advantage of the latest in source separation technology to correct and change not only instrument and vocal levels, but also EQ at the mastering stage without needing the original tracks. For each of four stems – vocals, bass, drums, and other – you can adjust EQ and level independently, soloing each to hear exactly what you’re working on, all with only one module!
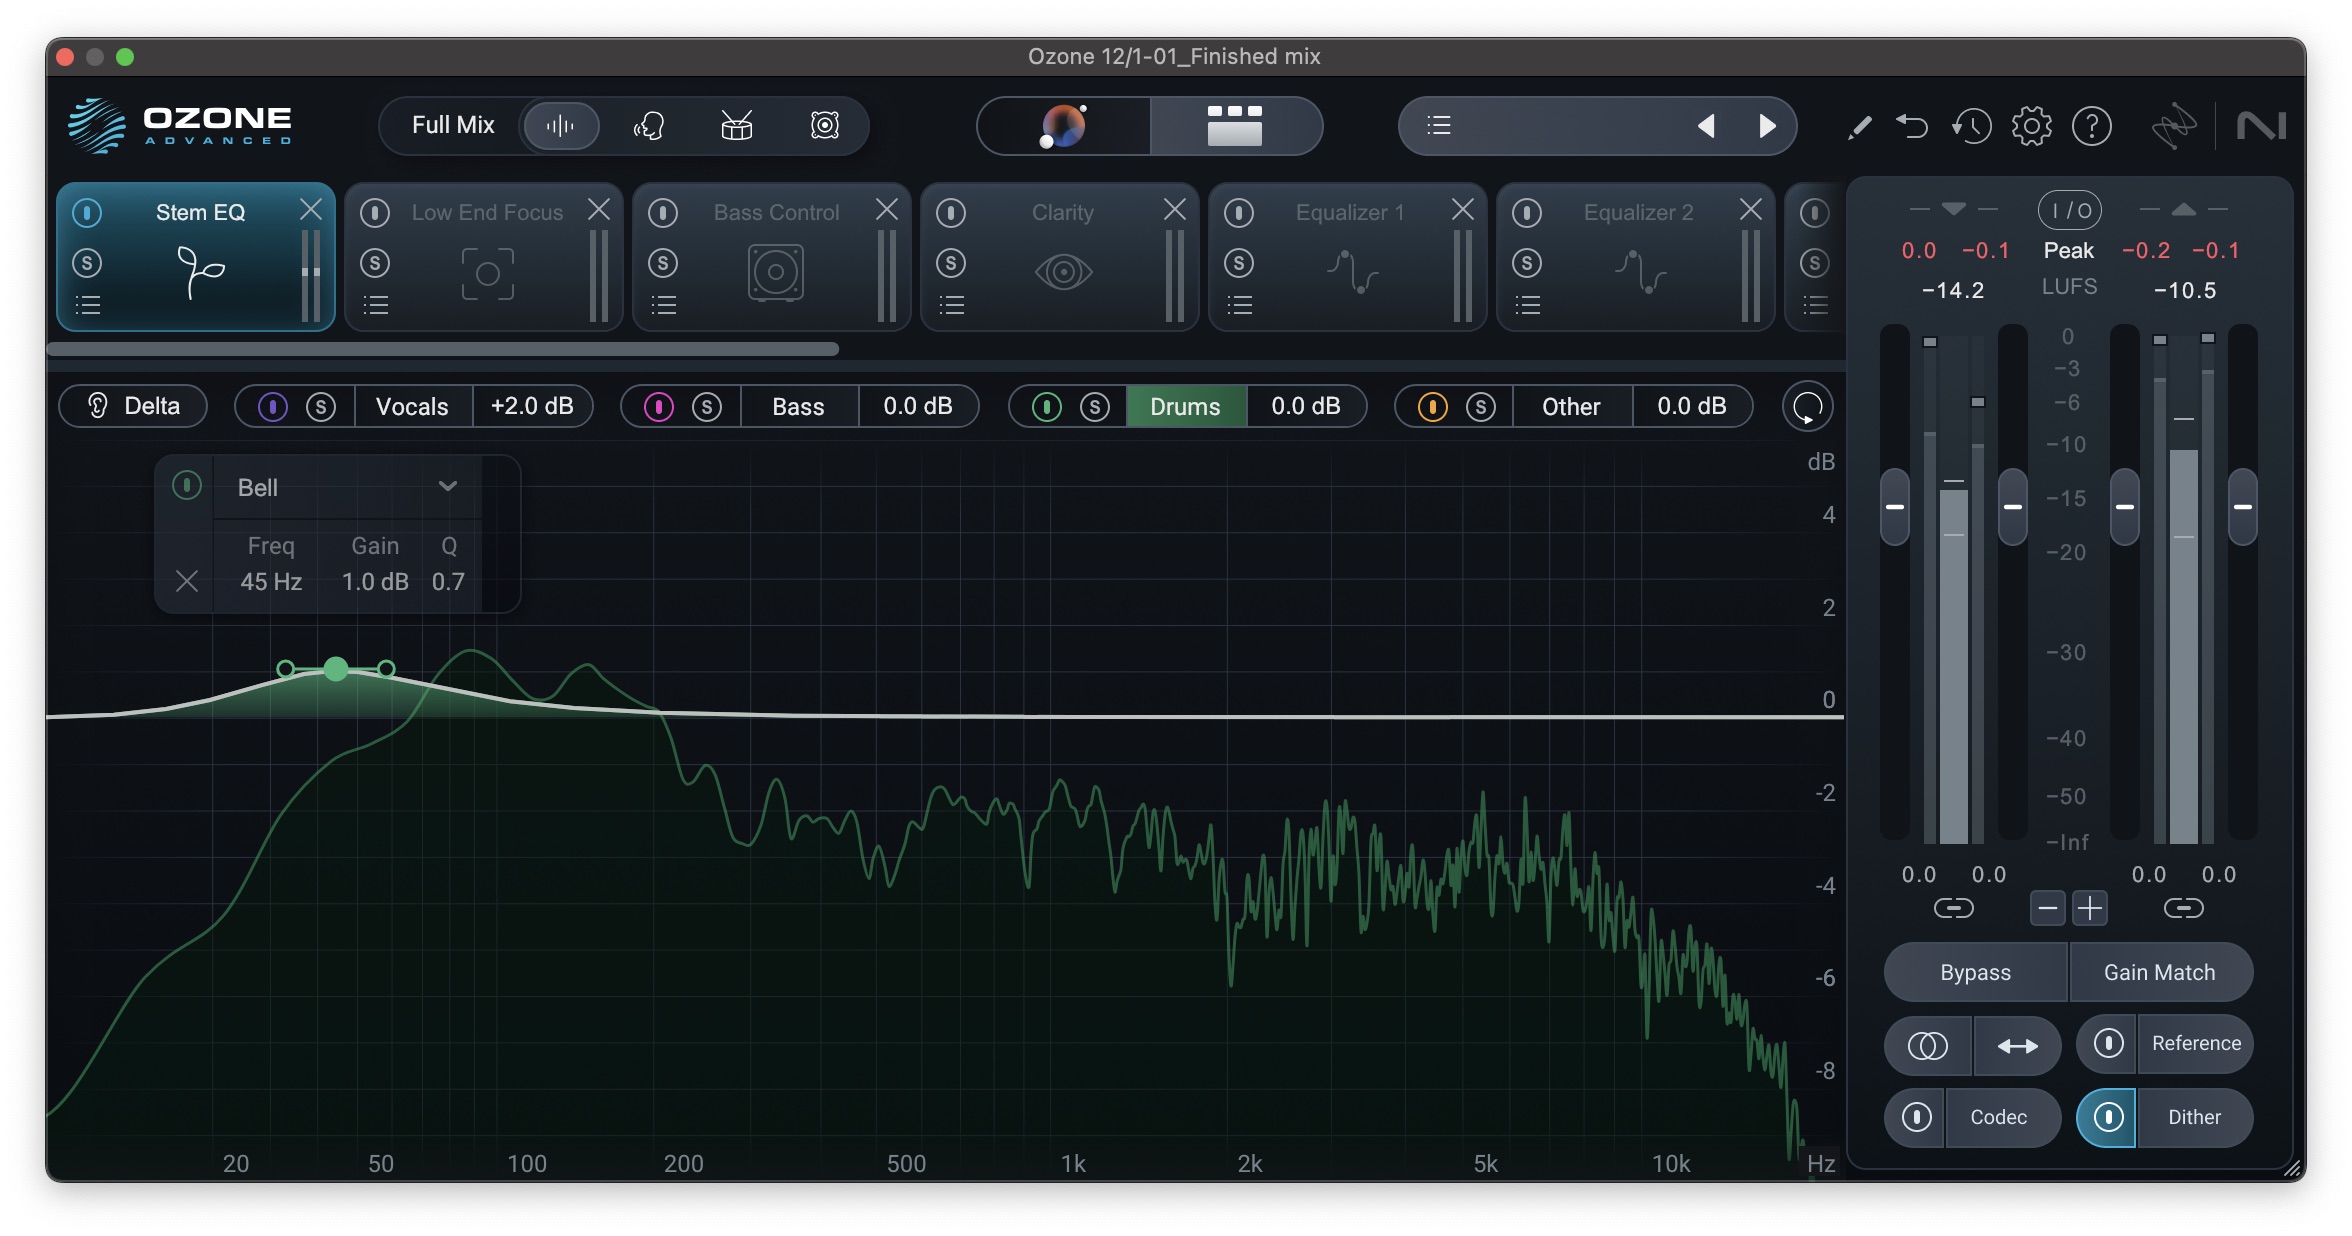
Stem EQ can bring the vocals forward, and more!
Workflow tip: Use Stem Focus to adjust more than just level and EQ
Whether you're mastering one of your songs for which you’ve lost the mix session, or you’re mastering someone else’s song and it’s simply not possible to get a mix revision, sometimes you really just want to reach into the mix to adjust more than EQ or level for the vocal, bass, or drums. With the improved source separation in Stem Focus, you can use any of Ozone’s powerful modules to adjust those stems directly in the master.
Just load up an instance of Ozone, select one of the stem icons at the top left, and now any modules you add to your signal chain will apply to just that stem. Of course, going back to the mix should always be the first port of call for these types of changes, but when that’s not possible Stem Focus opens a new world of possibilities
Using Stem Focus to enhance the drums
7. Add focus and clarity
Mixing and mastering the low end can be complex. The bass frequencies can contain the body of an acoustic guitar, the growl of saxophones, the weight of the bass guitar, and the punch of a kick drum. With lots of instruments competing in this space, the overall tone of your low end can become muddy and unfocused.
Similarly, as you transition into the midrange and high frequencies, sounds become much more harmonically dense and it can become difficult to precisely target problem areas with EQ alone. Walking the razor’s edge between a harsh and muffled upper midrange can often be a matter of less than a dB in either direction and is no mean feat. Luckily, Ozone has modules to help you dial in both these regions.
Workflow tip: Use the Bass Control, Low End Focus and Clarity modules in Ozone
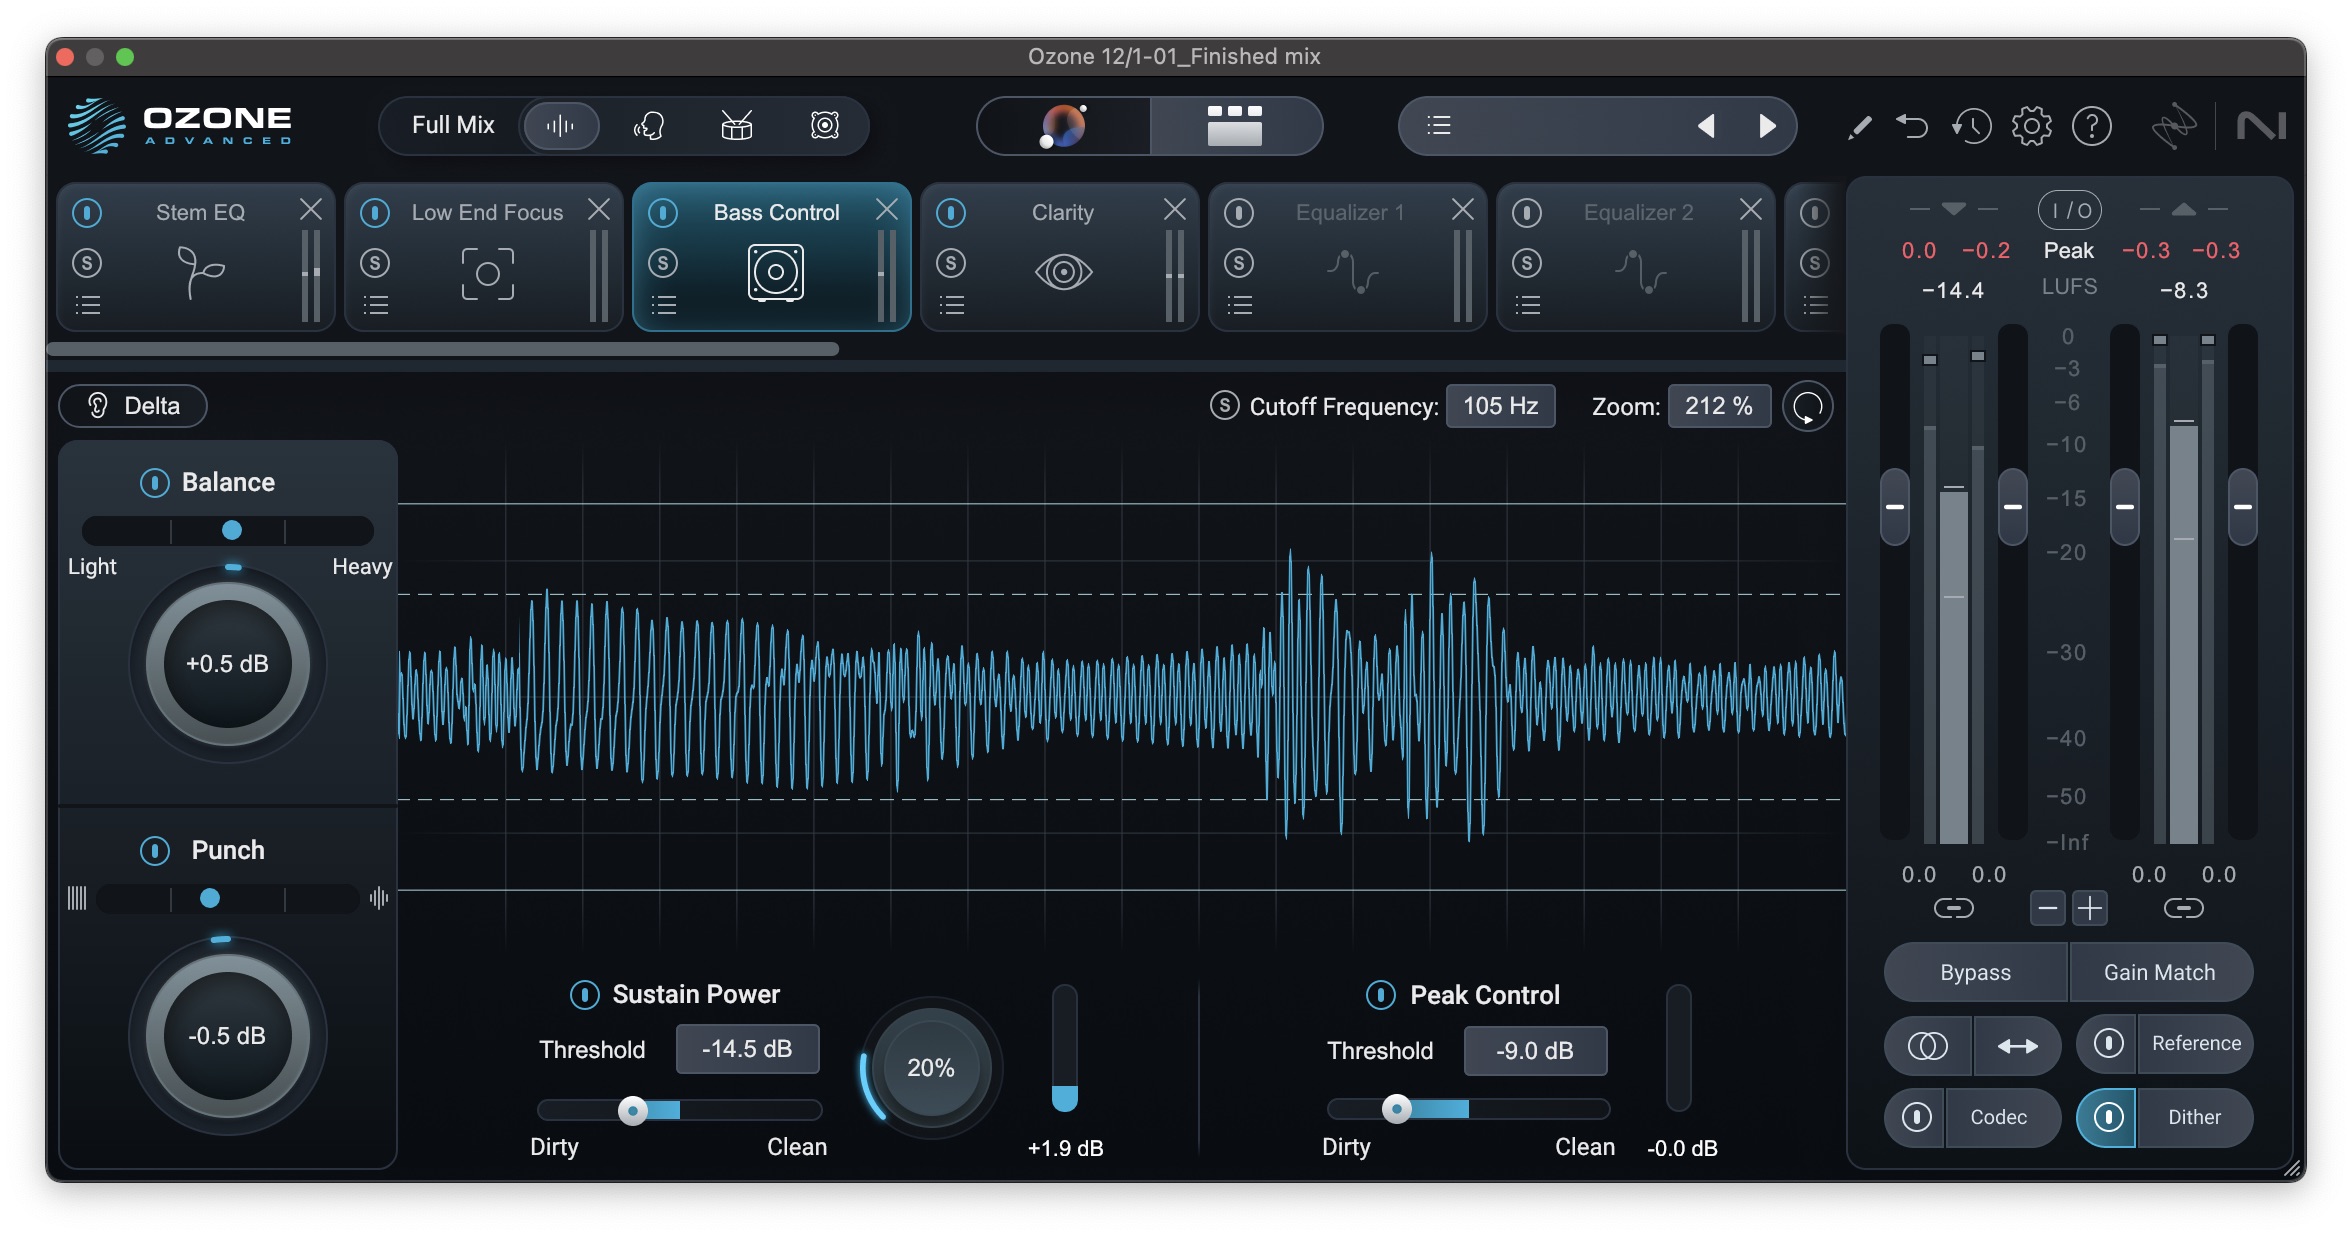
You can add articulation, power, and clarity to the overall low end with the Low End Focus and new Bass Control modules in Ozone. Low End Focus gives you control of what’s in focus in your low end (between 20 – 300 Hz) by either preserving the most prominent spectral content and lowering the less prominent content, or by bringing both extremes closer together for your low end.
By contrast, Bass Control gives you insight into – and control over – both your overall low-end level, as well as its micro and macro-dynamics.The oscilloscope view allows you to see the relationship between the transient and sustained material in your low-end, and the Balance and Punch modules allow you to control just that. You can also use the Sustain Power and Peak Control sections to refine the dynamic characteristics of the low-end. For more details, check out my new article on mastering low end.
A good rule of thumb is to place Low End Focus before Bass Control or multiband compressors – known as the Dynamics module in Ozone. This ensures that the module’s processing will be properly framed and controlled via the compressor and Dynamic EQ modules after it. That said, you may only need Bass Control, or Low End Focus and no other dynamics processing.
The Clarity module, on the other hand, is tailored to frequencies from 300 Hz up and works to flatten the frequency response – within reason – in the action region defined by the frequency handles. This means it can simultaneously tame harsh frequencies while enhancing deficient ones, leaving you with a midrange and high end that’s full and present without getting harsh.
Adding power with Bass Control
8. Correct the tone with EQ
Should you EQ or compress first? The answer depends on the needs of your song, but you generally want to focus on making corrections before making enhancements. If you hear problematic frequencies that are poking out, for instance, then use subtractive EQ to remove them. Conversely, if there’s a big hole in the frequency spectrum, or the fundamental of a particular instrument is feeling a bit weak, a targeted EQ boost could be just the ticket.
The reason we like to focus on corrective moves first is that the processors we use for enhancement – or sweetening – often have nonlinearities that can exacerbate problems. For example, imagine there’s a bit of a resonance that needs to be tucked in. If we add something like Vintage Tape or Exciter that adds harmonics, now that resonance gets spread across the audio spectrum via added harmonics.
So, focus on corrective moves first. These include but are not limited to harsh sibilance, excessive low end, and any resonances that distract from the enjoyability of the song.
When using EQ in mastering, a little can go a long way. There are no rules, per se, but in general, small moves of ±3 dB with a broad Q are a good place to start. If you need a tighter Q to tame a particular resonance, that might be OK, but be sure to listen to what that EQ filter is doing when the resonance isn’t happening.
Also, consider that a more specialized tool, like Spectral Shaper, might be more appropriate, so be sure to weigh all your options. Ultimately, your moves need to be subtle, otherwise you risk altering the foundation of the mix. Below, we’ll cover a few different types of EQ applications.
Stereo, Mid/Side, and Transient/Sustain EQ
Ozone’s EQ has different channel processing modes that allow you to EQ different aspects of the audio. This makes it easy to surgically attenuate problematic frequencies or add stereo widening effects.
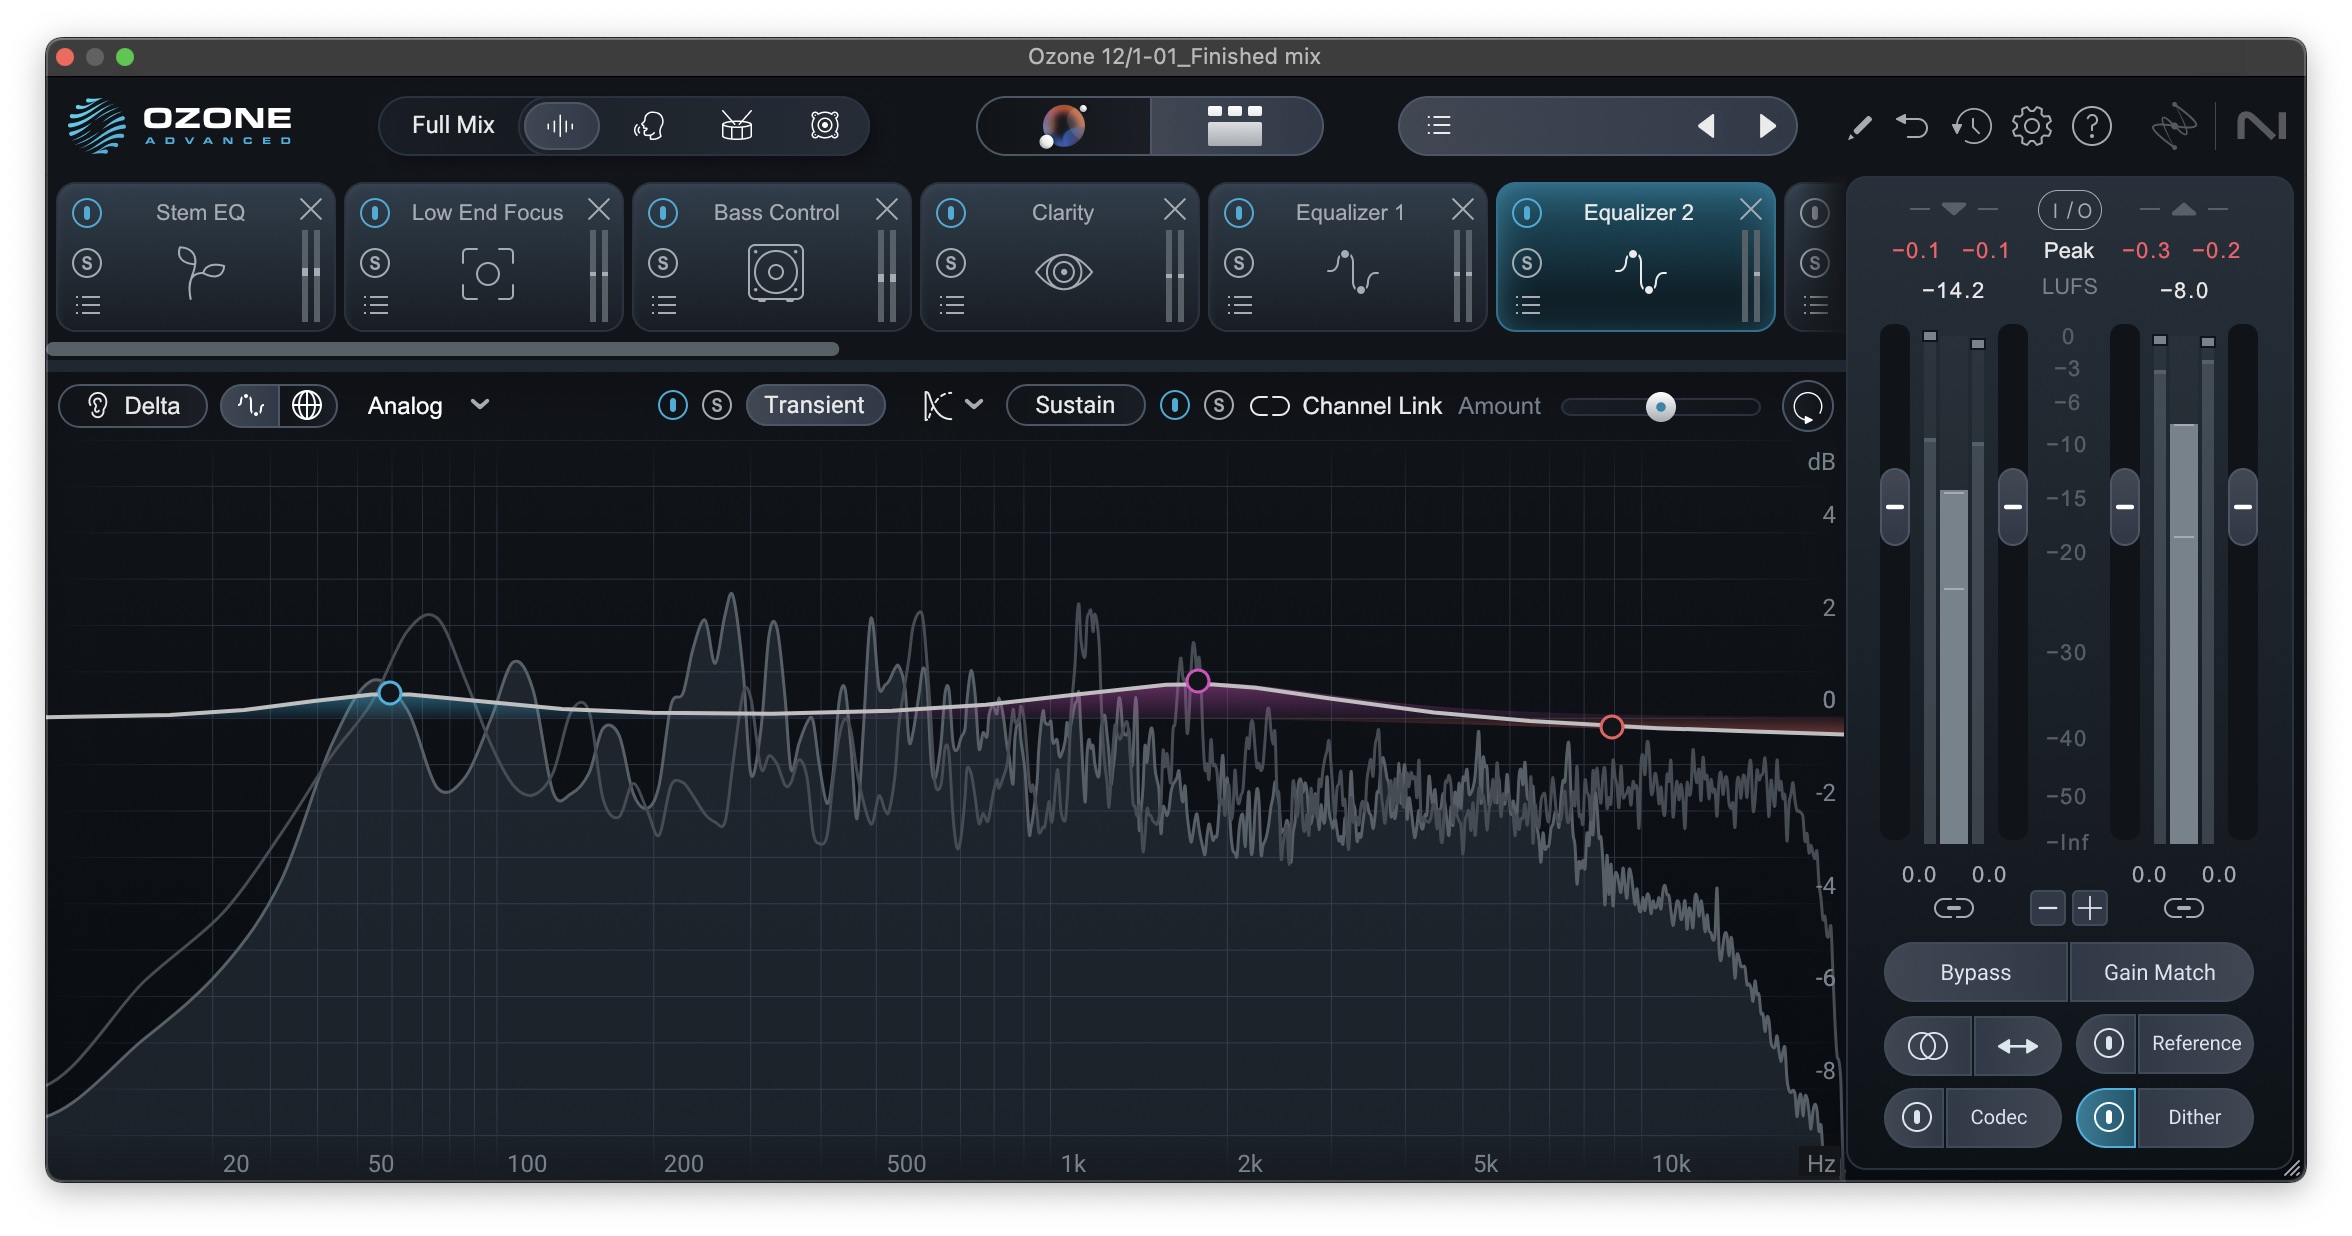
Transient/Sustain processing gives us powerful options
The following options are available in the dropdown menu and determine how processing is applied by the Equalizer: Stereo, Left/Right, Mid/Side, and Transient/Sustain.
Stereo EQ
Stereo Mode applies processing to the entire stereo signal. When selected, EQ adjustments will apply to both the Left and Right channels in equal amounts.
Left/Right EQ
Left/Right Mode separates the left and right channels so you can EQ each independently of one another. For example, if your guitar is panned hard left and you hear the unpleasant scraping sound as the guitarist’s fingers slide across the fretboard, you could isolate the frequency in the left channel and attenuate it. If you use Stereo mode (instead of Left/Right mode), attenuating that frequency will affect the entire mix rather than the left channel where the problematic frequency lies. Just be careful not to shift the energy or overall image to one side more than the other.
Mid/Side EQ
Mid/Side mode is almost better thought of as frequency-selective width control. It’s often described as affecting the center and edges of the stereo image, but it’s really quite a bit more nuanced than that. We won’t get too into the weeds here, but don’t be fooled into thinking you’re just EQing things at the edges or the center of the stereo field.
It is true that by using an EQ in mid/side mode you’re altering the tonal balance, but you’re also doing it in a way that simultaneously alters the width in the EQed region. Here are some basic principles to keep in mind.
- A boost in the mid channel narrows that frequency while also making it more prominent.
- A cut in the mid channel widens that frequency while making it less prominent.
- A boost in the side channel widens that frequency while making it more prominent.
- A cut in the side channel narrows that frequency while making it less prominent.
For example, if the lead vocal feels like it’s a little buried you might add a mid channel boost around 1.8k – or some other prominent frequency region in the vocal. This will both narrow it – along with other instrumentation at that frequency – and make it more prominent. The net effect is that it feels more focused and forward, but don’t forget to listen for the tradeoff of other things in that frequency range also getting narrower and making sure that you’re happy with both.
Lastly, don’t discount the role of phase response in mid/side EQ! It’s well worth auditioning between Analog and Digital modes in the Ozone equalizers. In digital mode you can even manipulate the phase response of each individual filter. Personally, I go for digital mode with a linear phase response nine times out of ten, but your mileage may vary.
Transient/Sustain EQ
Transient/Sustain mode – surprise, surprise – allows you to EQ the transients and sustained elements in your mix separately. This can be deceptively powerful in all sorts of situations, but the classic example is a mix with dull vocals and bright drums, where a mix revision isn’t possible.
The transient “channel” allows you to tame the bright, pokey bits of the drums, while the sustain “channel” lets you bring up the low-level detail and air in the vocal. Experiment with this though – you might find your next favorite technique!
Here, I’m adding thump to the kick and crack to the snare, while taming high transients, and simultaneously pulling out a little muddy sustain around 400 Hz without robbing power from the drums there.
Isolate frequencies with Alt-Solo
A useful feature you can use to identify frequencies you want to boost or cut is the Alt-Solo function. You can click the Solo button on a node, or use the alt/option key when clicking on a node or anywhere in the spectrum to momentarily solo a specific frequency region. When you release the mouse click, alt-solo will be disabled.
NOTE: While you generally want to start with corrections before moving on to making enhancements, make sure you’re using subtractive EQ carefully and intentionally to avoid cutting important frequencies.
Workflow tip: Use the Stabilizer module in Ozone
The Stabilizer module is an intelligent and adaptive mastering EQ that listens to your audio and reacts in real time to dynamically sculpt a professional-quality tonal balance that’s genre specific. It will automatically detect and tame problem resonances, carve away harshness, smooth transients, and add clarity and weight for better translation across listening environments. It also supports the 25 new genre and sub-genre targets added in the latest version of Ozone.
9. Tame your dynamics and glue your mix together
To control the dynamics of your track, you’ll want to use a compressor. Three main reasons for using a compressor in mastering include:
- Adding glue
- Adding punch
- Enhancing rhythm
When people mention “glue” compression they’re referring to creating a dynamically cohesive mix that has consistent levels and feels like a cohesive unit rather than many disparate elements. You don’t want instruments or frequencies sounding out of place and distracting from the enjoyability of a song because they suddenly spike in level and overpower other elements in the mix. Punch on the other hand, refers to the impact of the track’s transients. With the right compression settings, you can add more impact to your transients.
Using two compressors
To achieve transparent punch and glue compression, try serial compression – a technique that uses multiple compressors in succession rather than having one compressor do all the work. Each compressor can have unique timing and ratio settings that serve a specific function.
For instance, the first compressor might have a medium fast attack and release – about 30ms give or take – and ratio of 2–2.5:1 to enhance the attack of the transients. That could then be followed by a compressor with a slow attack and lower ratio that helps even out the overall dynamics and create a little movement. In other words, use one compressor for punch and another for glue.
When using compression, keep an eye on your gain reduction. Again, there are no rules, but if you start seeing more than about 3 dB of gain reduction, listen carefully to make sure you’re not introducing unintentional pumping or distortion, or that the bridge doesn’t rush up in level and become inappropriately loud when lots of instrumentation drops out. Subtlety is key since you’re applying compression to the entire mix; small moves become noticeable quickly.
Other types of compression
While compression helps control the overall level of your entire master, there are times when you’ll need to get surgical and tame micro-dynamics. While macro-dynamics refers to the overall differences in level between the loudest and softest parts of your song, micro-dynamics is another way of talking about crest factor, or the short timescale differences between peak and average levels.
There are several dynamics processing tools you can use depending on the types of levels you need to control: compression, multi-band compression, spectral shaping, dynamic EQ, and transient processors.
- Multiband compression allows you to apply separate compression settings to different frequency ranges. Instead of applying compression to the entire signal like a normal compressor, you can separate the frequency spectrum into different frequency bands and apply separate compression settings to each of them. This is ideal for controlling broad frequency ranges such as the low end, mids, or the high end. When in doubt, use as few bands as you can get away with and start with the same attack, release, and ratio settings for each band.
- Dynamic EQ can act like a compressor or expander on specific frequencies once they cross a threshold. Dynamic EQs are different from multiband compressors in that they allow for narrower bandwidth settings which make them ideal for the surgical removal of specific frequencies such as resonances or harsh sibilance, while also avoiding the use of crossovers.
- Spectral Shaping is low-ratio compression that is employed individually across dozens of frequency bands. You could imagine spectral shaping as a 32-band dynamic equalizer, with individual band-shelf filters for every band, each automatically setting thresholds, time constants, and reduction amounts based on tuned models for each sound source. The result is a more transparent and surgical form of dynamic control that is constantly aware of the frequency content present in the incoming signal, and adjusting its processing accordingly.
While you’re free to use these tools as you see fit, it’s sometimes best to stick to the essentials. More often than not, all you need is a compressor (or two) to tame the dynamics and add punch and glue to your track.
Workflow tip: Use the Impact module in Ozone to directly control micro-dynamics
The Impact module in Ozone is a multiband micro-dynamics processor that allows you to easily add or remove transients from independent frequency bands. It reduces the complexity of working with compression parameters (threshold, ratio, attack, release, and makeup gain) by combining them into two main goal-oriented controls: the amount sliders and the Envelope.
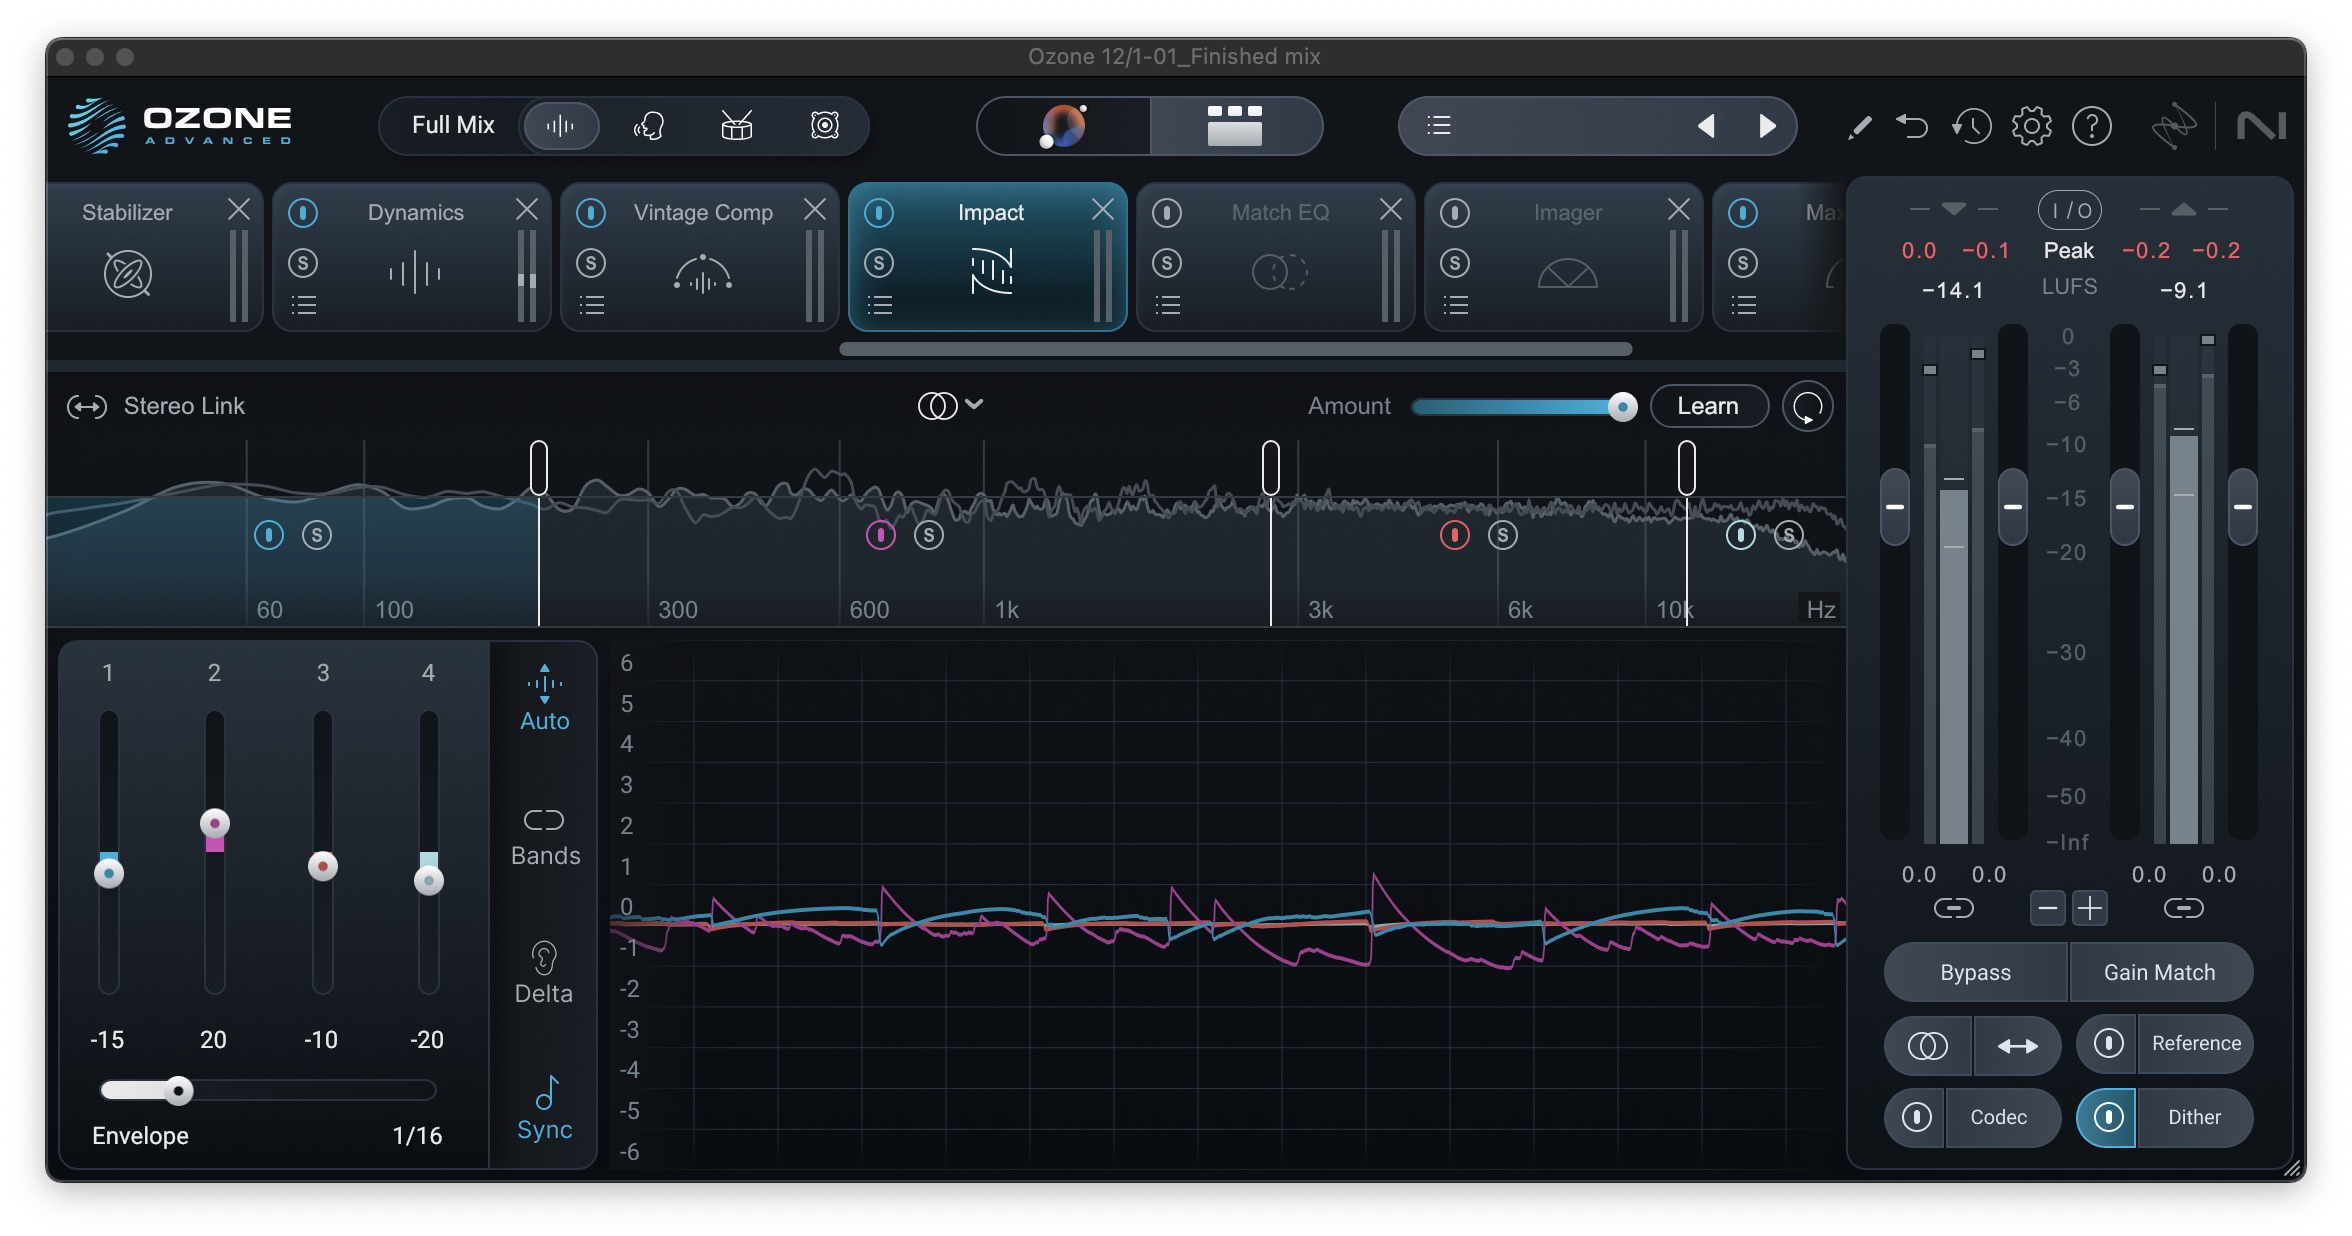
Shaping transients with Impact
The amount sliders control the effective threshold and ratio – the degree of compression or expansion applied to each of the four frequency bands. Slide them up to increase the dynamics (expansion), slide them down to reduce the dynamics (compression).
The Envelope slider, on the other hand, controls the release of the dynamics processor. While most compressors work in milliseconds, the Impact module has a tempo sync feature that automatically sets the attack and release times to work with the natural envelope and BPM of your track. Simply select the beat division and the Impact module will shape the envelope of your track accordingly.
10. Make EQ moves inspired by your reference
Using reference tracks when mastering music can ensure that a track you’re working on is headed in the right direction. By specifically comparing things like frequency response, width, and dynamic range you can make moves to match the aesthetic of the sound you’re after.
Having a reference can also keep you from losing perspective while you're mastering. If you’re listening to your track for too long, your ears can adjust to unwanted frequencies, like high frequency build-up. Switching to your reference can quickly expose these differences and provide a much needed reset.
For this step, the goal is to make EQ adjustments that move your track toward the spectral profile of a reference track. To borrow a concept from my friend Ian Shepherd, aim for balance, not a precise match. Applying the tonal spectrum of one song directly to another can often sound odd – especially if they are in different keys – but if you balance your song’s EQ in a way that compliments your reference, you’re likely to end up in a good spot.
Some of the main tools you can use for this are Ozone’s Master Assistant, Ozone’s Equalizer and Match EQ modules, Ozone’s Stabilizer, and Tonal Balance Control.
Master Assistant tone matching
Master Assistant gives you the ability to upload your own references, save their tonal balance curve, and recall them within the Ozone plug-in. Once you drop in your reference track, the Master Assistant will analyze its spectral profile and set up a signal chain to match the tone, dynamics, imaging, and more. You can then use the EQ slider and the Stabilizer slider to pull your track’s spectral profile (white line) closer to that of your reference (blue line).
Match EQ
With Ozone, you can match any reference track to an extreme degree with an EQ that uses over 8,000 separate bands of frequencies for very precise reference matching. So if there’s an EQ profile out there that you love, Ozone will learn it and let you transfer it onto the track that you’re working with. As previously mentioned though, this can sound rather odd when used with extreme settings. For more natural results, ~50–70% smoothing and 15–30% match tends to work well.
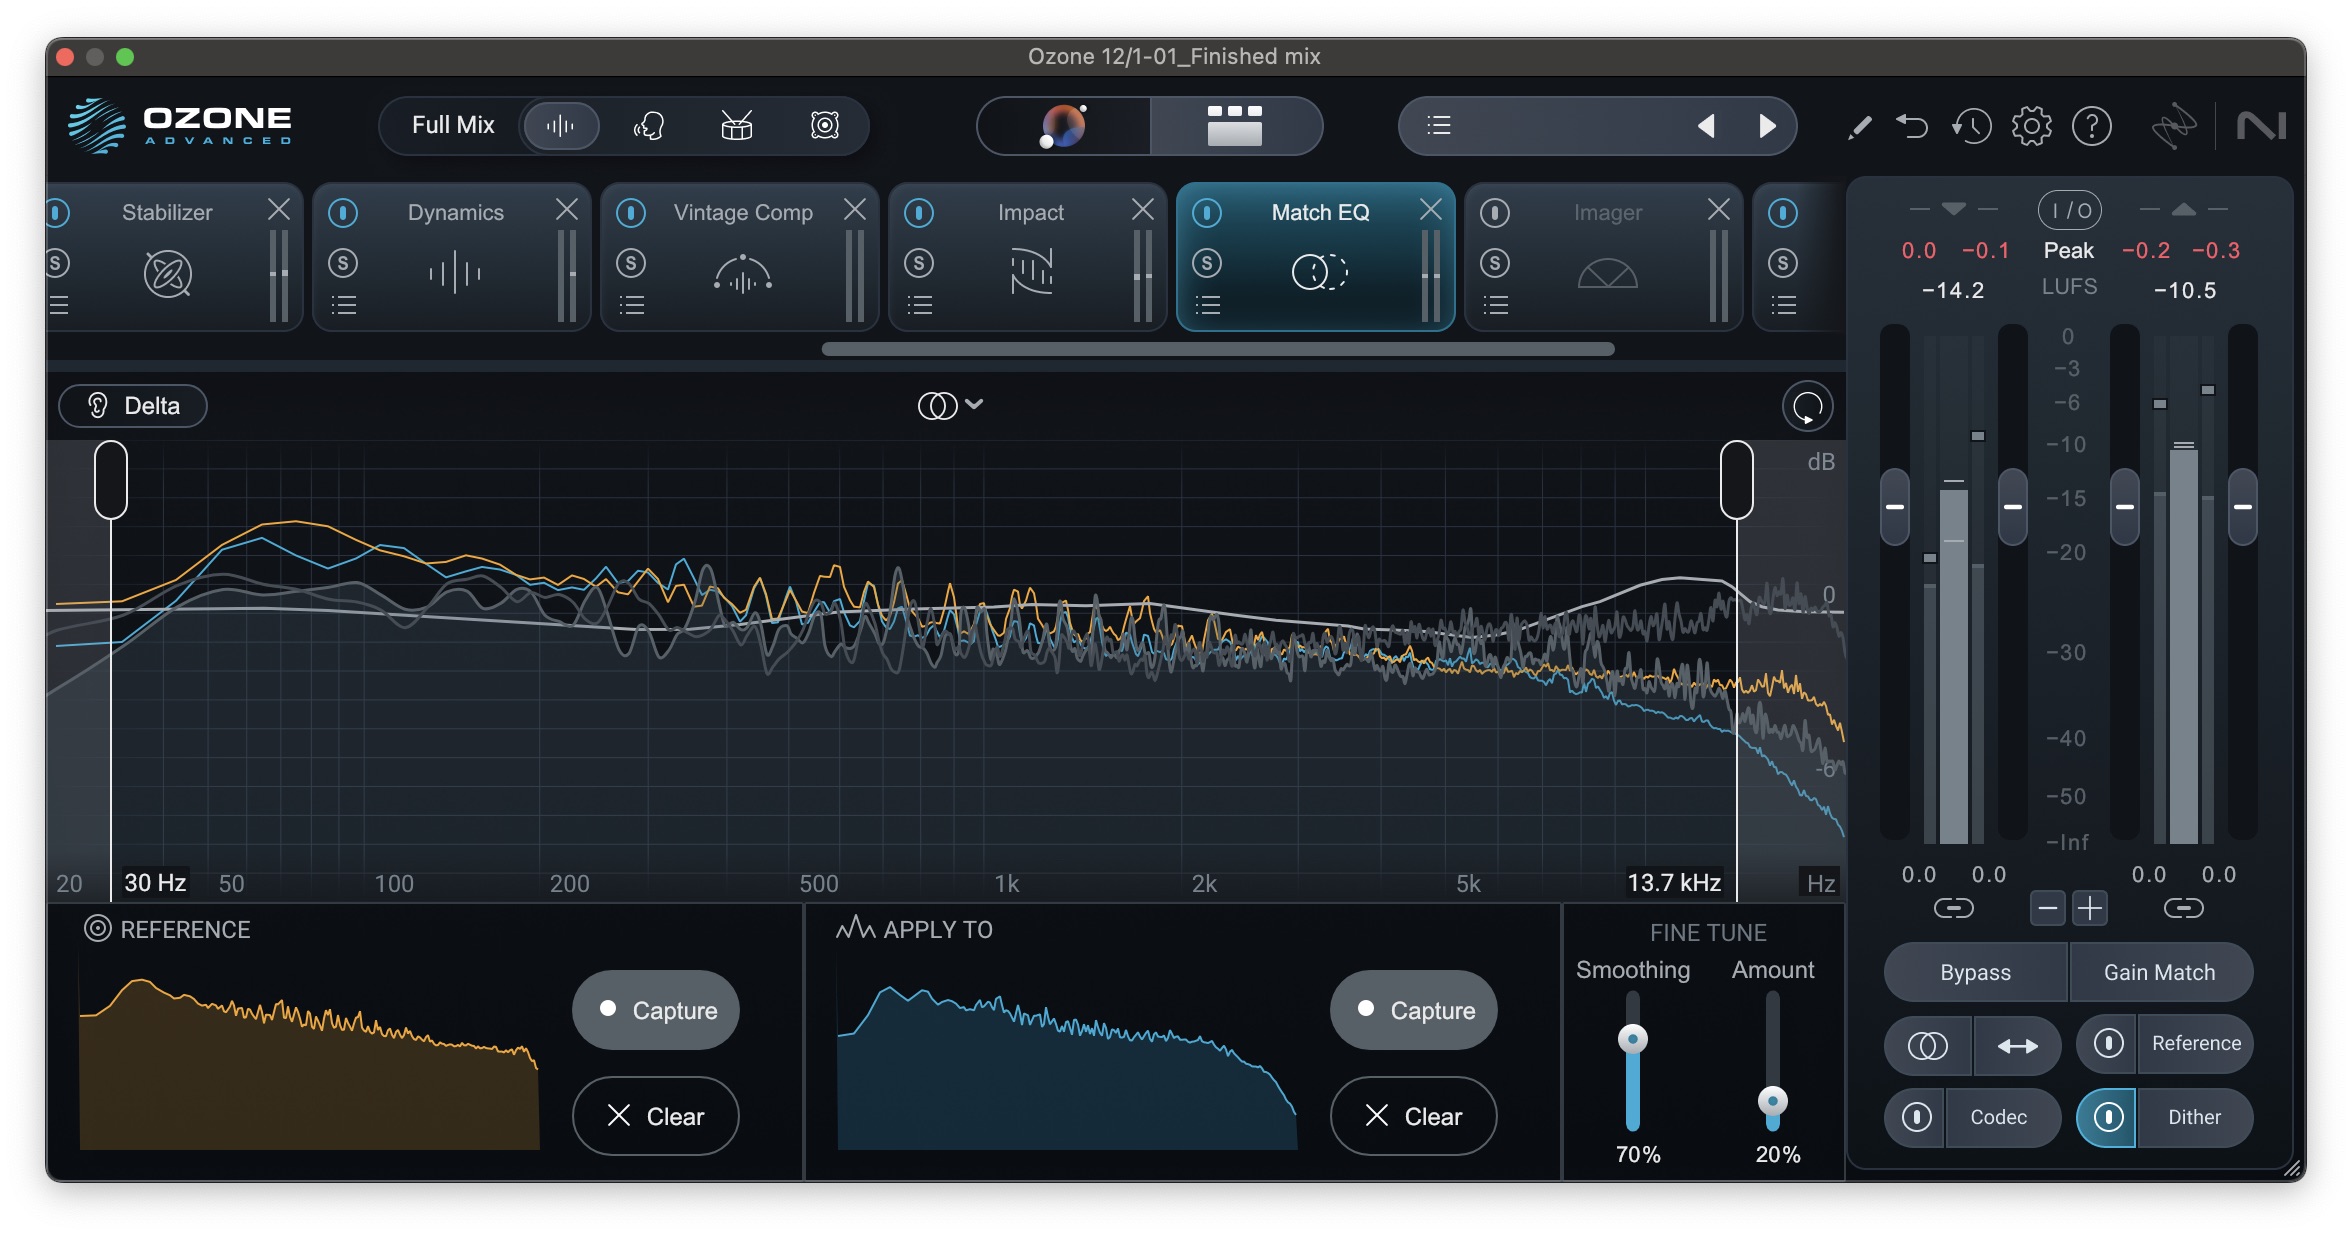
A little Match EQ can go a long way
Verify with Tonal Balance Control
To make sure you’re not overusing Match EQ, create a custom target in Tonal Balance Control. You can use the same track you used to create your reference snapshot preset in Match EQ, but the more tracks you feed Tonal Balance Control, the better it will be able to create a smooth average response.
By using Match EQ and Tonal Balance Control in tandem, you give yourself both broad and detailed views of how your song’s spectral profile compares to that of your reference. If you notice your track having too much or too little of a particular frequency compared to your reference, you can address it by controlling Ozone’s EQ module directly from Tonal Balance Control. Remember though: balance, don’t match. There’s no need to get obsessive!
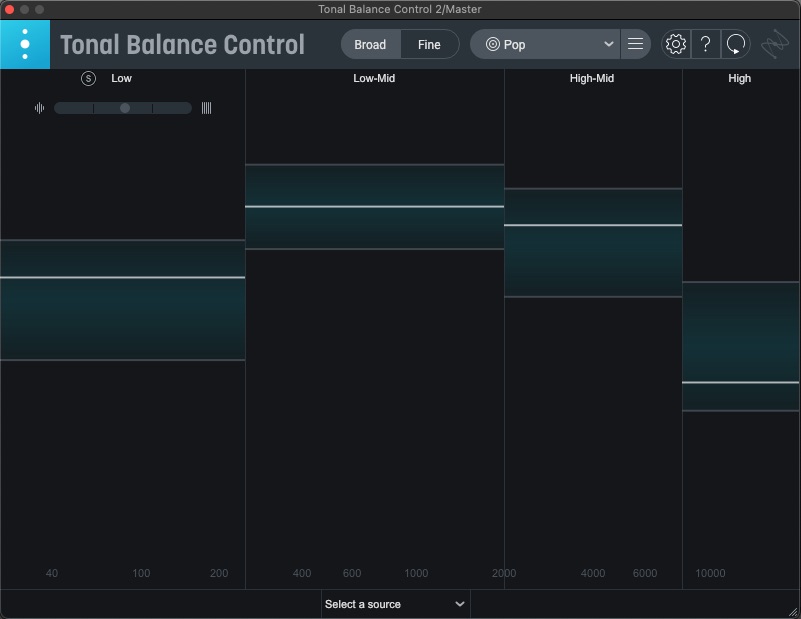
Checking the big picture with Tonal Balance Control
11. Fix or enhance the stereo image
Next you want to listen to your track and determine whether you need to apply stereo widening or narrowing with an imaging plug-in. Oftentimes a mastering engineer will want to increase the perceived width of the mix to make it feel more immersive. However, stereo widening can also introduce phase issues which lead to your mix sounding worse when played in mono.
On the other hand, there may be times where you want to narrow an element of the mix in order to create more clarity. For instance, you may want to narrow bass frequencies that have gotten unnecessarily wide. Narrowing an element of the mix to mono, however, can cause you to lose information that exists in wider pan positions.
So the main takeaway is to use it subtly and only when necessary. Make sure to use a stereo imager with a correlation meter that shows your stereo file’s mono compatibility.
Workflow tip: Use Ozone’s Imager to minimize drawbacks
Ozone’s Imager precisely adjusts the stereo width for your master while minimizing the drawbacks associated with stock stereo imagers. Use it to add width to any frequency band without causing mono compatibility problems with Antiphase Prevention (found in Settings under the Imager tab).
Conversely, when reducing width in Imager, the Recover Sides feature enables you to add back to the mid channel any side channel information that has been removed. Imager also has an integrated Vectorscope and Correlation Meter that gives you valuable visual feedback to help you identify mono compatibility issues so you can craft a perfect stereo balance.
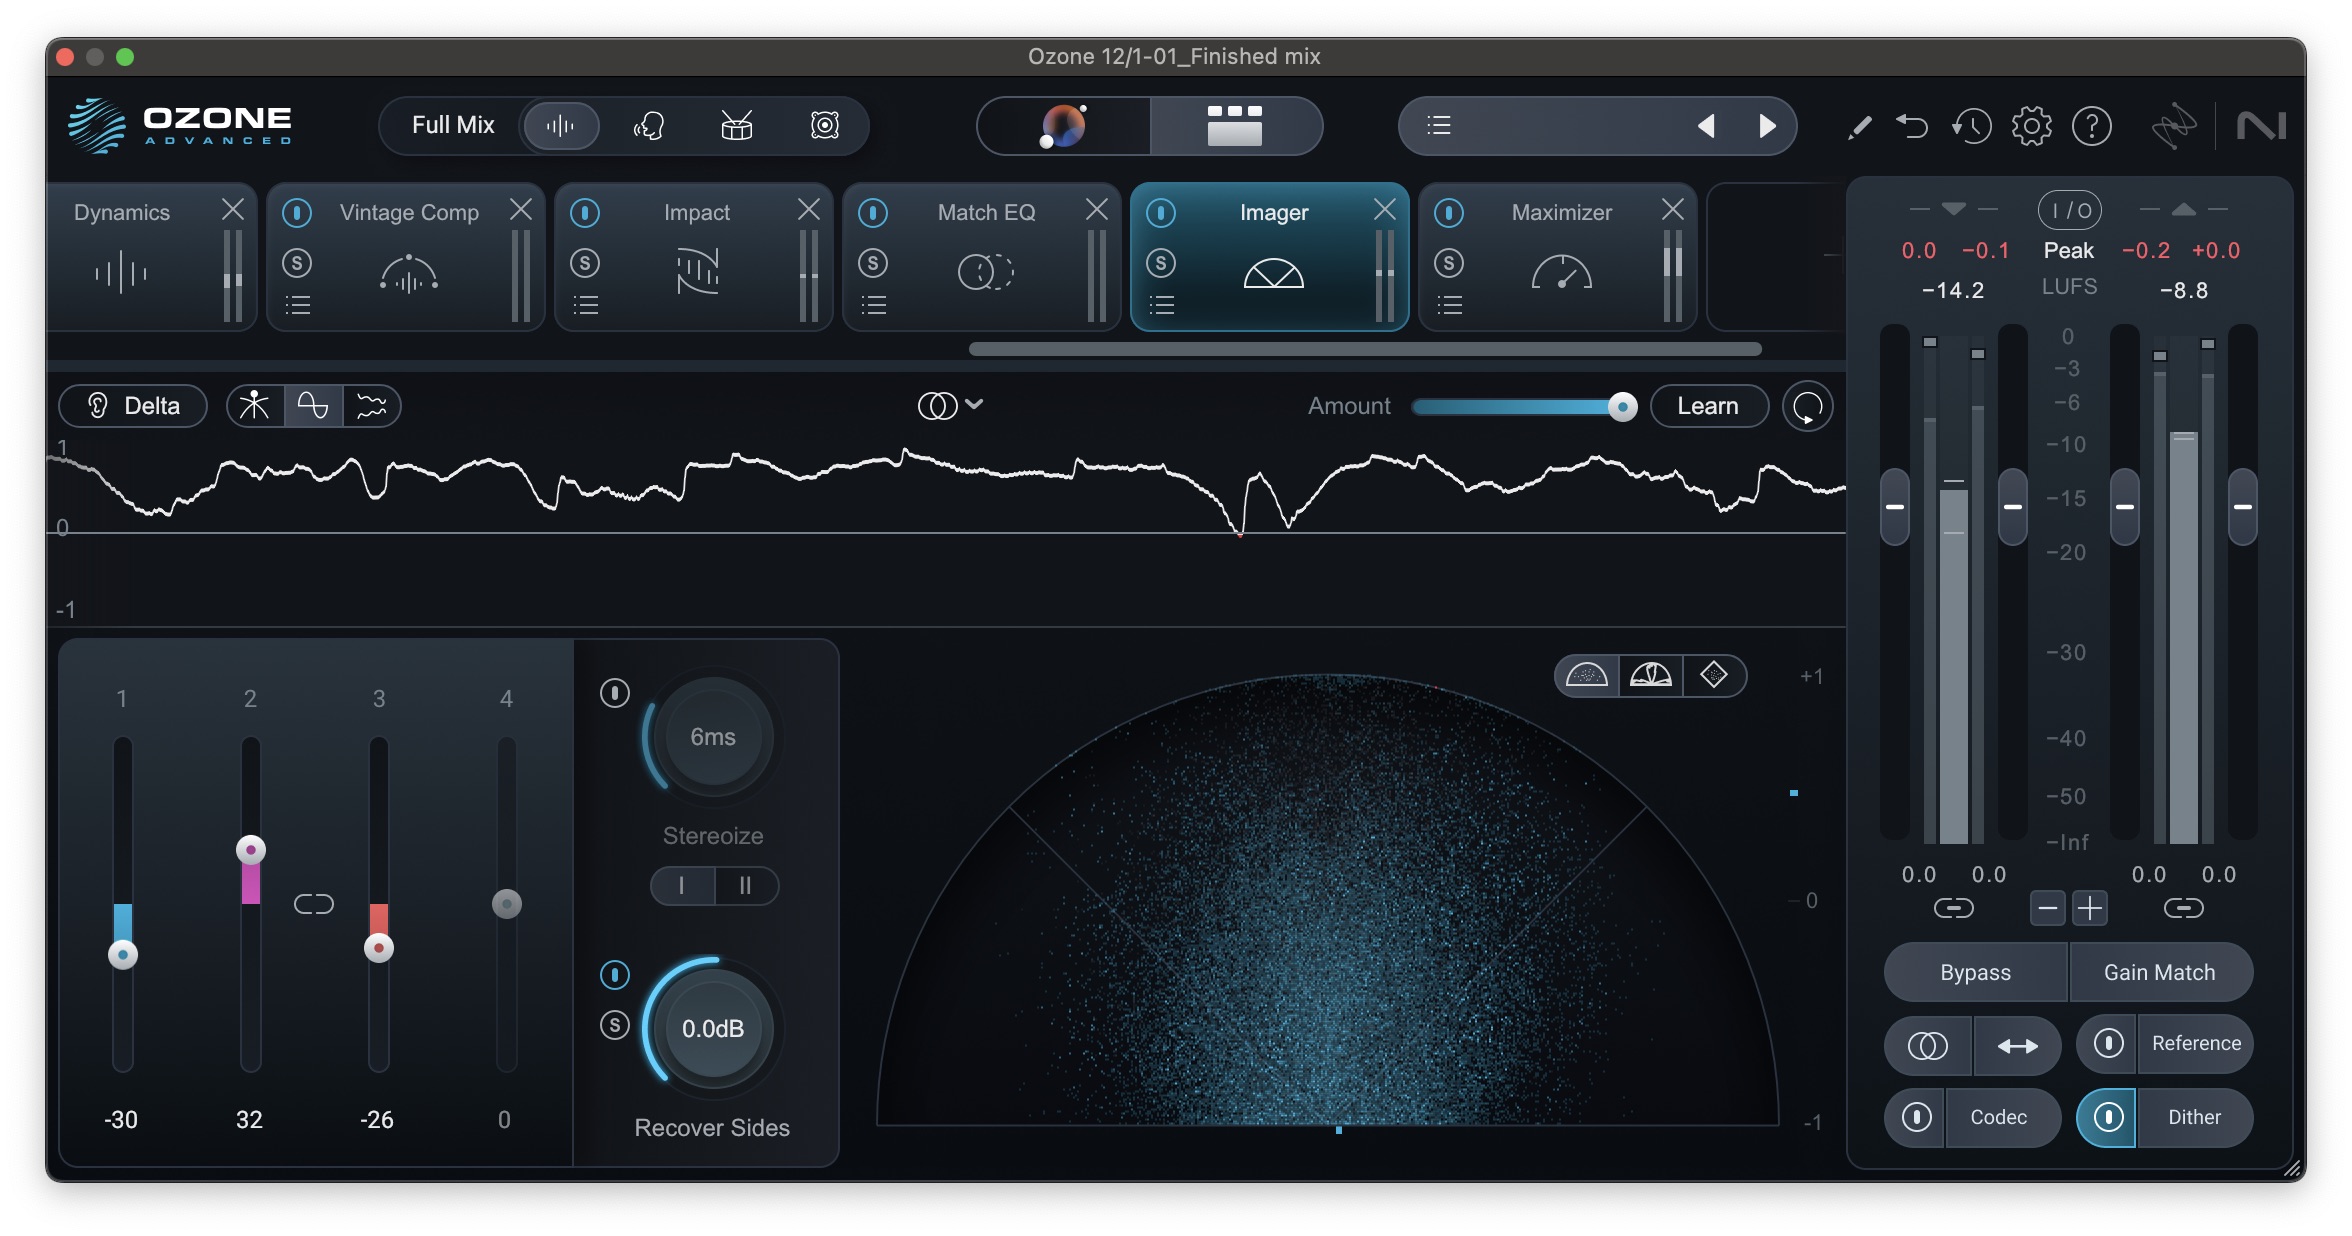
Accentuating the midrange width
How long does it take to master a song?
How long is a piece of string? The answer to this question can vary a lot, based on many factors. How much experience do you have? Is it the only song in a project or the 10th one on the album? How complex is the song – e.g. Does it have many disparate sections? For an experienced mastering engineer who’s in the flow in the middle of an album, a straightforward pop song might only take 15 minutes or so. For someone newer to the craft, working on the first single of the day, it could take a few hours. And both are ok.
12. Final mastering checks
You’re nearly there! Now it’s time for the final checks. For this step, you want to make sure you’re happy with the dynamic range of your master and that your loudness levels work for the genre and delivery mediums you're producing for.
Go back to Step 5 and make sure that the limiting you set up at the beginning is still working. Can you squeeze a little more input gain out of it now that you’ve optimized everything else? On the contrary, is it now working a little too hard? This is your chance to fine-tune it.
How loud should my master be?
When mastering a song for streaming, it’s a good idea to be at least a little above -14 LUFS integrated loudness with a maximum True Peak level of -1 dBFS. However, this varies a bit depending on genre. For some genres such as pop, rock, and EDM, the integrated LUFS level could range between -12 and -8 LUFS – or even higher. For music with a more acoustic and dynamic focus such as folk, acoustic, and classical, an integrated level of -18 LUFS might not be uncommon.
At the end of the day, here’s my best advice: make your song as loud as you comfortably can without also making any sacrifices to its micro-dynamics that you’re not 100% comfortable with. The best way to check this is to turn on Gain Match in Ozone, turn up your monitor gain a little so that you’re listening at the same SPL, and turn your final limiter/maximizer on and off. If you can do that and not be unhappy with the way the sound changes when limiting is added, you’re there!
Workflow tip: Use Upward Compress and Magnify Soft Clip in Ozone Maximizer for high fidelity limiting
The Maximizer module in Ozone has two extra features to help you achieve optimal loudness without overlimiting. The Upward Compress feature lets you boost quiet sections while preserving fast transients. The result is an increase in density and detail, all with one intuitive slider. Additionally, the Magnify Soft Clip feature allows you to boost loudness while maintaining the highest fidelity and the snap of your transients. Like Match EQ, small amounts of both can go a long way – be careful not to overdo it!
Finally, Ozone’s acclaimed IRC (Intelligent Release Control) algorithms let you apply astonishing amounts of limiting without sacrificing punch or clarity, and the new, multiband IRC5 algorithm maintains transparency and minimizes distortion to an unprecedented degree.
Dynamic range
Dynamic range – a.k.a. crest factor – is the difference in dB between the peak and average level of your song. If your music doesn’t have a lot of transient action like drums and percussion, it’s not entirely abnormal for this value to get rather low at times, but for more mainstream genres try not to let the dynamic range get below about 6dB.
In other words, if there’s less than 6dB between the Short Term loudness and the peak level, your song will begin to lose its punch and impact. Rather than having movement and excitement, your transients will start to feel small and wimpy. Aim to get as much dynamic range as is suited for your genre within your loudness target.
Keep in mind however, that dynamic range can also vary by genre. An EDM track may sound more appropriate with a smaller dynamic range – within reason – while a classical piano piece may sound better with a wide, natural dynamic range.
Delivery medium
Another important consideration is the delivery medium you're mastering for. Different platforms have loudness standards and constraints you need to take into account. For instance, if your track is not loud enough, some streaming platforms may apply their own limiter which can change the way your music sounds. Mastering for streaming is different from mastering for vinyl. Make sure you do your homework.
13. Bounce your master
With everything ready to go – that includes trimming song starts and ends, or tops and tails, and adding any fades needed – your song is ready to be exported into a stereo audio file you can release to the world. Your main master should be a lossless format – WAV or AIFF – at the sample rate you mastered and 24 bits, with dither. Some services may also require a 16-bit, 44.1kHz version, so it’s good practice to make a master in that format too – especially if you know your aggregator requires it.
You can also make an MP3 or AAC if you want a more portable format for promo, radio play, etc. but try to use a setting of at least 256, or ideally 320 kbps.
With the file format, resolution, and sample rate selected, you’ll want to apply dither to your track. Proper dithering ensures no audible loss of quality when you convert to lower bit depths.
NOTE: make sure to only dither your audio when you reduce from a higher bit depth – such as 32-bit floating point – to a lower one – such as 24 or 16-bit fixed point!
Finally, here’s our limited mix compared to our finished master.
Mastered Track
Workflow tip: Dithering with Ozone
Ozone includes a comprehensive set of dithering tools to help you prepare studio-quality audio for different delivery formats. The Dither panel includes iZotope’s MBIT+ dither algorithm along with a unique set of meters to offer a complete view of the conversion process.
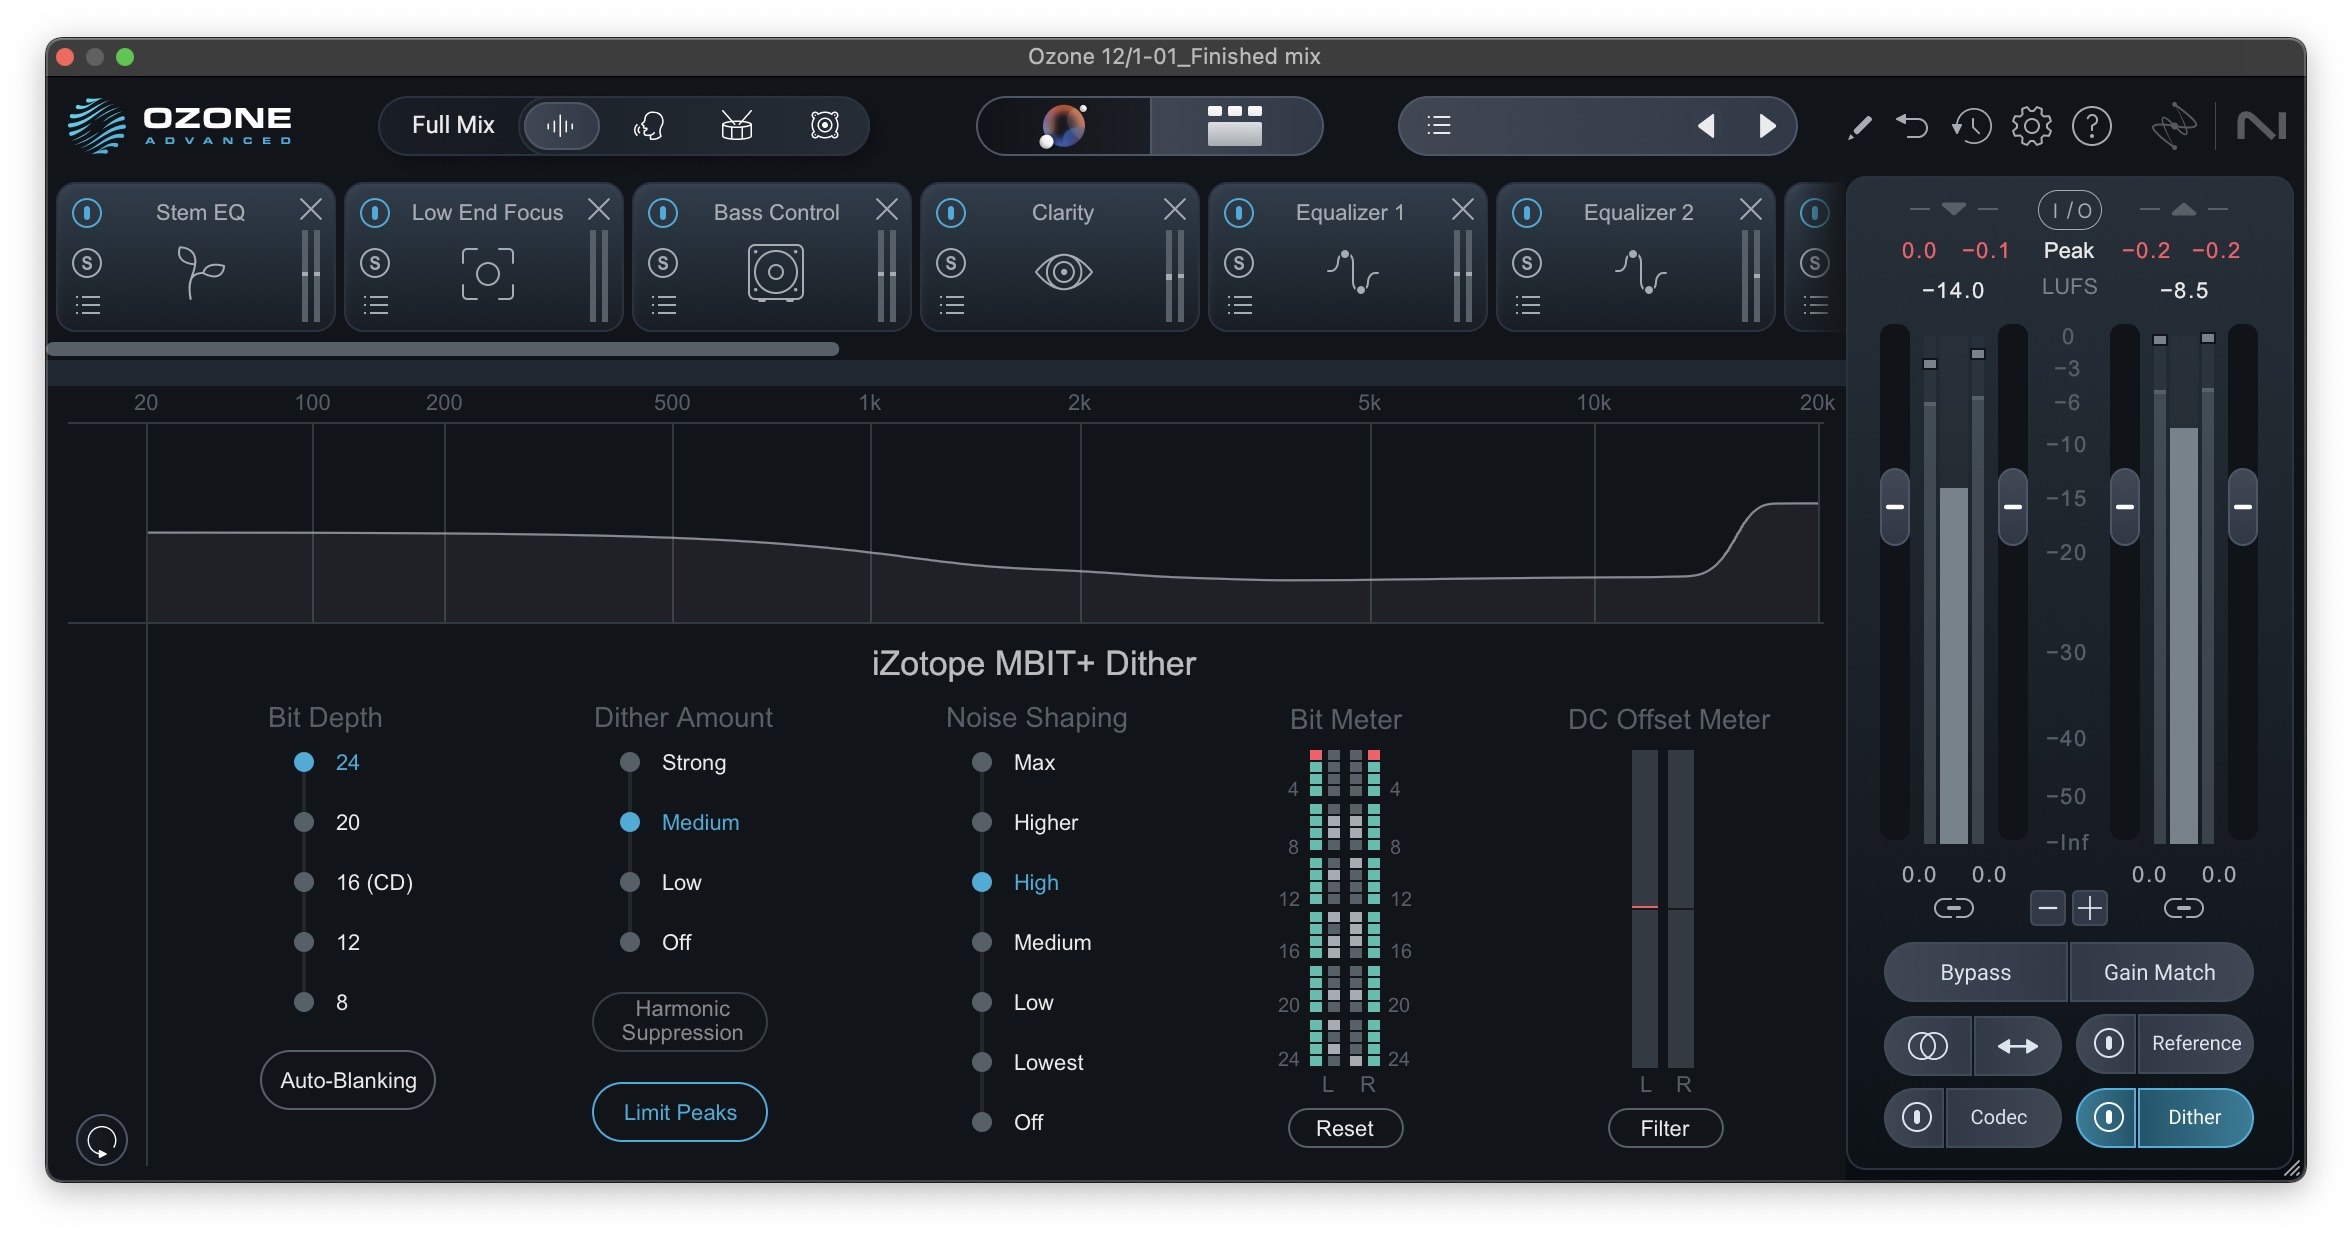
iZotope Ozone dithering tools
Start mastering music with Ozone
Now you have the foundations of how to master a song! Remember that not every song needs every technique. Often just a few may suffice. Whether you’re a pro mastering engineer or mastering a track for the first time, it can be a complex process – but it doesn’t need to be. We hope this guide and the intelligent tools and ways to use them outlined above offer some guidance on the mastering workflow. Please be sure to check out more articles about audio mastering for more helpful techniques.