
The mastering process is the final stage of audio production and one of the most crucial in achieving a professional sound. While there are many approaches to mastering a song from start to finish, in this article, we’re going to focus on the essential effects common in most mastering signal chains.
In this article you’ll learn:
Follow along in your DAW
Create your mastering signal chain with iZotope Ozone, the ultimate mastering toolkit with cutting-edge processing and AI-powered workflows.
What is a mastering signal chain?
A mastering signal chain is a series of processing effects applied to a signal in a linear order. Each processor alters the musical signal in some desirable or purposeful way before passing it along to the next processor in the chain.
However, without thinking through the entire processing chain and having an intended result you’ll likely end up adding extra processing to compensate or “fight” against other processing that’s happening upstream.
When building a mastering signal chain, you should think through what you want to achieve, and when you change the order of your processors accordingly, you can turn that fight into a harmonious dance.
Mastering is also more than just a signal processing chain. It’s about sequencing and timing on an album, creating consistency, final QC, and preparation for distribution. Processing is exciting, but it’s important to remember the whole picture.
How do you choose a mastering signal chain?
It pays to have a plan when mastering. Whether setting up a multiband compressor or an entire mastering chain, having a clear idea of what you want to achieve and how you’ll get there is key. Of course, along the way, you may uncover things or run across happy accidents that push you in a new direction, but having a strategy and goals that you can refer back to can be immensely helpful.
The way I like to approach this is to grab a notepad – digital or analog will do just fine – hit play, and only allow myself to take notes. No adding plug-ins or tweaking things, just set a comfortable volume, listen, and jot down the things that stand out. These could be overall tonal balance, potentially problematic dynamics, overly wide or narrow stereo imaging, odd noises or defects, or things I especially like and want to enhance. I’ll also want to be sure to include any specific notes or requests from the artist or producer!
Once you’ve compiled your list, take a minute to look at the big picture and start assigning tools to each of your goals. There are a lot of exotic and powerful tools out there, and they can certainly prove invaluable, but the truth is that most songs can be mastered with an EQ or two, the occasional compressor, and a limiter.
Learn to master these tools and how they work symbiotically in a chain first. Then, when you move on to processors like Clarity, Low End Focus, Stem Focus, or Spectral Shaper in Ozone, they’ll be able to provide an additional level of control without muddying the waters.
Mastering processors and how you use them
Types of processing
Processors can be either linear or nonlinear, and they can be used either correctively or for sweetening. Let's break down these terms and define them.
Linear processors are ones for which the output signal is not dependent on the level of the input signal. In other words, whether the input signal is very loud, or very soft, the processor will do the same thing to it. Stereo imagers and most EQs are common examples of linear processors we use in mastering – although dynamic EQs or EQs which model the saturation of their analog counterparts do not fall into this category. (Note: the terms linear and non-linear shouldn’t be confused with linear phase and minimum phase EQ, both of which are nominally linear processors.)
Non-linear processors are ones for which the output signal is dependent on the level of the input signal. In other words, the processor will react differently to a loud signal than it will to a soft one. Common examples of non-linear processors are things like compressors, limiters, and saturators.
The idea of corrective vs. sweetening moves is perhaps a little more intuitive, but to make sure we’re on the same page, let’s outline those too. Corrective moves are typically to remedy something problematic in the source audio.Common examples of this could include a buildup or hole at a specific frequency, an overly dynamic element in the mix, or a stereo imaging issue.
Sweetening moves, on the other hand, aim to enhance things we like about the source audio. Maybe that’s adding a little extra sheen to the top end, accentuating the stereo field for all, or part, of the frequency range, or some compression tailored to accentuate certain percussive elements or enhance movement.
Why it matters
So how do these concepts inform the order of your mastering signal chain? Let’s first think about corrective vs. sweetening moves.
Ideally, if you’re working with a great mix, you won’t need to make any corrections and you’ll be free to focus solely on sweetening and enhancement. From that perspective it’s easy to view corrective moves as a method to transform a good mix into a great mix that you can then focus on sweetening. Thus, most often it makes sense to do any corrective moves before ones aimed at sweetening.
What about linear vs non-linear processors then? In the sub-category of corrective use cases, I would say that 9 times out of 10 it makes sense to make linear corrections before non-linear ones. For example, imagine a song that has a big bass buildup along with a snare that’s poking out a little more than you would like, both things you’d like to adjust with corrective moves prior to sweetening.
You could start with a compressor to reign in the snare, but if there’s a ton of low end energy it could make the compressor pump or even distort in a way that you don’t want. By EQing first and tidying up the low end, you allow the compressor to more accurately focus on the snare as part of a well balanced signal. Conversely, as a linear processor, an EQ will behave the same whether it comes before or after compression, so there’s no distinct advantage to compressing first.
When it comes to linear vs. non-linear sweetening moves the answer is less clear cut. Personally, I find myself preferring non-linear sweetening moves prior to linear ones a majority of the time, but it’s by no means a landslide. Experimentation can be key here. Don’t hesitate to swap the order and tweak your processing accordingly. Perhaps by EQing prior to saturation you need less overall saturation, or by EQing after you’ll need less high end sheen.
What should be on a mastering chain?
Ideally, as little as possible to effectively achieve the desired result. The vast majority of mastering chains will probably have at least a maximizer or limiter at the very end to set and control level. Even if it’s not doing any limiting 99% of the time, it will help prevent unintended distortion.
Beyond that, some mixes will allow you to just use a single EQ, or perhaps an EQ and compressor, while other mixes may require a more “everything but the kitchen sink” approach. Regardless, a minimalistic approach where you ask yourself, “is there a simpler way I could achieve this with fewer steps or less processing?” is not a bad habit to develop.
But enough of the theory! Let’s take a look at how to actually put these concepts to use by building an actual mastering chain.
Mastering signal chain example, from start to finish
1. Limiting
The example song today is going to be Hayward’s “Where You Belong.” To start, I’m going to add a limiter and adjust it to achieve something close to the final level I think I’d like for the song. I know I’ll probably come back and tweak this a bit, but since level affects your perception of tonal balance, it’s important to do the initial listen at a level not too far off from where you think you would like to end up.
Here’s an excerpt with just some limiting. Have a listen, make some notes, and compare after the break. As always, good, full-range speakers or headphones are recommended.
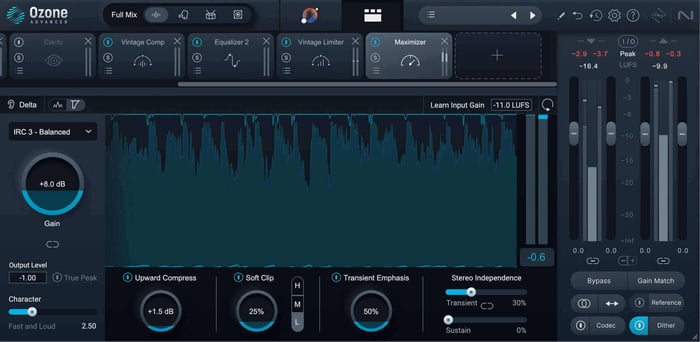
Setting the desired level with Ozone Maximizer
What popped out to you? Here are my notes:
- LOTS of low end, causing some distortion in the limiter and generally overpowering other elements.
- The kick is poking out a bit too much compared to the bass for this style.
- The offbeat claps feel perhaps a touch sharp and forward.
- I’d love to enhance some of the groove and movement.
- The vocal performance is really lovely and has this powerful message. I’d like it to feel a bit less distant and more commanding.
Looking at this list, you can see that the first three points are more corrective, while the last two are aimed at enhancing or sweetening. Moreover, the first two notes are going to play off one another. Here, it definitely makes sense to start by getting the overall low end to sit in a more appropriate spot, so I’ll do that.
2. Corrective EQ
The next step in the mastering chain is using corrective EQ to carve out a few different areas in the low end to help with the overall balance.
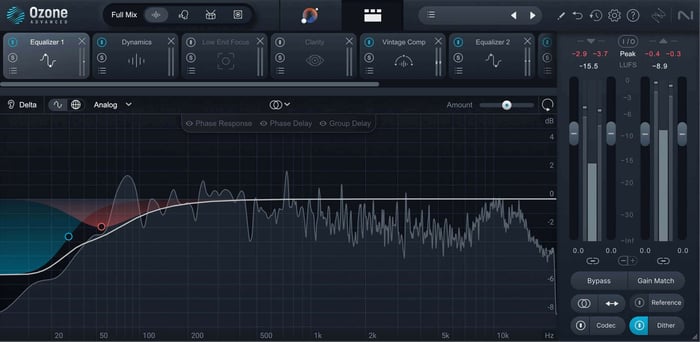
Corrective EQ to reign in low end
As you can hear, things are feeling better, but that kick is definitely still poking out a bit, and I haven’t done anything up near that clap. I’ll tackle both of those with two bands of multiband compression.
3. Corrective dynamics
By setting up a low band below about 130 Hz, and a high band above 3 kHz, I can use fairly fast attack and release times to grab just the transient portions of the signal in those regions and pull them back a little.
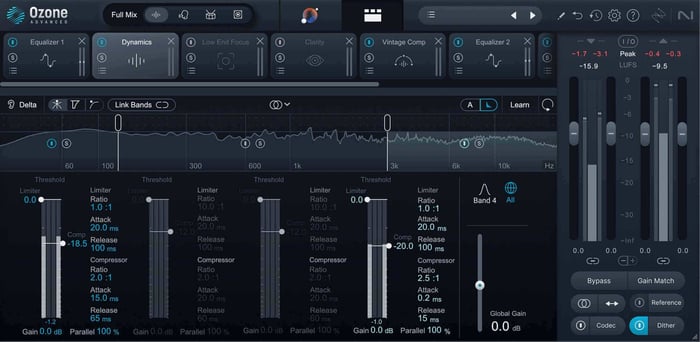
Corrective dynamics to tame transients
There, that’s tucking in that kick just enough to tighten up the low end, and also smoothing out the clap just enough to keep it from feeling abrasive or sharp.
At this stage ready to transition into some sweetening moves. I noted that I wanted to enhance the groove and movement, and for the vocal to feel a little more forward and intimate. I can achieve the latter with some EQ boosts in the midrange and top end, while the former will likely come from some wideband compression. I don’t necessarily want to boost the vocal presence into the compressor though, and risk triggering more compression off the vocal, so I’m going to start with some kind of gluey, groovy compression.
An alternate approach to steps 2 and 3
While I absolutely want to encourage you to learn the fundamentals of EQ and compression in mastering, we could also use Ozone’s advanced spectral processors Low-End Focus and Clarity. Not only can we achieve a similar effect, we can perhaps add some sweetening at the same time, saving ourselves additional processing further down the line.
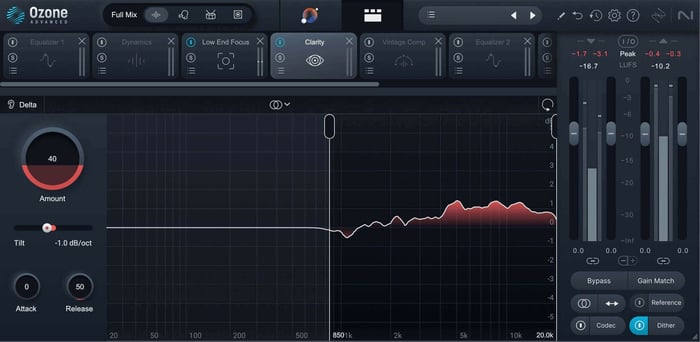
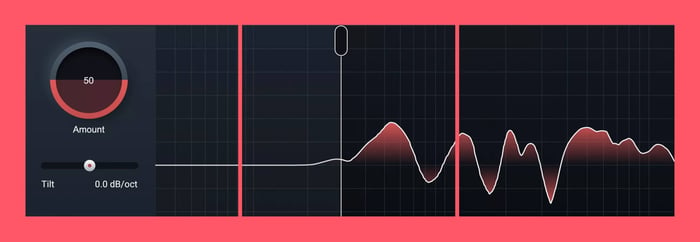
Using Clarity for simultaneous correction and sweetening
I’m using Punchy mode and some negative gain in Low-End focus to simultaneously reduce the contrast between the kick and the bass – similar to what the low band of the Dynamics module was doing – and pull back the overall amount of low end – similar to what the EQ was doing.
Then I’m following that with Clarity. I’ve got a fast attack and release so that it will grab the transient of the clap and a little negative tilt to keep it from getting too bright. Not only is it taming the high end of that clap though, it’s also helping bring the vocal – and some other low-level detail – forward, achieving some of the sweetening I was after.
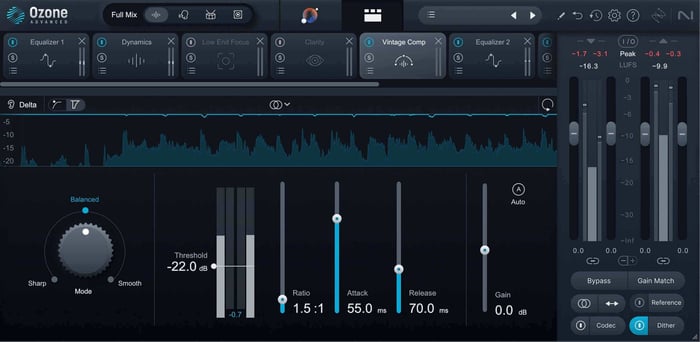
4. Sweetening compression
Back to the original EQ and Dynamics chain. I’m just looking to add a little movement and groove, so I’m going to set up a Vintage Compressor with a low ratio and medium attack and release to just bounce in and out of compression on the choruses.
Sweetening compression to enhance groove
Yup, I’m liking that. Now that the compression is working, I’m going to make some enhancements to a few key points in the vocal range. My goal is to enhance some of the power and openness in the vocal so that its tonality more closely matches the lyrical message.
5. Sweetening EQ
I want to be careful not to work too much against what has already been done, vis-à-vis reigning in the claps, so I’m going to use the new Transient/Sustain mode in Ozone 11 to add a few boosts to just the sustained portion of the signal, avoiding adding too much sharpness back to the claps.
Here, this is working well, but if it weren’t I would also consider another instance of Ozone to utilize Stem Focus mode so that I could EQ just the vocal.
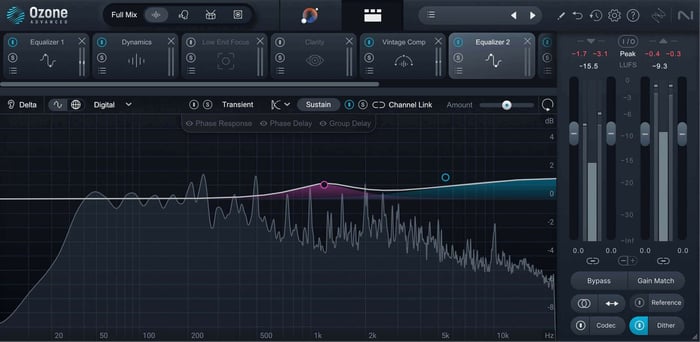
Sweetening EQ using Transient/Sustain mode
Nice! I think the song is almost there. At this point I’m going to re-check the levels with Insight, and revisit the limiter settings. The levels are still looking good, but the limiter is working a little harder than I would like, and I’m also wondering if a touch of midrange warmth might be nice.
6. Sweetening limiter
I’m going to try to take care of both these items at once using the Vintage Limiter module in Analog mode. It’s got a nice midrange push and it can also soak up some level in a very euphonic way.
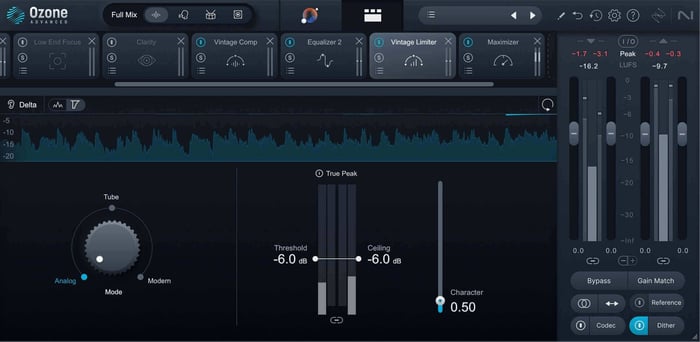
Using Vintage Limiter for some final sweetening
Sure enough, with a little tweaking that’s doing a really nice job! At this point I’m happy with my processing and I’m going to go ahead and print things. However there’s one more thing that’s part of my mastering chain on almost every single song: iZotope RX.
This isn’t quite part of the mastering chain in the same way that the other tools were, but there are almost always little clicks, pops, and ticks that surface throughout the course of mastering a song, and RX is by far the fastest and easiest way to quickly scan through and reduce or completely remove little artifacts like that.
Start mastering with optimal signal chains
Now you know the thought process in creating the ideal mastering signal chain for any song you work on. To recap, start by simply listening and making a strategy – writing notes helps! Then look at your notes and start to sort them into corrective vs. sweetening moves, and think about whether they will be achieved with linear or non-linear processors. Then, use the guidelines above to lay out an initial order based on processing type.
Of course, as always, never be afraid to experiment. You may find some cool processing interactions by switching up the order, but you can also easily end up fighting an uphill battle if processors start working against each other. If that happens, just remember you can always rewind and come back to these principles to work out the right chain for your song.
Good luck, and happy mastering!