5 Mix Tips You Need to Improve Dynamic Range
A balance of loud and soft in a mix adds interest and emotion. But dynamics can also be overdone and sound sloppy. Here are five dynamic range compression tips to find the right balance.
To bring more emotion to a performance, musicians will play certain sections softly and others with more force. The difference between these two points, measured in decibels (dB), is what’s called the dynamic range. As mixers, it's our job to decide whether we should reduce or expand it. Dynamic range is one of the trickier areas of mixing, since we want to maintain natural dynamics but also sound focused and tight in a way that’s appropriate for commercial audiences.
To find the right balance, here are five mix tips to improve dynamics.
In this piece you’ll learn how to:
- Consider genre and listener in relation to dynamic range
- Properly gain stage your mix to account for dynamic range
- Watch out for too many dynamics in a mix
- Listen for over-compression your mix
- Use metering to help improve your dynamic range
Improve your dynamic range with iZotope Plug-ins
Start your free trial of


iZotope Music Production Suite Pro: Monthly


Neutron


Visual Mixer


Nectar Pro


Insight Pro
1. Consider the genre and listener
Before pushing faders and slapping compressors on every track, make note of the style of music you're mixing and where it will be listened to. Even if it seems obvious, skipping this step might land you with a mix that doesn’t fit the expectations of the music at hand.
When mixing pop music, we strive for polish. The vocal is almost always front-and-center, the kick and bass always powerful, and supporting elements need to be as tight as possible. To get this kind of consistency to translate in the loud places we listen to pop—in the car, on public transport, and in public spaces—some pretty considerable dynamic range compression is required.
It's also worth mentioning that pop, like many other genres, doesn’t have just one sound. It might borrow from soul, house, or hip-hop. This means you should adjust your approach accordingly.
Mixing jazz and orchestral recordings takes an opposite approach. To preserve the live feel, we typically go easy with dynamic processing, allowing the music to speak for itself. As for the typical listening environment for jazz and orchestral, we can assume it's at home where things are quiet and listeners can hear softer sections with ease.
While there are many other styles that exist between these two extremes, the message remains the same: the use of dynamics varies greatly across the musical spectrum, and doing something that works for one style may not be appropriate for another. Apply the kind of processing you hear in pop to a jazz mix, and you will certainly end up with some frightening results.
This article references a previous version of Neutron. Learn about 

Neutron 5
One great way to match the dynamic range typical for your genre is to use Mix Assistant in Neutron. Mix Assistant will listen to your audio, detect the instrument, and automatically adjust settings according to your chosen target to create a starting custom preset. When launching Mix Assistant, you’re able to control the amount of processing, including dynamic compression, that will be applied to your audio.

Use Neutron Pro’s Mix Assistant to set compressor levels
As you can see in the image above, you can specify your desired Style (Warm, Balanced, or Upfront) and Intensity (Low, Medium, or High) in order to match the genre and vibe you’re going for. So, whether you’re mixing an orchestral symphony or your latest EDM production, you can be sure the dynamic range will be fitting for the genre.
2. Don’t forget proper gain staging
Getting a punchy, dynamic mix starts with setting the right levels at both the recording and mixing stages—commonly referred to as gain staging. Once upon a time, engineers needed to record instruments hot to avoid capturing the tape hiss present on tape. DAWs and modern converters offer us a huge dynamic range so this is no longer an issue, meaning signals can be recorded at lower, more reasonable levels and still sound pretty great.
Despite this, it's common to receive sessions with instrument tracks that are massive bricks of sound. If you record everything as loud as possible, the wonderful ebb and flow you get from dynamics doesn’t occur and headroom (the buffer zone of gain between your highest peaks and 0 dBFS in your DAW) gets compromised.
When it comes to gain staging in the mix phase, decide which elements are the most important to the song and make those the loudest, while tucking other elements underneath it. This leads to a richer, diverse mix that better communicates the musical story while avoiding clipping.
If you have trouble balancing levels, bring all your faders down, leaving only the dominant element playing. Slowly bring up the next most important part until you find that pocket where it belongs, and repeat this process until everything has its place.
A useful tool to help with gain staging is iZotope’s free


Visual Mixer
3. Listen for too many dynamics
While we generally appreciate dynamics in music, there can be too much of a good thing. A mix will sound sloppy and lack definition if one or all of the instruments are too dynamic.
A usual suspect here is the vocal, which has a naturally wide dynamic range. There are changes in level from word to word, phrase to phrase, and section to section. Because of this, some parts jump out of the mix and others trail off into the backing music.
One huge time-saving feature for controlling vocal dynamics is the Auto Level Mode in


Nectar Pro

Use Auto Level Mode in Nectar Pro to control vocal dynamics
While vocals are more audibly dynamic, some sounds are harder to catch. A good mix tip to suss out issues is to turn the mix up loud, then slowly go back down while listening to the overall balance. At lower levels, some instruments will start to disappear and others will dominate the mix—these cues point you to where your attention is needed.
Dynamics are also a consideration in the “big picture” of the mix from beginning to end. In most pop music, the overall dynamic structure is mostly predetermined. A song starts softly, does a slow build during the verse, and explodes during the chorus, repeating this pattern a few times. Electronic music typically keeps a tighter, less varied structure to keep people continuously moving on the dance floor.
The basic concern is to have enough dynamic range that listeners get to feel the impact of the ups and downs, without having to adjust playback levels from section to section. If you need to turn up the verse to hear the details, but this same level fries your ears once the chorus comes around, people won’t be too happy. Conversely, a chorus or drop that unintentionally has less energy than the section before it is equally a bummer.
4. Listen for over-compression
Compression allows us to focus dynamics so that there is less of a difference between the quiet and loud parts and more overall consistency. It's a necessary tool for mixers, but one that is also easily misunderstood and misused.
If you squeeze too hard with compressors on multiple instruments, the mix will start to sound choked. Without any real difference in level between the quiet and loud parts, your waveform will look like a brick, and make for a fatiguing listening experience. If proper dynamics equals movement, then an over-compressed mix feels stiff and annoying.
When you notice these signs in a mix, pull your compressor settings back to find a balance where you can preserve the original dynamics, but keep things tidy.
Sometimes, it can be difficult to determine if your low end is over-compressed since these frequencies are more often felt than heard. For monitoring the compression level on your low end, you can use


Tonal Balance Control Pro

Tonal Balance Control Pro shows if your lows are properly compressed
In Tonal Balance Control Pro’s Crest Factor meter (pictured above), you want the light grey circle to hover right around the middle after you’ve selected the appropriate genre from the top of the plug-in window. If it’s leaning far to the left, you may want to up the compression on your low end, and if it’s leaning too much to the right, you may have over-compressed. This highly useful metering tool can really help you identify if there are any over-compression problems in the low end frequencies, since you may not be able to hear them if your listening environment isn’t treated properly.
Another big challenge with dynamic range compression, which leads to many mistakes, is hearing its effects in a mix. Unlike reverb and delay which get turned on and off during a mix to emphasize certain moments, we don’t get to hear the same sound uncompressed and compressed in a mix. If this feels like a common situation for you, watch the video below, which provides a before-and-after of compression on a full mix and an individual instrument, along with notes for what to listen for.
5. Use a meter to monitor dynamic range
For those just diving into the realm of mixing, you might want to use the visual feedback of a metering plug-in, like


Insight Pro
In the LUFS meter up top, which measures the perceived loudness of audio material, you’ll want to direct your eyes to the loudness range (LRA) readout. It shows you the difference, in loudness units, between the quietest and loudest parts of a mix, and when placed on the master output, is great for getting an idea of the overall dynamic range.

Insight Pro’s LRA readout
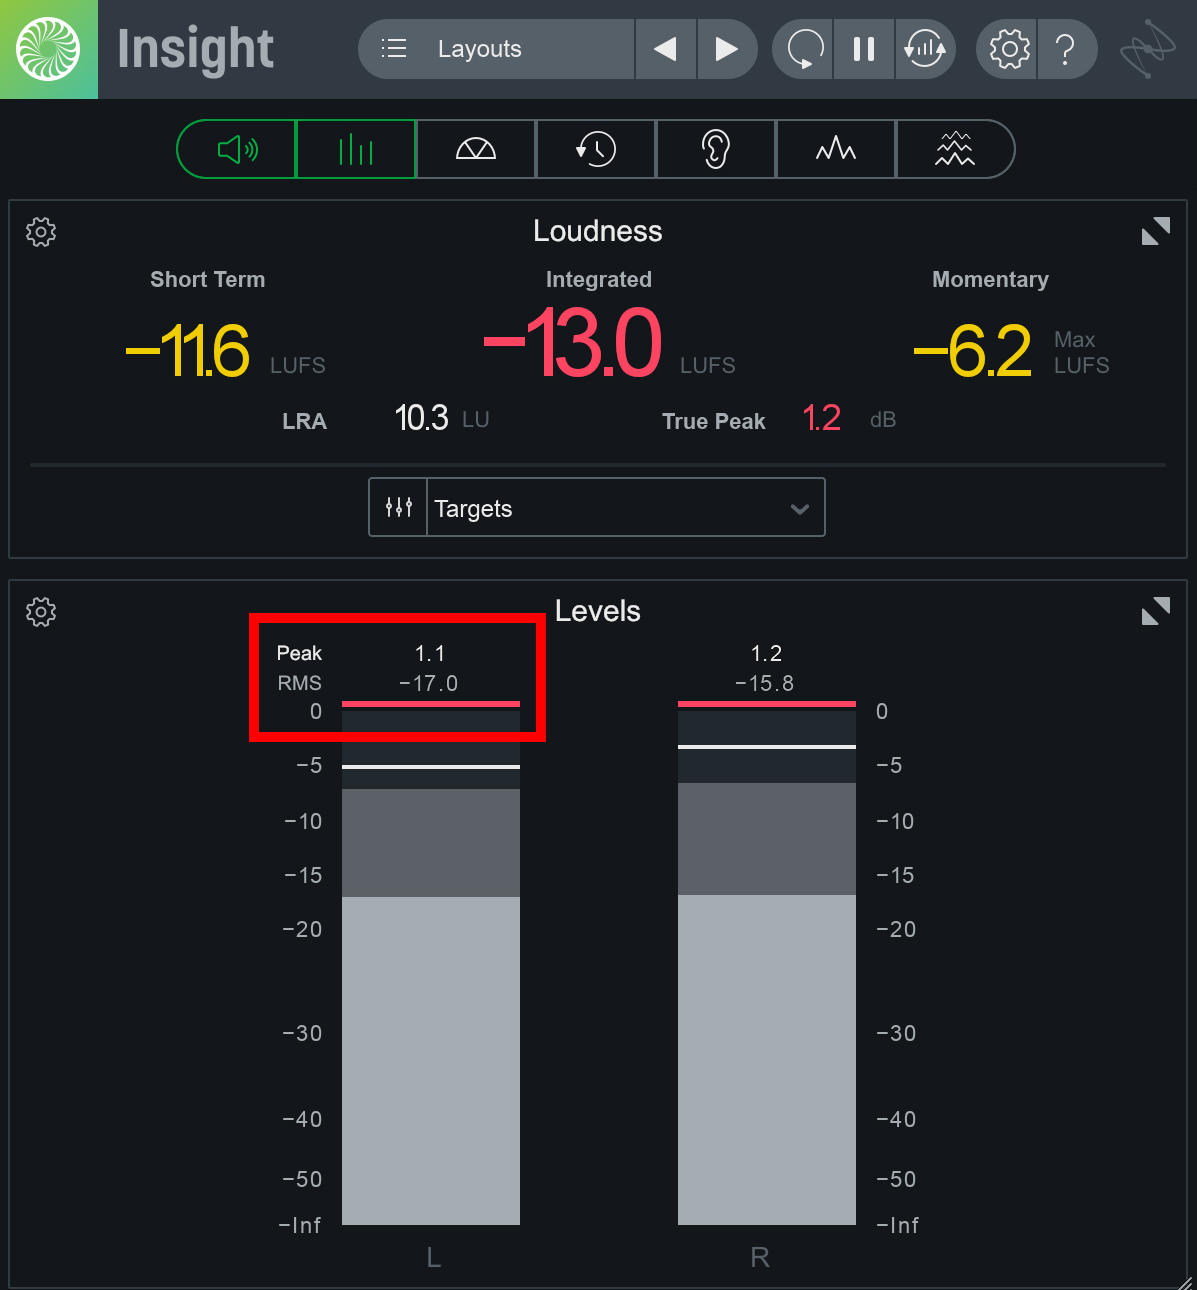
In the Level meter, you get two readouts: RMS level (average energy of a mix over a 300 ms or so window) and Peak level (the highest level of audio in a mix) that allow you to understand the dynamics of your mix. A very high peak compared to the average level is a good hint to bring those peaks down with dynamic range compression.

Insight Pro’s RMS level and peak level readouts
To get a sense of what you should be hitting on the meters, play a few great reference songs through Insight Pro and see what the readouts display. How does your music look in comparison? When you have a familiarity with dynamics targets common to the styles of music you mix, you can more easily make music that competes.
Improve your dynamic range
The amount of dynamic range you should have in a track is going to depend largely on the genre and vibe you’re going for. But, hopefully these five tips will help you improve the way you think about mix dynamics so you can be creating better, genre-fitting mixes in no time.
It’s also worth mentioning that every plug-in referenced in this article comes with a Music Production Suite Pro membership. If you aren’t already a member, you can start your free trial to get access to Neutron Pro, Nectar Pro, Tonal Balance Control Pro, and Insight Pro—plus many other mixing and mastering plug-ins, custom presets and samples, and exclusive educational content.


