Choosing the right compressor for your sound
Learn to navigate the myriad compression tools included in Music Production Suite, and download a free preset.
A compressor in mixing and mastering is used to reduce a signal's dynamic range—that is, to reduce the difference in level between the loudest and quietest parts of an audio signal. It's an integral tool of the production process, and there are a lot of options to choose from. iZotope


Music Production Suite 7
If the sheer number of possible starting points is feeling overwhelming, not to worry. We’re going to take a look at each compressor included with Music Production Suite, breaking down their different modes and strong suits to give you a solid foundation to start from.
Follow along with your copy of


Music Production Suite 7
Why do we compress?
Before we look at all the compressors on offer, let’s quickly recap the main reasons we would choose to use compression in the first place. If you’re new to compression, you may also want to get up to speed on some common mistakes to avoid.
To control a signal’s overall dynamics: The signal level varies too much between loud and quiet sections, and we want to control its dynamic range. Think of a vocal that grows too loud at the end of each phrase.
To shape transients: Using the attack and release controls, you can really alter how transients come across. You can squash them down into the body of the signal for a denser sound, or accentuate them for more smack and excitement.
To alter the groove or feel of an instrument: You can use a compressor to shape the groove of an instrument in a variety of ways. Sidechain compression is one way of doing this, though you can also shape groove without an external sidechain input, particularly on a looped phrase; you can change the feel of a drum kit or a bass part, for example.
To add color or tonal alteration: Hardware compressors often impart a desirable, useful tone that results from the unique designs of their analog circuitry. Subtle harmonic distortion and “box tone” is a big part of what gives these coveted compressors their place in history. These days, many digital compressors model the saturation and tone of their analog counterparts.
How to use the compressors in Nectar
With iZotope


Nectar 3 Plus
To figure out your starting point, it can be instructive to think about what our goals are. For vocals, there are often two main things you’re trying to achieve with compression: transient control over consonant sounds—especially plosives—and an even body where particular words or syllables are neither lost nor obtrusive. In fact, many engineers will employ both these techniques in series, something you can do easily with Nectar’s two compressor modules (more on that in a minute).
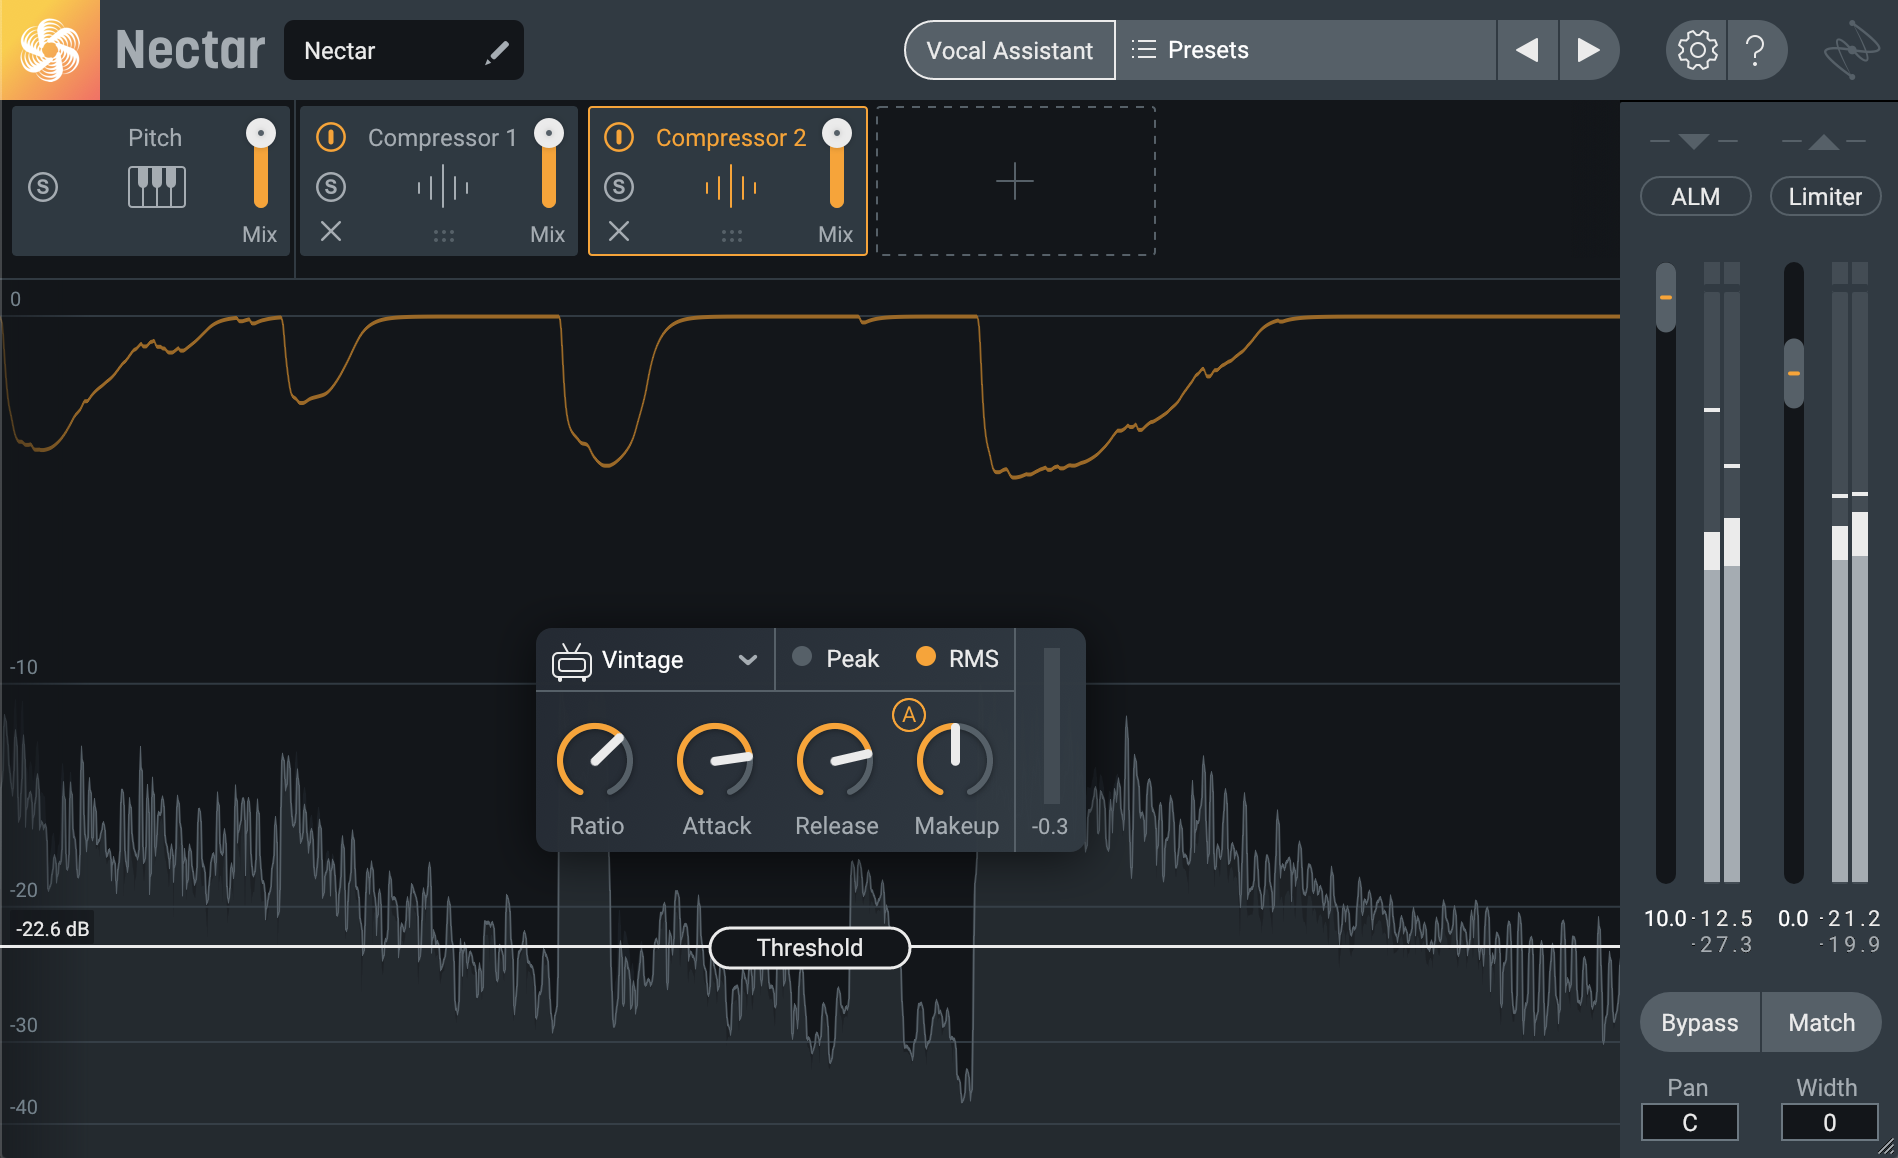
Serial compression in Nectar
Nectar’s Digital and Solid State compressor modes are particularly well suited to transient control when set to use peak level detection. If you’re looking to keep things clean and pristine, stick with Digital mode. If, on the other hand, you want to add some harmonic coloration, give Solid State mode a try.
Settings to try:
- Ratio: 3:1–8:1
- Attack: <10 ms
- Release: 30–80 ms
For a smooth, even body, Vintage and Optical modes with RMS detection really shine. If you find those to be too colorful, Digital mode with RMS detection can be astonishingly invisible, while still imparting the level control you need.
Settings to try:
- Ratio: 1.5:1–4:1
- Attack: 30–100 ms
- Release: 80–200 ms
For a classic approach to vocal compression, try using Compressor 1 for fast transient control, and Compressor 2 to even out the body of your vocal. I personally like Solid State followed by Vintage or Optical!
Also, don’t hesitate to try Nectar’s compressors on things like drums and bass. Vintage mode can be just the ticket for a “Hulk Smash” approach to drum rooms mics, while Optical mode can provide some nice bass leveling with a touch of harmonic coloration.
How to use the compressors in Neutron
If you’re looking for incredibly versatile compression on instruments and buses across the rest of your mix, iZotope


Neutron
First, Neutron’s new Punch mode is a simplified take on traditional compression that gives you direct control over your signal’s dynamics with just three controls. The amount control allows you to either increase or decrease your signal’s crest factor, while the attack and sustain controls allow you to fine tune the shape and timing of the dynamics processing.
Don’t hesitate to get creative with this though. Try overdoing the settings, as shown below, and then turning down the Mix control in the signal chain header for some parallel goodness. Or try reducing the dynamic range but using a higher attack setting to leave—or even enhance—some of the initial snap of the transients. Of course, if you’re after some more conventional compression, Modern and Vintage modes give you a range of options to choose from.
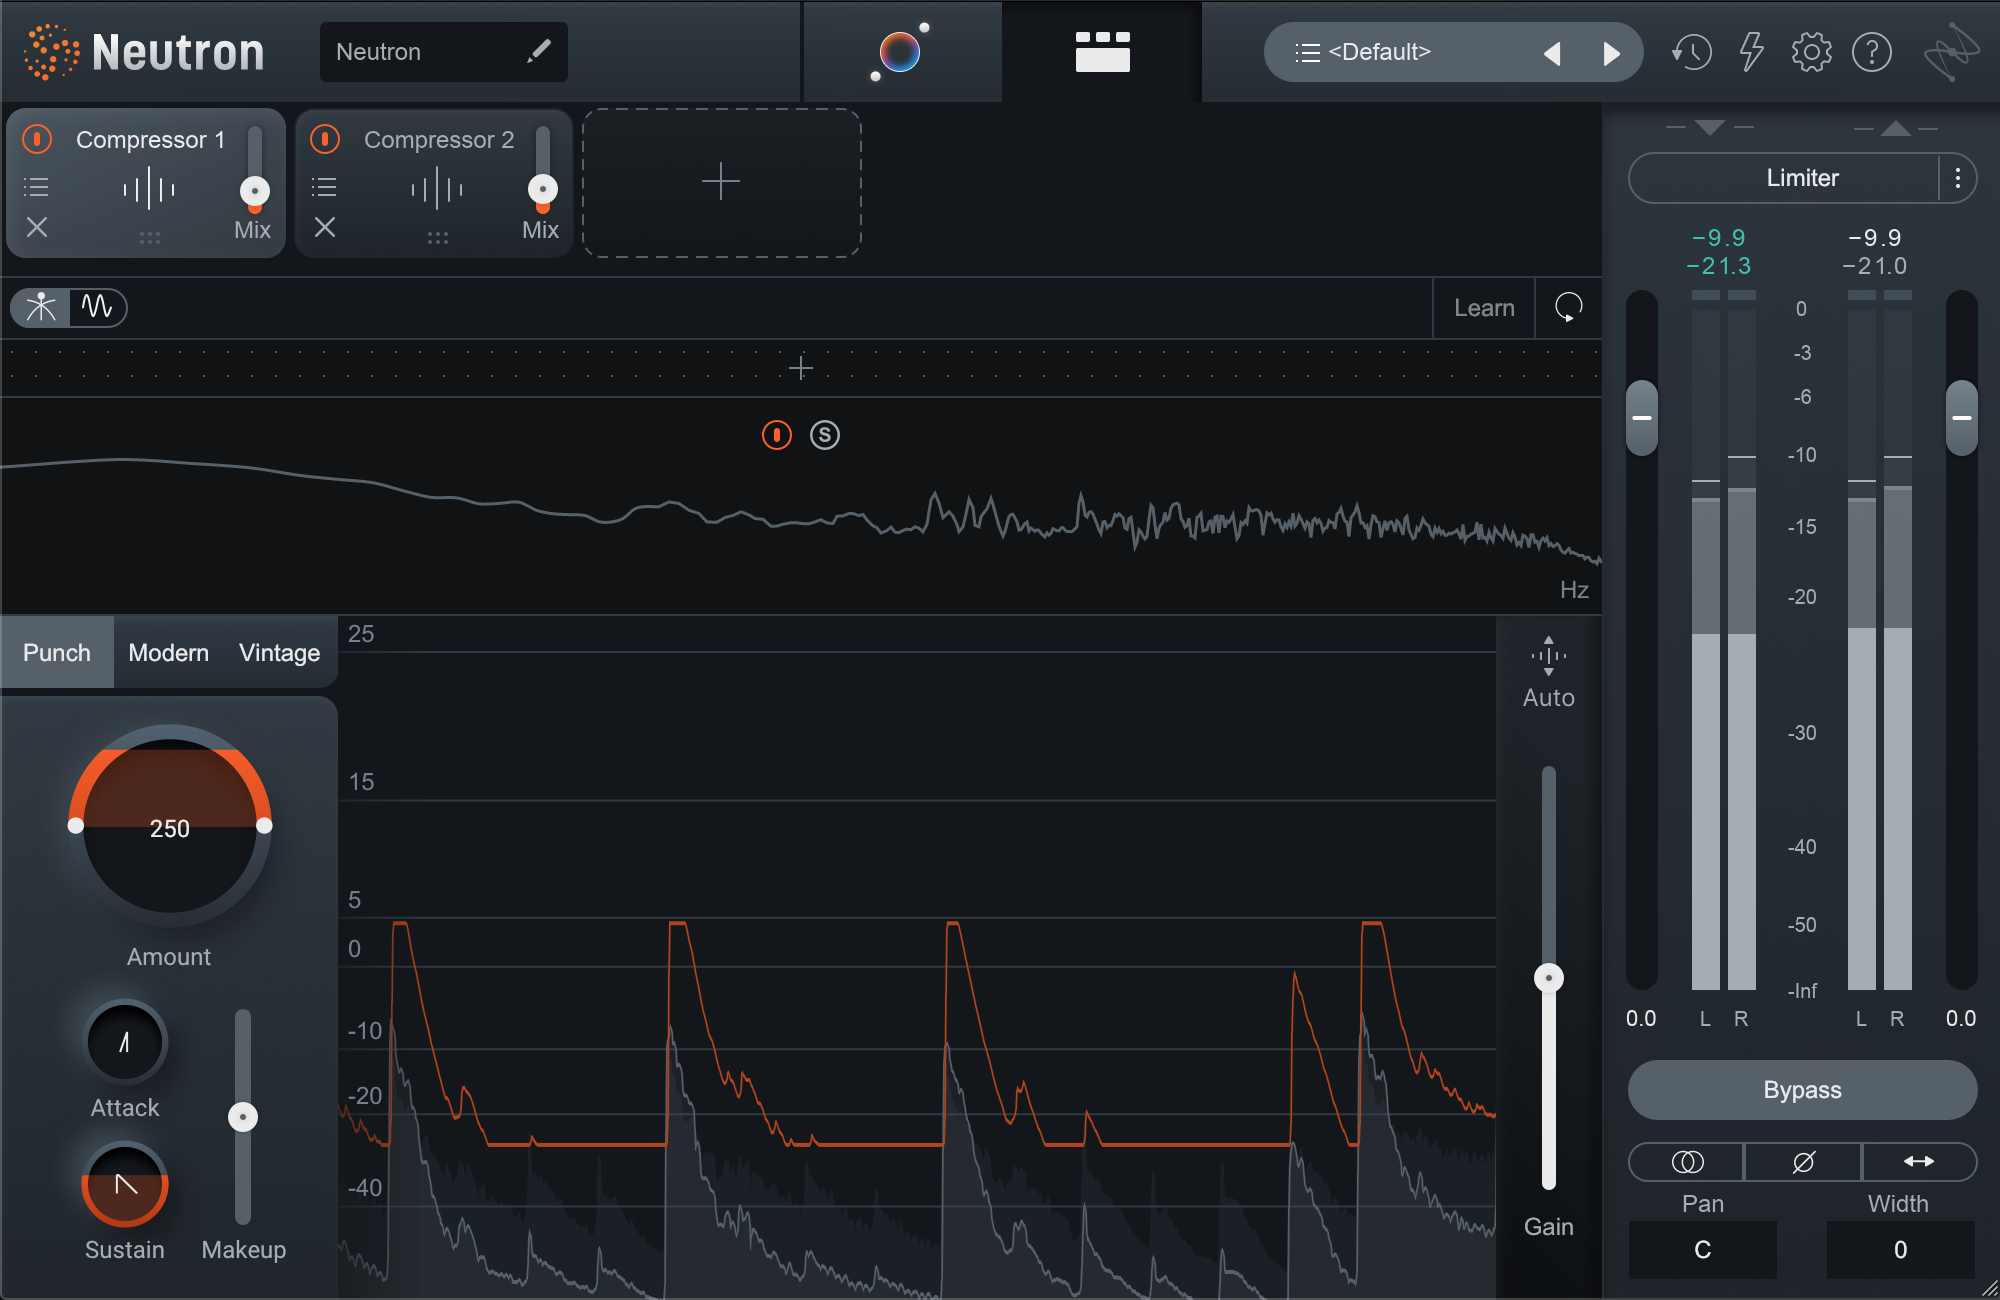
Adding some parallel punch with Neutron
While most compressors use either peak or RMS detection, the Neutron compressor offers three level-detection options for Modern and Vintage modes: RMS, Peak, and True. Its unique True Envelope mode looks to solve one of the common issues associated with RMS detection. In a bog-standard RMS detector, low frequencies tend to dominate due to their comparatively higher energy, which can make the compression pump more than you might like.
True Envelope mode addresses this by normalizing the signal across all frequencies, giving them all equal footing. If you’re after slower, leveling-style compression, but find RMS mode reacts too strongly to low frequency components, give True mode a try. You could even combine this with the detection filters to further tailor the frequency response of the detection signal. Below, I’m filtering out some additional low- and high-end, but only for the compression detector—the full range signal is still being processed and heard.
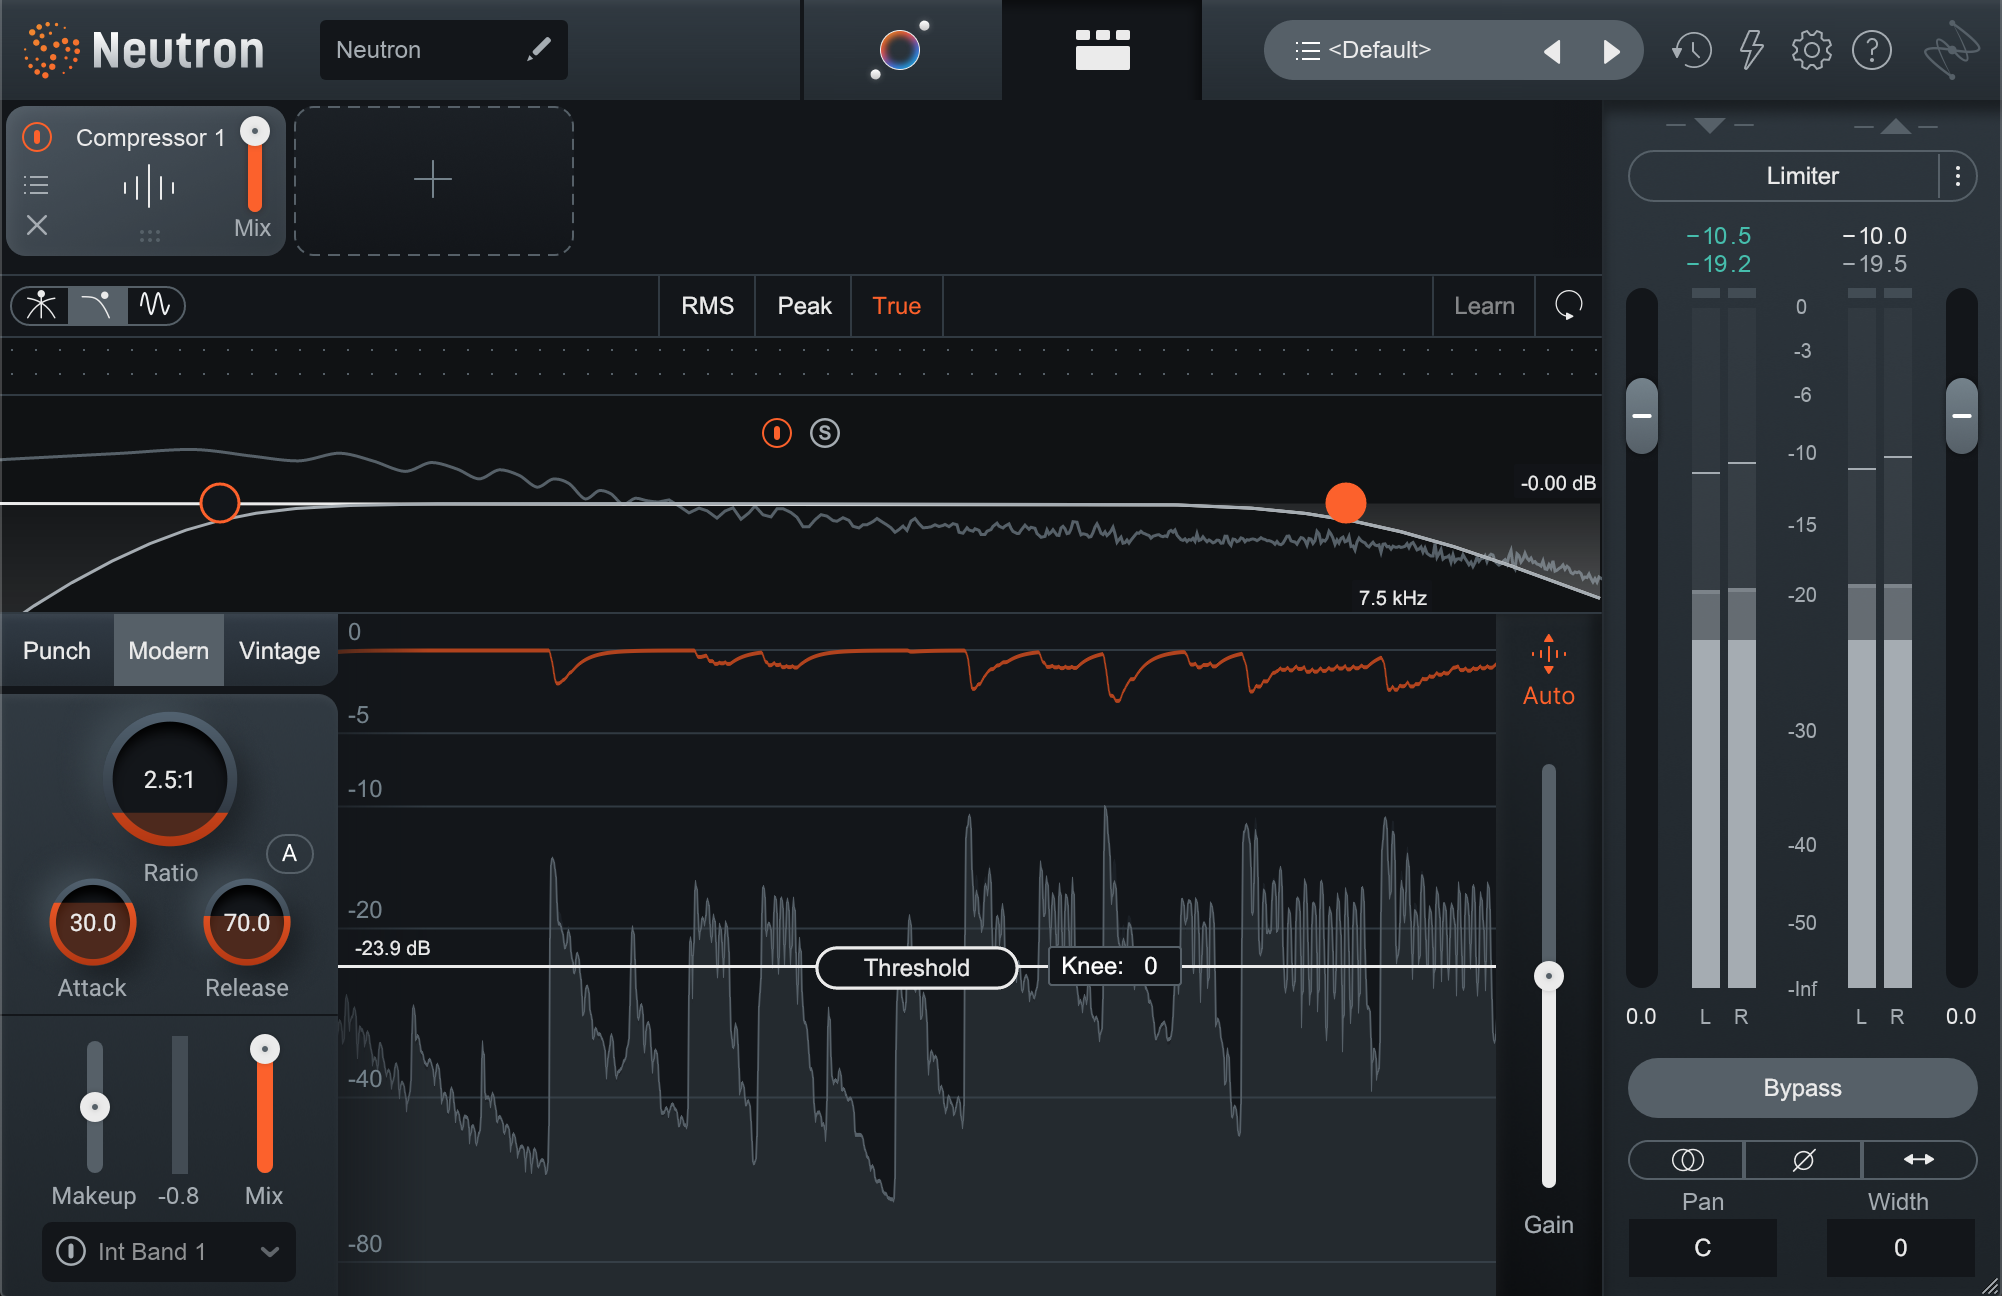
Applying detection filtering to Neutron’s True mode
Multiband compression in Neutron
The Neutron compressor also offers targeted compression for up to three independent bands. Of course, you may only want to compress a single band. For example, you could create a single split somewhere in the upper midrange and use the high band like a de-esser, or high-frequency limiter to control spikey high frequency transients. Or, you could move that band split lower down to just compress the low end of an instrument or bus.
One more example: use two bands with broadly similar ratios and thresholds, but slightly different timing to accentuate different parts of a signal. This can work wonders to pull a little extra plucky attack out of something like a bass while still keeping the low end firmly controlled and preventing it from getting thumpy. Or conversely, keep ratio, atack, and release the same in each band, and just fine tune the thresholds so you’re not overcompressing any one band.
Parallel compression in Neutron
Neutron’s compressor also can work wonders on drums. By using both compressor modules, you can add a little punch and dynamic control, and follow it up with some parallel smash to really add some energy and enhance the groove. For example, on a drum bus you might start with settings like this.
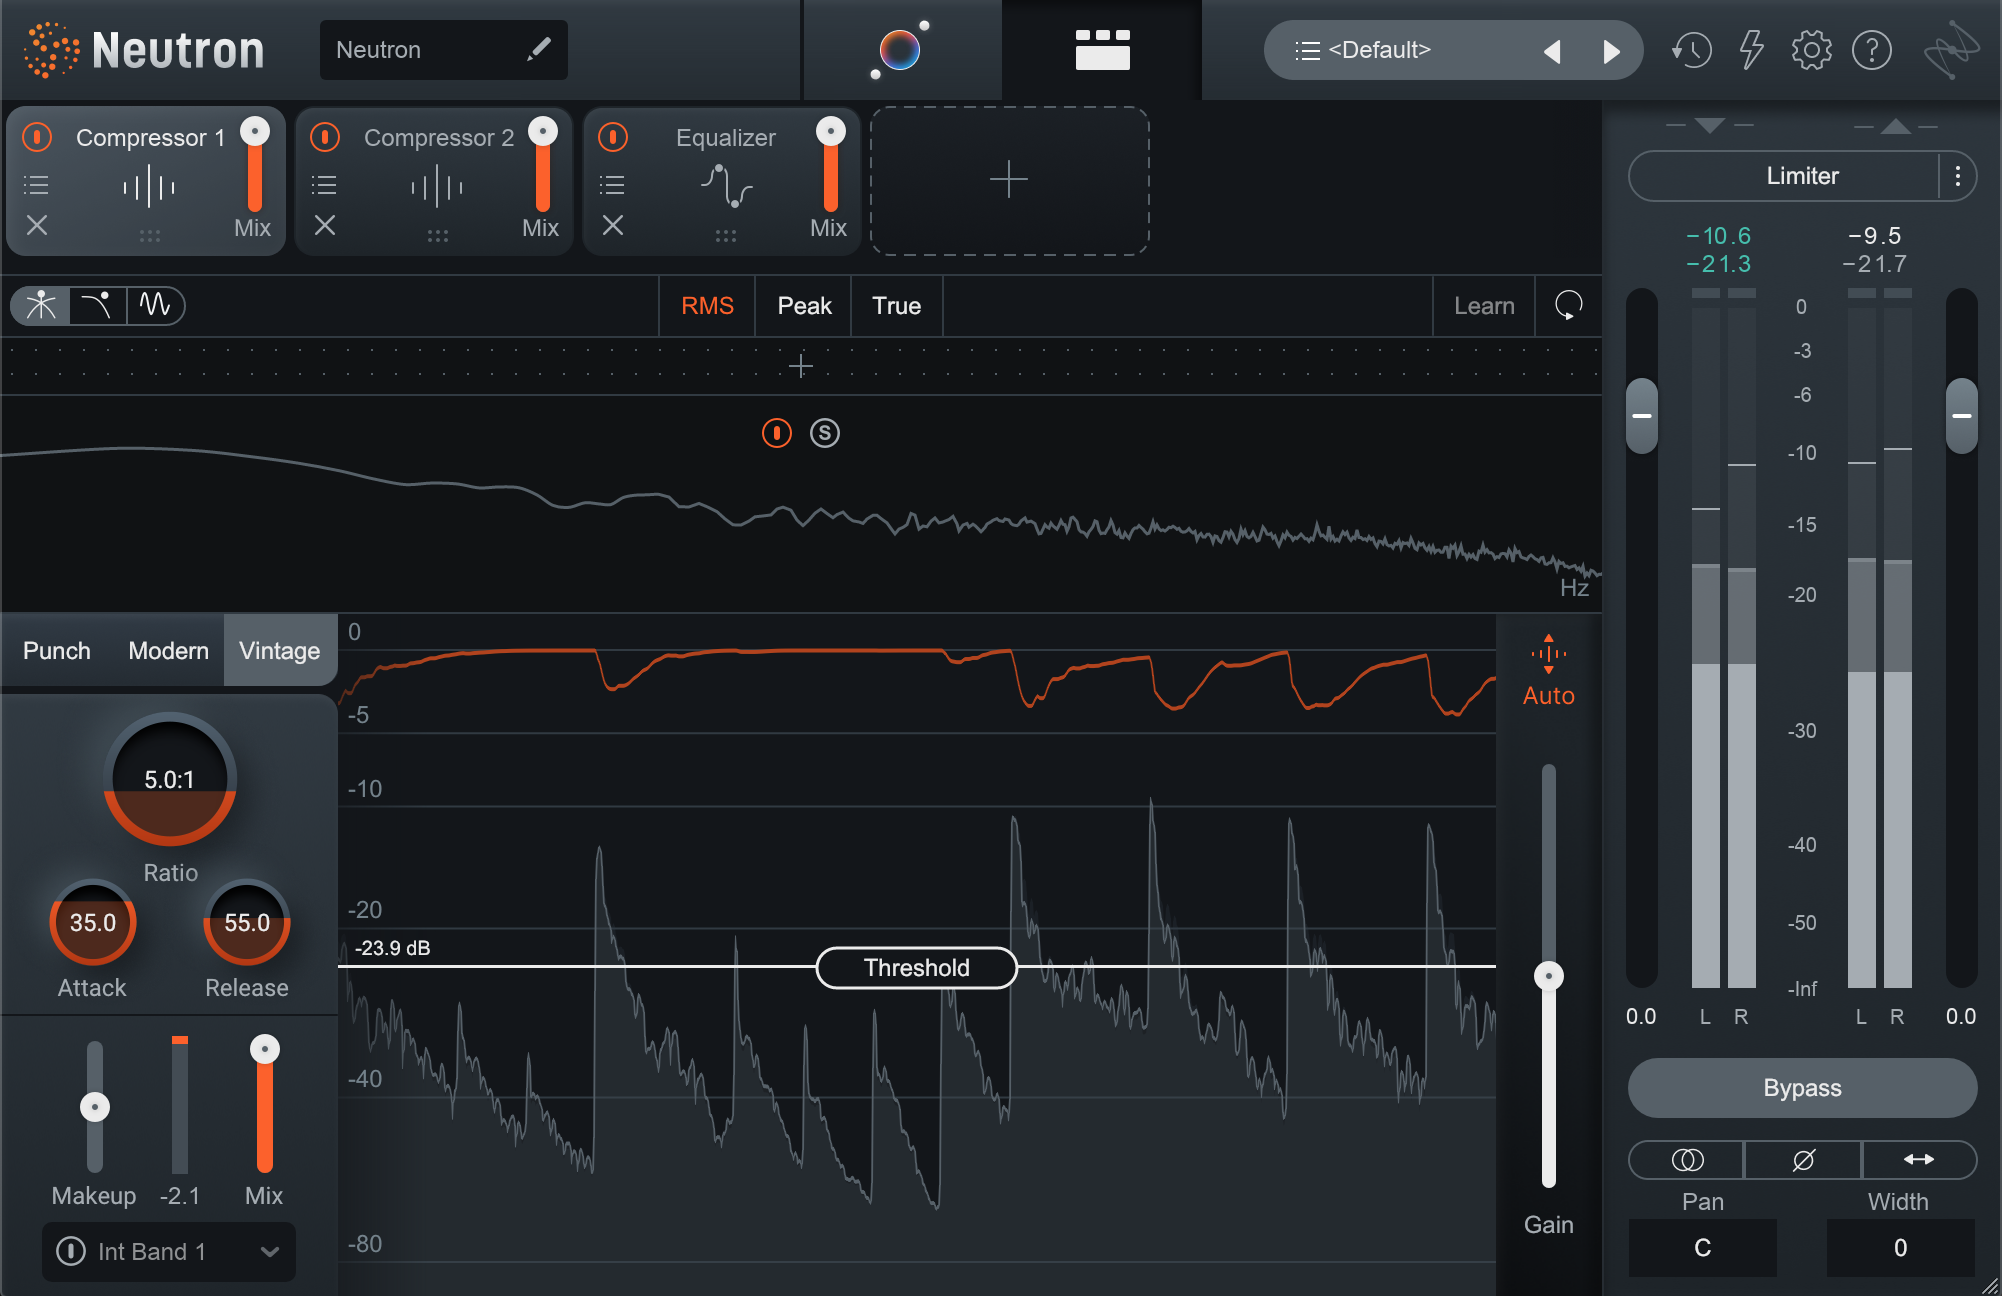
Neutron for drum punch and control
Followed by Compressor 2, set up like this—notice the Mix control set to 20%. And in case you’re wondering, the EQ is just there to take out a little ringing in the snare.
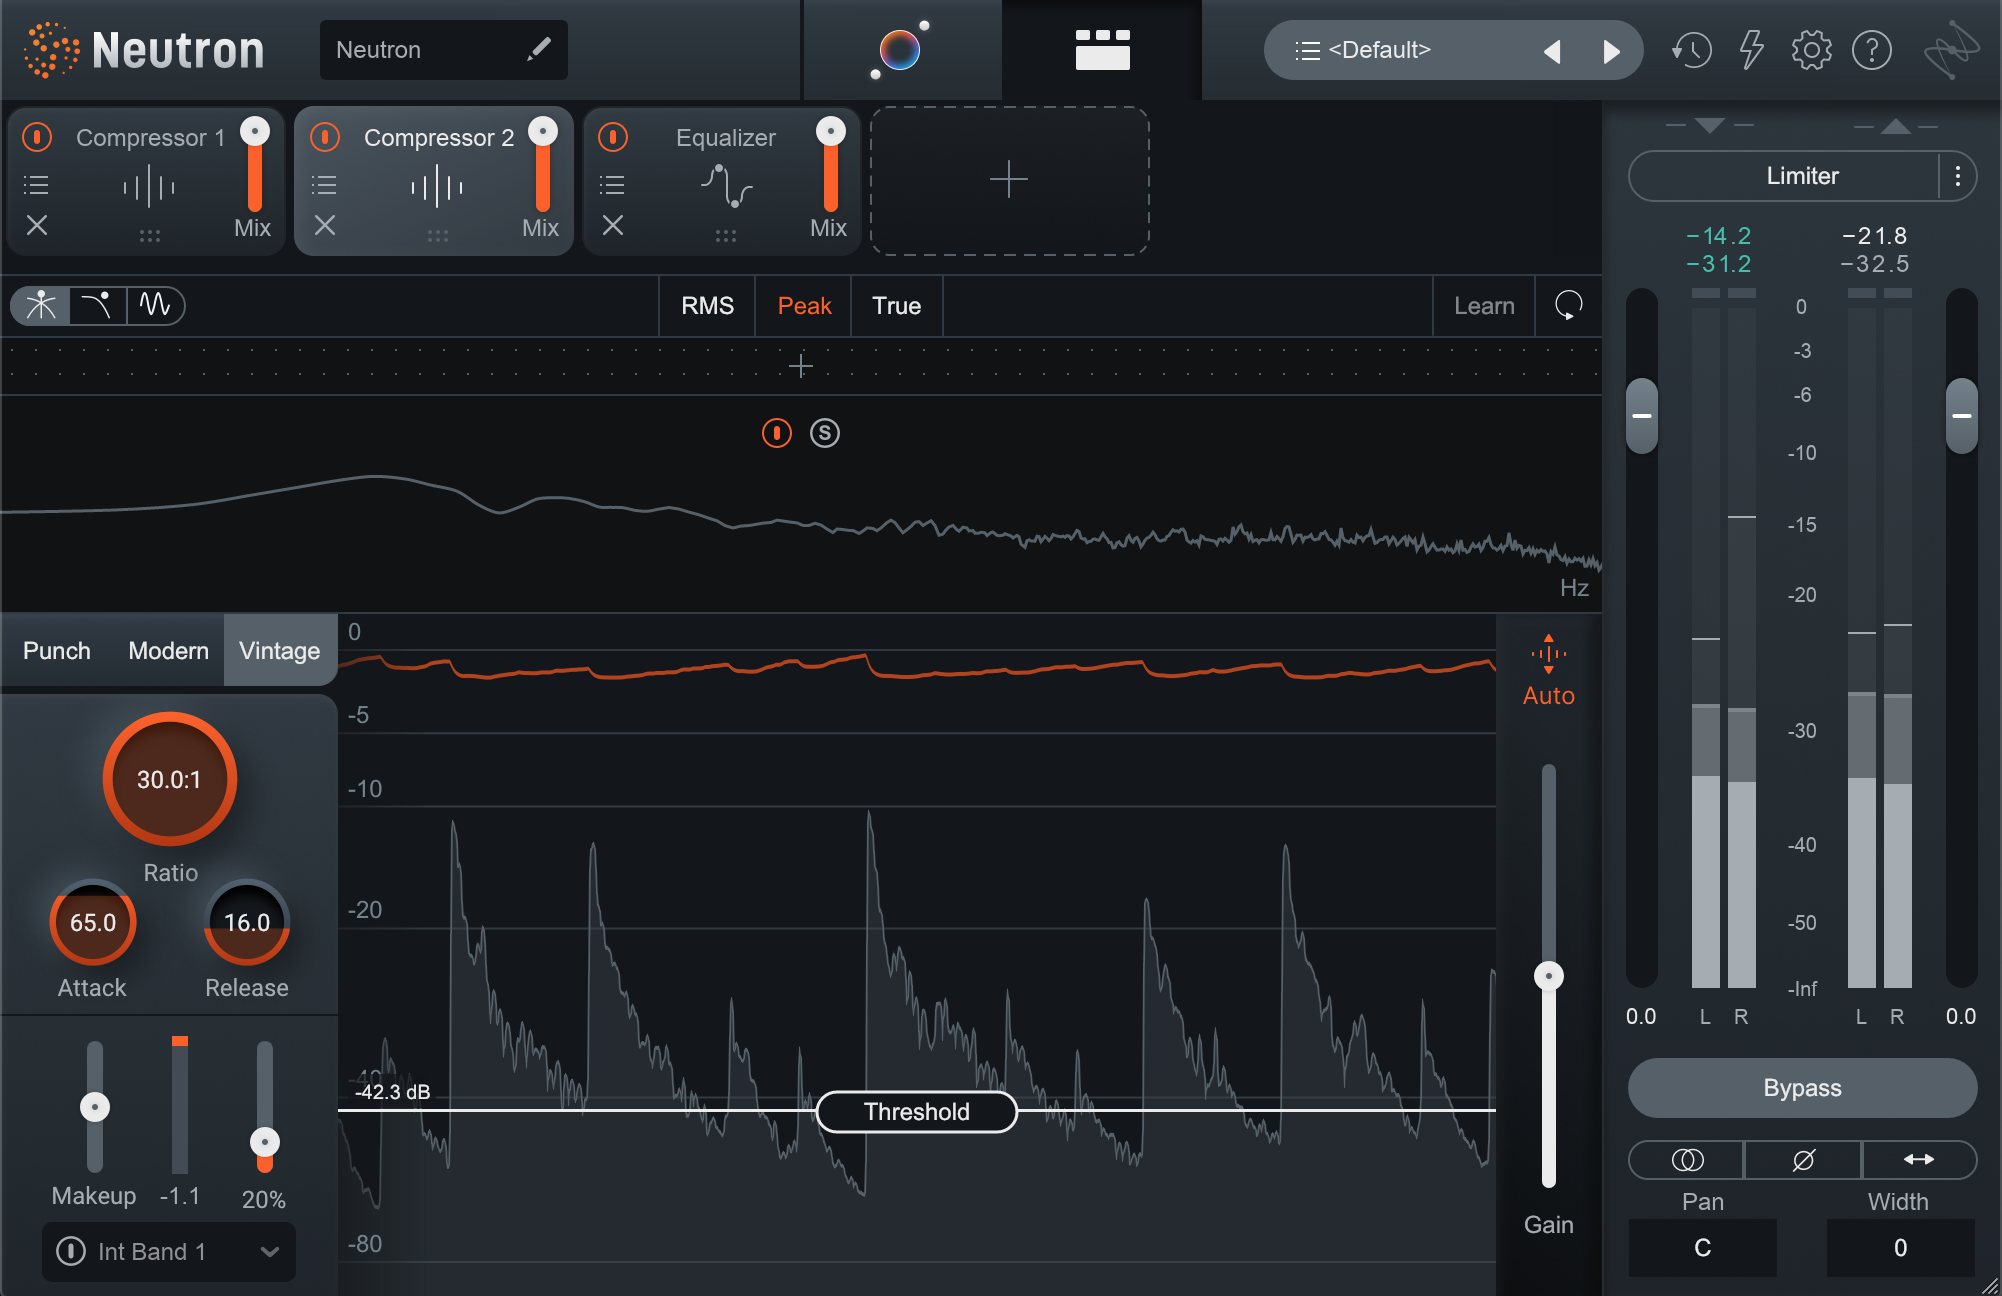
Sonically, that will get you from something clean and straightforward, if maybe a little sterile, to something with a lot more groove and character. Pay attention to the attack of the kick and snare, and how the high-hat seems to really move in and out to accentuate the swing in the offbeats. Listen to the compression in action below.
Drum Loop Before & After Compression
Parallel compression is great for adding everything from thwack—try attack times in the 25-30 ms range—to filling out the body of a sound, but it’s also useful for controlling the dynamic range in a way that doesn’t squash your transients. Sometimes we don’t want to alter the attack of a drum hit, but we need the body of it to be more consistent. By using parallel compression with a high ratio, fast attack and release, but blended under the dry signal, we can let the original transients dominate, while pumping up low-level detail and tone.
Sidechain compression in Neutron
Sidechain detection in the Neutron compressor is also extremely versatile. Not only can you key one band-split off another internally, but you can also key from an external source either wideband or via any of the band splits you’ve set up. The possible applications here are far too numerous to list, but here are a few ideas.
You could add some pump and bounce to a drum loop or drum bus by keying a higher band to a low one restricted to the thump of the kick. This can achieve that classic sidechain pumping without adding any additional compression to the kick, and might look and sound a bit like this.
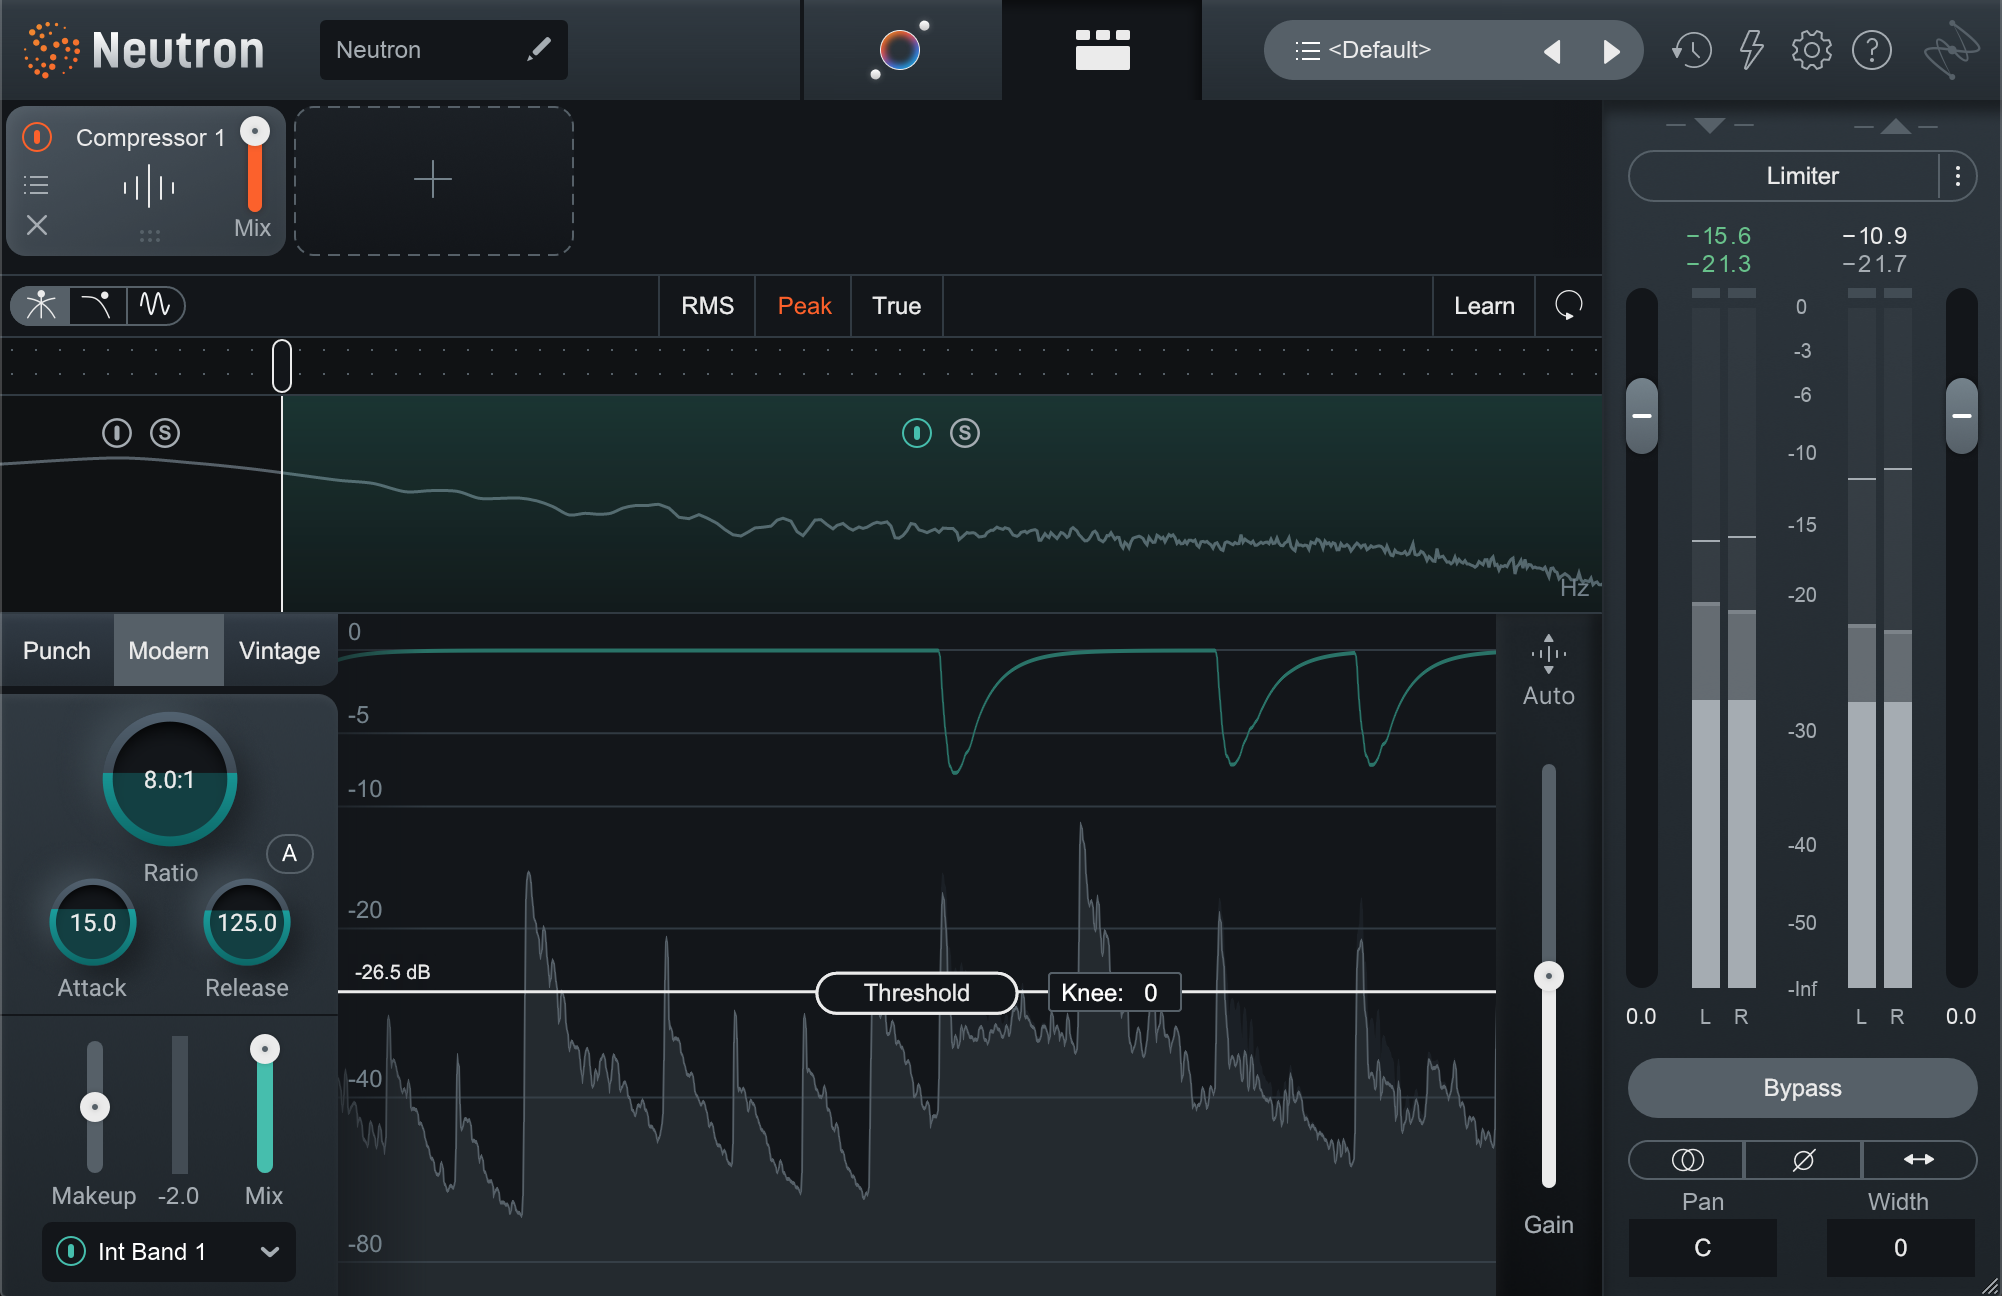
Drum Loop Before & After Sidechain Compression
Or, for a more transparent take on sidechaining the bass to the kick, use the external sidechain but restricted to the low band to make room for the low end of the kick without causing pumping in the upper harmonics of the bass.
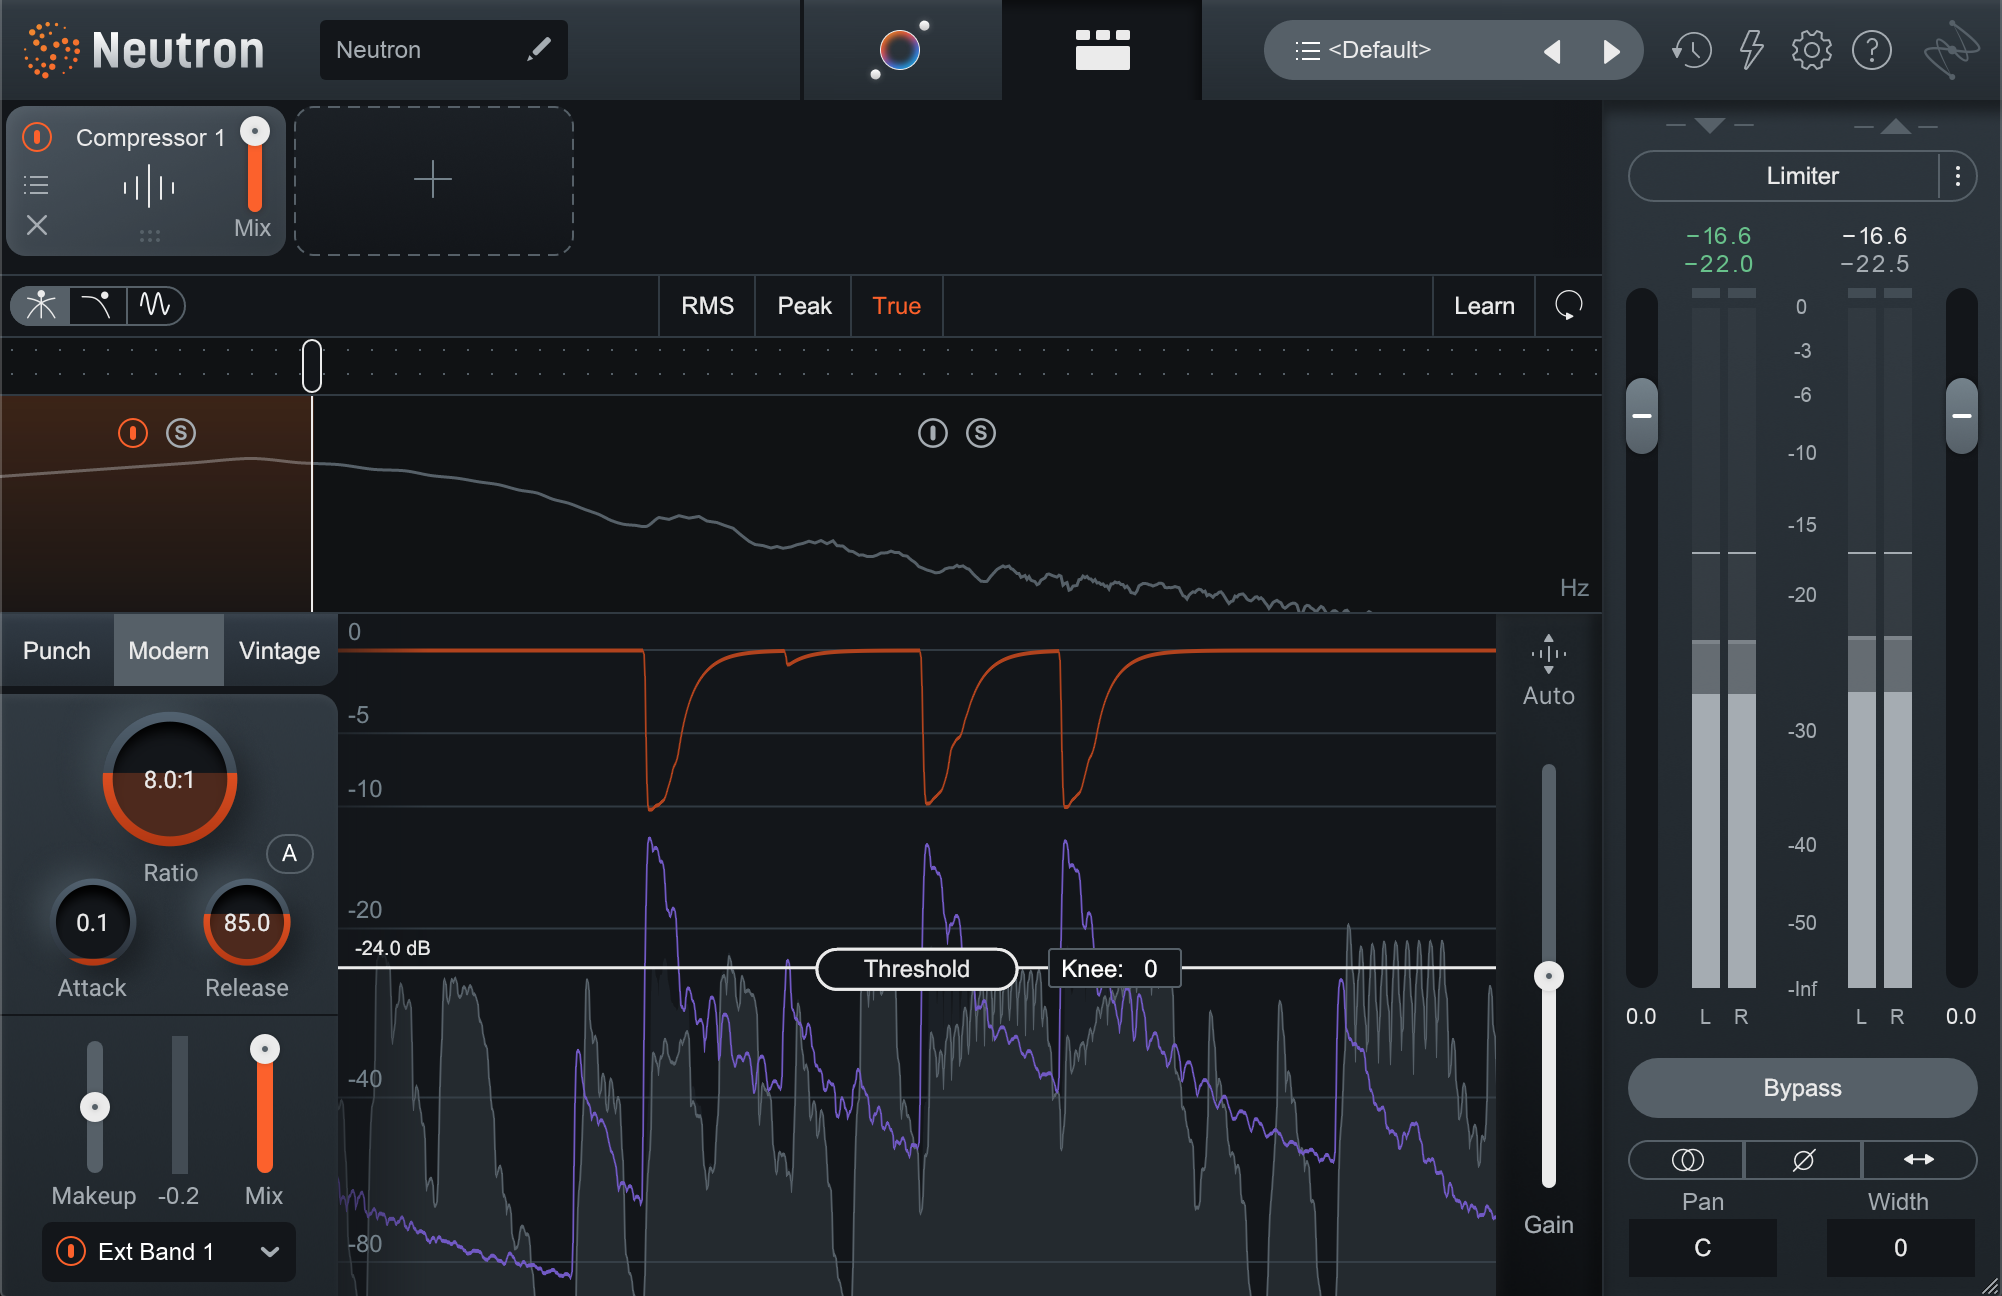
Sidechaining the bass low end to the kick low end
Lastly, don’t forget to check out compression ratios below 1:1. Ratios of 0.9:1 and lower turn Neutron’s compressor into an upward compressor, turning up signals that fall below the threshold. This can be great for enhancing low-level detail without squashing the peaks. Do be aware that because compression is happening below the threshold, the attack and release controls sound a bit like they’ve swapped functions.
Add to all this Vintage mode with its unique knee, ratio curve, and harmonic coloration, auto release, variable soft-knee, and the parallel mix controls, and you’ve got a true powerhouse processor for just about any mix compression scenario you can dream up.
How to use compressors in Ozone
Whether you call it your 2-bus, your mix bus, or your master bus, this is where the Vintage Compressor and Dynamics modules included with iZotope


Ozone Advanced
If you’re after a compressor that takes its cues from some classic hardware units and can impart some color and mojo, look no further than the Ozone Vintage Compressor. It can do great things to warm up a slightly sterile-sounding master, but can also be put to great use in a 2-bus chain to mix into. In fact, pair it with the Vintage EQ and Tape modules and you’ve got the makings of a great 2-bus chain! But I digress…
When it comes to choosing the right mode—Sharp, Balanced, or Smooth—unfortunately there’s not any one-size-fits-all guidance I can give you. A lot of what the Vintage Compressor does is fairly program dependent, so for that reason, experimentation is key. In general, though, Sharp mode uses somewhat faster time constants and a slightly soft knee, while Smooth mode uses slightly slower time constants and a very soft knee. Balanced, unsurprisingly, is somewhere in between these two.
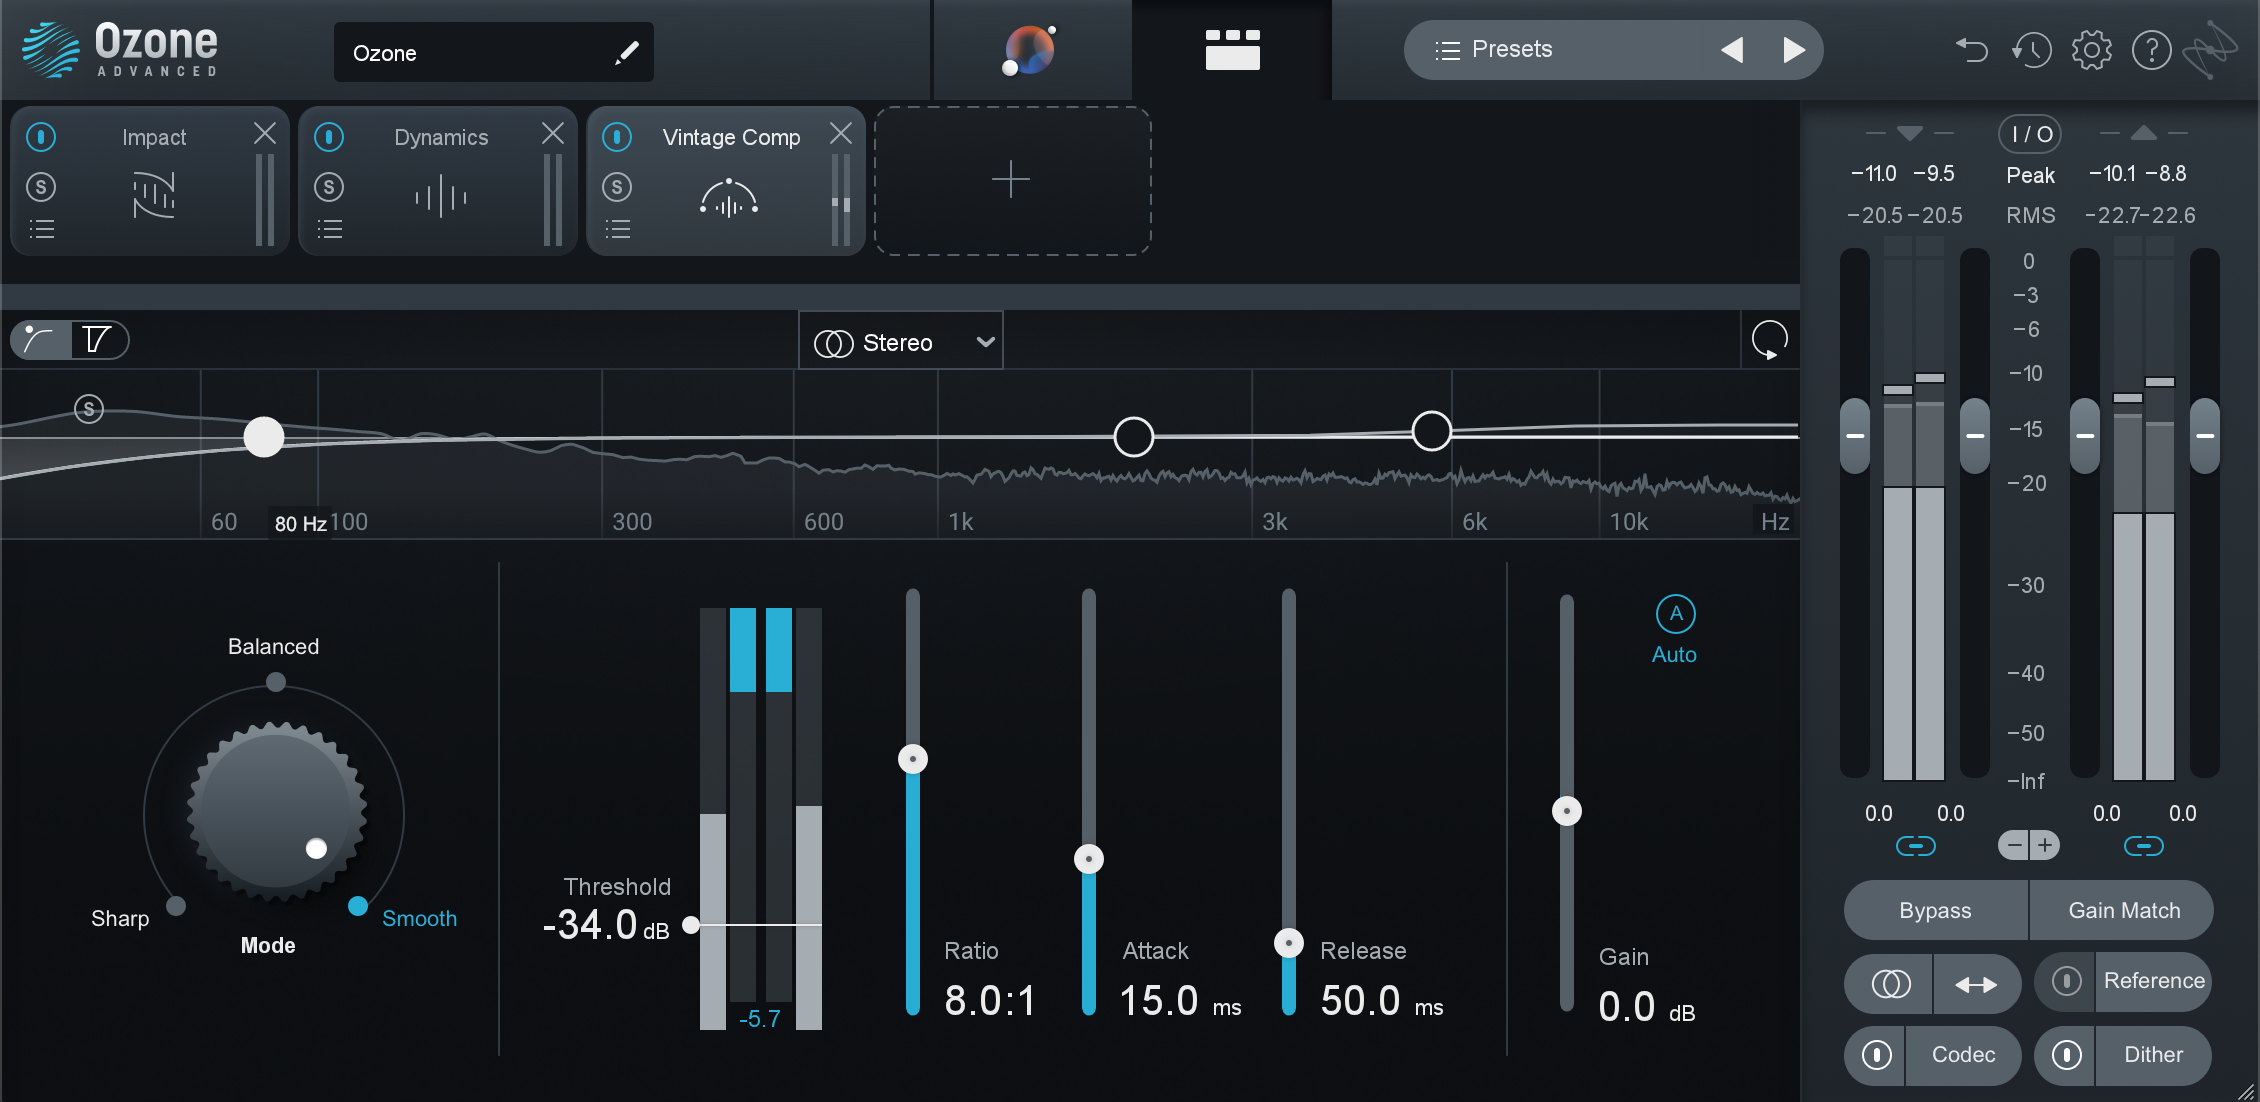
Ozone’s Vintage Compressor on a drum bus
The Dynamics module in Ozone is a dynamo of nuanced master compression. Like the Neutron compressor, we could spend an entire article dissecting the functionality and practical applications of this compressor. With stereo and mid/side processing, internal sidechain filtering, up to four bands of multiband processing, a compressor and limiter per band with positive and negative ratios each, three detection modes, parallel blend, adaptive release, and more, the number of possibilities is truly vast.
With so many options at your disposal, it can be easy to get in the weeds and start doing more harm than good. My best advice here is to keep it simple. Use only as many bands as are truly needed—often two are perfectly adequate—and try to use similar settings for each band. Exploring the presets to find one you like and then analyzing how it’s set up can also be a great way to learn all the ins and outs of this compressor.
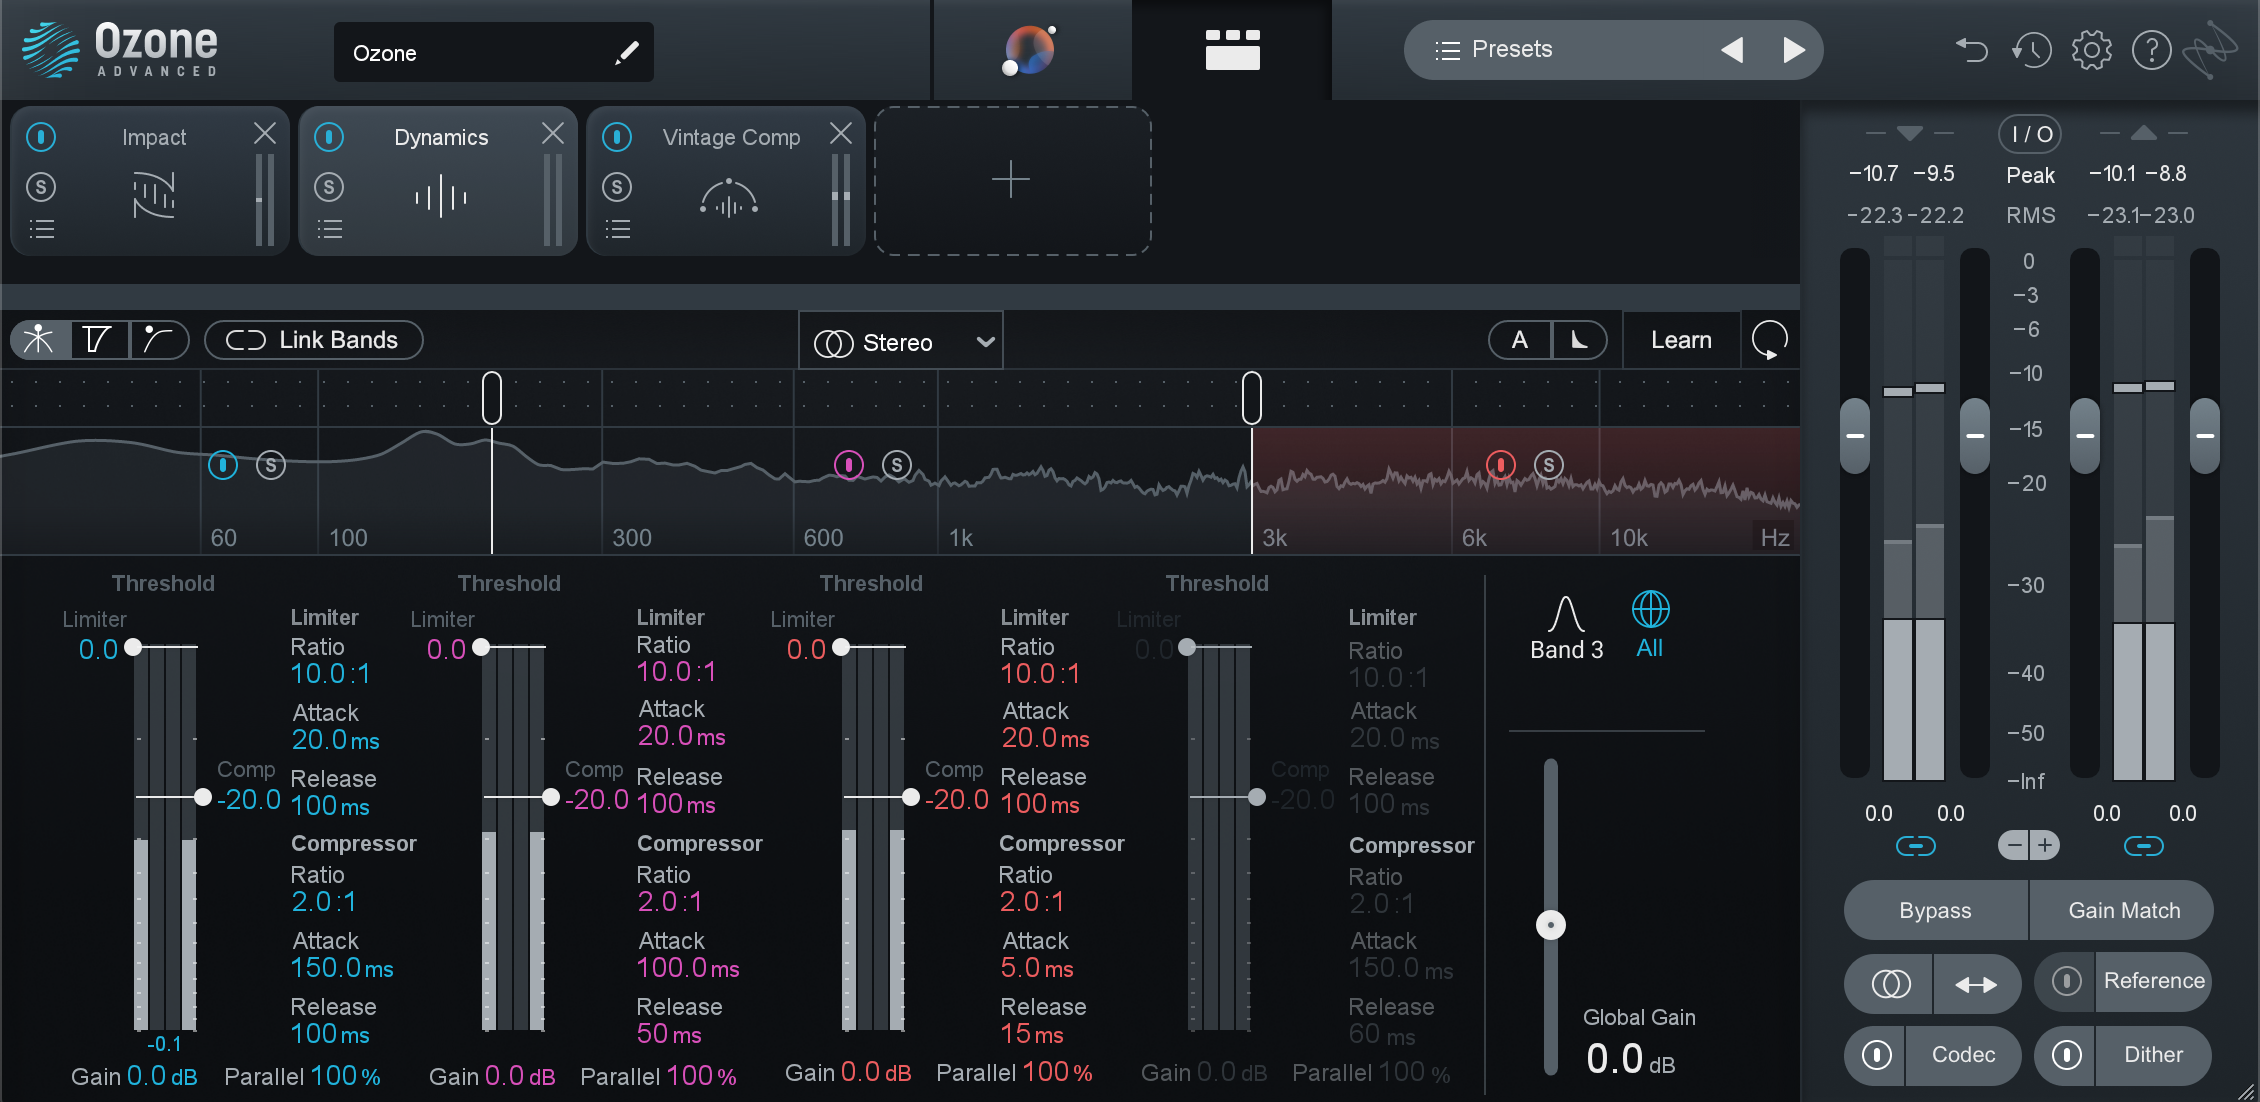
Ian’s 3-band starting preset for the Ozone Dynamics module
Lastly, don’t forget about Ozone’s Impact module. While it might lack the familiar controls of a standard compressor, it allows you to reach into your music to directly—and easily—manipulate the microdynamics. This can do everything from enhance punch and snap, to smooth out the top end, or ease the workload on your final limiter. Put all three of these Ozone compressors together and you’ve got a powerful way to enhance punch and tightness, while adding some cohesive glue. Check it out.
Basic Groove Before & After Ozone Compressors
You can learn even more on how to use Ozone's Impact module below.
Start using the right compressors in your next session
As you can see, you’ve got a ton of compression options at your fingertips. Hopefully, this guide has helped prepare you to think more easily about which one is right for the job at hand. You’ll also likely find that as you experiment and try out each compressor you’ll discover your own favorite uses for each, and before long you’ll be able to listen to a vocal, or instrument, or bus, or an entire mix, and know just which one to reach for.
If you’re still feeling overwhelmed, try not to stress. This is music, and it’s meant to be fun. Take solace in the fact that many classic techniques or sounds were born out of happy accidents, or from engineers experimenting, abusing, and trying gear in ways it was never intended to be used. So go ahead, try the Nectar Optical compressor on a bass, or the Ozone Vintage Compressor on a vocal bus, and see what happens. You may just discover your next favorite compression technique! And remember—all of the plug-ins can be accessed in iZotope Music Production Suite.

