
Table of Contents
- 1. Consider your destination and appropriate loudness standards
- 2. Collect genre-appropriate references
- 3. Get yourself a meter
- 4. Start mastering with only three (or four) tools
- 5. Set level first with limiting
- 6. Level match your master to your mix
- 7. Level match your reference track to your master
- 8. Translation is key
- 9. Monitor consistently
- 10. Rinse and repeat
- Start mastering with confidence
Audio mastering is the final step in the audio production process and the first step in the distribution chain. It is an opportunity to enhance the overall sound of the mix and take the track to a new level, both figuratively and literally. It’s also your last opportunity to catch any little defects like clicks, ticks, pops, edits, or dropouts. Learning how to master music can feel intimidating, but once you know some of the key steps and techniques to use, you’ll be ready to master like a pro.
What follows are some of the fundamental techniques I’ve developed over the years to master individual tracks. The heavier work of mastering – blending together a cohesive album; creating DDPs and whatnot – that’s for other articles.
If you’re a musician, songwriter, producer, or mix engineer looking for tips on how to deliver your own master, we’ll walk you through how to master a song if you’re not a professional mastering engineer using tools like iZotope Ozone, Tonal Balance Control, and RX.
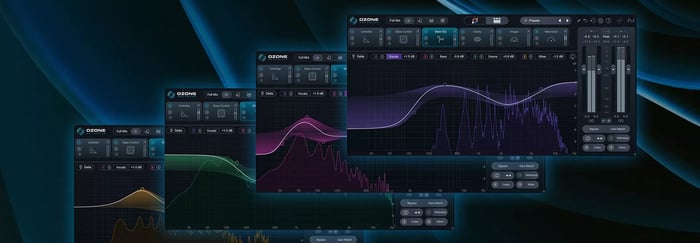
Try some of these mastering tips with Ozone 12 , the comprehensive mastering suite that helps you give your tracks a release-ready sound.
1. Consider your destination and appropriate loudness standards
You want to have an idea of where your song will end up before you master it – especially these days, as Spotify, YouTube, Tidal, and Apple Music have embraced (to various degrees) loudness normalization. This means that if you deliver a master at a higher level than a streaming service’s reference level, the service will lower your song’s playback level so that all songs on that service sound similarly loud to listeners.
Chances are, if you’re mastering one tune for consumption, you’re going to stream it – so use this to your advantage. Streaming services tend to normalize to between -11 and -16 LUFS depending on the service – with most of them using -14 LUFS by default – and this gives you more room to create a breathing, punchy, musical master.
This doesn’t mean that you need to master your song to any particular level, but it does mean you don’t need to worry about crushing it to make it as loud as humanly possible. In other words, it gives you the freedom to do what’s right for the song. Learn more about mastering music for streaming services in the Are You Listening? episode below.
Checking loudness levels
You can see how loud your master is by checking your meters often in a plug-in such as Insight, observing your short term and integrated loudness readings to see if you’re in the ballpark. You can also check your final integrated level quickly in RX using the Waveform Statistics window. Need more info? Explore common loudness myths and what to consider when mastering for streaming services.
If you would like additional information on the subject, check out the Are You Listening? episode on limiting and loudness in mastering below.
It’s also important to consider the context of musical genre, which brings us to our next point.
2. Collect genre-appropriate references
Your next move is to gather a few tunes that are similar in tempo, genre, and arrangement. Try to obtain lossless files if you can, such as .WAV. So-called “lossy” file types, like .AAC or .MP3, will give you a picture of how a song should sound, but once you start focusing on the details necessary for mastering you’ll notice the imperfections of lossy codecs, and the comparison will be harder to achieve as a result. Try to avoid them unless it’s the only option.
Keep in mind that with streaming services such as Tidal, Apple Music, Qobuz, Amazon Music, and Deezer offering lossless – and in many cases hi-res – streams, a streaming service plus Audiolens can be a totally viable way to access references.
Your own mixes can also make great references, as you’re already familiar with the material. The only caveat is that you should already be certain that you’re happy with how those tracks stack up next to other commercial releases. After all, the reason to use reference tracks is to ensure your master sounds at home on a commercial platform.
It doesn’t need to match a reference perfectly, but the two must meet for a game in the same ballpark. Their overall level, tonal balance, and dynamic impact should probably not be worlds apart. In other words, think, “would these work on the same playlist?”
We have many different guides on reference tracks, from tips on how to use them correctly, to genre specific primers with reference curves you can download and use yourself in Ozone’s Tonal Balance Control.
3. Get yourself a meter
Meters are critical in audio mastering because they can give us visual confirmation of what we’re hearing, often with a high degree of detail. Used in conjunction with a reference track, meters can be an enlightening resource that helps maintain objectivity.
Loudness meters
Displaying level using LUs (loudness units), these meters can measure perceived loudness in several ways including, momentary, short-term, and integrated loudness. Integrated loudness is typically used to ensure compliance with broadcast standards, but understanding your song’s integrated loudness will also give you clues as to how it will play back on different streaming platforms.
Momentary measurements are closer to what you would see with a VU meter, while short-term loudness can be useful for ensuring that you’re not pushing the loud sections too far, or leaving the soft sections too soft. Assuming you love the sound of your reference(s) – and you should – check them with your meter to see where integrated and minimum/maximum short-term levels lie.
Spectrum analyzers
These meters display the frequency content of your mix and can be useful to help pinpoint frequency ranges that may need adjustment. They are a good objective check on your ears and can clue you into what your room might be obfuscating.
Keep in mind though that two great mixes can look wildly different on a spectrum analyzer, so rather than let them determine your decisions, use them as a compass to help find specific frequencies that your ears are telling you are problematic, whether through deficiency or excess.
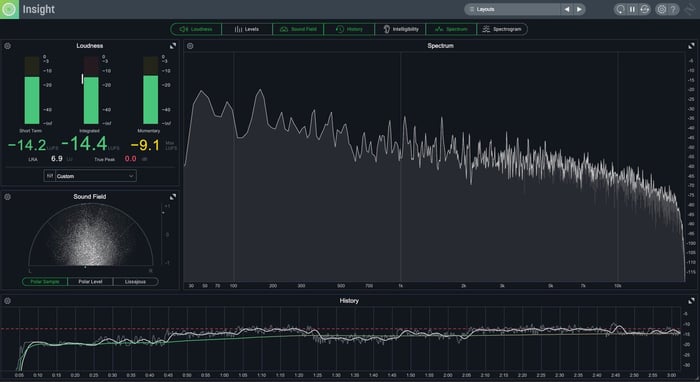
Insight gives you a full suite of meters to use during mastering
Correlation meters and vectorscopes
These tools give you concrete ways to check the width and mono compatibility of your master. A correlation meter shows you how much the left and right channels of a song have in common. A value of +1 indicates a mono signal, while a value of -1 indicates a purely antiphase signal – something that will disappear entirely in mono. For a wide, spacious mix, values between about 0.5 and 0.75 are normal.
Vectorscopes can show you how spread out or in what direction your mix is leaning. Here, a vertical line indicates a mono signal, while a horizontal line indicates a purely antiphase signal. Well-balanced stereo signals tend to make interesting clouds and shapes, and in general, as long as those shapes are taller than they are wide, things are good.
I tend to check my master in mono frequently, listening to whether important elements have disappeared or been greatly reduced in level. If they have, that’s a clue that something is awry, but these two meters can provide a good first warning that something’s wrong and remind you to check in mono if you haven’t already.
Loudness history graphs
If you have a meter that gives you a pictorial view of your different loudness metrics over time (such as the one pictured above), it can give you an easy way to gauge your song’s musical dynamics over time, and see which sections may be contributing more or less to the integrated level.
Luckily, iZotope makes Insight, a metering system that can display all of these and more – and in a customizable, resizable interface too. If you’re looking for a comprehensive all-in-one meter for mixing and mastering, you’ll be hard pressed to find a better one.
4. Start mastering with only three (or four) tools
While building a complex mastering chain can be a lot of fun, and is occasionally necessary, more often than not you will only need these three tools to achieve a great master: EQ, compression, and peak limiting at the very end of the chain. That’s it. These processors form the foundation of mastering and by adding much more it becomes increasingly easy to overprocess your song.
What are the basic steps of mastering?
In the words of Ian Shepherd, “Mastering isn’t easy, but it is simple.” The basic steps are:
- Set your level with a limiter at the end of the chain
- Adjust the tonal balance with an EQ at the beginning of the chain
- Tame dynamics, enhance groove, or add color with compression in between the EQ and limiter only if needed.
We’ll get into some of the details on just how to do that below.
Limiting yourself to just those three tools may feel restrictive, but used wisely there’s a lot that can be accomplished with them. Take stereo width adjustments for example. Any EQ with mid/side capabilities can help you widen or narrow different frequency regions of your mix. By boosting the side channel and/or cutting the mid channel you can make the frequencies under the curve wider.
Conversely, by boosting the mid channel and/or cutting the side channel you can make the frequencies under the curve narrower.
Be careful, of course, because you can easily change the mix’s intention, but the difference between a multiband stereo-width plugin and an EQ used well in mid/side mode is not as big as you’d think.
Tool #4: Ozone Master Assistant
Ozone 12 can make the first mastering pass easier if you’re just starting out. For instance, you can use the Master Assistant to get you in the ballpark of what your mix.
And while it can help you start your mastering process, its real strength is in using it to teach you how to master.
See what it’s cutting and emphasizing in the EQ. If you like the sound of the results, ask why these EQ changes are working. See how it does in manipulating width, dynamics, loudness, and vocal balance. The same deal applies: if you liked the results, examine why and how they work.
5. Set level first with limiting
This may feel counterintuitive if you’re new to mastering – I know it did for me when I started – but by first setting something close to your final level with a limiter you set yourself up for success. There are several reasons for this.
First, the way in which we perceive tonal balance is very dependent on the level at which we’re listening. The short version is that at louder levels we perceive more bass and treble so by listening at lower levels you may boost those frequencies unnecessarily. Now sure, you could just turn up your monitor gain to compensate, but…
Second, and perhaps more importantly, the way your limiter reacts when you’re at or near your final desired level will likely tell you a lot about the approach you need to take upstream with EQ and compression.
Third, since the limiter will inevitably have some impact on the sound, it really does make sense to work “into” it so you can hear your EQ and compression moves in the context of the final limited version. Put all three of these together and I think you’ll find that you can achieve better, faster, more natural sounding results by starting at the end.
First: Limiting
Yes, when you start the master signal chain by using a limiter, you do lose that dramatic moment of making the tune louder at the very end of the process. But let’s be honest, that was always a cheap thrill anyway. You also get a sense of a song’s innate loudness potential earlier in the process – and believe me, every tune has one. This impacts your upstream choices, giving you more of a structure to work within.
But if you’re limiting straight away, won’t you hit the limiter too hard? Won’t you introduce distortion into the signal immediately? Sure, you may notice some distortion at this phase. But now you can use the other tools at your disposal – the compressor and the equalizer – to avoid these distorted artifacts. This, in conjunction with corrective tonal choices, becomes the crux of your work.
Setting the limiter at the outset
For example, if the kick drum is breaking up and distorting, you know you’ll likely need to address that with a combination of a low frequency cut and some compression.
Next: Equalization
At this point, I like to circle back to the EQ at the beginning of my chain. By having things at the right level you can gauge EQ moves accurately, and the way the limiter reacts may give you some clues about problem areas.
As you presumably have some knowledge of how to mix, your final mix probably sounds good already. Your job now is not to make it sound better, but to allow the mix to shine across all sorts of listening environments and platforms. You do this, as a rule, by implementing very subtle moves – a 1 dB cut at 800 Hz or so if it’s nasal, a subtle shelf of 1 dB at 8 kHz if it’s too dull, for example. This is an area where checking your references can be very useful.
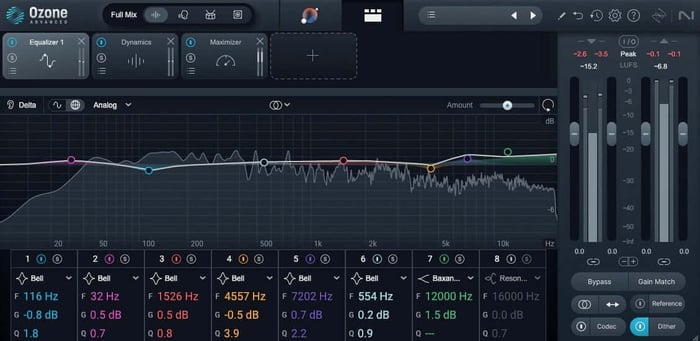
EQ settings to improve translation, openness, and reduce limiter distortion around 116 Hz
Just as you can use a compressor to keep the peak limiter from being overworked, you can also use the equalizer to back off frequency ranges that cause the limiter to clamp down in a particularly distorted manner.
Lastly: Compression
You’ll use compression in one of two ways: to control the dynamics of the material or to add color. For tips on how to achieve the former, see this article on avoiding compression mistakes – particularly the section on how to fine-tune attack, release, ratio, and threshold controls. Both processes should help you tame distortion before the limiter, as the dynamic range will be addressed either way, and the limiter won’t have to work as hard.
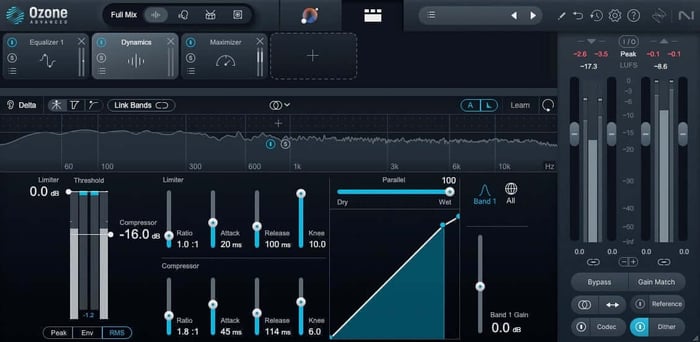
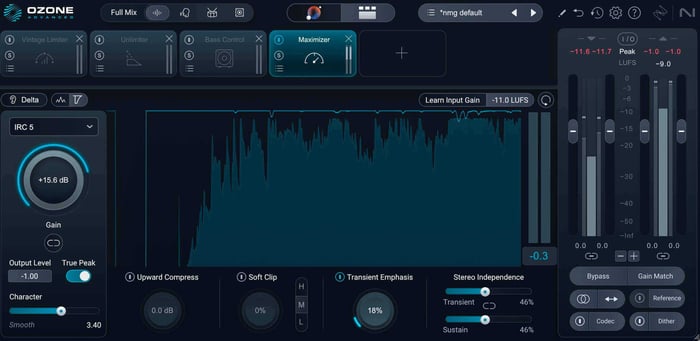
Ozone Dynamics dialed in to improve punchiness and limiter behavior
One philosophy I find works well here is to use your dynamics processors – compression and limiting – in an accelerating manner. In other words, start with slower attack and release times with your compressor, allowing it to work on the body of the sound while leaving the peaks nearly untouched. This lets your limiter react more quickly and in a manner that’s less likely to distort.
6. Level match your master to your mix
Since level plays such a major role in how we perceive sound, it’s crucial to put your master, references, and mix on a level playing field when comparing them. A mastering suite like Ozone makes this a breeze, but if you’re mixing and matching plug-ins, try the following:
Put an unprocessed copy of your mix on one channel and your master on another so that they’re time aligned. Then feed both of these into an aux or group channel, and place a loudness meter on this aux. Obviously, while you’re working on your master you’ll need to solo the appropriate channel.
Once you have your master to a place where you feel happy with it, switch to the unprocessed mix and loop the loudest part of the song, noting the short term or integrated loudness reading of the unprocessed mix. Then, switch back to the mastered track and bring its fader down until you’ve achieved the same meter reading as the mix.
Note that I said to level match your master to the mix and not the other way around – if you were to boost the mix, you’d hit the digital ceiling and run into some unpleasant clipping. You may also want to increase your monitor gain by the same amount that you’ve lowered your mastered track, so that you’re hearing things at the same level.
Now, solo between the mix and the master to hear if what you’ve done has been an improvement, or if it’s made things worse. If something sounds too squashed or distorted, it’ll jump out here, and you can back off your compression, or make limiter-based equalization decisions (i.e. backing off 100 Hz or so if the kick triggers the limiter too hard). You may even find that you’ve pushed too hard into the limiter and that you need to back that off a touch.
When you’re happy with your results, reset your monitor gain and the fader on your mastered track, and proceed to the next step.
7. Level match your reference track to your master
Much like you did before, set up another track with a reference mix on it or import a reference track into Ozone. Now, level match that reference track to your master in the same manner as above. Track referencing is an incredibly helpful tool to keep in your back pocket for times when your ears are getting a bit fatigued.
As you switch between the reference track and the master, you can make aesthetic decisions regarding EQ. Does the reference feel brighter than your master? Then go ahead and try to match it with a subtle shelf. Does it have cleaner low mids? Try a dip in midrange to uncloud the master. Check compression as well: Does the master feel more squashed than the reference mix? Pull back on the compressor, or don’t hit the limiter so hard.
Compare your master to reference tracks in your genre
A great way to check if your master is “playlist-ready” is to line it up against commercial tracks in your genre. Does your song feel as loud, clear, and balanced as the others?
Ozone 12 makes this easy with its Reference panel. You can load in your favorite mixes and quickly switch between them and your track to hear the differences. The visual meters in Ozone can also help you spot where your track might be lacking in low end, brightness, or width compared to the references.
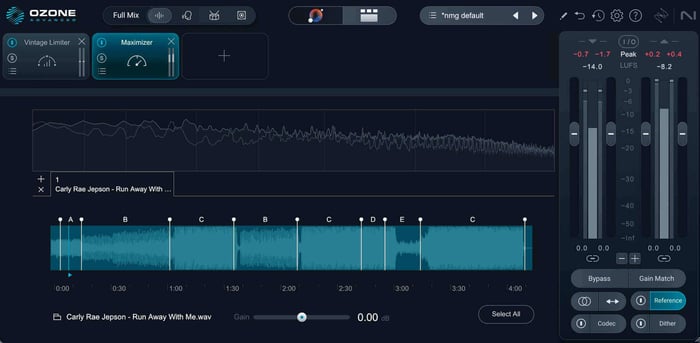
Ozone 12 reference panel
8. Translation is key
It’s a mixing engineer’s job to make the mix as good as it can be. A mastering engineer’s job is different in one key way: the mix (or group of mixes) must sound good in as many disparate rooms, cars, headphones, etc. as possible. Thus, you must make sure your master translates to various places by optimizing playback across different systems.
How, as a novice, can you do this? By employing every monitoring environment at your disposal. Work off your trusted rig, for sure, but then monitor the mix any which way you can, including through studio cans, computer speakers, laptop speakers, clock radios, your car, your best pair of consumer headphones, and your worst pair of earbuds. Buy terrible speakers for the sole purpose of monitoring in terrible conditions. Seriously – it’ll go a long way.
This next bit is important, and it’s where many engineers in this position can get helplessly and hopelessly lost in the maze of too many playback systems: find the average here and look for consistency, not perfection.
If you’re consistently finding everything harsh on consumer-grade headphones, well, you may need to tame that high end. If your midrange is underrepresented on all your smaller speakers, you need to give it some juice. Don’t forget to bring your references along for the ride, too. If your master sounds a bit nasal on a particular playback system, but so do all the references, that’s a problem with the playback system, not your master, and there’s no need to play whack-a-mole there.
9. Monitor consistently
For your primary playback system it’s crucial to have a fixed monitoring level, as listening at different levels can lead to inconsistent processing choices and ear fatigue. You might boost the lows and highs when listening quietly, then turn up the level, decide the mix is too scooped, and wind up boosting the mids; you could’ve left everything alone in the first place!
Your monitoring level should be comfortably loud – as in, loud enough to hear an accurate representation of the low and high ends of a piece of well balanced music, but not so loud that you fatigue your ears. Some engineers prefer 80–83 dB SPL, although in many small, undertreated rooms that can border on too loud, and 70–73 dB SPL may be more appropriate.
Whatever you choose, a fixed – or at the very least, repeatable – monitoring gain will help you make objective decisions, because it will be a permanent point of reference in your studio. You’ll begin to know, over time, that if a master sounds good at this level, it will translate to other systems at other levels. Moreover, if a master sounds loud, or quiet, at this monitor gain it probably is loud or quiet.
It’s also useful to have a monitoring level about 12–20 dB quieter on hand (often called a dim position), to make decisions about how the master sounds when listened to more quietly. Flick to this setting occasionally, and then come back. You can set one up in your DAW with any simple gain plug-in; just be sure to leave it off when you bounce (export) the audio file.
10. Rinse and repeat
Mastering engineers, as a rule, tend to work very quickly. It makes sense: working quickly helps you stay objective. You can’t fall prey to the perils of auditory habituation if you don’t give yourself the time to habituate – and it can happen astonishingly quickly! One way to work fast and achieve good results is to cycle through these steps again and again, making quick, bite-sized changes.
It might look a bit like this: I’m happy with the level I’m getting out of the master but notice the low-mids are getting a bit crunchy through the limiter, so I move to the EQ and pull out a dB or so at 115 Hz. That helps, so I move to compression to dial in some initial settings and see if I can take a little more load off the limiter. Great, that’s helping things feel more punchy and dynamic. Can I get a little more ultra-low end out of it now? Back to the EQ. 55 Hz? Too chesty. 40 Hz? Not quite. 32 Hz?! Wow! That’s low but it feels good! Can I balance that with a little more midrange presence around 1.5k Hz? Yeaaaahhhh, that’s nice.
Ok, let’s jump back over to the compressor and see if we can fine tune the attack and release times to get things grooving even more. A few little tweaks and things are feeling even better, although I’m noticing a little upper-mid harshness, so back to the EQ to take a touch out around 4.5k Hz. OK, let’s check in with one of the references. Definitely close, maybe we could use a little midrange warmth and some sparkle and air on the master, so back to the EQ…
I’m feeling pretty happy so I’m going to take a break, check some emails, maybe make a cup of coffee, and come back in ten minutes when my ears have had a little break. Maybe I’ll find I’m happy, or perhaps make one or two additional tweaks, but by avoiding getting completely in the weeds and trying to perfect the EQ before I even think about compression, I’ve been able to move quickly and get to a natural sounding result quite quickly.
How do I get good at mastering?
As with so many things in life, there are no shortcuts here. Repetition is absolutely key in achieving good, repeatable results. There are a few things that help though:
- Get to know your monitoring environment intimately. To master effectively you have to be able to trust it explicitly. That includes monitoring levels, as discussed above.
- Listen to a lot of music in your main monitoring environment, at your main monitoring level. Work on developing an innate sense of what sounds good, and what doesn’t.
- Stick to the basics of EQ, compression, and limiting until you know them inside and out before moving on to fancier tools, and…
- Master as many songs as you can get your hands on. Remaster the same songs, trying different approaches to see what works and what doesn’t. Rinse and repeat.
Bonus tips
Check for errors
This requires its own dedicated listening pass with revealing headphones. Listen for clicks, pops, artifacts, issues that might be a problem. If you have RX, you can use the standalone app to surgically remove these issues – though how to do so comprises its own topic worthy of a dedicated article.
This illustrates a key fact about mastering: it’s not stereo bus processing. There’s far more involved, like finding and fixing potential issues.
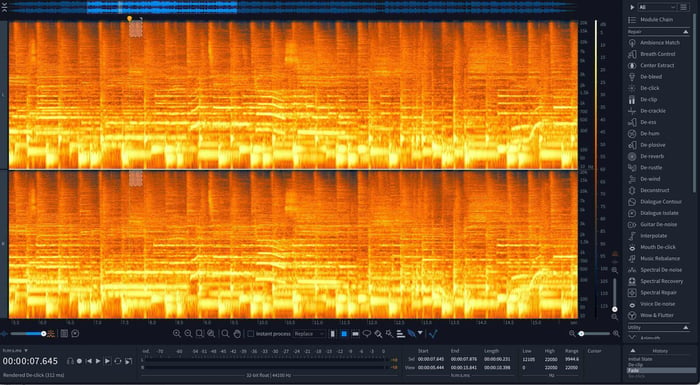
A spectrogram in RX with a bit of high-frequency gunk selected for removal
Make someone else the client
It’s tough to stay objective when you’re both the producer and the mastering engineer. To get around this, “deliver” your master to someone you trust – whether that’s a producer friend, a DJ, or just someone with good ears. Ask them if it feels finished, balanced, and competitive.
If you don’t have a collaborator handy, try stepping away for a day and then listening fresh, or play it in a different environment (like your car) to hear it as a listener would.
Export and dither
Once you’ve gotten the master how you like it, it’s time to bounce, render, or export the file. There are a few considerations here, and they can get complex quickly, so let’s cover the basics.
For most streaming masters these days, you can submit hi-res files – although one or two aggregators still require 16-bit, 44.1kHz files. Hi-res masters should be 24-bits at the same sample rate as the mix. If you’re planning on making CDs, those will also require 16-bit, 44.1kHz WAV files.
You’ll also need to apply dither to the final master, and if we had another 3,000 words, I could explain why. We don’t, so I’ll just refer you here. In the event you need both hi-res and CD versions, it’s easiest to export at the mix sample rate with 32-bit floating point bit-depth. Then you can use a tool like RX to apply sample rate conversion and dither to 24 or 16 bits as needed.
Start mastering with confidence
You may notice that we didn’t touch much upon stereo widening, multiband compression, saturation, expansion, or other such tools.
Why did we save these topics for other articles? First and foremost, it’s important to master the fundamentals of EQ, compression, and limiting before moving on to other more advanced techniques. Additionally, as often as not those tools are all you’ll really need! It’s our hope that this article will provide another useful perspective on your journey to audio mastery.
Start mastering your tracks today with Ozone 12 for a release-ready sound.