What Is Audio Compression? Everything You Need to Know
Master the art of compression in mixing and take your audio to the next level. Learn the fundamentals of compression, including how to use compressors, setting attack and release times, and sidechain compression techniques.
Of the five principle tools at our disposal when crafting a mix—level, panning, EQ, compression, and spatial effects like reverb and delay—compression is by far the most mysterious. When should it be used, does every track need it, how much should be applied and with what settings, and my personal favorite, “is this knob actually doing anything?” We’ve all been there and it can be frustrating.
In this article we will attempt to clear up the compression confusion once and for all. We'll answer the question, "what is compression in music?" We will also discuss the basic compression parameters and demonstrate a few of the most common compression techniques that you can put to use today in your mixes.
Follow along with iZotope


Neutron
What is audio compression?
Audio compression allows us to control the dynamic range—the difference between the loudest and the quietest moments of a signal—by reducing its level when it rises above a specified threshold. There is a common misconception in audio that compression is a tool used in mixing to make things louder, when in reality it makes things quieter.
The parameters of a compressor allow us to control when the gain reduction of a signal happens, how quickly that gain is reduced, the amount that it is reduced, and how quickly it stops being reduced.
If we understand how to manipulate these parameters we can level the dynamics of a performance, add punch to a drum kit, add bite to a guitar, bring excitement to an entire mix and much more.
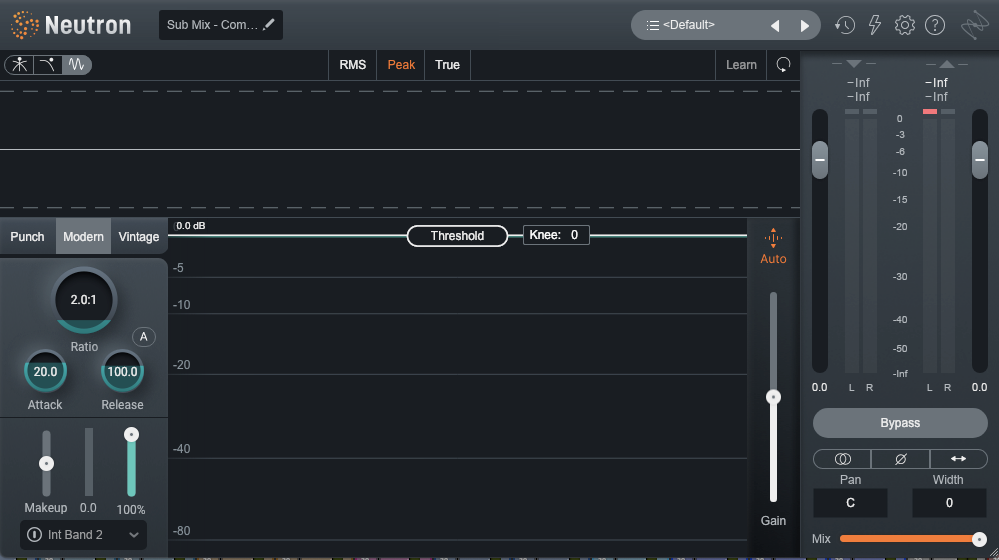
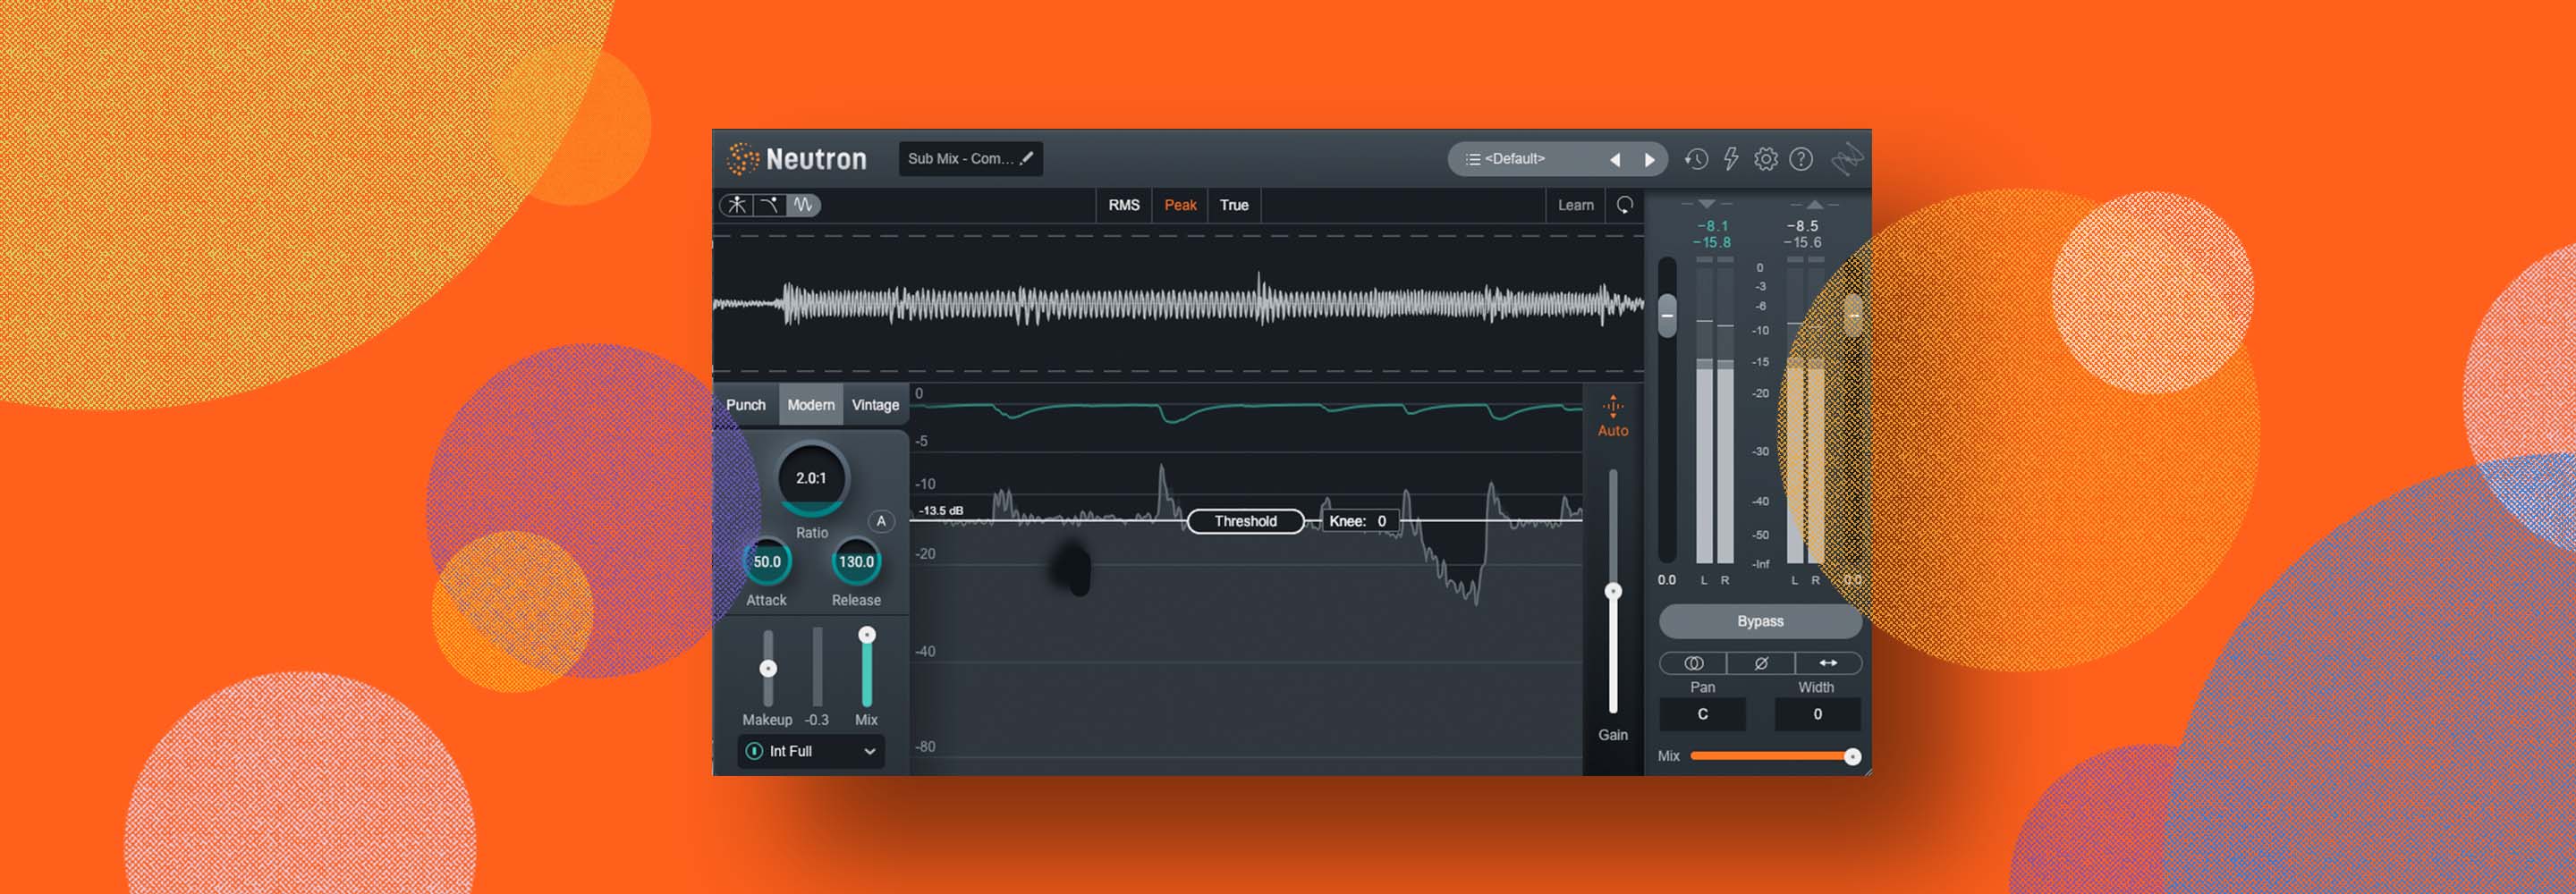
Stereo compressor in Neutron
Compression parameters
Threshold
A compressor’s threshold setting allows us to set a level, measured in dBFS (decibels relative to full scale), at which the compressor will begin to act on a signal.
Audio that rises above the threshold will trigger compression, audio that falls below the threshold will not.
Ratio
Once a signal has risen above the threshold, the ratio setting controls how much it is turned down. The amount it’s turned down is known as “gain reduction”—sometimes abbreviated as GR— and the higher the ratio the more the gain reduction.
This is a simple matter of decibels in to decibels out. For example, a ratio of 4:1 means that for every 4dB of signal above the threshold at the input we will receive 1dB of signal above the threshold at the output.
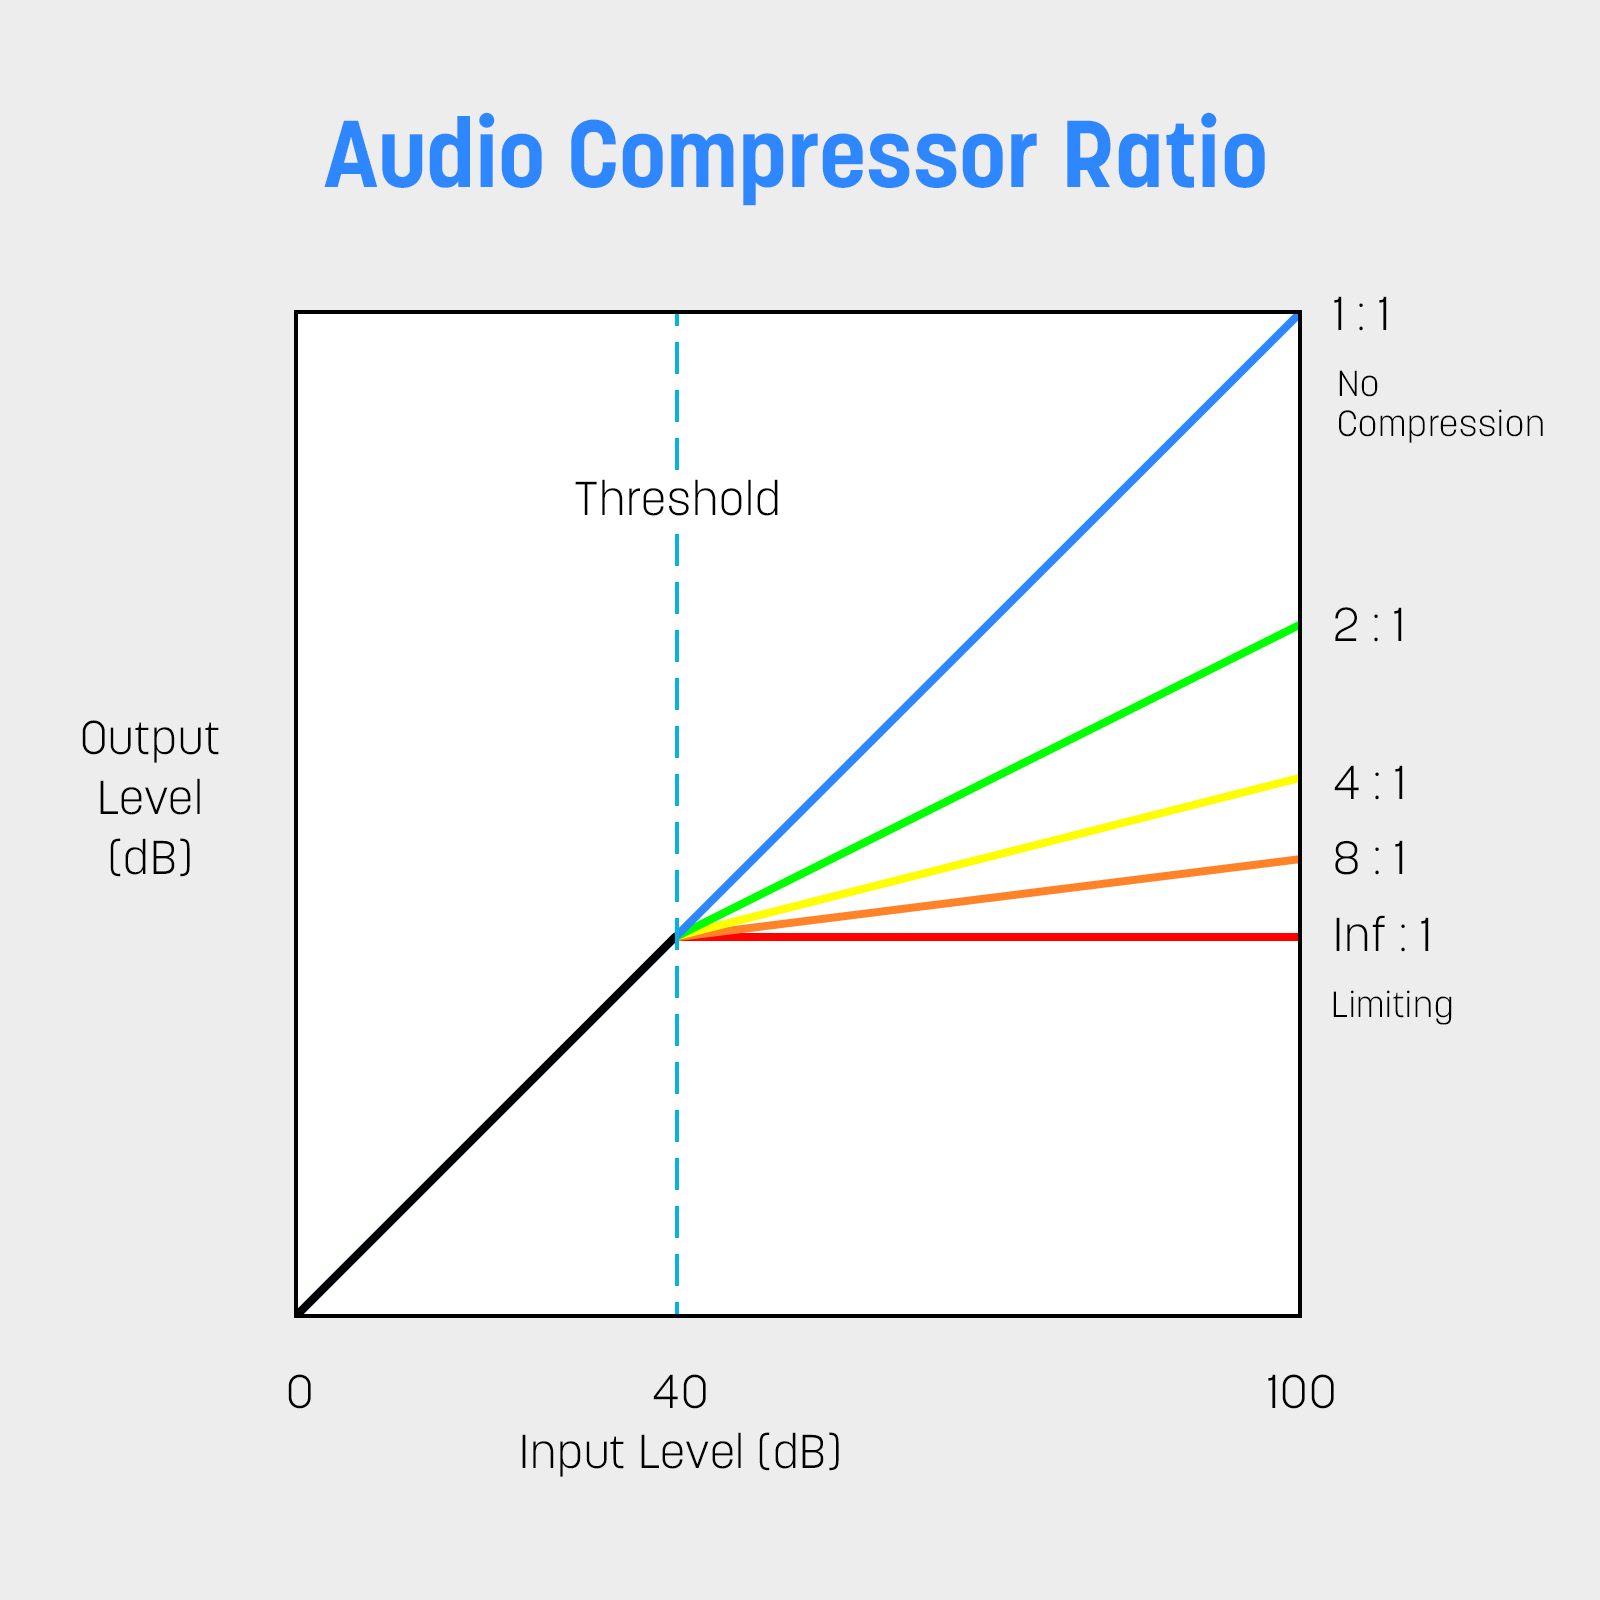
Audio compressor ratio
Here are some examples of what people may mean when they say “low ratio” or “high ratio.” However, keep in mind that this depends a bit on the context of the type of instrument or bus the compression is being applied to.
- Low ratio (1.5:1 - 2:1)
- Medium ratio (3:1 - 4:1)
- High ratio (5:1 - 8:1)
- Very high ratio (10:1 - inf:1)
Attack
Attack is the amount of time it takes for a compressor to reach a specified amount of gain reduction once a signal has risen above the threshold. Sometimes this is ⅔ of the total gain reduction, sometimes all of it. This is part of why the same attack time on two different compressors may sound different.
Below are some common ranges associated with “fast” and “slow” attack times. However, It is important to note that these times are relative to the nature of the signal being compressed, and tempo of the music. In addition, what is considered fast and slow in mastering is typically shorter than what is considered fast and slow when compressing a single instrument. For this reason you will notice some overlap in values. The values shown here are only a generalization meant as a starting point. They should not be taken as absolute.
- Very fast attack (0.1ms - 5ms)
- Fast attack (1ms - 15ms)
- Medium attack ( 3ms - 30ms)
- Slow attack (10 - 100ms)
Release
Once a signal drops below the threshold, the release setting determines the speed at which a compressor returns the signal to its original uncompressed state.
Setting the proper release time is very dependent upon rhythm, tempo, the type of signal being compressed, and the desired effect.
For example, when attempting to smooth out overall dynamics, you may want the release time to be slow and smooth relative to the performance causing it to be transparent. If you are compressing a percussive instrument like a snare drum, you want the release time to be fast enough to stop compressing before the next snare hit. If you are trying to limit only momentary transient peaks, you may want the release time as fast as possible without creating distortion.
Below are some common ranges associated with “fast” and “slow” release times. However, It is important to note that these times are relative to the nature of the signal being compressed, and tempo of the music. In addition, what is considered fast and slow in mastering are typically shorter times than what is considered fast and slow when compressing a single instrument. For this reason you will notice some overlap in values. The times shown here are only a generalization meant as a starting point. They should not be taken as absolute.
- Very fast release (0.1ms - 5ms)
- Fast release (5ms - 50ms)
- Medium release (30ms - 100ms)
- Slow release (50 ms - 100ms - or slower)
One important idea to understand and remember is that attack and release times are not how long a compressor “waits” to start or stop compressing, but rather how quickly it makes gain adjustments. Any time the audio is above the threshold it is constantly “attacking” and “releasing.”
Knee
The knee affects how a compressor responds to a signal as it approaches the threshold. Up to this point we have explained that a compressor will only react to a signal once it has risen above the specified threshold. This type of response would be considered hard knee, and is true for most compressors.
However, some analog leveling amplifiers like the iconic LA-2A react to a signal with what is known as a soft knee, and some compressor plug-ins (like iZotope Neutron) offer a knee parameter that is adjustable from hard to soft.
Using a soft knee will cause the compressor to gradually begin compressing a signal, increasing the ratio smoothly as it approaches the threshold, and in effect creating a more gentle transition and a more transparent sound.

Illustration of soft and hard knee
In iZotope Neutron the knee is only available when Modern processing mode is enabled. A higher values create a “soft knee” effect, while the lower value creates a "hard knee" effect.
Makeup gain
Once a signal has been compressed, its overall level will be quieter. Makeup gain is a level control at the output of the compressor which allows for the compressed signal to be turned back up in order to compensate for the gain reduction caused by the compression.
Due to the fact that what we perceive as louder always sounds better to our ears, it is important to adjust the makeup gain of a compressor so that the compressed signal is the same level as the uncompressed signal when the compressor is in “bypass.” This will allow us to compare both signals accurately and make a proper assessment of our work within the context of the entire mix.
Common uses of compression
Dynamic smoothing
One of the most common uses of compression in music is to level out the overall dynamic range of a performance by bringing down the louder moments to in turn bring up the quieter moments in order for it to sit better in the mix.
In this scenario I normally want to apply gentle, transparent compression with about 3–6 dB of gain reduction.
To accomplish this, my starting compressor settings might look something like this.
- Attack: medium (8ms)
- Release: medium to slow (200ms)
- Ratio: medium (3:1)
- Threshold: Set to only compress about 3–6 dB at the loud moments and not at the soft moments
Please note that ratio and threshold both affect gain reduction. The higher the ratio, the greater amount of gain reduction. The lower the threshold, the greater the amount of gain reduction. So how do you know which to adjust? A trick is to think of threshold as the “what” (what part of the signal do you want to compress), and ratio as the “how much.”
Start by setting a very short attack time (1ms), a very short release time (50ms), and a medium ratio (4:1). Next, adjust the threshold until you see the gain reduction meter only react at the loud moments that you want to compress, but not react to the quiet moments that you want to leave uncompressed. Once you find the sweet spot, adjust the ratio to the desired amount of gain reduction and tune the attack and release to be more suitable.
In the example below I have applied compression to a vocal with the following settings.
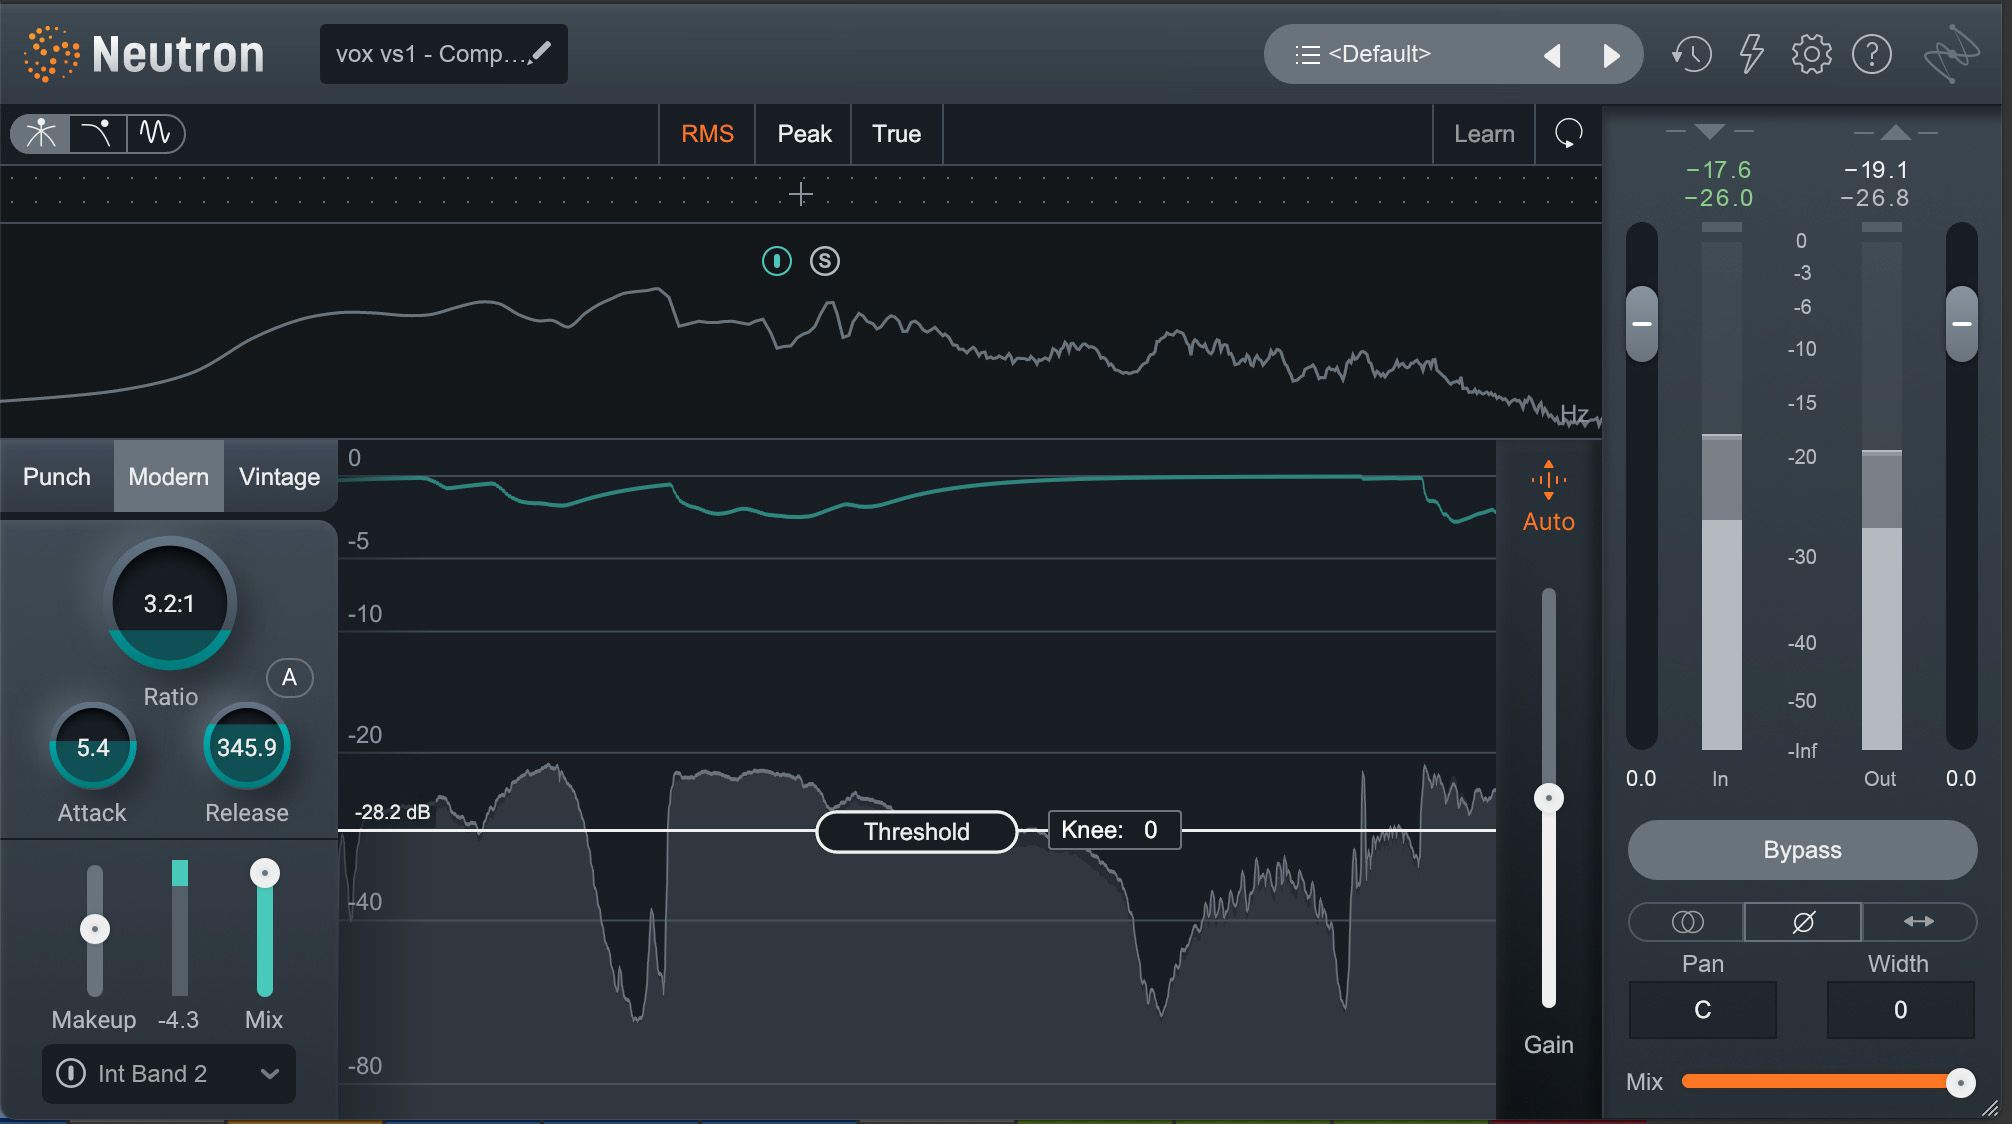
Vocal compressor settings
Here's what the waveform of the vocal looks like uncompressed.

And this what the vocal sounds like before and after compression, along with the visual of the compressed waveform.
Vocals Before & After Compression

Waveform of smoothing compression on vocals
It is very subtle, but you should notice that the performance is a bit more even and tighter sounding from start to finish.
Vocal compression tip: If the dynamic range of a vocal performance is extreme—for example, if the verses are sung softly, but the choruses are sung loudly and with force—they will require different compression settings (or at least different threshold settings). For this reason it is best to isolate these parts on of separate tracks in order to process them individually.
Or, if there is one line, or a single word, that stands out above the rest, similar to the last two words of the previous example, “hide behind,” it is best to reduce the level of these moments manually matching the average level of the rest of the phrase, before compression.
Create punch (transient shaping)
A slightly more aggressive use of compression can be applied to percussive elements like kick and snare to create punch.
This is done by setting a slow attack time that allows the initial attack (the transient) to pass uncompressed in conjunction with a low threshold and high ratio for a greater amount of gain reduction (6-12dB)
To add punch to an instrument, my starting compressor settings might look something like this.
- Attack: slow (20-40ms)
- Release: medium (song tempo dependant)
- Ratio: high (6:1)
- Threshold: low
Start by setting a very short attack time (1ms), a very short release time (50ms), a high ratio (6:1), and adjust the threshold until you see about 6-12dB of gain reduction. Next begin slowing down the attack until you can hear that the desired amount of transient, is able to pass uncompressed. Too short and the transient will sound pinched and lack low end. Too long and you will not achieve the desired amount of punch. I usually find the sweet spot somewhere between 20 and 40ms.
Let's hear what adding punch with compression sounds like. I have applied compression to a kick drum with the following settings.
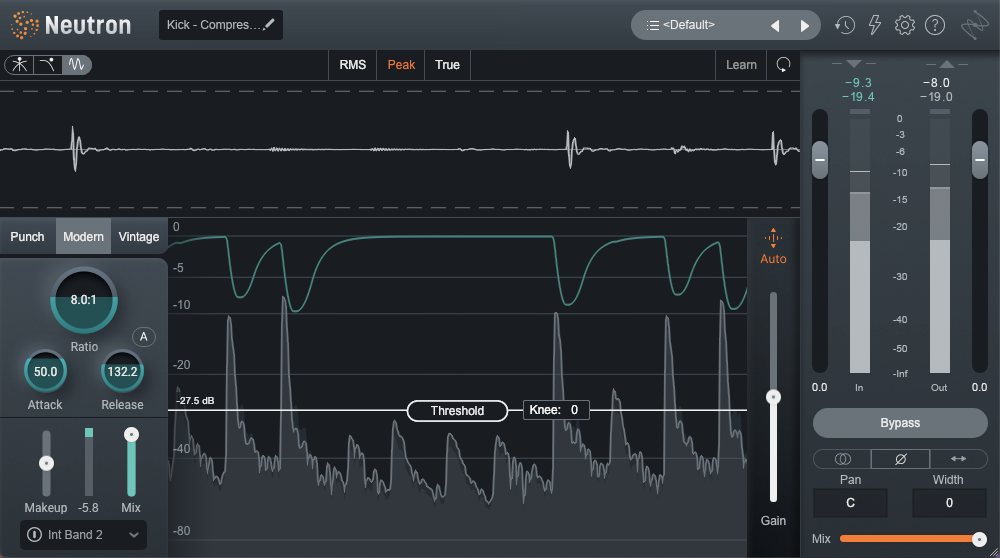
Adding punch compression settings in Neutron
Kick Drum Before & After Compression
Although subtle, you will notice that the attack of the kick is just a bit tighter, and the hits a bit more even.
Let's look at adding punch to another instrument in the mix—the snare drum. In the example below I have applied compression to a snare drum with the following settings.
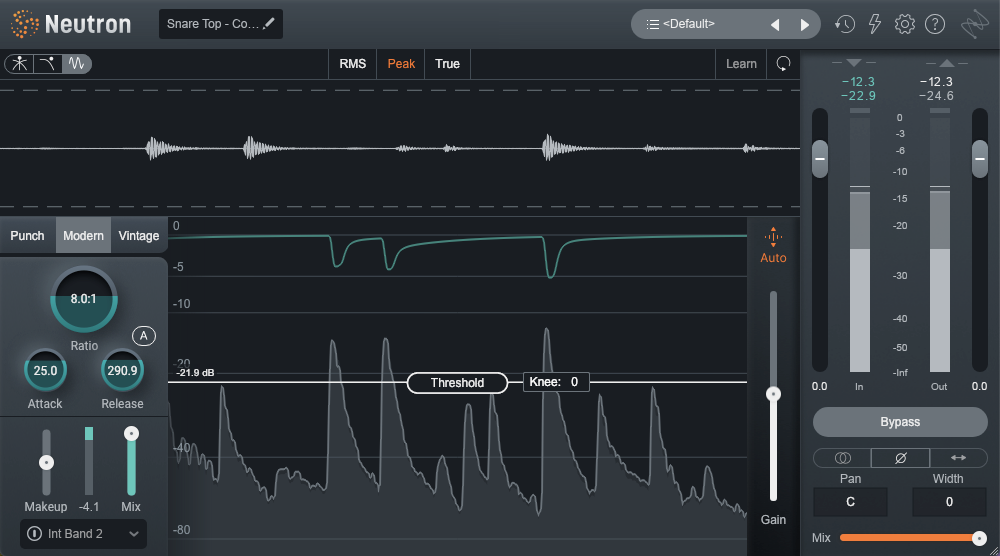
Adding punch to the snare drum with compression
Snare Drum Before & After Compression
Notice that the attack of the snare is just a bit tighter and more even after using compression.
Now let’s listen to it in context with the entire mix.
Snare In the Mix, Before & After Compression
It may be subtle, but notice how the attack of the snare is just a bit tighter and more even. You’ll also notice that the sustain of the snare, the ghost notes in between the main beat pattern, and the bleed of the kick is a bit louder. This is due to the applied makeup gain to compensate for the gain reduction of the compressor.
Crushing room mics
One of the more fun techniques is over compression of room mics. This is done with the intention of removing transient information, extending sustain, and sometimes adding distortion with the effect of adding excitement to the drums and making the room sound bigger. This technique is most often used in rock but as with anything, if the song can benefit from it, go for it!
To accomplish this, my starting compressor settings might look something like this.
- Attack: very fast (0.1ms)
- Release: medium (adjust until you achieve the desired amount of sustain or pumping you desire)
- Ratio: high (10:1)
- Threshold: very low
In the example below I have applied compression to a pair of room mics with the following settings.

Crushing room mics, compression settings in Neutron
Room Mics Before & After Compression
Not at all subtle. What you should notice is that the transient has been suppressed, the sustain of the kick drum has been extended to swell between hits, and there is a touch of distortion.
Listen to it in context with the rest of the drum mix as well. Can you hear the rock influences in the sound?
Overheads in Drum Mix, Before & After Compression
Sidechain compression
In most cases, the signal sent to a compressor to be compressed, is the same signal that triggers the compression. However, there are times where we may want to use a different signal to trigger the compression. For this reason, some compressors have a second input called a key input, or external sidechain input. This allows us to send one signal to the audio input of a compressor to be compressed while sending a different signal to the key or sidechain input to trigger the compression. This technique is called sidechain compression, or sometimes simply sidechaining.
For example, this is a common technique used in EDM in order to create that classic pumping effect.
To set up my DAW I applied the following routing steps.
- First I sent the kick drum and the claps to the main output of my DAW uncompressed.
- Second I routed the rest of the instruments to a stereo auxiliary track consisting of a stereo compressor with a key input.
- Third I used a pre-fader auxiliary send to feed the kick drum signal to the key input of the stereo compressor. This causes the instruments going through the compressor to only compress when the kick drum hits.
- Finally I routed the output of the auxiliary track to the main output of my DAW to be mixed back in with the uncompressed kick drum and claps
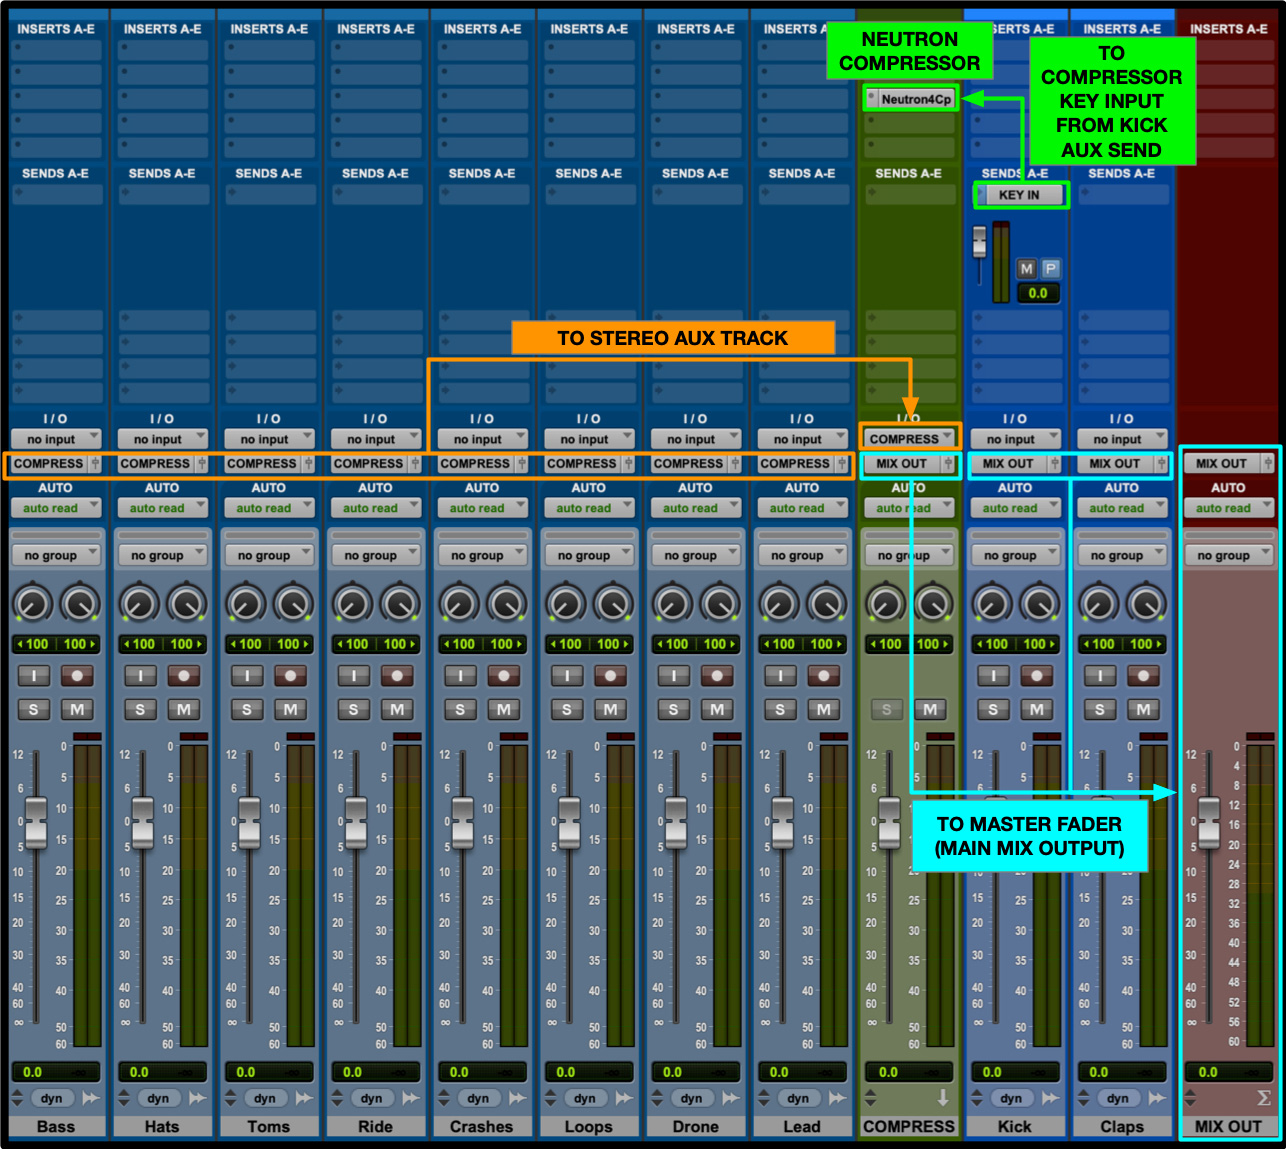
To set my compression parameters I applied the following steps:
- I set the attack time to .1ms (100 microseconds)
- I set a high ratio of 6:1
- I set a release time of 175ms (In time with the tempo of the song so that there is no more gain reduction just in time for the next kick drum hit)
- I pulled down the threshold until I reached my healthy amount of gain reduction. In this case I went to 14 dB of gain reduction. This is to taste and is different in each situation.
- Lastly, I slowly increased the release time until the compressed signal was able to return to its uncompressed state just before the next kick drum attack.
To demonstrate this style of sidechain compression I chose to compress my entire mix apart from the kick drum and the claps, however, I could have applied this to a single track, only a few tracks, or the entire mix. It all depends on the effect that you want to create.
In the example below I have applied side-chain compression to a mix with the following settings.
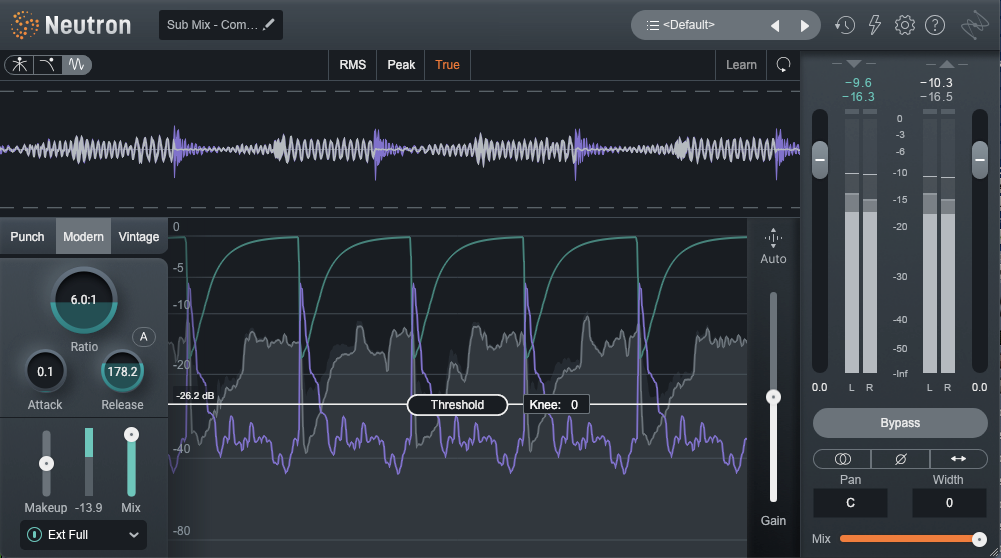
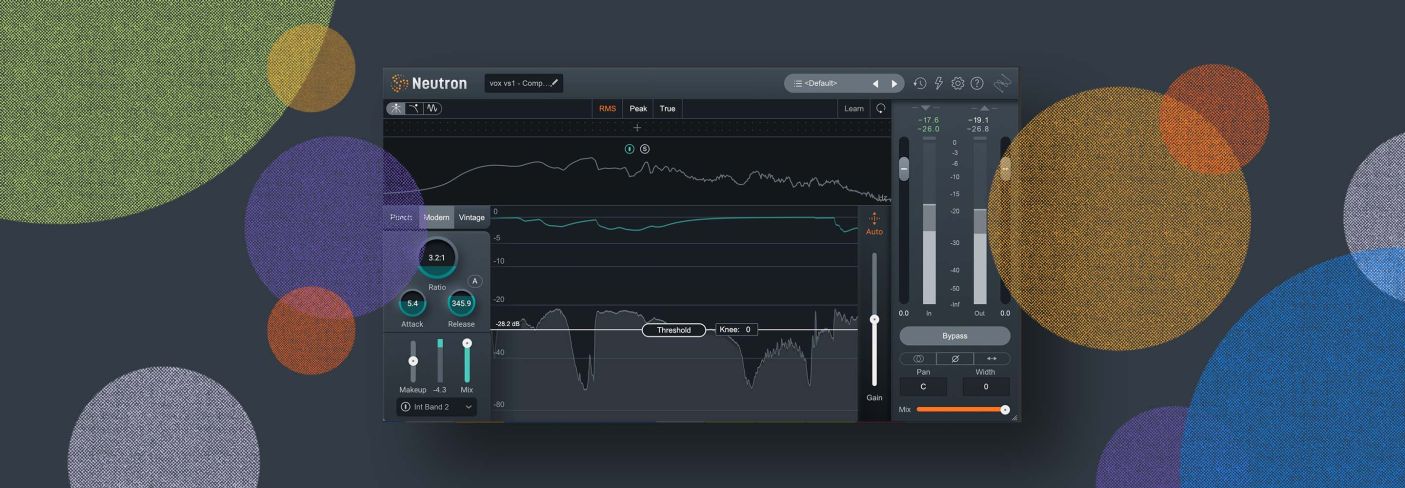
Sidechain compression settings in Neutron
Mix Before & After Sidechain Compression
Start using compression in your mix
In this article we have touched on two very common uses of compression; dynamic smoothing and transient shaping (adding punch), as well as two creative uses of compression; exaggerated compression of room microphones in a drum mix and side-chain mix compression. Although we have only scratched the surface on all the various uses of compression, I hope this article has helped unveil some of the mystery and set you up with a foundational baseline of understanding so that you can start making meaningful enhancements to your mix with confidence.
It takes time and it takes practice and yes, it can be challenging. But, what it should not be, is scary, unless of course that is the effect you are going for!
And whether you're trying out these concepts in your DAW for the first time or trying to dial in your compression techniques, iZotope Neutron is a powerful, intuitive way to compress your tracks.
