
Table of Contents
EQ is a fundamental tool used by audio engineers to shape the sound of music, voice recordings, and other audio content. With equalization, you can boost or cut specific frequencies to make certain elements of the audio stand out more clearly, to make the overall sound more balanced, or to add certain tonal qualities to the audio.
EQ can be tricky to understand, so before we dive into the technicalities, listen to a piece of music and ask yourself some questions. How does each instrument sit with you? Listen to how the bass hits you in your gut, and to how the cymbals draw your attention from one side to another. Notice how the reverb extends and elongates notes. What words do you use to describe what you hear? Bright? Full? Harsh? Smooth?
As this article takes you on a technical journey through EQ concepts and terminology, referring back to this listening experience will ultimately let you make good use of the information that follows.
Now let’s get started. if you don’t know the first thing about EQ (the shorthand of “equalization,”) this one’s for you.
Follow along with this tutorial using iZotope Music Production Suite that contains multiple professional EQs in Nectar, Neutron, and Ozone that can help you achieve your desired sound.
What is equalization (EQ) in music?
Equalization (EQ) in music is the process of adjusting the level or amplitude of specific frequencies to achieve a clear and balanced mix.
All music is merely the combination of sound waves vibrating at various frequencies. All sound can be described in terms of its frequency, as frequencies determine a note’s pitch.
A frequency vibrating at 440 Hz is the note “A” in modern western musical tuning.
A 440 Hz in Insight
That’s A 440 Hz measured on a frequency analyzer in Insight 2 . It measures at 440 cycles per second, also known as 440 Hz. We measure frequencies in either Hz (Hertz) or kHz (kilohertz). It’s named after the dude who first proved the existence of electromagnetic waves – but you don’t have to worry about that.
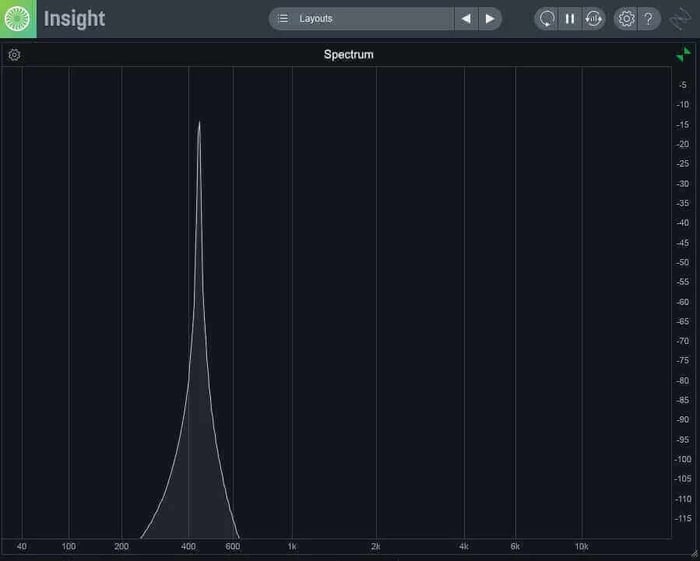
Do remember that music contains much more than one frequency at a time. If I pluck an open A-string on my guitar and run the result through a frequency analyzer, you’ll see more than a thin needle spiking at one specific frequency. You’ll see a multitude of frequencies.
Frequency spectrum of a guitar string pluck in Insight
This has to do with many factors. The construction of every instrument contributes to its particular harmonic content – the way the wood is bent changes the amplitude of the frequency content.
If I played a note on one guitar, it would not have the same metrical make-up as another. In the case of the screenshot above, the room also contributed a harmonic coloration all its own. It threw its own unique signature into the mix.
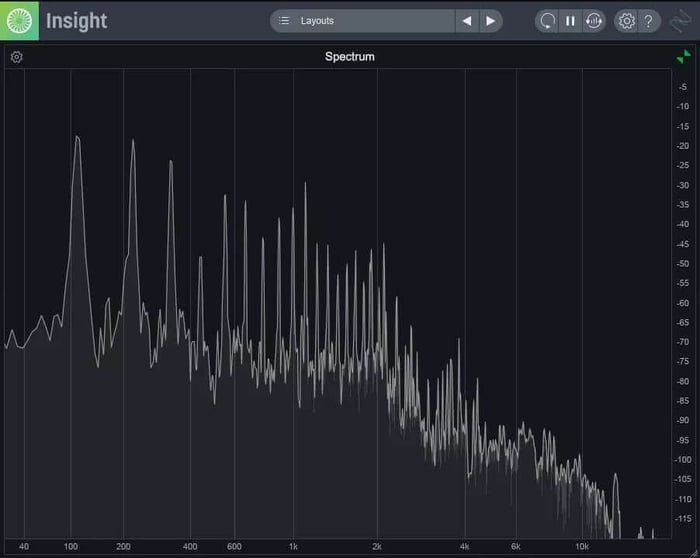
That’s just one note on one guitar. What happens when we run music under a frequency analyzer?
Frequency spectrum of music in Insight
Yeah, that’s a lot of frequencies, all happening at once!
And now we can get to what an EQ is, in simple language: you know the volume controller on your phone? The buttons that make the music louder or softer? An EQ is basically like that – a volume knob, but for individual frequencies.
That’s a little too basic, so I’ll dive deeper:
EQs allow you to focus on a select group of frequencies, giving you the ability to choose how this group is affected. You can grab a bunch of frequencies and turn them up (“boost,”) or select only a few frequencies, and turn them down (“cut.”)
When to use EQ
EQs can be used for a variety of different ways to correct problems or as a sound design tool in your mix. Typically, EQs are used for the following operations:
- EQs address frequency masking issues. Frequency masking is the “muddiness” that occurs when instruments with overlapping frequencies clash with each other, making it difficult to clearly perceive simultaneous sounds. Do you have problems hearing the kick drum over the bass guitar? That’s a job for an EQ.
- EQs also identify and fix problematic frequencies: sometimes you may find annoying resonances or harsh sounds that were captured during recording or processing. Do you hear one annoying ringing resonance on your snare drum? An EQ can remedy this.
- EQs can be used to sculpt an audio signal’s timbre, acting as a creative sound design tool to achieve a desired sound effect.
- With new advances in DSP, EQs are now routinely used to sculpt the transient portion of a signal (the initial hit) from the sustaining part (everything that comes after the initial hit). This has opened up a whole dimension in how to use EQ. We’ll talk about this in its own subsection.
EQ parameters
The parameters in an EQ are used to adjust the character of filters that will boost or cut frequencies. Common parameters you’ll find include:
- Frequency: Selects the frequency you want to boost or cut (attenuate).
- Q: Controls the bandwidth – how wide or narrow the boost or cut will be. In other words, you can determine the range of frequencies that will be affected by the equalizer. Higher Q values will give you a narrower bandwidth, while lower Q values will allow you to boost or cut a wider range of frequencies.
- Gain: Determines how much of the selected frequencies are cut or boosted. Think of it as a level knob for selected frequencies.
- Filter type: Allows you to choose the shape of the filter for the selected frequency band.
- Filter slope: Sets the steepness of certain filters (like a Q control, but for specific filter types).
We’ll get into more detail with these parameters in action below.
How to use different types of EQ in music
When equalizing, you will have to make small adjustments all the time, since the frequencies and respective ranges of every instrument becomes interdependent in the context of a mix. In general, you want to preserve or emphasize the characteristic frequencies of a given sound (guitar, kick drum, etc), while curtailing frequencies that get it into trouble with other instruments, or just don’t sound good on their own.
We classify a group of frequencies as a “band.” We can refer to frequency bands generally: “bass,” “low-mid,” “midrange,” “high-mid,” and “treble.” We can also pinpoint bands as specific ranges: “between 300 and 500 Hz”, “between 1 and 2 kHz.”
In choosing how frequency bands are manipulated, we talk of filter shapes. We say “high-pass filter,” “bell,” “shelf,” and other terms. We qualify the width of the filter, or speak of its slope. We also refer to its amplitude (“boost 300 Hz by 3 dB”).
You’ll use different filter types depending on what you want to accomplish. These are the main types of filters you’ll find in an equalizer:
- Peak/parametric/bell filters
- High pass and low pass filters
- High shelf and low shelf filters
Before we dive into what these look like and what they’re used for, let’s listen to a piece of audio:
This is a piano. Pianos are extremely effective in showing off the effects of EQs, which is why we’re using this sound.
Peak and bell filters
A “bell” or “peak” filter (same thing, different names) is a common type of EQ and is extremely versatile. It can be used to pinpoint a very small range of frequencies, or it can be used in a broader way to adjust tonal character. A peak filter is often deployed in the midrange, for example. It is delineated from other types of EQ by its bell-like shape.
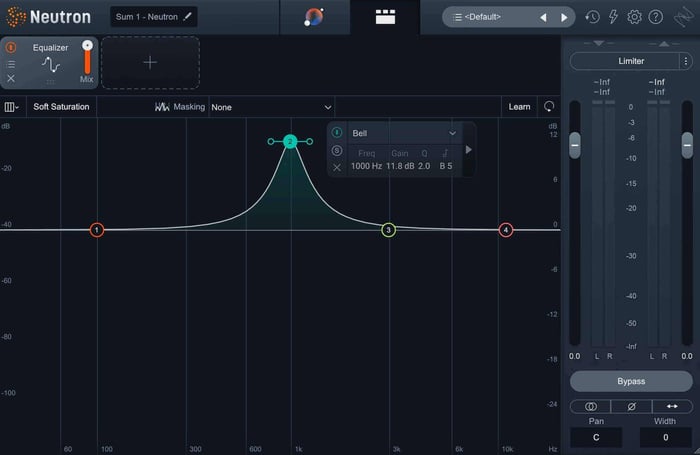
Bell filter at 1 kHz
This particular bell filter sounds like this:
Bell filter
When we talk about making some frequencies louder or softer – when we say we’re going to “cut” or “boost” – we’re speaking about that frequency’s amplitude. As we said earlier, the number of frequencies we can make louder or quieter is dictated by the Q or “Quality Factor” control. The Q point determines the “shape of the bell” or how wide the area around the center frequency is going to be.
Observe the differences among Q values in the following video:
In general, we use wide parametric EQs to enact broader, sweeping changes. Narrow parametric EQs, on the other hand, accomplish more specific tasks, such as resonance control – they’re a great tool for taking out excessive ringing from a snare drum, for example.
High-pass and low-pass filters
High-pass and low-pass filters are fantastic for cutting out whole swaths of frequencies that you don’t want in your tracks – particularly in harmonic, melodic, or otherwise arhythmic recordings.
For instance, many engineers say there’s nothing of note for a commonly-tuned guitar below 90 Hz, so if you notice signal below 90 Hz in your frequency analyzer, you might try cutting out with a high-pass filter, as it could interfere with other instruments that actually make use of the low end. This isn’t always true, of course.
High- and low-pass filters often have slope controls, which can be similar to the Q controls on bell EQs. The slope dictates how steeply or gradually the filter will cut off all extraneous sound.
High-pass filter
High-pass filters cut all the frequencies below a selected cutoff point. They often cut rumbles below 60 Hz out of signals captured with microphones. For the following example, we’ll dig quite a bit higher than 60 Hz so you can really hear what we’re cutting out of the piano:
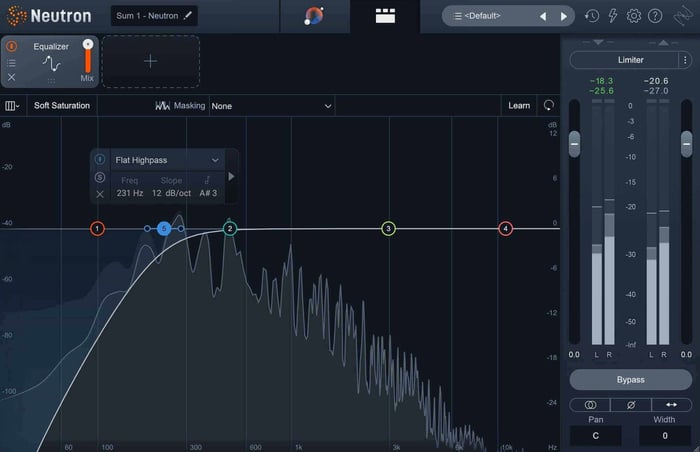
High-pass filter at 231 Hz
High-pass filter
High-pass filters get their confusing name by way of their operation: they allow “high” frequencies to “pass.” Some time long ago, people tried to rebrand them as low-cut filters to avoid confusion. It didn’t take: both terms are now employed, making everything even more confusing. Sorry, it’s just the way it is.
Low-pass filter
A low-pass filter cuts all the frequencies above the cutoff point. A low-pass filter is often used to cut very high hiss noises above 18 kHz. Use it with caution in order to avoid cutting too much high end of the track. In this screenshotted example, I’m pointedly not following my own advice:
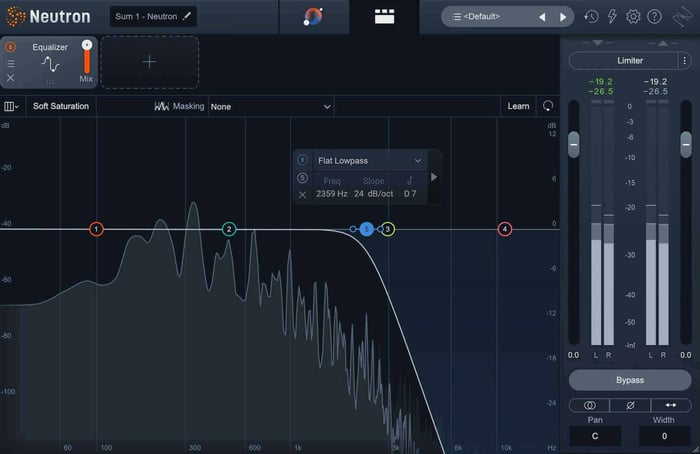
Low-pass filter at 2.3 kHz
Low-pass filter
People also call low-pass filters high-cut filters.
High-shelf and low-shelf filters
Shelf filters are great for strengthening the low end or for adding some high-end sparkle to the treble range when necessary. Below, you’ll see a low-shelf and high-shelf boost on our piano example.

Low-shelf and high-shelf filter on piano
This is what these boosts sound like:
Low- and high-shelf filters
Notice how you can hear the pianist’s foot on the pedal now, thanks to the low-shelf boost. You can also hear a brighter quality to the sound thanks to the high-shelf boost.
Shelf filters can also attenuate highs and lows, and the following examples will show you how.
Low-shelf filter
A low-shelf is often use to take out excessive low end in percussive instruments, because it has a more natural effect on the phase-response of these vital sounds (this gets outside our given subject here, but EQs tend to cause phase anomalies – and pass-filters do so in the most audible fashion).
In this case, let’s remove the foot pedal noise from the piano with some low-shelf attenuation.
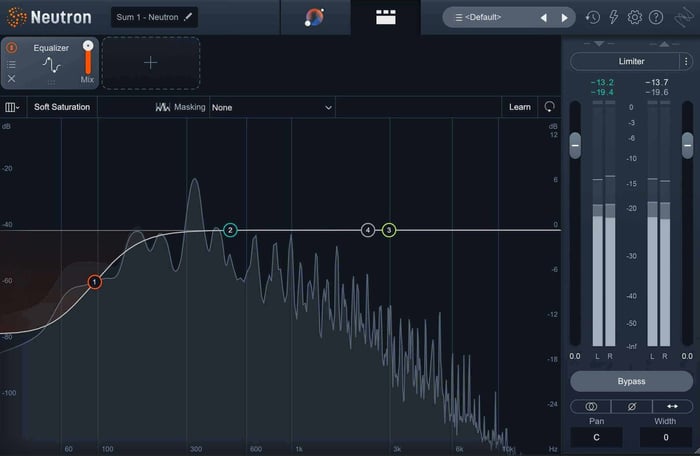
Low shelf attenuation
Low-shelf attenuation
High-shelf filter
While a high-shelf filter can be used to brighten up a track, you can also use it to attenuate treble material in a subtler way than a low-cut filter.
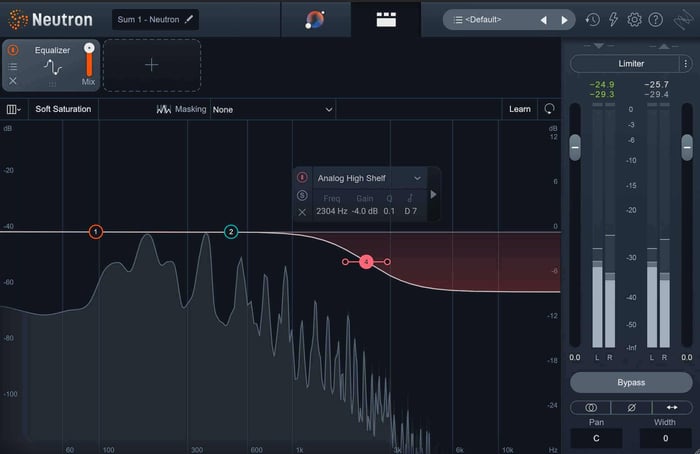
High-shelf attenuation
High-shelf attenuation
You might find a low-shelf filter is great for softening a brittle instrument – or even an overly bright mix!
Transient/Sustain EQs
Transient designers and other plugins meant to sculpt transients have existed for a while, but around five years ago, someone had a bright idea: what if you could separate the transient portion of the signal (the initial thwack or hit of a sound) from the rest of the material (what we call “the sustain” portion of the audio)? You’d be able to EQ each of these portions of the audio individually, and recombine the signal at the output.
What would this get us? Turns out, it gets us more control than ever before.
Let me show you exactly what I mean with the new Transient/Sustain processing in the Ozone EQ module.
Let’s take a vocal with rather spiky transients, noticeable on hard constants and sibilance especially.
We could EQ the aggressive regions down a bit like so with an EQ in Nectar , but we’d lose some life in the overall sound:
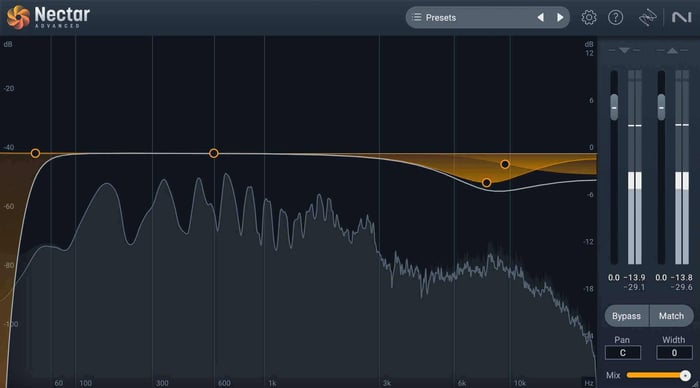
Nectar on spiky vocal
Spiky vocal with Nectar
Observe what happens if I use an EQ to curtail the transient signal in these aggressive regions, but leave the sustaining material alone.
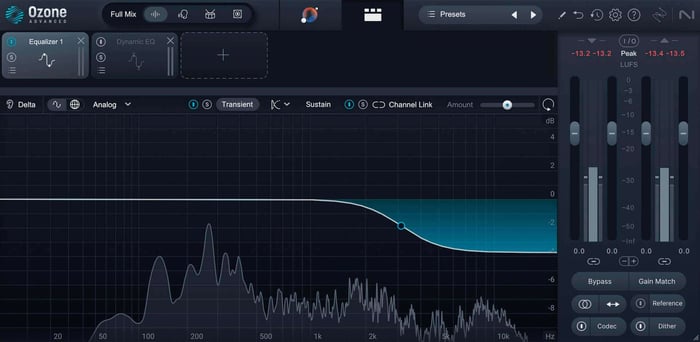
Ozone transient processing
Spiky vocal with Ozone transient processing
It’s less piercing, but we still have that edge, which helps sell the vocal as a Springsteen style piece of hardfought Americana.
If you’re interested in using Transient/Sustain EQ, you can get Ozone EQ for free.
Go forth and EQ
The aim of this article is to show you, in simple terms, what an EQ can do for you – to give you a good grounding as you go forth with Nectar, Neutron and Ozone to explore the world of equalization.