Every session, every time: 7 audio engineers reveal their go-to techniques
Top audio engineers reveal their indispensable, go-to techniques for achieving impactful mixes every time.
Mixing and mastering can sometimes feel like navigating uncharted waters, where every project presents its own unique set of challenges. But in talking to friends and peers in the world of mixing and mastering, I’ve discovered that even the most seasoned professionals have certain touchstones they rely on, tricks and techniques they deploy time and time again.
In this article, I spoke with some of my favorite audio engineers – people who work at a high level in mixing, mastering, or both – and asked them what they do on every mix. The answers range from the practical to the plugin-centric, but they’re all things you can try right away. We’ll be talking to mix engineers Marc Daniel Nelson and Adam Hawkins, mix/mastering hybrid engineers Eric Mitchell and Johannes Ahlberg, and mastering experts Adam Matza, Mat Laffler Schulman, and Bob Macciochi.
Whether you’re just starting out or looking to refine your process, there’s something here for you. And if you’re looking for even more mixing tips, check out what these engineers use for reference tracks.
Follow along with these techniques using iZotope plugins including
![]()
![]()
Ozone Advanced
![]()
![]()
RX 11 Advanced
1. Marc Daniel Nelson: Automation over shortcuts
Like many people, I first found Marc Daniel Nelson on YouTube – but I quickly realized he wasn’t the customary Youtube huckster, shucking anti-snake oil potions with an outlined finger pointing upward at the plugin of the week.
Instead, his videos reveal a mixer who works in deliberate and incremental steps until – bam! – a polished record appears. He’s also the real-deal: not a lot of people get to polish off a Geoff Emerick record, but Marc was asked to do so.

When we talked, Marc quickly mentioned using iZotope RX as an audiosuite process to ameliorate the noise issues engineers run into everyday – but the technique I’d like to talk about doesn’t require any plugin at all: taking the time to automate things by hand.
“It’s always hand painting,” he told me. “Automation can be through volume, but it can also be automating EQs, plugins, compression to get things to sit. I think we always forget that the DAW allows you to automate – in a non-linear fashion – any moment at any second of a song.”
For Marc, it’s about achieving a feeling of movement.
“Listening back to the great mixes I grew up on in the 80s and 90s, it wasn't flat and static. There was always stuff coming up. Michael Brauer is really good at that. CLA is really at that, Bill Schnee is extremely good at it. Clearmountain is really good at that. Where like if there's nothing in that pocket, Find the melody in anything and pull it up.”
I asked Marc about the practicalities of real-time automation – namely, how he handles the latencies that crop up when you’re doing rides through a ton of processing.
“Of course, when you're building a template and everything's going through separate buses, by the time you're done, your latency is stacking, so your moves might not be exact.” He said.
Ultimately, you get used to the latency – though if you find it particularly impeding, you could always copy the automation and move it back.
However you do it, it’s worth spending time on, as it will bring a sense of life to your mix no piece of gear in the hardware or software world can replicate.
I’ll illustrate what I mean with the following section of a project I’m working on with the artist Jon Birkholz (Adjective Animal, Super City).
This year, he and I have begun a podcast called Nick And Jon Mix A Song, in which he brings a song snippet that he’s written using a piece of lo-fi gear, and I help produce it. I used automation in the way Marc described on his tune “Cognant This.”
Here’s a snippet of the song he sent me, recorded entirely on the OP-1.
Here’s the mix – but with all of the automation turned off.
And here’s what the automation brings to the table:
As you can hear, there’s just a bit more humanity to the mix – and it’s all thanks to automation.
2. Adam Hawkins: Drum augmentation with purpose
I’ve been a fan of Adam Hawkins’ work for years, especially his mixes for Twenty One Pilots. Tracks like “Jumpsuit” have become palate-cleansing references for me – a reminder of what a truly balanced, dynamic mix sounds like. So I was especially amped to get his take on what he does on every mix.

Adam doesn’t think of himself as someone with a “one-size-fits-all” approach.
“Everything is so different; no two things work every time,” he told me. But there is one technique he relies on somewhat regularly, and it’s something that mixers deal with all the time: drum augmentation via samples – commonly shorthanded with the term “Drum Replacement.”
When it comes to augmenting drums, Adam turns to tried and trusted samples first, before he goes spelunking through sample libraries.
“Often, when working with a live drum kit, I will replace – or not replace, but add a kick and a snare. I'll try two or three until I find the one that I like.”
But his approach goes beyond the drum replacement plugins people tend to use.
“I often will use Massey DRT to create MIDI. That way I can use anything that I've got – Superior drummer, Addictive Drums, Battery, Kontakt: I've got favorites in all of those.”
Two things about this are key for you to keep in mind. First, he’s given himself the means to really tailor the velocity of each sampled hit to the track.
“I like the velocity controls so that softer hits don't have to sound exactly the same as the harder ones.” That’s what converting to MIDI – rather than using a more automated process for triggering – can get you.
Second, it grounds him for the next part of the process: in a world where every song sounds different from moment to moment, he can count on his samples providing a sort of baseline.
“That grounds you,” he said. “It gives you that one thing is good, so you can move on from that. Even if it's just that one thing, you can build everything around that.”
I have my own take on this technique: in my current mixing template, I have a few beloved triggers ready to go, and I can pull them up as needed.
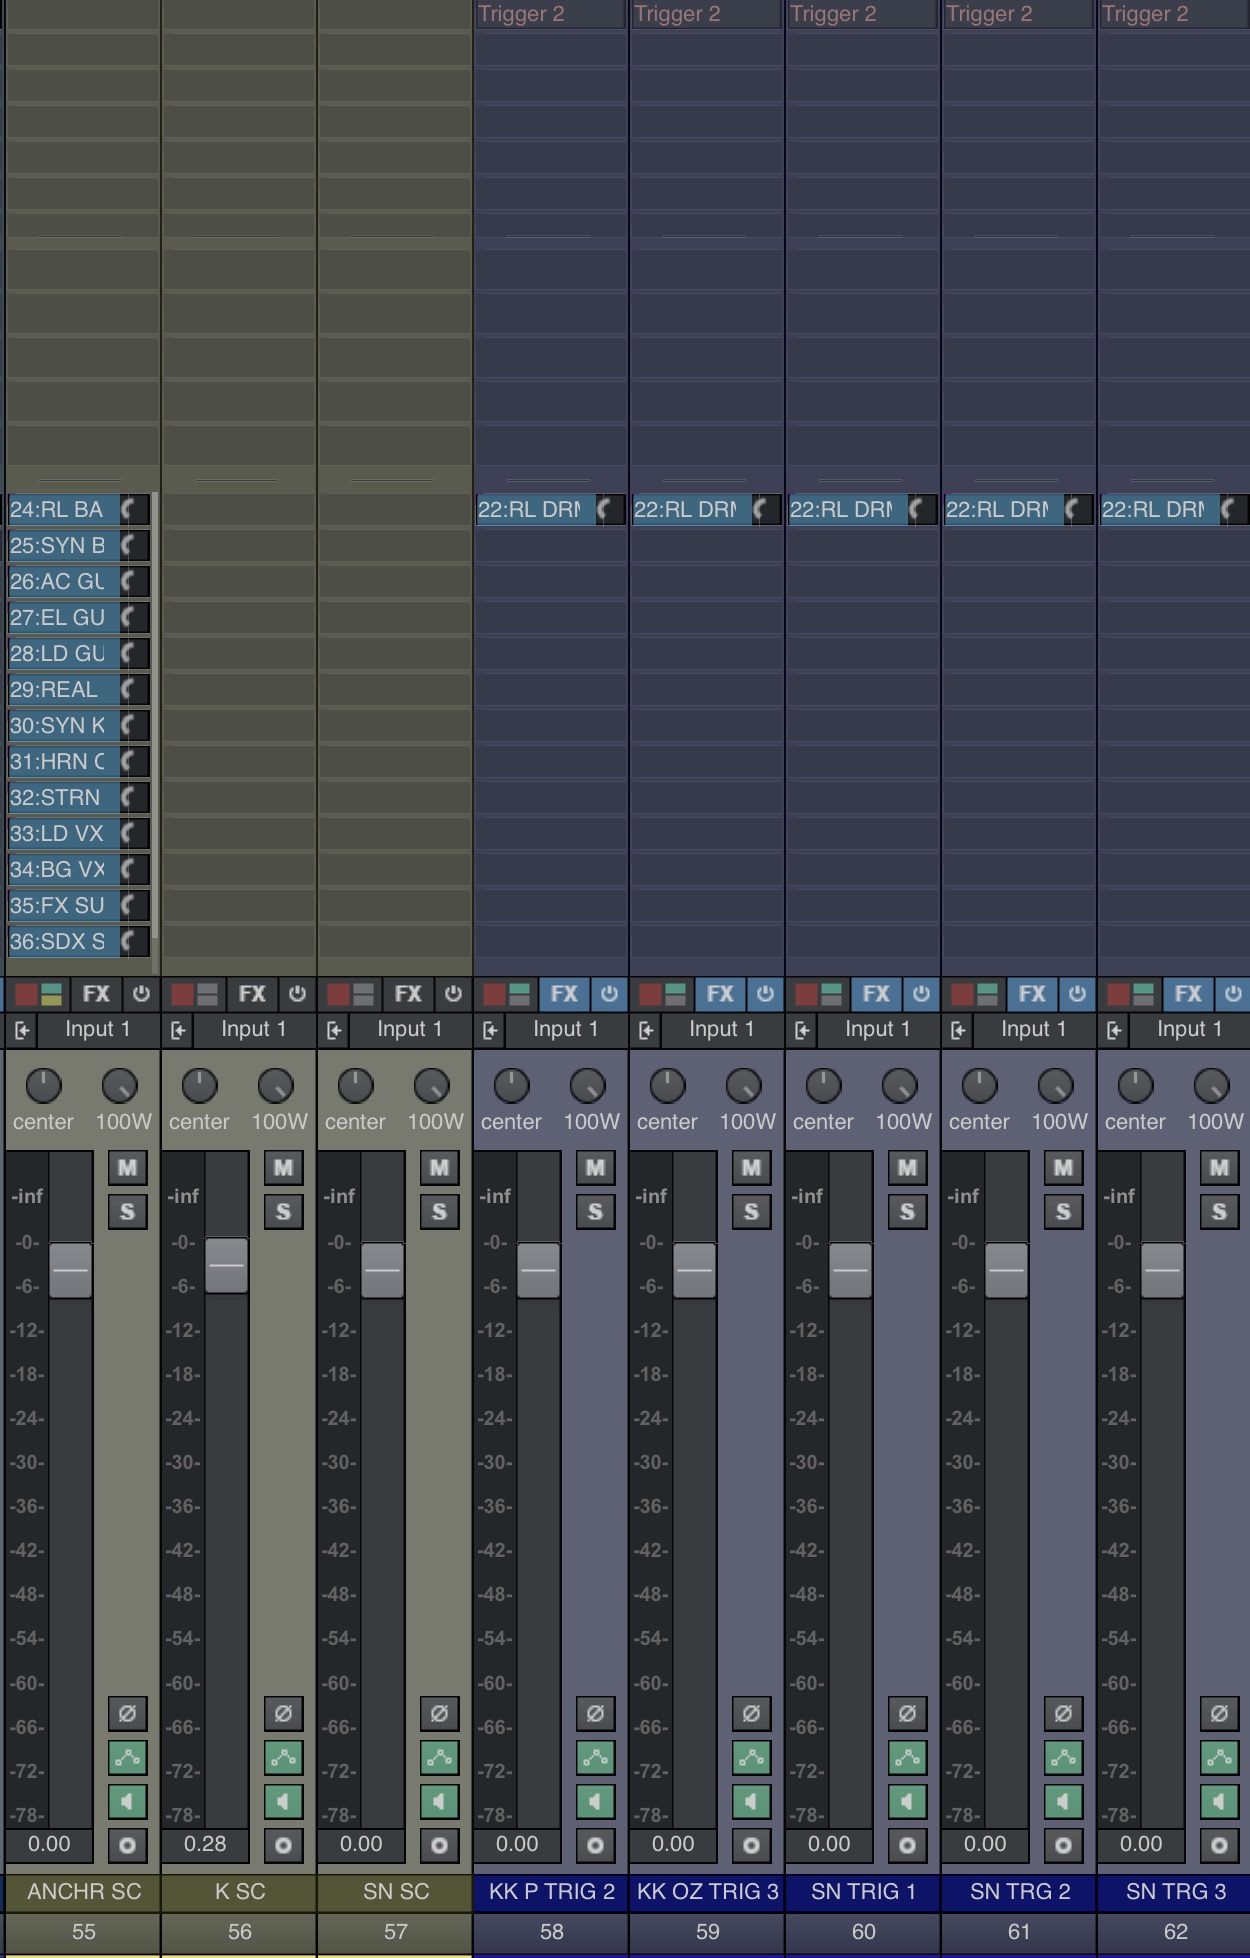
Drum sample template
This is how it looks in my Reaper template, but it’s exactly the same in my Pro Tools and Logic templates too. Having a drum-augmentation template that works for you can save a lot of time and money.
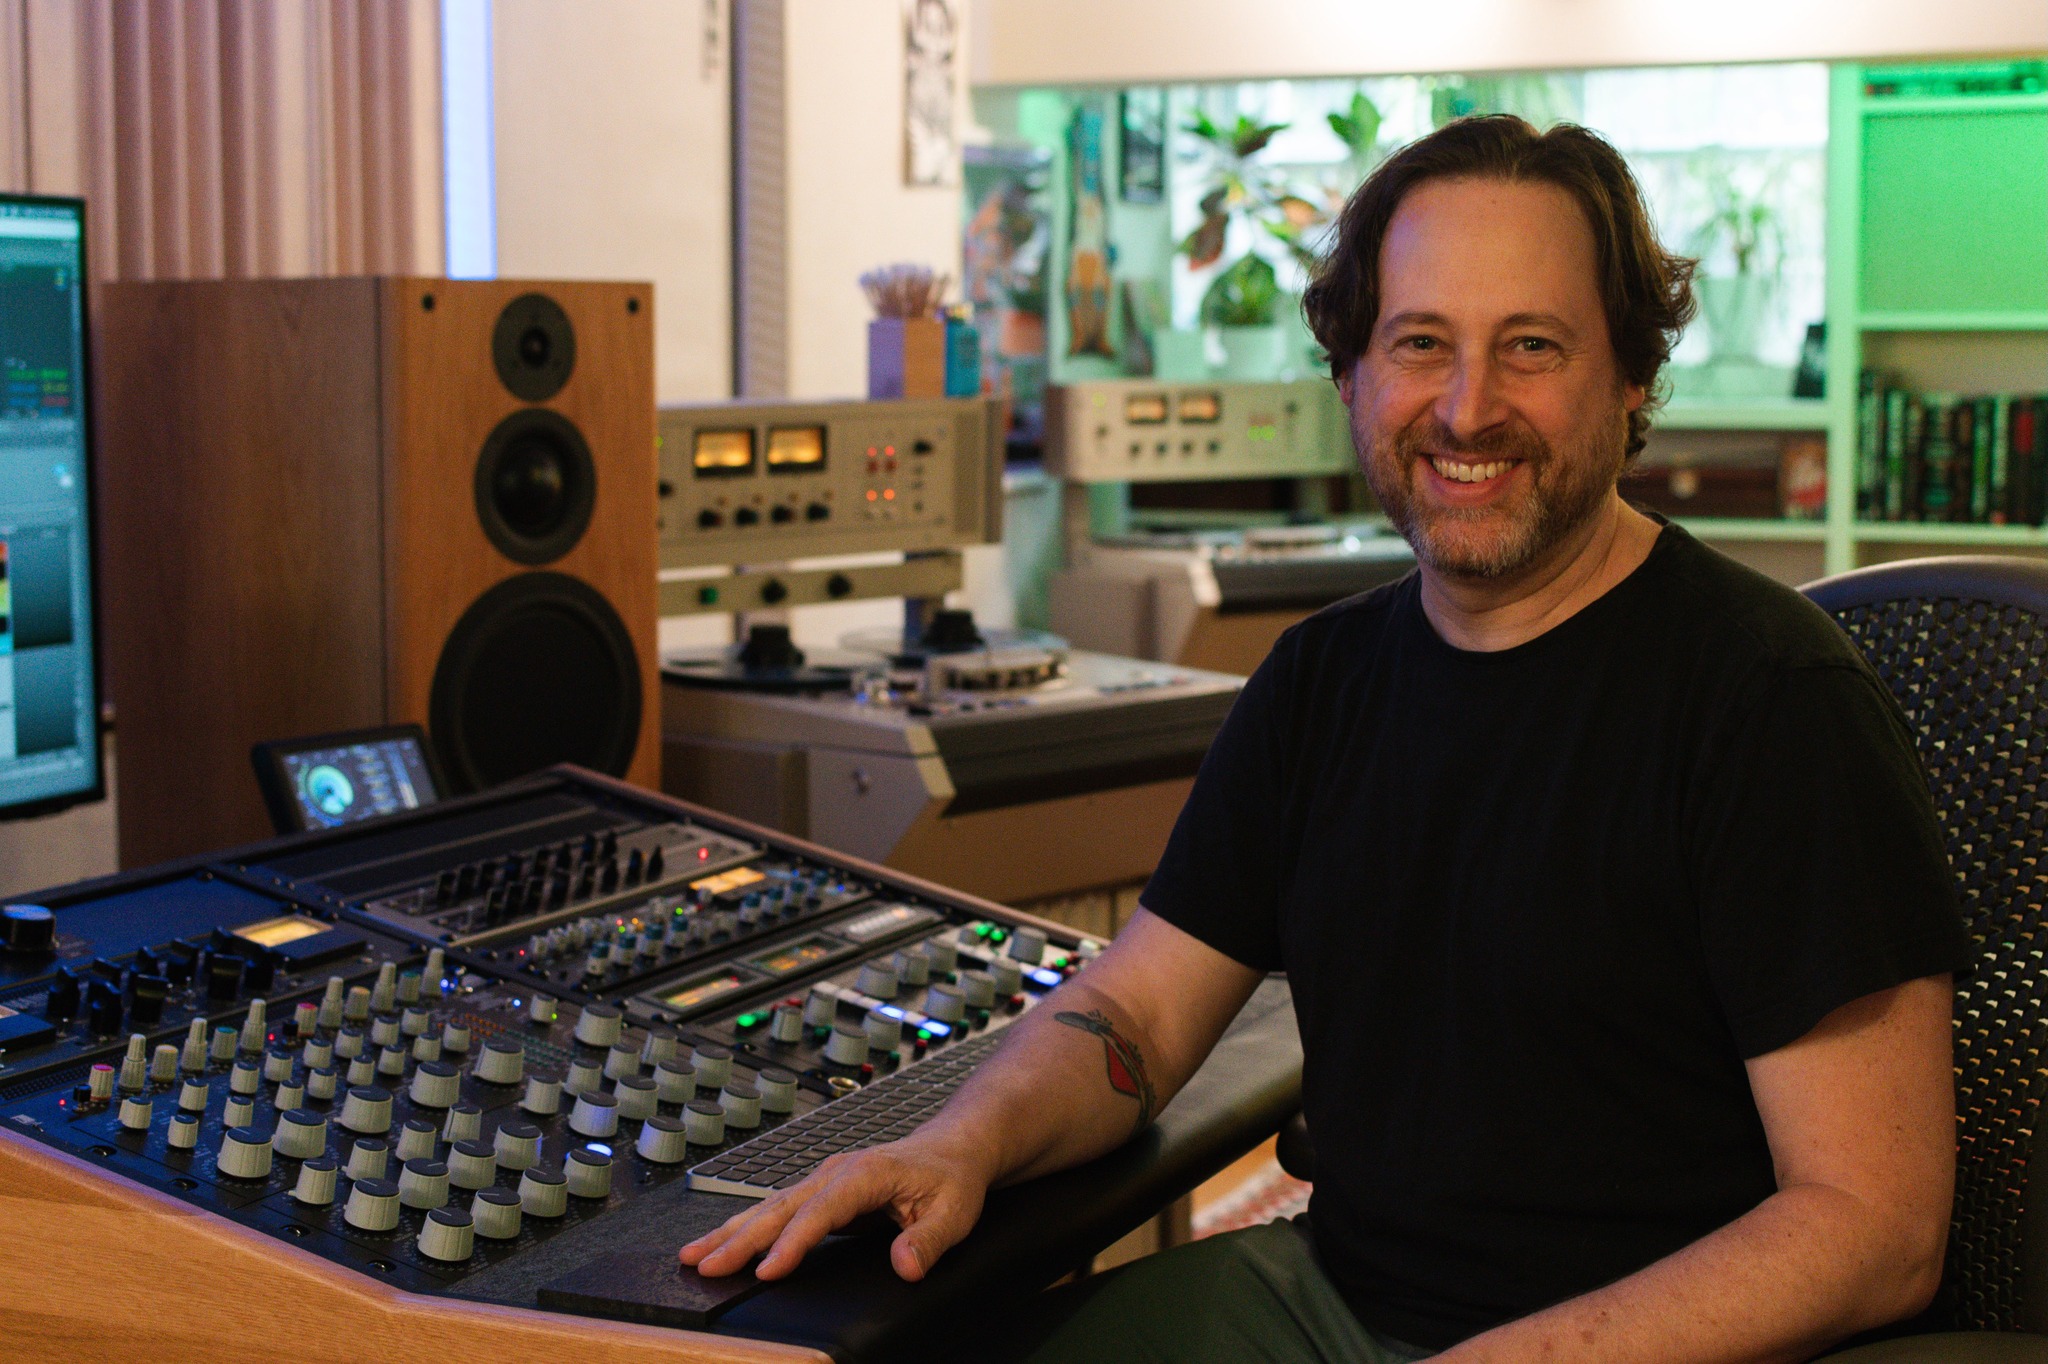
3. Eric Mitchell: Frequency over trickery
Eric Mitchell has worked with artists such as Glassjaw and Head Automatica, and he’s carved out a niche for himself as a hybrid mix and mastering engineer. Often, he’s brought in to take a client’s session over the finish line, helping them transform rough mixes into polished, professional tracks.
Eric is proudly “in the box,” and we’ve corresponded frequently about this and other topics. But this was our first time talking on the phone, and I was eager to hear his perspective.

Like Adam, Eric doesn’t have a single plugin he turns to every time for every guitar or every kick drum. But he does have a perspective that seems to impact his work, one that you can bring to your own projects:
“Probably the biggest thing I'm doing every day is hyper-management of frequencies,” he told me. People these days want their master so loud. You can't really have any buildup or overlap or else that's going to get in your way and have a clean, loud master.”
This extends to a pet peeve of his – artificial widening.
“I'm probably like the most anti-Haas effect person you'll ever meet,” he said. “I hate Haas-effect widening. Something I'm always doing on projects sent to me is replacing Haas widening with mono-compatible widening.”
Generally, he prefers frequency-based methods for widening in these situations, using his tools to pull certain frequency ranges to the left speaker, and others to the right.
You can actually do this with Ozone’s imager, and I’ll show you how by running Ozone in Plugin Doctor. First, I’ll use Ozone’s EQ to boost the left channel pretty broadly by 2.5 dB across the board.
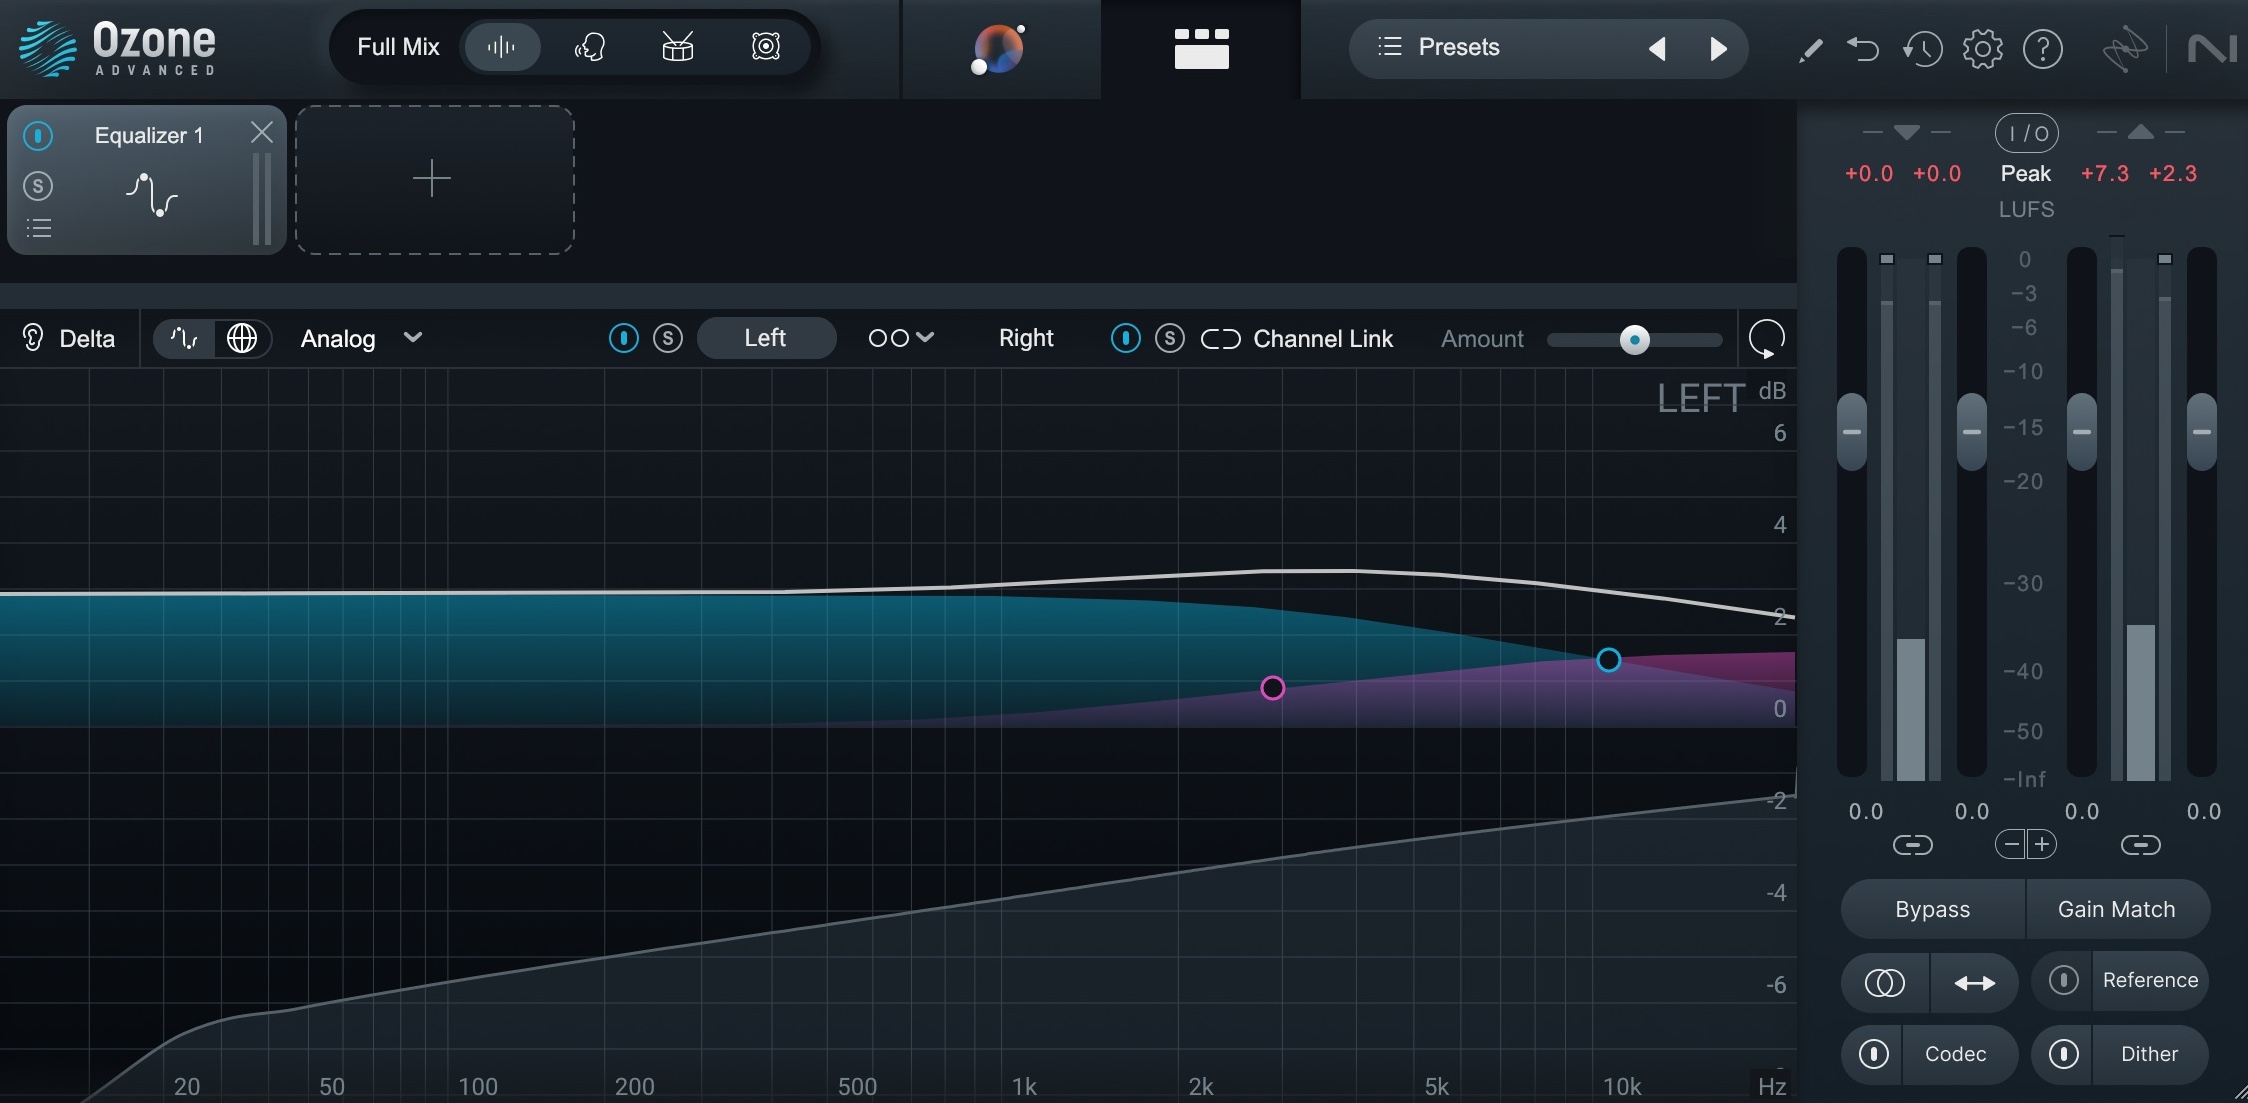
Ozone EQ in LR mode
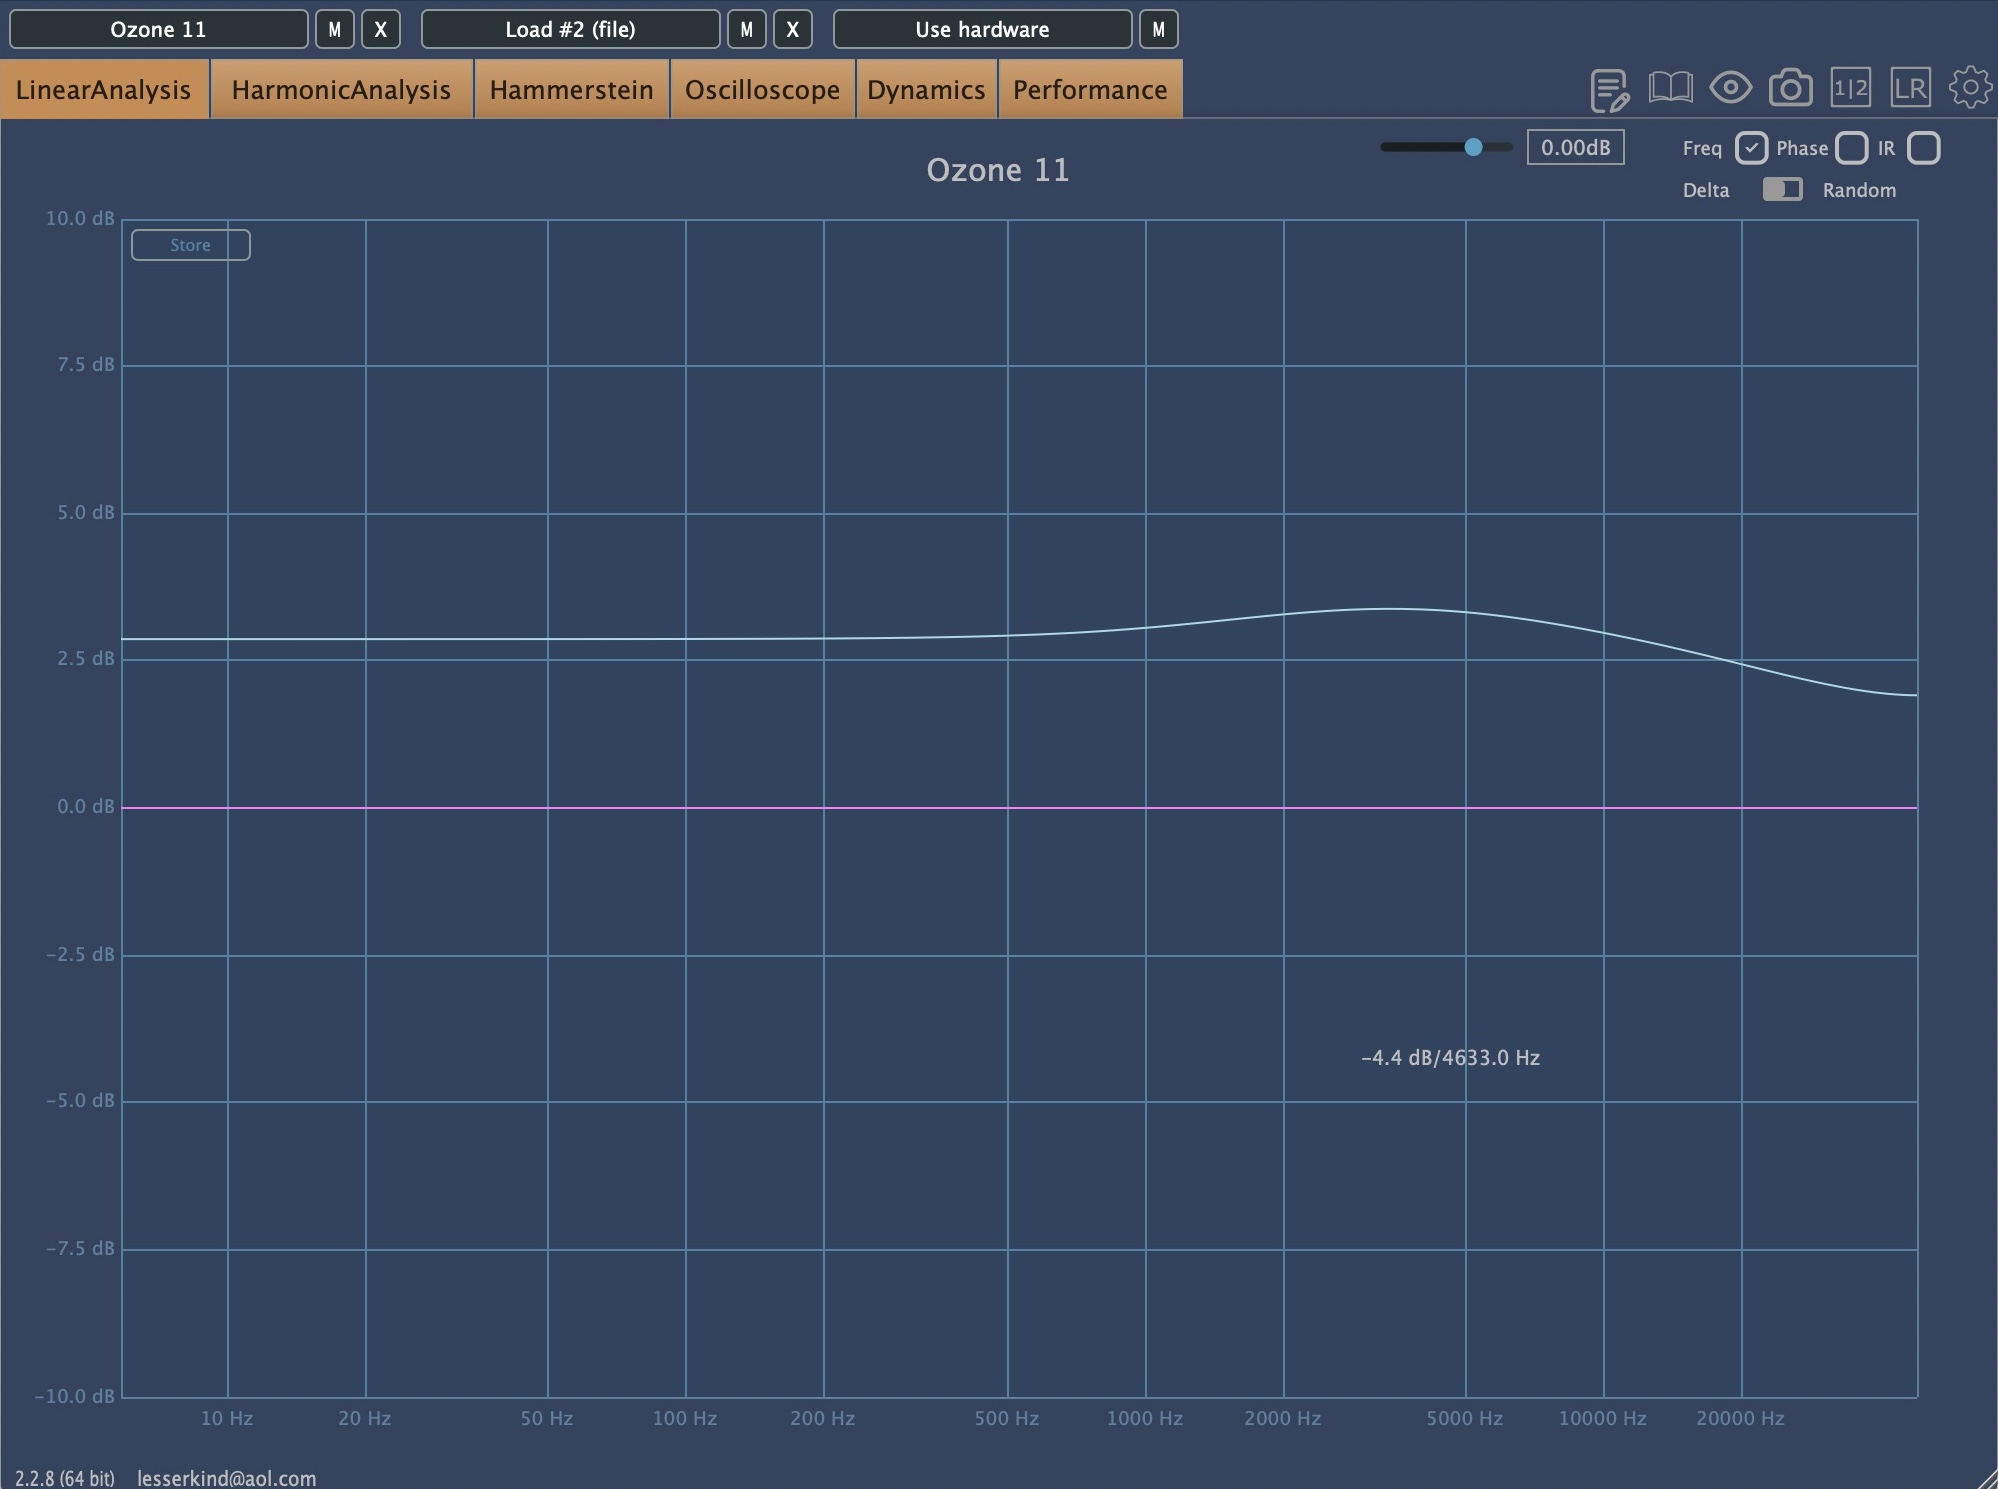
Plugin Doctor, L in blue and R in pink
The left signal is in blue, the right signal is flat, hovering along the purple line at 0.0 dB.
Now watch what happens when I use the Imager after the EQ, and engage widening across four bands.
As you can see, moving the sliders around has a direct effect on the amplitude of frequencies between the left and right channels. That’s what using the Imager does in its default mode. Now, look at how it affects the phase:
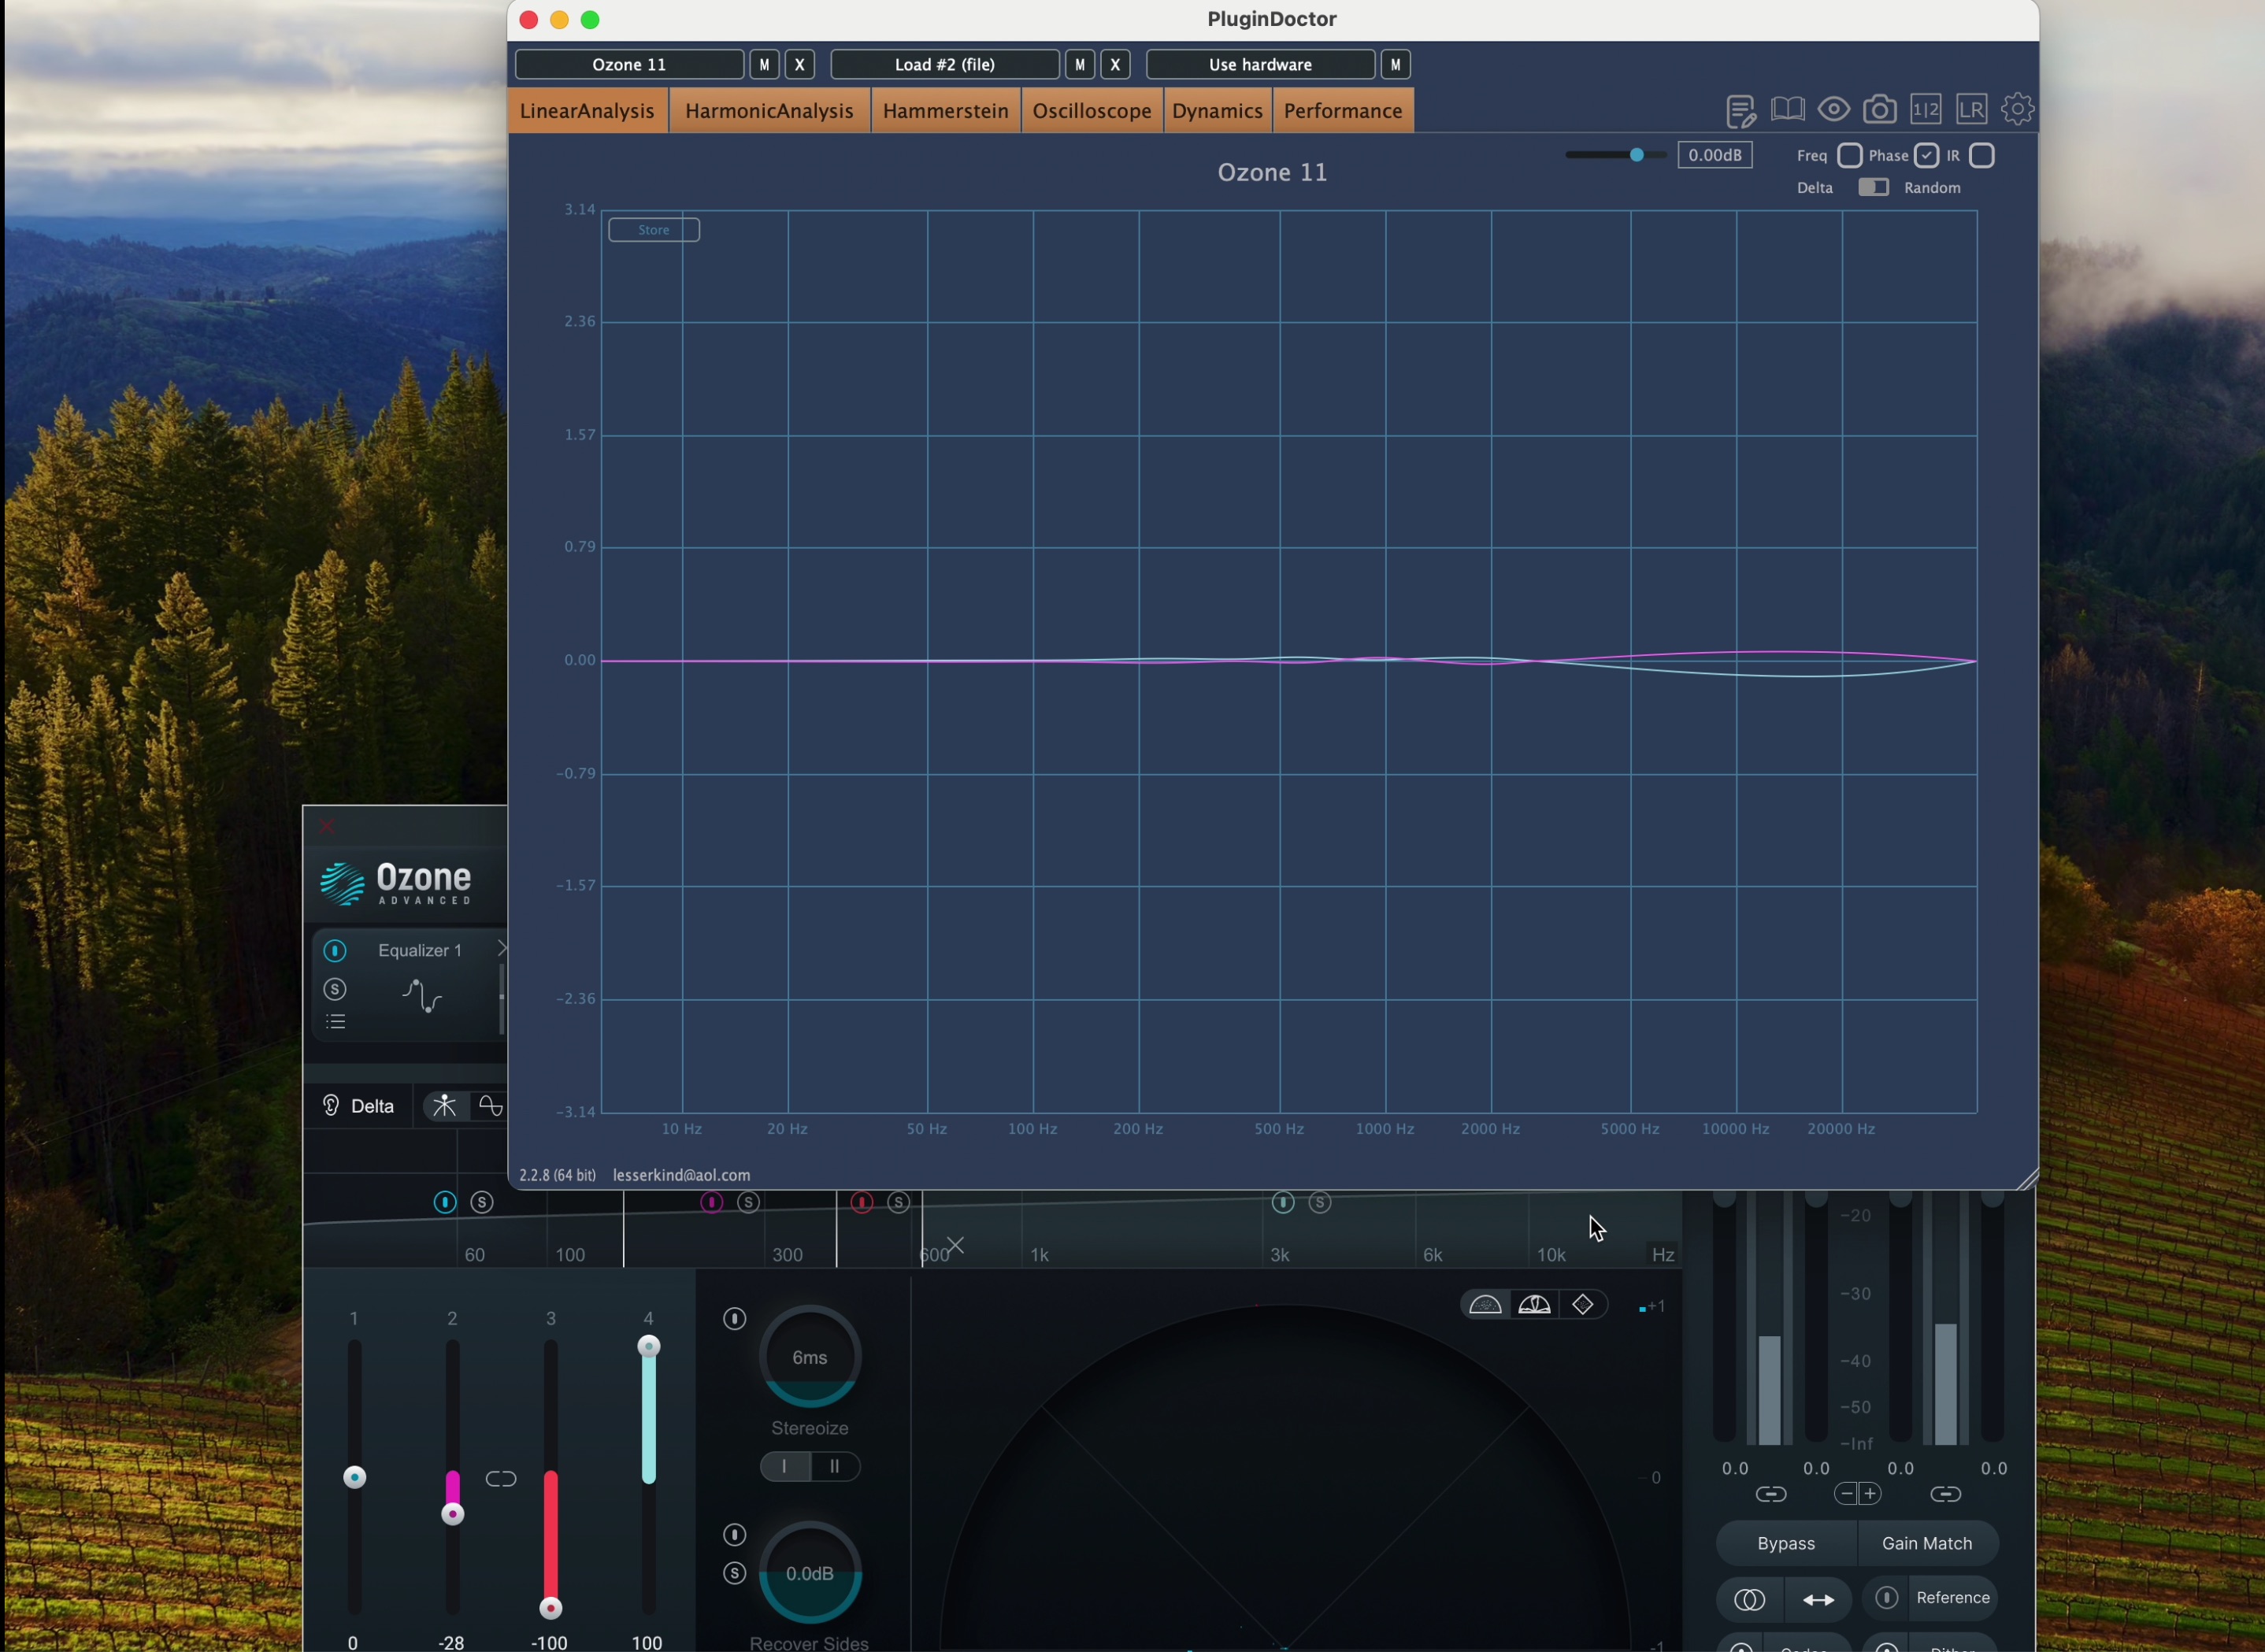
Phase in Ozone Imager, default
This is pretty good where phase delays are concerned – and these are the default settings of Ozone.
Once I engage the “Stereoize” button, however, we do enter the world of Haas trickery.
4. Johannes Ahlberg: tape excitement in dual mono mid/side
Johannes Ahlberg is a mixer and mastering engineer based out of Stockholm who works quite often in electronic genres, having engineered for Diskopunk.
Johannes also spends time in the digital trenches of plugin development: he is the sole developer behind the Patreon-supported brand Noisebud, a boutique company that makes some fantastic tools that users of Pro Tools will sadly never get to experience (he codes to VST3 and AU exclusively).
Johannes is a good friend – he even named a parameter in a plugin after me – but he knows how to get the best out of digital tools when looking for analog sounds. So I was excited to hear his take on the matter, and he didn’t disappoint:
“I recently started using the free NeuralAmpModeller with a NAM profile for the ZULU hardware,” he told me. This isn’t surprising at all; one gets the feeling Johannes might delight in finding esoteric tools that elude the common practitioner.
But what I particularly found interesting – and practical for you all – was how he uses this type of plugin:
“I often route it in mid/side mode,” he said, “which makes it easier to either boost or attenuate the signal for more color without changing the gain.”
He says that tricks like this give him the sonic results he “used to rely on before going completely ITB.”
“What's great using independent mid/side (or even left/right) coloration,” he wrote me, “is how it can ‘untie the knots’ in a mix. When done right, the sound seems to lift off the speaker cones and move into the room, as if the music starts breathing more freely.”
For iZotope readers, Johannes emphasized that “you don’t need the exact plugins I’m using – any tape-style saturation or tone-shaping tools that let you process M/S separately can help achieve this.”
The important thing is subtlety: “it’s not about exaggeration, but subtle shifts in harmonic content and transient behavior that can make a mix feel more three-dimensional.”
I recently showed off how to do something similar with the Ozone Exciter in the article “How to mix a song from start to finish.”
Note how I used the Ozone Exciter on the master bus roughly 4:35 into the video – that’ll show you what mid/side processing of the tape variety can do for a mix.
To show off how to do this with tape-style distortion, specifically I’m going to take one of my favorite mixes that I’ve ever had the privilege of mastering – “Something More” by Micah E. Wood, mixed by Matthew Lampart of Moose House in Baltimore.
Here’s the mix:
And here’s two different options for tape-style mid/side enhancement. The first uses Kiive Tape Face, run in mid/side rather than stereo.
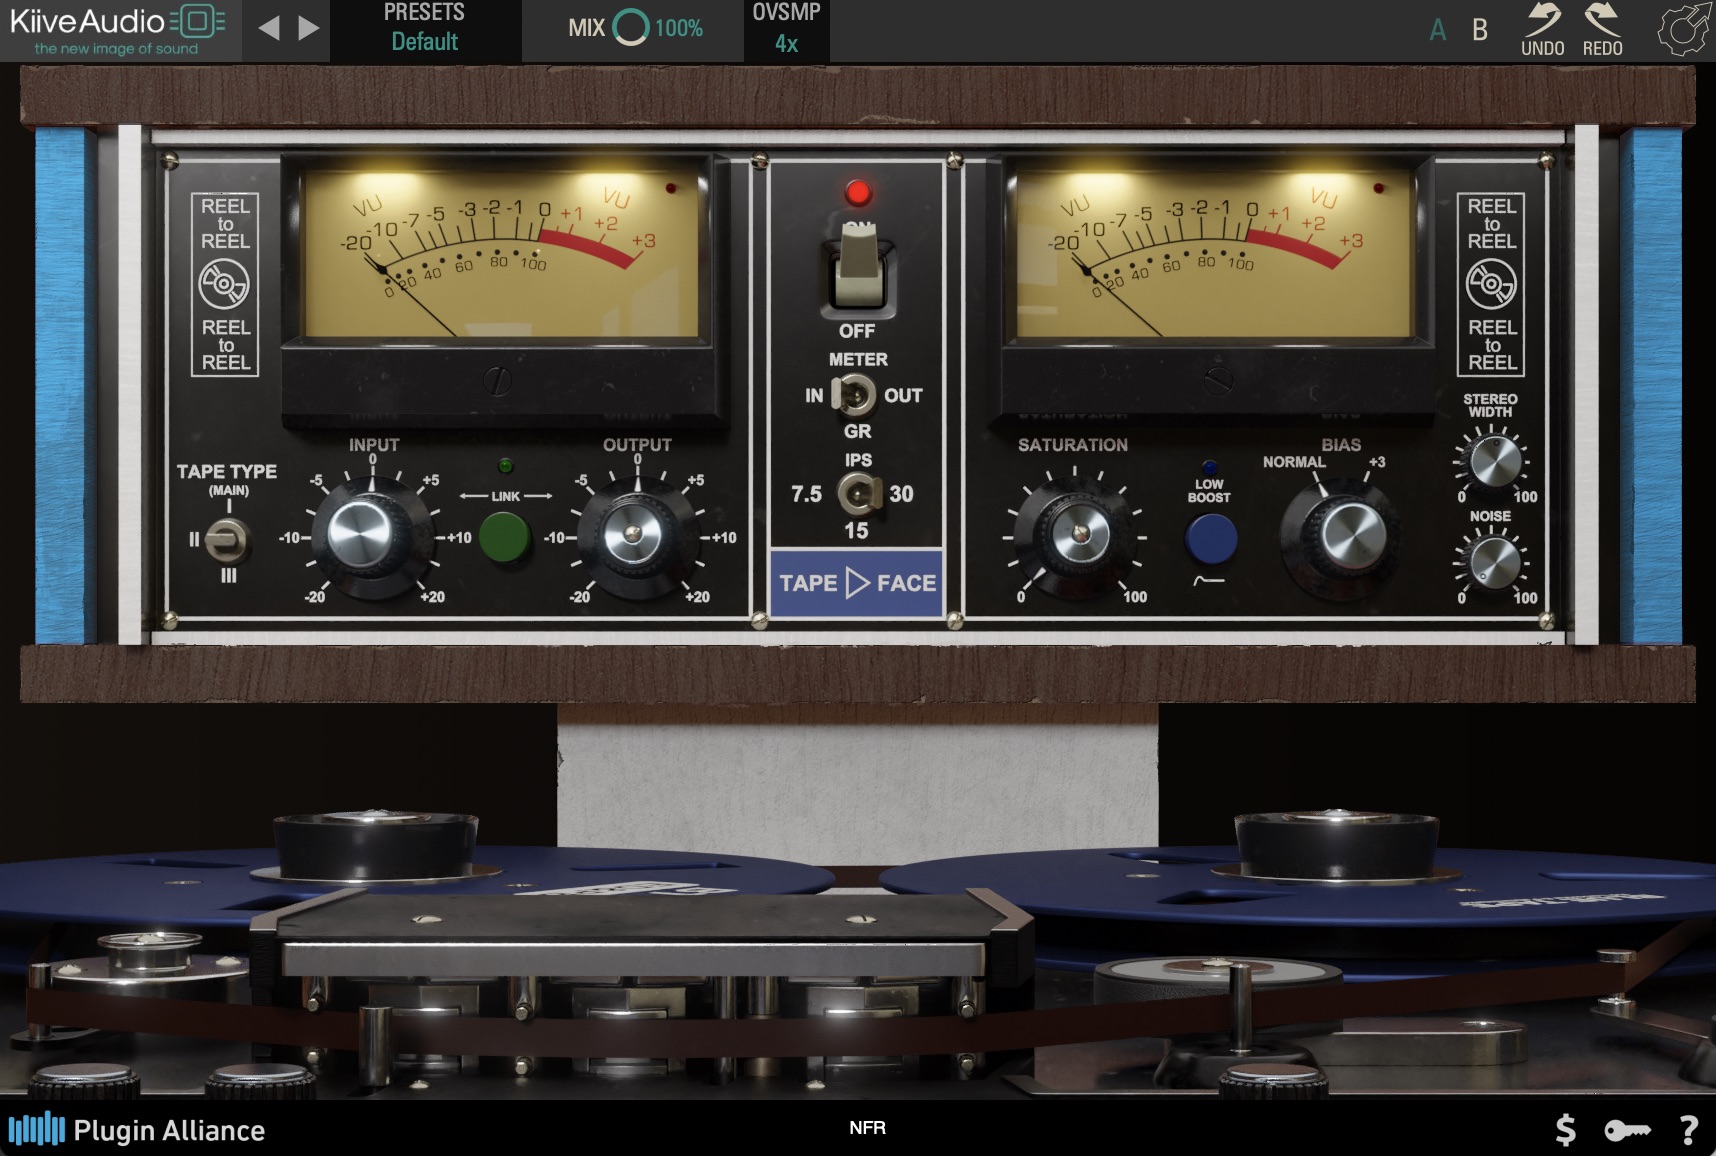
Kiive Tape Face
And here’s Ozone Exciter, with different settings for the mid and side channels.
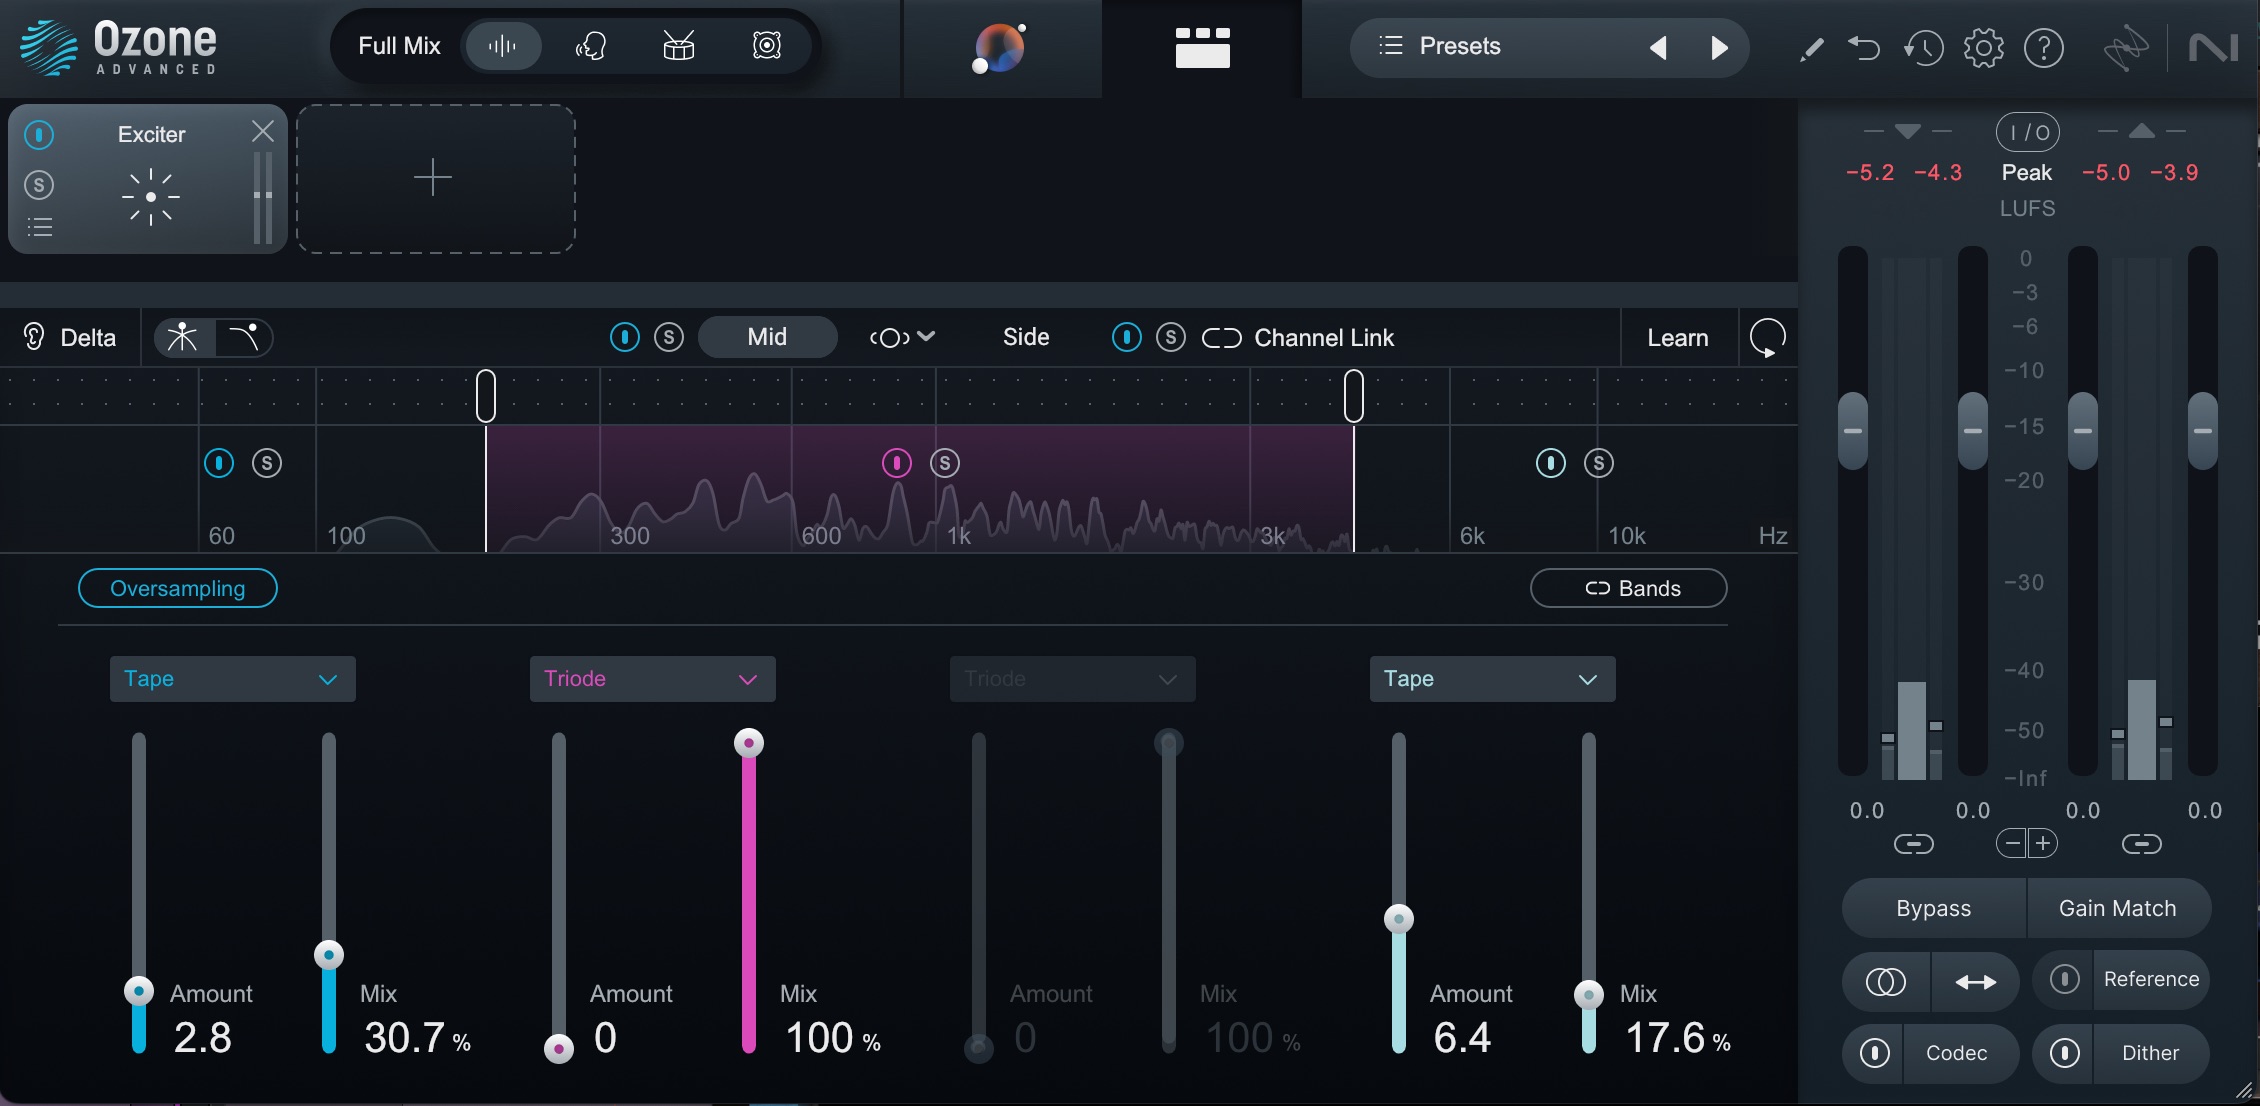
Ozone Exciter, mid settings
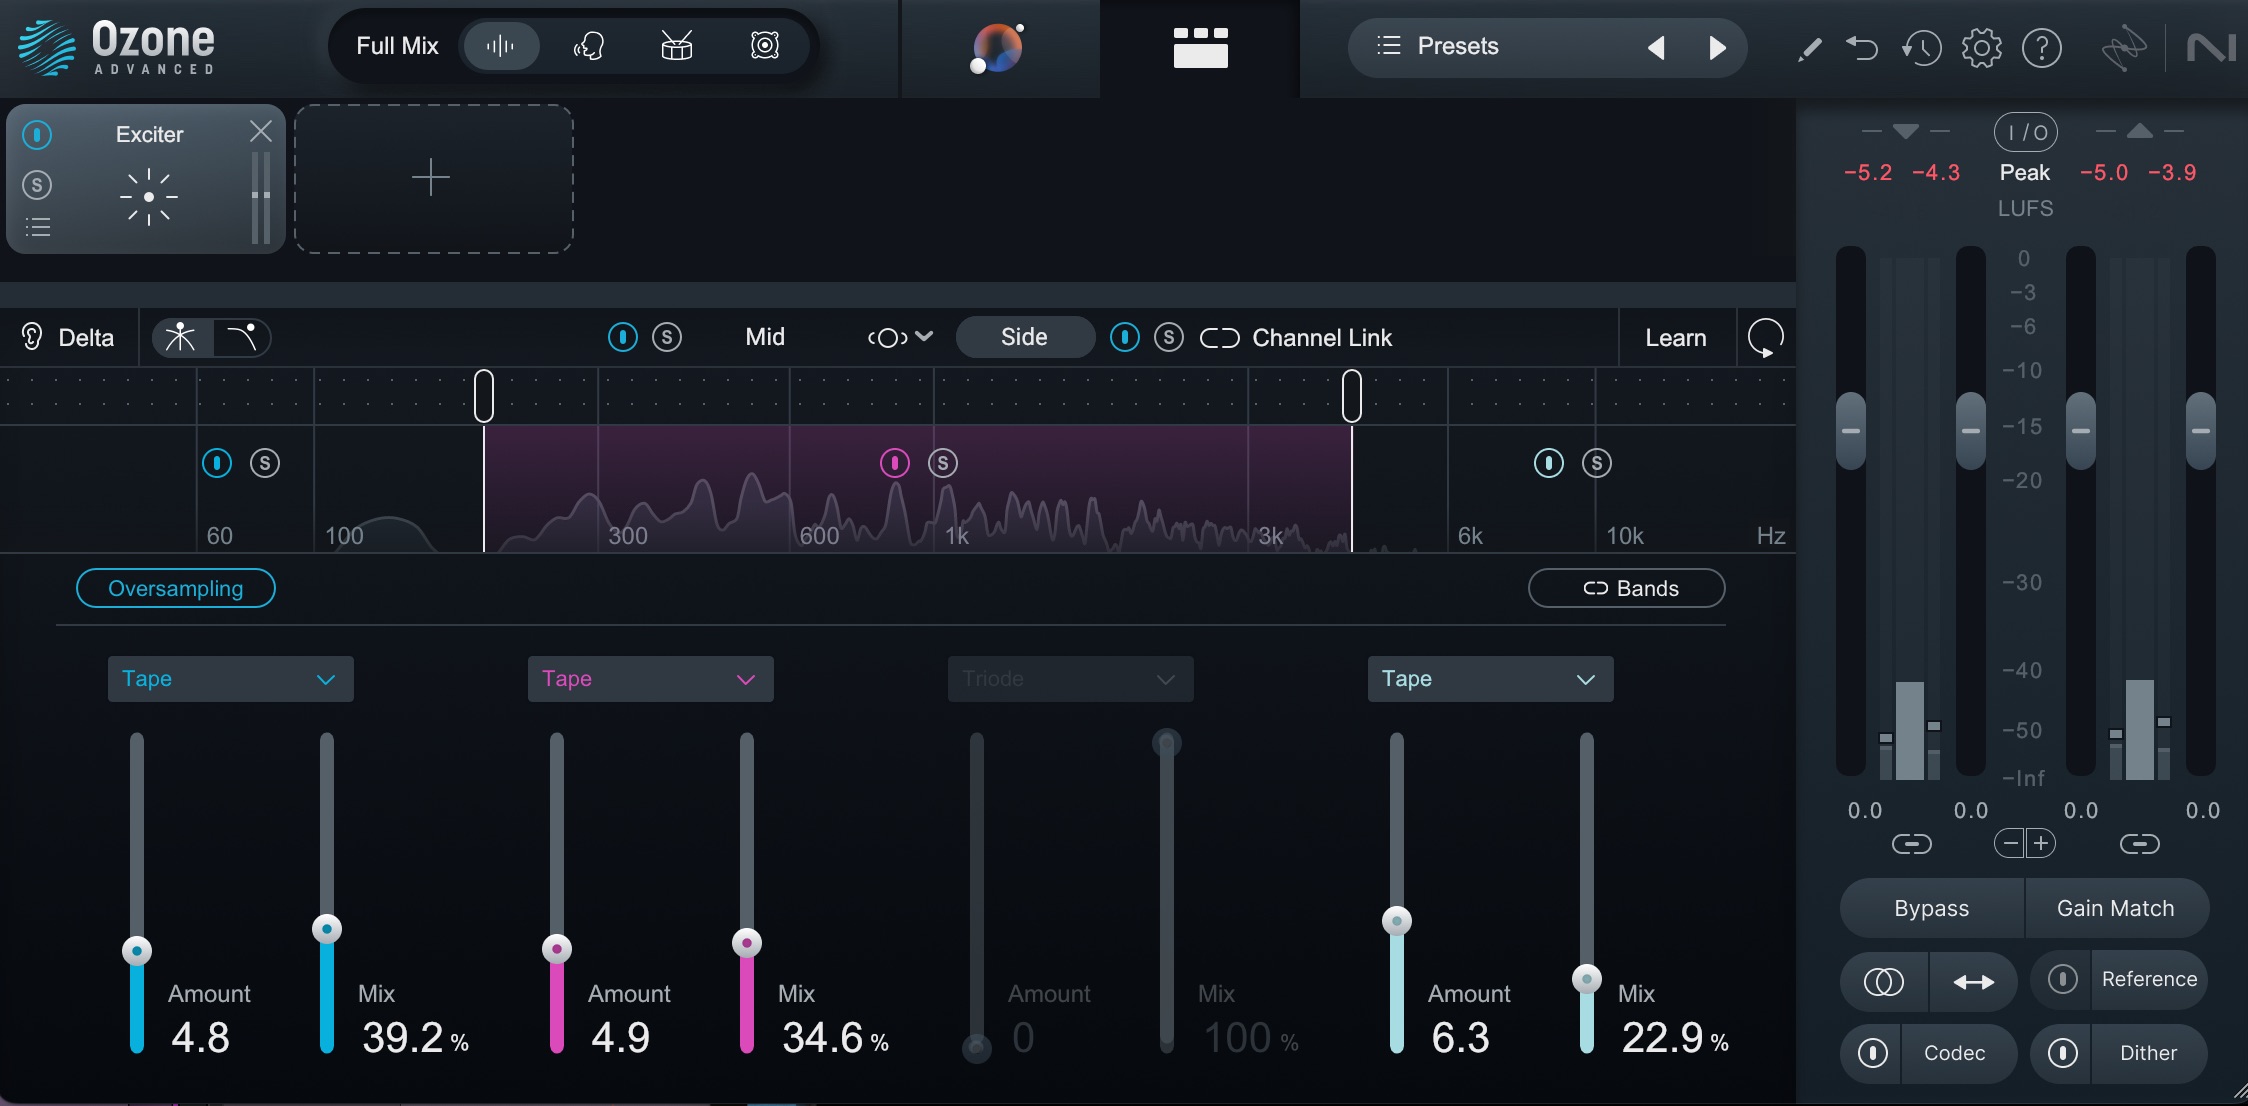
Ozone Exciter, side settings
5. Adam Matza: RX for de-essing
Adam Matza is the founder of Magic Ears Mastering, and his work spans multiple genres, from rock and pop to electronic and hip hop. He’s mastered the work of grammy-winning engineers like Bob St. John, and he’s worked with artists like Consolidated and Meat Beat Manifesto.

Adam’s approach is the analog yin to the digital yang of Eric and Johannes. Though he’s no slouch when it comes to plugins, he relishes using a highly curated selection of outboard gear – hardware pieces that he spent years selecting. This attention to sonic detail has netted him an impeccable sound.
However, when it comes to de-essing a master, he made his predilections quite clear:
“I de-ess with RX,” he told me. “I just find all the places that it needs to be de-essed because I don’t find many de-essers to be particularly fantastic.”
Adam does all his analog processing and then opens up the results in RX. “The only way to know it is by taking the time to do it this way,” he told me. “I'm listening to each one, and how it sounds in context of the song. And maybe I want that sibilance there. There's an emotion that that sibilance is carrying, that if I take it out, it loses.”
This might seem counter to how others do it, but plenty of mastering engineers work this way. I know I frequently do. In fact, I can share a spectral repair preset I made for exactly this purpose.
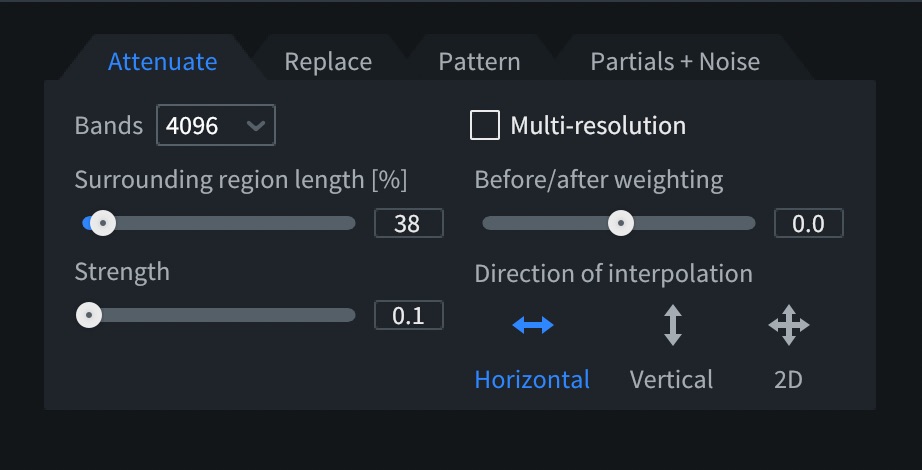
RX de-essing preset settings
The process is relatively simple: you identify the troublesome sibilance by sound and by site.
Here’s one, for instance, in a mix I did for the artist Glorian:
You highlight the sibilance with a frequency selective tool, and apply settings such as the one I just posted, tweaked as need be.
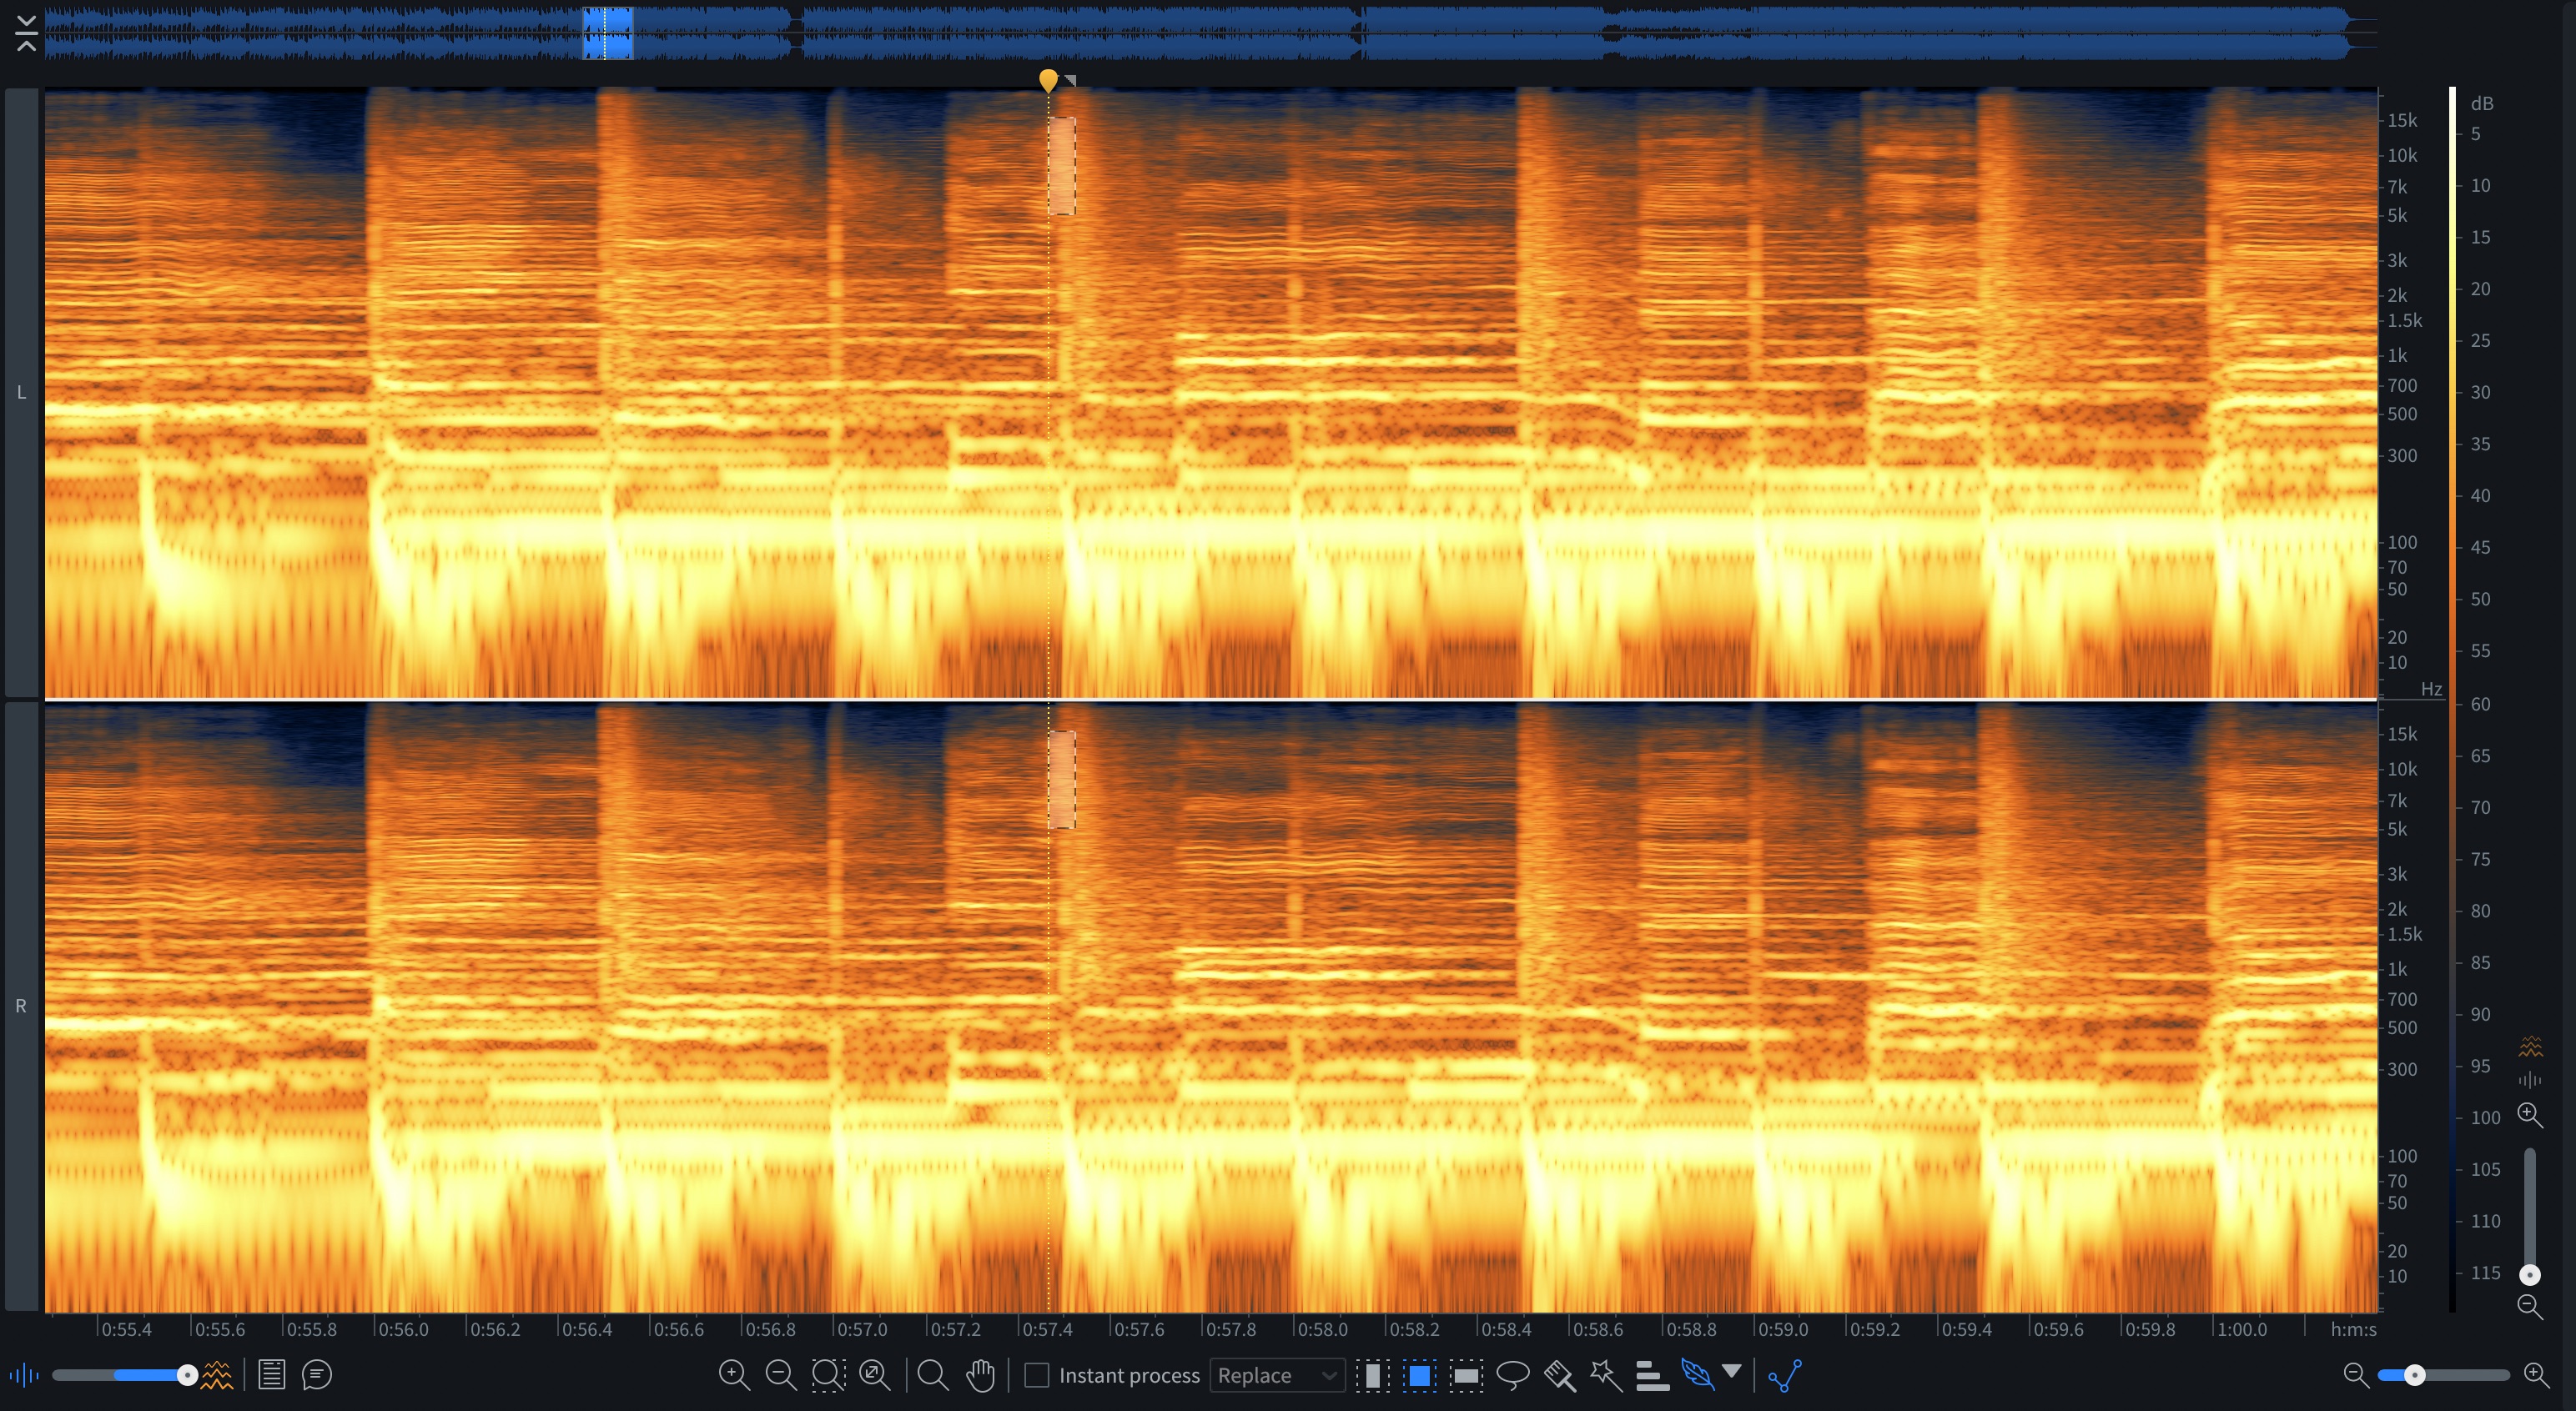
Frequency selection in RX
In this case, the band size of “4096” yielded something that wasn’t smooth enough to my ears, so I reduced it to 128 bands.
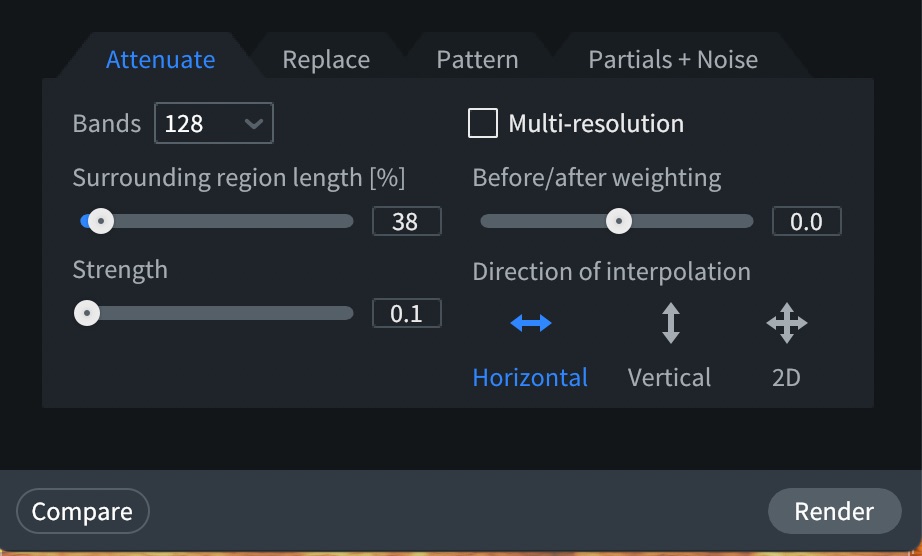
RX de-essing preset settings adjusted
Here's the result:
I have these de-essing presets – as well as some others – mapped to the number keys on my computer in RX.
When de-essing material, I select the offending sibilance and hit 1. If that isn’t strong enough, I move to 2. And so on. I find it works quite efficiently.
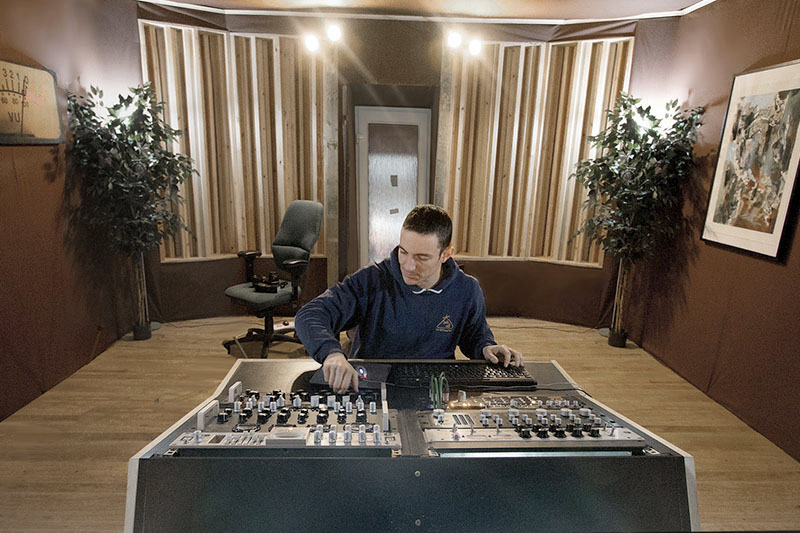
6. Mat Leffler-Schulman: RX before the job begins in earnest
Mat Leffler-Schulman runs Mat Leffler-Schulman Mastering, and has mastered countless records over the years, working with Beach House, Dan Deacon, and Jon Batiste. He masterfully mastered an acoustic record for me – Ari and the Buffalo Kings’ In The Altogether.
He’s a meticulous engineer with an ear for detail, and his tip is all about preparation: before sending a mix out for processing, he spot-checks it using iZotope RX.
“I do the same thing on every mix that comes through my desk,” he told me. “I open up RX.” He pulls up RX and does his pre-processing “QC for every song that comes to my desk. Clicks, overs, pops, weird low-end anomalies, lots of mouth noises that I’m always cleaning up.”
Sometimes, it helps him connect with a mix engineer. “Sometimes they want some of those like lip smacks or whatever,” he says. “Sometimes, if I have a rapport with a producer or a mix engineer, they'll say, ‘just go crazy and fix it.’”
Either way, he was pretty clear: “Every mix goes through RX for that quality check at the beginning,” he said. “I'd be screwed without that.”
In my own experience, RX is a bit like matrix code: to the uninitiated eye, this looks like gibberish.
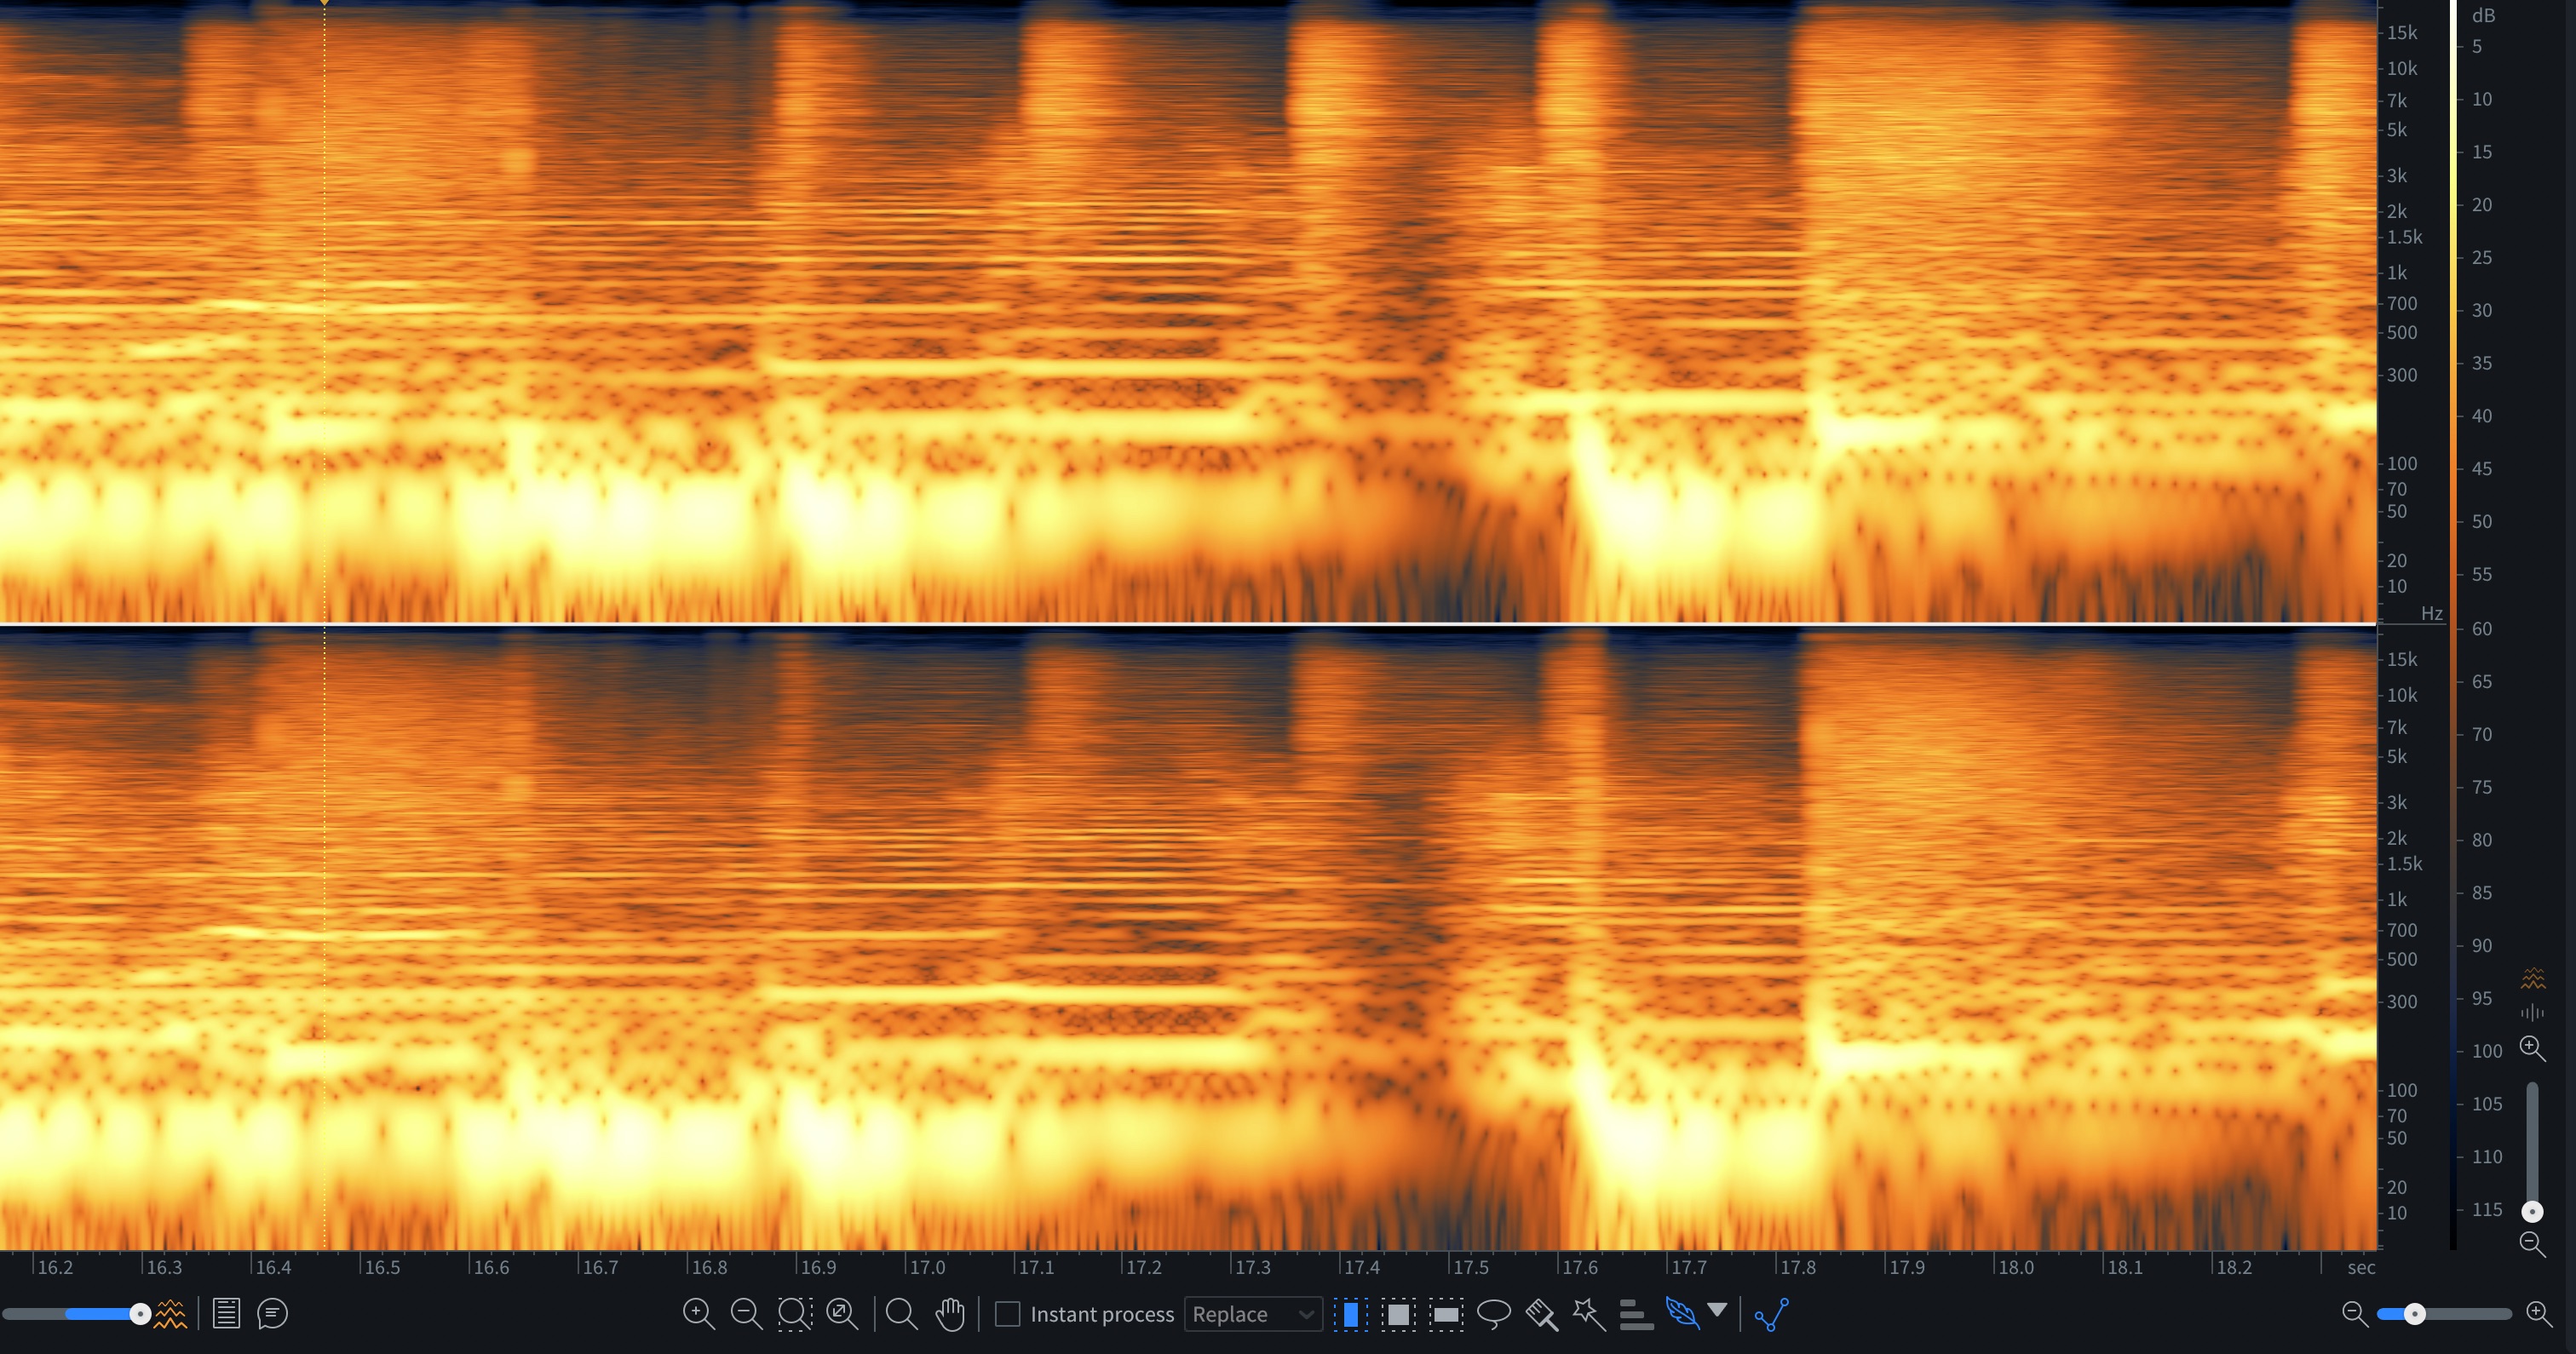
Matrix code in RX
But after a while, you can see the irregularities, such as a noticeable tick/click at right before 16.9 seconds.
7. Bob Macciochi: Compression as a magnifying lens
I honestly don’t know where to begin with introducing Bob Macciochi – or Macc, as he’s more commonly called. If his only credit were “Don’t Speak” by Run the Jewels, that would be enough for me (his discography doesn’t stop there, of course, and you can peruse the long list yourself at Discogs).
Macc is also an inspiration to anyone who wants to learn the craft: many are the Gear Space threads that feature sage advice from Macc. In our own correspondences, he’s suffered my inane questions with patience, giving me long, thoughtful answers to the overcomplicated approaches I can often fall prey to when experimenting.
So when I got this assignment, I knew I had to ring him up – and he gave me a tip that is worth its weight in gold, as it constitutes an instant magnifying glass for judging your material, instantly showing you where the frequency build-ups are.
Macc likes to grab a compressor and “squash the absolute bejesus out of it – like 15, 20 decibels of compression,” adjusting the makeup gain so that it’s level-matched to the original.
In terms of settings, he uses “just a moderate release time, so that it's not distorting, and it's not pumping too much – and not too much high-pass filter in the sidechain either, maybe like 40 Hz or something like that.”
He recommends putting it last in the chain, though it’s important to stress that this compressor is not going to stay on your final mix or master. It’s merely a stress test. “If you sweep an EQ band in front of that,” he told me, “it will tell you very quickly where the buildups are, and it will tell you about how loud something is, if it's too loud, too quiet.”
Basically, if reducing a frequency band under these conditions makes the whole mix sound better, that tells you a lot about your mix. Now you can take the compressor off and fix the issues.
“Don’t do it on a master bus,” he told me. “Do it in the mix because you know that the vocal, the guitar, they're all contributing different amounts to that problem area.”
Here’s an Ozone preset that can work for this sort of thing:
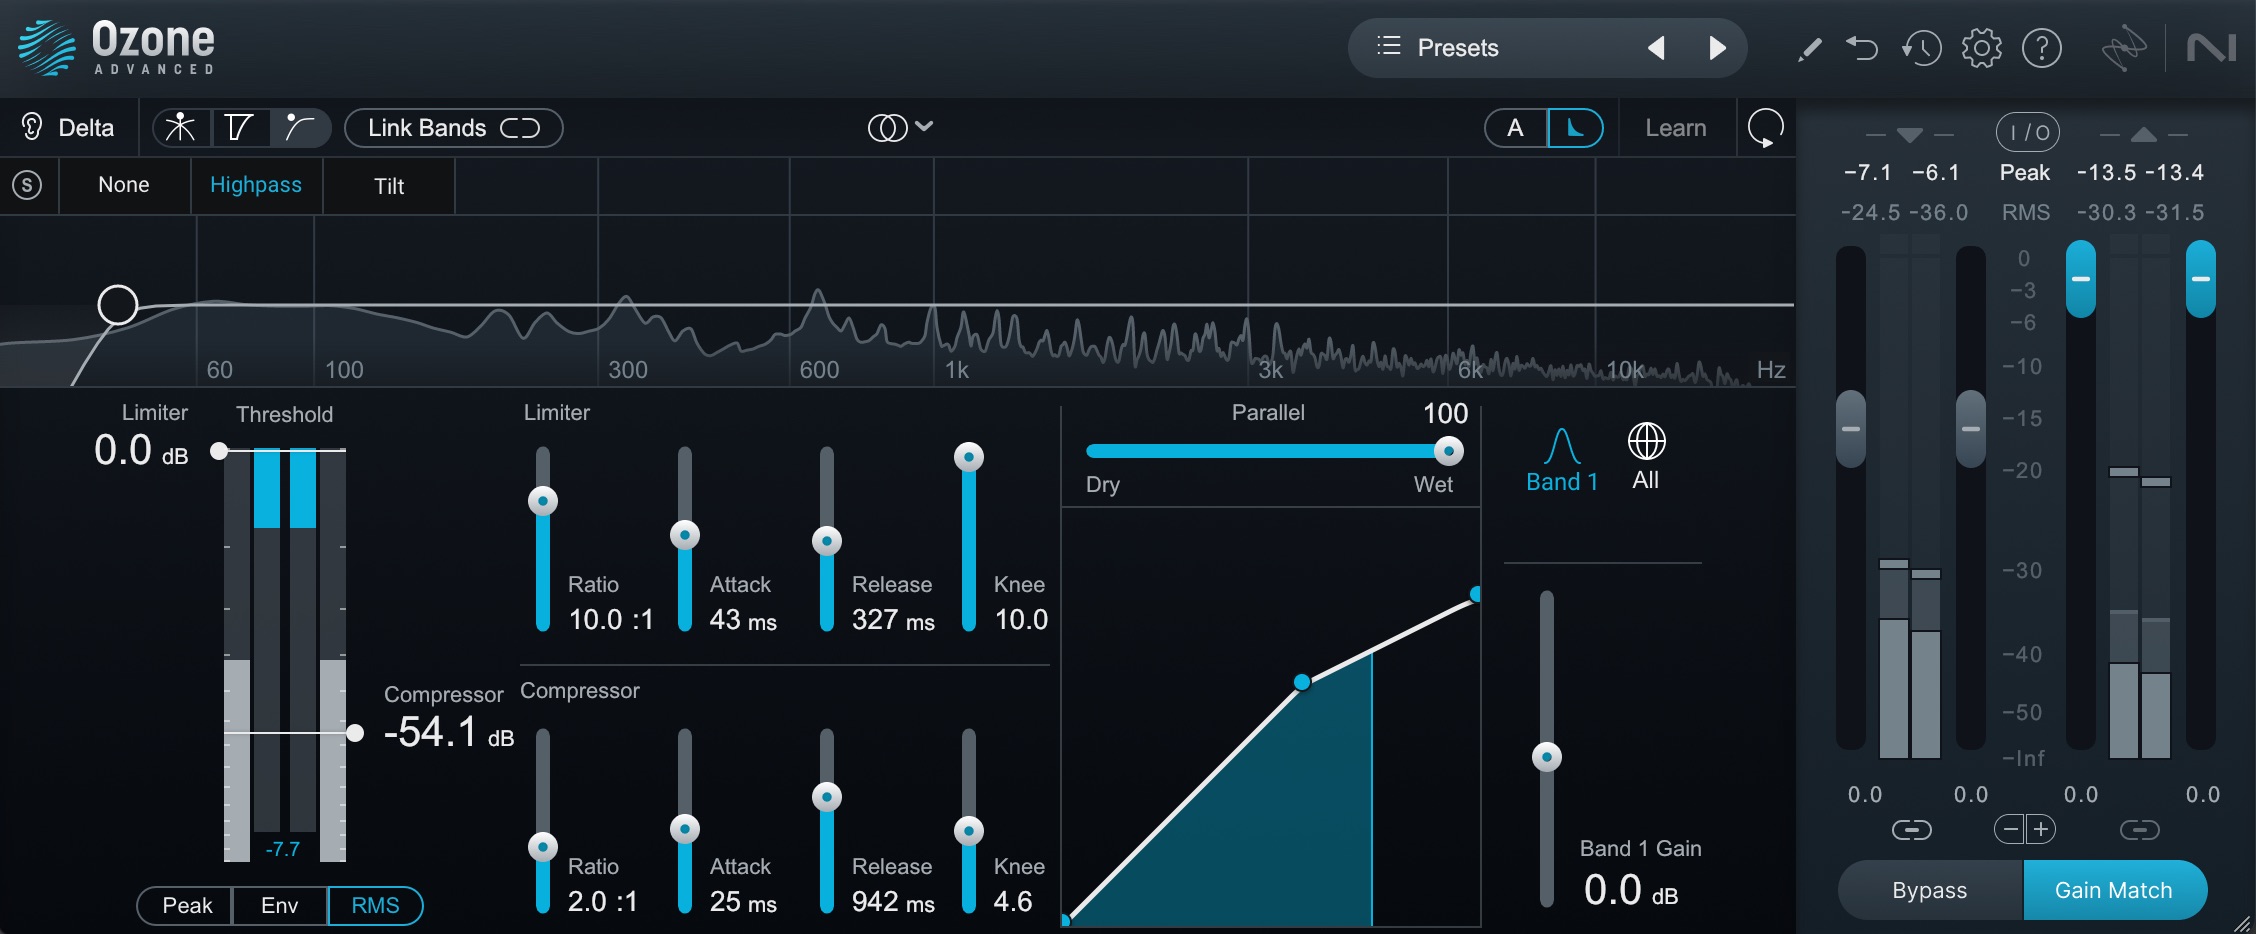
Ozone compressor preset settings
To test it out, I took a sample from one of the first mixes I ever had released commercially way back in the 2000s. Surely this thing would be in need of some help – help that I could give it nearly 20 years later.
Here’s the mix.
And here’s what Macc’s advice got me:
It’s subtle – but far less aggressive than it used to be.
Start your engines
Mixing and mastering are deeply personal processes, and there’s no single right way to do it. But by incorporating some of these tips into your workflow, you might discover new ways to enhance your sound.
If you’d like me to do a follow-up with more tips from the pros, let us know! This is a mere fraction of what I collated from these trusted experts, and we're always happy to talk to colleagues.
Try some of these techniques discussed today with a free demo of Ozone.