What Is Mix Automation? Everything You've Been Too Afraid to Ask
Have questions about mix automation in a DAW? We have answers. Learn what automation is, when to use it, the types of automation modes, and more.
Whether it was a music producer saying "I automated the EQ cutoff frequency to create an awesome filter sweep" or a sound engineer using "automation to ride the vocal track," you've probably heard the word automation used a lot.
In this article, I will try to answer all the questions you've always had about mix automation but were too afraid to ask. We'll go over what automation is in mixing, why you'll want to use it, and the basics of automation. To learn three creative applications of using automation in a DAW, check out this article.
What is automation?
Automation refers to automating, meaning having a robot or a computer do some task(s) for you. In the case of music production, automation means having a DAW (Logic Pro X, Pro Tools, Ableton, etc.) automatically perform tasks over time, particularly moving knobs, faders, and switches for you.
The most popular use of automation in mixing is to adjust the volume of a track. For example, it allows you to bring an instrument to the forefront for a moment and fade it back out when the lead vocal comes back in. Take a look at the example below and notice how the fader on the left moves automatically based on the automation curves on the track on the right.

Why would I use automation?
To answer that question, let me take you back in time. In the old days (30 years ago), before our music recording and mixing processes became digital, everything had to be done by hand.
Imagine this scenario: You were mixing a song performed by a full band. You'd set your levels and balances so everyone sounded great in the verse. But you noticed a problem. When the chorus came in, the vocal was suddenly getting a bit buried in the mix. If you were to bring up the volume fader for the whole song, the vocal would be too loud in the verse. The solution? You would manually move the fader up when you entered the chorus. You'd take a piece of tape, and mark on the side of the vocal volume fader that during the verse the fader should be set at -8 dB and then for the chorus it should be boosted to -6 dB. And each time you'd play through the song you'd have to remember to push that fader up a bit.
That solved the problem with the vocal levels. Then you realized that the reverb that made the vocal sound gorgeous on that first verse was too wet for the amount of activity happening in the chorus. So now you’d have two tasks when entering the chorus. Volume up, reverb down. Soon you found more things that needed adjusting, but there was one big problem: you only have two hands and they were already busy. So how did you get around that? You literally needed to have another person who was able to help you turn any additional knobs and adjust any faders along with you. The more parameters you wanted to change over time, the more hands were required.
Now, rather than having five (or more) people running around the board and making pre-planned adjustments on the fly, you can now tell your DAW to perform all those tasks for you.
So why would you want to use automation?
- It saves time
- It allows you to make adjustments with exact timing and precision
- It lets you create unique effects
What can I automate?
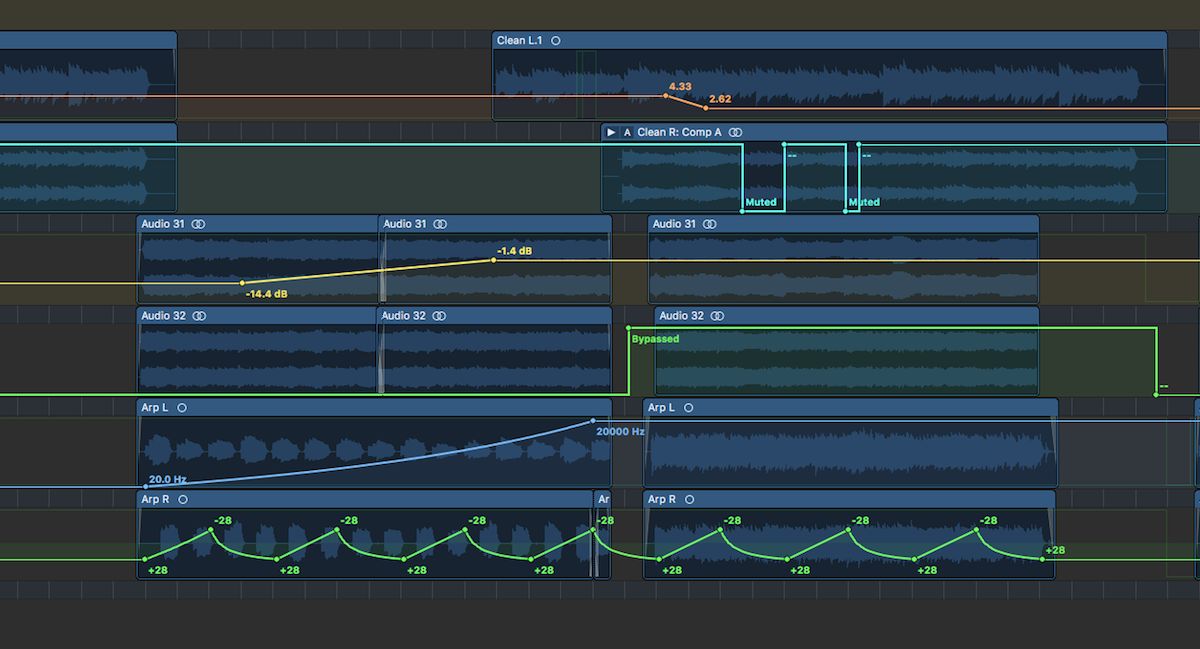
Almost anything! You can use automation to automatically adjust all sorts of parameters (volume, panning, sends, faders, etc.) on any track in your DAW. You can even automate changes to settings inside of plug-ins. Do you want to bypass a plug-in for a certain portion of your song? You can do that. Here are some ideas to get you started:
- Automate an effect bypass on and off in certain sections of your song. This could be super useful if you want to create a delay or a long reverb tail only on a couple specific words to help emphasize them.
- Automate individual plugin parameters. This can be particularly handy when creating EQ filter sweeps, or when you want to alter the delay feedback amount in a section of your song.
- Automate a VCA or a bus to control the level of a group of instruments at once.
- Automate the master fader to create a fade out for the end of your song.
Can I automate more than one parameter on a track at once?
Yes! Almost all modern DAWs allow you to perform virtually limitless amounts of automation at the same time. So, for example, you can have the reverb send amount fade out to 0 over the course of two bars, and at the same time have the volume, the compression threshold and the delay mix amount adjusted.
When should I use automation?
Use automation any time you want to adjust a parameter on any track or in any plug-in in your song. If you want this adjustment to happen over time every time you play over that section of the song, you should use automation for it.
How can I record automation?
In most DAWs you have three main options for recording automation:
- You can draw it in manually using your mouse
- You can perform your changes by moving the fader/knob/button directly on the channel strip or in a plug-in
- You can perform your changes using an assigned knob/fader/button on a MIDI controller and have your DAW record those adjustments.
You'll have to reference your DAW's manual for the exact way of doing either of those, as each DAW has a unique way of assigning controllers and recording automation.
Drawing in your automation is probably one of the faster ways to achieve precise results. Depending on the DAW you’re using, you may have different tools available to you. In Logic you can just click on the automation line to create new points. Each point can be moved to the desired location, which results in a straight line between the two points (see GIF below). You can then use the Automation Curve tool to give your automation curves and add smoothness to your sound (see GIF above). This is useful if you’re trying to gradually speed up or slow down the movement of the parament you’re changing.
Finally, you can literally “draw” in your changes using the Pencil Tool (sometimes also called the Paint tool). In this mode your mouse is treated as a brush so you can freely “paint” your automation. Again, you’ll want to reference your DAW’s manual for more information on the tools available to you.
What are automation modes?
Automation modes determine how automation is treated on a particular track. In its basic form, automation can either be read or written. In most DAWs you can independently set the automation mode for each track. Almost all audio recording/editing/mixing programs offer the following four automation modes:
- Read: When your track is set to this mode, the DAW plays back all the automation that exists on the track. For example, if data that adjusts the volume exists, the volume fader will move during playback, following the recorded automation on the track. Moving controls will not affect anything on a permanent basis, as no new data will be recorded in this mode. As the name suggests, Read mode only reads already existing information.

- Touch: This mode plays back automation in the same way as Read mode. However, in Touch mode, you can modify the value of the chosen automation parameter by moving controls (on your track, in a plug-in or on your MIDI controller) during playback. After the fader or knob is released, the parameter reverts to following existing automation on the track. This mode is useful if you only want to touch up (thus the name Touch) certain portions of your automation without affecting the rest.

- Latch: This mode works like Touch mode, but after the fader or knob is released, the last parameter value on which you released the fader or knob continues to replace existing automation on the track. As the name suggests, it latches onto the last value that you moved your fader or knob to and continues writing/replacing anything that follows as you keep playing back.

- Write: This is the most intense automation recording mode, as it erases any existing automation on the track as the playhead passes over it. In Write mode, the DAW records the new control movement or deletes any existing data if you do nothing.

Which of the four modes you use is really up to you. I find that in most cases I switch between Touch and Read mode. And for small adjustments, I just draw those in manually as it lets me be more precise. Particularly when I'm trying to create a gradual movement of a specific parameter (like a volume fade out for my entire song).
Are there differences in how automation works between DAWs?
Yes, each DAW has a slightly different way of recording, displaying and editing automation information. Throughout the years most DAWs have streamlined the process and nowadays you'll find that most of them do things similarly. Ableton Live is an exception (let me explain).
Almost all modern DAWs including Logic Pro X, Pro Tools, Cubase, Reaper, and Studio One, among others, follow the standardized method of dealing with automation, where you're able to select parameters and automation modes before recording automation data. You're also able to record automation data during playback when using Touch, Latch and Write modes.
Although Ableton 10 has introduced significant improvements in how automation data is presented, for the most part, the recording of automation data is still more cumbersome in comparison to other DAWs. In Ableton, automation data is treated like any other data: It doesn't exist until you record movements from a parameter/fader/knob/button. Additionally, there are no automation modes to be selected. Whatever parameter changes exist on a track get read on playback, and can be overwritten only while recording.
As before, reference your DAW's manual for exact instructions on how to record, edit and playback automation data.
Can automation be used as a creative tool? If so, how?
Absolutely! In fact, it frequently is! If you've ever heard an EQ frequency sweep building up to the beat drop in a dance song, you'll know that it can help create some great tension build-up. Try using automation to pan an instrument back and forth between the left and right speakers. Or maybe bring up the delay only on certain phrases to emphasize them. Or use automation to have the distortion plug-in turn on on your lead vocal for only the bridge.
Start automating your music
Automation is a fantastic tool that you can use to bring otherwise static elements to life. So give it a try and see how it can help you. I'm hoping that you'll soon discover how much it can improve your music production. Can't wait to hear what you create using it!


