
Vocals are a tricky business, especially when the singer is sibilant. Sibilance can be piercing, harsh, shrill, and generally unpleasant. Yet we often need vocals to be bright in the mix. These two phenomena are at odds with each other, confounding many a beginner.
In this article, we’ll explore the best tool to reduce sibilance: a de-esser. Learn what a de-esser is, how it works, as well as how to use a de-esser in your mix to get a clean, smooth sound.
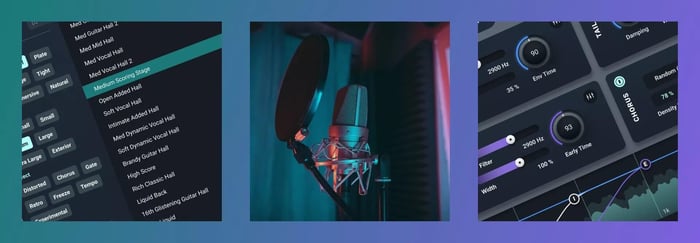
Follow along with Velvet, a smart de-esser for smoother vocals.
What is a de-esser?
A de-esser is a type of audio compressor that applies gain reduction to sibilance and other high frequency issues in a vocal track.
Sibilances are high frequency sounds created by the human voice when pronouncing the letters "s," "f," "s," "sh," and "ch." But, you can find these harsh high frequencies in other instruments as well, like crash cymbals and electric guitars.
Sibilance and harsh frequencies typically happen anywhere between 4 and 10 kHz depending on the vocal and instrument. However, they can sometimes go as low as 1.5 kHz with certain vocalist and microphone combinations.
How does a de-esser work?
A de-esser operates by targeting and attenuating frequencies associated with sibilant sounds in vocal recordings. Your basic de-esser is a compressor that responds to these aggressive frequencies, turning down the vocal whenever it detects harsh piercing sibilance. But we have gone far beyond basic de-essers: with AI-powered technology, amazing things are possible when it comes to defanging these horrible noises.
Still, all de-essers rely on a similar tactic: a circuit that detects an excessive level of sibilance, typically in the range of 4 to 10 kHz, and a processor to clamp down on these frequencies in a musical manner. The goal is to maintain a natural and intelligible vocal quality while mitigating the harshness. Parameters such as threshold, attack, and release settings allow users to fine-tune a de-esser's response to match the characteristics of different vocal performances, providing a pragmatic solution for controlling sibilance in audio production.
That’s a basic de-esser. But we’re now far beyond basic de-essers: AI-powered technology – coupled with the ingenuity of the human spirit – has achieved amazing new possibilities in the world of sibilance.
Still, the goal of de-essrs remains the same. At the end of the day, a de-esser is any tool that suppresses the sibilance while maintaining a natural, intelligible vocal.
Introducing Velvet: smart de-esser
Throughout this article, we’re going to use Velvet to show off some fundamental de-essing concepts.

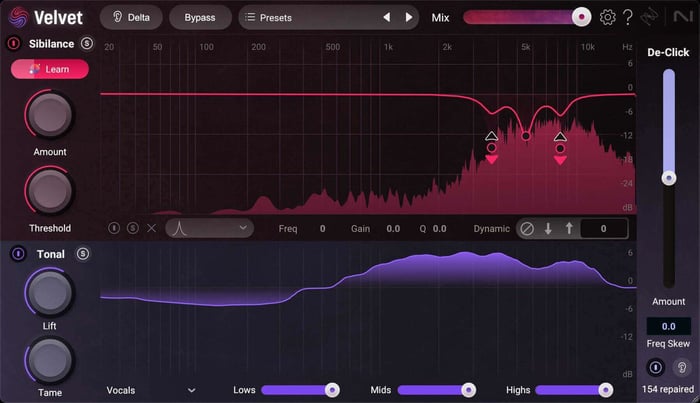
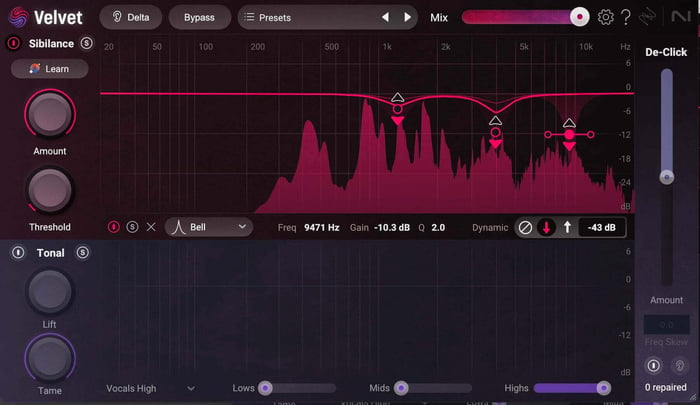
iZotope Velvet
More than a de-esser, Velvet offers global tone controls for spectral shaping, as well as a simplified version of RX’s Mouth De-click built right into the interface.
Velvet offers a combination of forward-facing technology and already-proven features. Controls like Threshold and Amount are on hand, and these are relatively self-explanatory.
Still, here’s a basic run down: Threshold dictates the level at which gain reduction will be applied to the signal, while “amount” is the amount of gain reduction Velvet will provide. Speed controls are automated, as is the case in most de-essers.
Newer to the scene (though you might recognize it from other iZotope products) is the prominent Learn button.
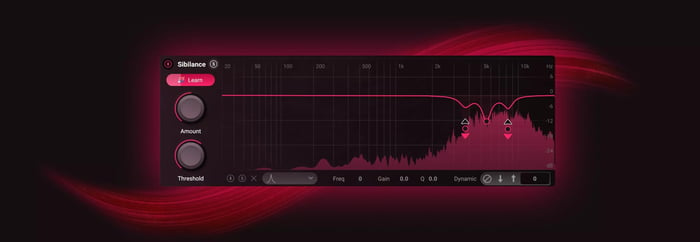
Velvet identifying sibilant frequencies with Learn
Loop a sibilant section audio, select the Learn button, and the plugin will do several things at once.
First, it will analyze your audio and generate a sibilance profile that it uses as a sidechain for the clickable bands (more on these later). Secondly, in default settings, it will intelligently set two narrow parametric bands in your signal path, with each cut targeting a specific sibilant offender.
Lastly, it will set a starting threshold for the onset of de-essing.
This Learn button is designed to speed up the de-essing process, and it does so quite effectively.
Once you have the signal learned, you can click in parametric or shelving bands as you can with any modern drag-and-drop EQ. The bands can be static – like a typical EQ – but by default, they respond to the sidechain signal and act like a de-esser.
Each band also has its own “mini-threshold” control.
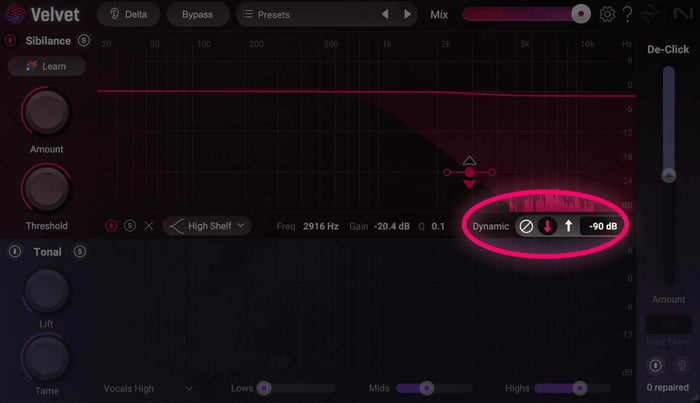
The band-specific threshold sets the signal level which dynamic gain adjustments will be triggered for the selected EQ band
That’s right, you can tailor the amount of gain reduction for each frequency band you click in.
You can also control whether the band is compressing, expanding, or remaining static. You can add multiple boosts or cuts all across the frequency spectrum. This opens up many new possibilities for curtailing sibilance and harshness.
For instance, some mic/preamp combinations can sometimes experience plosives that are triggered not by plosive sounds, but by wind noise made by sibilance. You can set Velvet to reduce these plosives based on the sibilances.
With Velvet introduced, we can now move on to talking about different types of de-essers – because yes, there are many types of de-essers, and it’s important to learn about them.
I’ll describe these de-esser typologies and use a variety of products to illustrate them, frequently coming back to Velvet as well, since Velvet can do so many different kinds of de-essing.
Types of de-essers
Let’s cover all the different methods and processors that can loosely be termed “de-essers.”
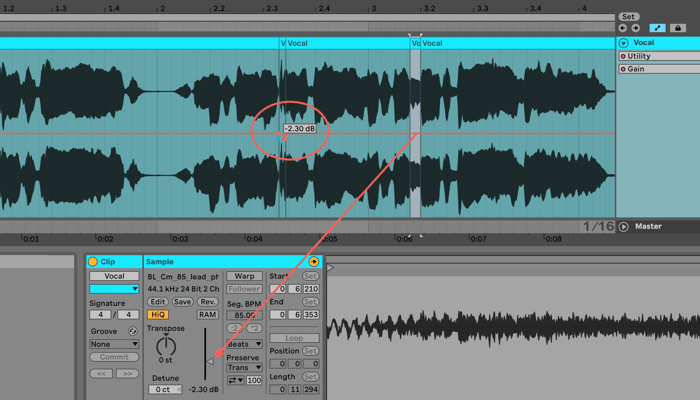
Manual de-essing
Manual de-essing is done by hand. No plugins are required. The mixer spots the sibilance in the waveform, which isn’t so hard to do.
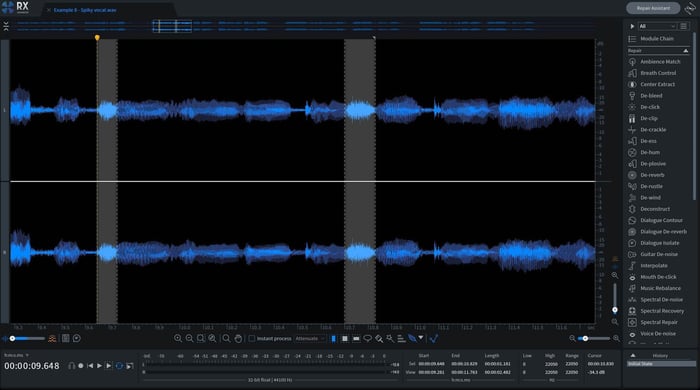
Spotting sibilance in a waveform using RX
Here I’ve highlighted two sibilated regions in RX . Note how densely concentrated the waveform becomes when sibilance hits the microphone – that’s the big giveaway: a dense, football shaped region of sound.
In manual de-essing, The engineer splits this solidly-packed mass of sibilance into its own audio region, and then clip-gains the region down a few dB. Crossfade into and out of the new region, and presto: you’ve become the de-esser.
Wide-band de-essing
Wide-band de-essing can be described as the plugin version of manual de-essing: the plugin identifies sibilance and brings the whole signal down in response.
Nectar has a wideband de-esser that accomplishes this very task.
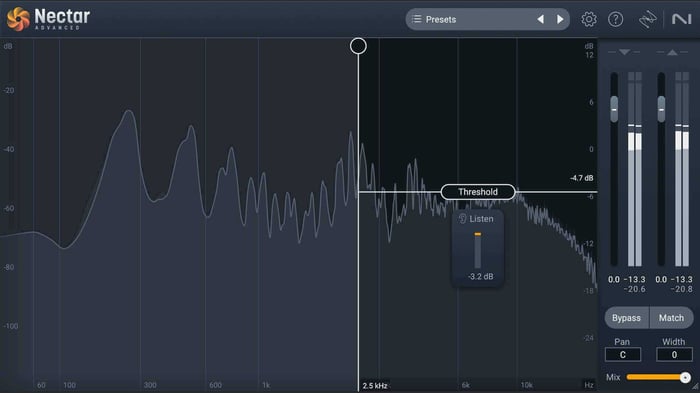
Wideband de-esser in Nectar
Let's see how wideband de-essing works in the following video.
Note the threshold control, which allows you to set the level after which de-essing will occur. In a wide-band de-esser, the frequency range – depicted here as a sort of curtain – combines with the threshold to tell the de-esser when to lower the entire signal.
The RX de-esser also has its own wideband mode. That would be the “classic” option, rather than the “spectral” mode (more on spectral de-essing later).
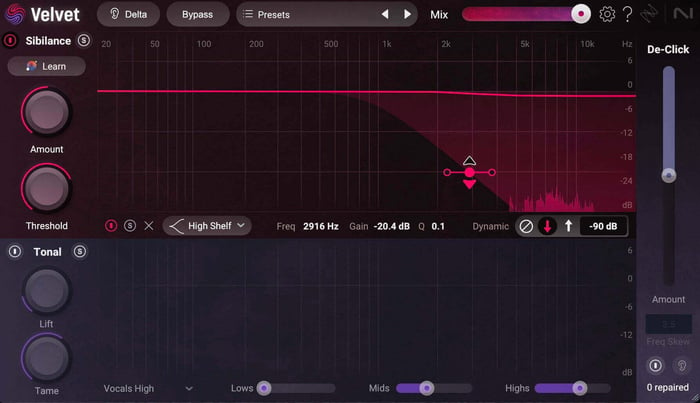
Velvet doesn’t have a wideband mode per-se, though you can get something approximating wideband de-essing in Velvet by using the widest possible high-shelf band down at the absolute lowest point of the frequency spectrum.
Select the Learn button, and Velvet will automatically learn the sibilances of your vocal track, tuning the threshold settings accordingly. You’ll be left with something like this:
It’s not a true wide band de-esser, but it effectively acts as one, because it’s de-essing everything starting at 50 Hz.
In reality, this is actually a very wide split-band de-esser – the concept behind which we’ll cover right now.
Split-band de-essing
Many de-essers have split-band modes, which reduce sibilance above a selected frequency, leaving the rest of the signal intact. They’re almost like multiband compressors, except there’s only one band of compression occurring above a set frequency target.
In Velvet, the process is the same as described above, except we set the band differently:
Split-band de-esser
This is the effect:
Multiband de-essing
As the boundaries between de-essers, multiband compressors, and dynamic EQs continue to blur, newer tools let you attenuate multiple bands that each contribute to sibilance in their own specific ways.
Velvet is one such de-esser, first through its learn function, and then again through its drag-and-drop interface.
Observe the learn feature in action when no bands are present in the interface:
It automatically detects problem areas and sets the values accordingly. Then, you can click more bands in as needed.
Adding bands in Velvet
Note how each band has its own control that acts like a threshold. This makes tweaking the de-esser quite easy.
Spectral de-essing
A spectral de-esser sounds like some scary AI tool, but really it’s just a ton of compressors working on many narrow frequency bands at once to achieve a more balanced sound while de-essing.
RX has a spectral de-esser that sounds fantastic. It applies this kind of compression in a split-band manner: it targets frequencies above a point you determine and blasts it with spectral compression until the ess is not harsh anymore.
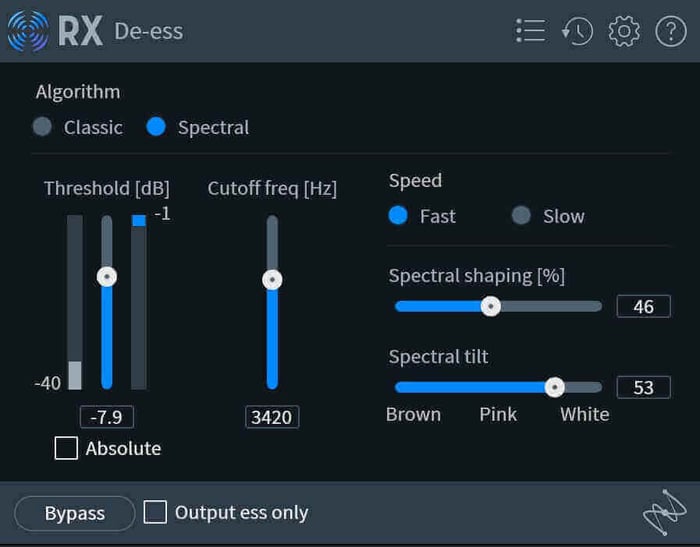
Spectral de-essing in RX
With the de-esser in RX, you can tailor the effect in a more bespoke fashion, helping to curtail harshness in either the lower or upper end of the frequency band depending on how you set the Spectral Tilt control.
I have made a preset that I find works for me quite well when I want to reach for this particular spectral de-esser. Here it is.
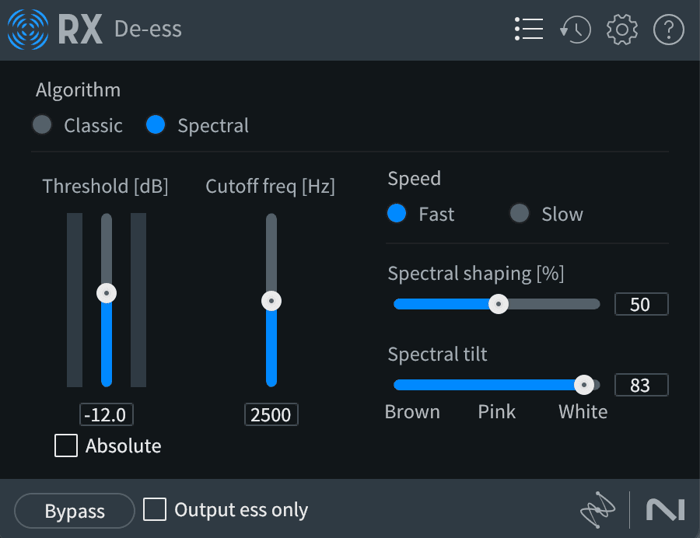
Spectral de-esser preset in RX
From here, I tend to tweak the cutoff frequency and the amount of spectral shaping. This preset has a way of evening out a specific kind of harsh, cheap-sounding sibilance.
How to use a de-esser to your advantage
Now, let's learn how to work with traditional de-essers.
1. Try clip-gaining or level automation first
First, reduce the workload of your de-esser by attenuating sibilance with clip-gain or level automation – that “manual de-essing” we talked about earlier.
This can often sound more natural than other forms of de-essing, as you’re able to treat each sibilant sound individually. Basically, you look for the recognizable “ess” in the waveform – separate the "esses" into their own clip, and reduce the gain of that clip.
Manually de-essing sibilant sounds with gain automation and clip gain
2. Focus the de-esser on the right frequencies
With a de-esser in your vocal signal chain, you'll want to focus the de-esser on harsh frequencies you want to attenuate.
Sibilances typically happen between 4 and 10 kHz depending on the vocal (though with home setups, I’ve heard sibilance down below 2 kHz as well).
Do keep in mind that tools like Velvet have Learn functions that make setting the de-esser an automated breeze. We’ve covered that earlier, but here’s the video again if you missed it:
3. Decrease the threshold until you hear gain reduction
Next, drop the threshold until the de-esser begins reducing the harsh frequencies caused by sibilance. Remember, you don't want to completely remove the "esses," since they're a normal component of human speech. Apply just enough gain reduction that the sibilance no longer sounds harsh to the listener.
4. Don’t be afraid of automating your de-essers
If you’re finding that one particular syllable is hitting the de-esser too hard, you have options: you can clip-gain that syllable down, but if your de-esser isn’t the first process in line, you’re also affecting all the other processors you have before the de-esser.
Don’t forget that you can always automate your de-esser! Just raise the threshold if you’re catching too much sibilance in one particular setting – or bypass it all together if it’s being unhelpful.
In the case of Velvet, you can automate specific bands to come in and out, or change their individualized targets accordingly.
For instance, in the last section of the tune, where the vocal gets louder, the de-esser is taking too much out of the high-mids. I’ll automate that so it looks like this:
5. Think of your compressor, EQ, and de-esser as a complementary system
You’ll find lots of tutorials telling you to put the de-esser after the EQ and before the compressor. This is correct.
You’ll also find opposing instructions, such as placing the de-esser last in the chain, after all the compression and EQ. This is also correct. Some people say to put the de-esser first, followed by EQ and the compression. Also correct. Even putting one de-esser after the EQ and another after the compressor isn’t wrong.
How can this be? Because these three processes – EQ, compression, and de-essing – are interdependent.
EQ can influence how a compressor operates: if you apply a static cut to a sibilant region, the compressor might not work as hard.
Similarly, compressors can affect the sibilance of a sound, as an untreated spiky ess can make the compressor work extra hard – which has a snowballing effect: the esses become even more harsh.
A de-esser can also allow you to add a lot more top-end to the signal if put before an EQ. If you’re already treating that harsh frequency, you have more leeway to boost.
Given all these options, what shall you do?
Practice! Grab yourself an EQ, a de-esser, and a compressor. Spend some time with a vocal and see what happens when you work on all three processors at once.
Or, with a plugin like Velvet, use the tonal options on hand to combine EQ, dynamics, spectral processing, and de-essing to get your vocal in shape!
6. Don’t be afraid of using multiple de-essers
As we know from serial compression, it’s often better to move the needle with one small processor at a time, using many tools subtly rather than one tool with a heavy hand.
This principle is especially true when de-essing. A little manual de-essing here, followed by a split-band de-esser later in the chain is far more likely to get you a natural result.
Plus, you can target different frequency ranges with different de-essers, which can also be beneficial. A singer might sibilate at a higher frequency when singing softly, but hit the esses harder in the 3 kHz region when belting.
In the case of Velvet - you can handle this operation in one de-esser, but say you want spectral de-essing for some of the song and multiband Velveting for other parts. That’s totally okay!
7. Don’t forget to de-ess your sends, if necessary
If you’re planning on sending a little of your vocal to a reverb or a distortion effect, experiment with de-essing the send before hitting that processor. A bright vocal may be too much for the reverb or the distortion process, calling too much attention to the onset of the ambiance or the harshness of distortion.
Putting a de-esser before these processes can mitigate some of the unintended side effects.
8. Think beyond vocals
This is a bit of a bonus tip, but still, I’ll share it: de-essers are not just for vocals. Because of the innate harshness of many instruments – and because of the way some de-essers can respond quite smoothly – they can be great, band-specific remedies for guitars and drums, particularly overheads.
For guitars, this is especially true on electric axes that make use of amplifier simulators, as emulations often reveal their fakery in the harshness of the high-midrange. Slap a de-esser down around 4 kHz or so, and you may be able to get more authenticity out of a fake amplifier.
Likewise, if you have too much cymbal splash in the overheads – to the point that it’s just tearing your head off – give the de-esser a go. You may find it does the trick in softening the blow without sucking all the life out, as a static equalizer might.
This is why Velvet has different instrument profiles that help tell the de-esser circuit what it should be listening for when you use the Learn button.
Ask your doctor if de-essing is right for you
We’ve given you a good overview of the tools at your disposal for de-essing, as well as a blueprint for how to use them. All that’s left is to grab a bright vocal and start practicing! Try it out yourself with iZotope Velvet .