

Vocal processing isn’t rocket science. In fact, it boils down to a few common tools configured to complement the type of session you’re working on. In this piece, we’ll take a look at a basic vocal chain and learn how to craft a simple yet effective vocal effects chain using compressors, EQs, de-essers, reverb, and delay that can get your vocals sounding professional.
Here's the vocal before and after processing:
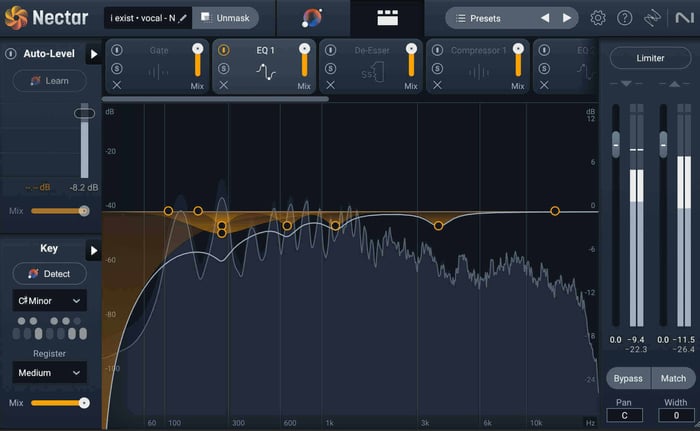
Vocal Chain Processing
A vocal chain is simply a series of processors that your dry vocals run through before getting added to your final mix. Dry vocals are your vocals without any effects or processing applied. Each processor is like a link in a chain, and your vocal will go through each processor in order to come out on the other side sounding golden.
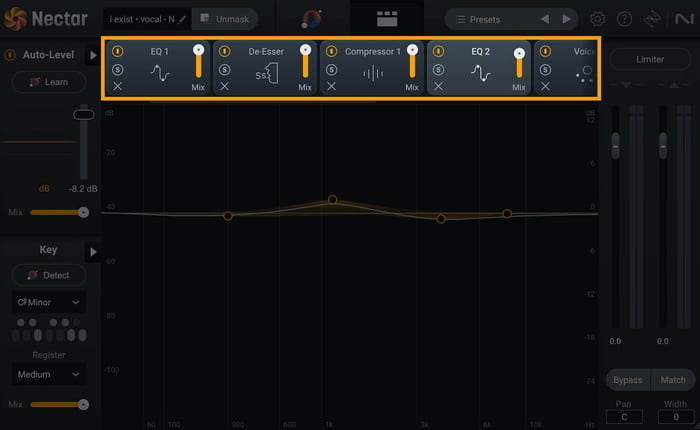
Vocal chain processing in Nectar
In this article, we’ll take a look at the processors commonly used in a vocal chain and learn how they work. We will go through each step in the order I have found works best in my vocal production, but keep in mind that depending on your style, genre, and preferences, you may decide to switch up the order—or exclude certain processors altogether.
That being said, it is important to realize that the order you put your links in will give you different results. Since your vocal runs down the chain in a series, and since each new processor you add will affect only the audio flowing into it, you can achieve very different sounds depending on how you build your vocal mixing chain. For example, you’re going to get a different sound if you put a delay before the reverb, versus doing it the other way around—even if all the settings for each processor stay exactly the same.
For this article, I’m going to walk you through each link in my standard vocal chain. But, definitely take some time to experiment with your own chain in order to figure out what creates the right vibe for your track.
Also, while most DAWs come with stock versions of the processors I’ll be highlighting below, I’m going to be using iZotope Nectar to explain each step in the vocal chain. Nectar is a vocal polishing powerhouse that has every processor we’ll be covering built into it. You can demo Nectar for free to follow along with this tutorial.
1. Use the Vocal Assistant
Nectar has an AI-powered feature called Vocal Assistant that will intelligently listen to your vocal and generate a custom vocal chain for you. What’s useful about this feature is that it gives you a great starting point to work from, but then you can still go in, deep under the hood, to make any adjustments you’d like.
Consider using the Vocal Assistant before you even start your vocal chain. The Vocal Assistant does a great job of handling most of the grunt work for you, so definitely take advantage of that feature if you want to speed up your workflow.
For the sake of this piece, I’m going to show you how to build a pro vocal chain the “old fashioned way” so you can understand the process.
Nectar Vocal Assistant
2. Pitch correction
The first bit of processing I send my vocal through is always pitch correction. Since pitch correction works best on a completely dry vocal, the Pitch module in Nectar always stays glued to the beginning of your chain. You can find the Key and Register features at the bottom left hand side of the UI, which you can use to open up the pitch correction options.
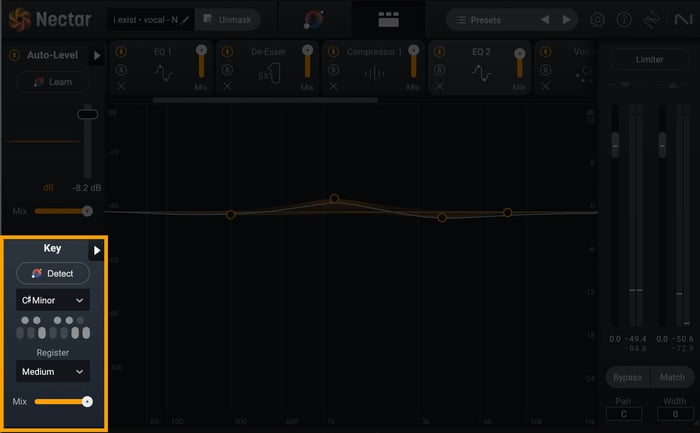
Nectar Key and Register options
First, you’ll want to set the key by either selecting it from the dropdown menu, or by clicking “Detect” and allowing Nectar to determine the ideal key by listening to your vocal track. Then, you’ll select the register. Low is great for Bass and Baritone vocals, Medium is perfect for Tenors and Contraltos, and High is ideal for Mezzo-Sopranos and Sopranos.
Then, click the triangle to the right of “Key” to open the pitch correction settings.
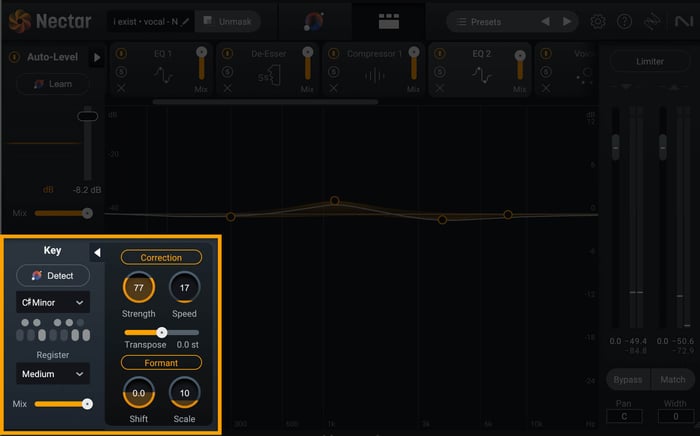
Pitch correction settings in Nectar
Click “Correction” to activate the effect and then dial the Strength and Speed knobs to your liking. The higher the strength, the more pitch correction will be applied, and turning down the speed will create more of a robotic effect. Take a listen to my vocal before and after pitch correction:
Pitch Correction
Notice that the Pitch feature does add a bit of a robotic sound to the vocal, but for the genre of the track I’m working on, this’ll be perfect. Play with the settings in this module until you hone in on the right sound for your track. You may opt for mild pitch correction, which will create a more natural sound. Or, you may crank the correction to the max. It all depends on the vibe you’re going for.
Learn more about pitch correction in our guide.
3. Compression and EQ
After pitch correction, the next modules I’ll typically add to my vocal chain are an equalizer, followed by a compressor. There’s much debate on which should come first, but over my years of crafting vocal processing chains, I’ve found this order yields the best results for vocal mixing.
EQ
Every vocalist comes with their own unique blend of frequencies in their voice. Some have a lot of high-end breathiness, whereas others might have a little bit of a nasal quality to them. The particular sound of a vocal is referred to as timbre.
In order to really get a vocal sounding professional, it’s common to use an equalizer to help achieve tonal balance across the frequency spectrum. An EQ will allow you to correct any uneven energy in your vocal by cutting or boosting certain frequency bands.
Nectar Equalizer module
When it comes to EQing, each vocal recording is going to require different frequency bands be cut or boosted. But, the main goal with adding an equalizer to your vocal chain is to remove any overly resonant frequencies—allowing your vocal to sound great and sit well in your mix.
Take a listen to the vocal from above. First, without any EQ applied, and then after I made some frequency adjustments in the Equalizer module in Nectar.
EQ on Vocals
Nectar also has a feature called Unmask that will actively listen to your vocal track compared to the rest of your mix, determine any competing frequencies, and then make custom EQ curve adjustments to create space for your vocal. This makes sure your vocal punches through your mix, front and center.
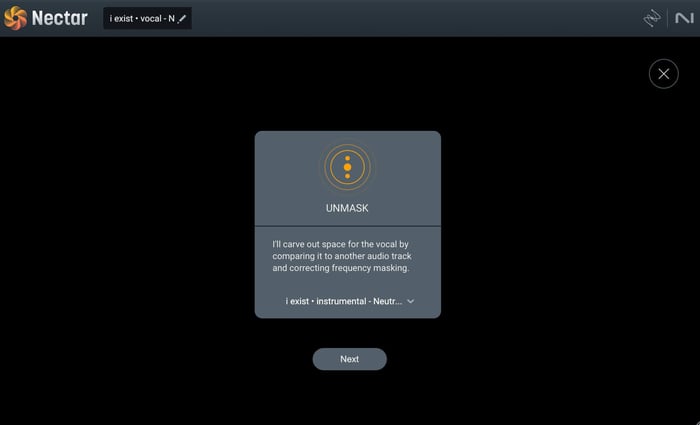
Unmask feature in Nectar
Learn more about how to EQ vocals in our expanded vocal EQ guide.
Compressor
The purpose of a compressor is to even out the dynamic range of your audio—making the loud parts quieter and the quieter parts louder. Since vocal performances tend to be very dynamic, with some phrases being performed more loudly than others, putting a compressor in your vocal chain will help create a more balanced version of the vocal and allow the listener to hear all the details clearly.
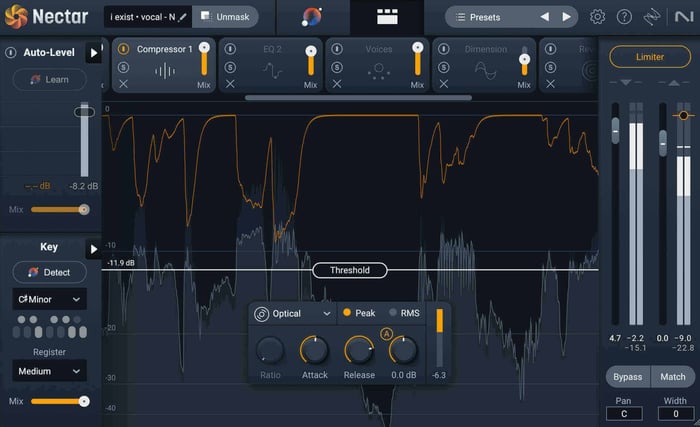
Nectar Compressor module
To begin adding compression in Nectar, simply drag down the Threshold line until the meter starts showing an orange bar, indicating that the compressor is working. It’s a pretty good rule-of-thumb to aim for anywhere between 3-7 dB of compression on your main vocal. If you’re compressing any more than that, it might cause the vocal to sound too “squashed” and unnatural.
In the Compressor module in Nectar, you also have the option of choosing between four different types of compressors (Digital, Vintage, Optical, and Solid-State) and adjusting the Attack and Release knobs to further dial in how the compressor is working. But, if the compressor is squashing your vocal too much, consider activating Auto-Level Mode (ALM) at the top left of the Nectar interface.
Nectar Compressor module
Auto-Level Mode will actively listen to your vocal and adjust the volume over time in order to keep the levels close to the target volume you set. In Nectar you also have the ability to activate the Tame Noises feature, which will help remove any breaths, mouth clicks, and other unwanted noises. You can access the Tame Noises feature by clicking the triangle to the right of “Auto-Level.”
Using Auto-Level Mode makes it so you don’t have to work the Compressor module so hard, giving you a balanced vocal without totally destroying the dynamic range of the performance.
4. De-esser
When making adjustments to the equalizer in your vocal chain, it’s common to boost the high end in order to enhance the brightness. But, this can also cause your vocal to gain a lot of sibilance (the harsh sound that comes from consonants like s, sh, ch, and z). In order to tame these harsh frequencies, you can add a de-esser to your vocal chain.
The De-esser module in Nectar is, essentially, an EQ and a compressor working simultaneously. It targets specific, sibilant frequencies and quiets them when they get too loud. Each voice contains sibilance at different frequency ranges, but it’s best practice to set your de-esser to tame any sibilance above 3 kHz.
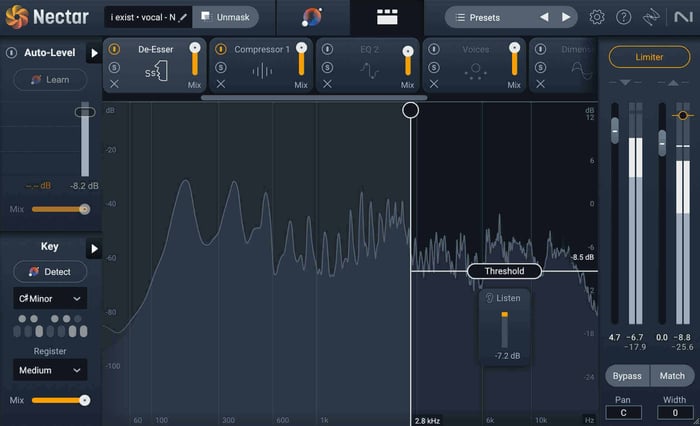
De-esser module in Nectar
5. Delay, reverb, and effects
The last step when building your vocal chain is going to be adding effects. Typically, most vocals are going to be treated with either a delay, some reverb, or both. Depending on the genre of your track, you may want to apply some additional effects to further dial in the right vocal aesthetic.
It’s important to remember that the order the vocal chain effects are placed in can drastically change the final sound. So feel free to play around with the effect sequence to see what works best for your track.
Delay
Adding delay to your vocal can really help provide a sense of space within your mix. Using shorter delay times can add some subtle texture to your vocal, whereas using longer delay times can help your vocal fill up a large space.

Delay module in Nectar
For my own vocals, I tend to like adding a very fast delay, but I’ll offset the left and right channels by 1/64. When the Feedback knobs are set to zero, this creates a really cool widening effect. You can also filter out some of the low and high frequencies of just the delays in Nectar in order to further guarantee they won’t muddy up the main vocal.
Take a listen to the before and after audio examples below to hear this effect in action.
Vocals with Delay
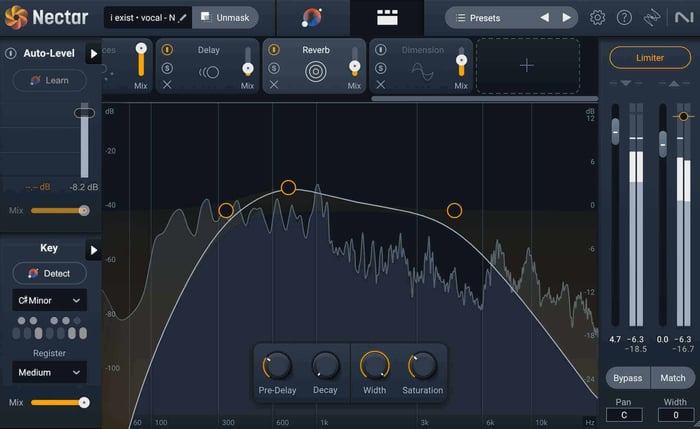
Reverb
Reverb tends to be one of those effects that people tend to overuse because it can be quite forgiving on vocals since it smooths out all the rough edges. But if you want your vocal to remain clear and intelligible, less is more when it comes to reverb.
That being said, using a little bit of reverb in your vocal chain can really get your vocal to sparkle and sit nicely within the rest of your mix.
Reverb module in Nectar
The Reverb module in Nectar allows you to change the Pre-Delay, Decay, Width, and Saturation of the reverb applied.
It also allows you to further sculpt the sound using a basic EQ. I typically like to roll off the lows and highs of the reverb and then play with boosting the midsection at various frequencies to hone in on the right sound for my track.
Take a listen to the audio examples below to hear my vocal before and after using the Reverb module.
Vocals with Reverb
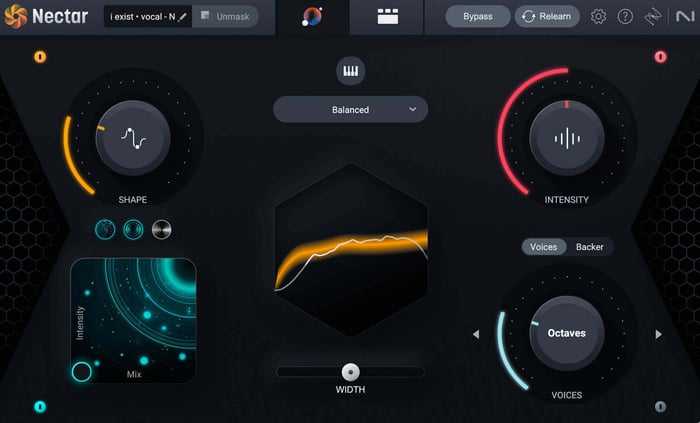
Voices
One cool, new feature they’ve implemented into Nectar is Voices. This feature creates custom harmonies of your original vocal, based on the key you set.
Within Voices, you can choose from 11 auto-harmonies or you can engage MIDI mode to control these extra harmonies and have them play exactly the notes you need. You can even adjust the range of these voices using the Direction control, and decide if you want them sung above or below your lead vocal.
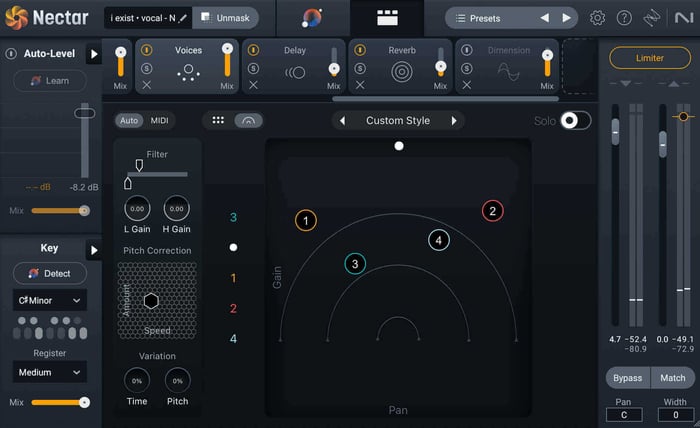
Voices module in Nectar
Check out the before and after audio examples below to hear Voices in action. For this example, I used the “Unison” harmony style to add a ton of width to the vocal.
Voices
Backer
Another really innovative addition to Nectar is Backer. This feature allows you to shift your vocals in order to create different backup singers—completely eliminating the need for double tracking.
You can even create your own style in Backer by using a reference target created with Audiolens.
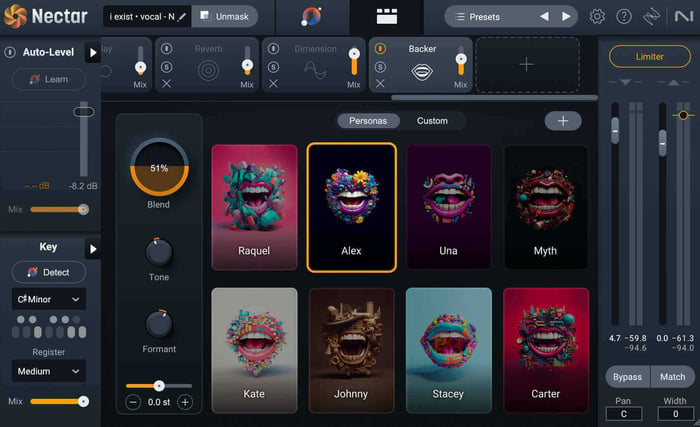
Backer module in Nectar
Backer uses AI to create backup vocals based on your original vocal, and it definitely creates some pretty interesting effects that can transform your vocal sound.
Take a listen to my vocal before and after using Backer.
Backer
6. Experiment with additional effects
In addition to the vocal chain effects we’ve covered, there are countless other effects you can apply to your vocal in order to get your unique sound dialed in. You may want to use the Saturation module in Nectar to add a bit of grit to your vocal chain, or you may want to give your vocal a psychedelic twist by cranking up the effects found in the Dimension module. The possibilities for getting creative in your vocal chain are endless.
Take one final listen to the vocal we’ve been working with, along with the rest of the mix, to hear the difference applying the vocal chain has made.
Vocal Chain Processing
Start crafting your vocal chain
Now that we’ve covered all the usual components that go into a vocal chain, it’s time for you to start building your own! Remember, when it comes to vocals, there’s not a “one-size-fits-all” approach. But, if you follow the guidelines in this article, you’ll be able to create pro vocal tracks that sit well in any mix.
Nectar contains all the processors you could ever need to get your vocals sounding professional. If you don't already have a copy of Nectar, you can demo it for free to start building your own vocal mixing chains.
For even more tips on mixing vocals, check out Vocal Mixing 101. That’s all, vox!