7 tips for mixing the low end
Mixing low end for clarity and punch is no easy feat. From sidechain compression to unmasking, here are our seven tips for how to mix low end.
Mixing low end can be a challenge for engineers working in any genre. The goal is to manage bass frequencies so that they are present without overwhelming the mix or masking instruments, making them indiscernible.
In this article, we’ll be exploring how to manage the low end of your mixes for a clear, punchy sound.
The tips in this article are geared toward those who have been mixing for a while but want to up their game a bit. For some beginner-focused tips on getting started with mixing, check out our guide on how to mix music.
Unlock a cleaner, punchier low end in your mixes with the intelligent power of iZotope
![]()
![]()
Neutron

What is the low end in mixing?
The low end of the frequency spectrum lies between 20 Hz–250 Hz. The area of frequencies between 20 Hz–160 Hz typically hosts the most energy for low end centric sounds like kick drums, basses, etc. Once we get past 250 Hz up to about 500 Hz, we refer to that area commonly as the low midrange or “low-mids.”

iZotope Carnegie Chart
Why is mixing low end so tricky?
People often ask "How do I get more low end in my mix?" and for good reason. When simply turning up the bass instruments in a mix doesn't yield the results you're looking for it can be frustrating. A common problem with this approach is called masking. Low frequencies have longer waveforms which often interact with each other. When there's so much sonic content in one area of the mix, instruments compete for attention and as a result it's hard to focus on any one thing. It's all a sonic blur.
The other issue that arises is that bass frequencies have a lot of energy behind them. Boost these frequencies too much and your mix will start to appear louder on your meters. However in reality, most of what's driving the meters is uncontrolled bass energy. Preventing buildup of bass frequencies leaves more headroom in the mix for everything else, giving you the ability to have a louder mix in general that still sounds balanced.
In this article, I'll be using clips from a project I'm mixing called “Coco Oils” by Tatyana Nahirniak to demonstrate some of these tips. Here's the song before and after mixing the low end.
Let's go over the process and some essential tips for mixing the low end.
1. Use EQ to add definition
The first thing we need to do is "take out the trash" by removing frequencies we don't need on an instrument using subtractive EQ. For example, we can low-pass most bass instruments to give more sonic room to other instruments such as vocals and guitars. You can most likely remove frequencies above 1.5 kHz from a bass guitar before noticing a change in articulation.
Removing some low-mids, around 300 Hz, from a bass will allow for more mid-focused instruments such as guitar and piano to come into focus. Conversely, filtering low frequencies from higher pitched instruments will give room to the bass and kick drum.
On the kick and bass, I also use a high-pass filter to remove some extra sub-bass energy from a mix so frequencies we can't perceive aren't causing my meters to react. Removing 20 or 30 Hz and below from bass heavy instruments will give your mix more headroom on your meters while still allowing for plenty of bass that we can actually hear and feel.
When mixing low end, it is crucial to listen to the entire mix the whole time – don't get stuck in solo-mode! EQ is all about context and how instruments are interacting. This is something that's impossible to evaluate while soloing a track. I avoid soloing any track unless I'm having a hard time finding a certain frequency with the entire mix playing. Even then, I would opt to solo the couple of tracks that are causing issues, almost always listening to them together.
For more on EQing, check out iZotope’s guides on how to EQ bass, how to mix bass, and how to EQ drums.
2. Use sidechain compression
During the process of EQing low end, you may notice that we still have quite a bit of overlap between kick and bass. For example, maybe we are preserving 60 Hz in both bass and kick because the tracks feel anemic without this frequency present.
What should we do if a frequency is only a problem when the kick and bass occur at the same time? Using EQ will remove a band of frequencies for the whole song (unless it's automated) so that's not the right move in this case. A better way to deal with this problem between kick and bass is with sidechain compression.
Sidechaining is a volume-based process, meaning it's time to get out a compressor. You'll need to use one that has a "key input" function and we'll get to why that is in a second. First, a refresher on how compression works.
Basically, a compressor looks at the volume changes that are happening on the track and in response, evens out those changes by making the loudest parts less loud. When we sidechain, we use volume from one track to compress a different track in response. In this case, we will send the volume from a kick drum track to a compressor on a bass track that will momentarily turn down the volume on that bass track. This gives the kick more space without making a global change to the tone of the bass by getting the bass out of the way of the kick for each hit.
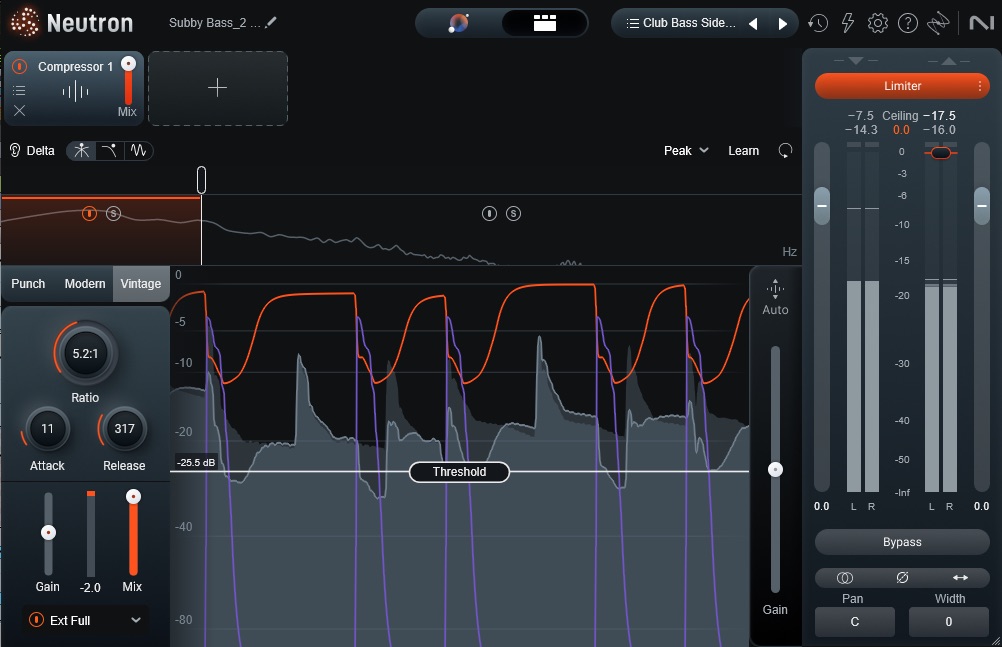
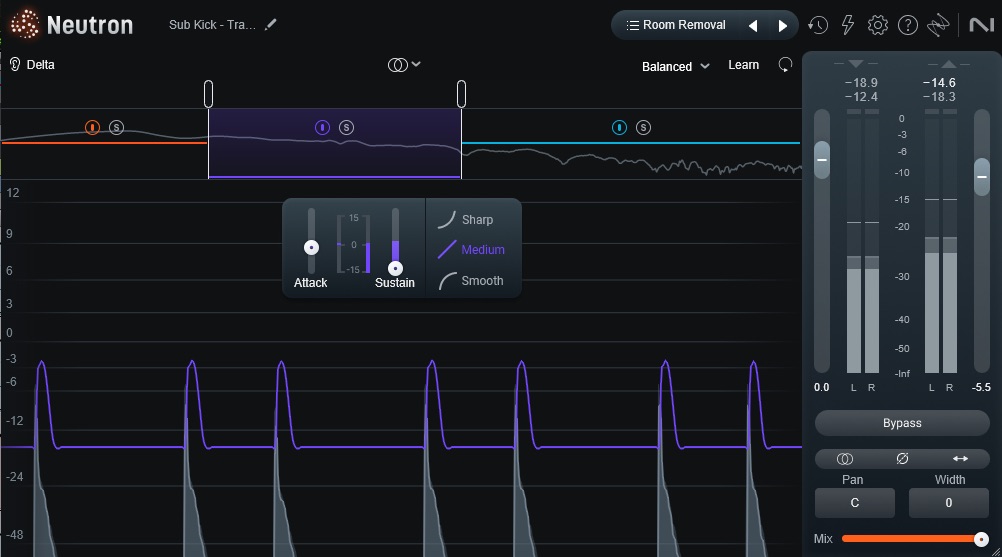
Using Neutron, we are compressing a bass track in response to volume from a kick drum
This works well on kick and bass because they are doing slightly different jobs in a mix. The kick is pretty much only there for rhythm. The bass provides some rhythmic content but is also a melodic foundation for the other instruments. We don't necessarily need to hear the attack of each bass note, but hearing the pitch of the note is important. When the kick is there to do the rhythm job, the bass can do the more melodic job during that beat. This is why we send the kick to compress the bass and not the other way around.
In this example, I used Neutron to sidechain my kick to a synth bass. The kick plays and triggers the compressor to turn down the volume of the bass. The bass effectively gets out of the way for a moment, allowing the kick to fully occupy the low end.
When trying to figure out which track should compress which other track in response, I'd recommend using the shorter, punchier sound to trigger the compressor on a track with more sustained notes.
For more on improving the relationship between kick and bass, check out these tips on how to mix kick and bass.
3. Unmask the low end
We've talked a lot about masking and how we can use EQ and compression to fix it. However, one of my favorite tools combines both EQ and compression to reduce frequency masking. Using multiband compression, we can isolate which frequencies we want to compress rather than compressing the entire track.
Using the Unmask module in Neutron, I can see what areas are overlapping between my kick and bass and focus my compression only on that frequency band. This compressor only engages when there's too much energy in the frequency band I specify, giving each instrument more clarity. Now the tracks fit together like a puzzle rather than competing with each other.
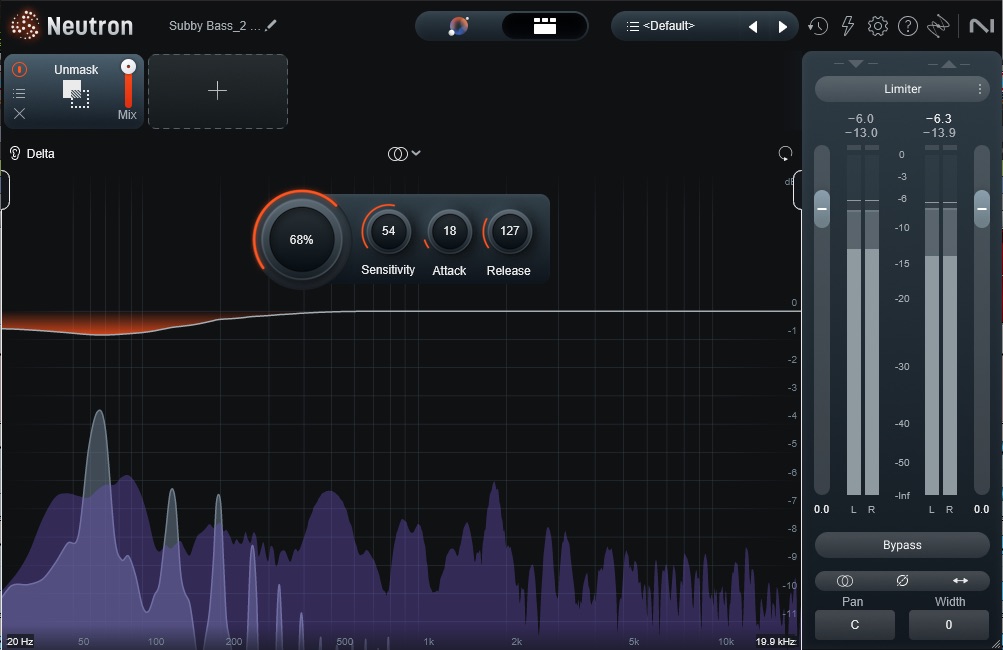
Unmasking in Neutron shows what frequencies are overlapping and corrects the problem areas
4. Try transient shaping
As the low end in the mix was coming together, I started to notice that my kick drum had a bit of resonance that was competing with the bass as well. I wanted a tighter sound from my kick in general and figured removing that resonance would also allow my bass to fill that gap so I opted to use a transient shaper to highlight the attack and minimize the sustain of my kick.
Transient shaping highlights the attack of the kick drum while taming resonance
I went a step further and customized the attack and sustain for three different frequency bands. I did like a little resonance on the lowest frequencies, but turned it down completely on the low-mids of my kick. With each of these steps, I'm really trying to get at the actual problem I'm trying to solve rather than slapping on plugins that impact more than they need to.
Here's what the transient shaping sounds like before and after.
For more on mixing drums and percussion, including transient shaping, check out these tips for mixing drums.
5. Listen to your mix on different systems
The most frustrating thing for me as a mixer is how different my mixes can sound on different systems. I have four sets of monitors in my studio that sound drastically different just so I can see how my mix will sound on these systems. It will even sound different depending on the pair of headphones you're listening through. It's quite the challenge to manage.
The benefit of listening on multiple systems is that one system may make an issue with your mix suddenly more apparent when it sounded fine listening somewhere else. For example, a pair of headphones may lack bass, causing you to overcompensate and add too much bass. Unless you listen to the mix on speakers as well, how will you know your mix has this problem?
On the flip side, if you only listened to your mix through very detailed, fancy monitors with a subwoofer, you might find that you needed to add more bass for it to be heard in headphones. The best place to start is on the system that you use the most to listen to music so you have a frame of reference. You already know how music is supposed to sound through that system. It is all about reference at the end of the day which brings me to the next tip.
6. Compare your mix to reference mixes
When working on a mix, it's really easy to lose perspective. We get so focused on the task we are working on that we can end up going in circles and doing too much. Taking periodic breaks to rest your ears will prevent fatigue or our ears "playing tricks" on us.
I also recommend recalibrating your ears by listening to reference mixes and A/B-ing them with the mix you're working on. Switching between your mix and a mix you love done by another person will help your ears clue in on the differences between them, giving you more direction in mixing decisions. Listen for the balance between instruments, how much overall low end there is, and note if you can hear or feel how compression is impacting the groove. What's different between your mix and your reference? Use what you hear to guide your decisions.
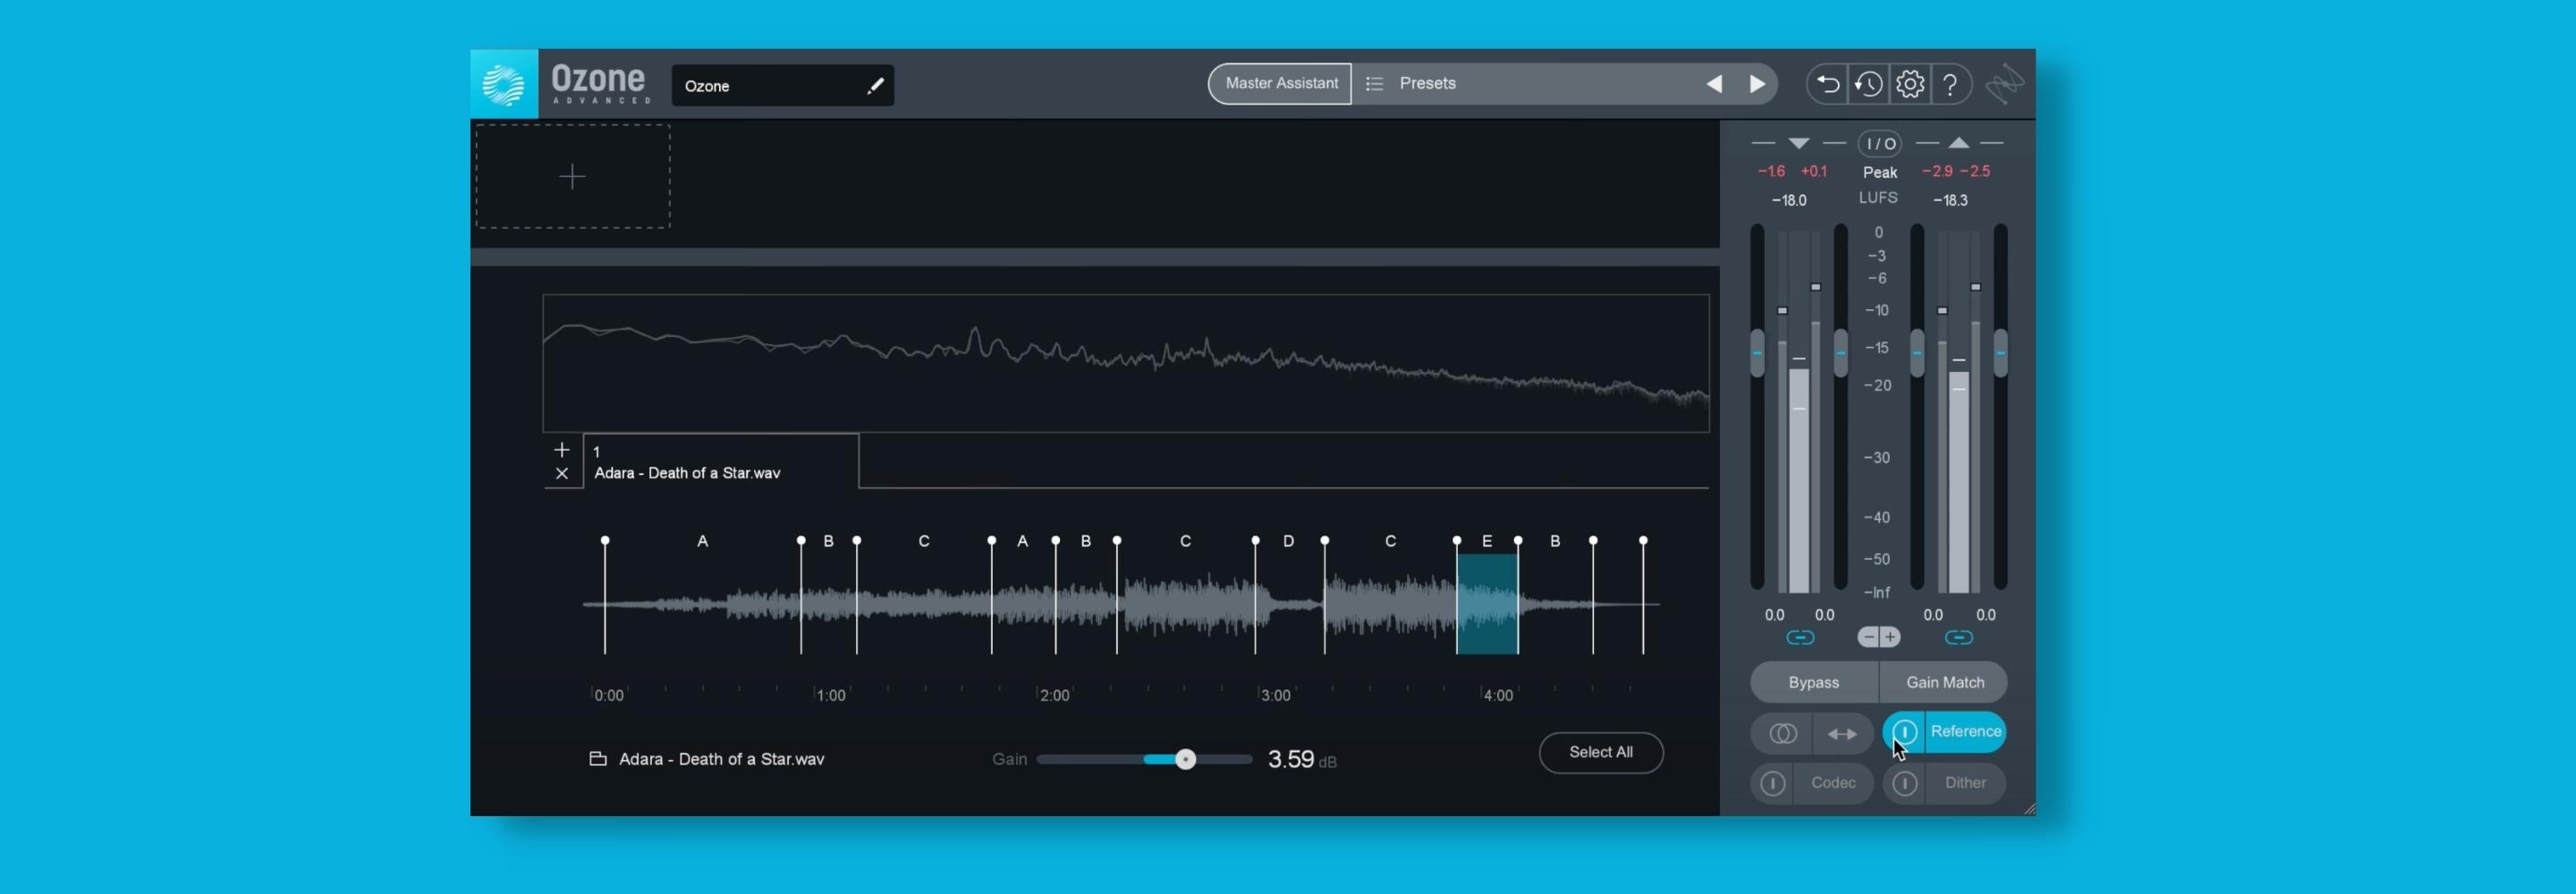
7. Give the low end a final polish with Ozone
As you're finishing your mix and listening on different systems, you might find you need to make a tonal adjustment so the mix translates better. For example, maybe you don't hear a resonance in your headphones but do on speakers. Let's listen again to “Coco Oils” with this in mind.
Here is the mix after Neutron and before
![]()
![]()
Ozone Advanced
It sounds pretty good, but I still wanted to get a bit more low-end punch so I used a tool in Ozone called Low End Focus.
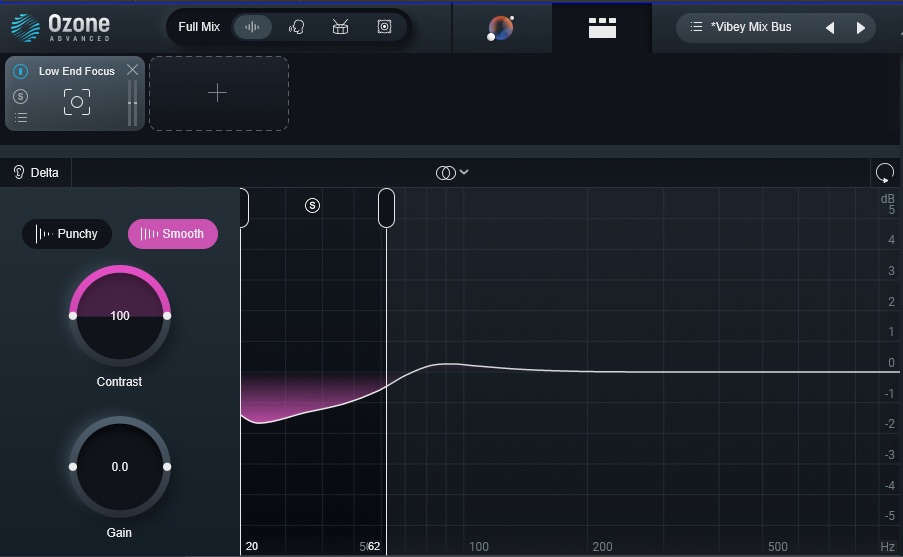
Ozone adds some contrast to the low end on a master bus giving the kick drum more punch
I selected a region from 20–60 Hz and raised the contrast, increasing the difference between low and high level content. This attenuates the low level content, resonance in this case, and brings out transients, leading to a punchier sound.
Pulling down the contrast will decrease the difference between low and high level content. The sound will blur and smooth like some really thick analog compression. Punchy and smooth modes further accentuate these differences. The "right" settings depend on the mix. While I wanted to add punch, using the Punch setting in Low End Focus made the kick transients extra sharp sounding which wasn't right for the song.
Start mixing clear and punchy low end today
Mixing low end is one of the trickiest parts of getting a mix just right. Remember that music is about feeling so give yourself grace as you learn. You'll get better with every mix as long as you are actively listening to relationships between instruments and how they change with each process.