What is top-down mixing? How to speed up your workflow
Discover what top-down mixing is, why it’s a useful technique to produce professional-sounding audio, and how to implement it in your mixes.
You might have heard about top-down mixing, a technique many professional engineers employ to speed up their workflow and maximize their efficiency. But what is it, really, and how can you implement it in your mix to save time and improve your sound?
In this tutorial, discover the ins and outs of top-down mixing, how to mix top-down, and the considerations you should take when implementing top-down mixing techniques into your sessions.
Follow along with iZotope


Music Production Suite 7
What is top down mixing?
Top-down mixing is when you work backward from the stereo bus to the individual track level. You tend to focus on processing the mix as a whole, rather than gussying up each individual track.
Here’s an example. You’ve just gotten a song to mix from a client. The song comprises a whole bunch of drums, a bass, some guitars, some keyboards, a few synths, and infinity vocal parts. All told, you’re listening to 107 individual tracks of audio all playing at the same time.
But it’s not really 107 tracks that you’re listening to. It’s only one: a single solitary stereo track that all of your audio is funneled into. This is the bottleneck for all stereo audio systems. Mute this channel, and you will hear nothing.
This channel is your “stereo bus,” also called the “two-bus,” the “master bus” and occasionally, the “master channel.”
Instead of evaluating each individual track first, you are listening to the entire mix holistically before getting into smaller groupings of tracks.
The approach makes a lot more sense when you tend to work with submixes, as many pros do.
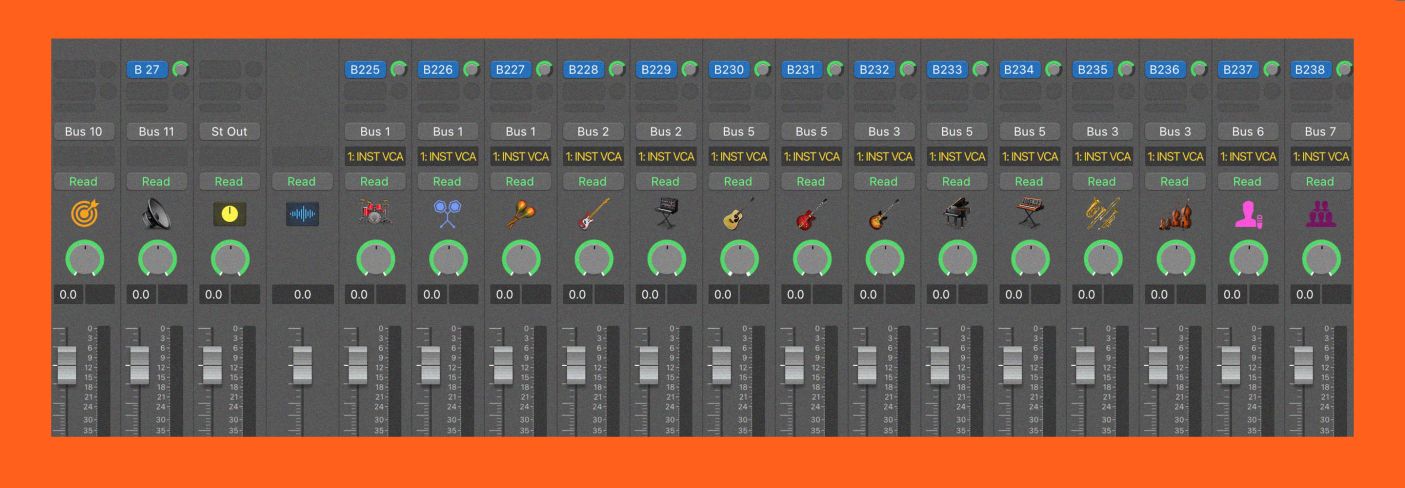
Let’s take a look at my routing template:
Routing template
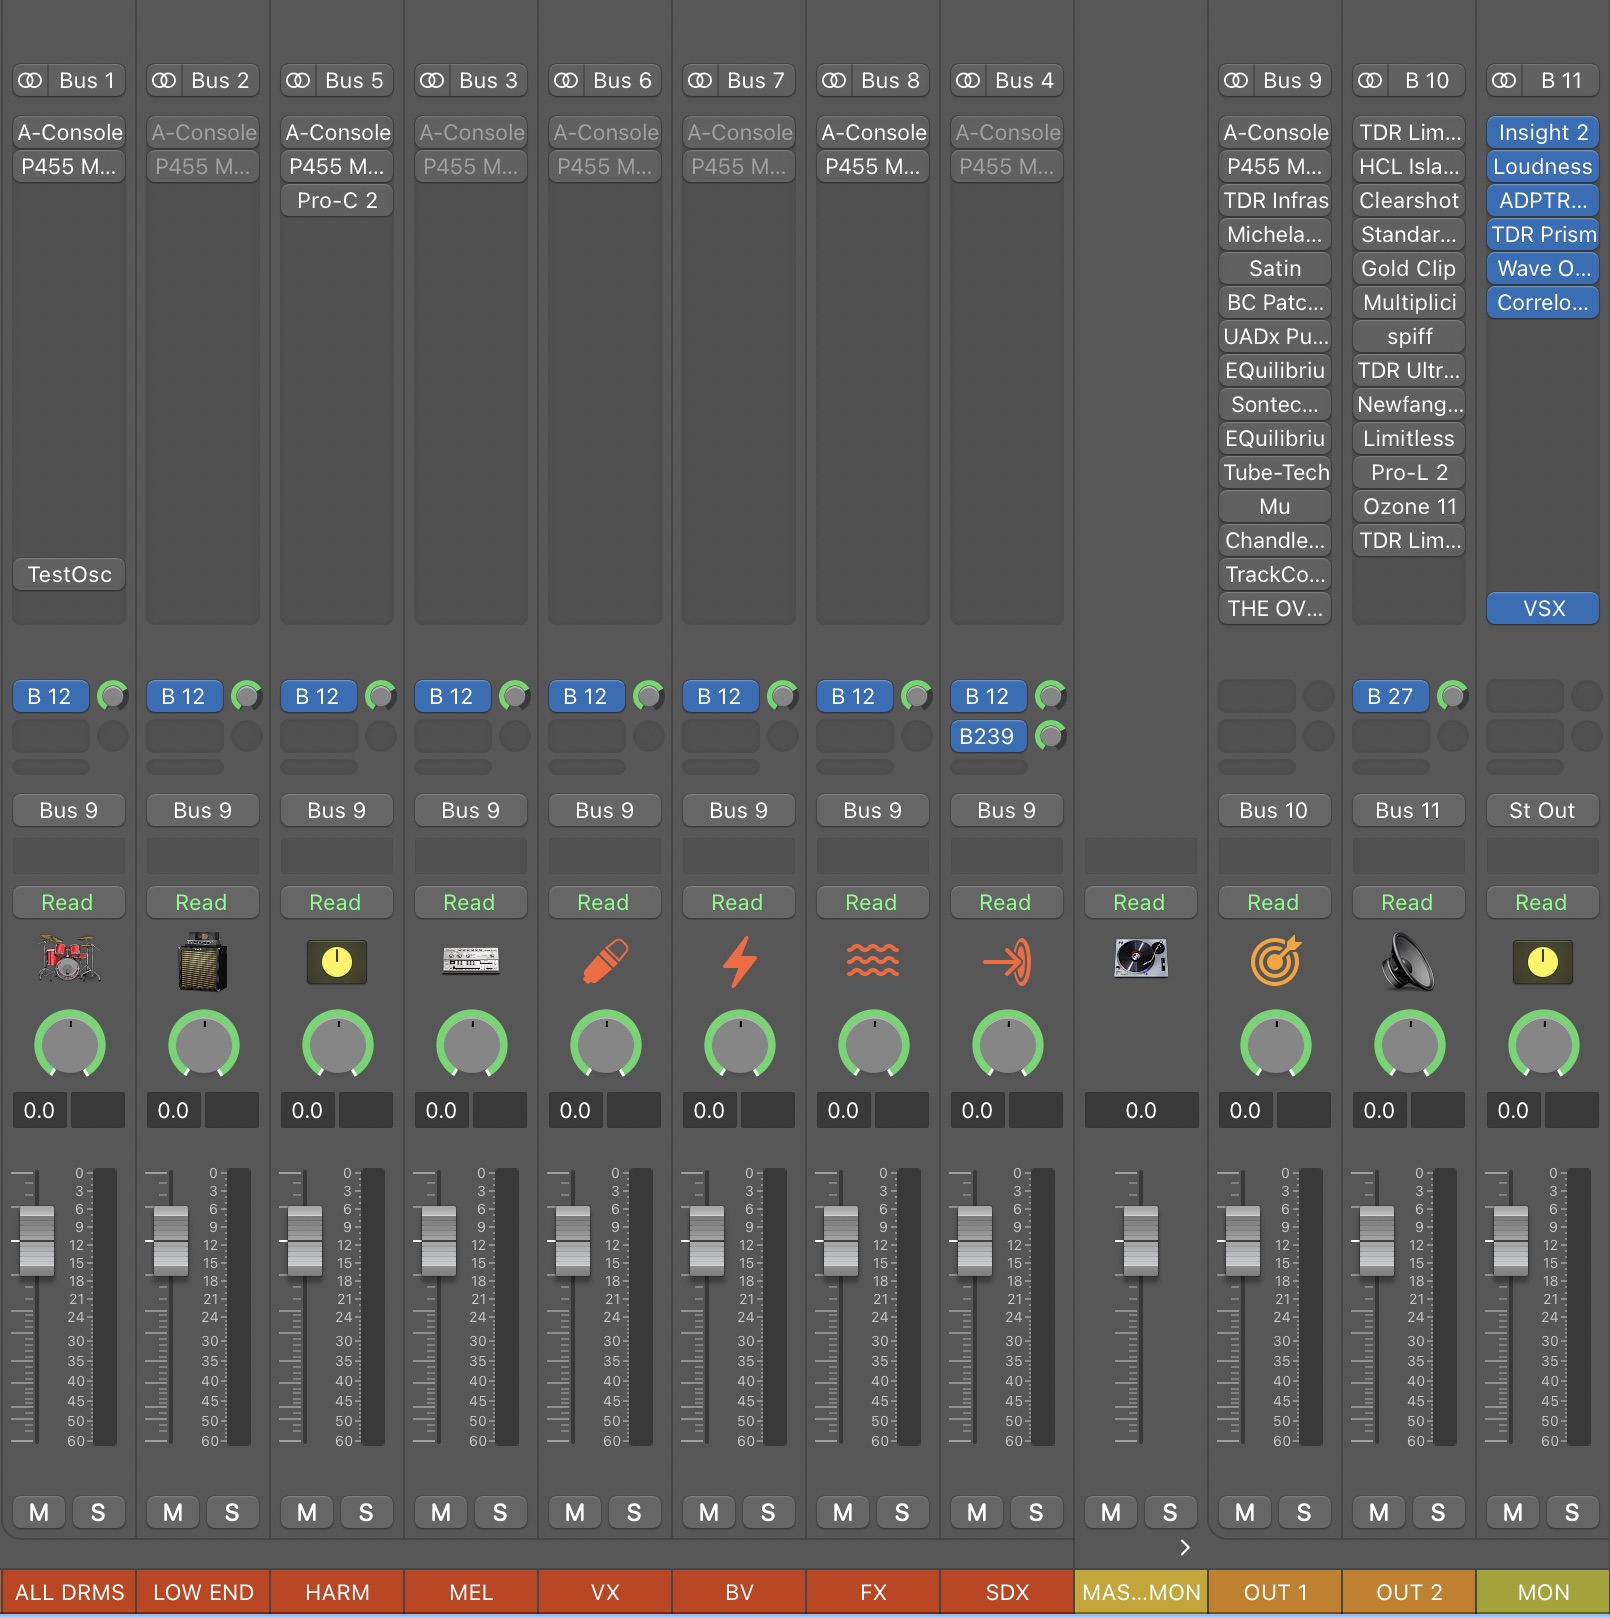
I’ve got buses going for each instrumental element. Acoustic drums get their own bus – their own stereo channel for processing – as do electric drums, real basses, synth basses, and so on.
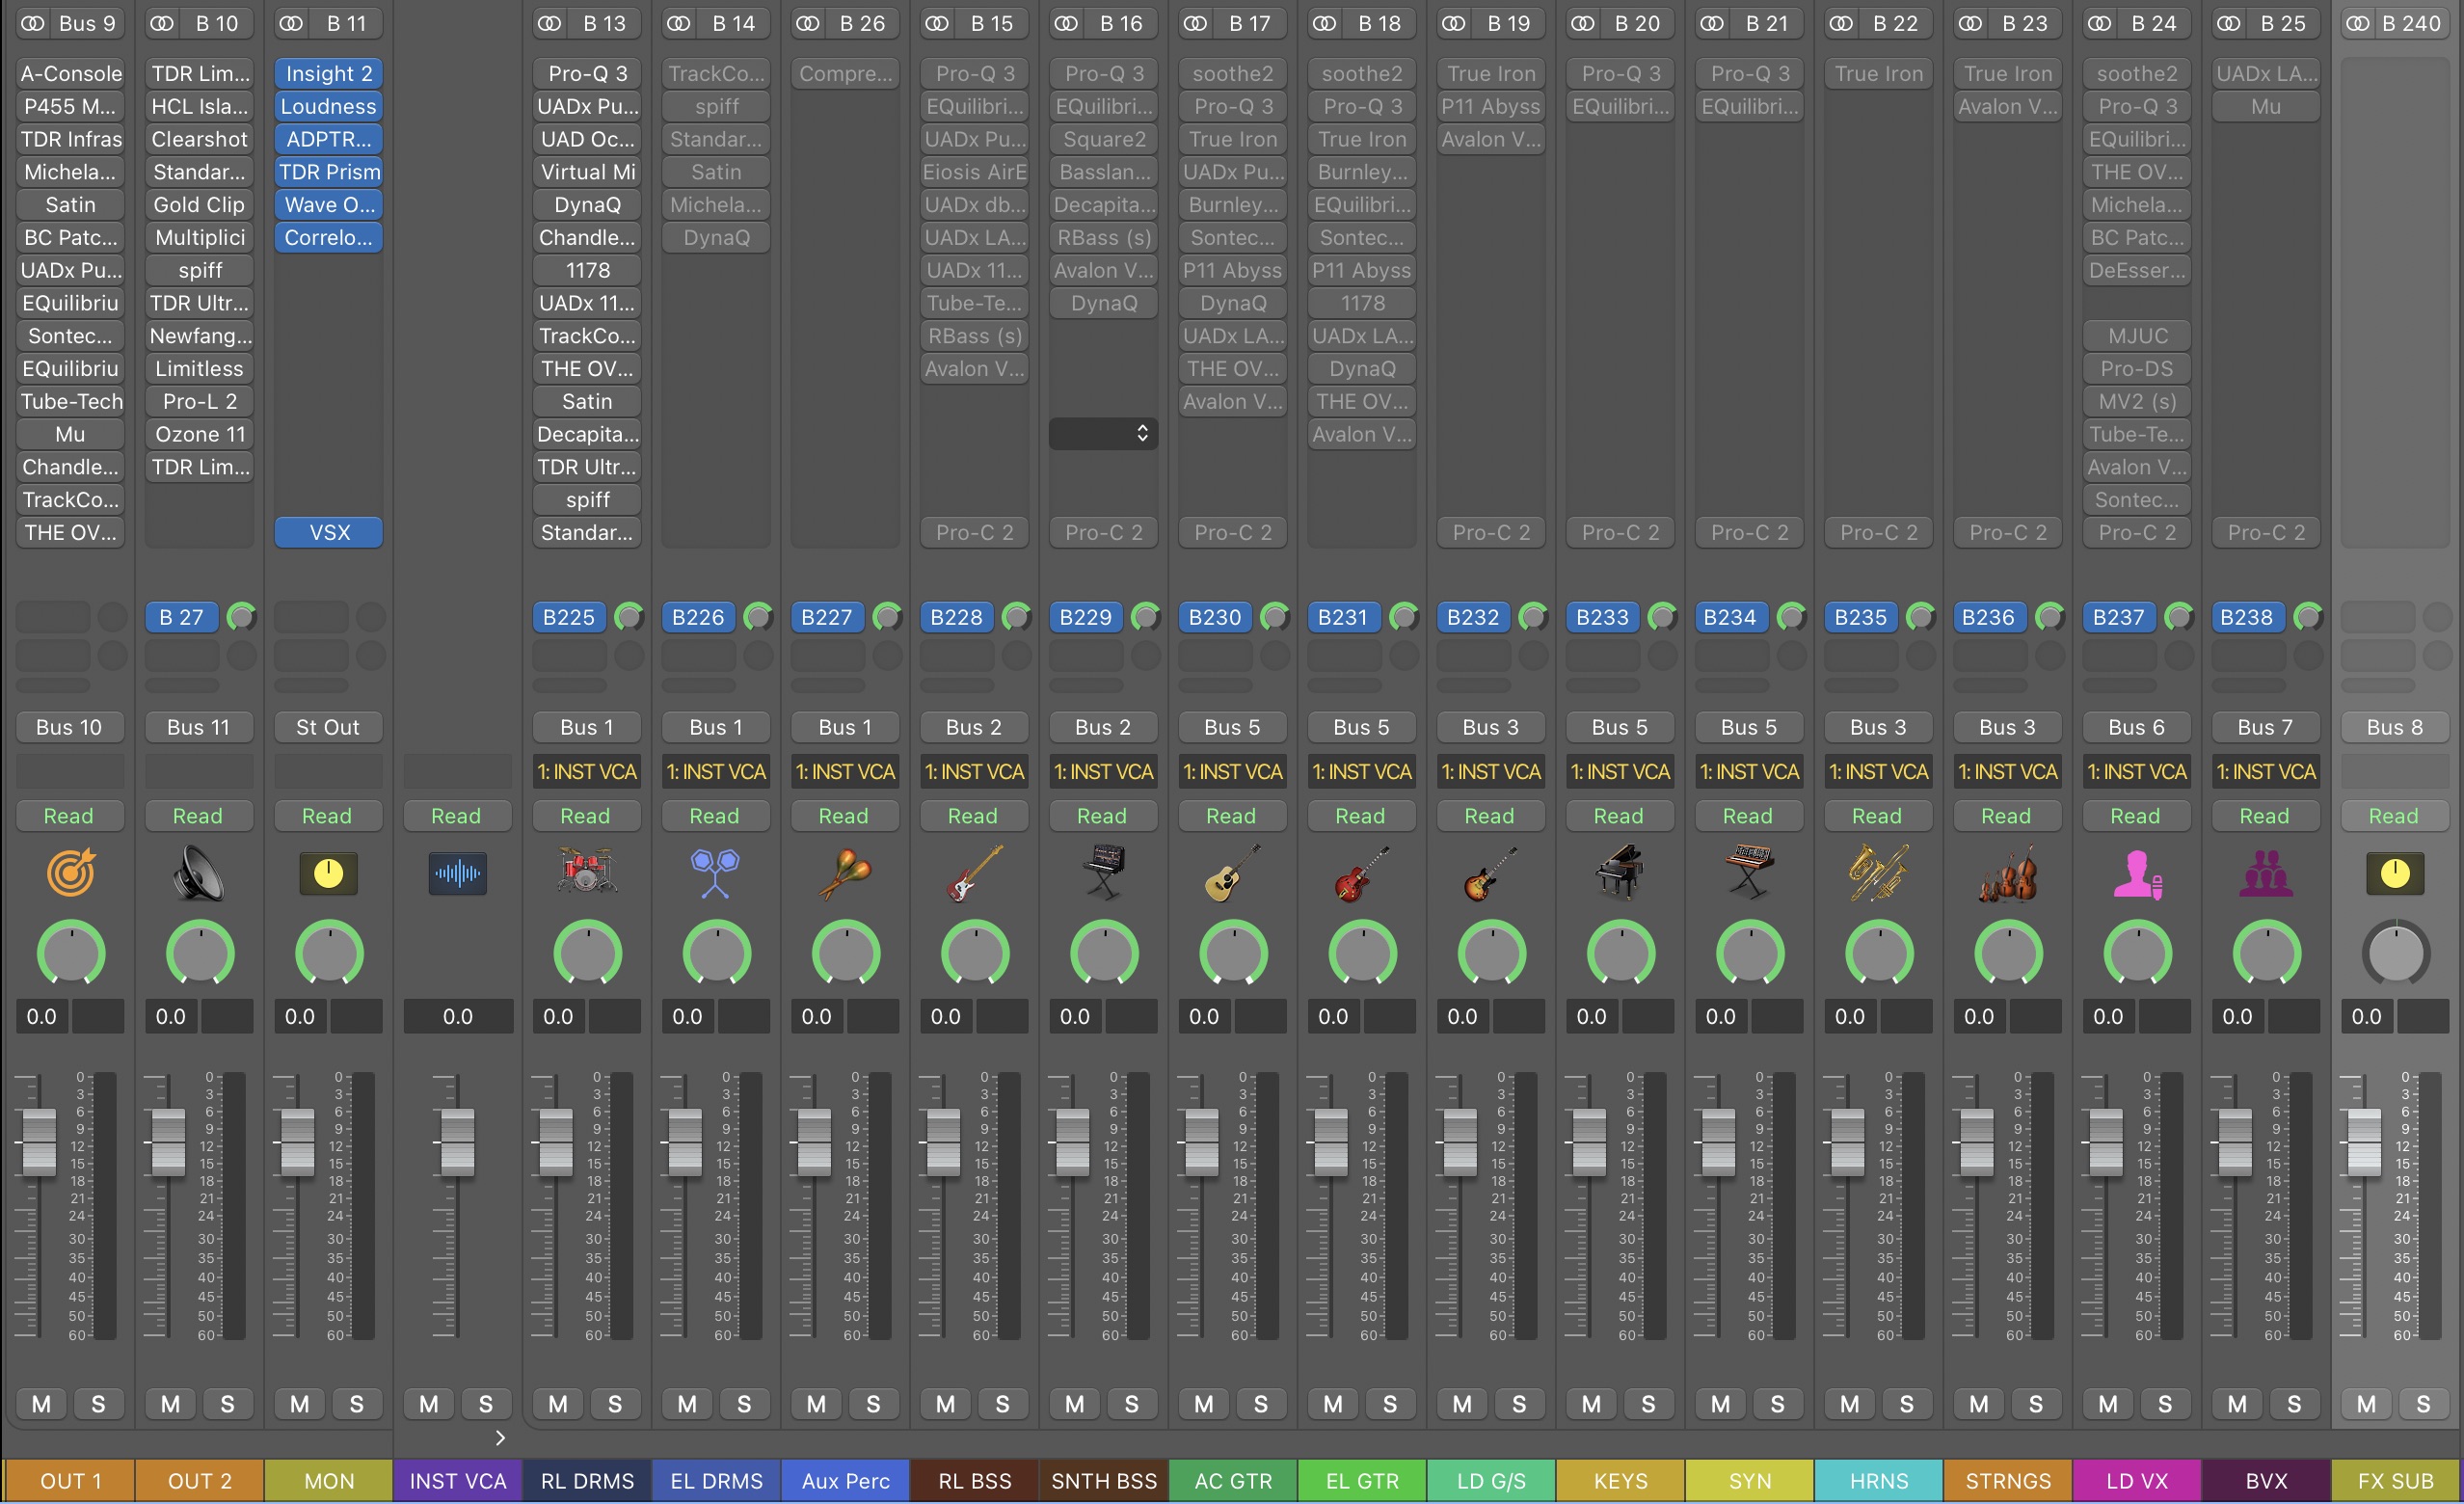
This is not the end of the line for the instruments. They are funneled further into more stereo buses:
More submixes
Here I can fine-tune things even further based on the role they take in the mix: All drums, all low end, melodic content, harmonic content, etc. This is quite useful if I need to do mix automation, level riding, and other moves.
In a top-down mixing approach, we’d tend to handle everything at the bus level, and only spend time with individual tracks that demand spotlighted attention.
Top-down mixing in the real world
You see a lot of content out there telling you to always do something. “Always pan LCR,” one might say. “Always EQ before compressing,” decries another. But in the real world, people are rarely so rigid.
Top-down mixing is not something to be done rigidly. You’re not going to ignore out-of-phase drums because you have to work on the stereo bus first. If one vocal out of ten has resonance issues, you’re going to treat that vocal as soon as it starts annoying you.
In the real world, you’ll find your own way to incorporate it into your workflow – and your methods will evolve over time. There’s nothing wrong with that.
Now, let’s cover some pros and cons to the top-down mixing technique.
Pros of top-down mixing
Here are the major benefits to mixing from the top-down.
1. Work quickly and effectively
Top-down mixes tend to go faster, because you’re concentrating on the forest rather than the trees.
Let’s take drums: an inexperienced mixer might lose their perspective auditioning various compressors for each element of the drum kit. This can be avoided by finding a vibey compressor for the drum bus as a whole, first. You’d be surprised how little you need on the tracks when you sort out the bus first.
2. Follow a client’s vision with ease
The artist or producer has a rough idea of how they want the song to sound. Often they send you the session, rather than the stems. When they do send stems, it's printed from their sessions, with their balances.
Do not cancel out their work and start from scratch. The rough mix communicates the emotional intent of the song. The artist/producer took it as far as they could before they hired a professional.
When you work from the top down, you can preserve their intent, polishing their work and bringing their vision to life.
It becomes easy to do this: you simply route their work into your bus template and start from there.
4. Work with your gut
Top-down mixing is big-picture thinking. You make big, broad choices rather than small nips and tucks – and big broad choices have more emotional weight behind them. When you work like this, you can quickly sew the mix up with emotion, protecting it from your over analytical thinking.
Yes, you’ll need to nip and tuck on the track level at some point, but you won’t exhaust yourself by doing all that stuff first. Instead, you’ll execute the grand vision of the song and fix the annoyances to serve that vision.
5. Use less CPU
In certain circumstances, top-down mixing can save on CPU, because you aren’t expending as much resources on the track level. However, this is not always the case.
Cons of top-down mixing
Let’s cover some drawbacks now of top-down mixing.
1. It won’t work if you’re too strict about it
You’re not going to get anywhere building up a drum bus if the kick mics are canceling each other out. You have to be flexible and move to the necessary track-level things as they come.
2. It won’t work with tracks that need rescuing
Let’s say you got a beautiful arrangement from the producer, complete with amazingly crafted sound design, impeccably sampled drums, and synths that sound gorgeously unique.
Then you hear the acoustic instruments, and it’s another story altogether: the artist has absolutely no idea how to record their voice, so you have a noisy track with tons of roominess and more than a little comb-filtering.
Unfortunately, this same miking technique has been applied to the guitars and drums as well, making them sound canned and paper thin.
You can’t top-down your way out of this. You have to rescue the tracks that need rescuing first.
3. It can take up more CPU than conventional mixing
Hold on, didn’t I just say the opposite?
Yes you’re saving CPU on individual tracks, but you might be spending a lot of processing power on buses – and you can’t freeze buses the way you can freeze tracks in many DAWs. You can bounce them to disk, but then you’re locked out of the track level, and there goes your time-saving measures.
It depends on how you process your buses, but yes, you can run out of CPU quickly if you’re using a lot of effects.
4. It can royally mess up stem creation
Often artists want stems of your mix, either for live playback, or for other reasons (creating clean mixes, TV mixes, instrumental mixes, and other things for sync). They’ll want a drum stem, a bass stem, a guitar stem, and so on.
If you don’t use processing across your stereo bus and submixes, these stems will add up to the original mix (except for any time-based effects with modulation, or any other randomized effects). But if you’re processing the stereo bus, you likely have to do a lot more to make the stems add up correctly.
5. You really need to know your tools to mix top-down
Ideally you know your tools well, but since top-down mixing relies so much on vibe and feel, you have to be doubly sure you understand what each processor brings to the table.
For instance, the bx_Townhouse, the Lindell SBC, and Native Instruments’ Solid Bus Comp are all VCA-style bus compressors. But they each have their own intrinsic flavor. You should be familiar with these flavors before implementing them in your mix.
It’s quite like cooking: you don’t want to accidentally put curry spices in your marinara, nor would basil work in rogan josh.
How to mix top-down
What follows is my top-down workflow. Feel free to borrow from it or change it how you wish.
1. Organize the instruments and route them into submixes
Organize your tracks. Color code them. Route the drums to their own bus, the bass to its own bus, and so on, as in the following video.
2. Get a static mix happening first
Now, use the faders and pan pots to get your static mix together. This can go several different ways. If you’re working off a client’s session, you already have your rough mix. The client provided it to you. All you have to do is correct any obvious imbalances and check your work against the rough.
If you’re working on your own mix – or you’ve got a client who trusts you – then set up your own static mix. I can demonstrate this using tracks from a PANTLER track I mastered. This artist, who mixes all his tracks within the Dirtywave M8 Tracker, always sends the tracks to me just in case he wants to go the mix/master route.
Here’s an example of a PANTLER static mix:
3. Fix glaring problems on the track level
Now’s the time to ask yourself what isn’t sitting right in the mix. Look for forensic issues that go beyond volume and panning. Are the acoustic guitars out of phase? Do the vocals have ugly resonances? Now’s the time to address that stuff before we move on.
This could include de-clicking a track with digital clicks and pops or de-noising a vocal. It could involve tuning something that’s woefully wavering, or de-clipping a bass track. Whatever sticks out needs addressing now.
For this track, I can see one thing I want to do at the track level before i move on:
4. Bring the vibe of your tune to the mix bus
We now have a static mix:
So, we begin the top-down process in earnest. We look at our tune holistically, making suitable choices for the master bus. These choices need to be executed with a light, yet decisive touch.
Saturation and compression are what you’re going to be looking at first. If you do experiment with EQ here, it’s going to be for a very specific reason.
I’ll attach a cheat-sheet of how I like to think of my processors, and maybe they’ll translate for you. Don’t be afraid to practice and develop your own associations.
Summing
In the analog world, summing occurs within the architecture of a mixer, summing mixer, or large format console: tracks get combined through the mixer’s electronics, and come out mingling in their own way.
Where analog treads, digital always follows, so of course you can emulate summing in the computer.
Lots of people debate whether summing is “snake oil.” That's really for you to decide. All I can show you, with examples, is that three digital summing plugins by Lindell do affect the sound.
Here are Lindell’s takes on API-, Neve-, and Helios-style summing:
Summing is thought to affect the transient response, frequency balance, width, and depth perception of a mix – often in a nonlinear manner. As a general rule, API-style summing is considered “fast, clean, and punchy,” Neve is “warm and creamy,” and Helios is “thick and grabby.”
The following null tests show that a nonlinear process is occurring, one that is affecting transients, frequencies, and the stereo field:
Whether these work for you is up for you to decide.
Compressors
Different compressors have different flavors, so let’s cover them now:
Vintage Mus: I like to use these to achieve a specific kind of round, bouncing effect. I tend to use them in mid/side to enhance interplay between the centered elements and those on the sides. It has to be right for the mix, however.
This is an example from the NEOLD Wunderlich compressor.

NEOLD Wunderlich doing the vintage mu
Modern Mu compressors: To my ears, these have a smooth and glassy way of hugging the signal, one that curtails the low mids, but preserves the deep subs. I find these wonderful for hugging the mix in a specific dynamic range without pumping. I often use these in dual mono for separation enhancement. A good option is the SPL Iron compressor.
Opto compressors: depending on the circuit, these can sound like a compromise between the mus listed above. I can get the smooth glassiness from the modern mus, but also do fun things to emphasize groove with the time constants.
Please note, we do not generally use LA-2A emulations on the stereo bus, but the NEOLD U2A can handle these duties: it’s recovery and R37 controls allow you to tune the attack and release times, and the drive parameter lets you dial in a suitable – and subtle – amount of saturation.
API style VCAs: Great for rock music and definitely suitable for adding a grabby quality to the music’s groove. I find API VCAs have a way of bringing the center image a little forward while spreading out the stereo field a bit. The Lindell SBC is a good option here.
SSL style VCAs: These can also add a “snap” to the transients, but they also lend a density to the mix that people often call “glue.” I find SSL-style VCA compressors don’t give you the same depth or stereo presentation as the API style VCAs. You can try this out with the bx_townhouse buss compressor.
Diode Bridge style comps: Think of these like adding grainy 70s film stock to your sound. They have a smoky vintage vibe, but I find them tough to control in terms of timing on the mix bus. These can be very aggressive, so definitely choose the right material and make friends with the mix knob. For this vibe, check out the NEOLD U17 and the Lindell 254E compressor.
Saturators
Tape style saturators: these tend to add thickness and warmth, and they tend to soften the highs as well. Pushed too much, they get really crunchy – so don’t push too much. Take a look at the Kiive Tape Face and Tape Saturation in Ozone to achieve this sound.

Ozone Vintage Tape module
Tube style saturators: What I look for in a tube-style saturator is a liveliness – a bouncing quality. Other things can get us density, but there’s a particular way Tube saturators can increase RMS while bringing down peak energy, which means they can help you get a louder sounding mix. Try out the Black Box Analog Design HG-2 for this sound.
Multiband saturators: In the digital world, we have all sorts of tools that use multiband tech under the hood to apply saturation in a manner similar to EQ. You can boost or cut various ranges, doing so in a non-linear way that reacts to your material. These kinds of processors demand rigorous study before use. The Exciter module in Ozone and Maor Appelbaum Mastering & Hendyamps THE OVEN are two options that can sound good on the mix bus.
Both of these tools make use of tube and transformer emulations to add saturation – and both sound lovely on the right mixes.
Passive-style EQ with Pultec curves: You may have heard of the “Pultec trick,” where you boost and cut the same frequency at the same time. This can work well on your master bus, alongside a gentle high end boost to open things up. Indeed, putting a slight, gentle boost on the highs and lows at the outset can help you avoid overemphasizing these elements on the track level.
Two EQs that can get you the Pultec trick, the Ozone Vintage EQ module and The Bettermaker EQ232D.
Vintage mastering EQs: In the late 1960s, two titans pioneered parametric EQ design and wound up giving us mastering EQs still in use today. Burgess McNeal’s take resulted in the Sontec, and George Massenburg’s work resulted in the GML. Both are fantastic – and fantastically expensive – EQs, not only for their curves, but for the euphonic quality they lend to material just by virtue of their innate color.
Plugin Alliance has modeled both of them, the AMEK EQ 250 and AMEK EQ 200. These can sound quite good on the master bus.
Esoteric EQs: We live in a golden age of digital, one where all sorts of new and zany EQs are coming out all the time. If you have a subscription to Plugin Alliance, iZotope, or Native Instruments, it can definitely pay to practice with these EQs and see if they work nicely for your mix-bus needs. One that comes to mind is the Harry Doyle Natalus DSCEQ, which can add subtle saturation as well as curve shaping.
Whatever you use, you must learn the gear: knowing how each parameter affects the sound is vital to achieving your desired results efficiently.
Let’s take a look at how I go about dialing in a basic two-bus sound on a track by track basis.
5. Move on to your submixes
Now that the mix bus has a certain flavor attached, move on to your submixes and start processing those.
I like to start with drums and bass at the same time; I'll bring the other buses down -18 dB or so, so I can keep them in mind, and start listening to the groove of the drums and bass buses moving together.
In terms of broad strokes, I ask myself if there’s a flavor I want, and reference my sonic palette, which I laid out above. Let’s take this example:
Here I want drums to have a bit of the API 2500 flavor I described earlier – that particular grab. Something about a helios style thickness and warmth is also calling out to me, so here’s the plugin combination I arrive at:
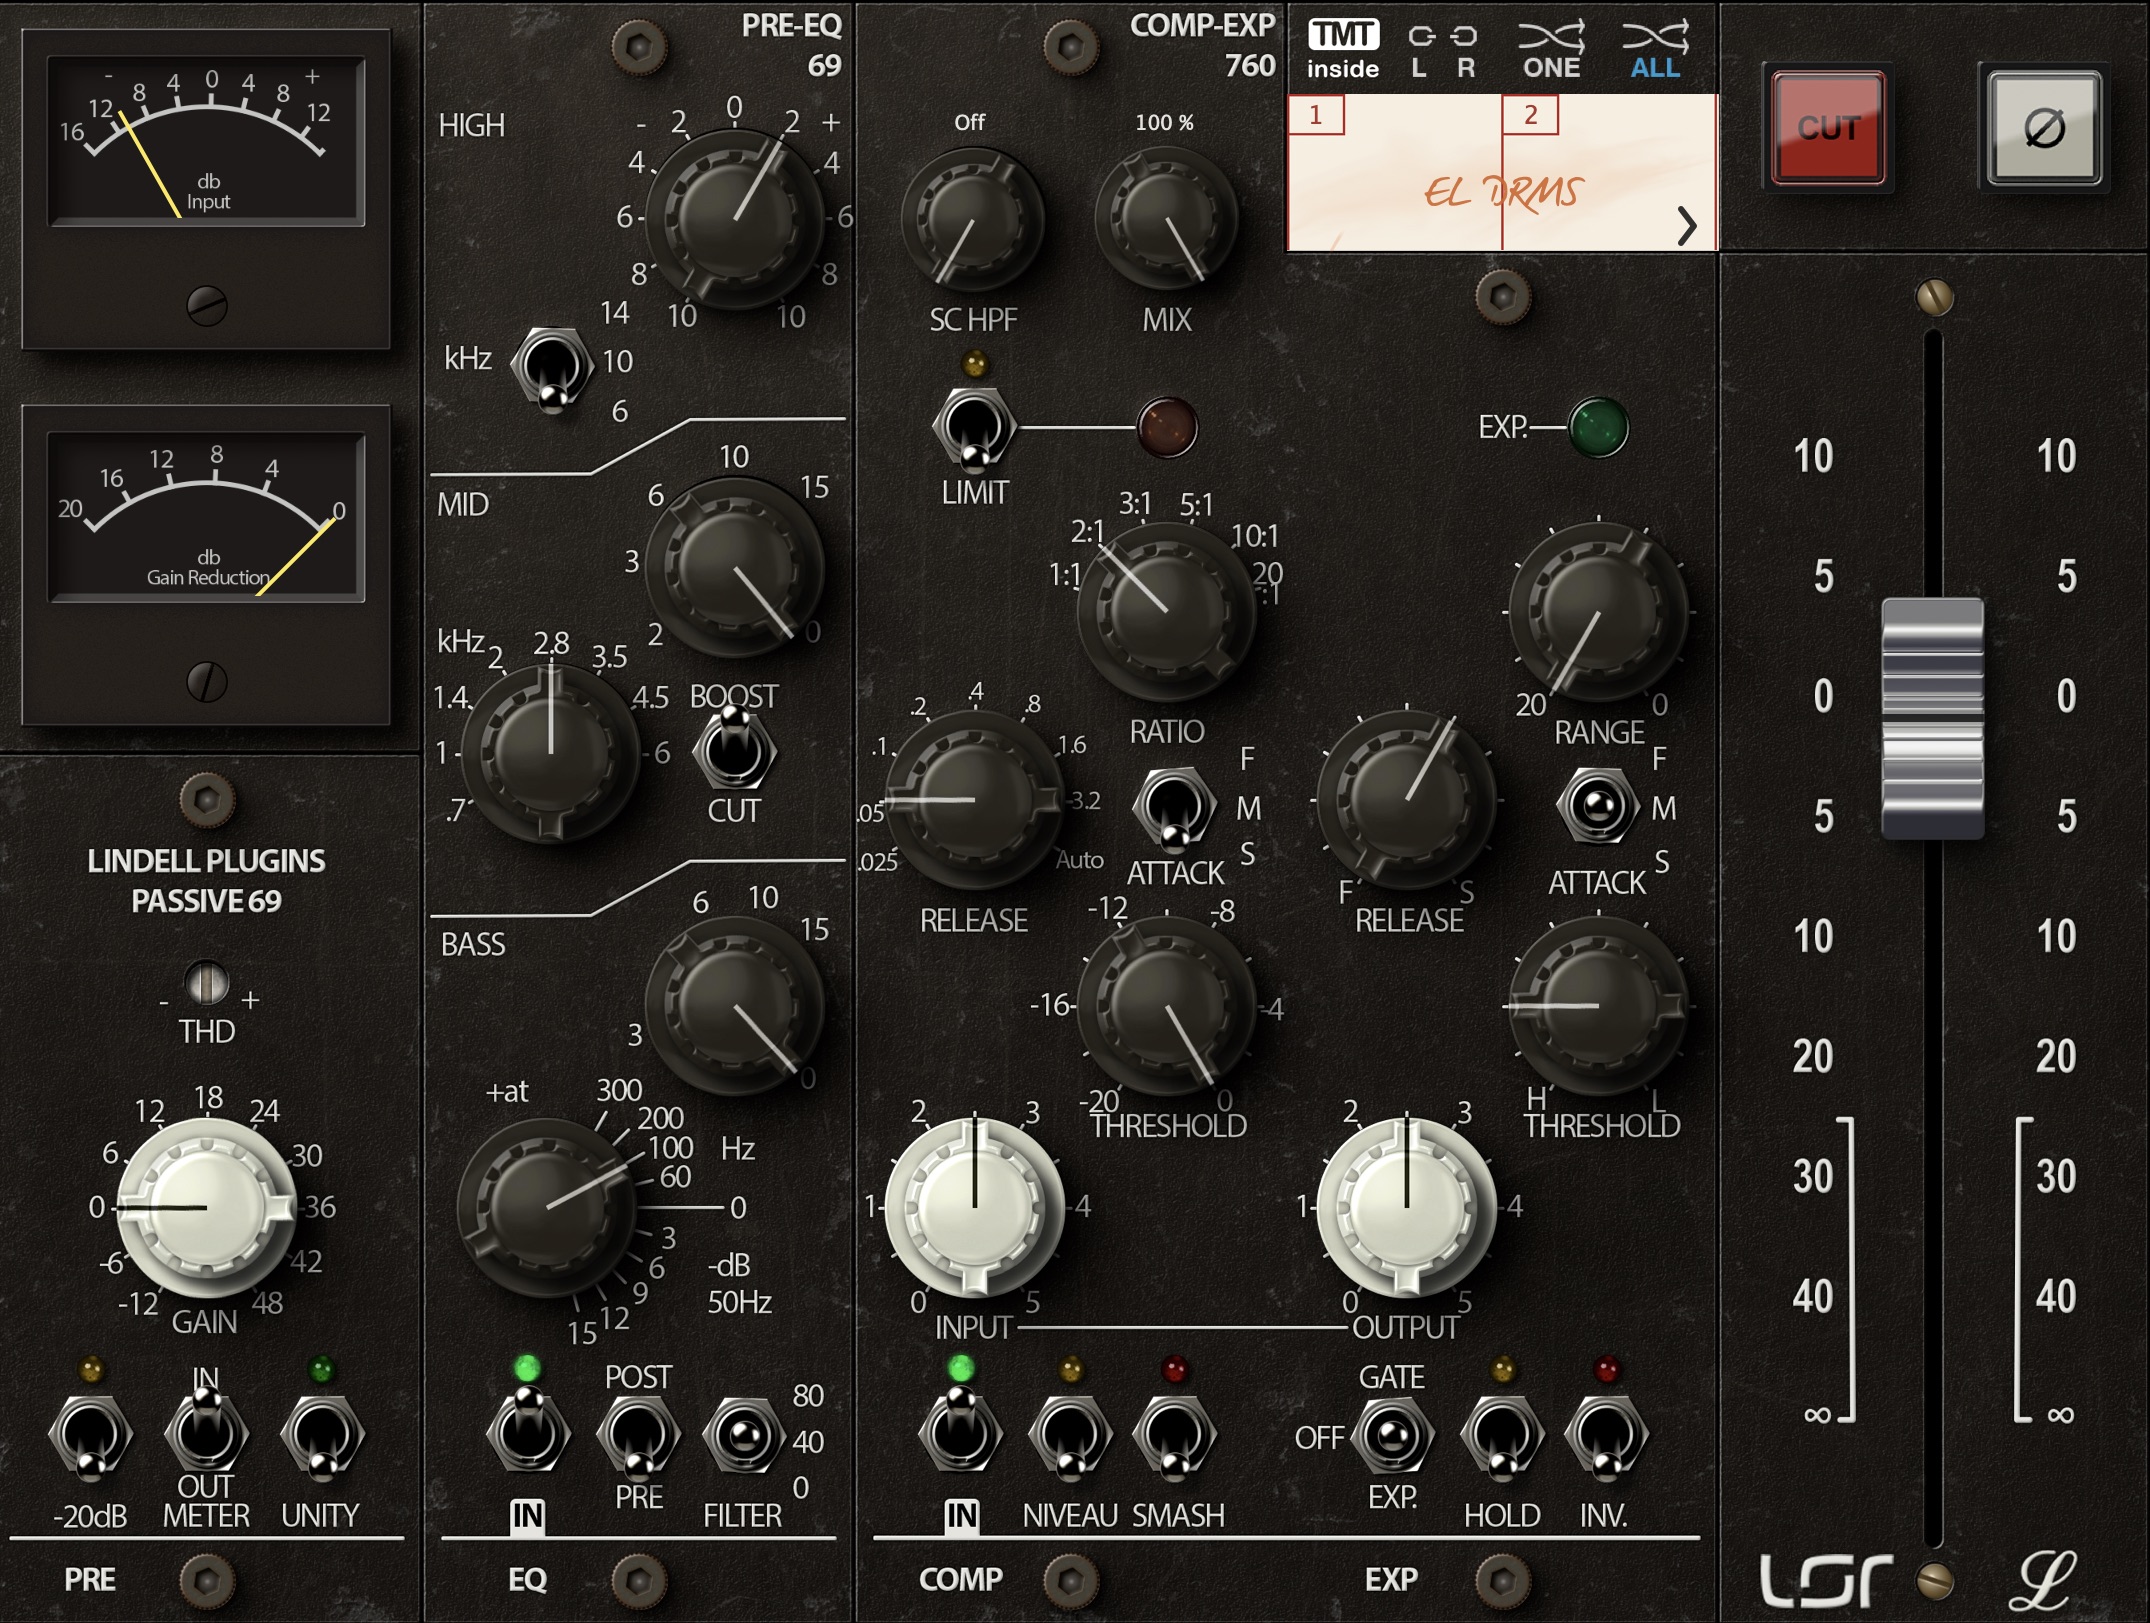
Lindell 69 on drums

Lindell SBC on drums
For the bass I want to feel more of the modern tube flavor I described – wherein we have a lively bounce, the subs are clear, but the low mids are curtailed a bit. So on goes the SPL Iron.
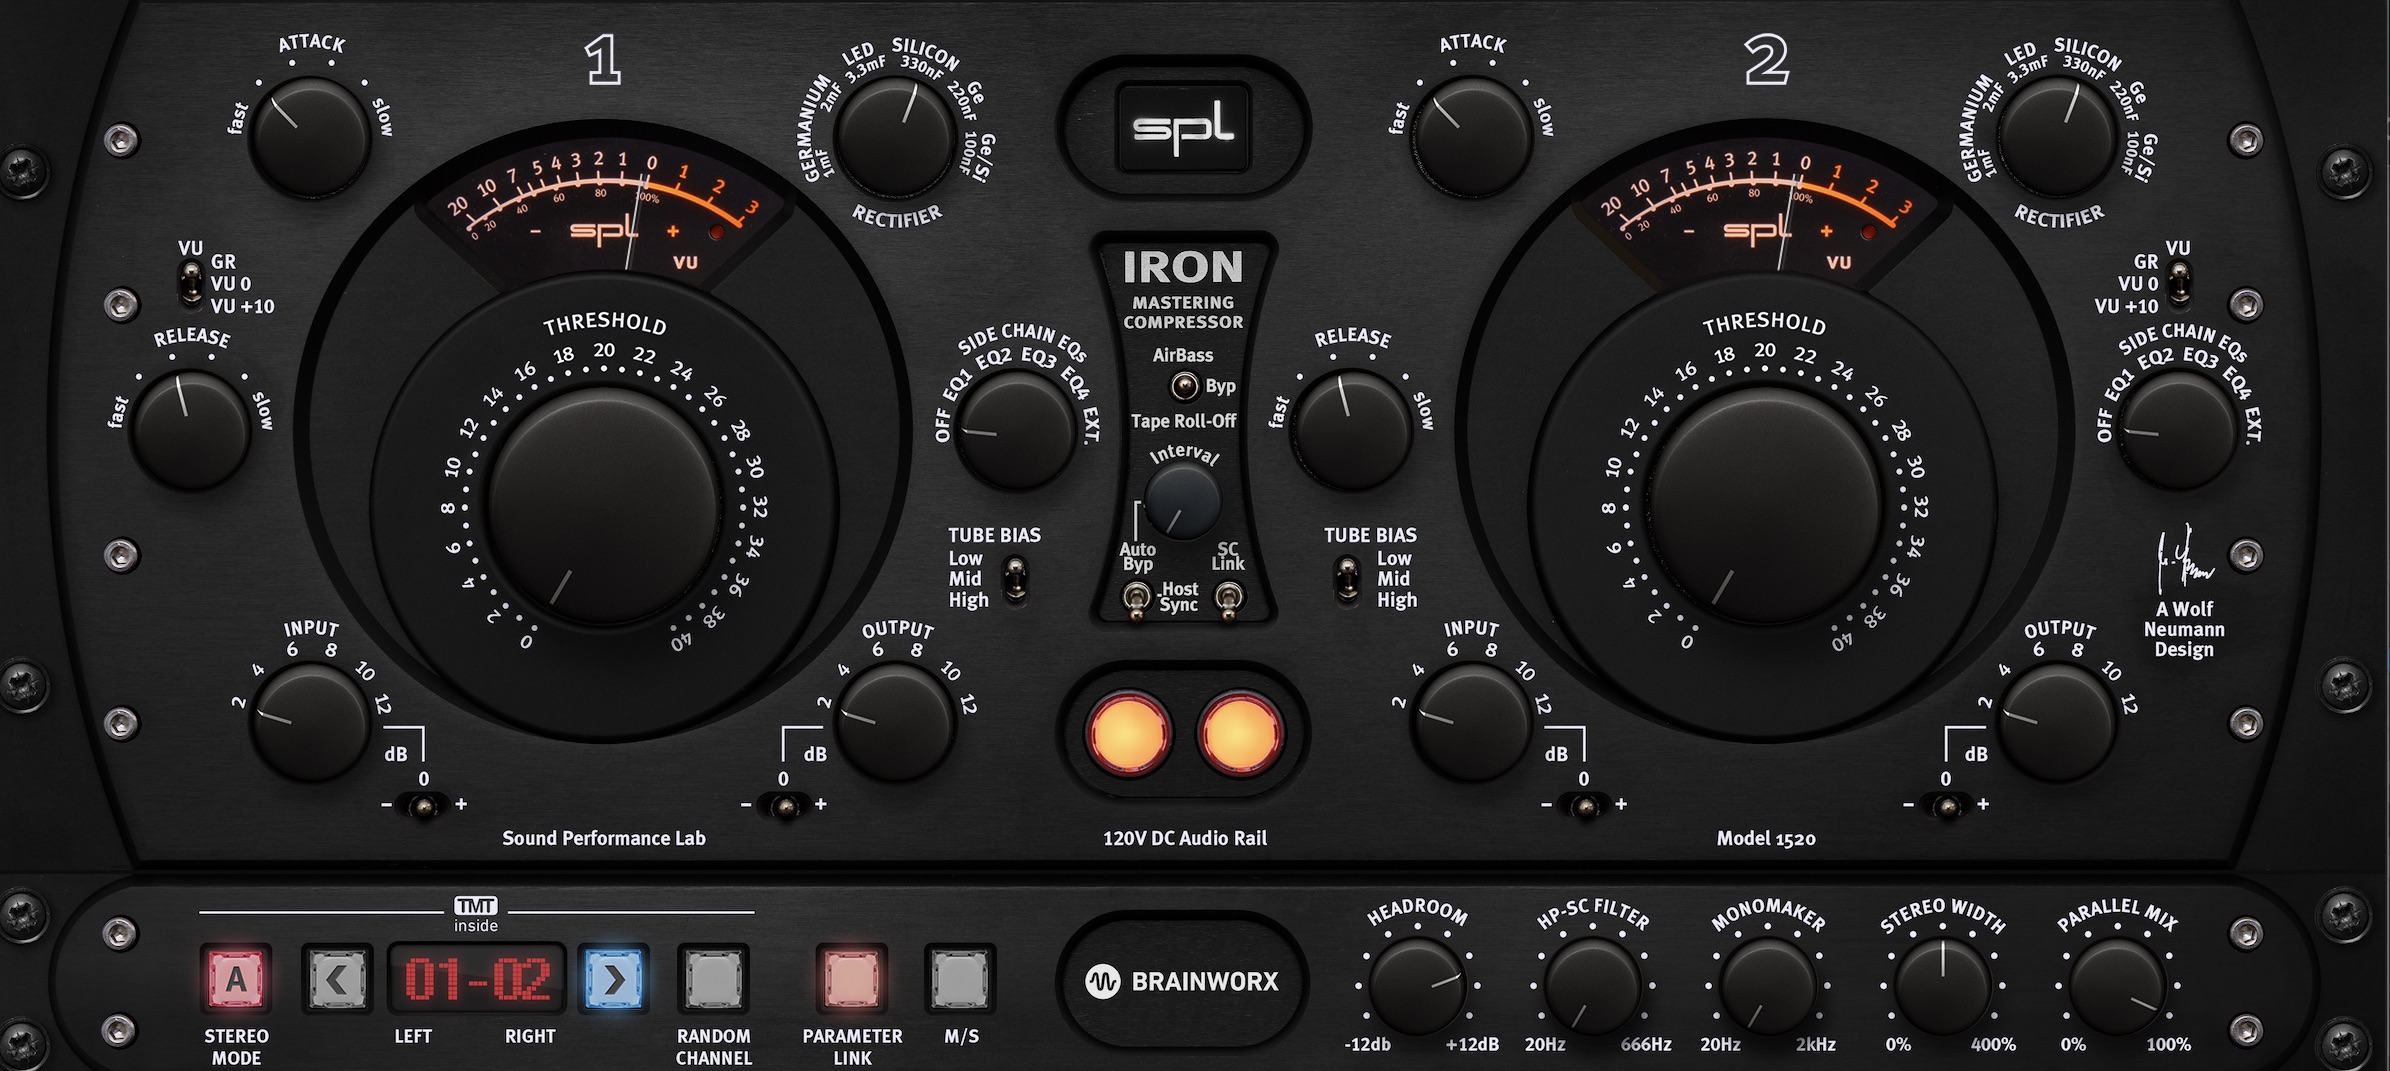
SPL Iron on bass
I might think surgically here as well. I’ll give you a few examples:
First, I know I’m going to want the bass to duck to the kicks, So I’ll set that up now with some transparent compression using TBT Cenozoix on bass, sidechained to the kick. Any compressor with a sidechain input will work, this is just the one I chose.

TBT Cenozoix on bass sidechained to kick
Now, I make an EQ decision: I want the bass to have the sub lows, and the kicks to be felt more in the 100 Hz region. So, using a linear-phase shelf, I’ll tamp down some sub lows on the drum bus with Ozone.

Ozone EQ on drum bus
I’m also going to cut out a slight bit of 100 Hz on the bass instruments so that the kick has a little more room with the EQ module in Neutron.
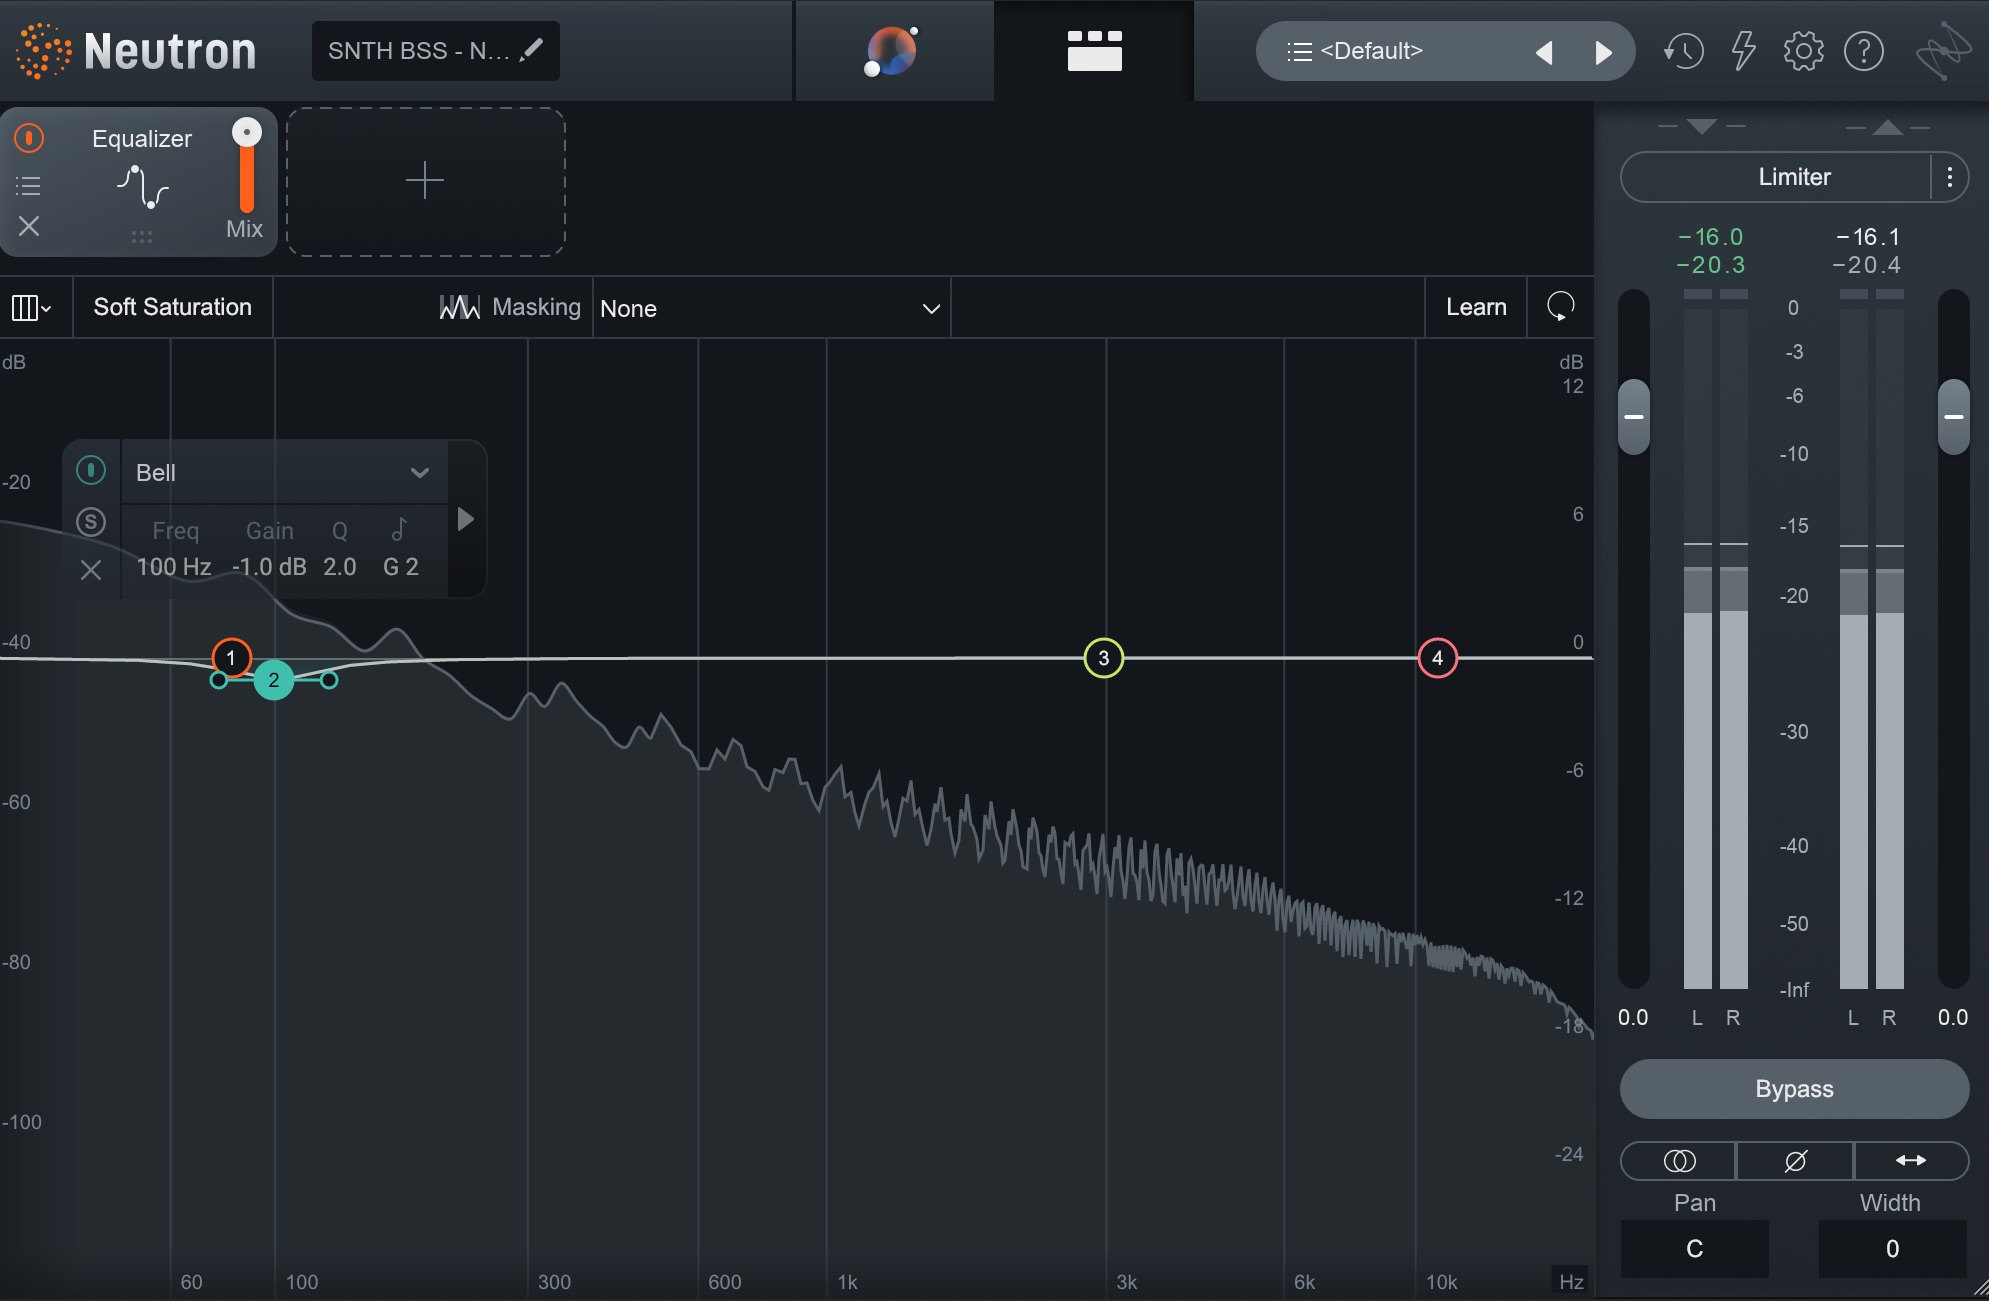
Neutron cut on bass bus
Lastly, I know the spiky transients of the kicks and snares are going to minimize my ability to achieve a loud mix. I want to make sure the drums are good and loud without peaking overtly, and I’ll use two plugins to achieve my goals.
First, I’ll get a little lively beef from The Oven, after which I’ll use bx_clipper to shave off no more than 1 dB of transient bite on the kick and snare.

The Oven on drums

bx_clipper on drums
Here’s all of that processing now:
Drum buss and bass bus processing
It’s tighter, leaner, but we haven’t lost obvious things that kill heft and import.
All of that goes by really quickly, and very instinctually – and it is a process we repeat for our other buses.
6. Move to the track level
This is where we’re at right now.
I listen, and I can hear track issues now that need fixing: The sub bass is too subby. I can fix that with a linear-phase high-pass filter to avoid messing up the layering, and by bringing the fader down.
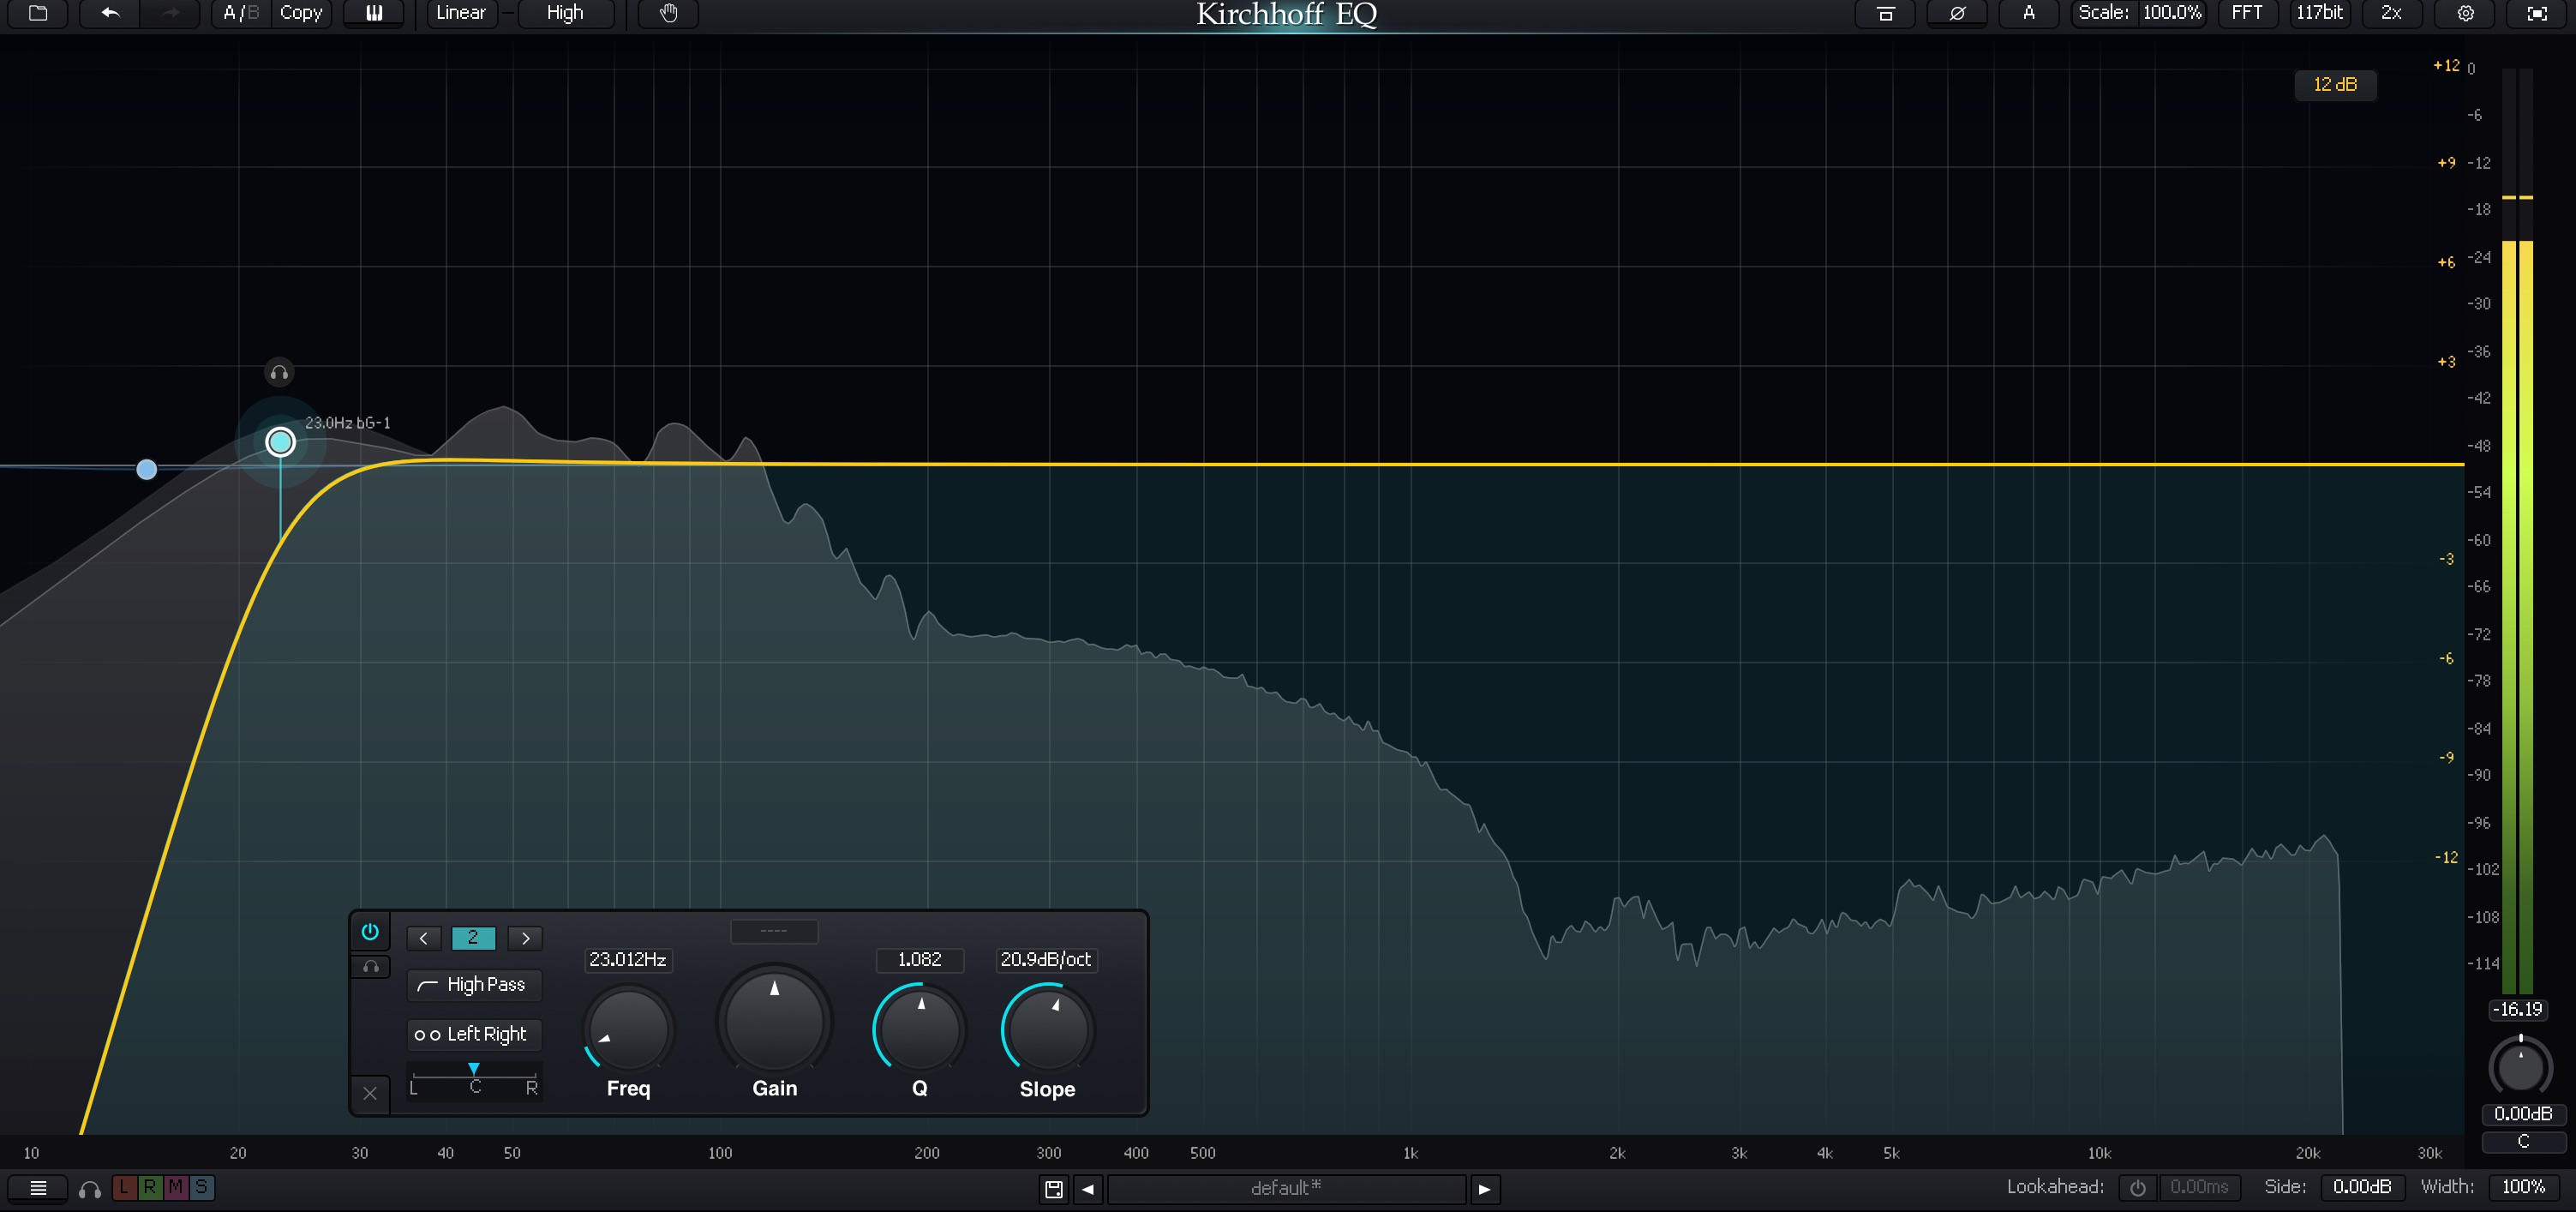
EQ on sub bass track
The hi-hat breaks are a bit too brittle. I can fix this with some simple corrective EQ.
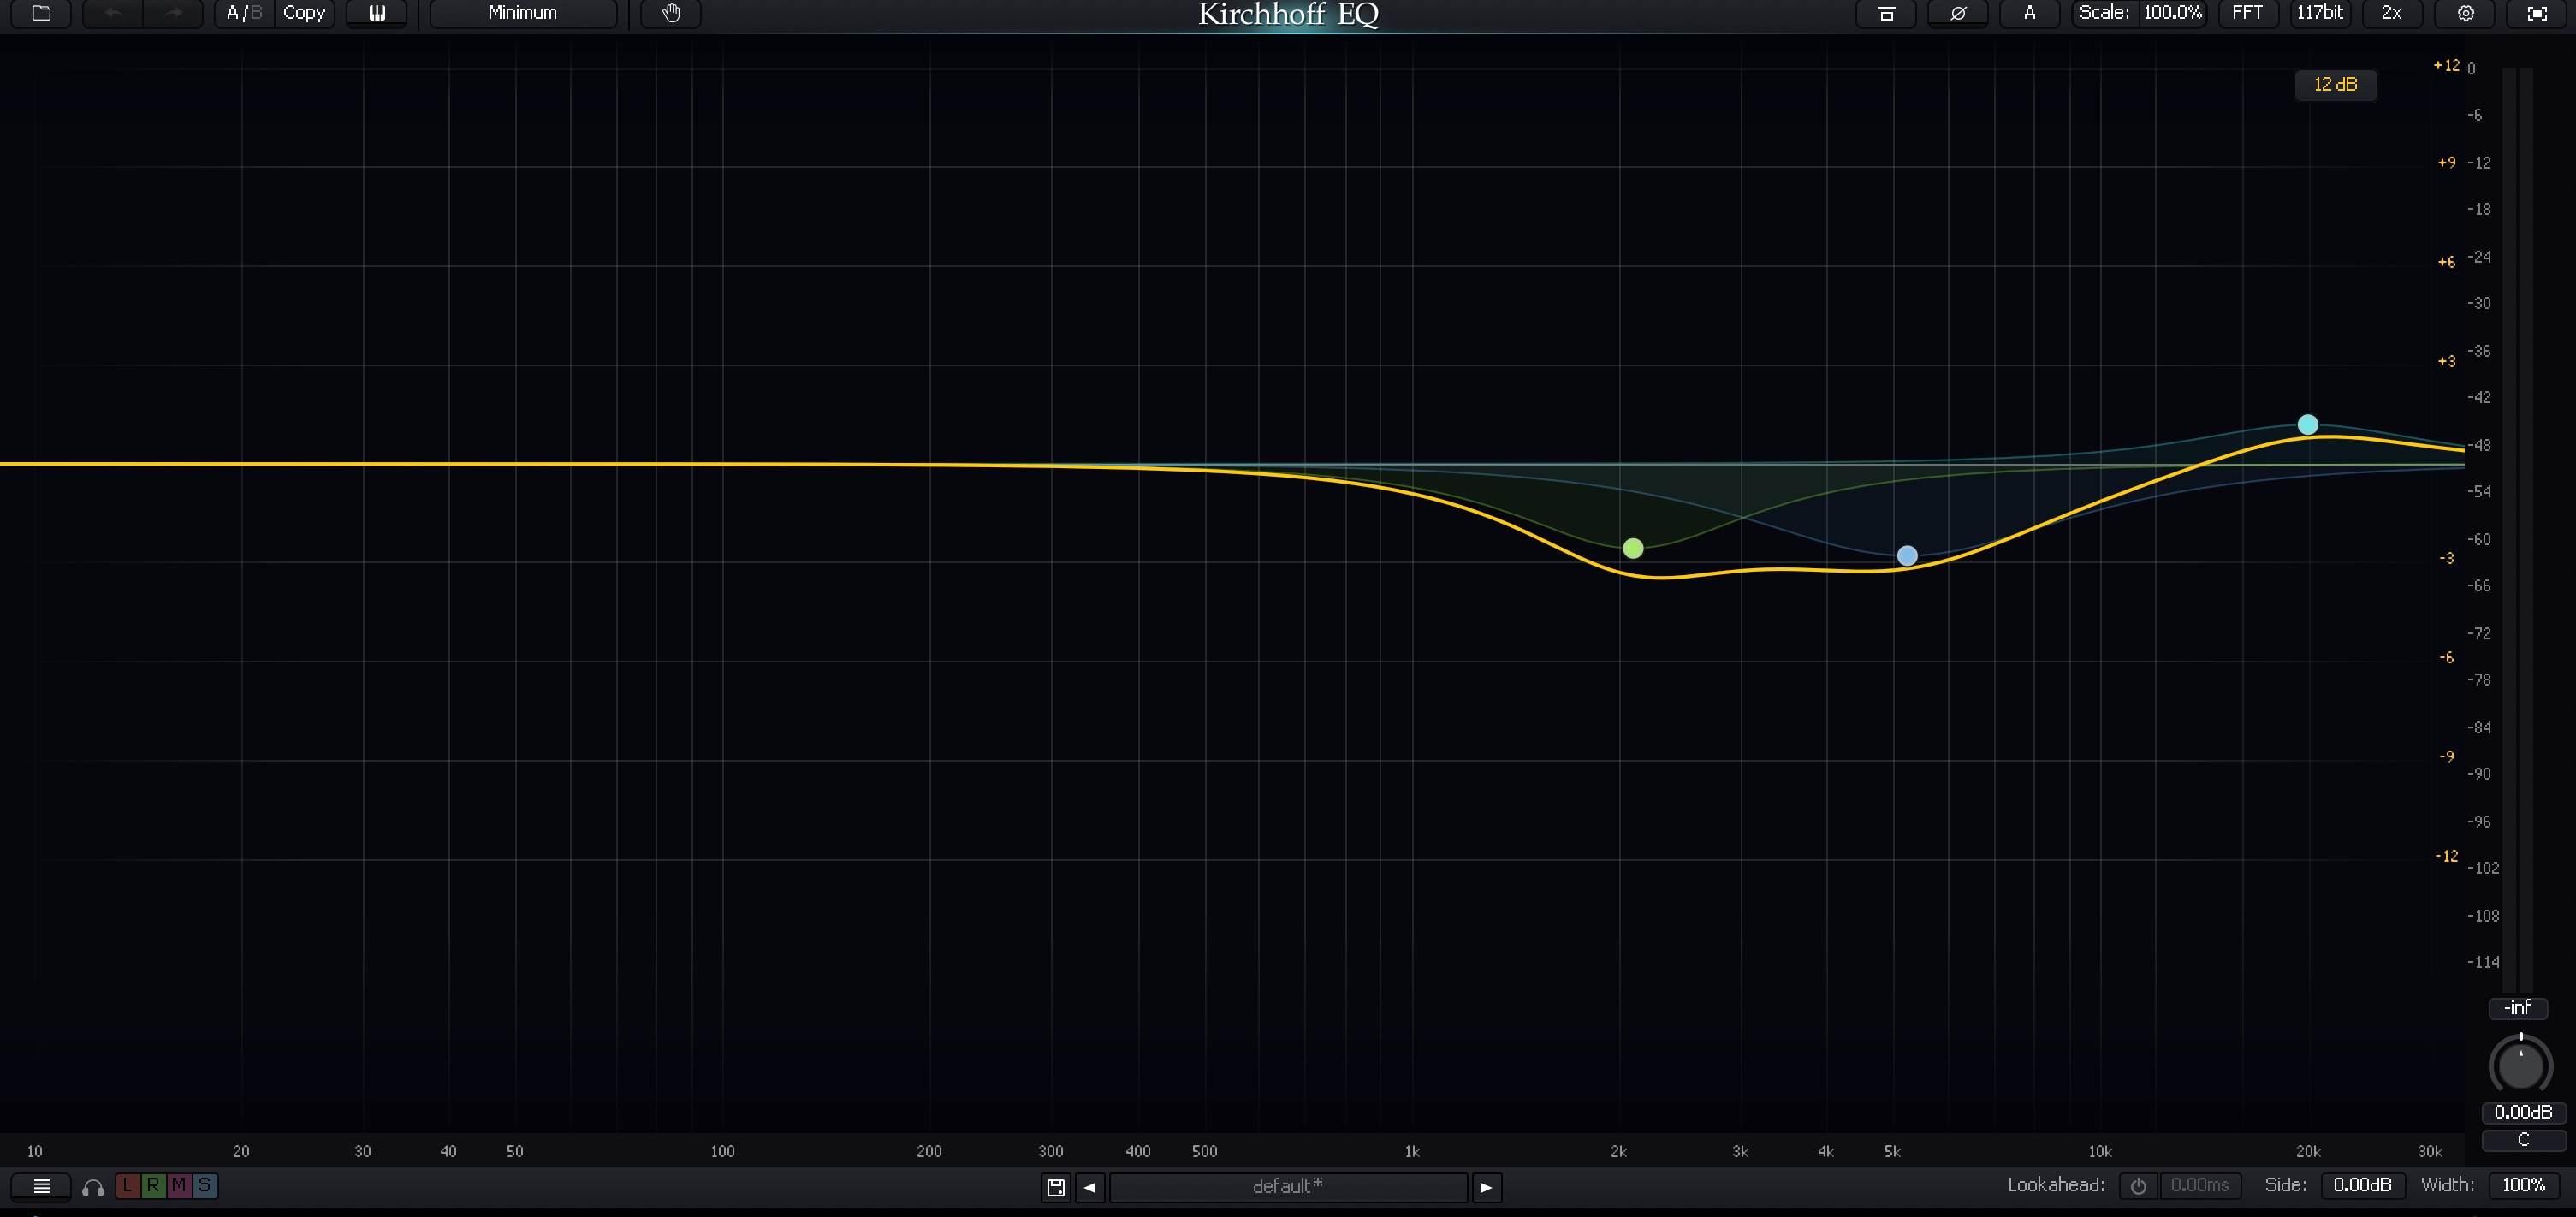
Hi-hat corrective EQ
The rest gets a bit more interactive, so another video is in order:
7. Tweak the mix bus
Now that we’ve gotten our tracks handled, it’s time to come back to the main mix bus and see if anything needs tweaking. If not, many engineers move on to another part of the process: making changes that benefit “the client mix.”
What is the client mix, you might be asking?
A client often wants to hear their song in context to commercial material. They don’t want to be told “turn your references down to match the level of my mix.” No, what they want is a mix that is as loud and commercially viable as the already mastered competition.
Believe it or not, the mastering engineer might want to hear this as well: it gives them something both in the ballpark of how loud the client wants it, and something to beat. In many ways, it can make their job easier.
While some people just slam their mix into a limiter and call it “the client mix,” that is largely a disservice: the client mix is an art in and of itself, as it can show you things you might have to do within your mix to make the mastering engineer’s life easier.
Indeed, a whole article could be written on the client mix. But for now, this video should suffice.
Start using top-down mixing techniques in your sessions
Top down mixing is not a beginner’s technique. It requires extensive knowledge of your tools and an ability to hear beyond what’s in front of you to the polished picture in your head. Nevertheless, it’s a skill worth investing in early.
Hopefully this article provided you with a roadmap – but remember, you must find your own way eventually. Tools included in iZotope Music Production Suite like Ozone and Neutron can help you get there.
