

Table of Contents
When learning how to mix music, getting vocals to sound professional can be one of the trickiest skills to master—but, it doesn’t have to be. With the right tools and knowledge, mixing vocals can be easy. While every vocal is unique and has different needs based on genre, this mixing walkthrough provides a step-by-step guide on how to mix vocals that will sound professional in any mix.
The vocal mixing concepts below use iZotope tools, including Nectar 4 vocal mixing plugin. If you don’t already have the plugins mentioned in this article, you can get access to all of them in one bundle with Music Production Suite.
Common questions about mixing professional vocals
What makes a vocal sound professional in a mix?
A professional vocal sound balances clarity, consistency, depth, and tone, blending naturally with the rest of the track while staying upfront and emotionally engaging.
How important is EQ when mixing vocals?
Very important – EQ helps remove muddiness, reduce harshness, and enhance presence. Typical EQ moves include cutting low-end rumble and boosting clarity around 2–5 kHz.
Why use compression on vocals?
Compression controls dynamic range, ensuring the vocal stays present and consistent throughout the mix without losing natural expression.
Should I add reverb or delay to vocals?
Yes, adding reverb or delay creates space and depth, but it should be used tastefully to avoid washing out the vocal.
What tools can help achieve a polished vocal mix?
iZotope Nectar and Neutron offer vocal-specific modules like EQ, de-essing, pitch correction, and dynamic processing to streamline vocal production.
8 steps to mixing vocals
Some of the qualities that make a vocal sound “professional” are that they are in tune, they’re easy to hear, and they have a consistent level. Depending on your vibe and genre, they may also have some creative effects to help enhance their presence in the mix. Below, I’m going to walk you through eight common mixing steps that’ll help get your vocals sounding great in any mix.
For this article, I’ll be using my own vocal from a track I’ve been working on with LOVD called “Lost.” Before we begin, check out this sample of the final product we’ll be working towards.
Mixed Vocals
1. Choose the best vocal takes
I always begin mixing vocals by comping all my vocal takes into just a few tracks. Vocal comping is the process of merging only the best parts of each vocal recording to create one final audio file for each vocal track you plan on having in your mix. For example, you’ll typically end up with one track for your main vocal and a couple for your double tracks, harmonies, and adlibs.
Comping your vocals before you begin mixing them will save you a ton of time since you won’t be wasting your energy processing vocals you aren’t even planning on using.
This is also a great time to fix any timing issues in your final vocal tracks. You’ll want to ensure your harmonies and doubles are lined up with your main vocal as tightly as possible.
Below, you’ll see a screenshot of my comping process for the lead vocal of “Lost.” The original vocal recordings are in maroon and the final vocal comp is shown in hot pink.
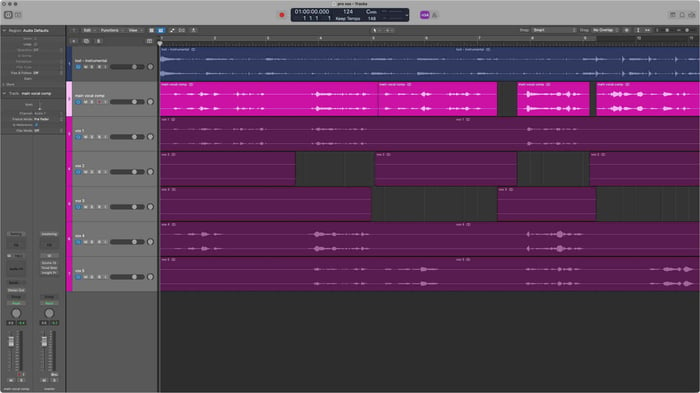
Vocal comping in a DAW
2. Remove unwanted noise
After you’ve condensed all your vocals into just a few tracks, it’s time to perform any necessary audio repairs. Whether you’re recording in your closet at home (like I did for “Lost”) or you’re in a super high-end studio, unwanted noises can always find a way to creep into your recordings. Whether you need to clean up background noise from a pesky air conditioner, lip smacking sounds from the vocalist’s mouth, or unnecessary breaths between lyrics; there are two approaches you can use for cleaning up your vocal tracks.
Remove unwanted noises step-by-step
When my vocal tracks are a bit too noisy for my liking, I’ll use RX Voice De-noise to remove any unwanted background noise quickly and easily.
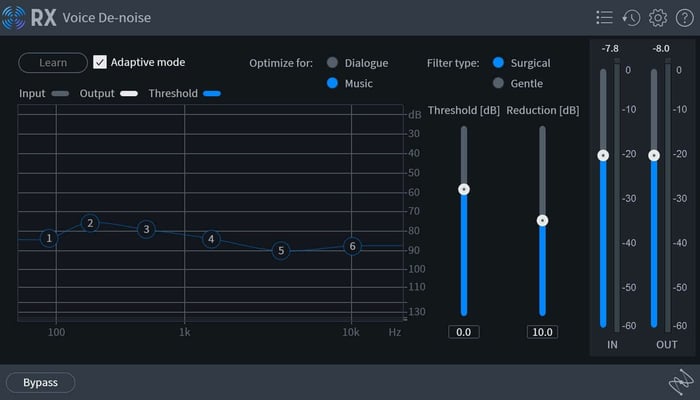
RX Voice De-noise
Then, since listeners likely don’t want to hear me smacking away in their ears while I’m singing, I used RX Mouth De-click to remove any of those wet-sounding lip pops and mouth clicks as well.
Lastly, during the repair phase, if you have any distracting breath sounds between phrases, you might want to consider using the Breath Control plugin that comes with Nectar 4 Advanced. This will cut out any unwanted breath sounds from your vocal and leave you with a nice, clean audio file to work with.
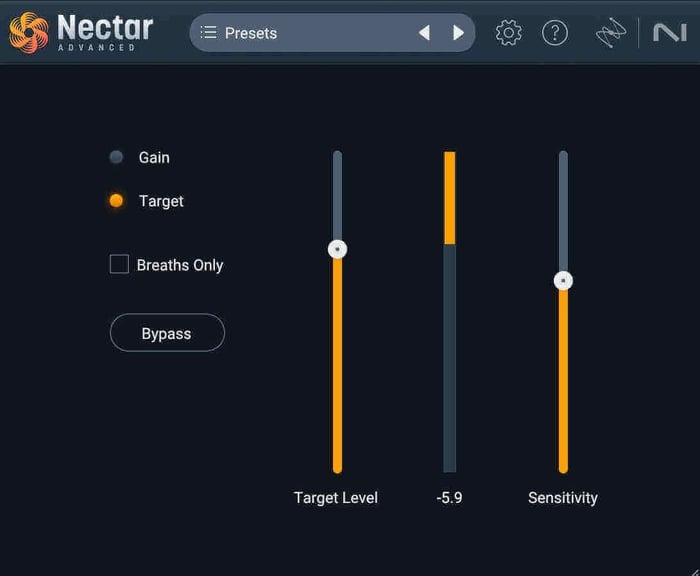
Nectar 4 Breath Control
This approach is great if you want ultra-fine control over each type of noise reduction—or, if you want to remove that AC sound, but keep all the original breaths in your vocal. But, if you want a quick and easy way to remove all “non-sung” sounds, I’d opt for the second approach.
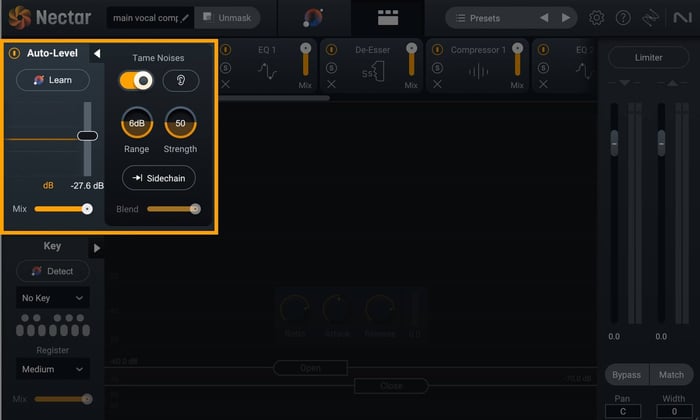
Use the Tame Noises feature in Nectar
In Nectar 4 Advanced, there’s a new feature found in the Auto-Level module (ALM) that will actively adjust non-sung vocal elements to ensure consistent and balanced vocals. All you have to do is make sure the Tame Noises feature is turned on and it will do all the heavy lifting for you!
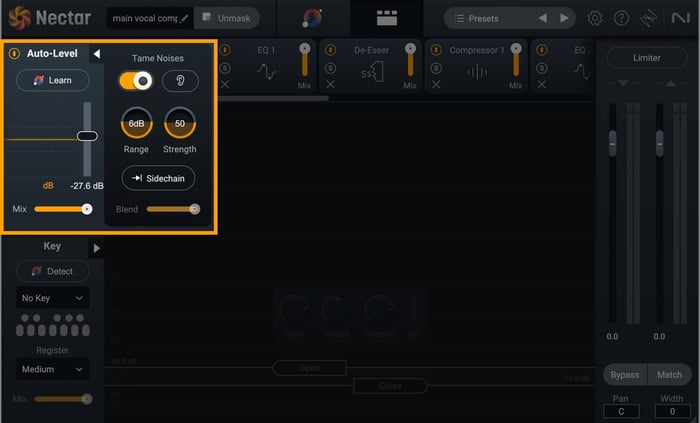
Nectar 4 Advanced Tame Noises feature
This is a simple way to get rid of background noise, mouth clicks, and breaths—all in one go. Below, you can listen to the same vocal take from above, but with all the unnecessary noises removed.
Vocals with Noise Removed
3. Use the Vocal Assistant in Nectar
Vocal mixing has a lot of steps and can be highly time intensive. Fortunately, there’s a feature of Nectar 4 that does most of this work for you. Similar to the Neutron Mix Assistant and the Ozone Master Assistant, Nectar 4 has a new Vocal Assistant that boasts some pretty sweet, new advancements.
Vocal Assistant is able to briefly listen to your vocal and analyze it to identify what processing is needed. Simply load Nectar 4 onto your vocal track, switch to the Vocal Assistant View and press play. Then, let the Vocal Assistant take it from there!
After Vocal Assistant is done listening, it’ll create a custom preset to bring professional polish to your vocal. It’ll help determine the key and range for the Pitch module; create a custom EQ curve based on the tonal quality of your vocal; apply the right amount of compression and vocal riding to achieve the optimal volume; and set custom parameters for the Reverb, Delay, and Dimension modules.
After taking care of all the grunt work, Vocal Assistant will direct you to a gorgeous user interface where you can quickly dial in the amount of processing applied to the EQ shape; the intensity of the dynamics processing; and the volume/intensity of the reverb, delay, and dimension effects.

Vocal Assistant UI in Nectar 4
From this view, you can also modify the key of your vocal, change your target EQ curve to fit your desired vibe, add additional width to your vocal, and activate the Voices and Backer modules (more on these later).
Let's listen to what Vocal Assistant did with the vocal we’ve been working with.
Nectar Vocal Assistant
4. Apply pitch correction
Now it’s time to fix any pitch errors in the vocal performance. For this, I like to use the Pitch module in Nectar 4. Within the Pitch module, you can adjust the strength and speed of the pitch correction to get the right amount for your vocal.
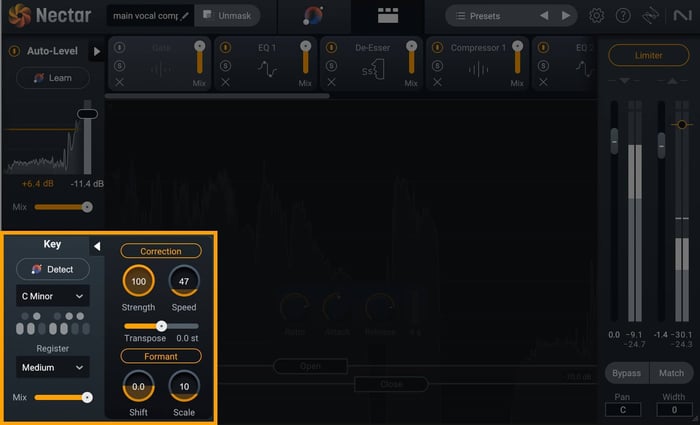
Nectar 4 pitch correction features in the Pitch module
Check out the lead vocal after I applied pitch correction using Nectar 4:
Pitch Correction
If your vocal requires a more surgical approach to pitch correction, you could also throw Melodyne 5 essential (also included in Nectar and Music Production Suite) at the top of the vocal chain in order to fine-tune specific notes and get everything locked in place.
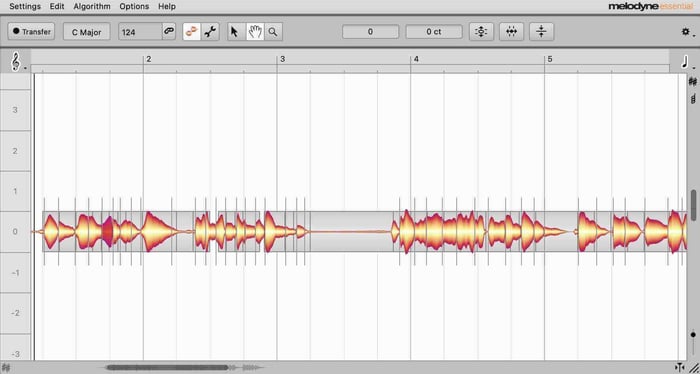
Melodyne 5 essential
5. Use EQ to create clarity
One thing that separates a professional-sounding vocal from a not-so-professional one is how the frequencies of the vocal are treated. Pro vocals are often both warm and present at the same time, and the majority of this tonal quality is created by sculpting the sound using an equalizer.

Nectar 4 Equalizer module
The Vocal Assistant in Nectar does a good job of adjusting the EQ parameters to remove unnecessary low end, add a bit of sparkle to the highs, and clean up any resonant frequencies in between. But, just in case you’re doing things manually, check out this great article on how to EQ vocals.
When mixing vocals, keep in mind that each vocalist, microphone, and recording room is unique, so there’s no “one-size-fits-all” approach with applying EQ to your vocals. This is especially true, considering that each mix is going to be unique as well. If you want a shortcut to get your vocal to sit properly in any mix, simply use the Unmask feature in Nectar's Vocal Assistant.
AI vocals
Nectar was one of the first AI vocal plugins on the market, using machine learning to save producers time and energy with vocal mixing. Now, Nectar 4 is fully compatible with Audiolens.
With Audiolens, you can take any recorded vocal and use it as an EQ target for the Vocal Assistant in Nectar 4. So if there’s a specific vocal sound you’re trying to emulate, simply play the reference vocal through Audiolens—it will listen and create a target EQ curve that you can then use within Nectar 4. This allows the Vocal Assistant to compare your vocal to the reference you set, and then make whatever tweaks necessary to get yours to match.
Nectar 4’s compatibility with Audiolens allows you to get your perfect vocal sound within just a few clicks.
6. Use level automation and compression
Vocal performances often have a wide dynamic range, where some notes are louder than others. This can result in quieter phrases getting buried beneath the rest of the mix. To even out a vocal’s level, simply apply compression and/or vocal riding.
Compression
To achieve a balanced vocal level, apply compression to tame any high volume peaks. This allows you to increase the overall volume of your vocal without it clipping. For this, I like to use the optical compressor setting in the Compressor module of Nectar.
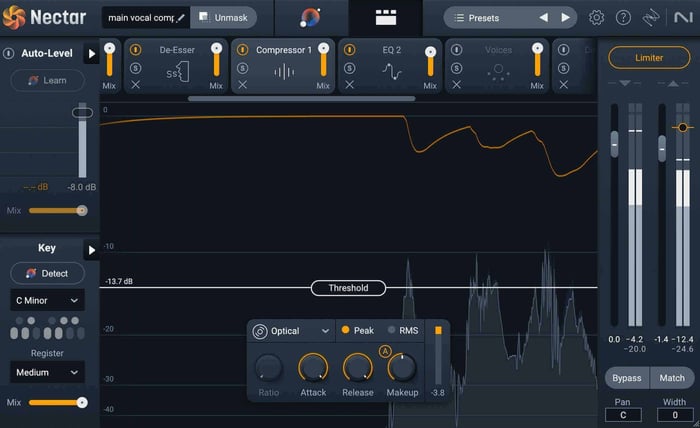
Compressor module in Nectar 4
I normally set the threshold to where I’m seeing about 3–7 dB of gain reduction. Some genres call for a bit more compression and some a bit less. The goal, though, is to create a consistent level without destroying the vocal's dynamics with over-compression.
Vocal riding
If your vocal is dynamic in volume, the compressor may have to work hard to level things out. When a compressor is working too hard, it can cause your vocal to sound “squashed.” If this is the case, you may need to ride the volume of your vocal to reduce the amount of hard peaks in volume. This can be done with volume automation in your DAW, but there’s definitely an easier way.
Auto-Level module in Nectar 4
We briefly touched on the Auto-Level module earlier when we were going over noise reduction, but the main purpose of this module is to recognize dips in levels and adjust the volume to be more consistent throughout the performance.
This is such a helpful feature, and it has literally saved me days of vocal mixing work. I used to spend hours drawing volume automation curves for my vocals, but now I just turn on the ALM and it works like magic.
7. Use a de-esser to reduce sibilance
After using EQ and then compressing your vocal, you may notice you’ve inadvertently raised the level of some harsher frequencies. If your sibilants (“s” and “sh” sounds) have become too loud, go ahead and use the De-esser module in Nectar to tame these harsh frequencies. A de-esser works like a compressor that applies gain reduction only to sibilant frequencies whenever they cross a specified threshold.
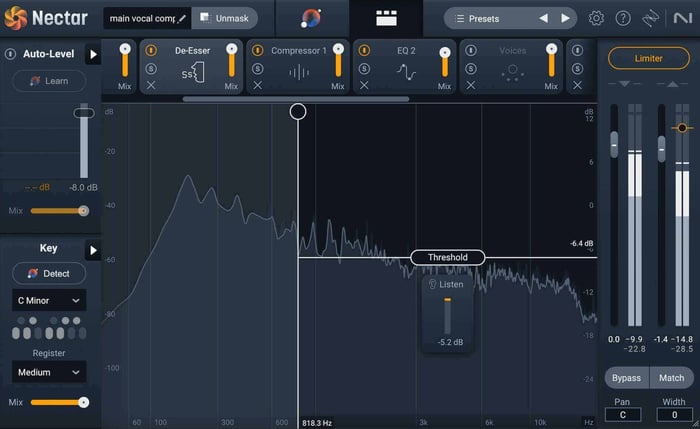
De-esser module in Nectar 4
8. Add depth and character with vocal effects
Last step—we’re almost there! Depending on the genre and vibe you’re going for, you may want to apply some vocal effects. Effects like saturation, doubling, delays, and reverb can add depth and dimension to your vocal, whereas distortion and vocoders help you craft a signature sound that’s all your own.
Saturation
After EQing the vocal, if it’s still not punching through the mix how you want, it can help to add some saturation. For this, I like to use the Saturation module in Nectar.
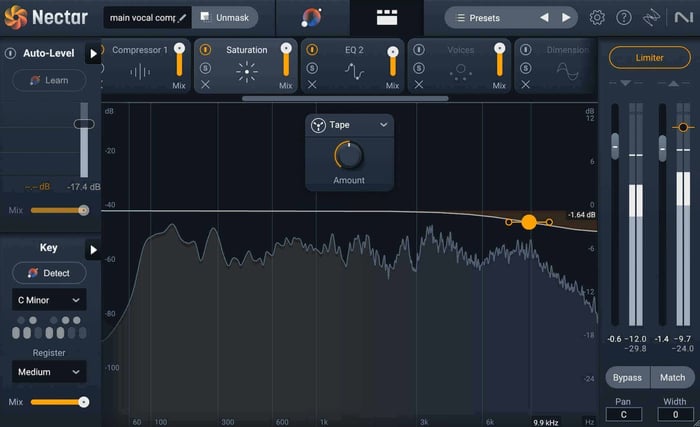
Saturation module in Nectar 4
The Saturation module will add harmonics to your audio and really fill up the frequency spectrum, making your vocal warm, rich, and bright. Within this module, you have several types of saturation to choose from so you can dial in the right sound for your track. I’ve decided to go with the Tape saturation at about 50%, with a high-shelf filter ducking down the highest frequencies so they aren’t too hissy.
Here's what saturation sounds like on my vocal.
Vocal Saturation
Vocal doubling
Vocal doubling is the process of layering the main vocal with other takes of the same section in order to give more body and width to your lead vocal. This can be done manually if you have enough good takes of your vocal, but there are a couple plugins that can help you achieve this sound automatically.
The first is the free Vocal Doubler plugin. It’s simple to use and will create thickness and a sense of space in the stereo field.
The new Voices module in Nectar is another option. You can actually choose from a selection of 11 auto-harmonies to discover the perfect fit for your vibe.
You can even use MIDI mode to precisely control these extra voices with the specific notes you need. This module also offers Direction control, allowing you to choose if the vocal harmonies are sung above or below your main vocal. And the best part is that you can easily manage and manipulate each voice within the Mixer view.
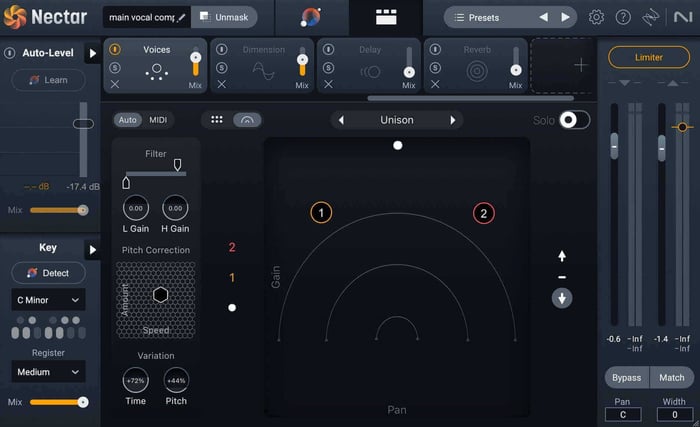
Voices module in Nectar 4
For this example, I used the Unison preset within the Voices module and adjusted the amount of processing applied to my vocal to about 70%. Give it a listen below, paying attention to how much wider the vocal sounds now.
Voices module
Alternatively, you could use the new Backer module in Nectar to create an AI vocal that will sing right along with you. The Backer module allows you to shift your vocal to create “backup singers” and then lets you blend these voices in with Tone, Pitch, and Formant features.
I turned on the Backer module in my Nectar 4 vocal chain, and applied the settings seen above. Although it doesn’t necessarily fit the vibe I’m wanting for this track, it’s worth giving it a listen down below to see what this new module can do.
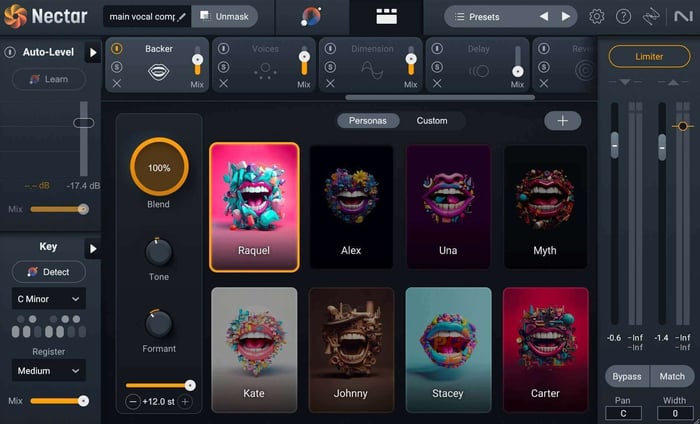
Backer module in Nectar 4
Backer module
One futuristic feature of the Backer module is that you can integrate it with Audiolens to create an AI vocal from any reference track—allowing you to, essentially, duet with your favorite singers! Definitely play with the settings in this module. The possibilities are, quite literally, endless.
Delay
When learning how to mix vocals, it’s important to consider the physical space you’d like your vocals to sound like they exist in. Is the vocalist in a small, echoey bathroom or standing on the edge of a huge canyon? What “space” does the rest of your track live in? Thinking of the sense of space you want to create, and then adding the appropriate amount of delay to your vocal can really give your productions that professional quality you’re looking for.
Using the Delay module in Nectar 4, I applied a small amount of delay with the settings seen below.
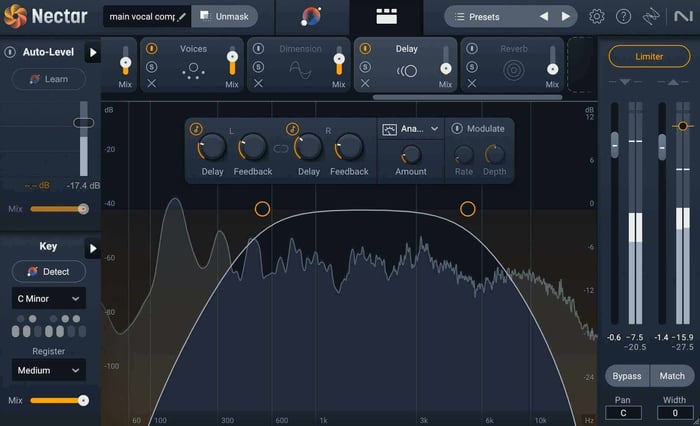
Delay module in Nectar 4
Delay module
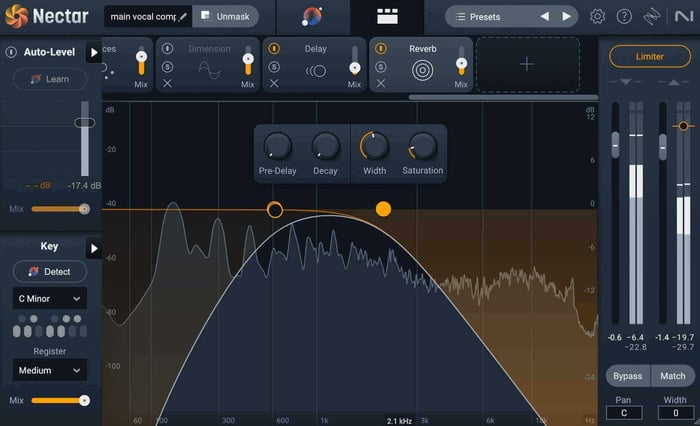
Reverb
Reverb can also add a sense of natural space to your vocal and help it sit nicely in your mix. If I’m going for a more natural sound for my vocal, I prefer to use the built-in Reverb module in Nectar because it helps vocals breathe, while still keeping the original clarity and punch in the mix.
Reverb module in Nectar 4
I applied reverb to my vocal using the settings seen in the screenshot above, keeping the amount of reverb pretty minimal in order to ensure the vocal sounds natural.
Listen to the little bit of extra sparkle the reverb gives to the lead vocal.
Reverb module
Start mixing professional vocals
Getting a professional sounding vocal can be a pretty time intensive process. But with the right tools, you can speed up your workflow and have a lot of fun along the way. And remember, every vocal is going to have different needs. But, if you follow the tips and tricks above, your vocal mixes are sure to get that pro sound you’ve been looking for.
You can get access to Nectar along with all the other plugins mentioned in this article by getting your copy of iZotope Music Production Suite. Happy mixing!