8 Tips for Perfect Vocal Comping
Vocal comping is the process of combining the best parts of multiple vocal takes to create one flawless vocal performance. In this how-to guide, we share eight tips that will help you perfect vocal comping so you can elevate the production value of your track.
Getting a perfect vocal performance rarely happens in one take. To get the perfect performance, vocalists will record multiple takes to get the whole song just right.
One of the secrets to a great-sounding vocal recording is vocal comping, also known as editing multiple takes together to create a composite track or comp of the best performance. It’s all about finding the magic moments that give you goosebumps and making sure they end up in the final take that wows the listener.
In this tutorial, discover eight vocal comping tips and techniques to help you get a polished vocal sound.
Edit clicks and pops in your vocal recording with iZotope


RX 11 Advanced
What is vocal comping?
Vocal comping is the process of piecing together phrases or parts from a bunch of different vocal takes to create the best overall vocal take possible. It involves evaluating takes to make sure all lyrics are correct and intelligible, that pitch is on point, and that, most importantly, the emotion comes through. The end result is a flawless performance that connects to listeners and draws them in.
Is vocal comping important?
Yes, vocal comping is important for a polished vocal recording that doesn't contain issues like extra breaths, clicks, or inconsistent performances. By seamlessly piecing together the best parts of multiple vocal takes and editing them, we can achieve a professional-sounding vocal for our mix.
So how do we accomplish comping a vocal? Let's dive into these eight tips!
1. Record a complete take, then record additional takes in sections
I like to start by recording one full take of the song top to bottom. This is a good warm-up for the vocalist and it gives you a template of how the sections of the song should flow into each other.
Then, narrow your focus to recording smaller sections of the song. Do a few takes of each section, noting what went well (or what could have gone better) in each take as you go, ensuring you have some options before moving on to the next section.
Depending on the song, it might make most sense to work from beginning to end or to jump around based on complexity and vocalist comfort level.
Don’t record too many takes
Recording too many takes can be frustrating and tiring for the vocalist. Plan to get 3–4 takes of each section so you have options then move on. Record much more than that and you risk running into the law of diminishing returns. Not only will the vocalist become fatigued, but you’ll find yourself with multiple takes that don’t have much variation between them to sift through.
Before recording a take, it’s a good idea to be specific about what you’re trying to do differently so that you have a goal going into each take rather than just doing another one for the sake of doing another take.
2. Keep track of good takes as you record
There are a couple of ways to keep notes as you record. I like to have a print out of the lyrics and color-code what went well so I have a roadmap to work from. Each take is represented by a different color and I highlight the text as I hear things that I want to make sure end up in the final edit. You can also give clips ratings in your DAW and mark the parts you want to use with a 5-star rating.
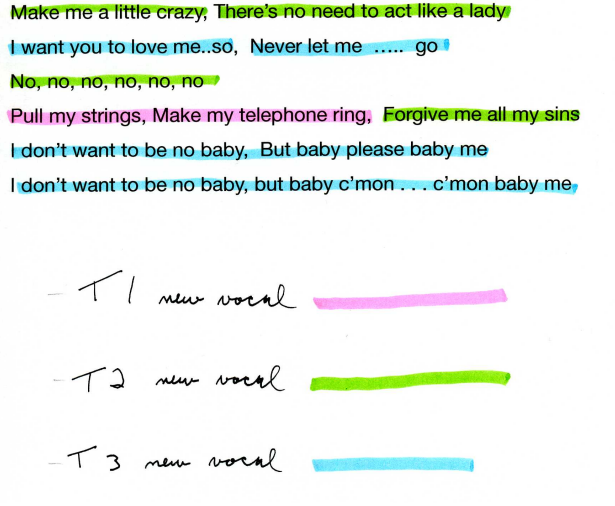
Color-coded lyrics sheet, marking good takes of a vocal performance
3. Cut on silences or on consonants
Breaking a waveform can introduce artifacts like pops and clicks. To prevent this from happening, try to make edits during silences rather than in the middle of a phrase. Cutting on naturally occurring silences helps to prevent vocals phrasing from sounding disjointed as well.
However, depending on the edit you’d like to make, cutting on silences isn’t possible. For those times, cutting on consonants such as s, t, or k is a seamless way to edit.
Listen for breaths
Make sure you don’t introduce double-breaths. Double breaths occur when you keep a fragment of a breath from one take, and it becomes edited next to a breath from another take. Editing between the end of a breath and the start of the following word is usually a natural-sounding edit point.
Double Breath
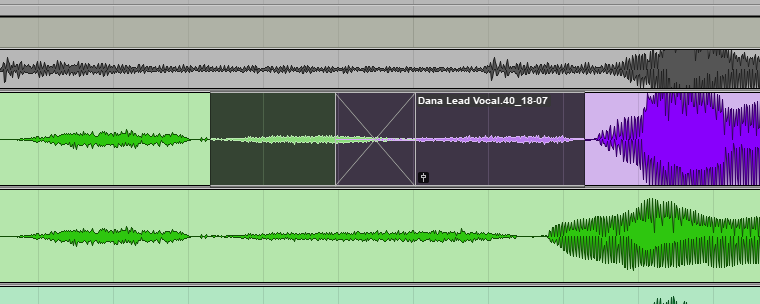
Vocal comp with audible double breath

Vocal comp with audible double-breath that has been fixed with a crossfade
4. Hide comps with downbeats
If there’s an edit that you’re having difficulty with, you can use the rest of the mix to help mask the edit. If you line up a troublesome edit with a big downbeat, it can help to cover up the sound of the edit by distracting the ear.
I like to do my vocal comping with my vocals soloed so I can really hear what my edits sound like, but when you listen to the full mix some edits that might not have passed the bar before suddenly work.
5. Adjust the timing
Even if vocals were recorded to a click track, there will likely be variations in timing during some vocal phrases. As you comp takes together, manually drag clips around to fix vocal phrasing. Make sure that vocal entrances and cutoffs are in time with the beat.
If you’re working with stacks of vocals, make sure they’re in time with each other as well.
6. Use crossfades
Avoid introducing audible pops by crossfading between clips. In fact, each clip should have a fade in, fade out, or crossfade. However, using too long of a crossfade will overlap the two clips for the length of the crossfade so be sure not to crossfade over any diction or sustained notes so you don’t hear two performances happening at the same time.
7. Use clip gain to fix dynamics issues
Sometimes differences in dynamics between takes can ruin an otherwise perfect edit. For example, one take might be just a couple of dB louder than another, but it’s enough of a difference to sound like an unnatural jump.
Using clip gain to smooth out changes in volume will not only make an edit more transparent, but will change how any dynamics processing on your track reacts to the signal, making compressors work a little less hard to correct dynamics.
8. Clean up any pops and clicks with iZotope RX
When a sudden break is introduced in a waveform, the result is an audible pop or click. When a crossfade isn't enough to fix the issue, you can use RX De-click to remove the artifact.
I start with the preset called Fix Discontiguous Waveform and adjust the Sensitivity to taste. This detects sharp changes in a waveform and smoothes it out. Notice the transitions in waveforms are a bit smoother after applying De-click.
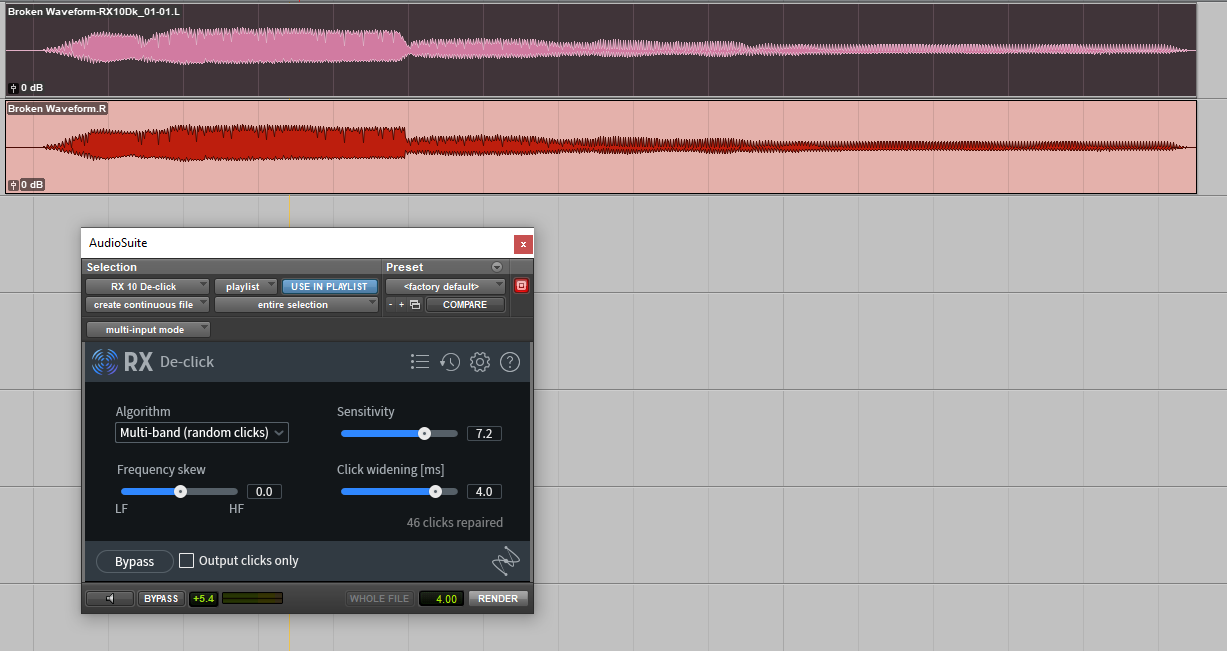
RX De-clip smooths differences in waveforms, reducing pops and clicks
RX De-click is also helpful for unpleasant mouth noises in a vocal take as well. In the video below, Brian Fisher shares how to remove unpleasant mouth noises and clicks in his vocal take as well as some helpful cleanup tips for guitar.
Remove background noise
It’s also possible to hear differences in room tone between takes as you edit. To correct this, use RX Spectral Repair to remove background noise or room tone. For tips on removing background noise, check out How to Remove Background Noise from Dialogue Recordings.
Comp the perfect vocal take
Comping vocals gives you a professional-sounding vocal track that delivers every line of the song with the most impact. Being able to piece together a seamless take takes practice, but the results are worth it.
