Ultimate guide: How to EQ vocals for beginners
Learn how to EQ vocals by gaining a better understanding of vocal frequencies, analyzing vocal recordings, and discovering the best EQ settings for vocals.
It is fair to say that although similar, no two of the same instruments are exactly alike. The human voice in particular is as unique from singer to singer as are snowflakes or fingerprints. For this reason, there is no one-size-fits-all solution for how to shape a vocal with EQ. However, there are some general concepts and tried and true techniques that will get you moving in the right direction and, with a bit of practice, set you on the road to success.
In this article I will highlight important considerations when assessing a vocal recording and guide you through my processes of how to EQ vocals step-by-step to get these results:
Vocal EQ
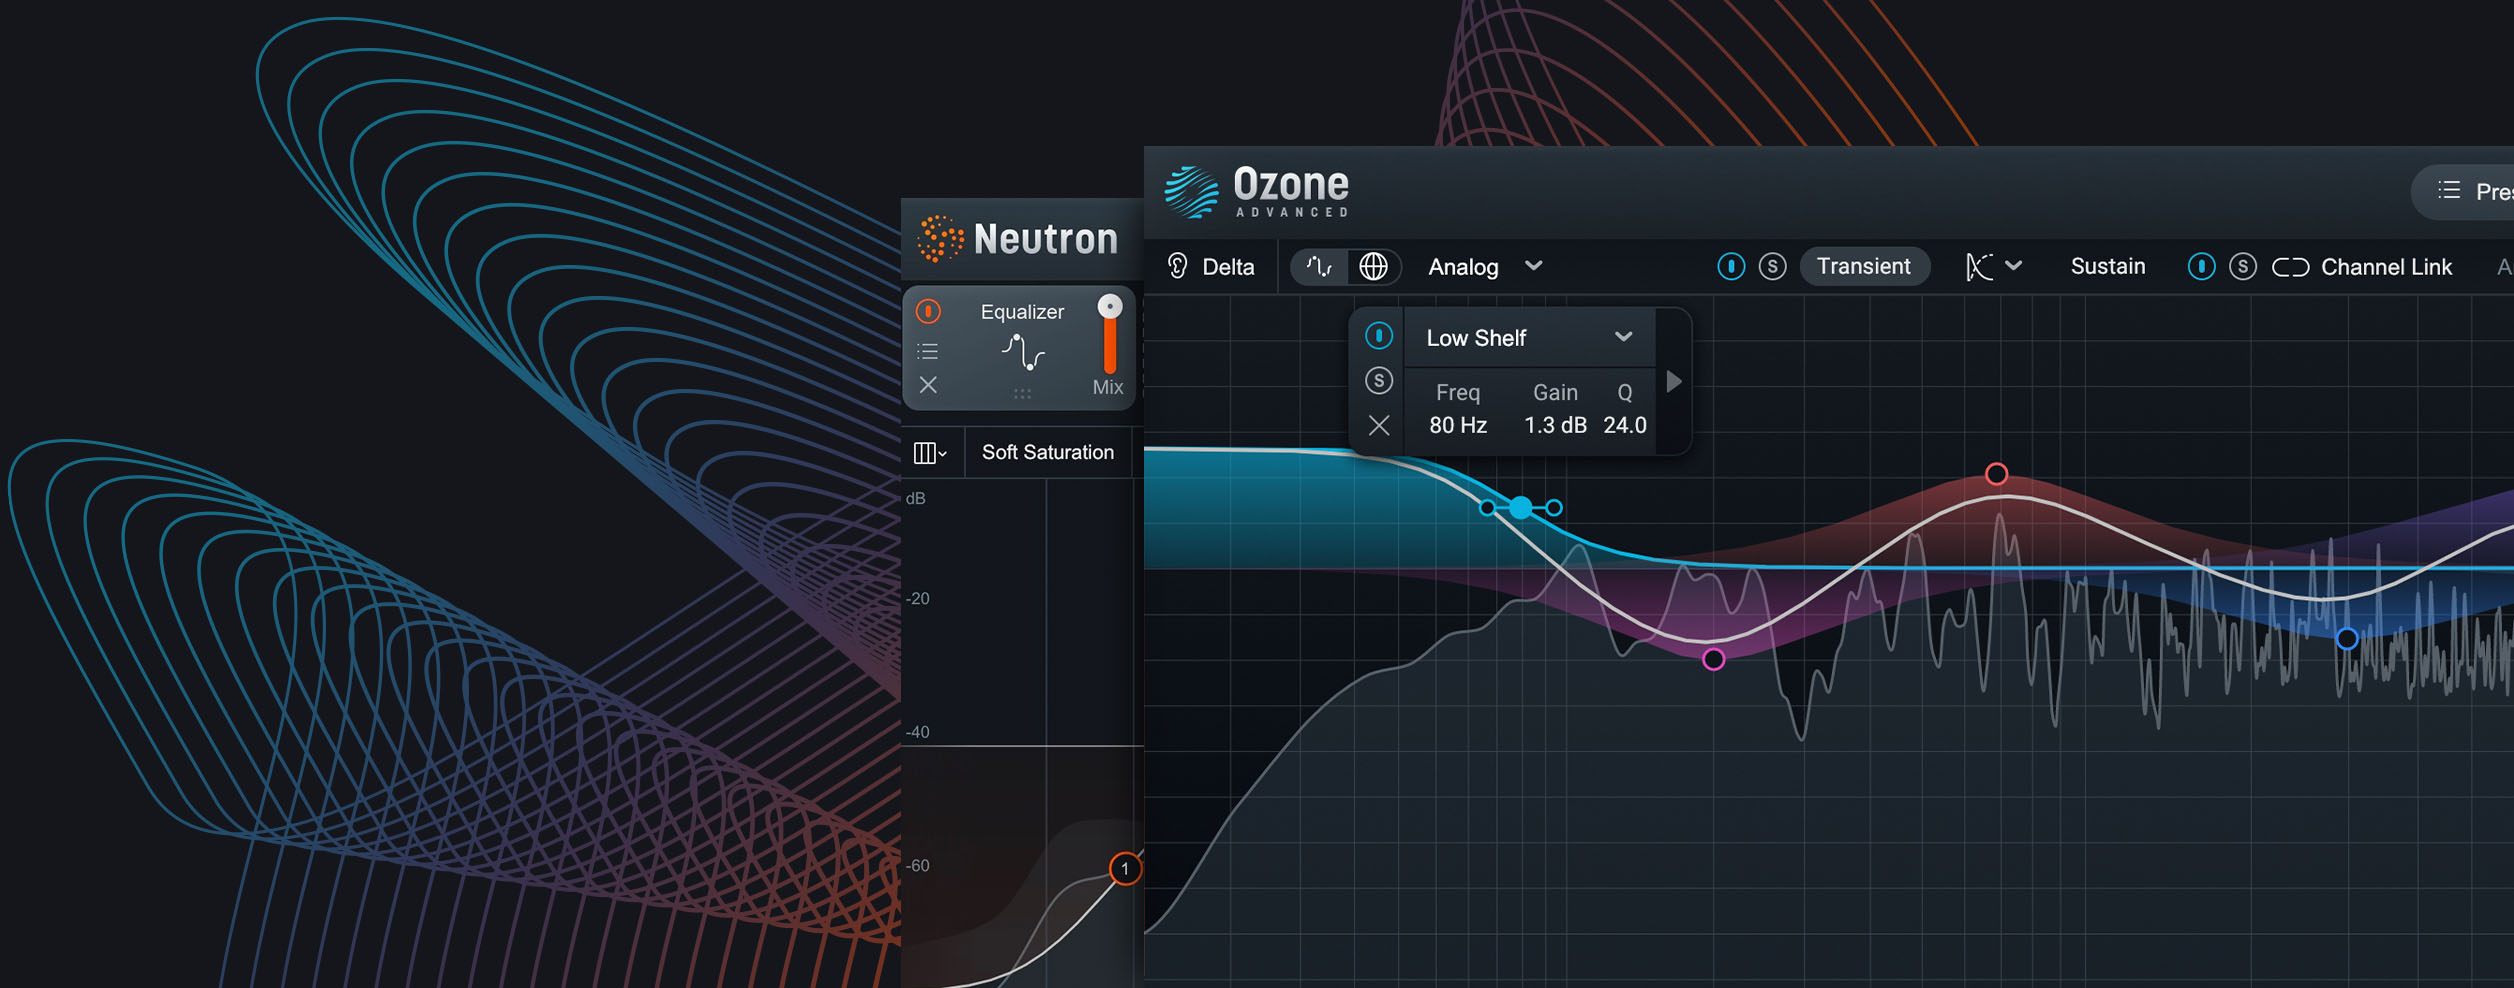
While Nectar is iZotope's powerful vocal mixing plug-in, I've opted to show you EQ moves in Neutron. (Feel free to check out Nectar's other vocal mixing features, like Vocal Assistant, Unmasking, Harmony, and more).
Follow along using a free demo of iZotope
![]()
![]()
Neutron
Common questions about vocal EQ
Why is EQ important for vocals?
EQ helps balance a vocal in the mix by enhancing clarity, reducing muddiness, and ensuring it fits well with other instruments.
What are the key frequency ranges to focus on when EQing vocals?
Key vocal frequencies include low-end rumble (below 100 Hz), muddiness (200–500 Hz), presence (3–5 kHz), and airiness (10–15 kHz).
How can I reduce muddiness in vocals?
Reduce frequencies in the 200–500 Hz range using a narrow cut to clean up muddiness without affecting vocal body.
What tools can help EQ vocals more effectively?
iZotope Nectar and Neutron offer AI-assisted vocal EQ and dynamic EQ tools that help shape vocal tone precisely.
Should I use a high-pass filter on vocals?
Yes, a high-pass filter is commonly used to cut low-end rumble below 80–100 Hz, which helps clean up the vocal signal.
Pitch and fundamental vocal frequency range
Before we dive into vocal equalization, it is important to first understand a bit about the human voice and where it lives within the audible frequency spectrum, which for humans, is 20 Hz to 20 kHz.
There are six vocal types, based on range, as defined in classical music. These fall into the categories of bass, bariton, tenor, alto, mezzo-soprano and soprano.
The following chart illustrates the fundamental frequency ranges of each of these vocal types in relation to relative note pitch.

Vocal ranges in relation to pitch and frequency
The fundamental frequency of any pitch can also be referred to as the 1st harmonic. If only this frequency were to be generated, it would sound as a pure sine wave.
However, the human voice is far more complex than this. The resulting timbre (tonal character) that we recognize as a vocal is a combination of the fundamental frequency and all of its upper frequency harmonics and overtones. Manipulating the amplitude of these upper harmonics and overtones with equalization (EQ) is what allows us to shape, or re-shape the overall tonal characteristic of a recorded vocal.
Analyze a vocal recording: key, melody, and harmonics
When assessing a vocal recording, knowing the key of the song and the note range of the sung melody can help to inform us of certain frequencies that may be more resonant, or simply more musical, within the context of a composition.
Here is a brief sample of a verse, a chorus and a refrain from a song with a male lead vocal.
If we analyze this bit of music we find the following:
The song key is D major and the tonic note is “D."
Vocal melodic range by section is like so:
Verse: D3–A4
Chorus: D3–D4
Refrain: F#3–G3
If we know that the tonic note of the song is “D,” then we know that any frequency representing any octave of the note “D” will likely be prominent in the vocal recording.
Additionally, if we look at the 3rd and 5th harmonics of the note, “D3,” which is the lowest not of the melody, we see the emergence of a perfect 5th and a major 3rd, which in the key of Dmaj, are “A” and “F#” respectively.
This tells us that any frequency that represents any octave of the notes, “A” and “F#,” may also be prominent in the vocal recording.
1st harmonic (fundamental) = D3, 147 Hz (tonic)
2nd harmonic = D4, 294 Hz (1st octave)
3rd harmonic = A4, 440 Hz (perfect 5th, plus 1 octave)
4th harmonic = D5, 587 Hz (2nd octave)
5th harmonic = F#5, 740 Hz (major 3rd, plus 2 octaves)
In short, this means that any frequency representing the tonic, the major 3rd, or the perfect 5th of the key has potential frequencies for boosting or cutting.
I am able to demonstrate this visually by using the spectrum analyzer in iZotope Neutron’s EQ module and capturing a screenshot of the note “D3,” as it is being sung.
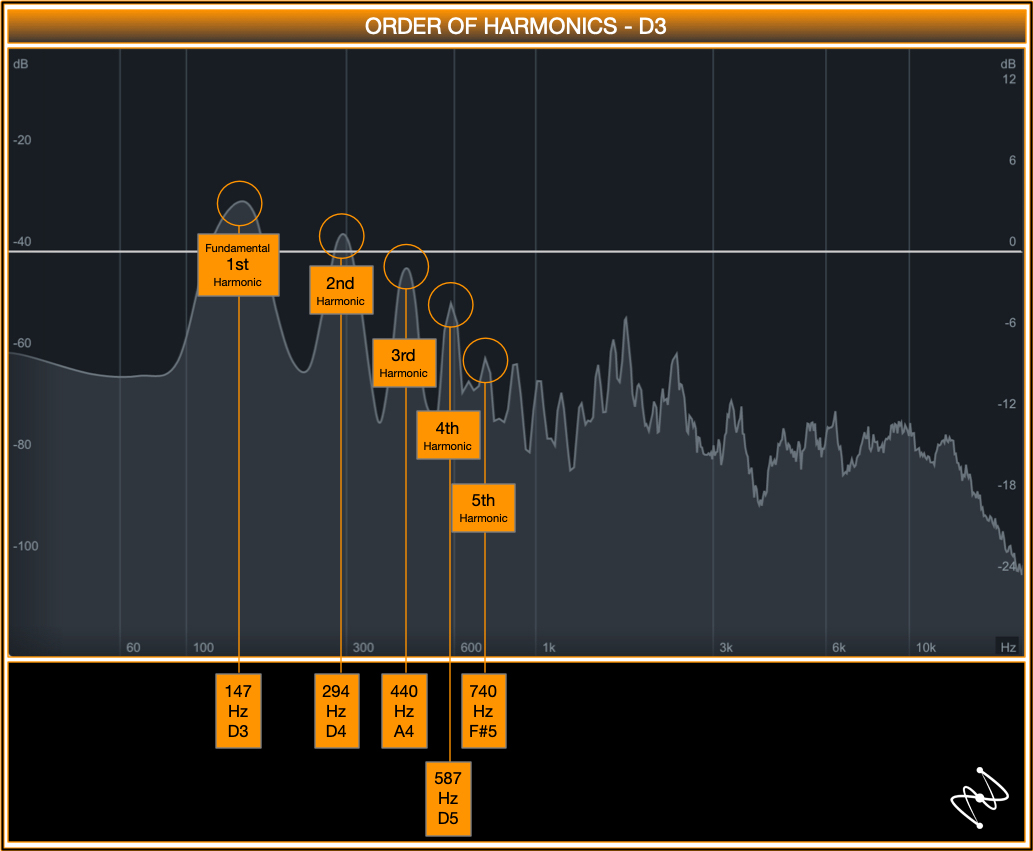
D3 fundamental and harmonics in Neutron EQ
To find the frequency of any note in the range of 20 Hz–20 kHz, I have created a chart for quick and easy reference.

Note pitches and relative frequencies chart
Neutron EQ not only shows you the frequency that you are currently boosting or cutting, but it also shows you that frequency's relative note pitch.

Neutron EQ viewing frequency and note pitch
Tonal characteristics in relation to the human voice
Now that we’ve gone over using song key, melody and pitch to find potential resonant or musical frequencies within a vocal recording, let’s take a look at how different frequencies affect a vocal’s tone.
In the chart below I have categorized certain frequency ranges by their tonal characteristics in relation to the human voice in an EQ vocal chart.
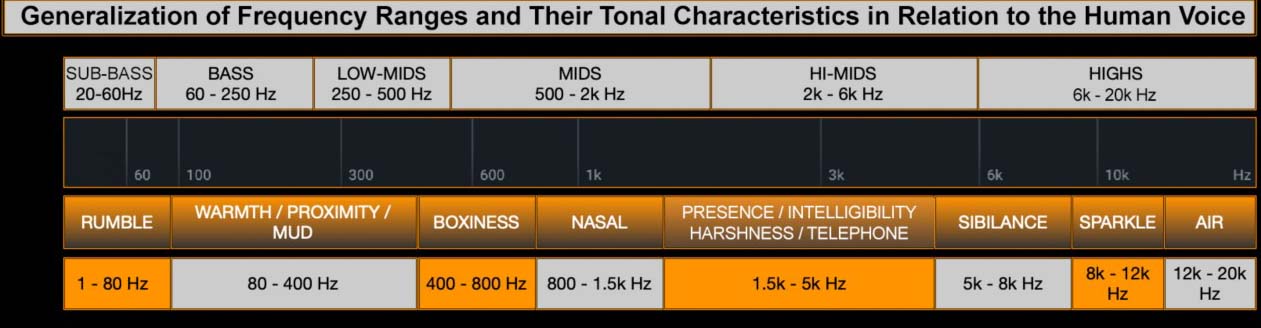
Vocal EQ chart
I have also added all of the frequencies that represent the 1st harmonic, the 3rd harmonic, and the 5th harmonic of the key of Dmaj, which is the key of our audio example. In doing so I have essentially created an EQ vocal cheat sheet.
Remember, the use of this technique to pinpoint specific frequencies is only a guide. Every voice is different, every recording is different, and every objective is different.
However, the ability to analyze a piece of music in this way, when combined with the, “boost and sweep” method (which I will explain later on), and having a good listening environment, is a very powerful place to start.
Let’s get to it!
How to EQ vocals
Apart from creating an impactful musical mix by way of level balancing and panning, EQ is our next most powerful tool. Unlike level which allows us to increase or decrease the volume of an entire signal, EQ settings for vocals allow us to increase or decrease the volume of specific frequency ranges within a signal, allowing us to change its overall tonal character.
With EQ we can make a vocal darker or brighter, smoother or more crisp, dull or sparkly, light and airy, or any other creative characteristic you can think of.
In the following steps we will process the verse of our original audio example, which consists of a male vocal in the key of D maj.
1. Remove unwanted low end (1 Hz–100 Hz)
What lives below 80 Hz in a vocal recording is most often low frequency room rumble, microphone handling noise, microphone bleed from unintended sources, or inherent equipment noise.
It may not always be audible, but if left unchecked, any audio information within this frequency range can build up when combined with other signals, potentially muddying up the low end of your entire mix or even diminishing the overall headroom of your master bus.
For this reason, when working with a vocal, the very first thing I do is engage a HPF (High pass filter) with a steep slope (Q) and remove everything from anywhere between 50–100 Hz and below.
To find the correct frequency, a good rule of thumb is to engage a HPF starting at 20 Hz. slowly move it up the frequency spectrum until it begins affecting the vocal, then back it off just a bit.
For our example recording I have set the HPF to 90Hz with a slope (Q) of 48 dB per octave.
Removing Unwanted Low End
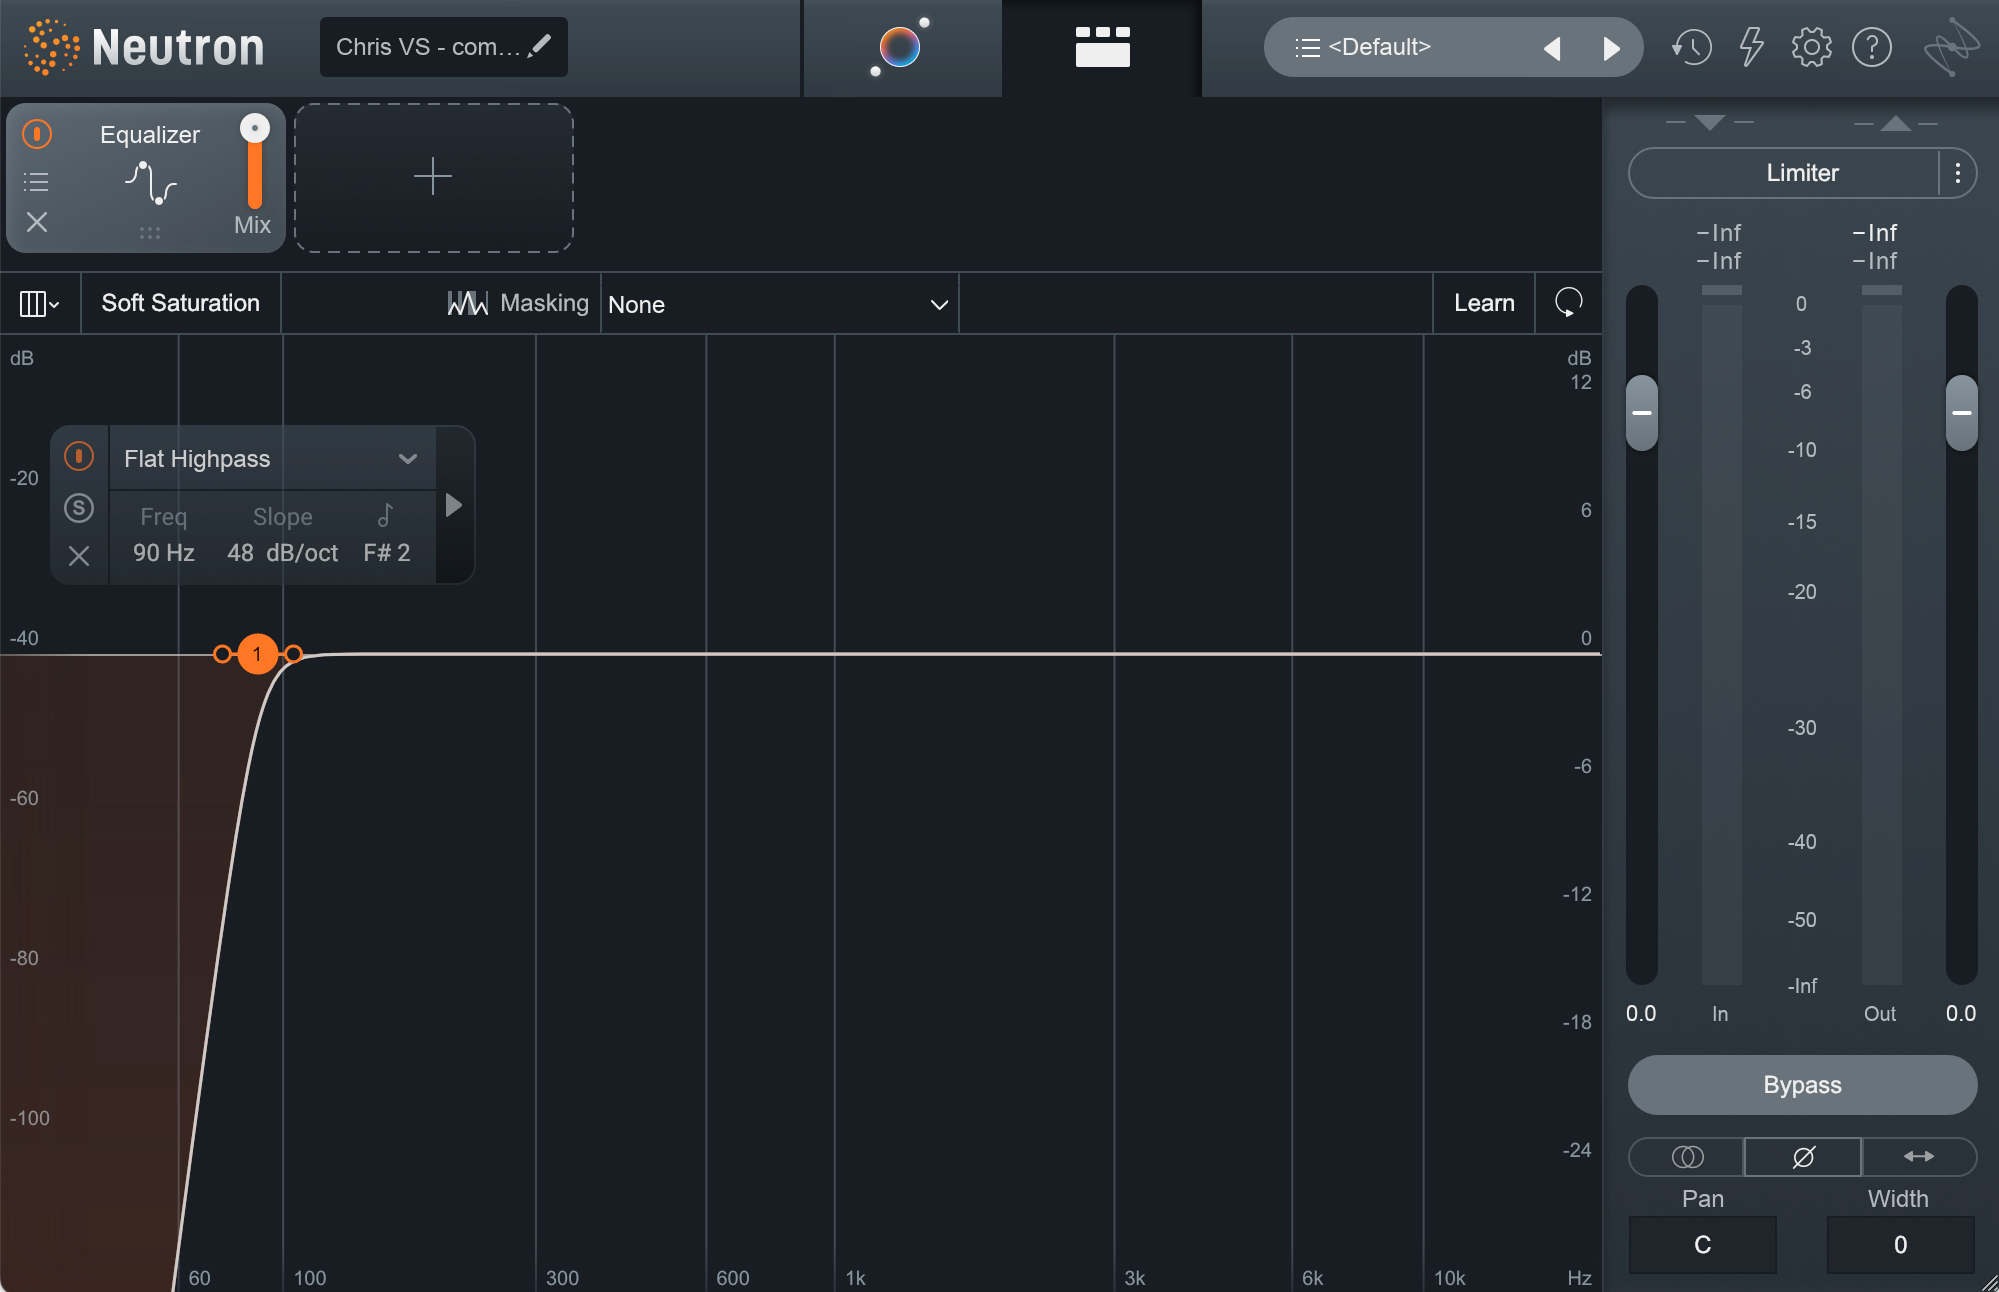
Vocal EQ settings for 1 Hz–100 Hz
As very little of the vocal lives below 90 Hz, the difference will be extremely subtle. It is more likely that you notice the low end of the kick drum is now ever so slightly more focused without the masking of any low frequency rumble in the vocal recording that may have been conflicting with it. Again, it may not sound like much, but when you have multiple layers of vocal doubles, triples, harmonies, etc. it can add up.
2. Balance body and warmth (100 Hz–400 Hz)
The fundamental frequencies of a vocal are typically found between 100 and 400 Hz. This is where the main body and warmth of a vocal lives.
Too much of this frequency range and the vocal will sound boomy, lack clarity and potentially muddy up the low end of your mix. Too little of this frequency range and the vocal will sound thin and weak.
In our example, the recording is a touch boomy in the 100–400 Hz frequency range.
Referring to our analysis from earlier, we know that any frequencies, within this range, that represent the notes, D, F#, or A, are potential frequencies to boost or cut. However, we must also use our ears.
To find any overly resonant or troublesome frequencies, a common technique is the “boost and sweep” method. This is done by boosting any frequency using a “bell filter,” typically with a medium to tight Q, and then sweeping it across the frequency spectrum until the overly resonant or troublesome frequency reveals itself.
Once discovered, make an EQ cut at that frequency.
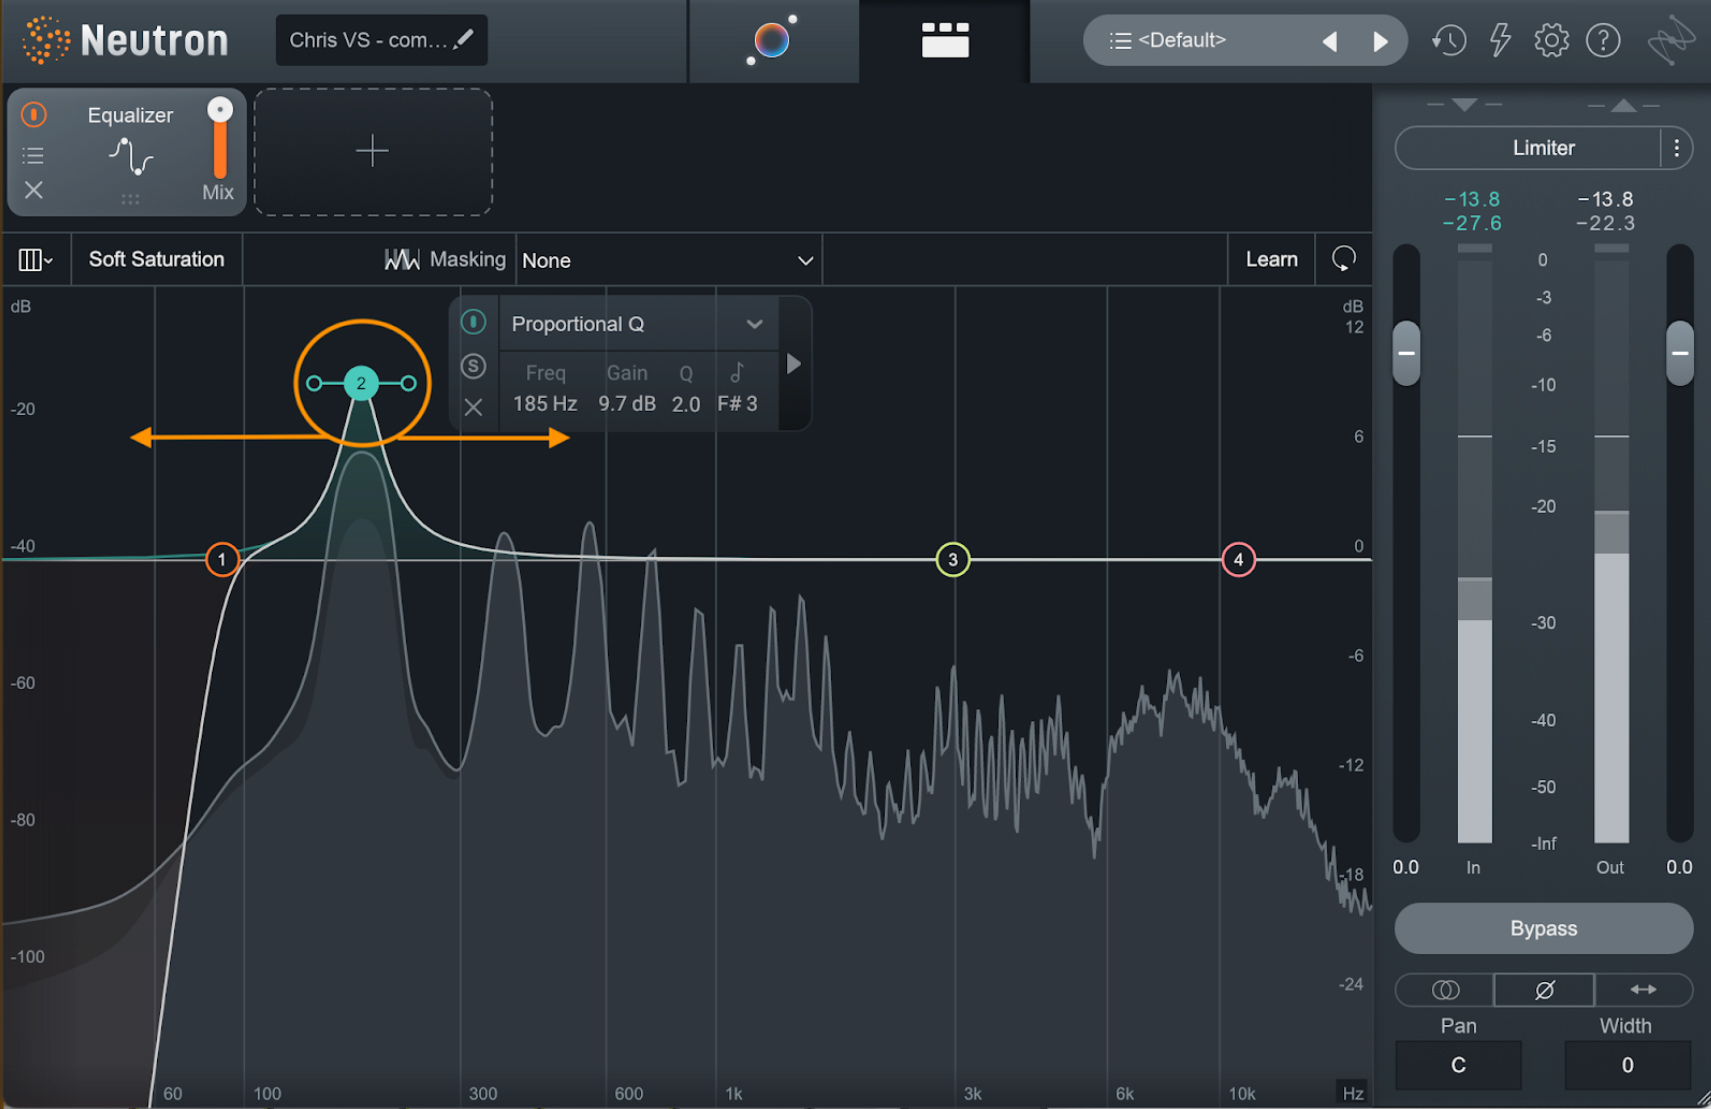
Boost and sweep in Neutron
With Neutron’s EQ you also have the option to “solo” any frequency.

Neutron EQ solo function
By using this method, I found the most resonance was centered at 185 Hz and 370 Hz, so I made my cuts here. I set the Q a bit wide in this instance to reduce some additional frequencies both above and below 185 Hz.
Balancing Body and Warmth
This should be immediately noticeable. The vocal is still warm, not thin, and overall more clear and less boomy.
3. Remove hollow or boxy frequencies (400 Hz–800 Hz)
A great deal of vocal character resides in the frequency range of 400 Hz–800 Hz.
Too much of this frequency range will accentuate the throatiness of a vocal causing it to sound papery or boxy. Too little of this frequency range and the vocal can sound hollow and unnatural.
Again, using the “boost and sweep” method I found a bit of an unwanted “papery" resonance at 657 Hz and made a very small cut.
Removing Papery Resonances
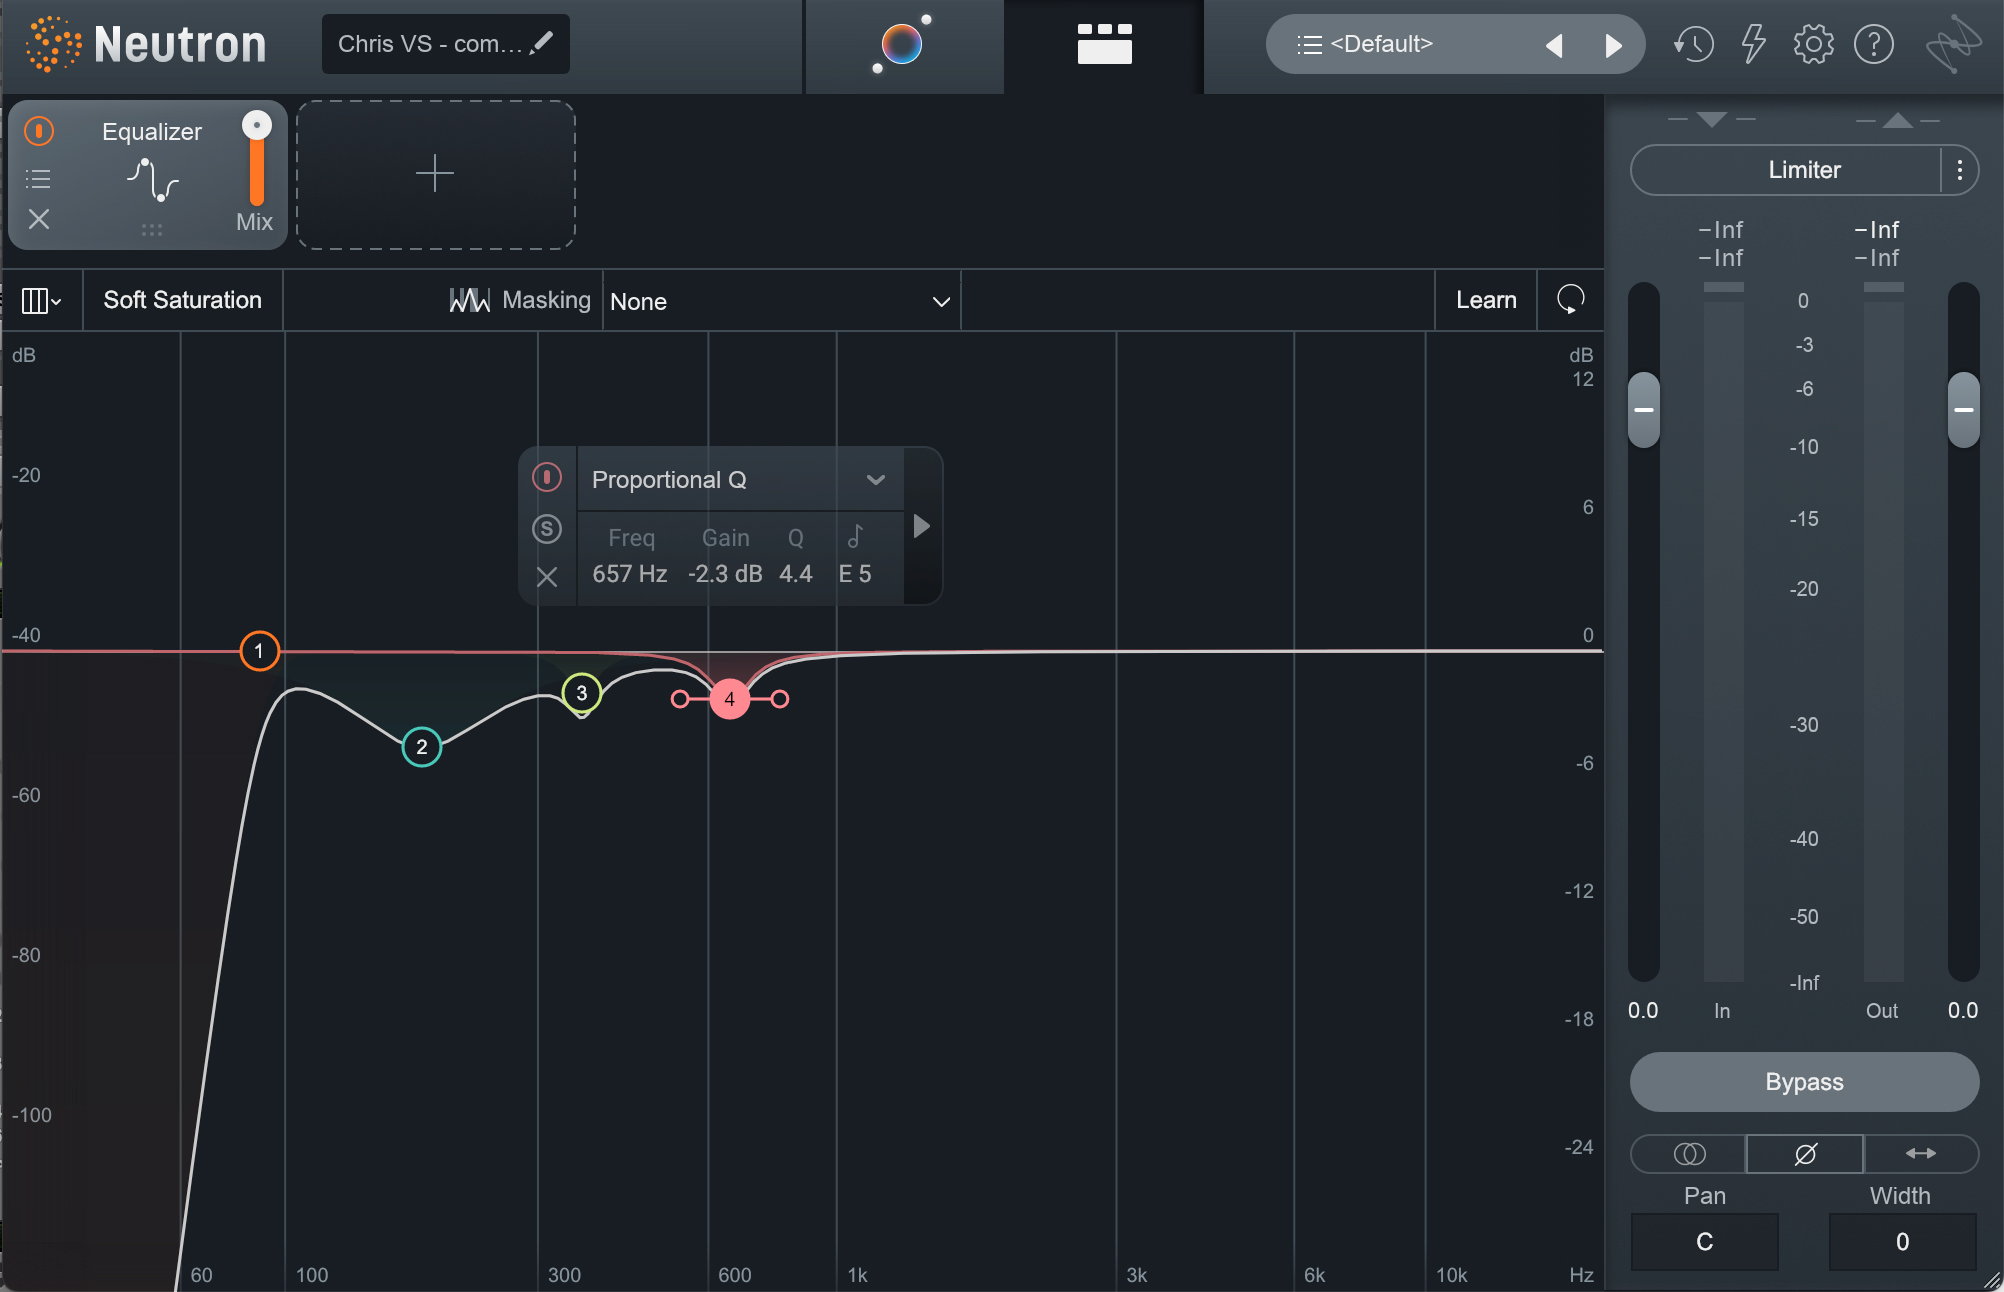
Neutron vocal EQ settings, 400 Hz–800 Hz
Again, this is a very subtle change, but with this cut, the vocal is a bit less papery and sounds a touch more natural.
4. Remove unwanted resonances in the nasal cavity (800 Hz–1.5 kHz)
The mid range of a vocal from 800 Hz–1.5 kHz, (sometimes a bit higher depending on the singer), is where the human nasal cavity resonates the most.
Too much of this frequency range can cause a vocal to sound a bit honky or nasally.
If there is any unwanted resonance in this area, it often has less to do with the key or melody of the song. It more often depends on the size and shape of an individual vocalists' physical nasal cavity. For this reason, the “boost and sweep” method is very helpful here.
It should also be mentioned that the frequency of the nasal resonance, once discovered, is fairly constant. Using a tighter Q in order to avoid reducing too many frequencies above and below the center frequency is common.
In our example I found the majority of the nasal resonance to be at 931 Hz.
Removing Unwanted Nasal Resonance
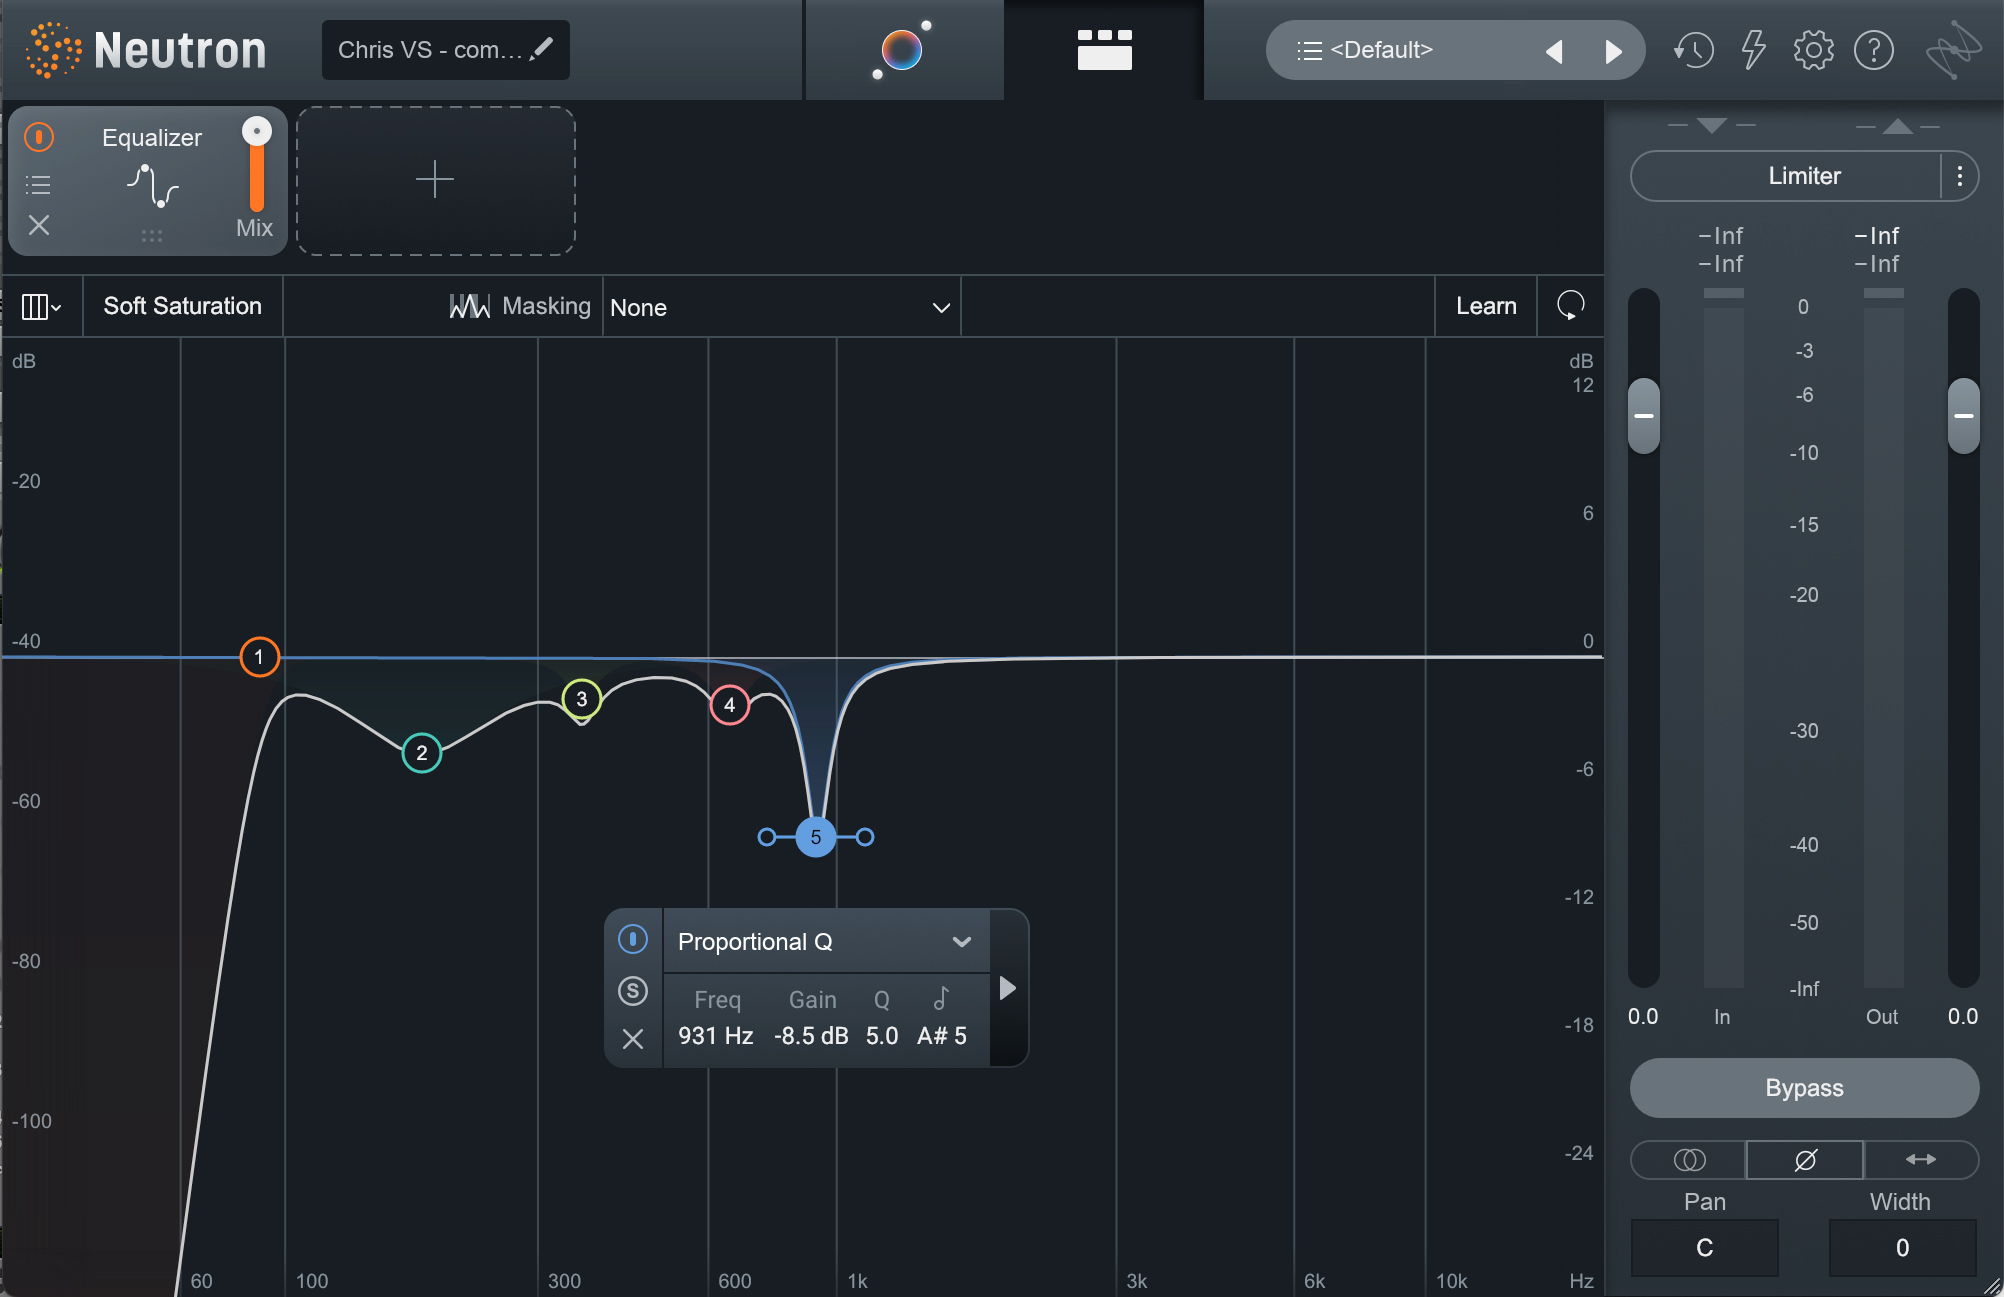
Neutron vocal EQ settings, 800 Hz–1.5 kHz
Again, much like our previous cut at 657 Hz, the difference is subtle, but offers a similar result. The vocal should now sound a bit less stuffy, less nasally, and more natural.
5. Improve presence and intelligibility (1.5 kHz–5 kHz)
Although the range of human hearing is from 20 Hz–20 kHz, our ears are most sensitive to frequencies in the range of 2 kHz–5 kHz. This also happens to be the frequency range in which human speech is most intelligible. For this reason, any EQ applied to this area of the frequency spectrum should be handled carefully. Making small boosts or cuts in this area, no more than 1 or 2 dB is common.
Too much in this frequency range and the vocal quickly becomes harsh and aggressive.
Too little in this frequency range and the vocal can sound flat or muffled.
Improving Presence and Intelligibility
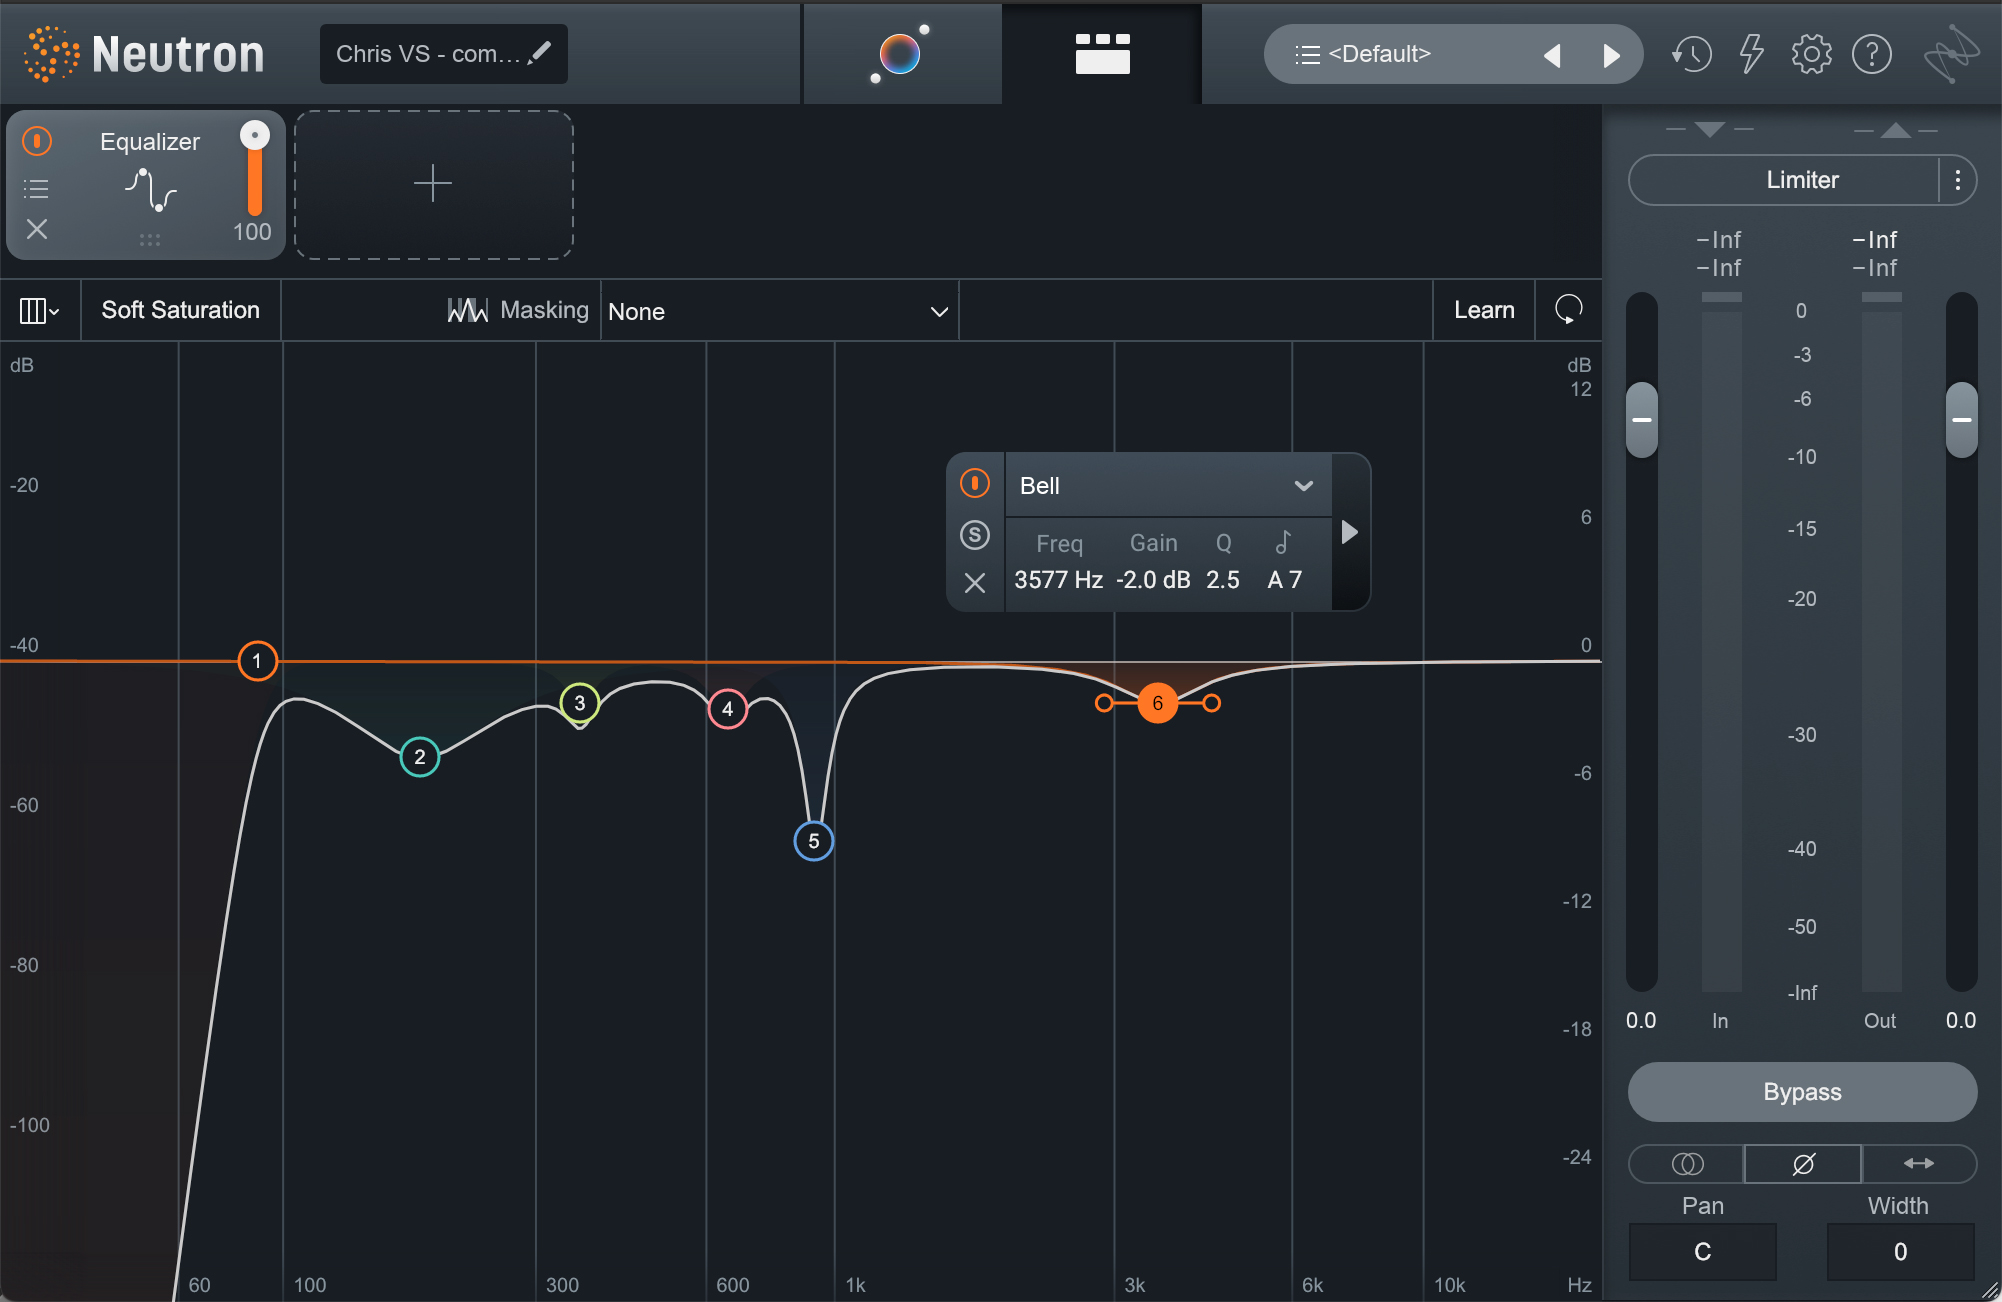
Neutron vocal EQ settings, 1.5 kHz–5 kHz
After making a small cut at 3,577 Hz, you may notice that the vocal now sounds slightly more dull. Although this may seem counter intuitive, it is actually by design. This will allow me to boost and brighten up the vocal later in the 8 kHz to 12 kHz. I prefer to brighten up a vocal in the 8 kHz to 12 kHz range more so than the 1.5 kHz to 5 kHz range as it leads to a smoother and less harsh sounding vocal.
6. Address sibilance (5 kHz–8 kHz)
Be aware that the bright resonance of “S’s” and “T’s” in a vocal performance, referred to as “sibilance,” is most prominent in the frequency range of 5 kHz to 8 kHz. By boosting EQ in this area, you will increase this sibilance. However if you feel the vocal is too dark and can benefit from a boost in this area, then you should do so. This should not be a deterrent, as sibilance can be dealt with in other ways.
Although sibilance can be softened by cutting frequencies using EQ, doing so can leave the rest of the vocal performance sounding dull and lifeless.
For this reason sibilance is better dealt with by manual editing of the waveform itself, or by using a de-esser. I will demonstrate this in the last step of this article.
In our example I have decided to leave this frequency range alone. I do not think anything is needed here.
7. Add sparkle (8 kHz–12 kHz)
As we enter into the frequency range of 8 kHz and above we find a bit more brilliance and sparkle in a vocal. As I mentioned in a previous step, I find that by cutting a bit of the harshness between 2 kHz and 5 kHz, and contrasting that with a small boost somewhere between 8 kHz and 12 kHz, brings back any of the lost brightness without any of the harshness.
In our example I have boosted 9,357 Hz by about 1.5 dB with a fairly wide Q.
You may notice that by doing so I have also increased some sibilance in the vocal. Again, this we will deal with later with the use of a de-esser.
Adding Sparkle

Neutron vocal EQ settings, 8 kHz–12 kHz
8. Pay attention to airiness (12 kHz–20 kHz)
The last frequency range I consider when working with a vocal is from 12 kHz and above. Although there is not very much tonal information in this area, boosting just a bit in this upper frequency range can help a vocal to feel more open and exciting.
For this purpose I prefer to use a different EQ to add a touch more character. Ozone Vintage EQ is excellent for this as it is modeled after vintage analog equipment.
If the original recording is dark, I typically boost with a “high shelf” from 12 kHz and up. If the original recording is already fairly bright, I typically boost with a “high shelf” from 16 kHz and up. In the case of our example, which is quite dark, so I chose to boost by about 3 dB with a “high shelf” starting at 12 kHz.
The difference will be subtle, but you should hear the vocal open up just a bit and be slightly less muffled.
Much like in the previous step, this extra boost in the high end may induce a bit more sibilance, but in the final step we will add a de-esser to compensate for this.
Adding Character to High Frequencies
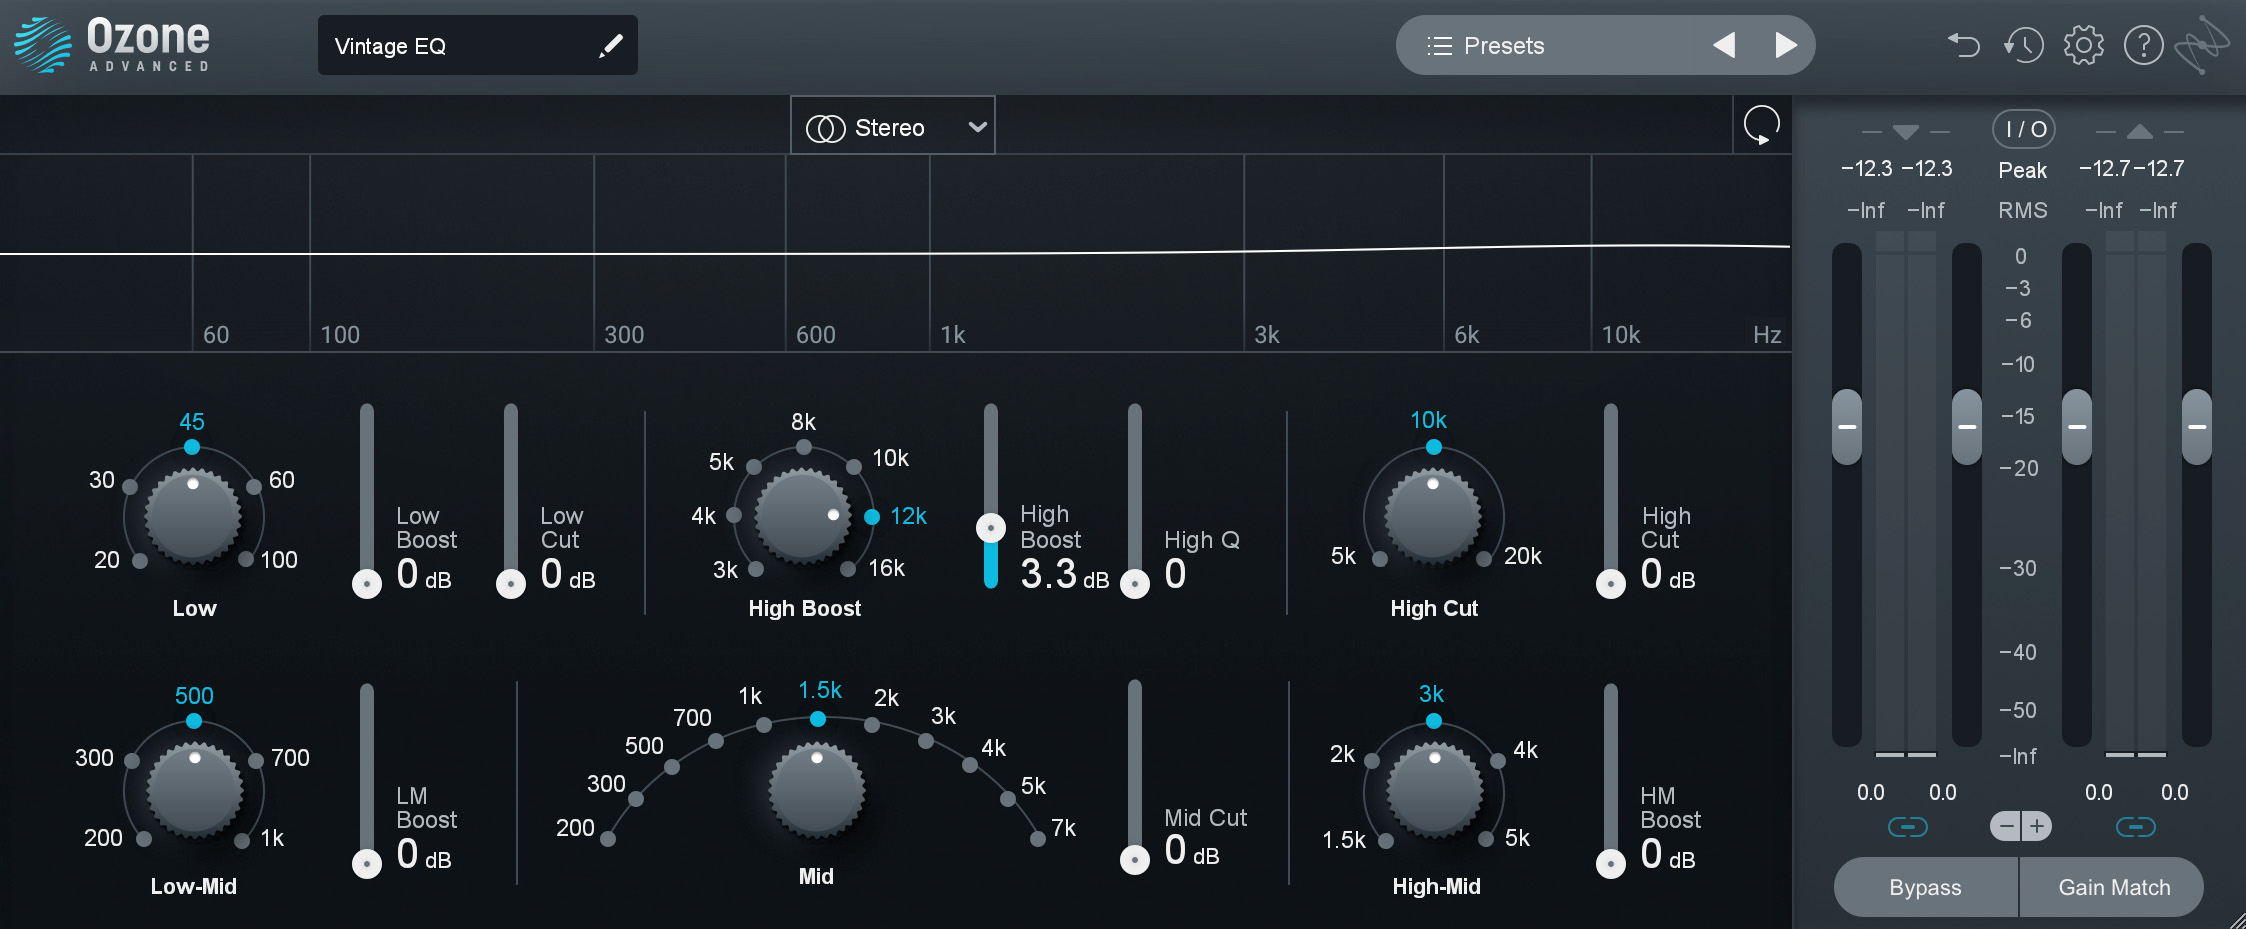
Ozone vocal EQ settings, 12 kHz–20 kHz
9. De-ess the vocal
iZotope Nectar has an excellent De-esser module. I set the frequency range to start at 4.4 kHz and adjusted the threshold until I heard the S’s and T’s reduce to a level that I felt sounded most natural.
It is important to not over de-ess. When this happens it creates a lisp sounding vocal and a lack of intelligibility on certain words.
De-essing the Vocal

Nectar De-esser settings
Final results of vocal EQ
Now that we have assessed our recording, completely examined our vocal across the entire frequency spectrum from 20 HZ to 20 kHz and applied EQ using iZotope Neutron, let’s take one more listen and compare the original to our final product.
In these final listening examples I have brought the level of the vocal down a bit so it sits better within the mix and also added a touch of reverb.
Let’s listen!
Vocal EQ
Start using vocal EQ
We have covered a lot of information in this article, however, it bears repeating, that when applying EQ to a vocal, or any instrument for that matter, there is no one size fits all solution.
In this exercise we looked at a male vocal recording of a song in the key of D maj with an overall melody range of D3 to D4. The song that you work on may involve a female vocalist performing in a different key with a wider melodic range. This will certainly change what frequencies you choose to boost or cut, however, the concepts and the techniques will remain the same, and with practice and repetition you will quickly train your ears to hear many of the minute subtleties that at first might escape you.
Finally, always remember, no one mixes in a vacuum. Do not underestimate the power and importance of a good reference track!