
How to get a loud mix while preserving dynamic range
Many people still crave a loud mix and master. In this tutorial, we'll dissect a song and learn how to mix for loudness while preserving dynamic range.
“The loudness wars are over!” they said. “Loudness normalization and dynamics won!” they said, and yet still, many people crave a loud mix and master, albeit one that has perceived punch and dynamics. As it turns out, that’s not so easy to achieve.
If you’re one of those people who still wants a loud mix and master, but you’ve been struggling with how to get loud mixes before mastering, this article is for you. In it, we’ll dissect a song and all the little moves that allowed me to get it good and loud at the mastering stage. We’ll also discuss “loudness potential” – the ineffable quality that allows a song to get loud during mastering – and how you can optimize it.
Even if you’re not after a super loud mix or master, the tips herein will still yield a mix that will translate to a great, dynamic, punchy master with minimal additional processing. So whatever your aim, let’s roll up our sleeves and get into it!
Follow along with


Music Production Suite 7
What is loudness?
Ultimately, loudness is in the ear of the beholder. That and their level – or volume – control. It is absolutely crucial to accept that in the end, you have no actual control over how loud someone listens to your music other than by crafting great songs that they want to turn up loud.
If, on the other hand, we ask, “What do we mean by ‘loudness’?” it becomes a question we can begin to answer. In the world of digital audio where we have a hard ceiling at 0 dBFS, one thing being louder than another generally has to do with it having a high average level. This is admittedly a slight oversimplification – tonal character and duration of sounds also play a role – but let’s go with it.
So, if our peak level stays the same but the average level goes up, that means that for one song to be “louder” than another, it necessarily has to have a lower crest factor – or peak-to-average ratio. Another way of saying this would be that a “loud” mix tends to be denser than a quieter one.
What is dynamic range?
In music production and audio engineering, dynamic range is a crucial aspect of capturing and reproducing sound faithfully. A wide dynamic range allows for greater expressiveness and emotional impact in music, as it allows for contrast between quiet passages and powerful, climactic sections.
Dynamic range in audio can also mean the difference between the loudest and softest values. For example, you could talk about the dynamic range of an audio format – 24-bit files are said to have 144 dB of dynamic range – meaning the difference between the loudest and softest values it can reproduce without distortion or noise becoming problems.
You can also talk about micro- and macro-dynamics, both of which tend to be more musical in nature as opposed to the strict technical definition above. When most people say micro-dynamics, they mean the short timescale difference between peak and average levels – in other words, crest factor – while when they discuss macro-dynamics they tend to mean the difference in average level between soft and loud portions of a song.
So, if something “loud” has a low crest factor or limited micro-dynamics, how can it also have good dynamics or dynamic range? Well, there’s the rub. In the strictest sense, it can’t, at least not on paper. This is where the ideas of macro-dynamics and perceived micro-dynamics come into play, and that’s exactly what we’re going to examine below.
How do you get loudness in a mix?
We’ll walk through each of these steps in detail below on mixing for loudness.
- Choose instruments and sounds in your arrangement that complement one another.
- From there, high-pass with care and pay special attention to your tonal balance – with a critical eye on bass – transients, and sibilance.
- Once your channels are as dialed in as you can make them, optimize things by processing buses, especially your drum and bass buses.
- You can then add extra weight with a parallel bus and fine-tune things with some master bus processing.
Mixing techniques for loudness potential
These next techniques we’ll review are ones that can help your mix have better loudness potential. What exactly is loudness potential? In short, every song has its own unique loudness potential, a latent, almost undefinable property that determines how much you can push the level at the mastering stage before it stops getting louder and just gets wimpier. Every song is unique in this regard and, strangely, two mixes that sound very similar superficially can have substantially different loudness potentials.
So that being the case, what can you, as the mix engineer, do to help a given song achieve the best loudness levels for mixing? Well, like so many things in audio – and life – it all goes back to the beginning.
1. Focus on your arrangement
If you’re the mix engineer and you didn’t arrange and produce the song, this probably isn’t what you want to hear, but that doesn’t make it any less true. A song’s loudness potential absolutely starts with its arrangement and production. Choosing instruments and sounds that complement one another without stepping on each other’s toes, and arranging how they play off one another is one of the best ways to achieve good loudness potential.
It can be tempting to add layer after layer after layer, and while interesting sounds can be crafted in this manner, taken too far it can absolutely work against you. Arrangement is truly an art unto itself, and we can’t go too deep here, but it is certainly worth thinking about. In particular, it’s important to consider spectral density and contrast while arranging.
Ultimately, if it’s in your power to shape or even modify the arrangement of a song, you’re likely to get greater loudness potential gains there than with any other step in this article.
2. High pass judiciously
You’ve probably heard cautionary tales of spurious low frequency content that will gobble up headroom and rob your mix of clarity. While this isn’t inaccurate, the cure – liberal use of high pass filters on nearly every channel – can often be worse than the disease. So, what to do?
Well, don’t disregard high-pass filters wholesale – they certainly have their place. However, there are plenty of occasions when a reductive low shelf, or even nothing at all will be a better solution. We’ll look at a few ways to gauge which technique is best, but first, let’s talk about the problem with high-pass filters.
First, high-pass filters have more phase shift associated with them than any other type of equalizer filter – except low-pass filters which are equivalent in phase response – and the steeper the filter, the greater the shift. Now, phase shift isn’t inherently a problem. In fact, sometimes it can sound really cool.
However, the peak levels of many sounds are dependent on the phase relationship between the fundamental and overtones – or harmonics. Because of that, when the cutoff frequency of a high pass filter gets too close to the fundamental of a sound, it can actually increase its peak level. Ultimately, that’s going to work against us, so it’s best avoided.
Second, most transient sounds – things like drums, plucked instruments, even the edges of square waves – have a DC, or 0 Hz component that’s an inherent part of the sound. By removing this you can rob those sounds of some of their vitality and, again, mess with peak levels in non-ideal ways.
So when is it safe to use high-pass filters?
- When there’s sufficient frequency space below the fundamental. Try to keep the cutoff frequency at least an octave below – that’s half the frequency of – the lowest fundamental.
- If the sound you’re applying it to isn’t overly transient in nature, and…
- If you can listen to the result, be happy with it, and verify that that peak level hasn’t increased too much (a few tenths of a dB are fine). Seriously, always listen to high-pass filters. They can have strange effects at higher frequencies than you would expect.
For example, here’s a perfectly reasonable use of a high pass filter. Note the original frequency content that’s being removed in darker gray, and that our peak output level is a dB lower than the input.

Good use of a high pass filter
On the other hand, here’s a snare for which a high-pass filter is doing no favors. Its peak level has increased by 1.5 dB, and it just sounds a little flat and lifeless.

Poor use of a high pass filter
If a high-pass filter just isn’t working on a given track but you’re still worried about some low rumble, try a reductive low shelf. The phase shift is much less extreme, so it’s less likely to increase peak levels, but a cut of 6–9 dB can still get you a worthwhile sonic advantage.
Finally, let’s listen to an example of what judicious high-passing can achieve. Here’s the flat mix with no processing at all, compared with just high-passing selectively.
Flat mix vs. high-passing selectively
If you’re thinking, “Gee, that doesn’t sound especially different,” I wouldn’t necessarily disagree with you – and I think that’s a good thing! I find that the high-passed version is a little clearer and less murky down low, but they’re not miles apart. However, it has gained us half a dB of peak headroom, and when you’re chasing level, every little bit counts!
3. Tonal balance management
If arrangement is the producer’s silver bullet, good tonal balance management – in other words, EQ – is the equivalent for the mixing engineer. In a good arrangement, every instrument, or group of instruments, should have a well-defined role in the frequency space, and likely in the stereo field as well. At the mix stage, you can work to enhance this and ensure everything is balanced and well-represented.
If certain elements are stepping on the toes of others it’s up to you to make space for the most important amongst them. Panning can be a great way to do this, but EQ typically needs to play a role as well. In


Neutron 5
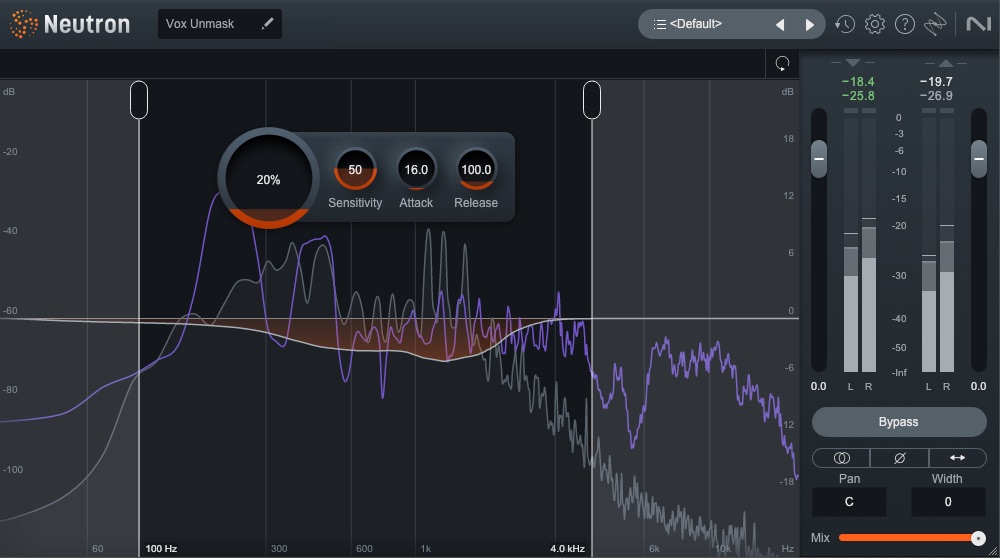
Neutron Unmask in action
Of particular importance here is good bass hygiene. This could almost be an article unto itself, but here are a few key bullets:
- Beware of wild bass dynamics. Something with a consistent and controlled average level, and predictable transients will be easier to deal with. We may be talking about tonal balance, but compression absolutely plays a role here. Low to mid ratios with a slow attack to let transients through is a great place to start.
- Bass isn’t always about bass. You need a good strong fundamental that you can feel on a full-range system, but good harmonic support in the lower midrange can be equally as important to our perception of low end. Since frequencies below about 100 Hz tend to eat up tons of headroom, getting this balance right is crucial.
- If you're struggling to achieve the level you’re after when it comes to mastering, chances are your sub-bass to lower midrange balance could be improved. Try a gentle reductive shelf way down low – maybe 60 to 80 Hz, context-dependent – and a wide Q bell boost in the 300 to 800 Hz range.
- Sidechain compression for effect is one thing, but it can also be utilized to transparently make room for kicks, snares, and other drums. Similar to the first bullet, tonal balance and dynamics generally need to engage in an intricate dance if high level is the end goal.
That last point has its foot halfway through the door to the next topic, and we’ll come back to it fully when we discuss bass bus processing, but keep it in mind while you’re working on your tonal balance.
Before we move on, listen to the following stems from this mix and take note of how everything really has its own defined space – and how much of the lower midrange is occupied by the bass.
4. Transient management
Transients are a full 50% of the equation that makes up the peak-to-average ratio, so controlling them at the mix stage is also crucial. It’s fair to say that without bass – roughly 50% of the average part of things – and drums, making something “loud” is a walk in the park.
The name of the game here is looking at and listening to your full mix, and figuring out which elements are creating the highest peak levels. Doing a temporary render when your mix is nearly done and opening it in


RX 11 Advanced
An important takeaway here is that things can sum together on your master bus to create peaks where they weren’t obvious on individual channels, and this gives us some clues about how – and how not – to handle them at the channel and submix levels.
To get directly to the point, clipping is surprisingly ineffective here. You might clip off the top of your kick drum, but when it sums with all the other drums, and the bass, and everything else in your mix, that flat top could end up on the side of your waveform, sort of like a scar, and now you’ve got the sound of clipping baked in without any of the benefit of peak level control.
As such, compression and limiting become the go-to tools. Don’t get me wrong, saturation and clipping are fine if they’re purely for their sonic benefits, but when it comes to controlling transients, the more that happens after that type of processing – including summing – the less useful it is. On the other hand, little bits of compression and limiting spread across channels, submixes, and the master bus are much more effective.
There are lots of ways and reasons to use compression, but in this context, it can be most useful to separate and control the body of a sound from its transient. This allows a limiter later in the chain to just work on a brief transient without getting triggered – and potentially distorting – from the body of a sound. To achieve this, look to medium fast attack times that allow the initial hit of a drum while providing consistent level control for the body of the sound. Ratios in the 3:1 to 6:1 range tend to be a good starting point.
For example, let’s check out the kick drum in our mix. There’s a tiny bit of midrange buildup that I know from experience will more than likely be problematic down the line. I could EQ it, but the attack of the sound in that range is important to it cutting through the mix and adding perceived micro-dynamics, so I’m going to use a multiband instance of Neutron 4’s compressor in Punch mode to enhance the attack between 200 and 800 Hz while pulling the sustain down in level.
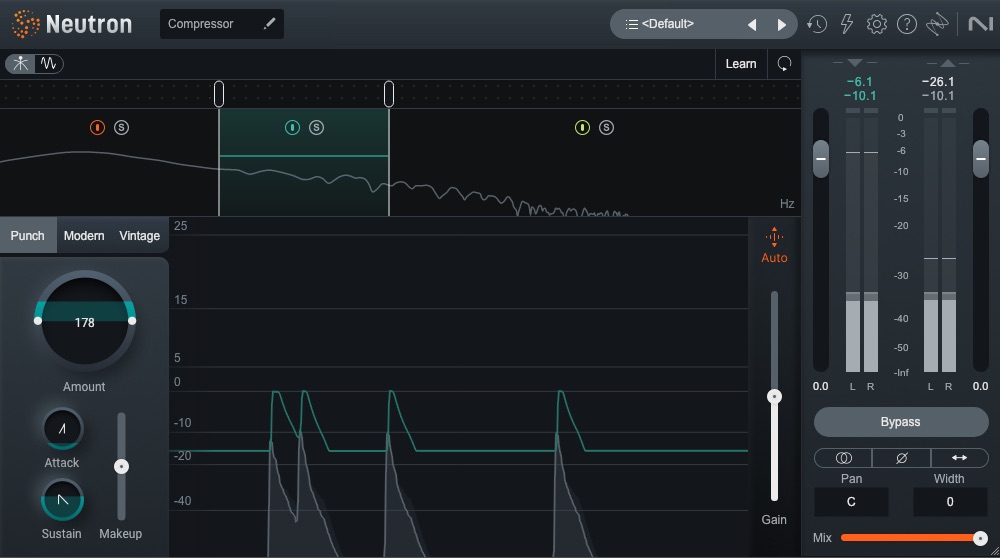
Punch compression on the kick midrange
Now, let’s take a listen to it. Like the high pass example, it’s fairly subtle, but it’s just enough to help things along and retain the perception of punch and dynamics while also mitigating distortion at the mastering stage.
Transient management with compression on kick
5. Sibilance management
One thing that’s almost inevitable when you’re chasing level is that little low-level, high-frequency sounds will get pushed to the forefront. While this certainly applies to things like lip smacks and mouth clicks – which can be dealt with in RX – vocal sibilance can result in a much more strident and abrasive sound.
As with many dynamics processors, a little bit of de-essing in multiple places can often sound more transparent than a lot all at once. Here, I’ve done some light de-essing on individual vocal tracks, but also used an instance of the


Nectar 3 Plus
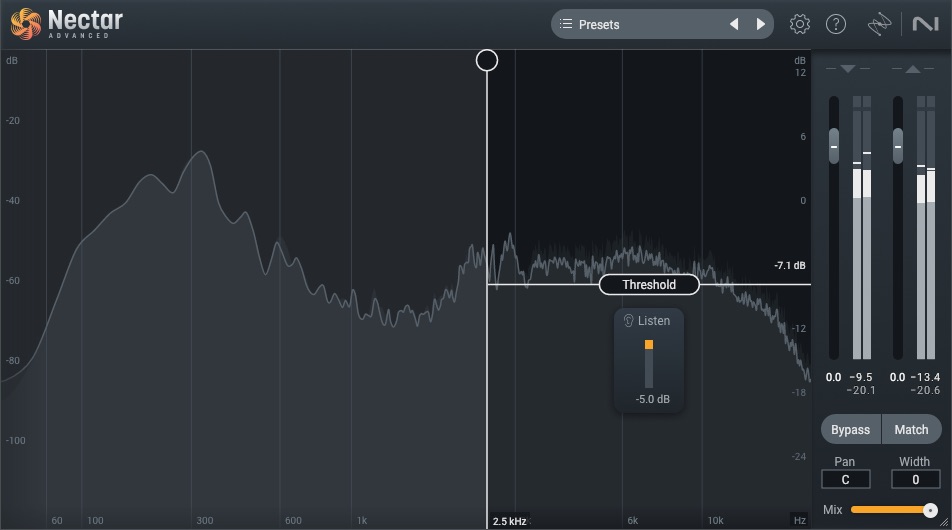
Vocal bus de-essing in action
De-essing vocals
While it may not be considered sibilance in the traditional sense, the upper midrange of certain drums and percussive elements from about 3 to 6 kHz can easily become fatiguing when level is pushed hard. Since saturation tends to spread out spectral content over a wider region, a combination of that and a little EQ can be a great way to control pokey, aggressive high-end.
By way of example, here I’m using Neutron’s Exciter and EQ to smooth out a very sharp hi-hat just a little. Notice that it’s also reduced the peak level while increasing the average level.

Using saturation to tame a hi-hat
Taming a hi-hat with saturation
Bus processing for loudness potential
Buses – or sub-mixes – are where you can make some big gains. Maybe it’s because I’m a mastering engineer and I usually apply processing to a full mix – which is basically the master bus – but this is where things get really fun and exciting for me.
To see where we’re headed, let’s listen to the mix before and after all bus processing. Then I’ll show you what I did each step of the way.
Bus processing
Sure, it’s louder, but crucially we’ve still got some peak headroom left below 0 dBFS without needing any limiting. So how did we get there?
1. Drum bus processing
This ties back to both our transient and sibilance management discussions above. First of all, while my saturation and EQ on the high-hat moved it in the right direction, it’s still likely to come forward a bit in mastering. Not only that, but the snare and some percussion elements also get a bit bright.
To address this, I’m going to add an instance of the


Ozone Advanced
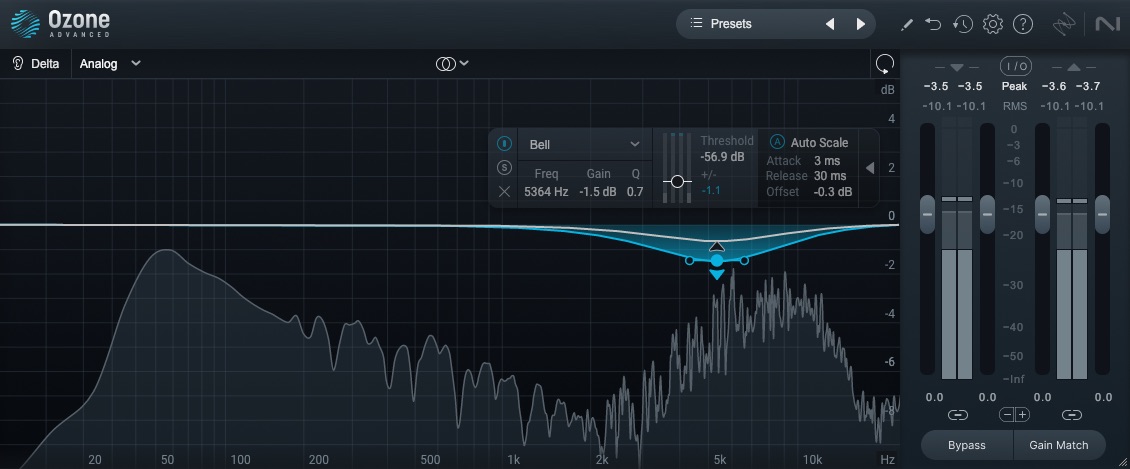
Dynamic EQ for the drum bus
Drum bus processing
It’s just that little bit more pillowy in the upper midrange which will help us avoid a fatiguing high-end down the line.
2. Bass bus processing
Think back to our tonal balance and transient management discussion. Some of the different bass tracks that sum into the bass bus already have some sidechain compression off the kick, but there is still some room for the kick to really punch through, and I’d like to make some room in the lower midrange for the snare.
Essentially, we’re looking to get the bass out of the way of the most important drums so that there’s less competition with them and the final master limiter doesn’t have to work as hard – at greater risk of distortion – during mastering.
To achieve this, I’m going to set up a 3-band instance of the Neutron compressor with the external sidechain active, and crossovers at 100 and 2.7k Hz – that’s what works for this bass bus, but you’ll want to tune your crossovers so that each range roughly matches the drums they’re trying to make room for.
Next, I’ll route the kick, snares, and toms to the sidechain input, and set up the compression in each band to quickly duck when a drum hits – so fast attack – and then fairly quickly return to unity gain – so medium fast release, but not so fast as to add distortion. Here’s what it looks like.
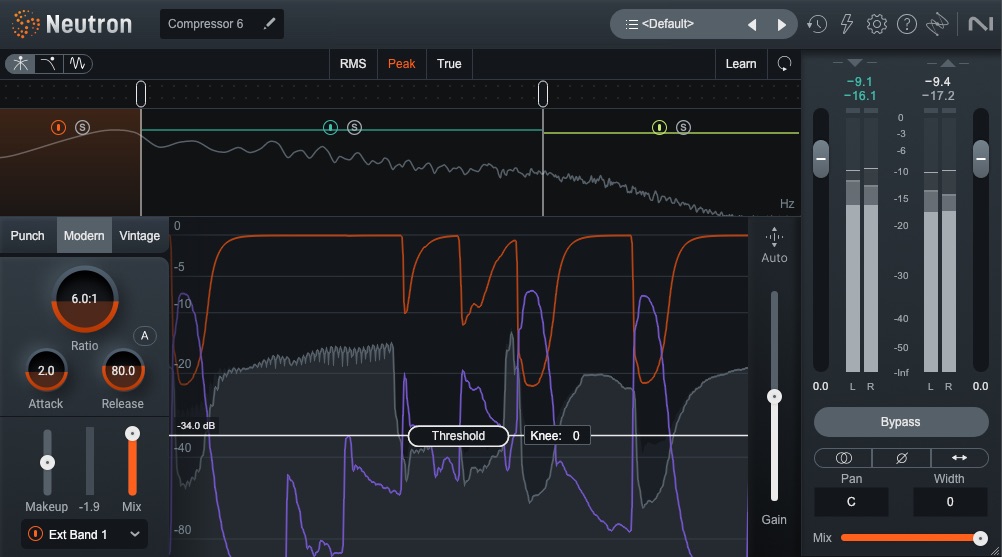
Multiband sidechain compression on the bass bus
Bass bus processing
3. Parallel bus processing
This next technique is very heavily inspired by Andrew Sheps’ “rear bus” technique, wherein you basically send the whole mix – minus maybe a few elements – to a bus, compress it heavily, and then blend it back into the mix in parallel.
I want to be honest in that I don’t remember exactly how much of this is Andrew’s technique, and how much is my interpretation and iteration on it, so let’s just say Andrew deserves all the credit here.
There is a lot going on, so I’m actually going to just walk you through it with a quick screen capture and narration video.
Here’s what the “rear bus” sounds like on its own.
And here’s a before and after with and without the rear bus, and no master bus processing. The main thing to be careful of here is not to blend in so much of the parallel bus that the verses become louder than the choruses. More on this later.
Full mix with parallel bus
4. Master bus processing
For our final bit of processing, we’re going to look at the master bus in two sections. We’ll look at the processors that we’ll print as part of our mix, as well as some loudness processing that will help us ensure our mix will work when pushed hard, but that we’ll disable before printing our mix.
We’re going to work backward here though, so let’s start by adding our loudness processing, which will help inform our upstream decisions. Because I’m a control freak, I’m doing this in two stages, but you could certainly just use one instance of Ozone Maximizer if you wanted. To start, I’m going to fire up an instance of Maximizer but set it to 100% soft clipping. Then I’ll toggle soft clipping off, add input gain until I see about 0.5 to 0.8 dB of gain reduction at most, and then toggle soft clipping back on.

Soft clipping for loudness
Next, I’ll add another instance of Maximizer and see how far I can push it before things start to really fall apart. Then I’ll back it off a touch or two.
Using the inverse link control underneath the main gain dial is a great way to hear when things start to fall apart without being deceived by the change in loudness. In this case, I set things up like this. (Here's a ittle secret: if you’re going for loudness, you can’t afford to worry about true peaks or -1 dB headroom recommendations. Push things right on up to -0.3.)
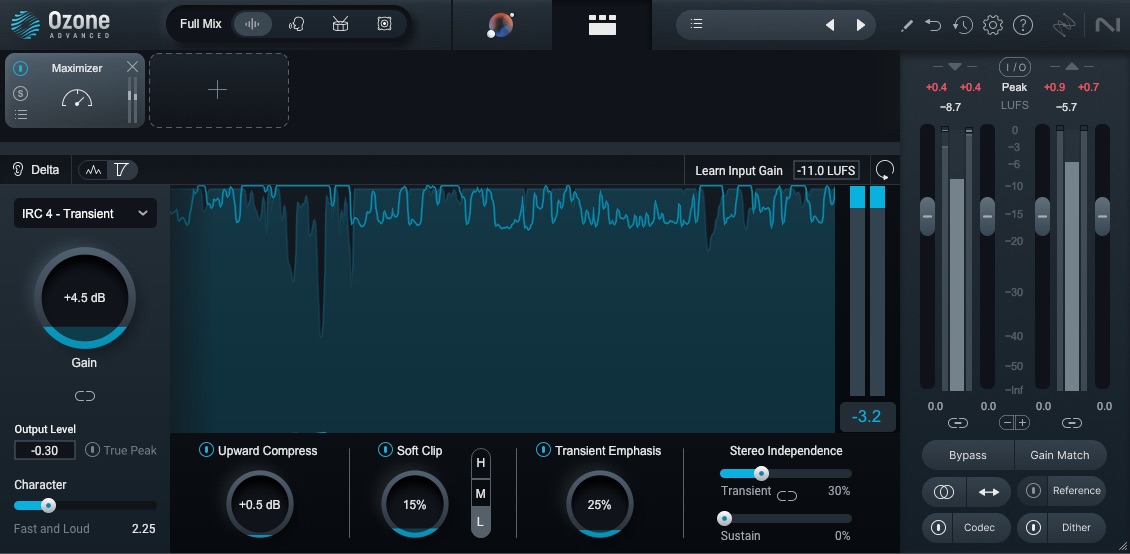
Limiting for loudness
At this point, you should have a pretty good idea of the loudness potential of your mix. If it’s not where you’d like it to be, it’s time to start iteratively reworking through all the steps above. Take note of what’s falling apart or causing distortion where, and see if you can fix it at the source.
Once you’re more or less happy, it’s time to move on to the mix bus processing you’ll print to see if you can get that final few percent. You could leave all of this for mastering if you want, but if you can do it well and carefully, you might as well to ensure that your mix has the best loudness potential you can give it.
First things first, EQ. I noticed that when I pushed my final loudness processing hard the low end was still breaking up a bit, so I’m going to tuck that back just a hair below 60 Hz. Things are also still a little abrasive when pushed hard, so I’ll tuck the high frequencies in a little up around 9k Hz. I’m also noticing the overall sound is a tiny bit scooped, so a gentle midrange push can help there, while also supporting the bass harmonics to compensate for some of the sub-range we pulled out.

Master bus EQ
Master bus EQ
Next up, some multiband compression. The EQ moves above helped, but there’s still a bit of distortion around the kick and bass, and experience tells me that multiband compression can help this by controlling the low-end body, while also adding some punch for perceived micro-dynamics.
Here are my multiband compression choices for this particular mix.

Master bus dynamics
Full mix with multiband compression
After our multiband dynamics module things are in pretty good shape, but there’s still this tiniest bit of breakup on some of the kicks. To solve this we’re going to add distortion. To remove distortion.
What?
That’s right, you heard me. Add distortion to remove distortion. By using the Exciter module in multiband mode we can tailor the type and amount of saturation we want in each band to get the effect we’re after.
Not only that, but by separating the bands we reduce intermodulation distortion which is most of what we don’t like about the sound of the distortion that occurs when the limiter breaks up. On top of that, we get an extra bit of sheen and gloss that’s really rather nice.

Master bus exciter
Full mix with Exciter
Last but not least we’re going to add the Clarity module. Clarity is really great at improving perceived loudness without actually changing the average level and if that’s not exactly the sort of thing we’re after here, I don’t know what is. Here are my chosen settings for this mix.

Master bus Clarity
Full mix with Clarity
There’s actually one final step I’m adding but that could easily be left for mastering. I’m inserting an instance of Ozone Maximizer that, like the Vintage Limiter on our drum bus, is just there for some gentle control of the highest peaks without adding level.
I like to use gentler, slower settings for this along with keeping the input and output gains linked. This should just be grabbing the occasional peak by a few dB, not digging in all the time.
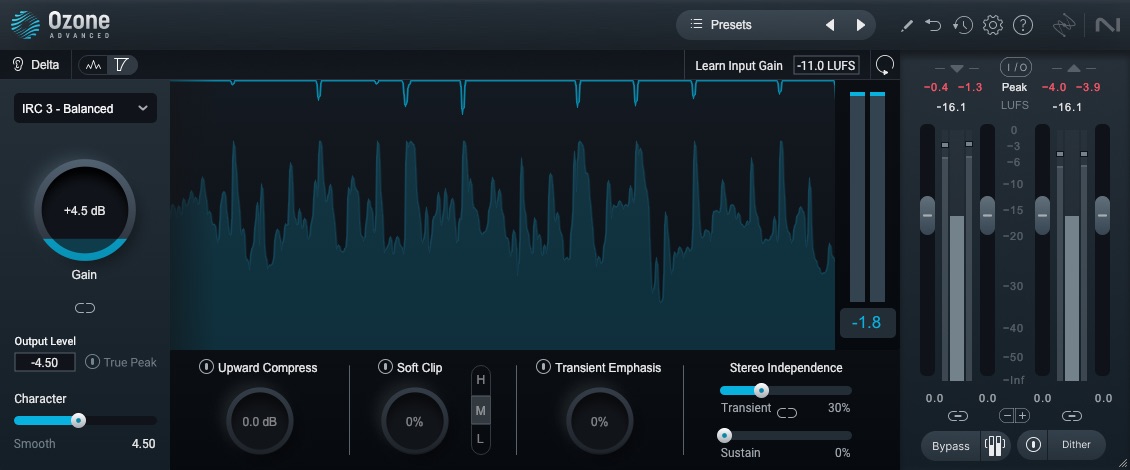
Gentle limiter to improve clipper behavior
Full mix with gentle limiting
Automation for dynamic control and impact
The last thing that you may want to do is add some automation to shape and sculpt your song’s macro-dynamics. Since we’ve been squeezing nearly everything through both serial and parallel compression, it’s easy to lose some of the dynamic contrast and impact between song sections.
One surefire way to undermine and sabotage all the hard work you’ve put in and guarantee that “loud” doesn’t sound loud is through lack of contrast – how can something be loud if there’s no soft to compare it to? To achieve this, there are a few key parameters you can automate in your mix.
1. Parallel bus automation
First, if you notice that verses are sounding louder than choruses, try automating the mix level of your parallel “rear” bus. Reducing the level by 2 to 4 dB during the verses, or bridge, may help you achieve the lift and impact you need when the choruses come in.
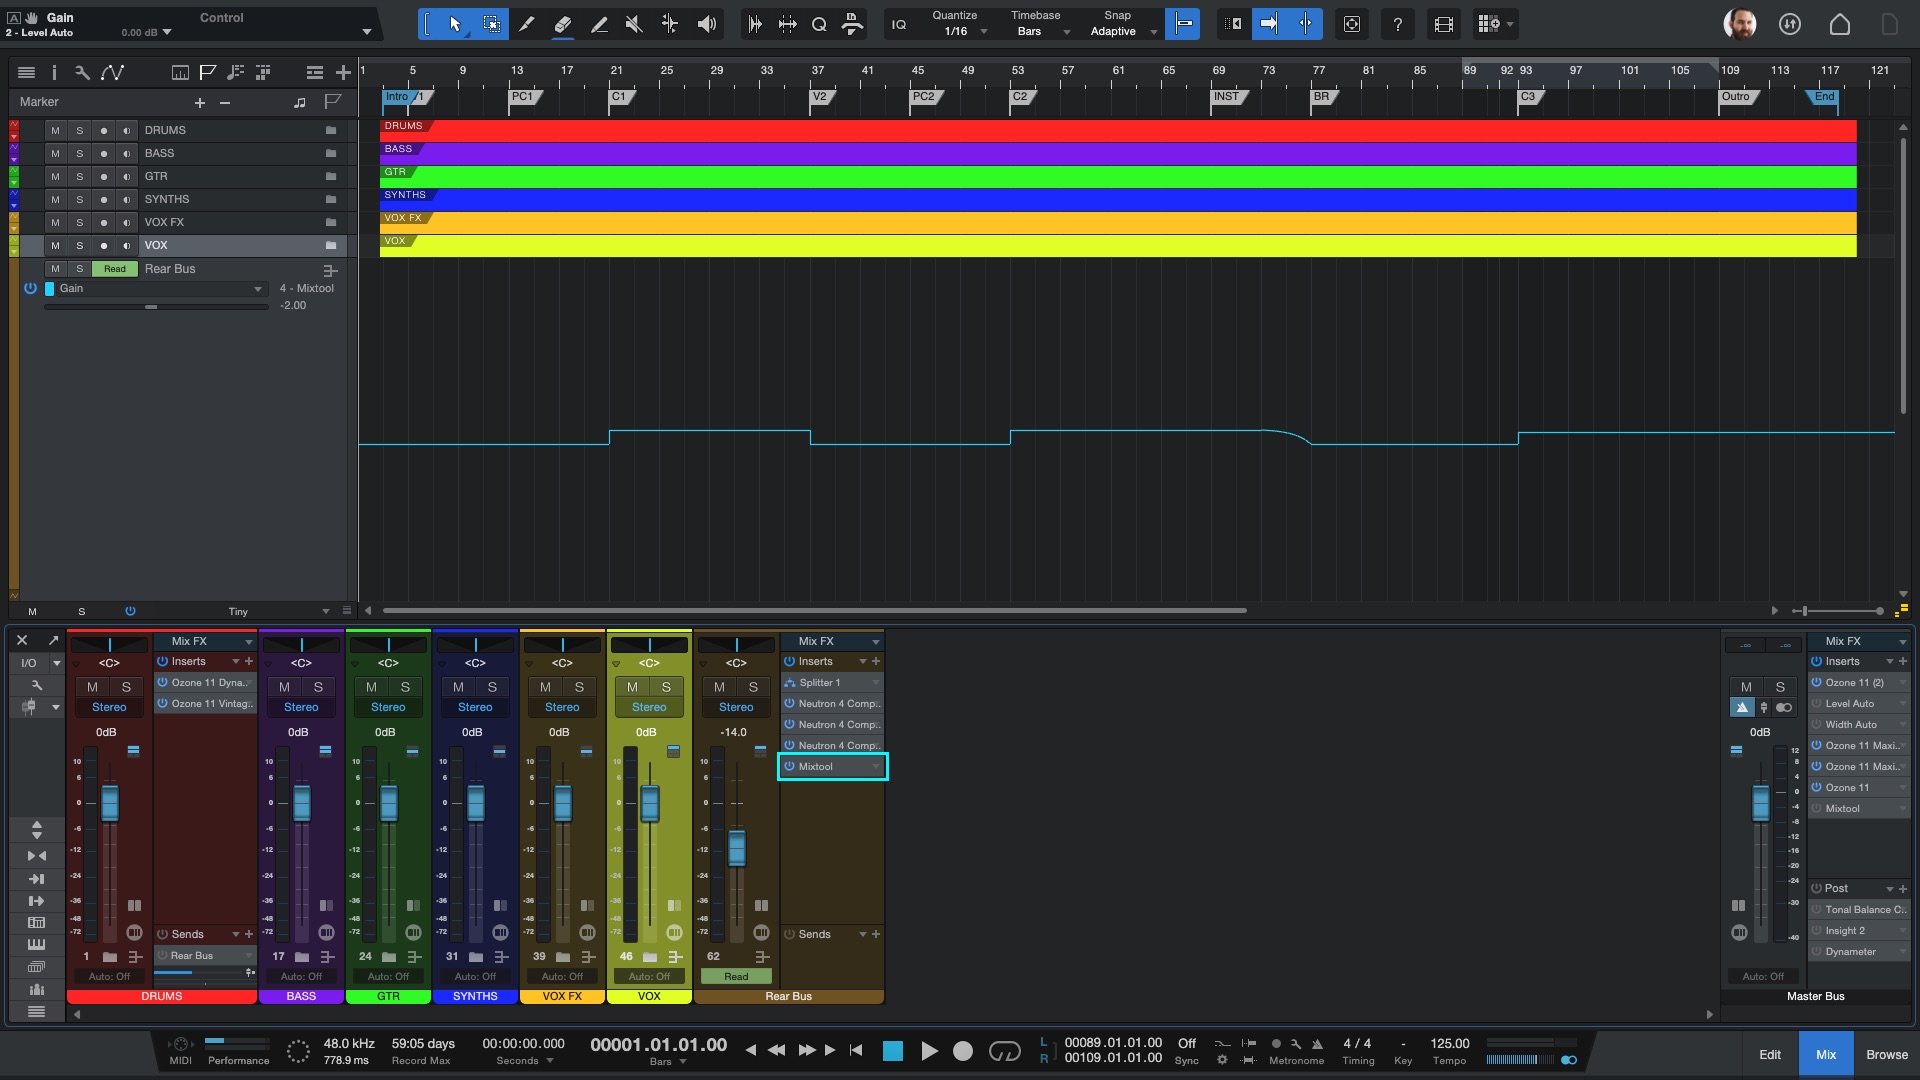
Parallel bus automation
Parallel bus automation
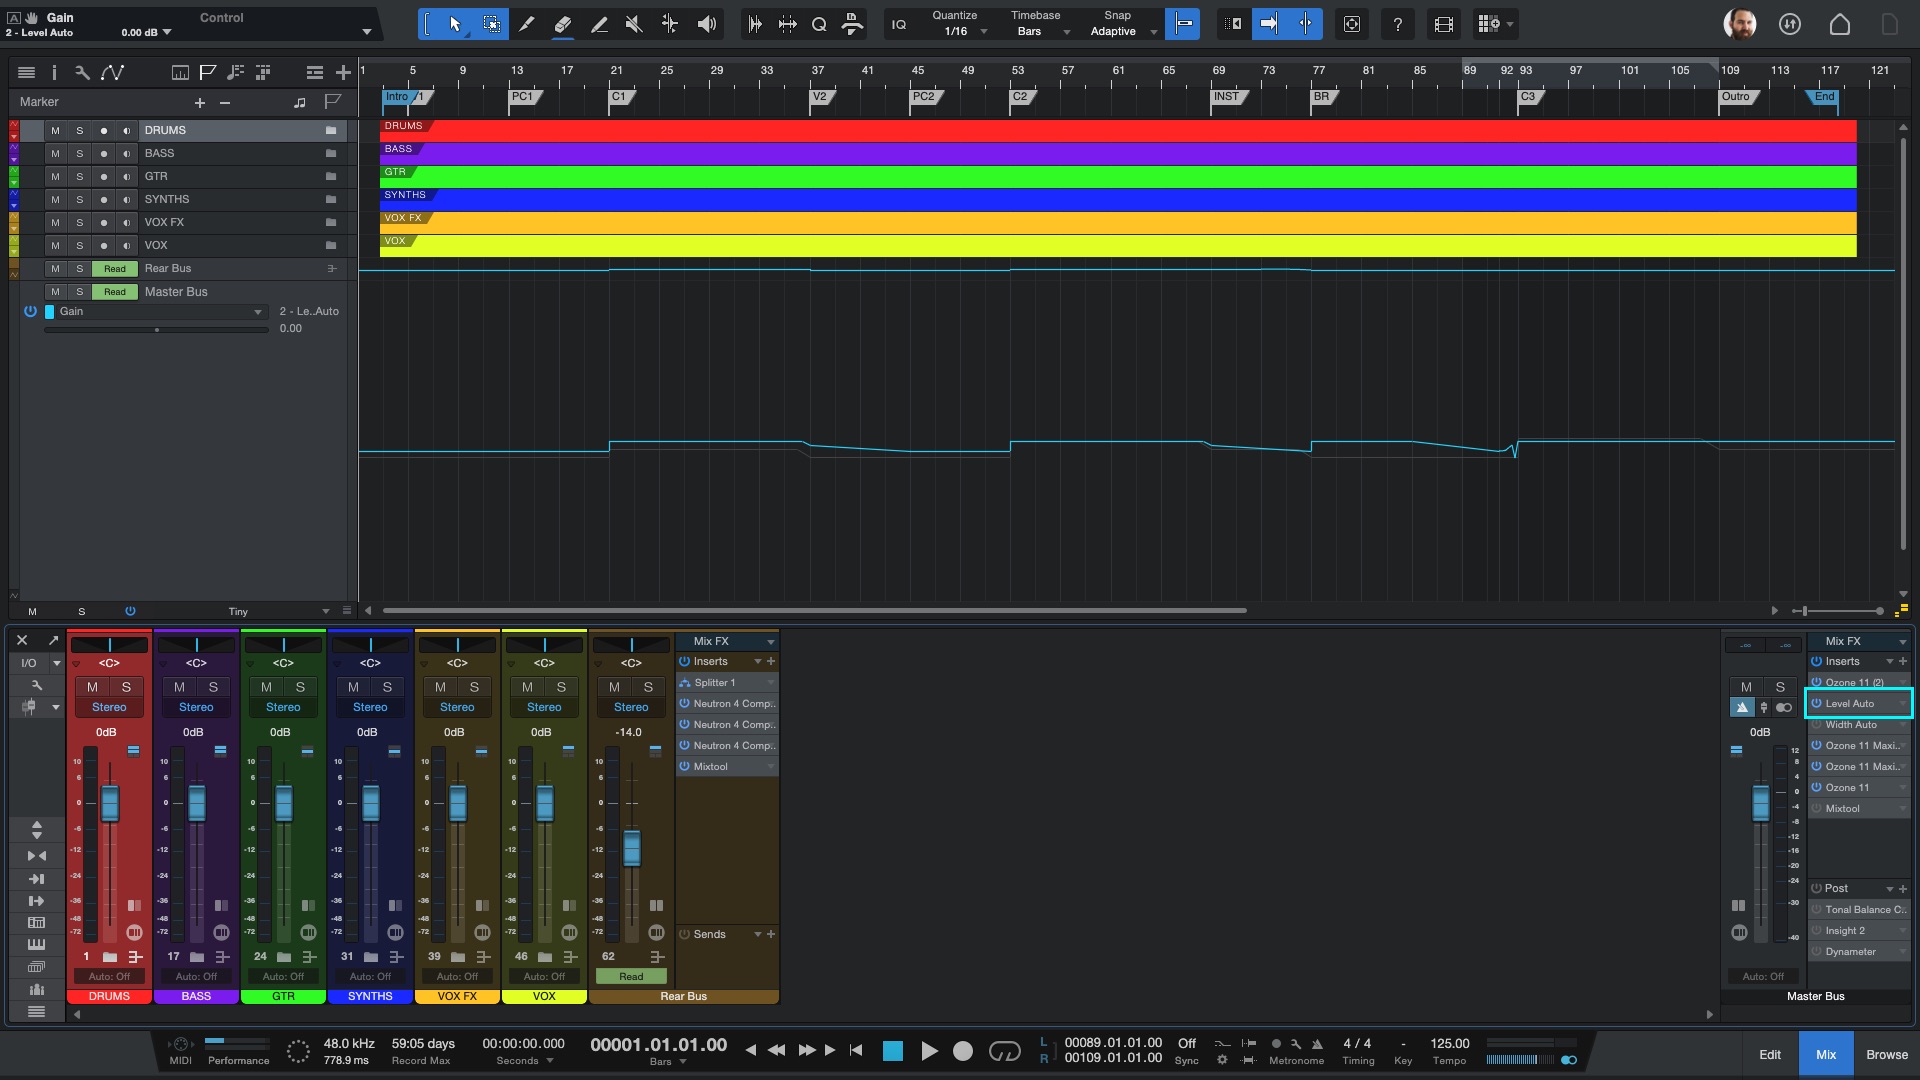
2. Level automation
Along similar lines, you can automate the level of the entire mix. You could do this on the master fader, but I often like to do it with a dedicated utility plugin – most DAWs will have one included for free – so that I can easily change where in the master bus chain it’s happening. 1 or 2 dB is usually more than enough here, especially in conjunction with parallel bus automation. Ideally I like to avoid transitions sounding obviously louder or softer, and rather just feeling it.
Level automation
Level automation
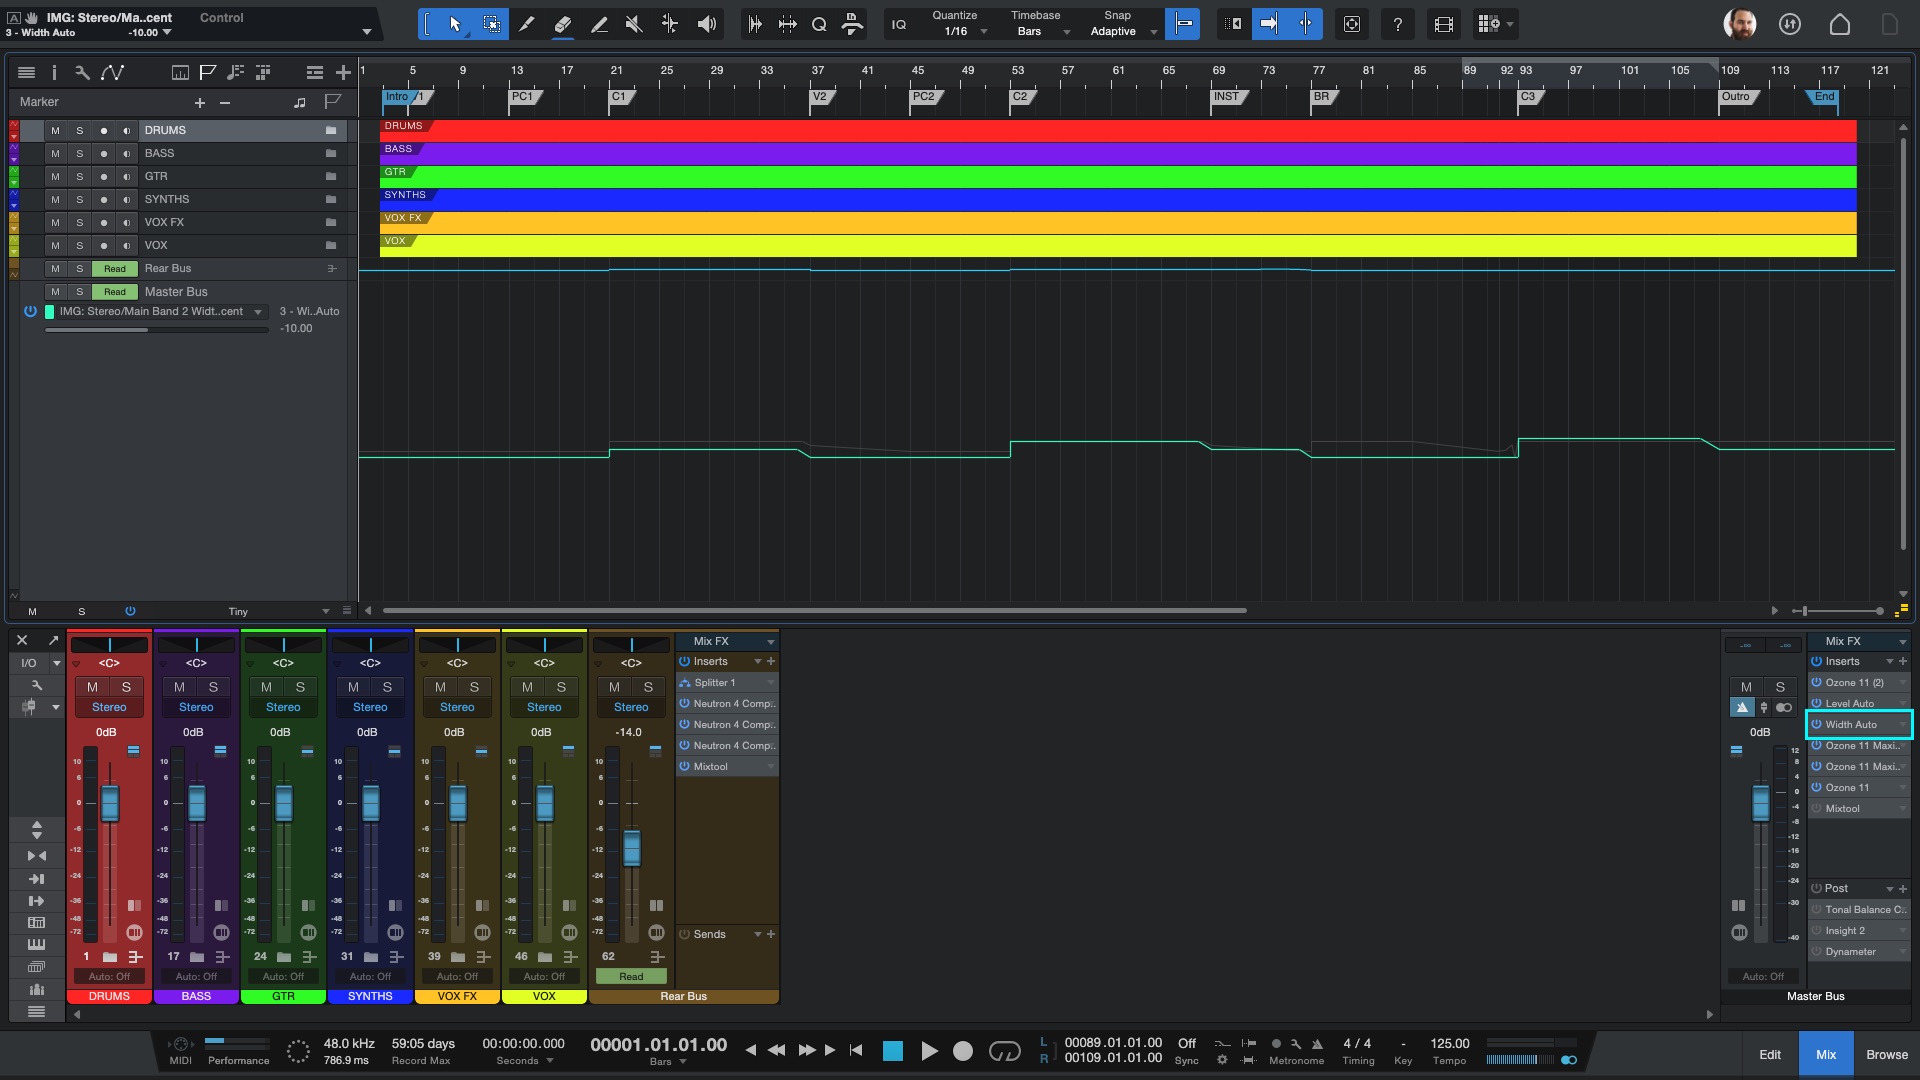
3. Width automation
Lastly, a tiny touch of width automation can be a great way to add some excitement and impact when the choruses come in. Ozone Imager – even the free version – is perfect for this. A 5% push during choruses is usually enough, although you could also pull the width back to -5 or -10% during verses or the bridge to add more impact if you want.
Width automation
Width automation
Start getting loud, dynamic mixes
So there you have it, plenty of ways to craft a mix with high loudness potential, great perceived micro-dynamics, and engaging macro-dynamics.
And this is where I’m going to pull the rug out from under you a little bit. Before we close things out let’s listen to our mix both with and without our final loudness processing, but normalized to -14 LUFS – as will happen on nearly all streaming services.
Mix with loudness processing
Personal preference is just that, personal, but for me the additional punch and snap – genuine, not perceived, micro-dynamics – of the mix without additional loudness processing wins hands down.
Interestingly, that mix can still be normalized to -14 LUFS without any clipping.
So what’s my point? Why did I show you all these techniques to craft a mix with high loudness potential if I still don’t think it sounds better? Well, my point is threefold:
- Always make sure to do a loudness-matched comparison of your mix and master to make sure it hasn’t been pushed too far, especially if you’re going for high loudness.
- If you do want to craft a mix with high loudness potential, you’ll almost certainly need to employ some of the techniques described above.
- Even if your ultimate goal isn’t high “loudness,” the tips in this article will help create a polished, engaging, and truly dynamic mix.