Mixing Vocals: 10 Hidden Features in Nectar Pro
Whether you’re new to mixing sung, rapped, or spoken vocals in Nectar or you’ve been using it for years, learn about these ten “hidden” mixing features that will make the vocal mixing process easier and help you get the perfect vocal sound.


Nectar Pro
Want to follow along as you learn about these new features? Start your free trial of


iZotope Music Production Suite Pro: Monthly


Nectar Pro
Please note: While these features are in Nectar Pro, many of these features are also included in


Nectar 3 Plus
1. Intelligent vocal identification with Vocal Assistant
Many people know iZotope for our intelligent assistants that listen to your audio and then give you a custom starting point. But what some people don't realize is that Nectar Pro has technology that will automatically detect whether you're working on a sung or rapped vocal and set the parameters accordingly.
Professional engineers know there's a huge difference in mixing vocals in different musical contexts. As such, Nectar Pro can now detect sung or rapped vocals and can narrow down the best range of options for your performance. To get started, fire up the assistant then play some audio to begin the process. Nectar will listen and start to work on a great preset for your rapped or sung track. If rap vocals are detected, Nectar Pro creates a more dry, upfront preset.
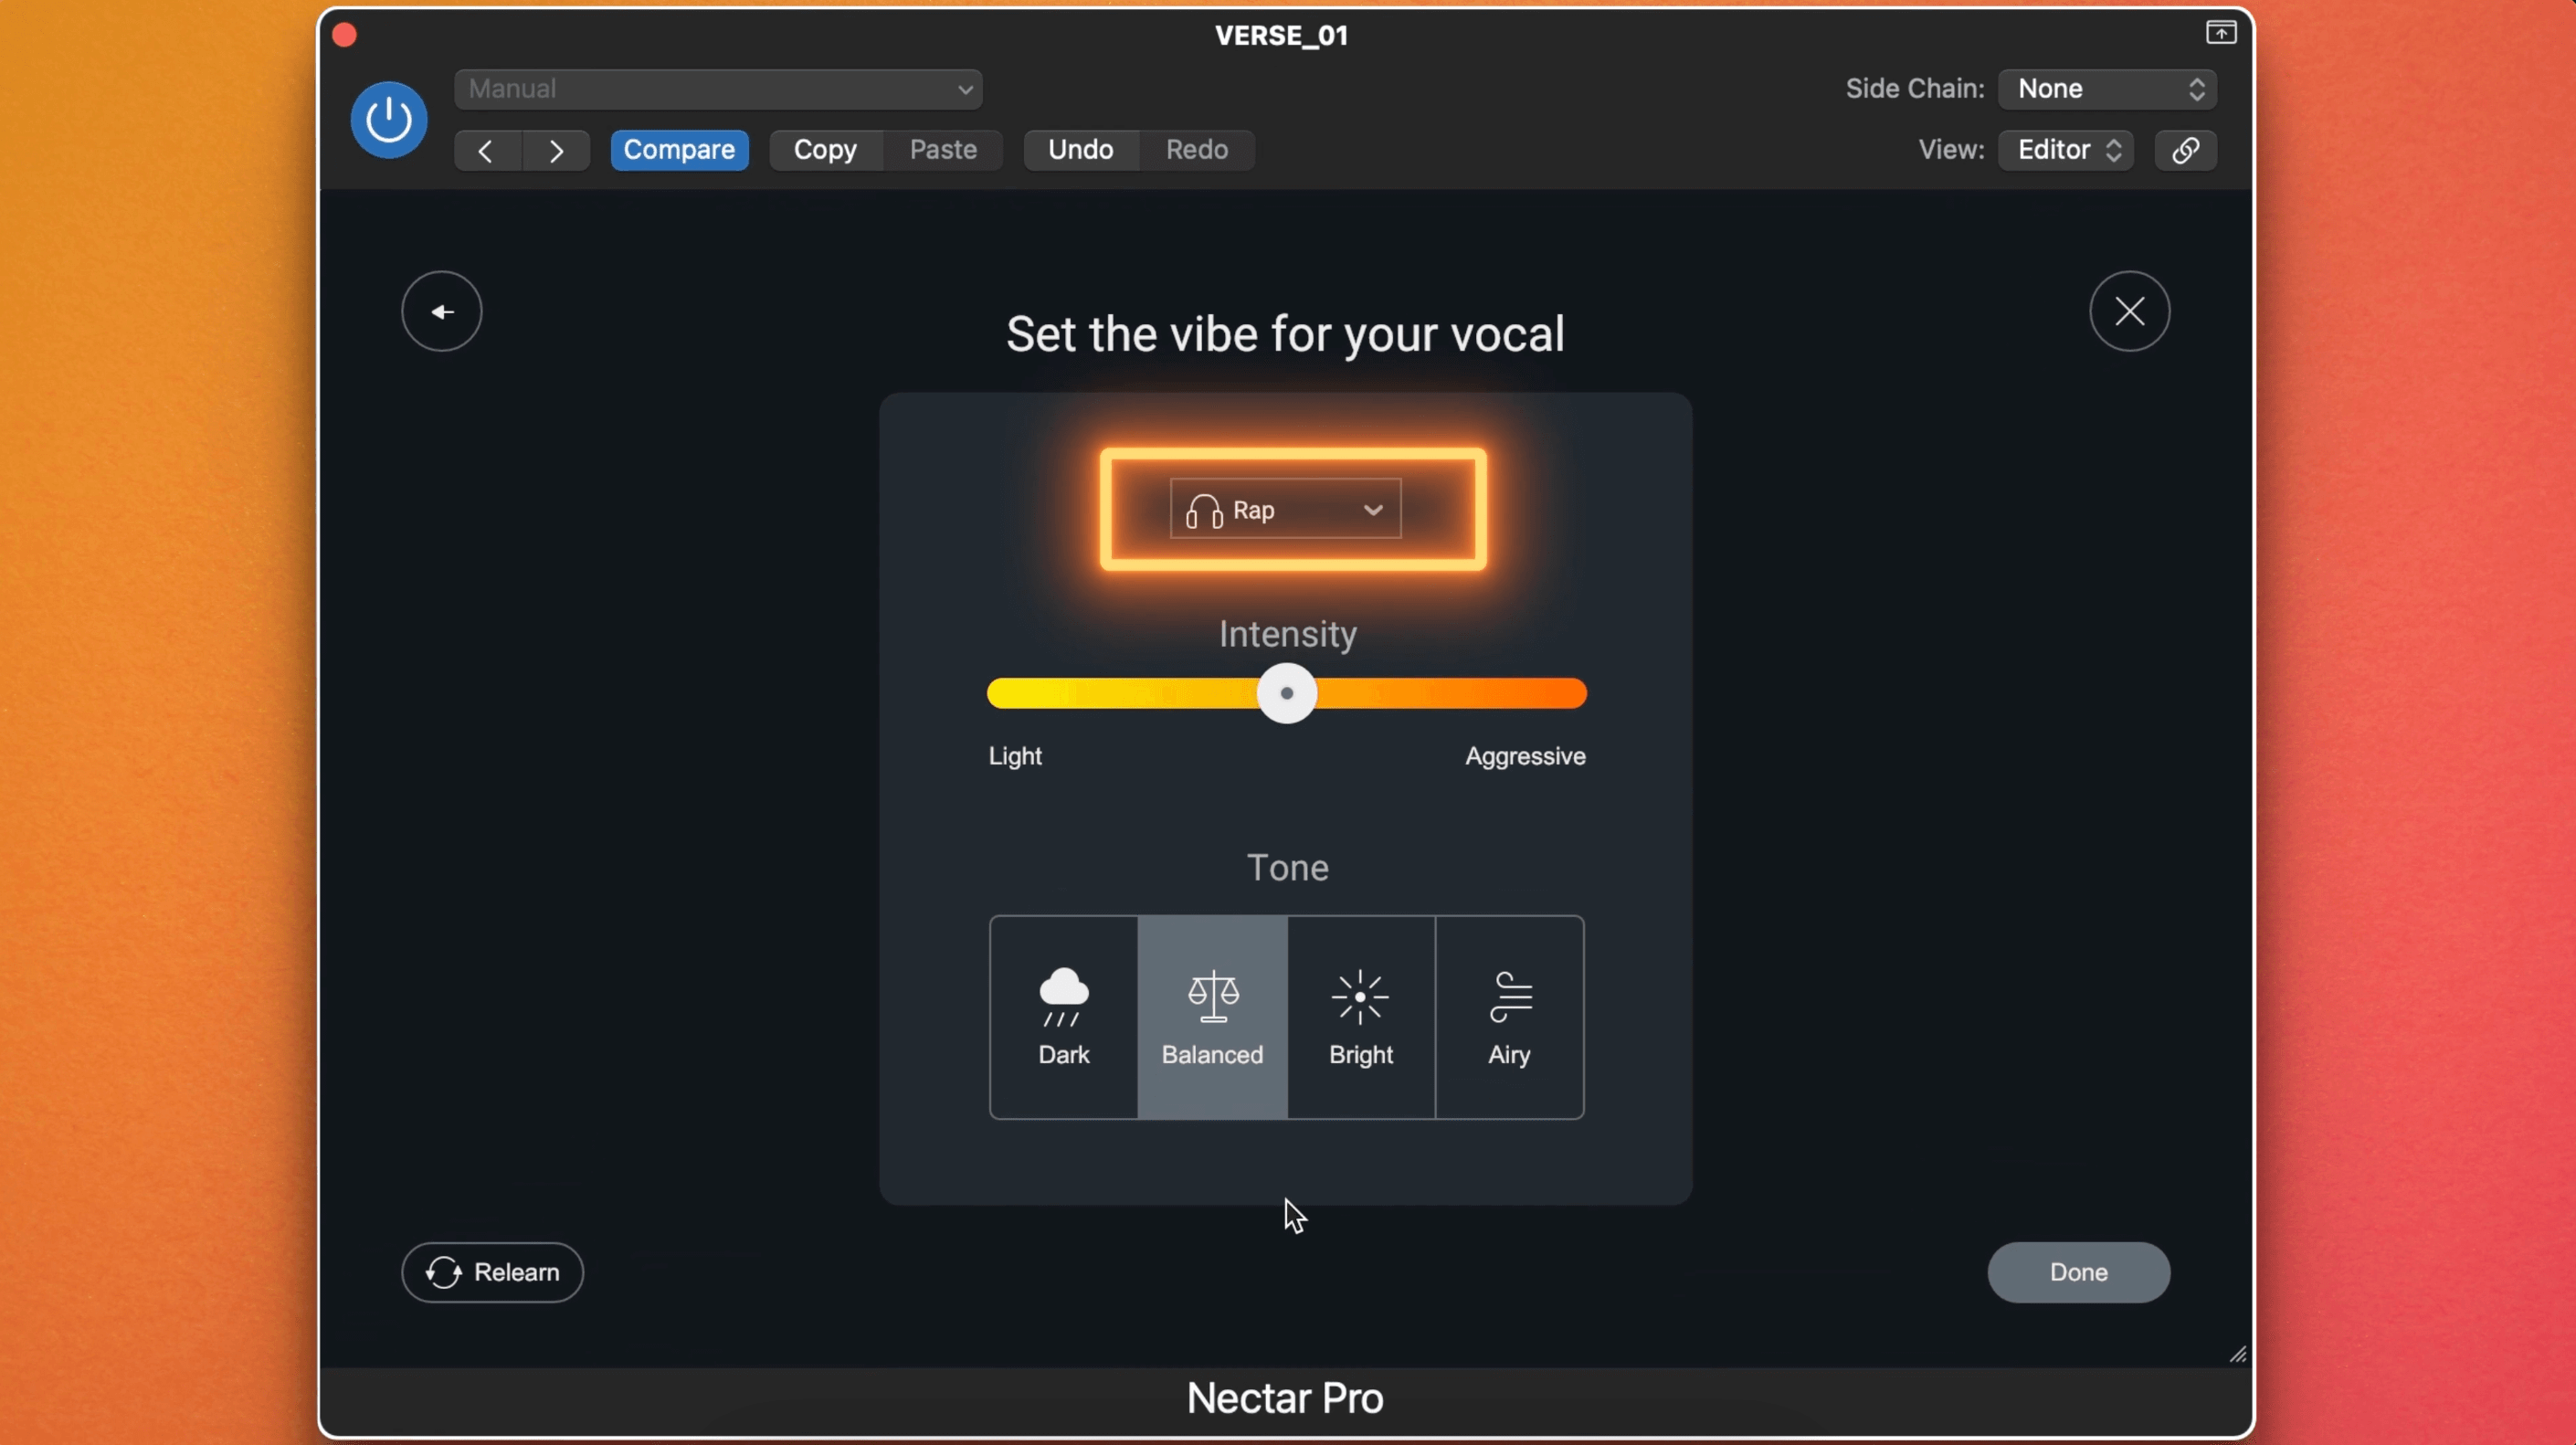
Nectar Pro can detect rapped or sung vocals and can narrow down the best range of options for your performance.
This configuration tends to avoid reverb processing, and if some vocals are detected, Nectar Pro will add additional effects such as reverb and use more subtle EQ targets. Nectar Pro builds a vocal chain based on the vocal that it detects. Play with the tone controls on different types of vocals and try different approaches to get your desired sound.
2. Easily mix spoken dialogue with Dialogue mode
Nectar is known as a vocal processor, but what people don't realize is that it's also a powerhouse for spoken dialogue. If you're working on a vlog, YouTube video, audiobook, podcast, and even within the assistant settings, you've got an option there for dialogue.
Head to the Vocal Assistant, then press Enhance and play some audio. Nectar might detect rapped vocals; don't worry. Speaking can be manually selected. Once you change this to speaking, the tone cards will change and you can preview full, strong, natural, and clear here, and boost or lower the intensity of the processing.
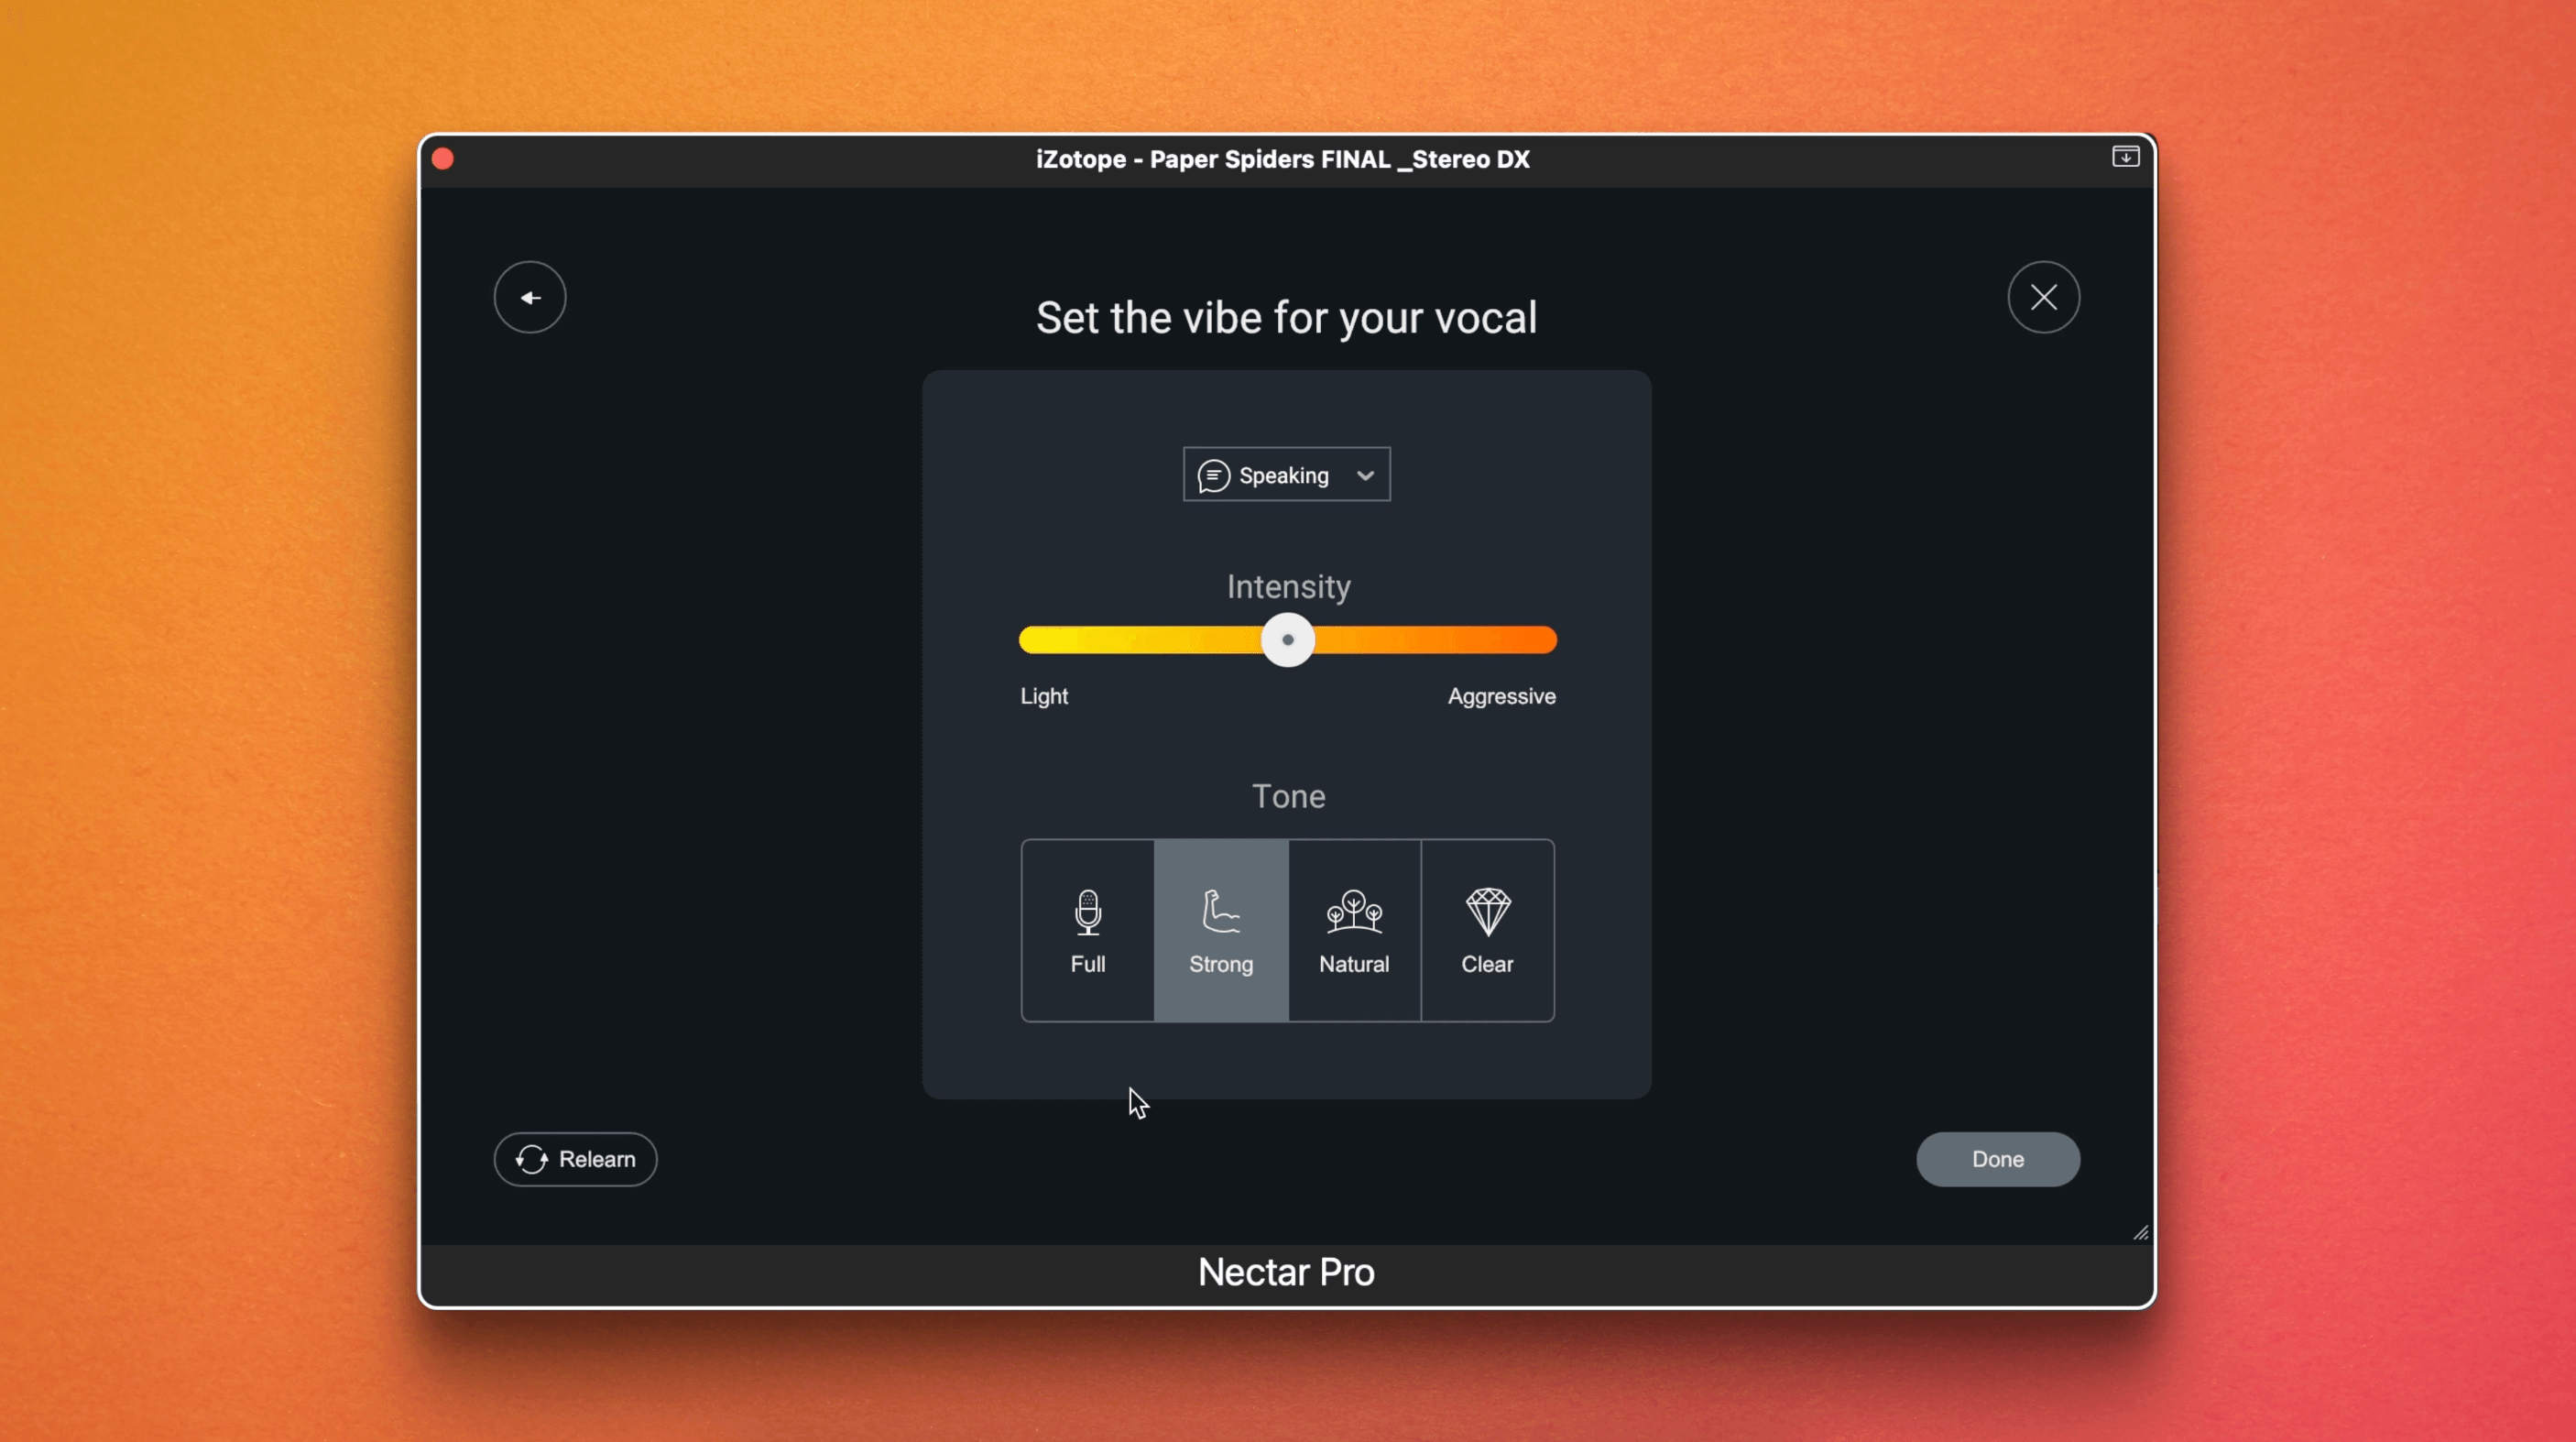
Speaking can be manually selected in Vocal Assistant, with full, strong, natural, and clear tones.
Press done, and now you can specifically see the processing Nectar worked on during its listening pass and tweak it from here to taste.
3. RX Breath Control included in Nectar Pro
Think of this next feature as not really a feature at all, but a bonus product that's hidden within Nectar Pro. Did you know that


RX 10 Standard
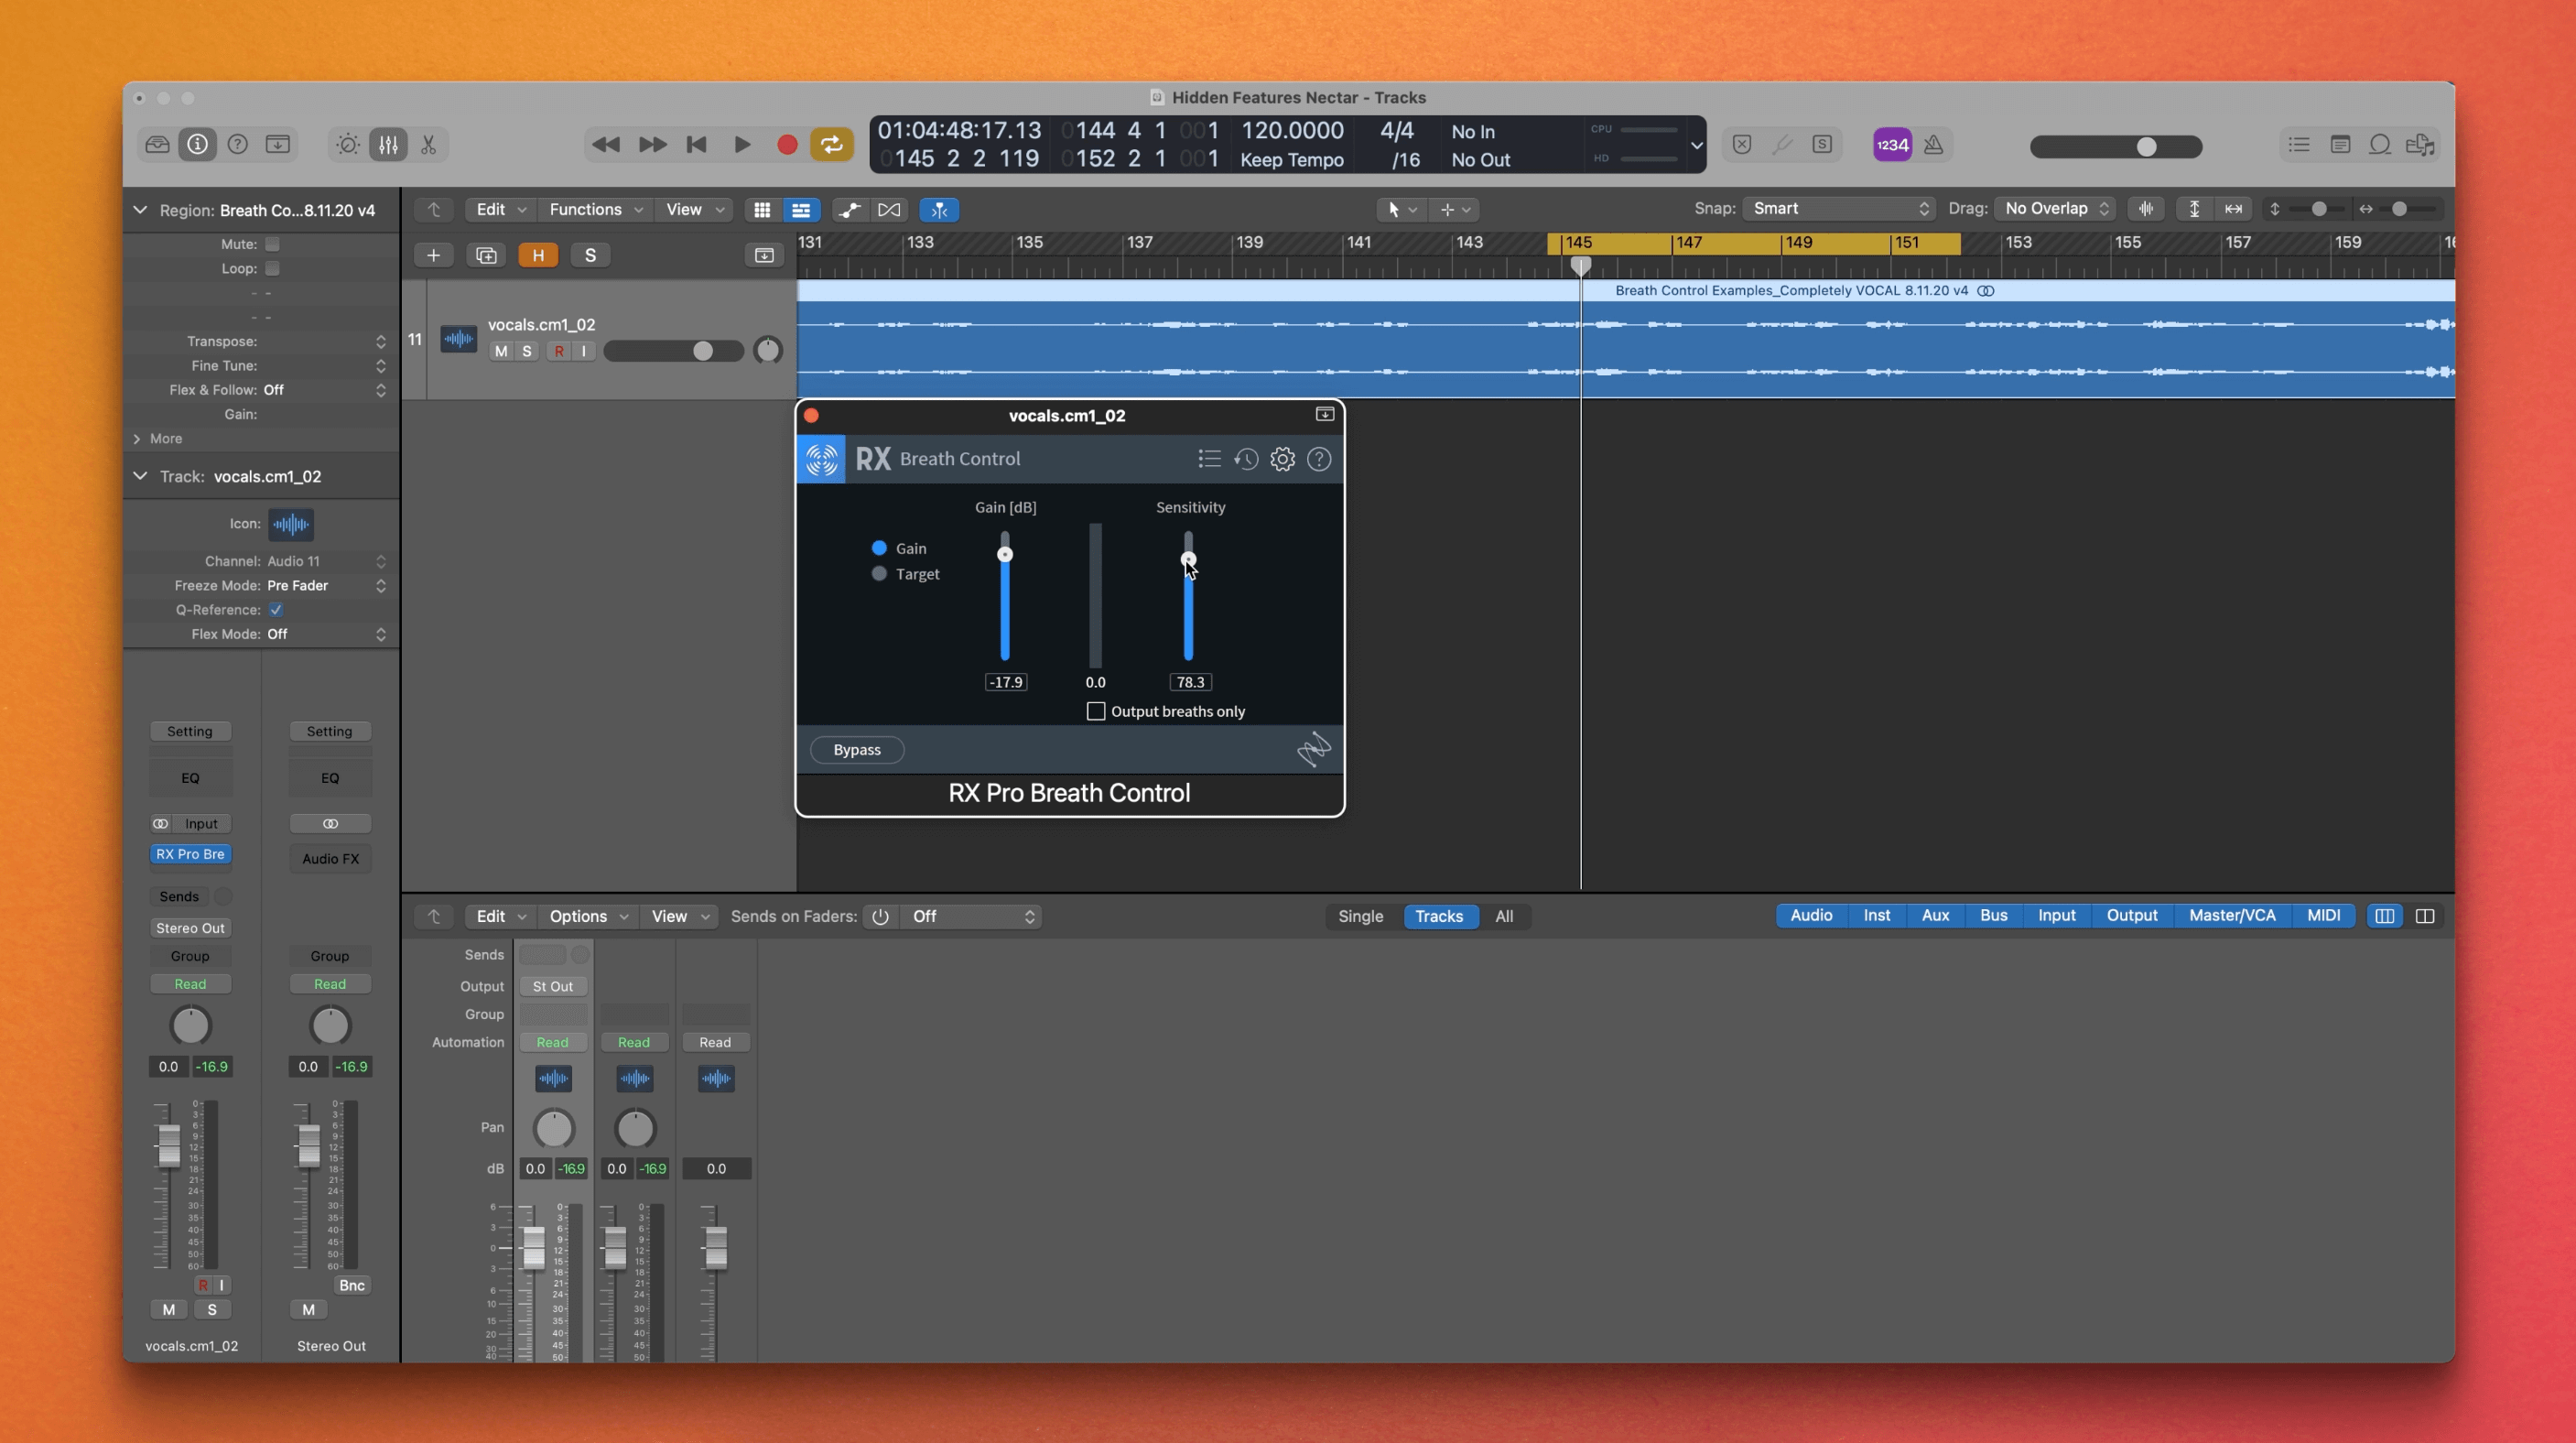
RX Breath Control is included with Nectar Pro to completely remove breath noises from sung, rapped, or spoken vocals.
Just instantiate it at the insert level of the track with the breaths that you want to control. You can use the gain or target mode and then the sensitivity slider to tailor the control of the plug-in.
4. Emulate the LA2A compressor
When people think of the most famous vocal compressor of all time, there's a good chance that the Teletronix LA2A compressor comes to mind. You can actually get the sound ballistics and soul of the LA2A within the two compressors that come in Nectar Pro. To get the LA2A sound, head to the compressor and choose the Optical algorithm. This will add smooth and transparent compression with subtle coloration.
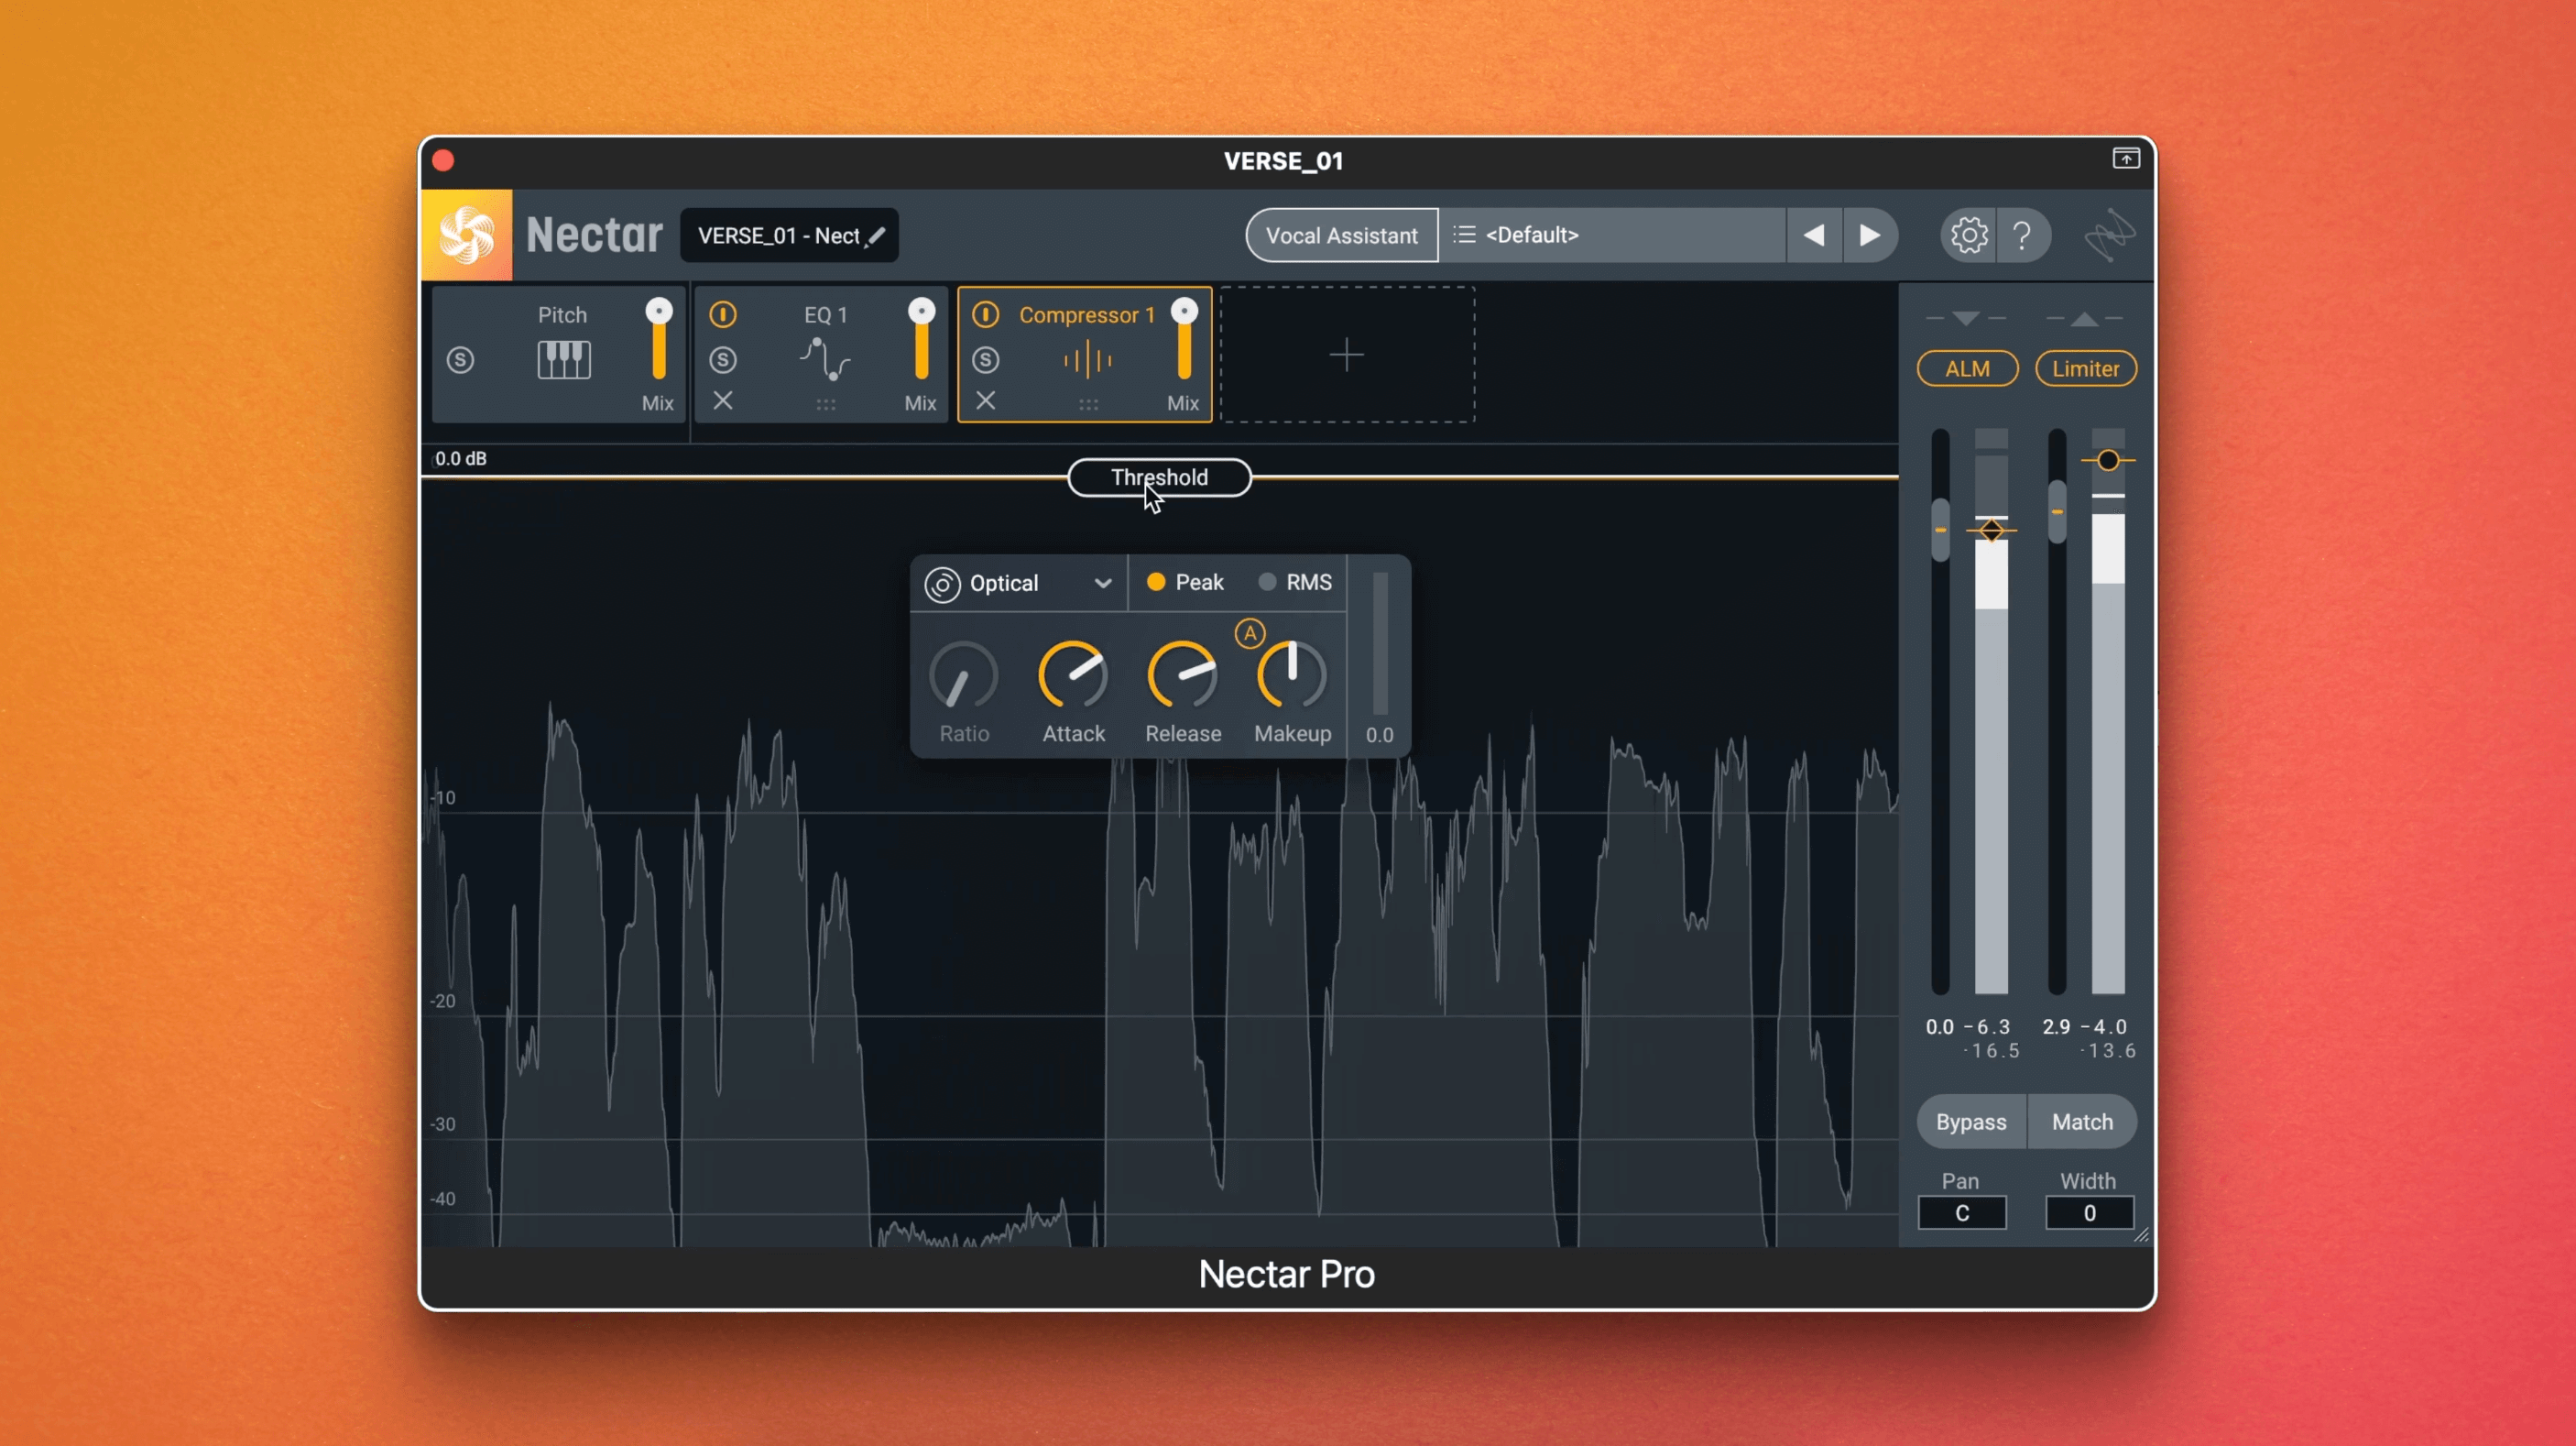
To get the LA2A sound, head to Nectar’s compressor module and choose the Optical algorithm.
Now, you'll be emulating the subtle harmonic coloration and non-linear attack and release characteristics of the classic hardware optical compressors. The ratio is fixed at 4:1 when optical mode is selected, with an attack setting from 1 millisecond to 100, and release settings from 40 milliseconds to 200.
Bonus tip: Use RMS Level Detection mode rather than Peak Level Detection to more faithfully emulate the sound of hardware optical compressors, which utilize RMS level detection.
5. Define your sound with dual EQs and compressors
A lot of pro-mix engineers like to double up their processing for creative or corrective purposes, but what Nectar Pro owners might not know is that you actually get two EQs and two compressors in the plug-in.
Now before you get carried away with sonic possibilities, let's talk about how you might benefit from dual EQs and dual compressors, starting with EQ.
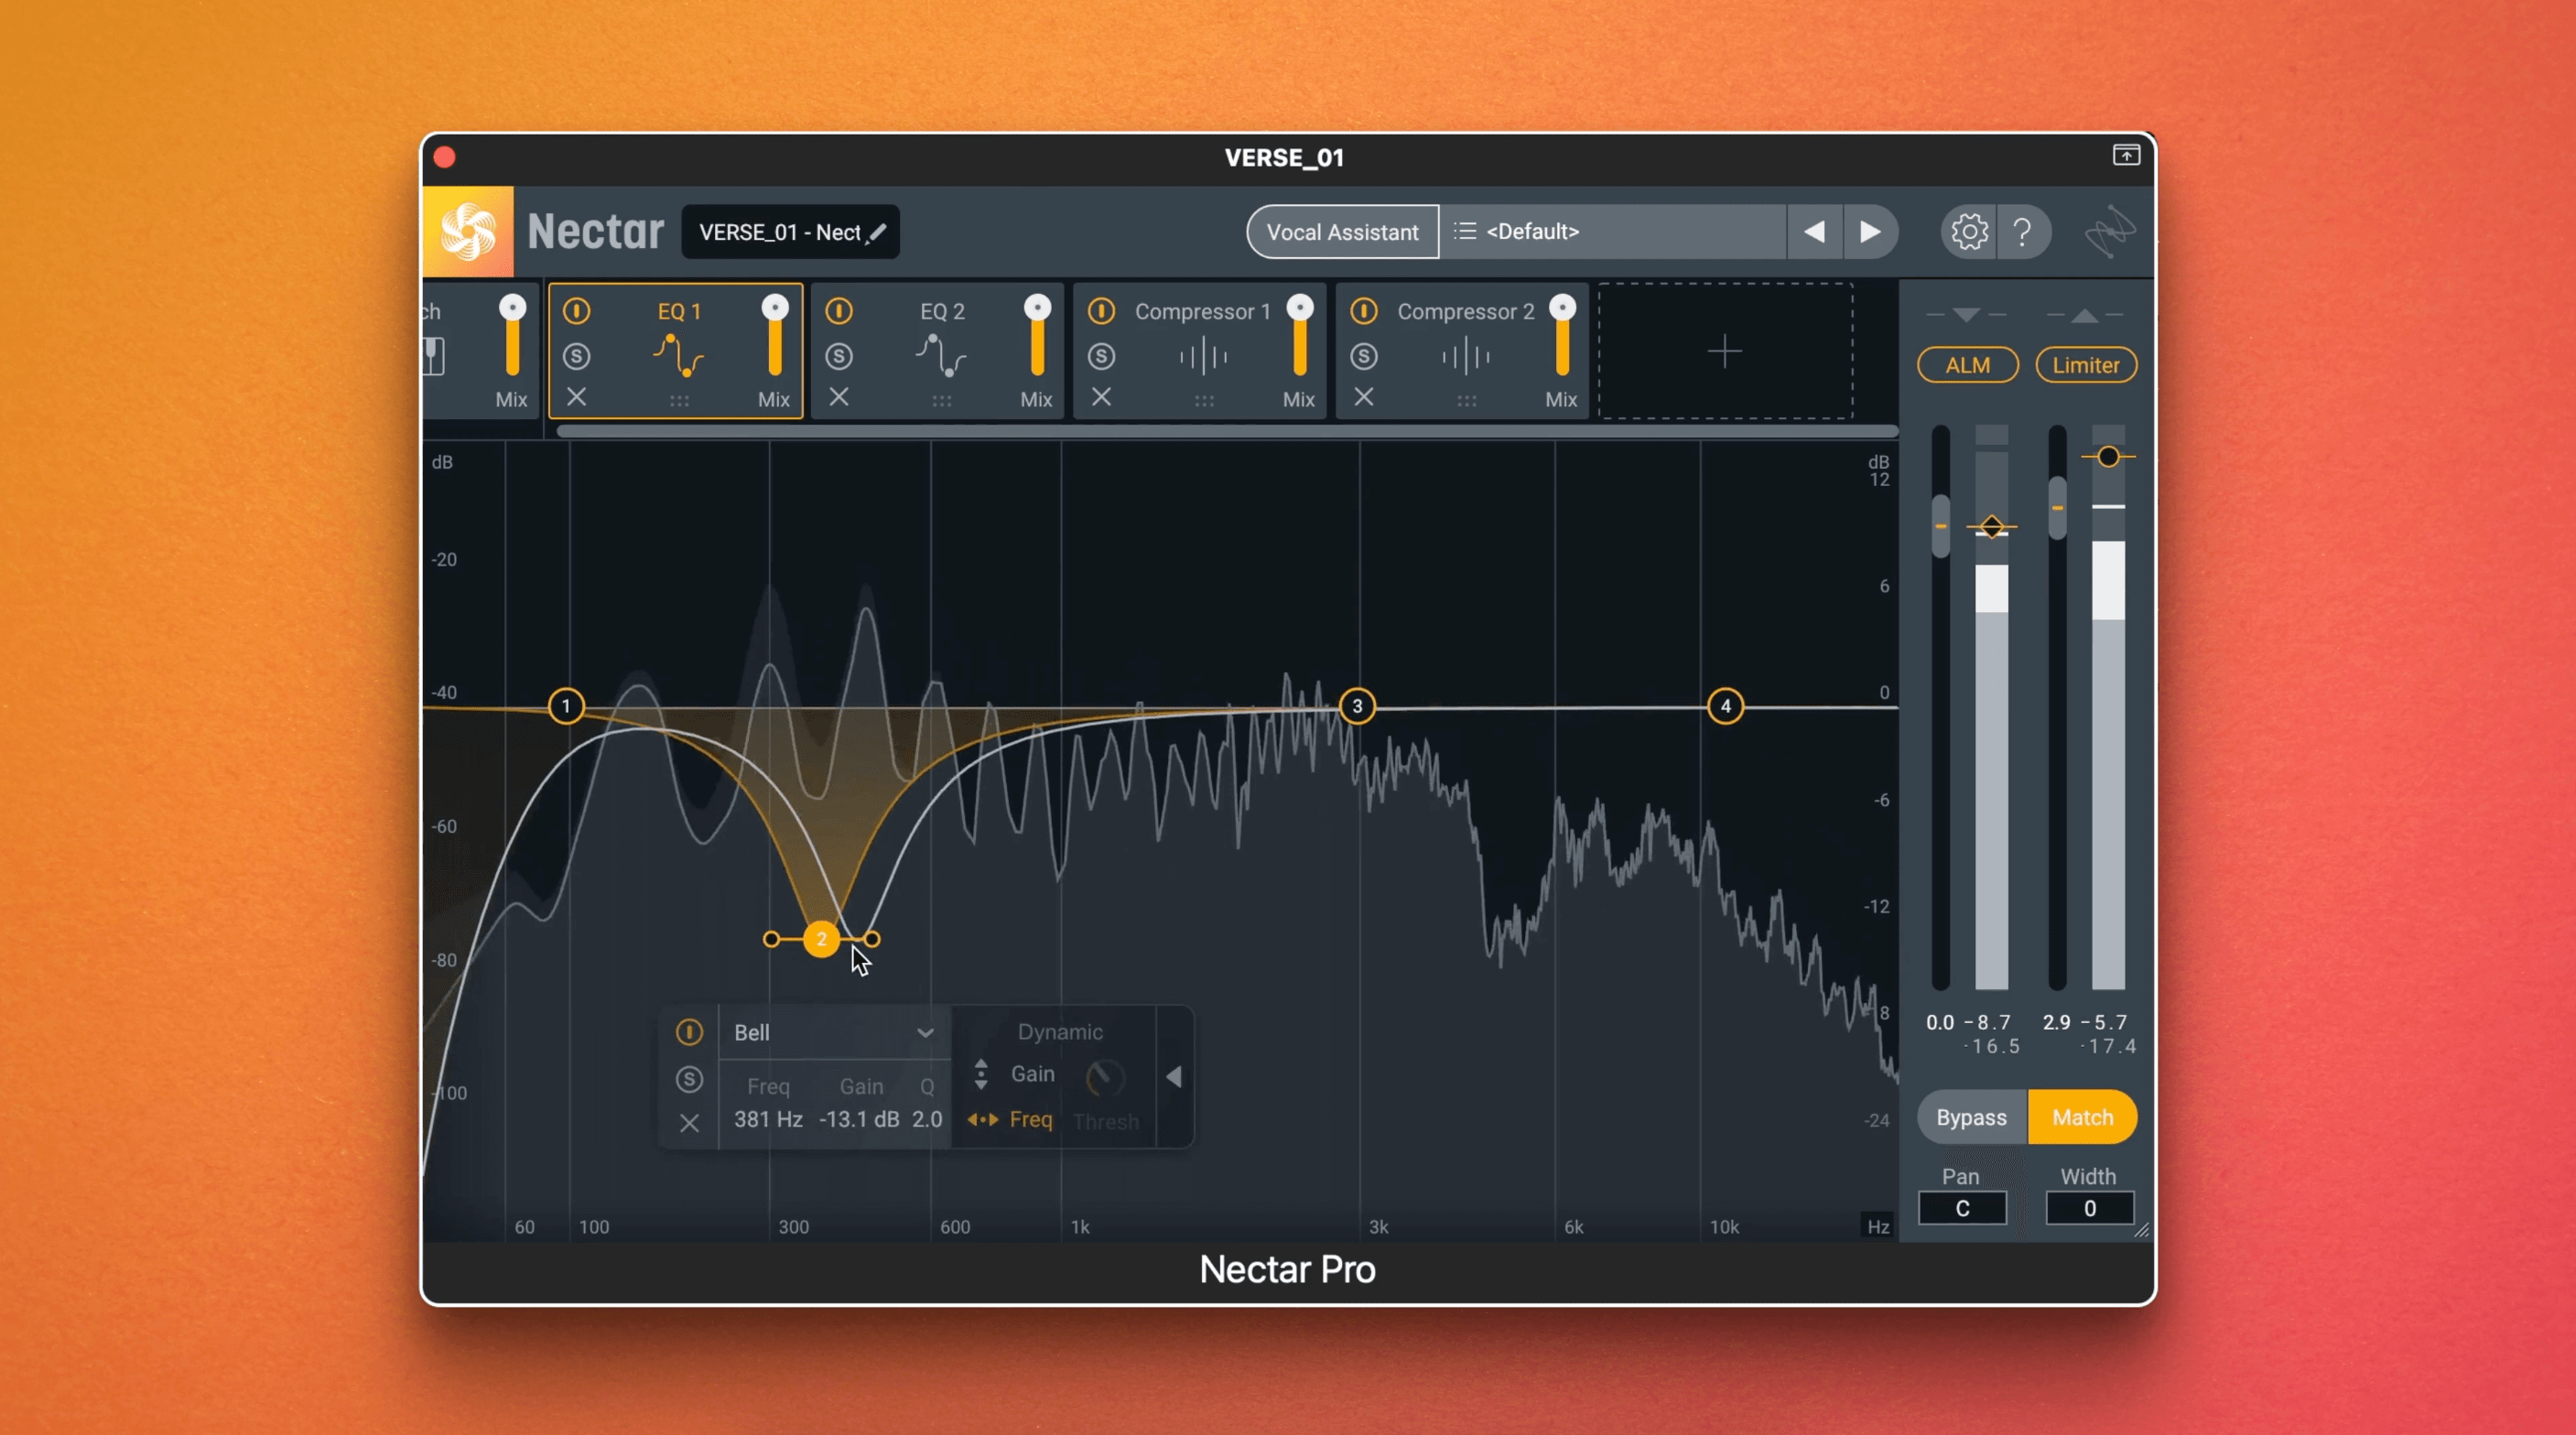
With Nectar’s EQ Follow mode, you can now attach a band and have it follow around a harsh frequency as it moves throughout a vocal performance.
Two EQs gives you lots of flexibility for controlling and enhancing your vocals. With the first EQ, you can tame and soothe harsh frequencies. Making this task especially easy is the EQ Follow Mode, whereby extending the partition and hitting the frequency icon, you can now attach a band and have it follow around a harsh frequency as it moves throughout a vocal performance. Now you can use the second EQ to boost and enhance aspects of the vocal with peace of mind that you won't be bringing up any harshness, because you've controlled that with EQ number one.
For compressors, two can definitely be advantageous to one. Let's say you're dealing with an especially dynamic vocal performance with a waveform that features loads of peaks and valleys. Try using a quicker compression style, like digital mode, with high ratios to tame some of the peaks. Then throw an optical or vintage style compressor afterwards to smooth everything out and impart a vibe on the vocal.
Or, you could use one compressor early on in the chain just to tame peaks gently, and then another that's completely squashed, but mixed in parallel, via the mixed slider to taste.
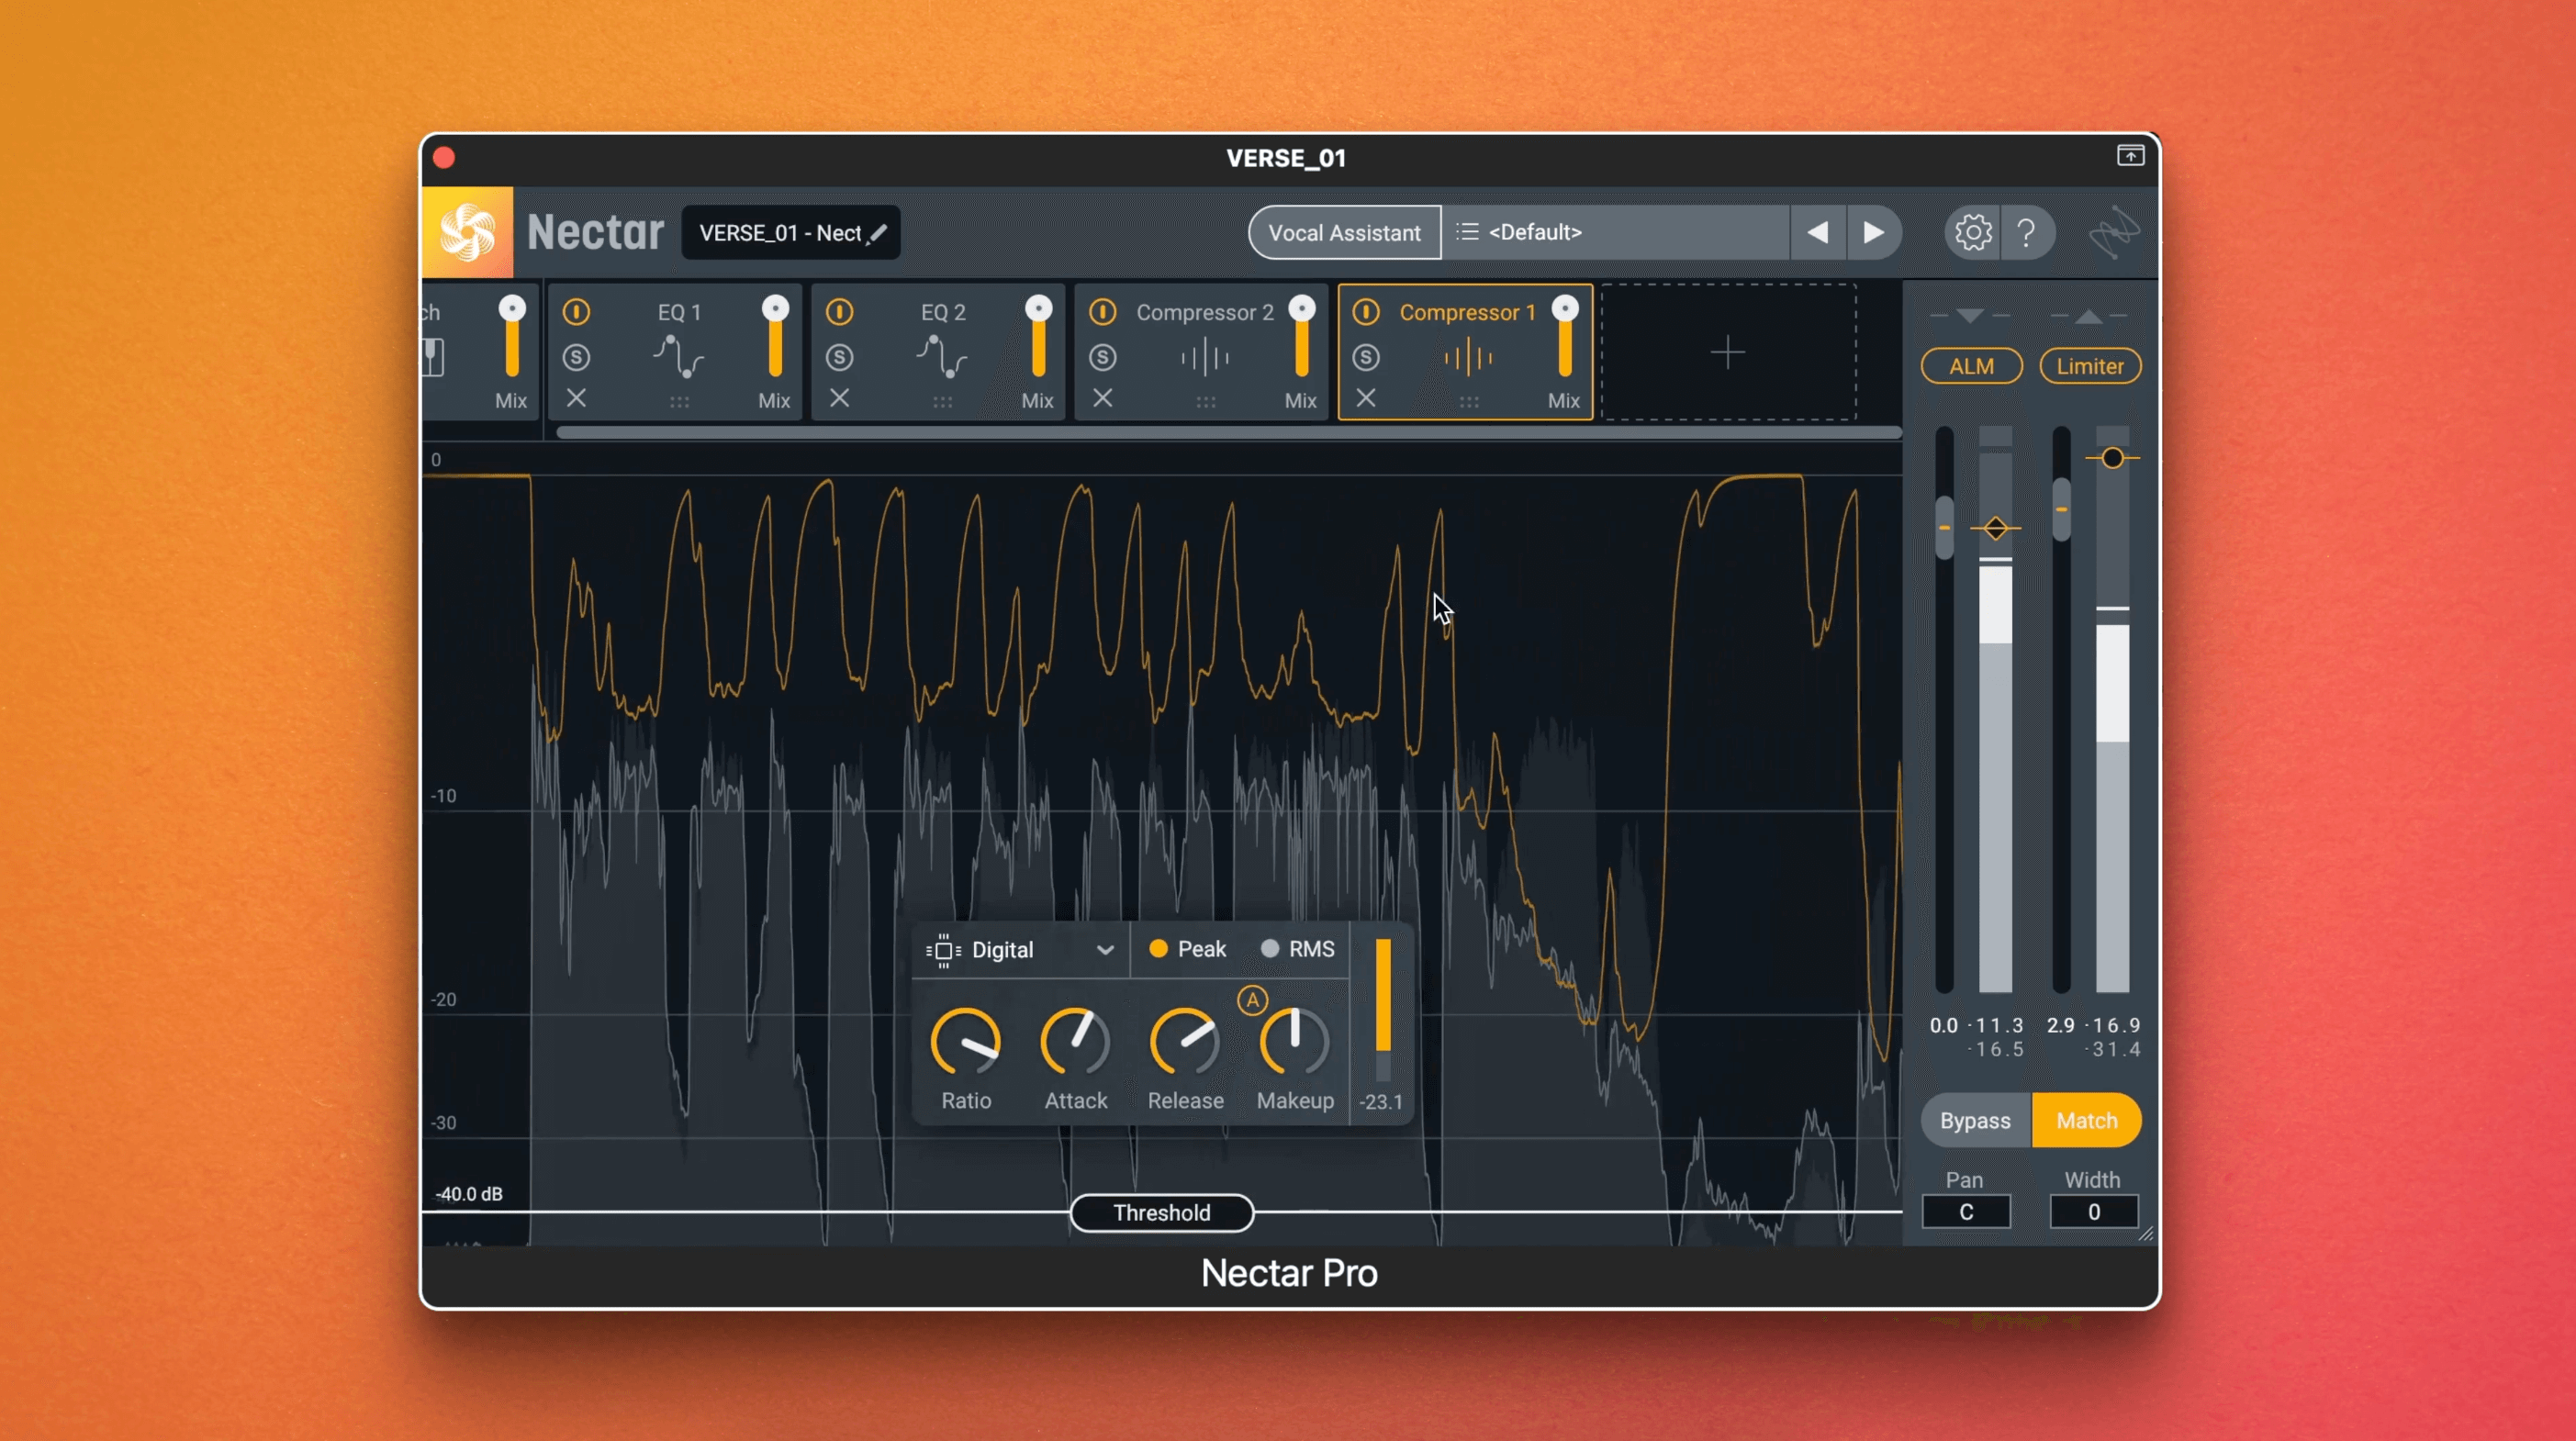
You could use one compressor early on in the chain just to tame peaks gently, and then another that's completely squashed, but mixed in parallel, via the mixed slider to taste.
6. Save time with Nectar’s Auto De-sser
Removing harsh ess sounds is par for the course if you're trying to make a sung, rapped, or spoken vocal sound professional. But it's also an annoying task, so why not let Nectar Pro's assistant do it for you? When you use the Vocal Assistant's Enhance feature, the assistant will automatically set parameters in the de-esser module for you in addition to a lot of other processing too. Just make sure that during the learning pass you loop a sequence that features sharp, essie sounds.
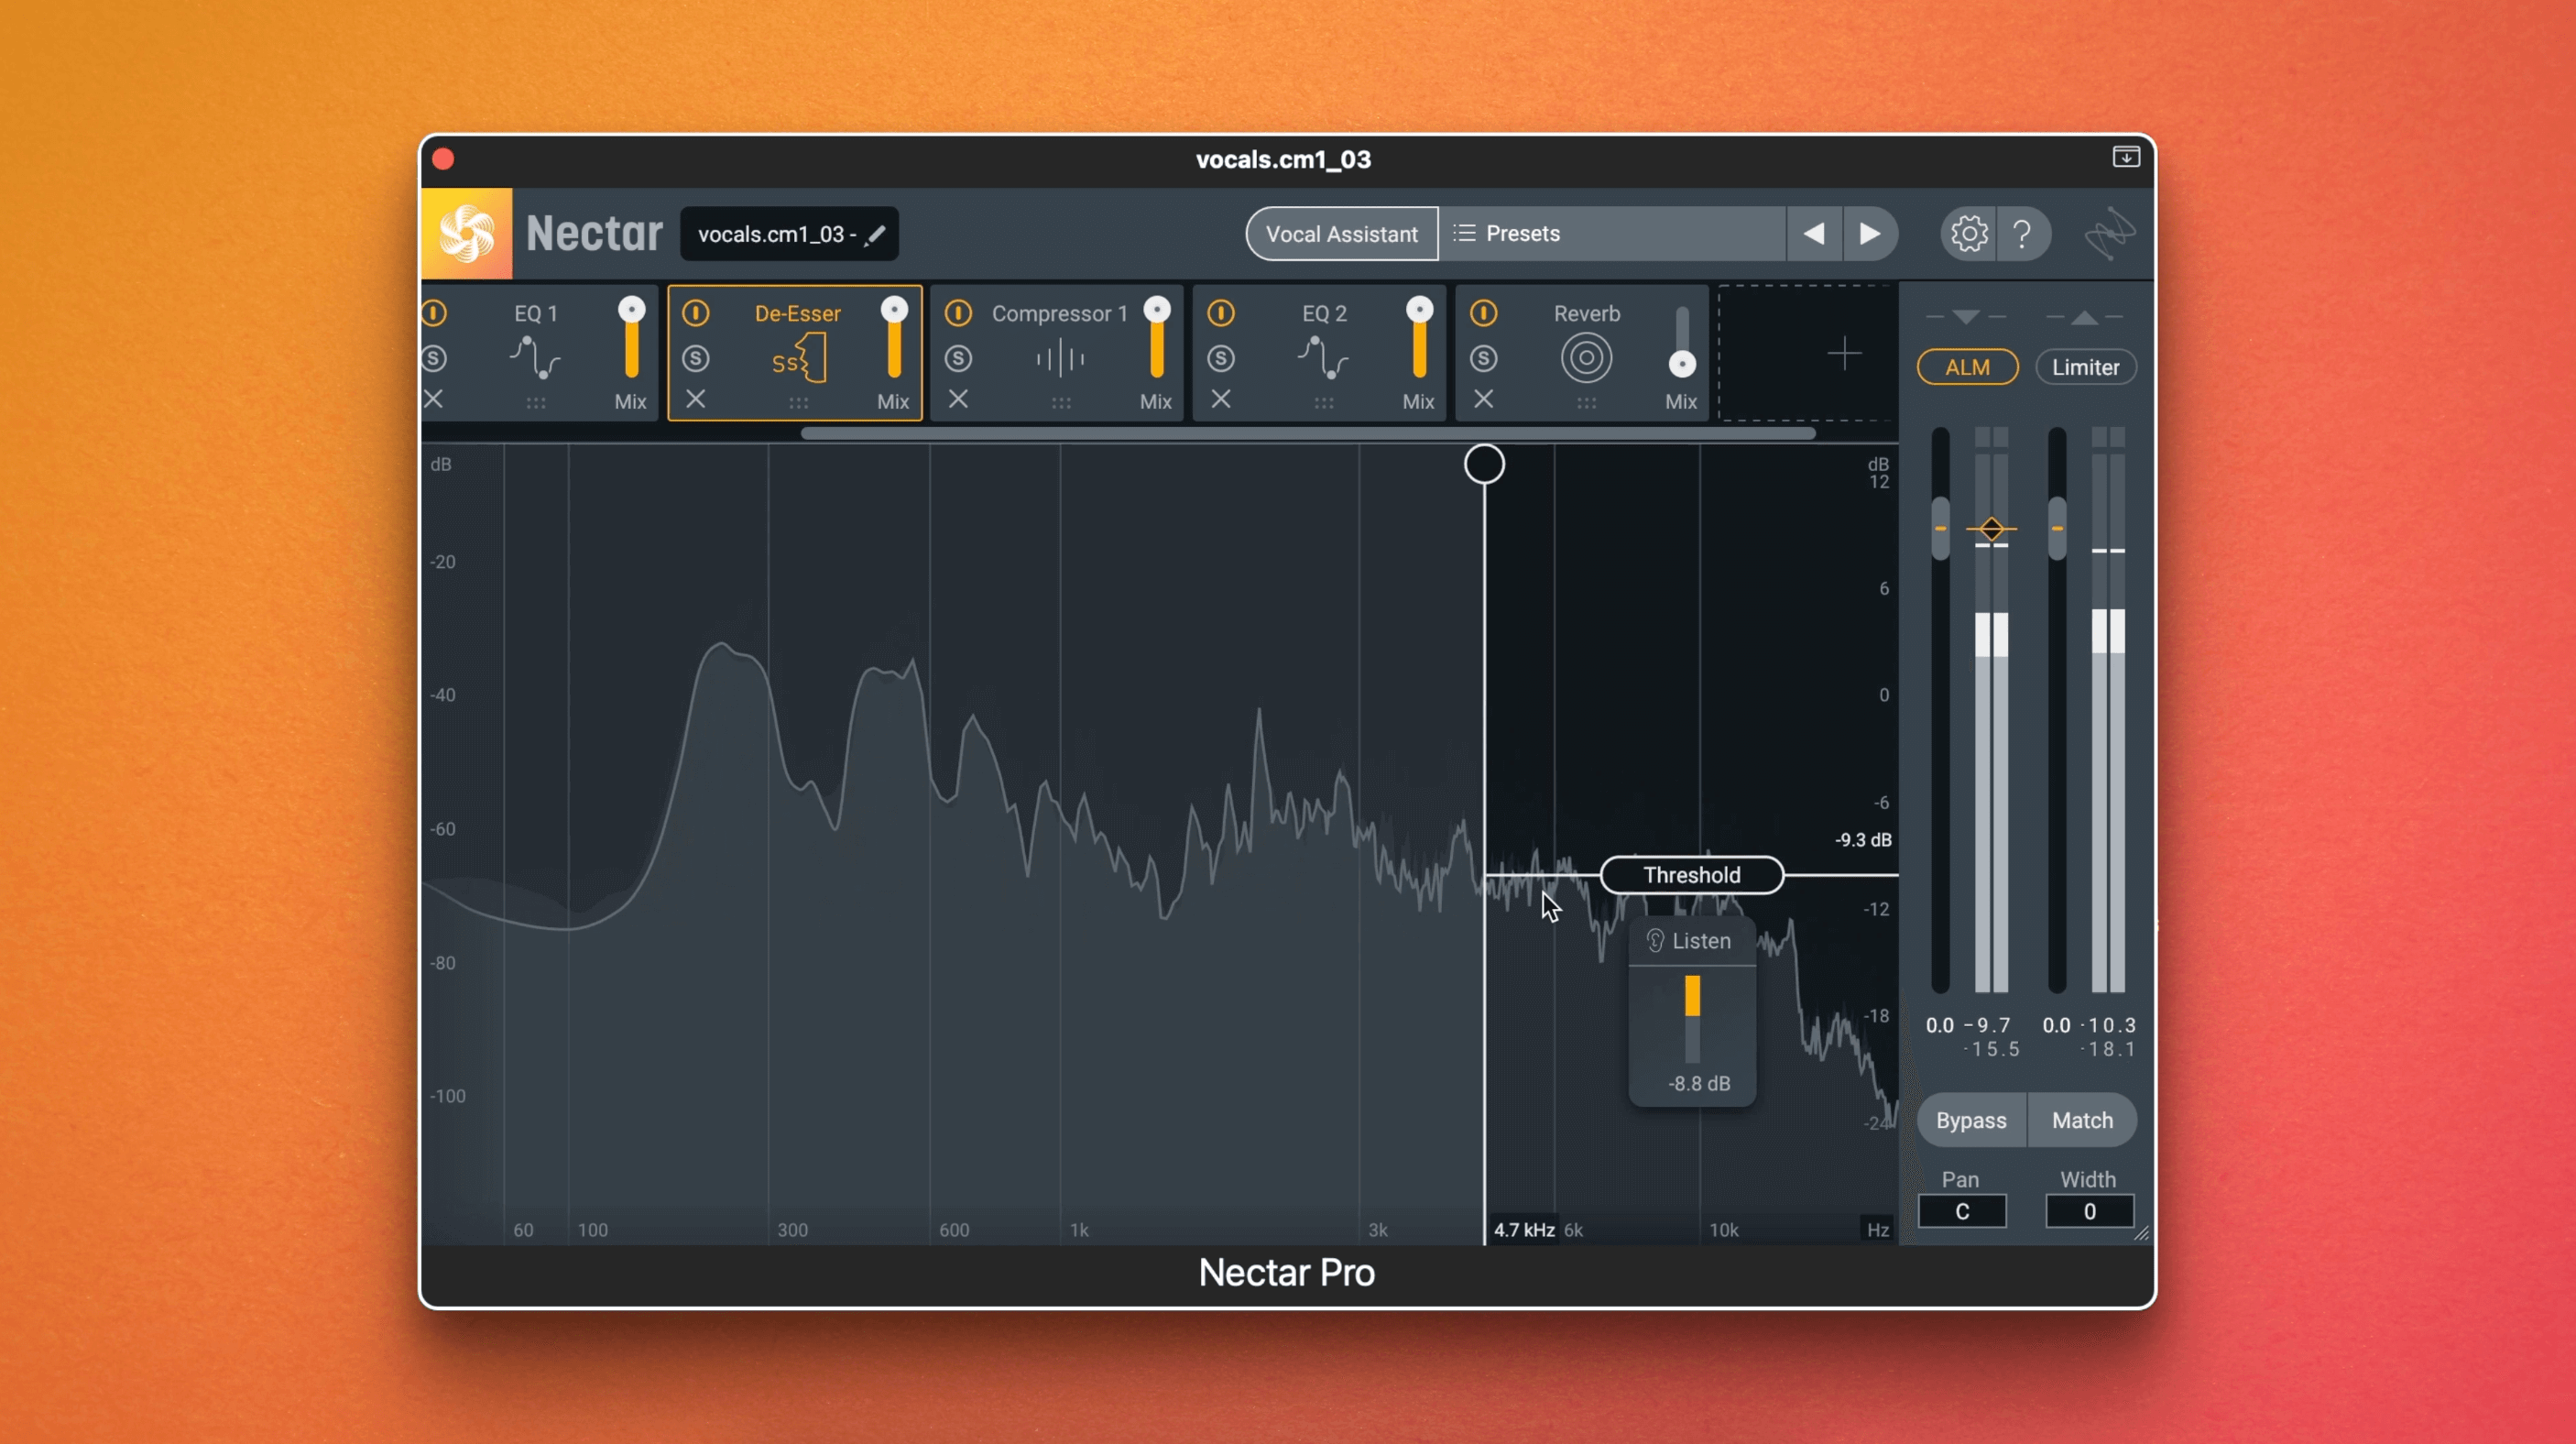
Nectar Pro's Vocal Assistant automatically sets parameters in the De-esser module for you.
Once you choose the tone you're after, you'll see that the de-esser is set smoothly controlling those sounds and you're free to tweak the parameters.
Bonus tip: The mix parameter allows you to blend in the amount of processing to taste, giving you even more control over those pesky sibilants.
7. Get even more vocal control with Dynamic Unmasking
Nectar’s Unmask is a tool that automatically listens to the rest of your mix and gets a source out of the way of your vocal using a static EQ. But what people might not realize is that changes were made to Unmask, so now you have even more control over the unmasking with a dynamic mode.
As a refresher to use Unmask, make sure you've got an instance of Nectar Pro on your vocal track. Next, place an instance of Nectar Pro,


Neutron 4


Relay
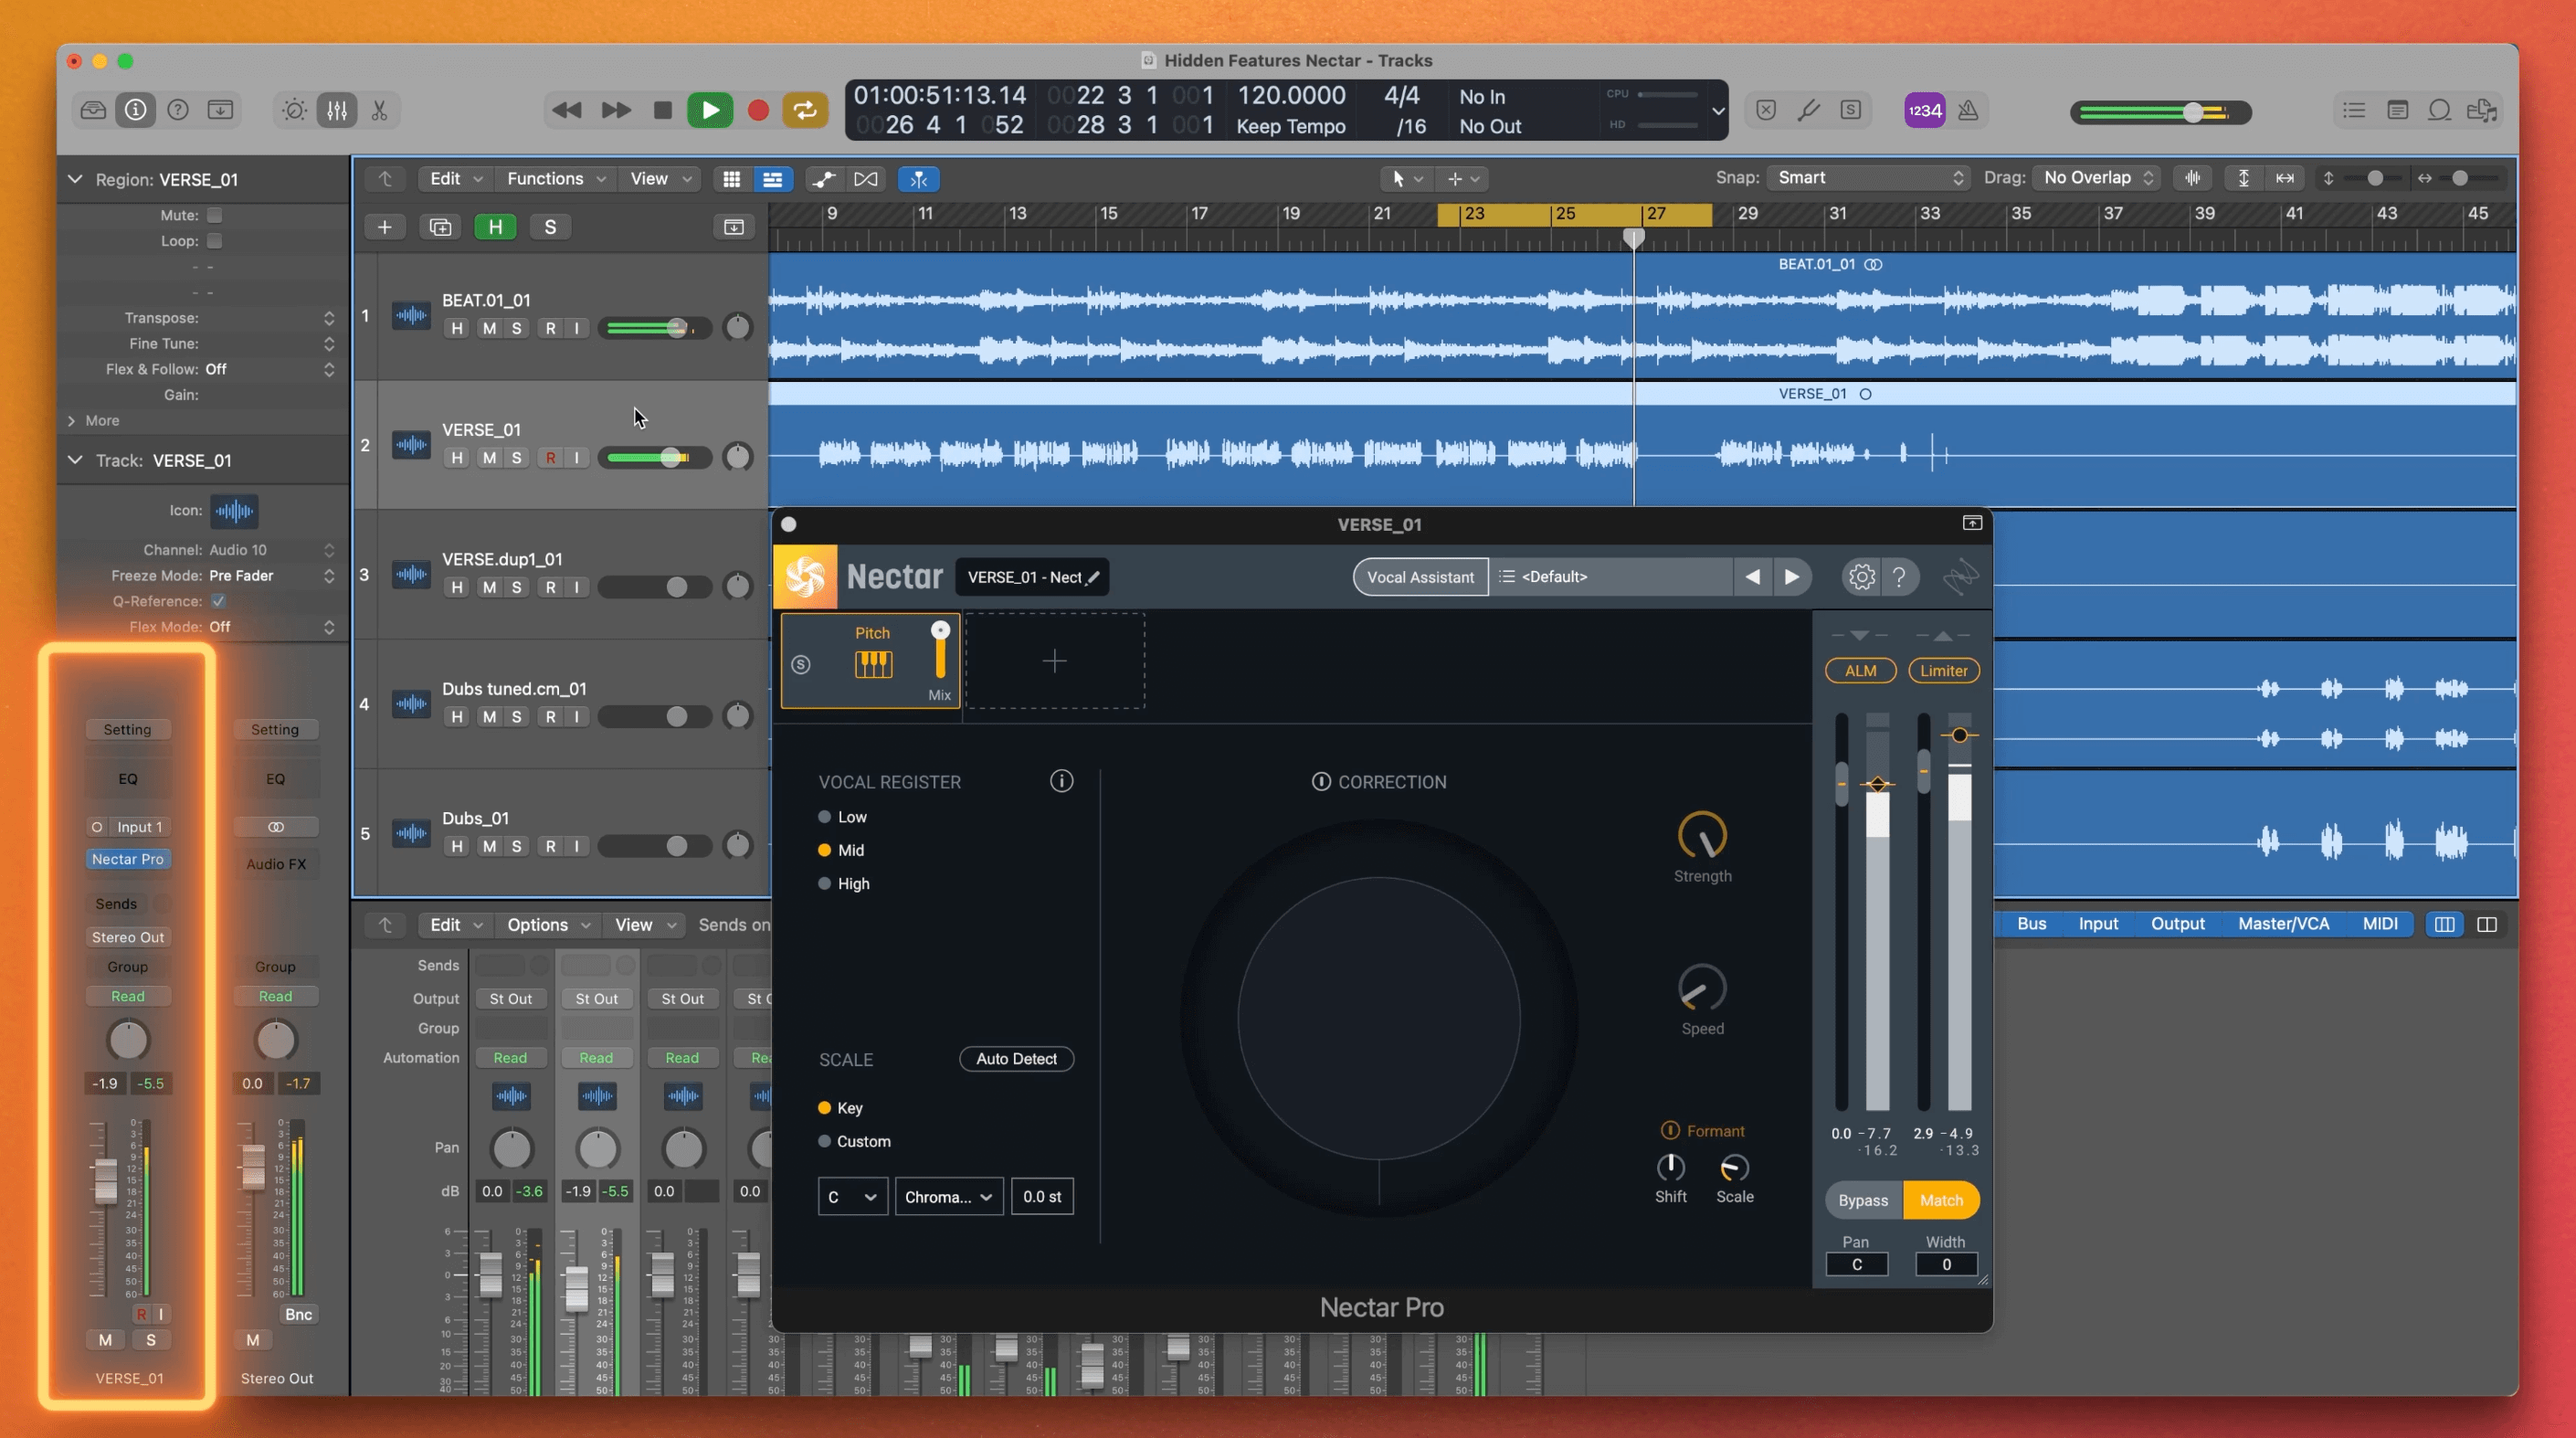
To use Unmask, place an instance of Nectar Pro, Neutron Pro, or Relay on a track or group of tracks that you think might be interfering with the intelligibility of your all important vocal.
In the instance of Nectar Pro on the vocal track, click the Vocal Assistant button at the top of the plug-in window and select Unmask, then click next. You'll see a dropdown menu containing all the compatible instances of iZotope plug-ins in your session.
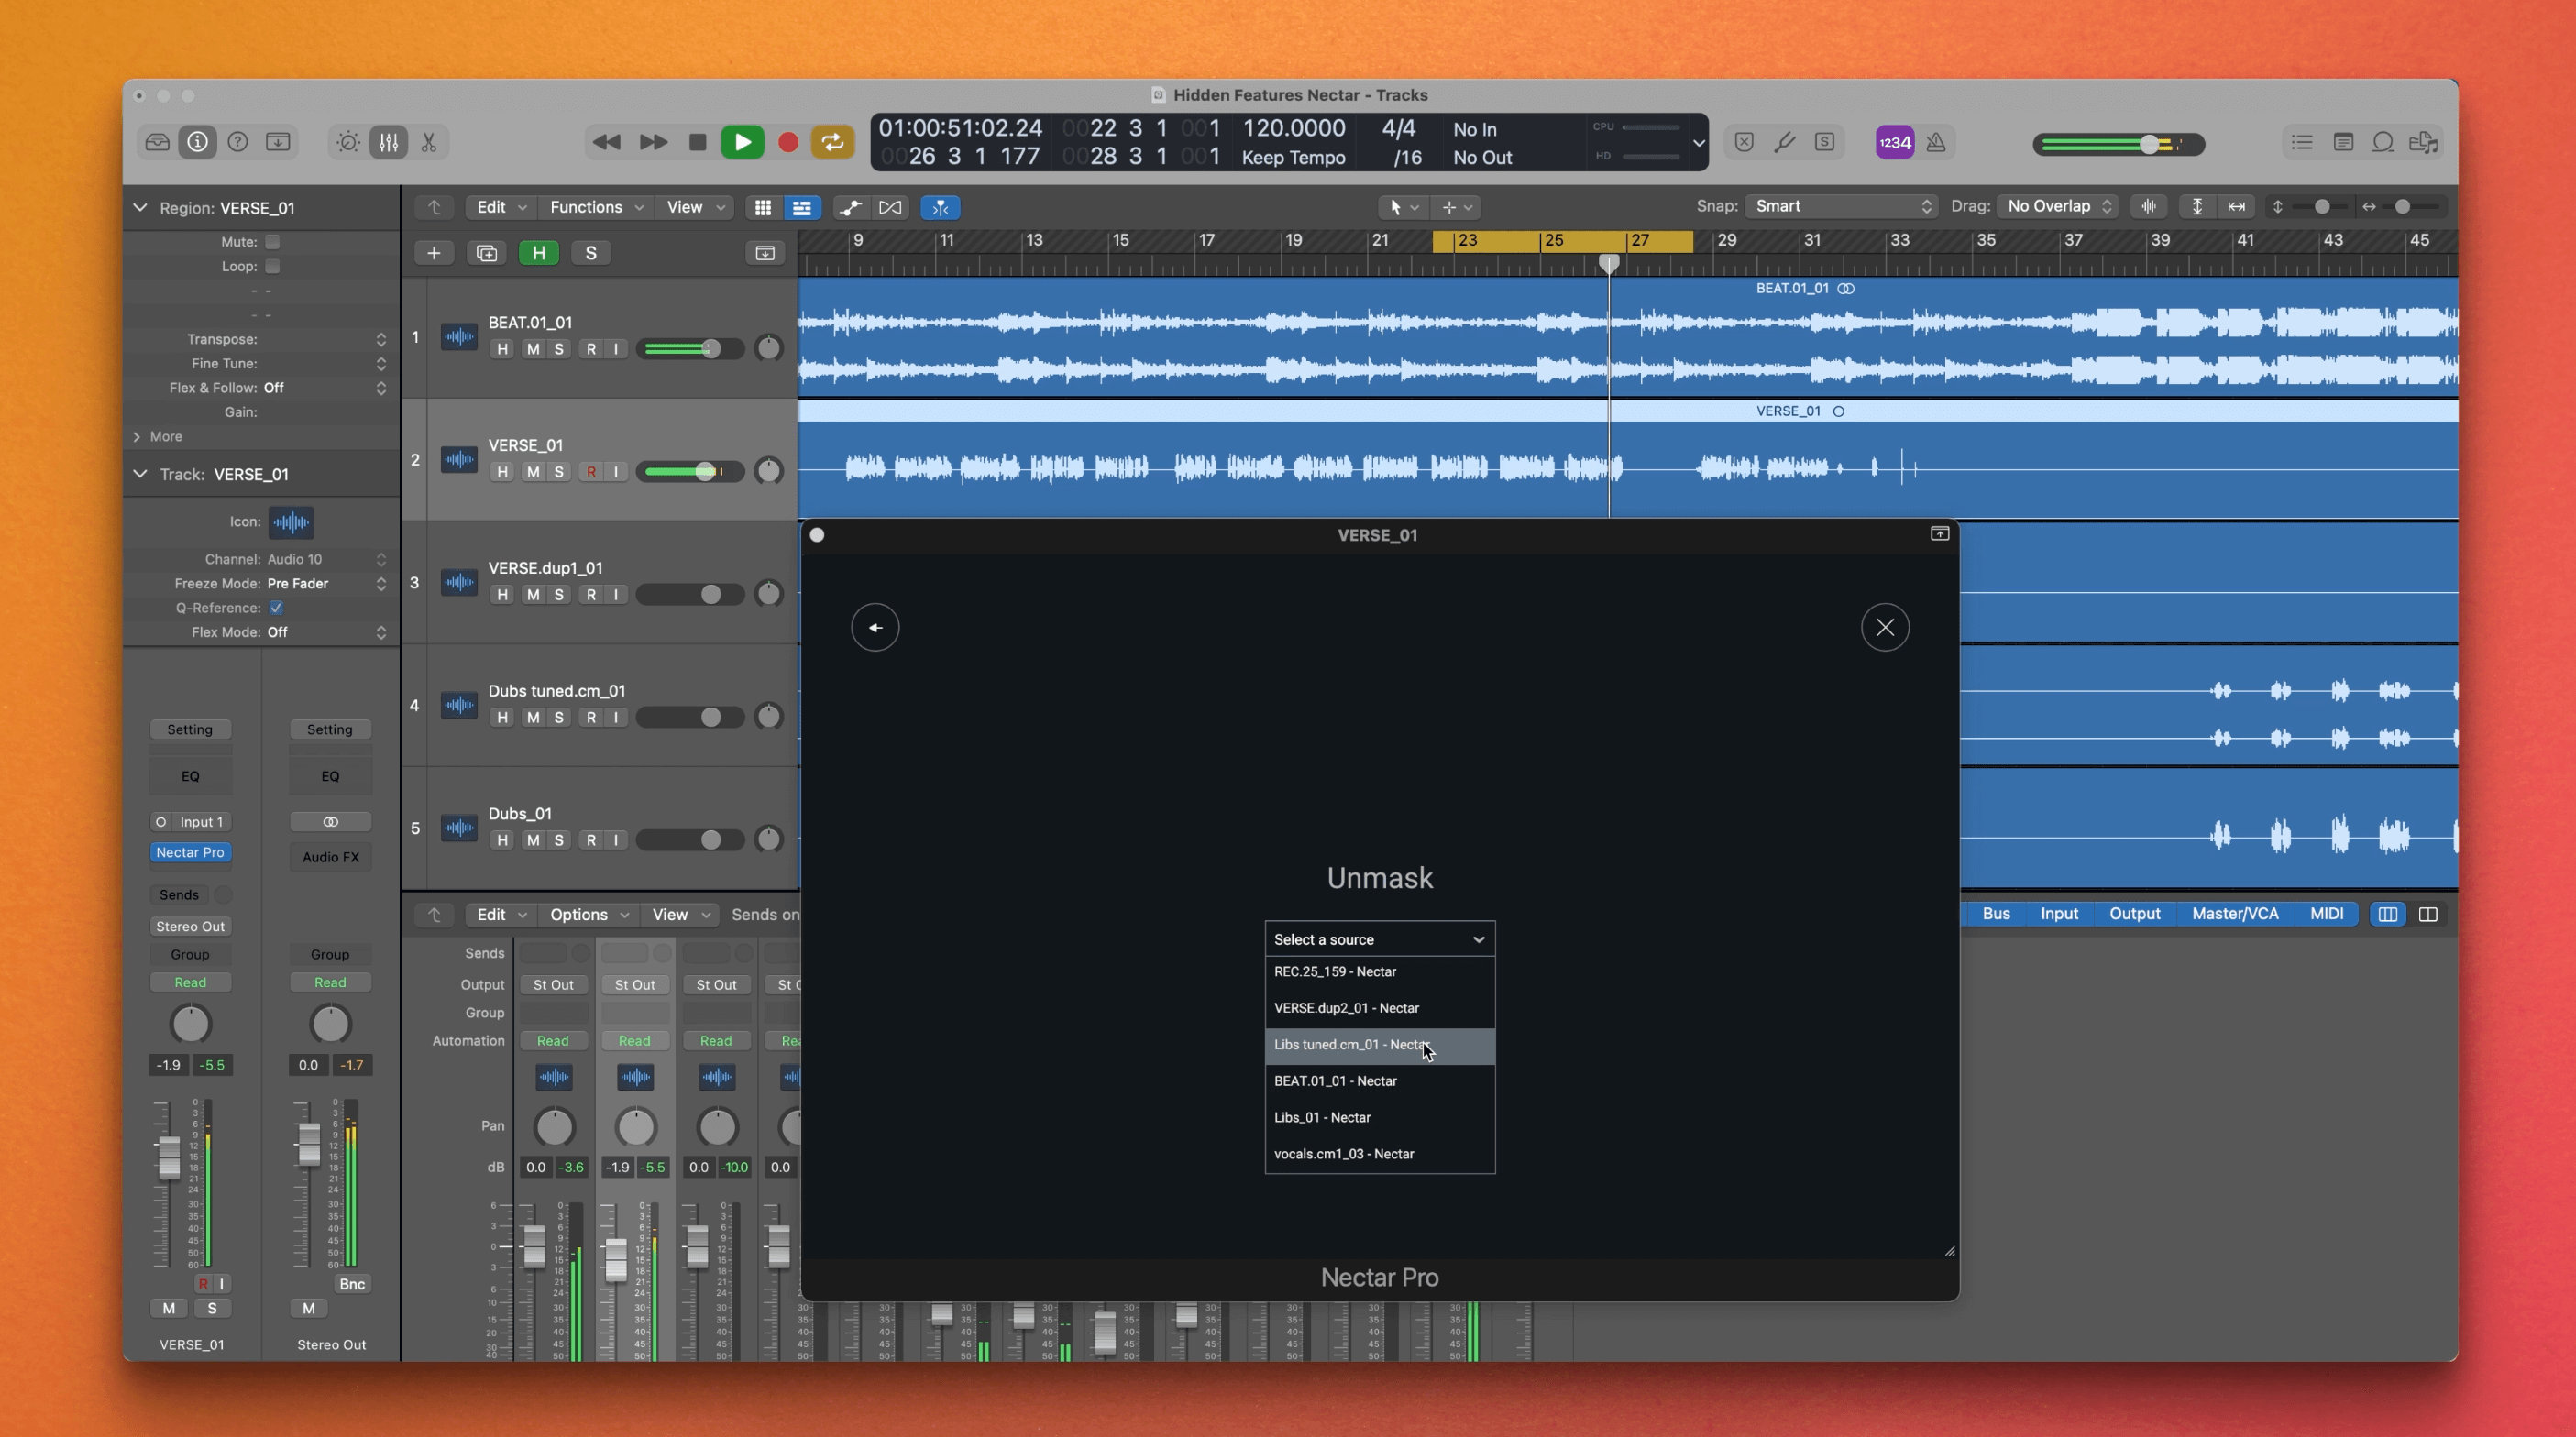
Nectar’s Unmask has a dropdown menu containing all the compatible instances of iZotope plug-ins in your session.
Select a compatible plug-in on the mix element that's masking the vocal and then press next again. Now Unmask will listen to the source of the masking and introduce an EQ that will suppress frequencies that are interfering with the vocal on the masking track.
Here’s the hidden feature: You can now use Dynamic Unmasking to cause the EQ curve to respond to the vocal track, performing even more transparent and reactive unmasking. This means that when the singer isn't performing, the EQ curve will settle back to default and only move out of the way when the singer starts up again.
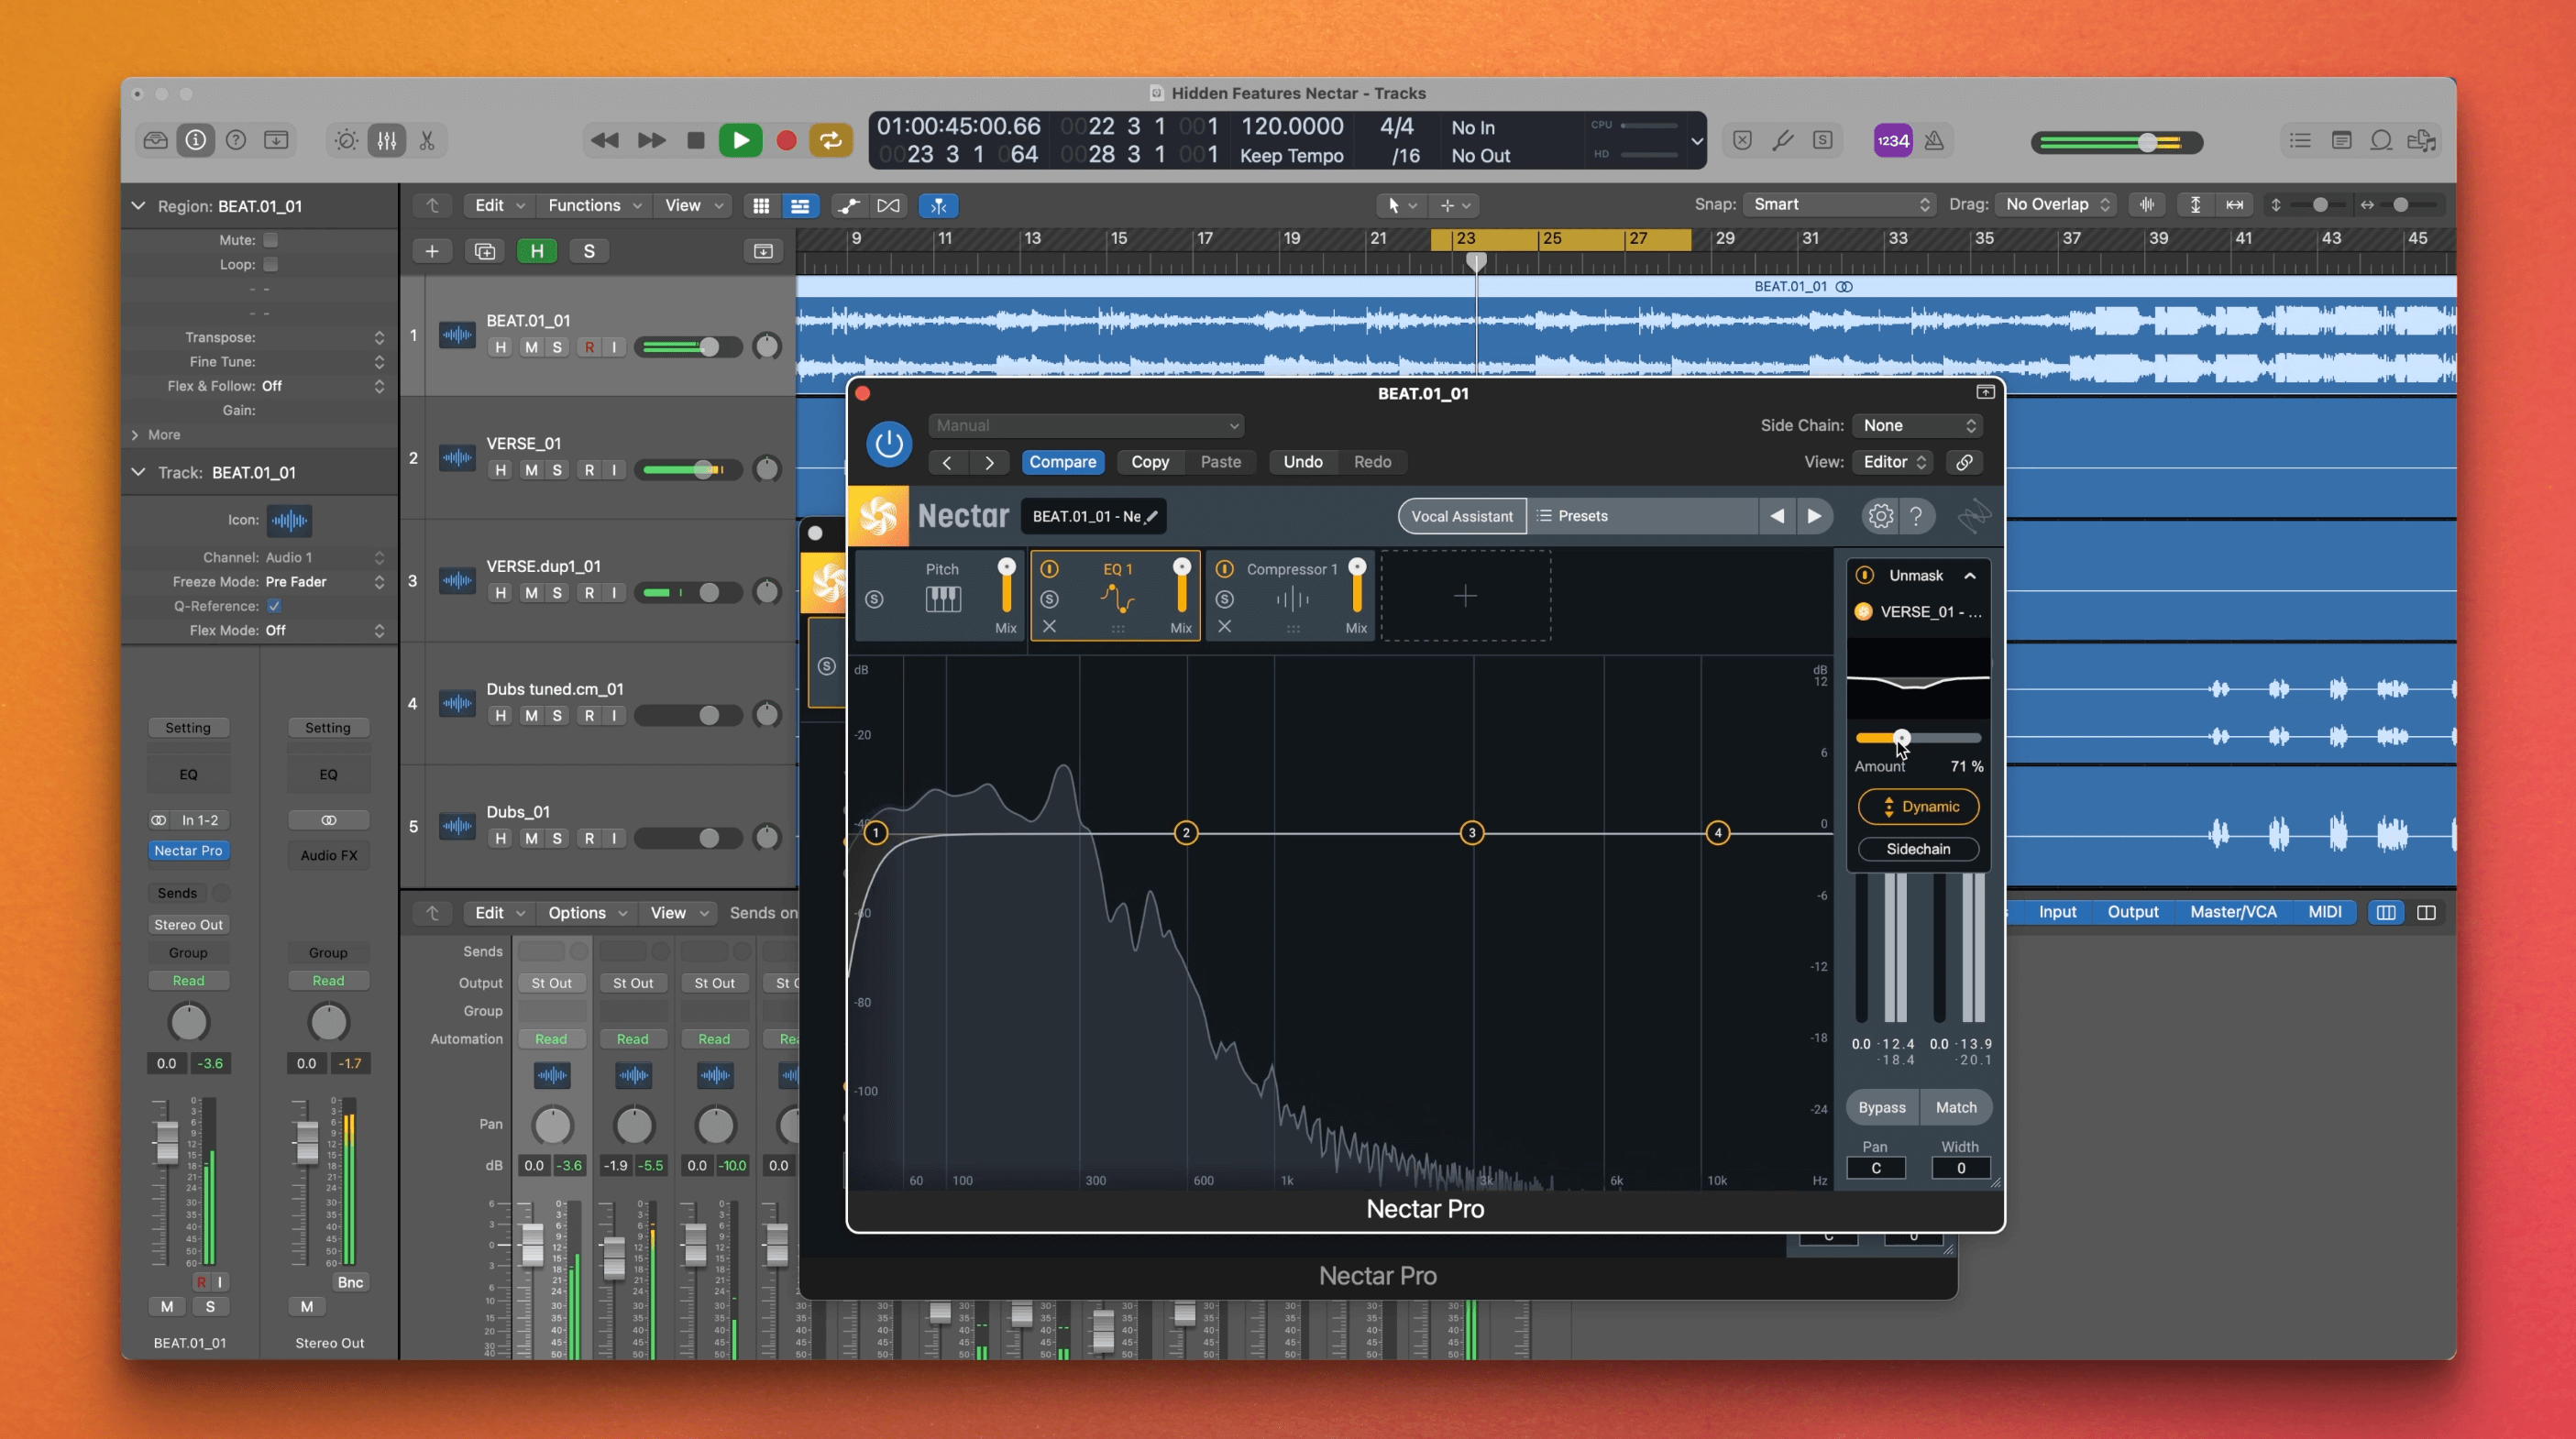
You can now use Dynamic Unmasking to cause the EQ curve to respond to the vocal track, performing even more transparent and reactive unmasking.
8. Set consistent vocal levels with Auto Level Mode
One of the most important keys to a professional mix is getting a consistent vocal level throughout the entire performance. Now some people will use pencil tools, automation, or gain riding or fader riding to achieve this, which is manual and very annoying. But did you know that Nectar Pro has a feature called Auto Level Mode which does this job for you?
Auto Level Mode eliminates the need for corrective dynamics or riding the fader by applying level correction to your vocal before any additional processing is applied. This ensures that your vocal performance stays on target and ensures your audience will hear everything loud and clear.
To turn on Auto Level Mode, head to the input meter and switch it on. It can be easily activated and controlled directly from the input section of Nectar, so it's a snap to use no matter what your signal chain is.
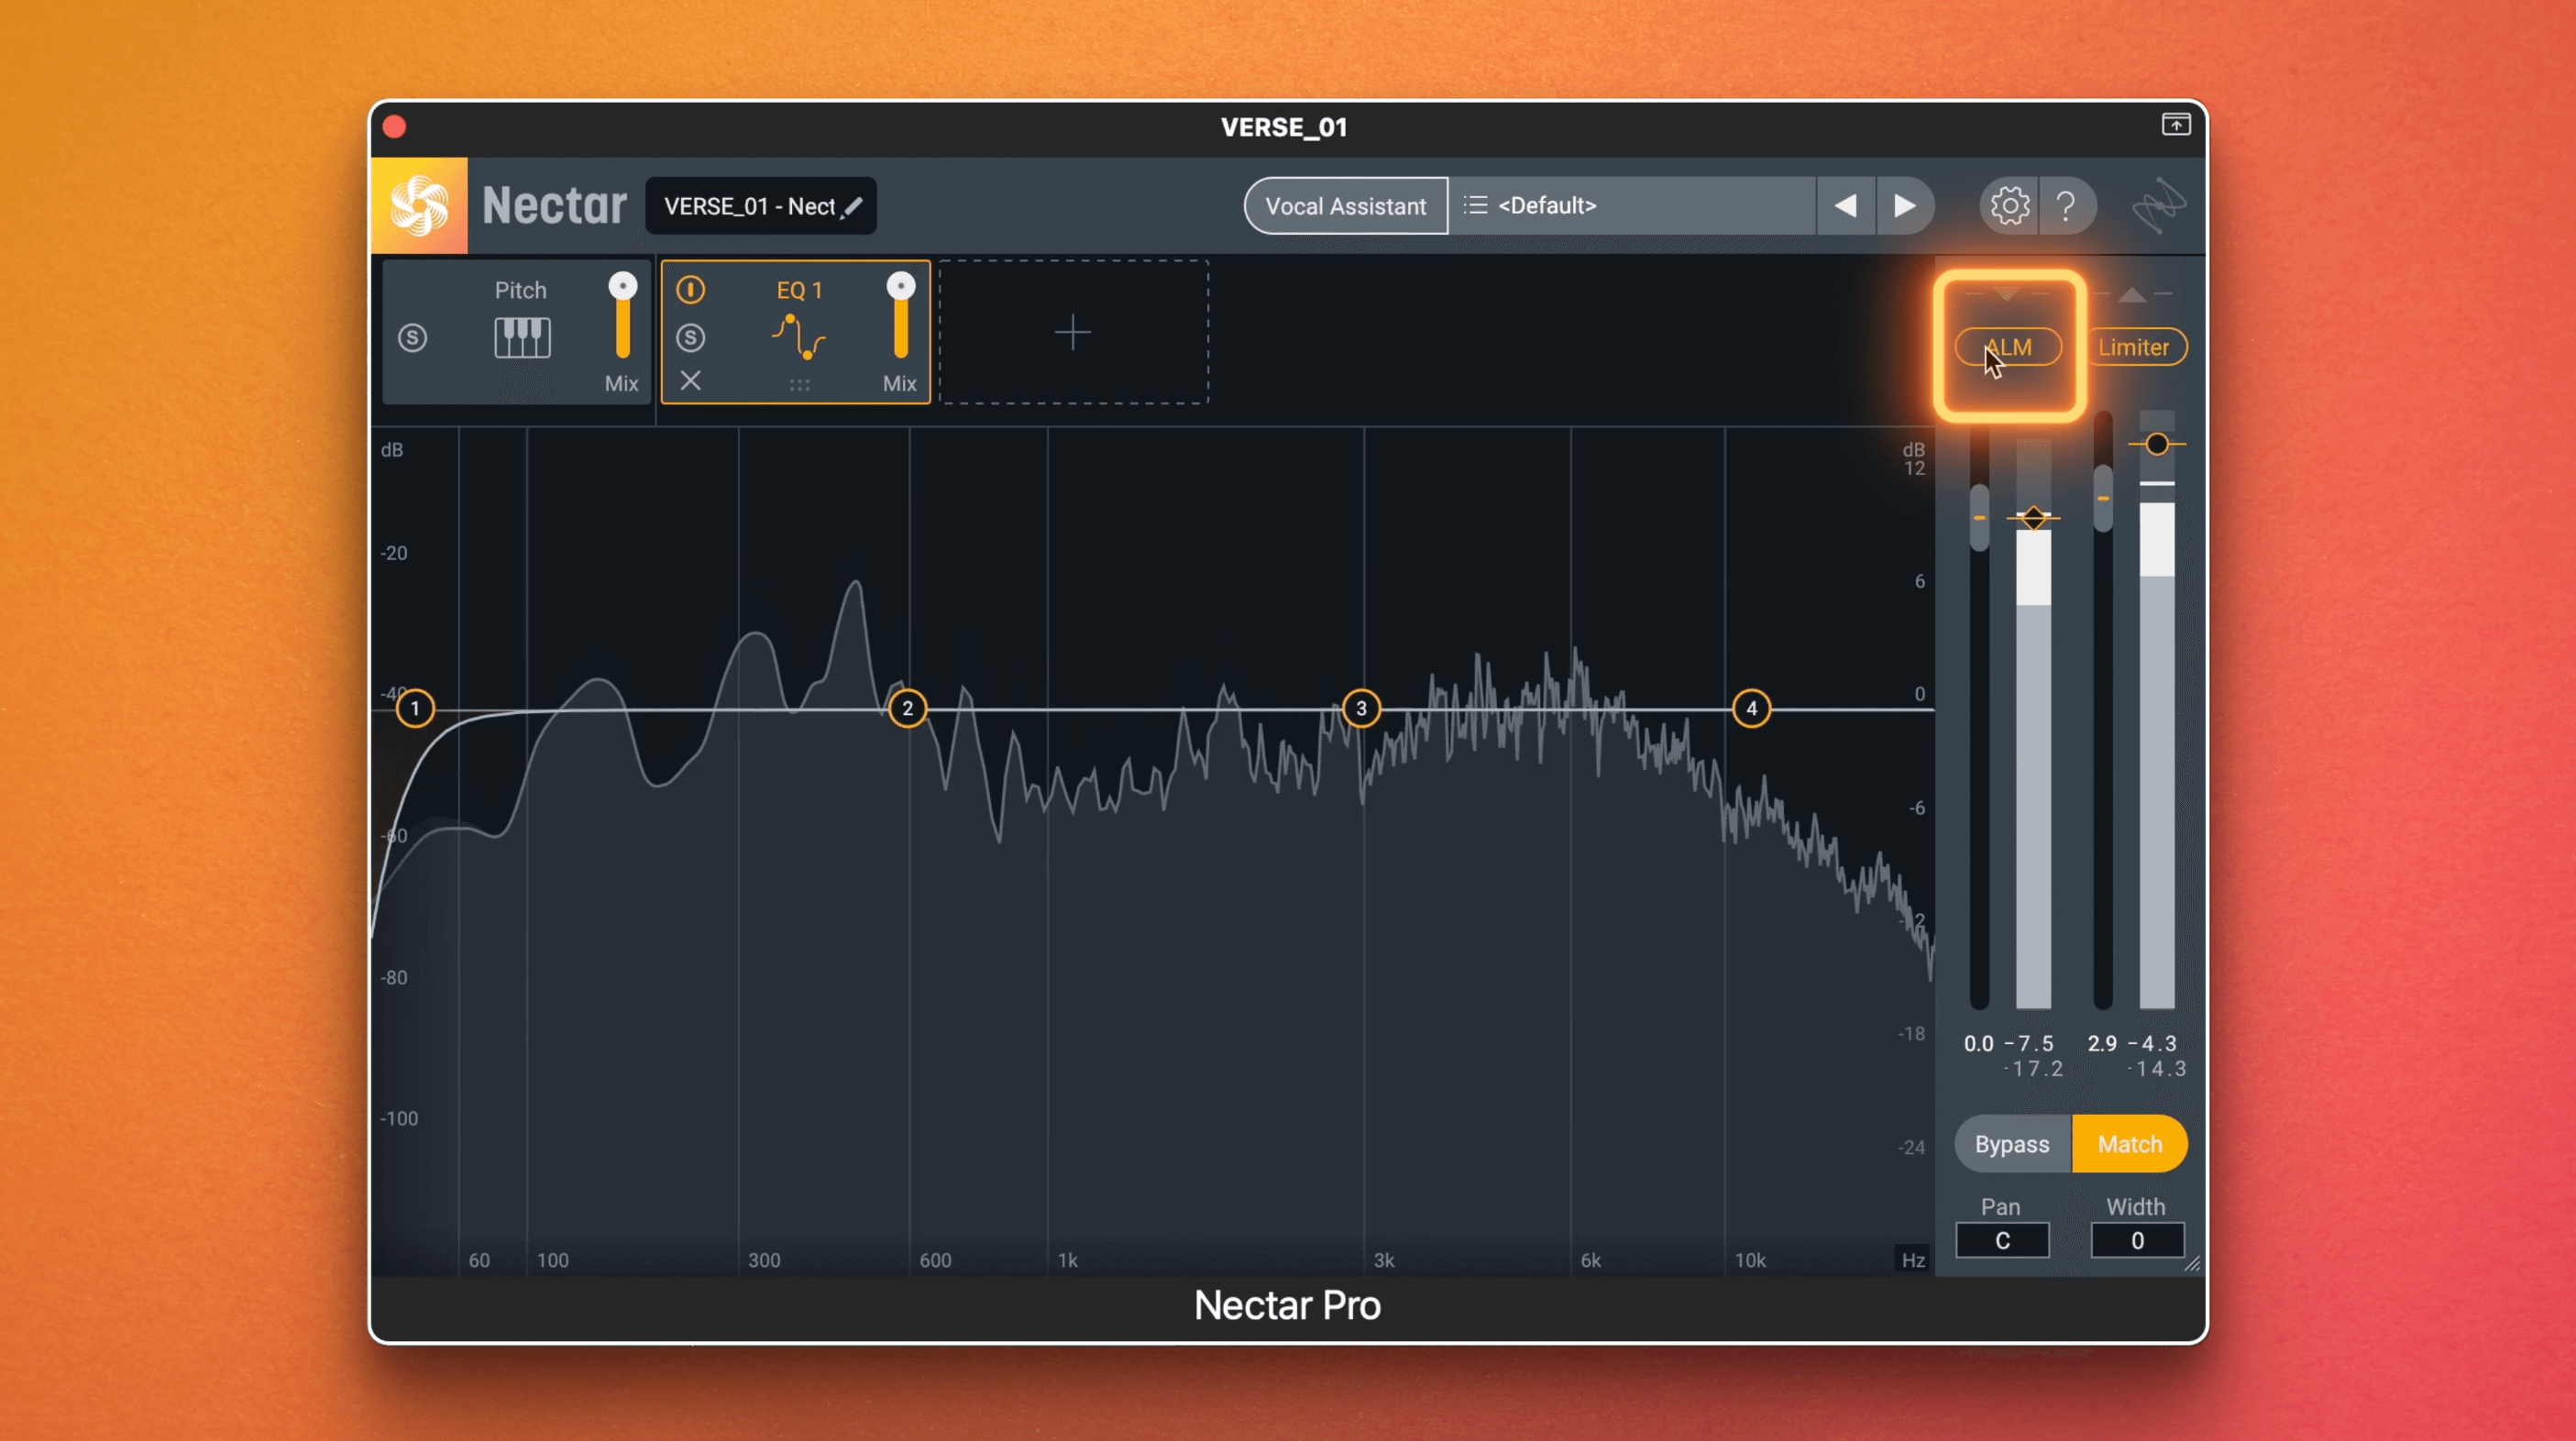
Auto Level Mode ensures that your vocal performance stays on target and ensures your audience will hear everything loud and clear.
Some background: Auto Level Mode is positioned at a default target RMS of -8 dB. This is a suitable level not only for providing sufficient headroom, but also for non-linear processing like saturation. You can change the default target of the Auto Level Mode by moving its position if you want more fine tuning.
9. Use time-based effects with more control
Compression, leveling, EQ, de-essing—all of these tools play a role in getting you a more professional vocal sound, but it’s arguable that time-based effects like reverb, delay, and even creative effects like saturation push a vocal over the finish line. It's important to use those tools in a controlled, intentional, careful way.
What you might not realize is that there are understated, if not hidden EQs throughout Nectar to help you use time-based and creative effects in a much more controlled manner. There are EQs across the delay and reverb modules in Nectar, and by using them, you're essentially regulating what aspect of the vocal is getting treated with the effect.
So why use EQs on time-based and creative effects like saturation? Reverb or delay on the high end part of the vocal could be creating a piercing high frequency tone, so why not perform a low pass to make sure that high frequencies aren't affected by the reverb or the delay? Alternatively, if you're using delay and reverb on background vocals, you might want a high pass with an EQ to prevent low frequencies from getting added into the effects, which could add mud to the overall performance.
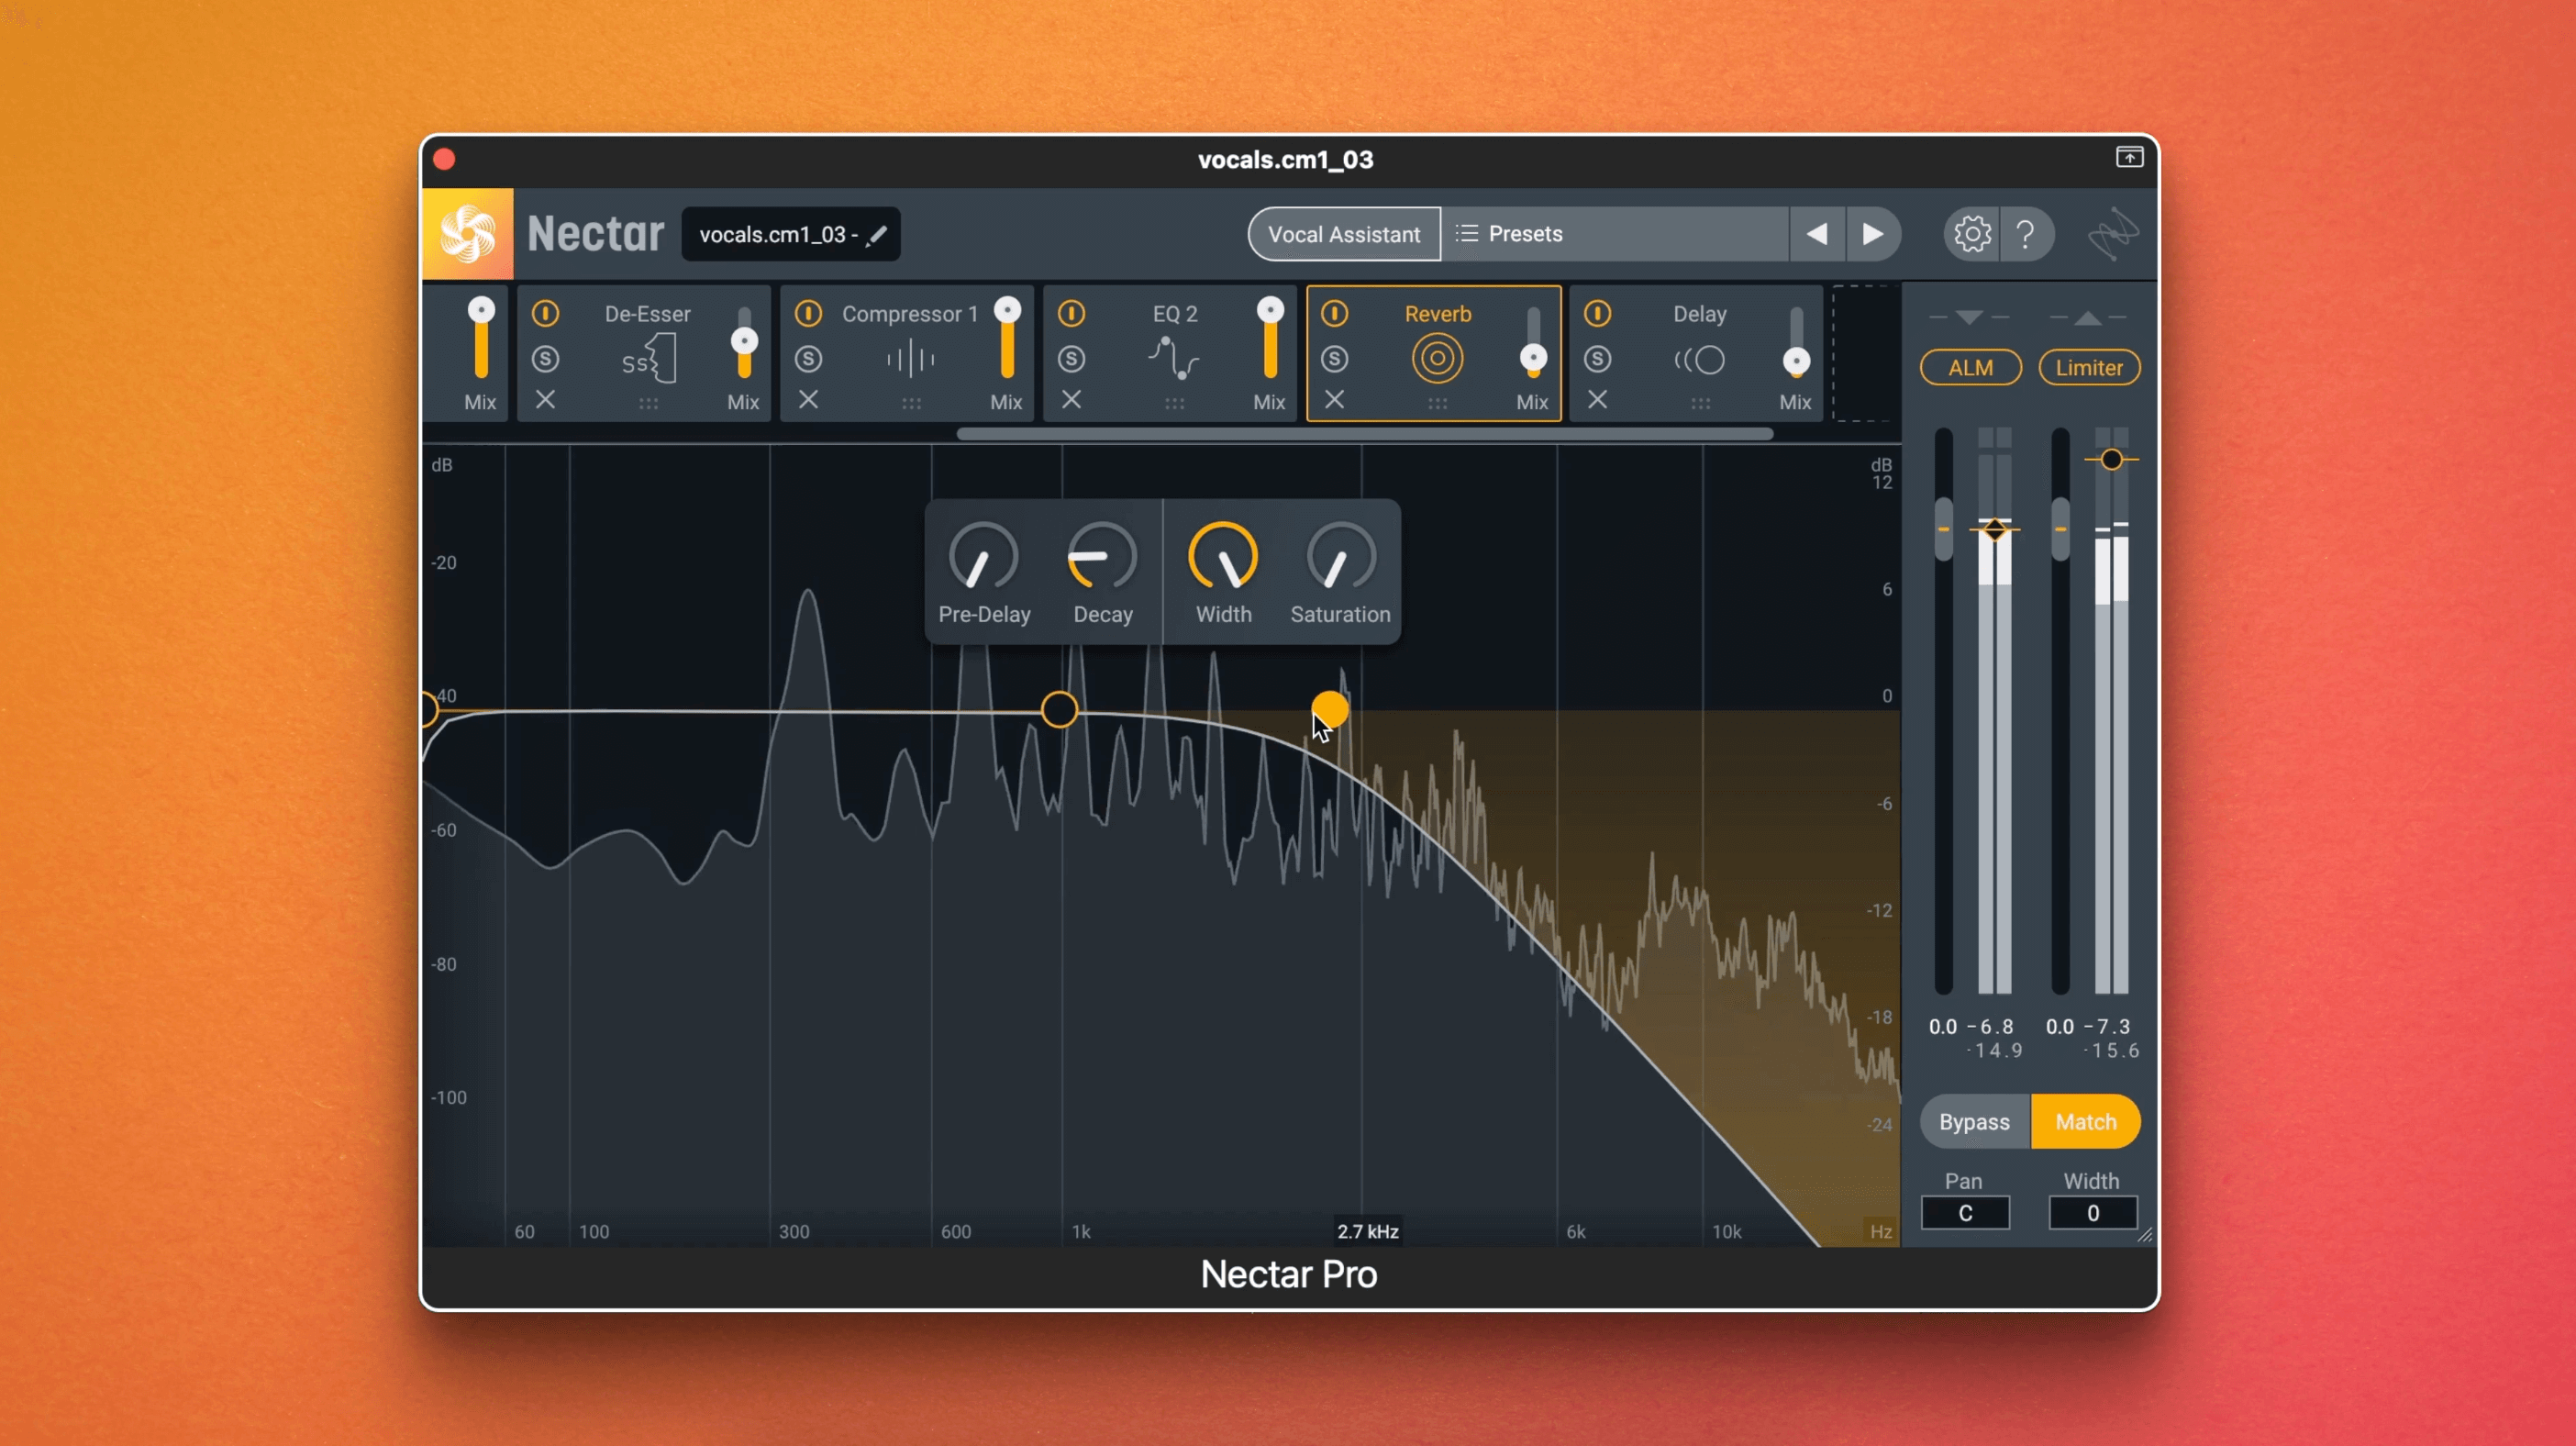
Nectar allows you to use a high pass with an EQ to prevent low frequencies from getting added into the effects.
Nectar also has a saturation filter too. This allows for the reduction of undesirable high frequency content in the processed signal. So you've got a lot of control with saturation as well.
10. Stay objective with Gain Match
Staying objective while you're mixing is one of the hardest things to do. In fact, there's an article and video about mixing mistakes which you should check out. When you're mixing a vocal, you especially want to make sure that all the moves that you're doing add up to something truly special on the vocal. There's a hidden feature in Nectar’s global controls which allows you to do just that.
At the bottom right of the plug-in you'll see a Match feature. When Nectar is bypassed and match is enabled, the bypass signal level will be adjusted to match the processed output level. This means you won't get fooled into thinking it's better because it's louder. With matched output levels, you can make more objective decisions about what's contributing to your great vocal sounds.
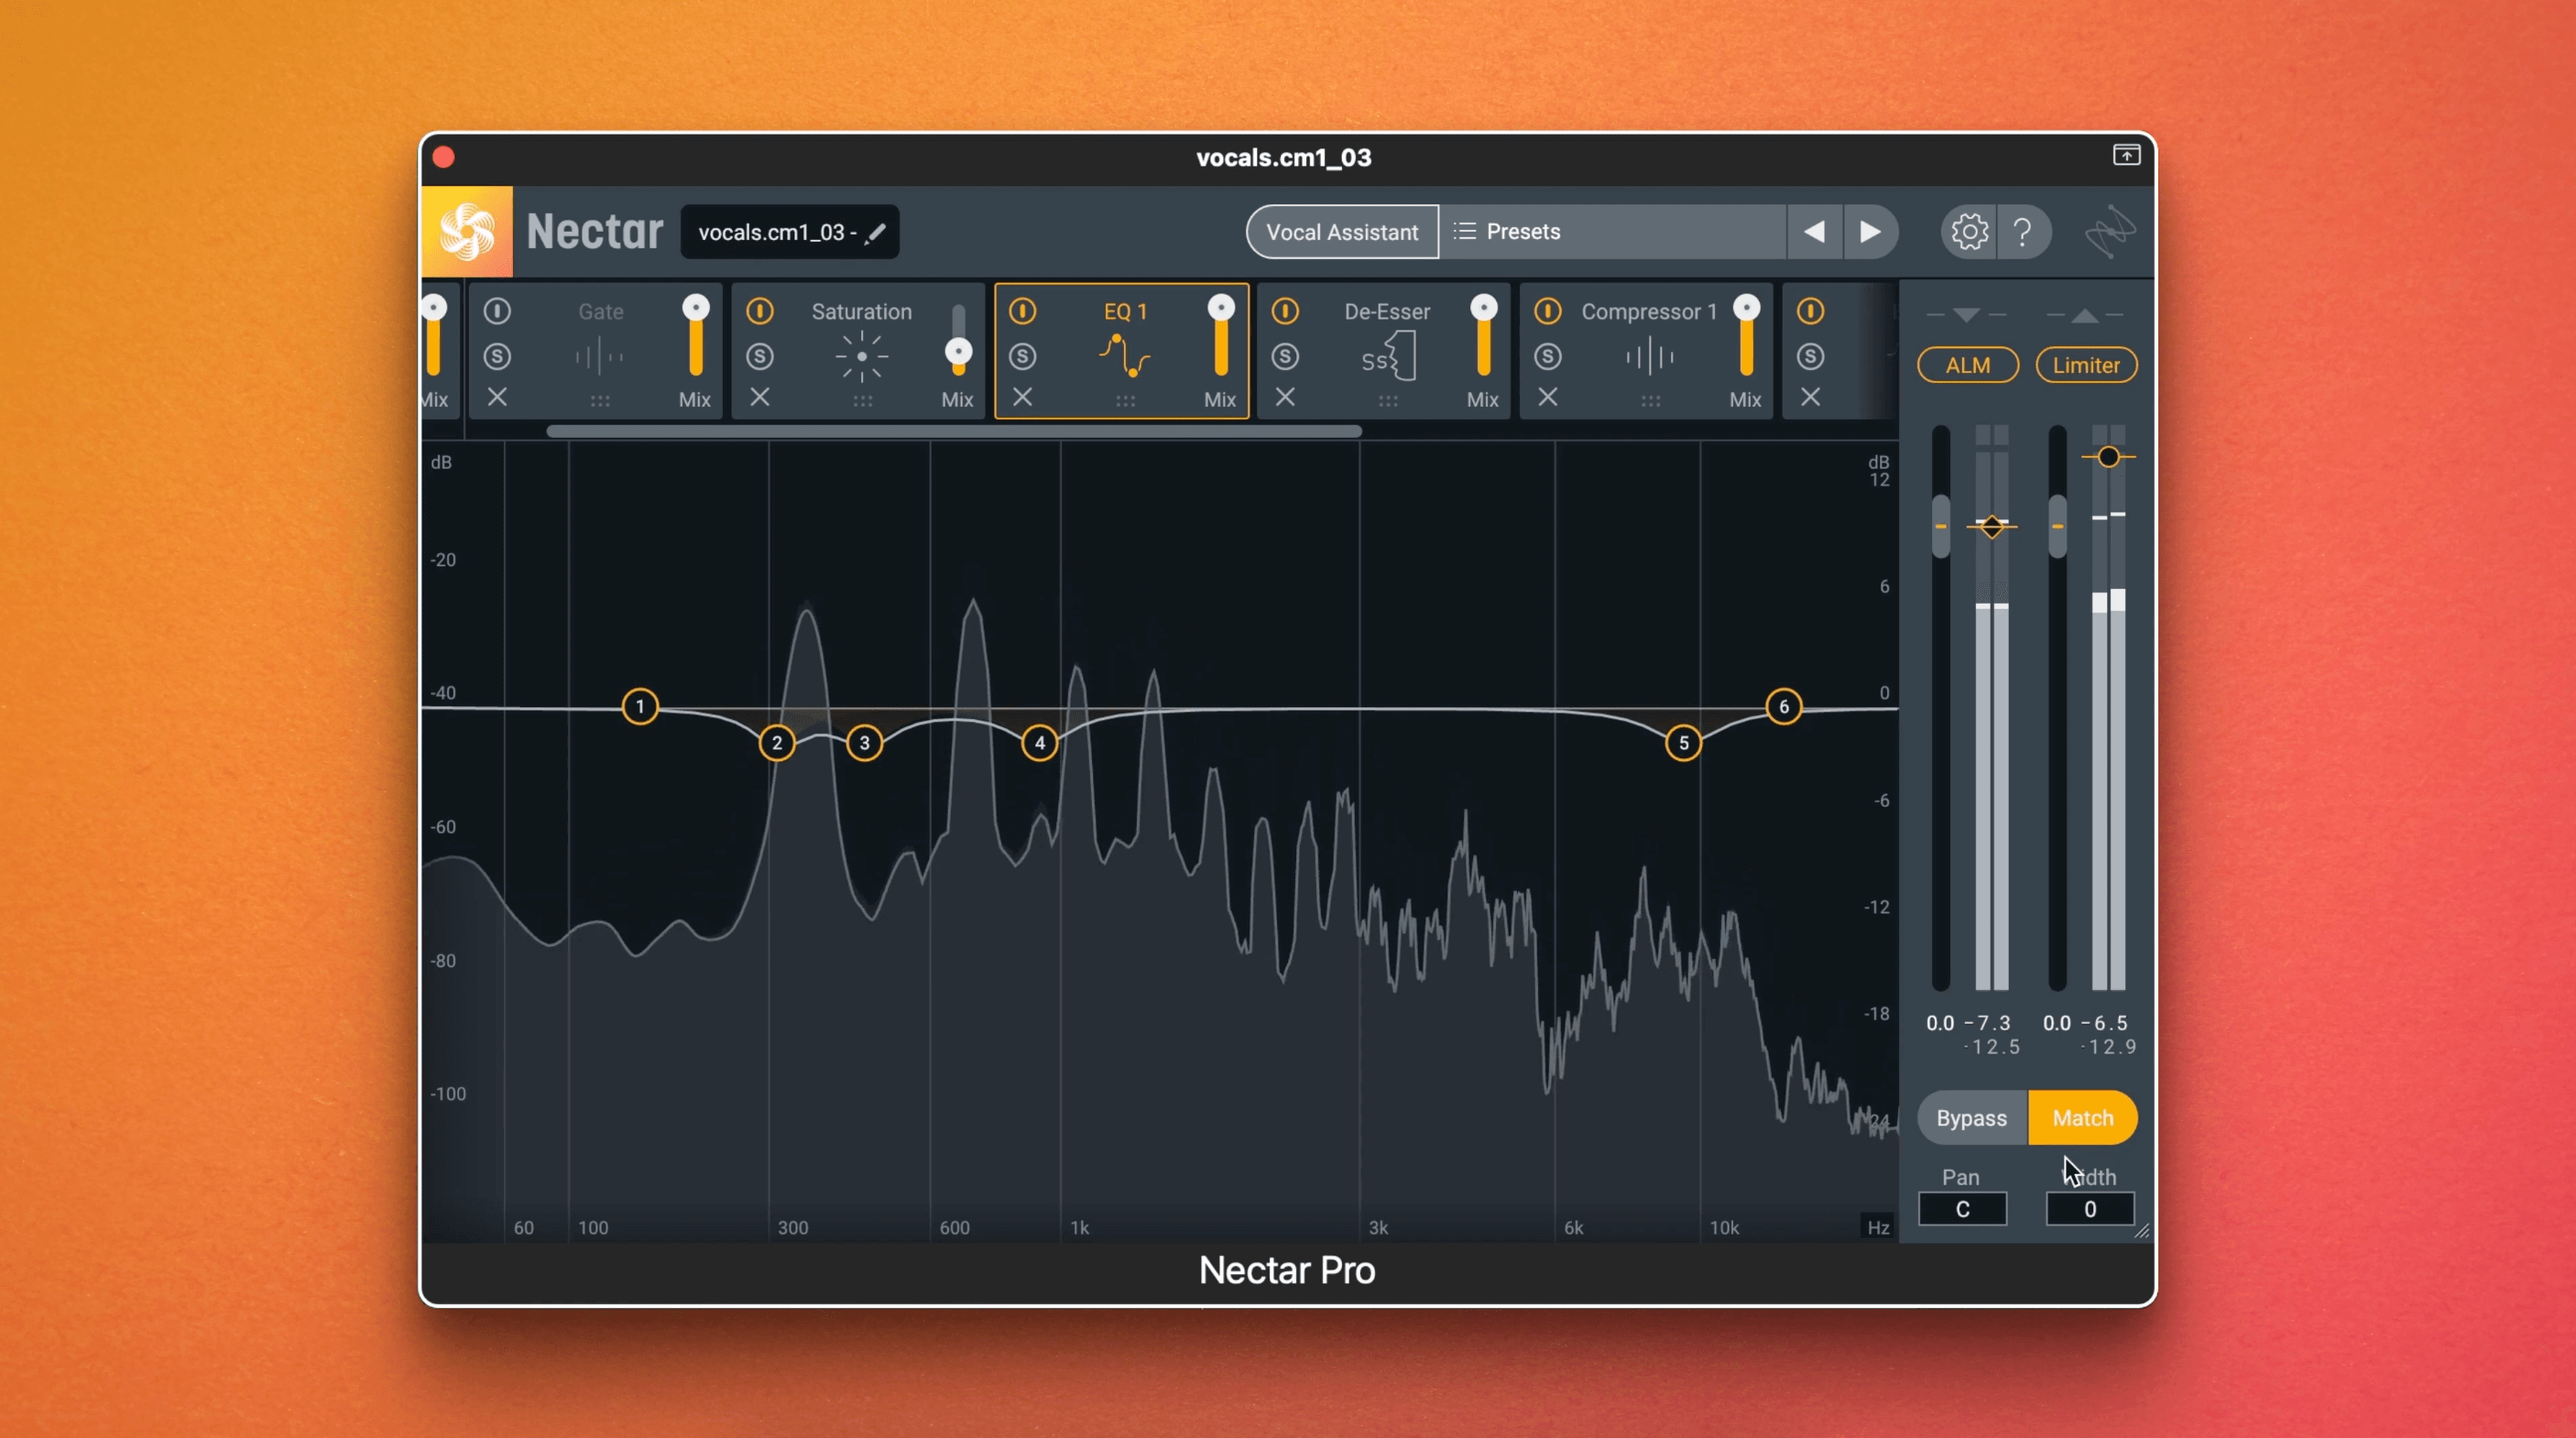
With matched output levels, you can make more objective decisions about what's contributing to your great vocal sounds.
Start mixing vocals with these hidden features in Nectar
Now that you’ve discovered the hidden features of


Nectar Pro

