Audio Mixing: 10 Hidden Features in Neutron
Looking for ways to improve your audio mixing workflow? Learn about these 10 “hidden” features in iZotope’s Neutron Pro that can help you get a better sound when mixing music and dialogue, or editing audio for post production.


Neutron


Ozone Advanced
This article references a previous version of Neutron. Learn about 

Neutron 5
Want to follow along as you learn about these new features? Start your free trial of


iZotope Music Production Suite Pro: Monthly
Looking for even more “hidden” features tutorials? Take a look at Ozone Pro, Nectar Pro, and RX Pro for Music’s hidden or lesser known workflows.
1. Unlock the power of Neutron’s Masking Meter
For longtime users of Neutron, the Masking Meter is perhaps no surprise. However, there’s still heaps of people who know a little about it, but not enough to truly take advantage of its power. So let’s break down how to find it in Neutron and how it can help you in your next mix.
When Neutron is used on two or more tracks in your DAW, Masking Meter uses inter-plugin communication to show you areas in the EQ where one track clashes with another. You can use the Masking Meter between two individual tracks, an individual track and a bus, between two buses, the choice is yours.
Once you’ve got two Neutron plug-ins set up, you’ll spot the Masking Meter icon.
Masking meter location in Neutron
When you click the dropdown menu, Neutron will look for other iZotope plug-ins in your session. To keep things simple, I’ve placed another Neutron on the bass track, so it populates for me here in this menu.
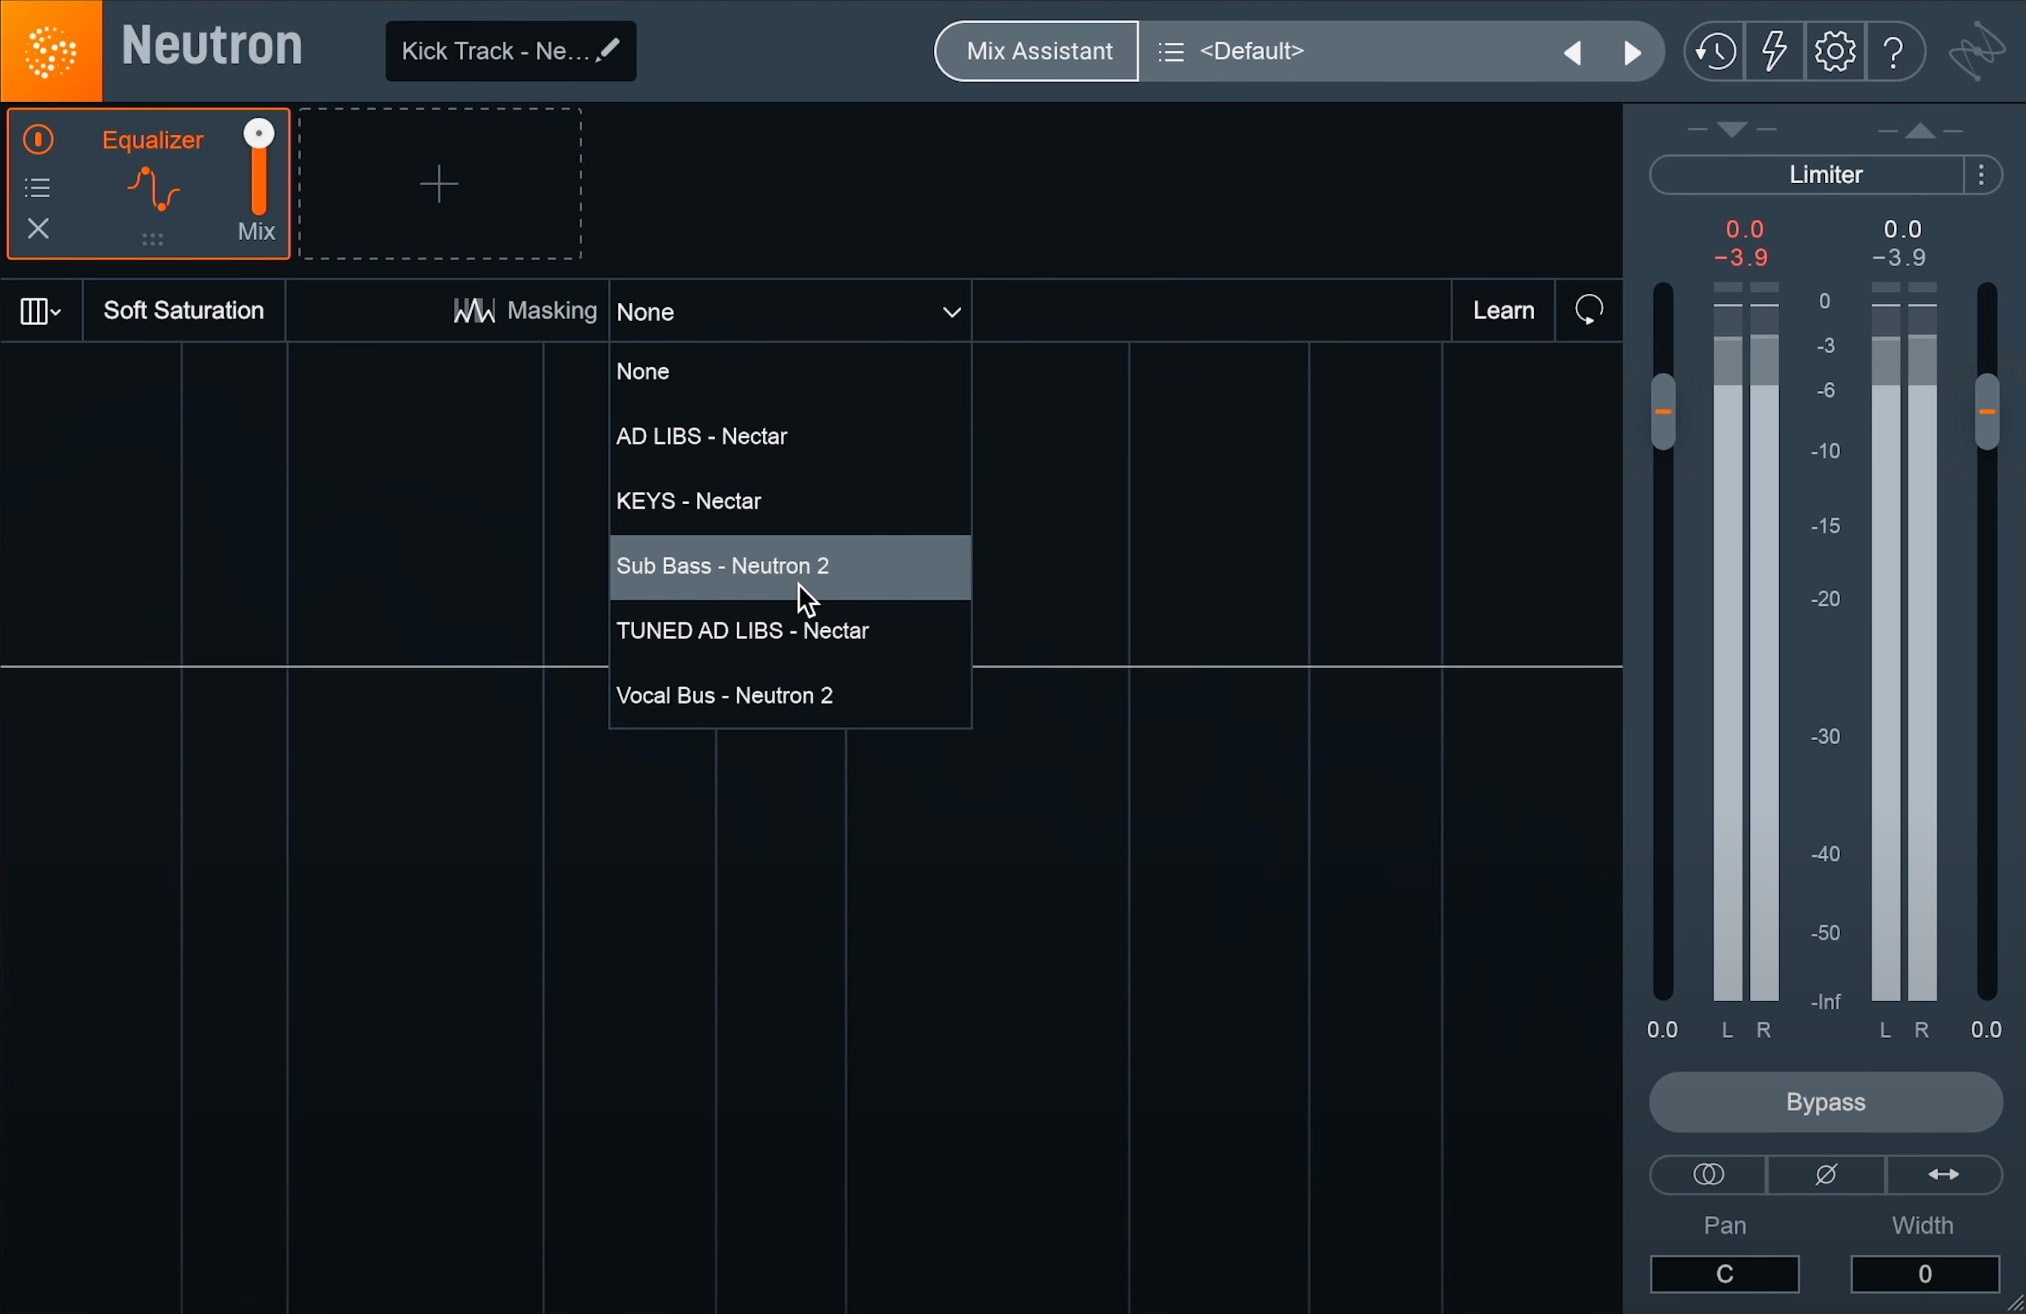
Neutron will look for other iZotope plug-ins in your session, and you can select them from the dropdown menu
By clicking on that track, the interface of the EQ changes and we can see some new controls. At the bottom of the EQ window, we have two tabs. The first represents the Neutron we’re currently using, and the second represents the Neutron on the other track.
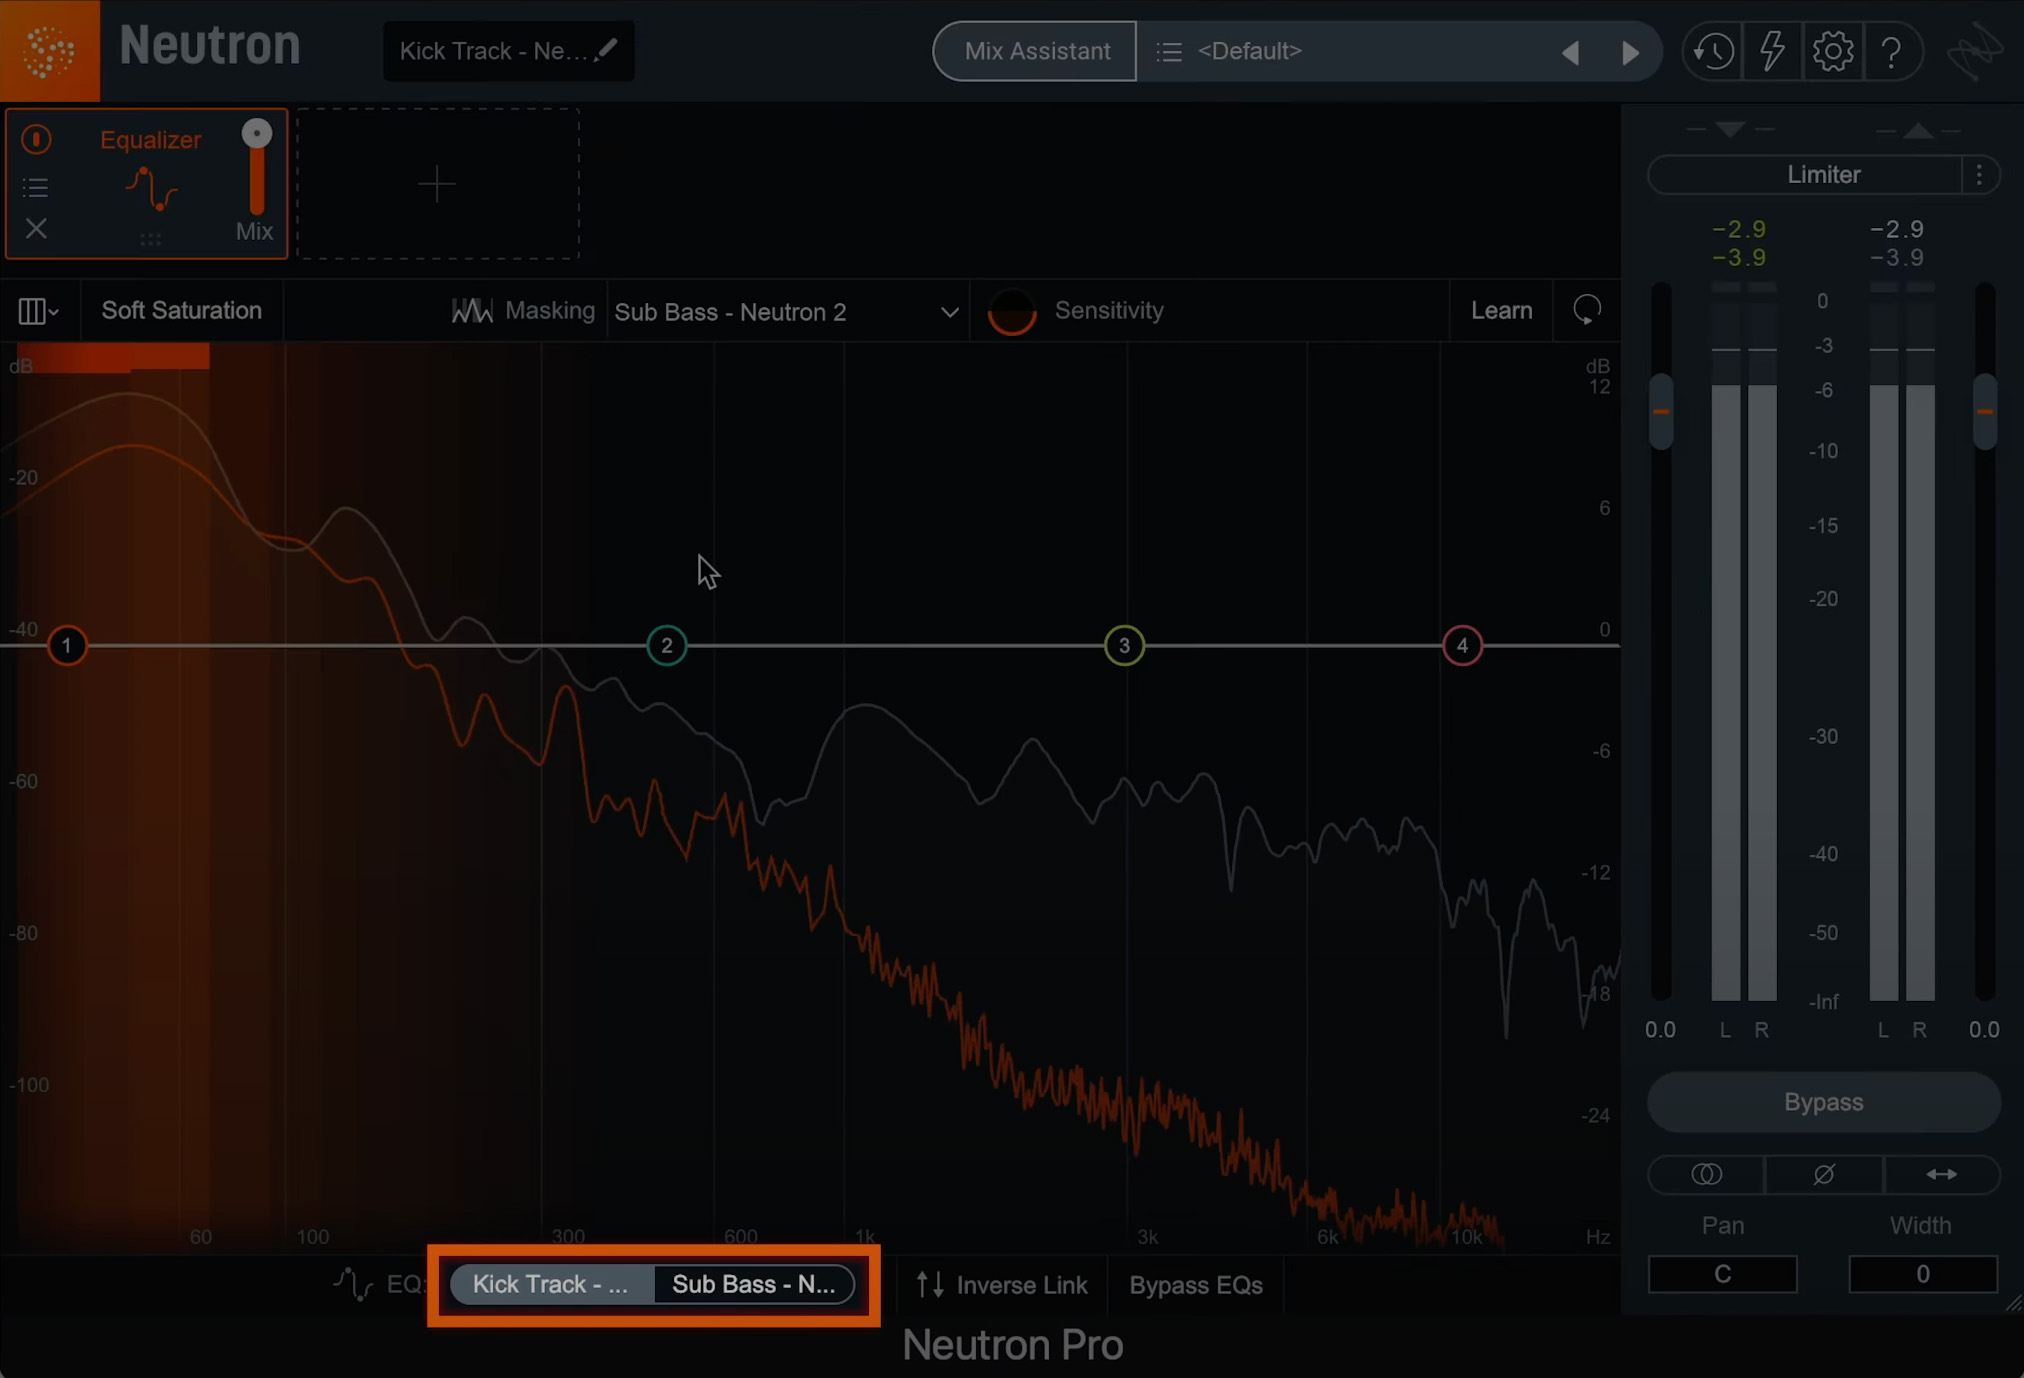
You can select the different tabs to unmask the different tracks in Neutron
We’re also seeing some new elements in the plug-in. The orange trace represents the frequency energy of the track on the other Neutron. The intermittent orange flashes represent where masking might be occurring between my two tracks.
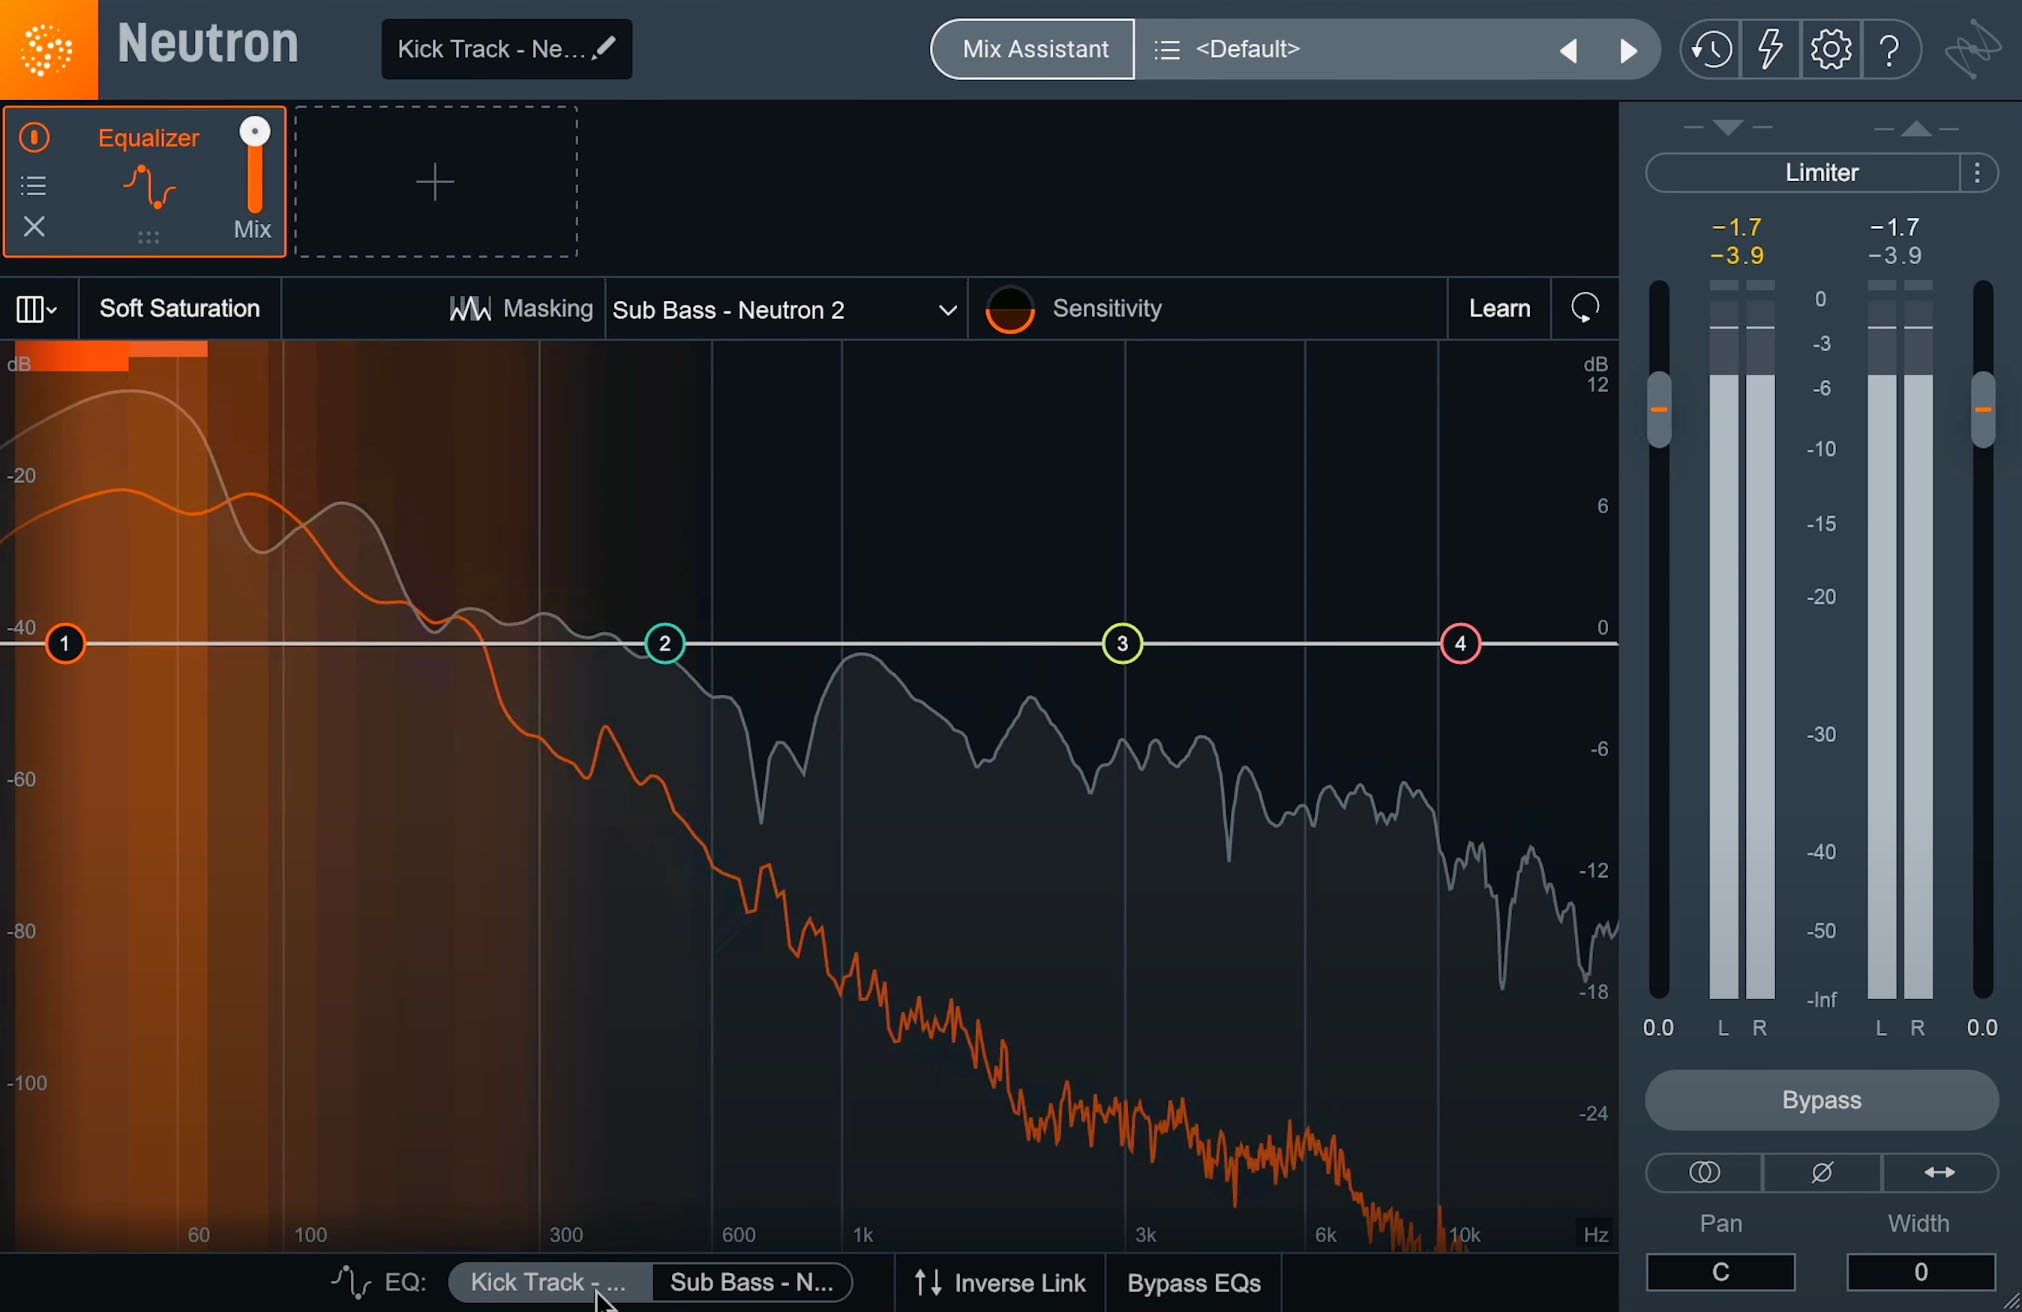
The orange flashing represents where masking might be occurring between the two tracks
If I want even more help perceiving masking, I can increase the sensitivity. Now these pink columns will emerge, giving me a histogram of masking over time.
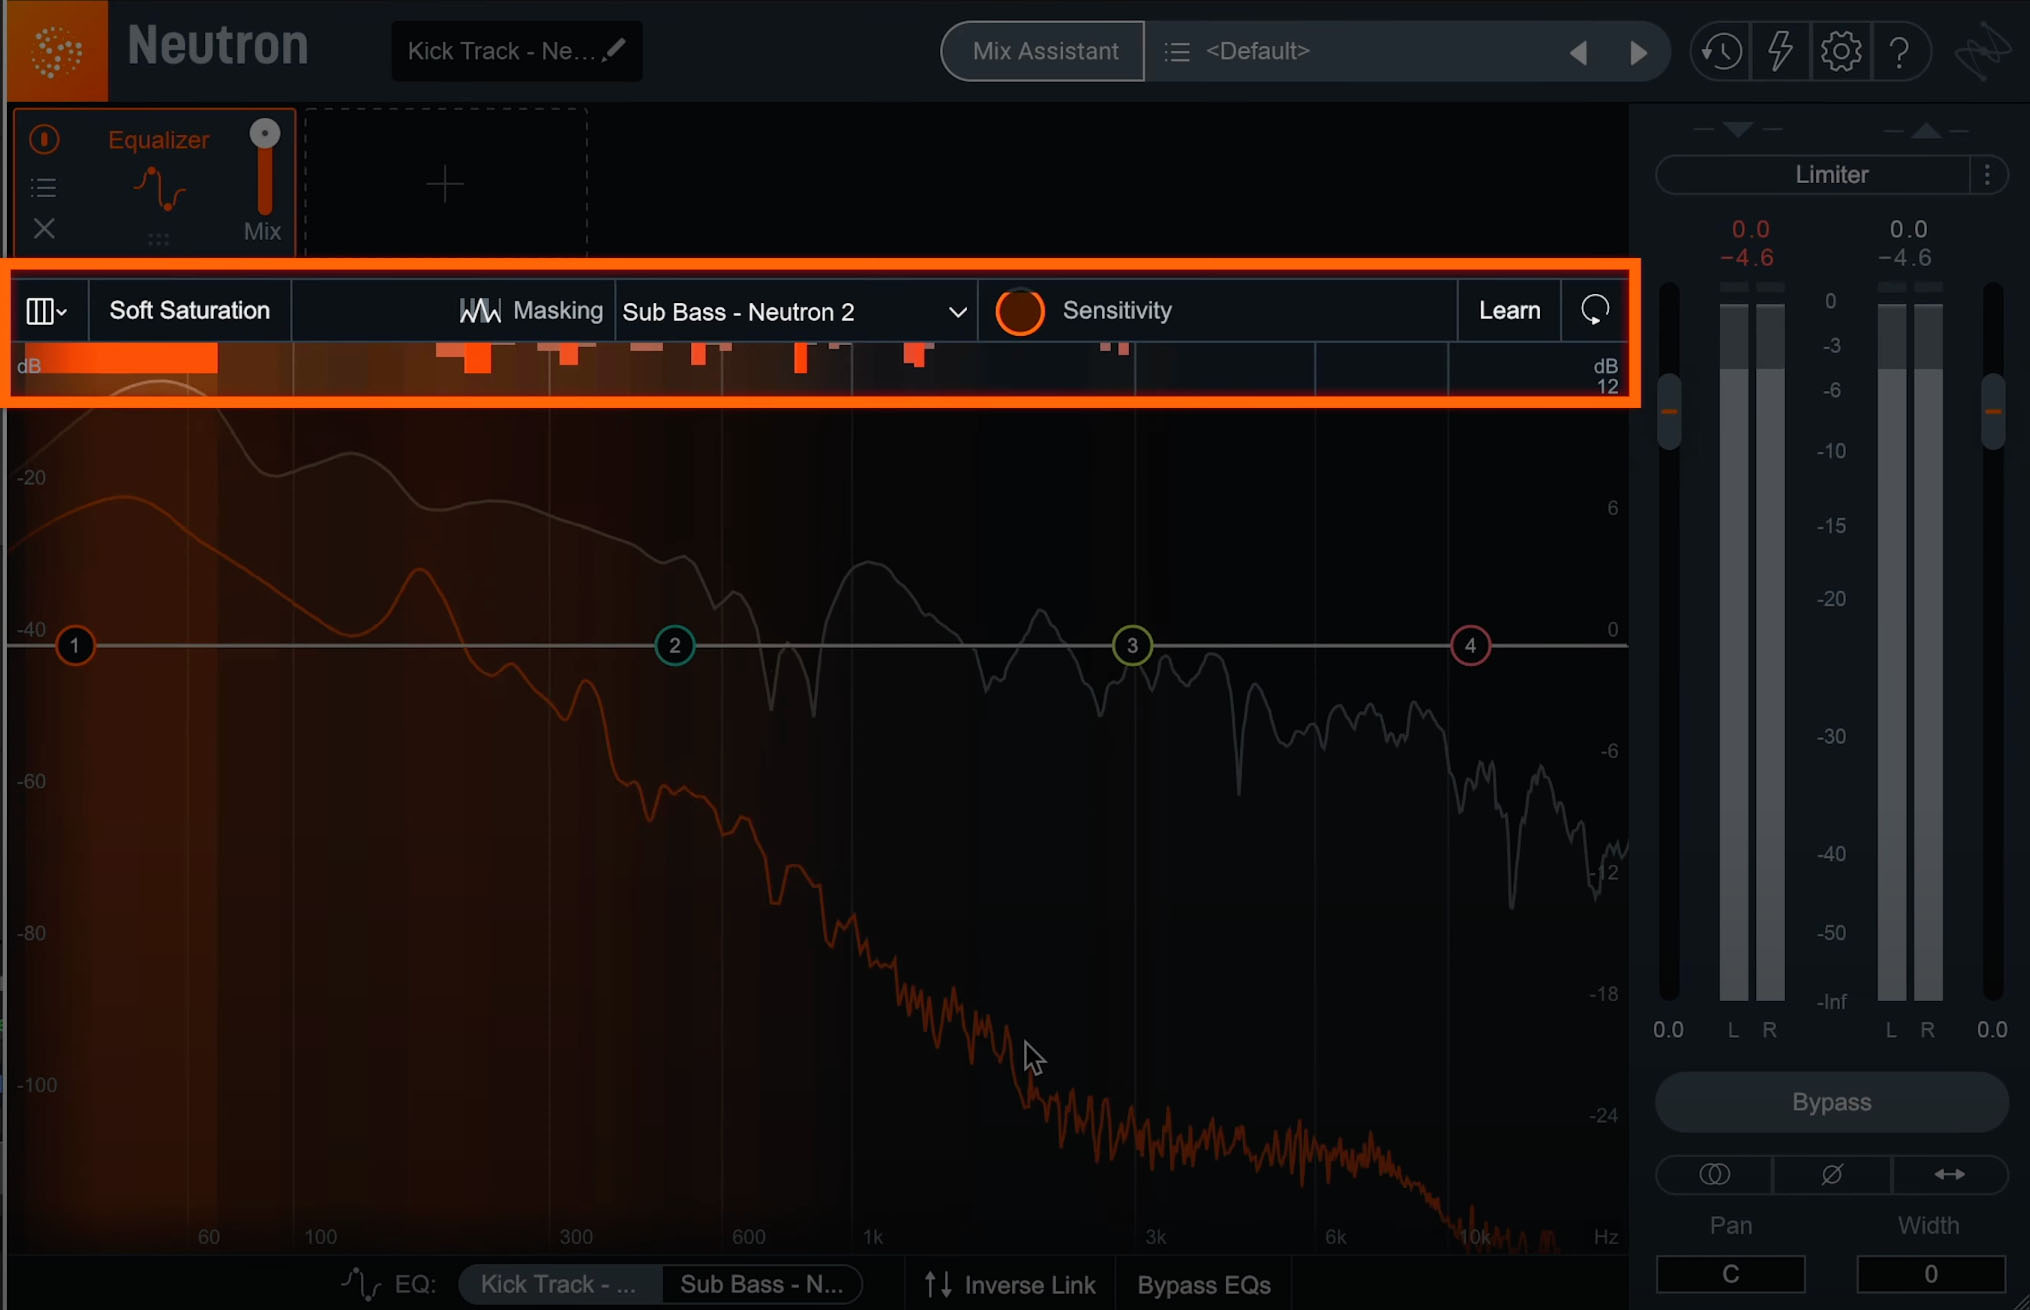
Increase the sensitivity level to see a histogram of the masking over time
Now that we understand what we’re seeing, we can take action. Based on where these flashes show up, I can decide to cut energy out of one track so that the other track isn’t clashing with it in that particular energy range.
Let’s say I want to remove energy from the corresponding track so it doesn’t interfere with the intelligibility of my main kick track. Thanks to inter-plug-in communication, I don’t have to open up the other Neutron’s EQ. That’s because I can tab over to the bottom of the current instance of Neutron, and make that dip. It might look like I'm performing this cut on the kick track, but I’m actually remote controlling the bass track’s EQ, all from the main EQ on my kick track.
To prove it, we can open up the kick track’s EQ and you can see how that dip carried over. In fact, as I make more moves you can see that I’m remote controlling the bass tracks EQ.
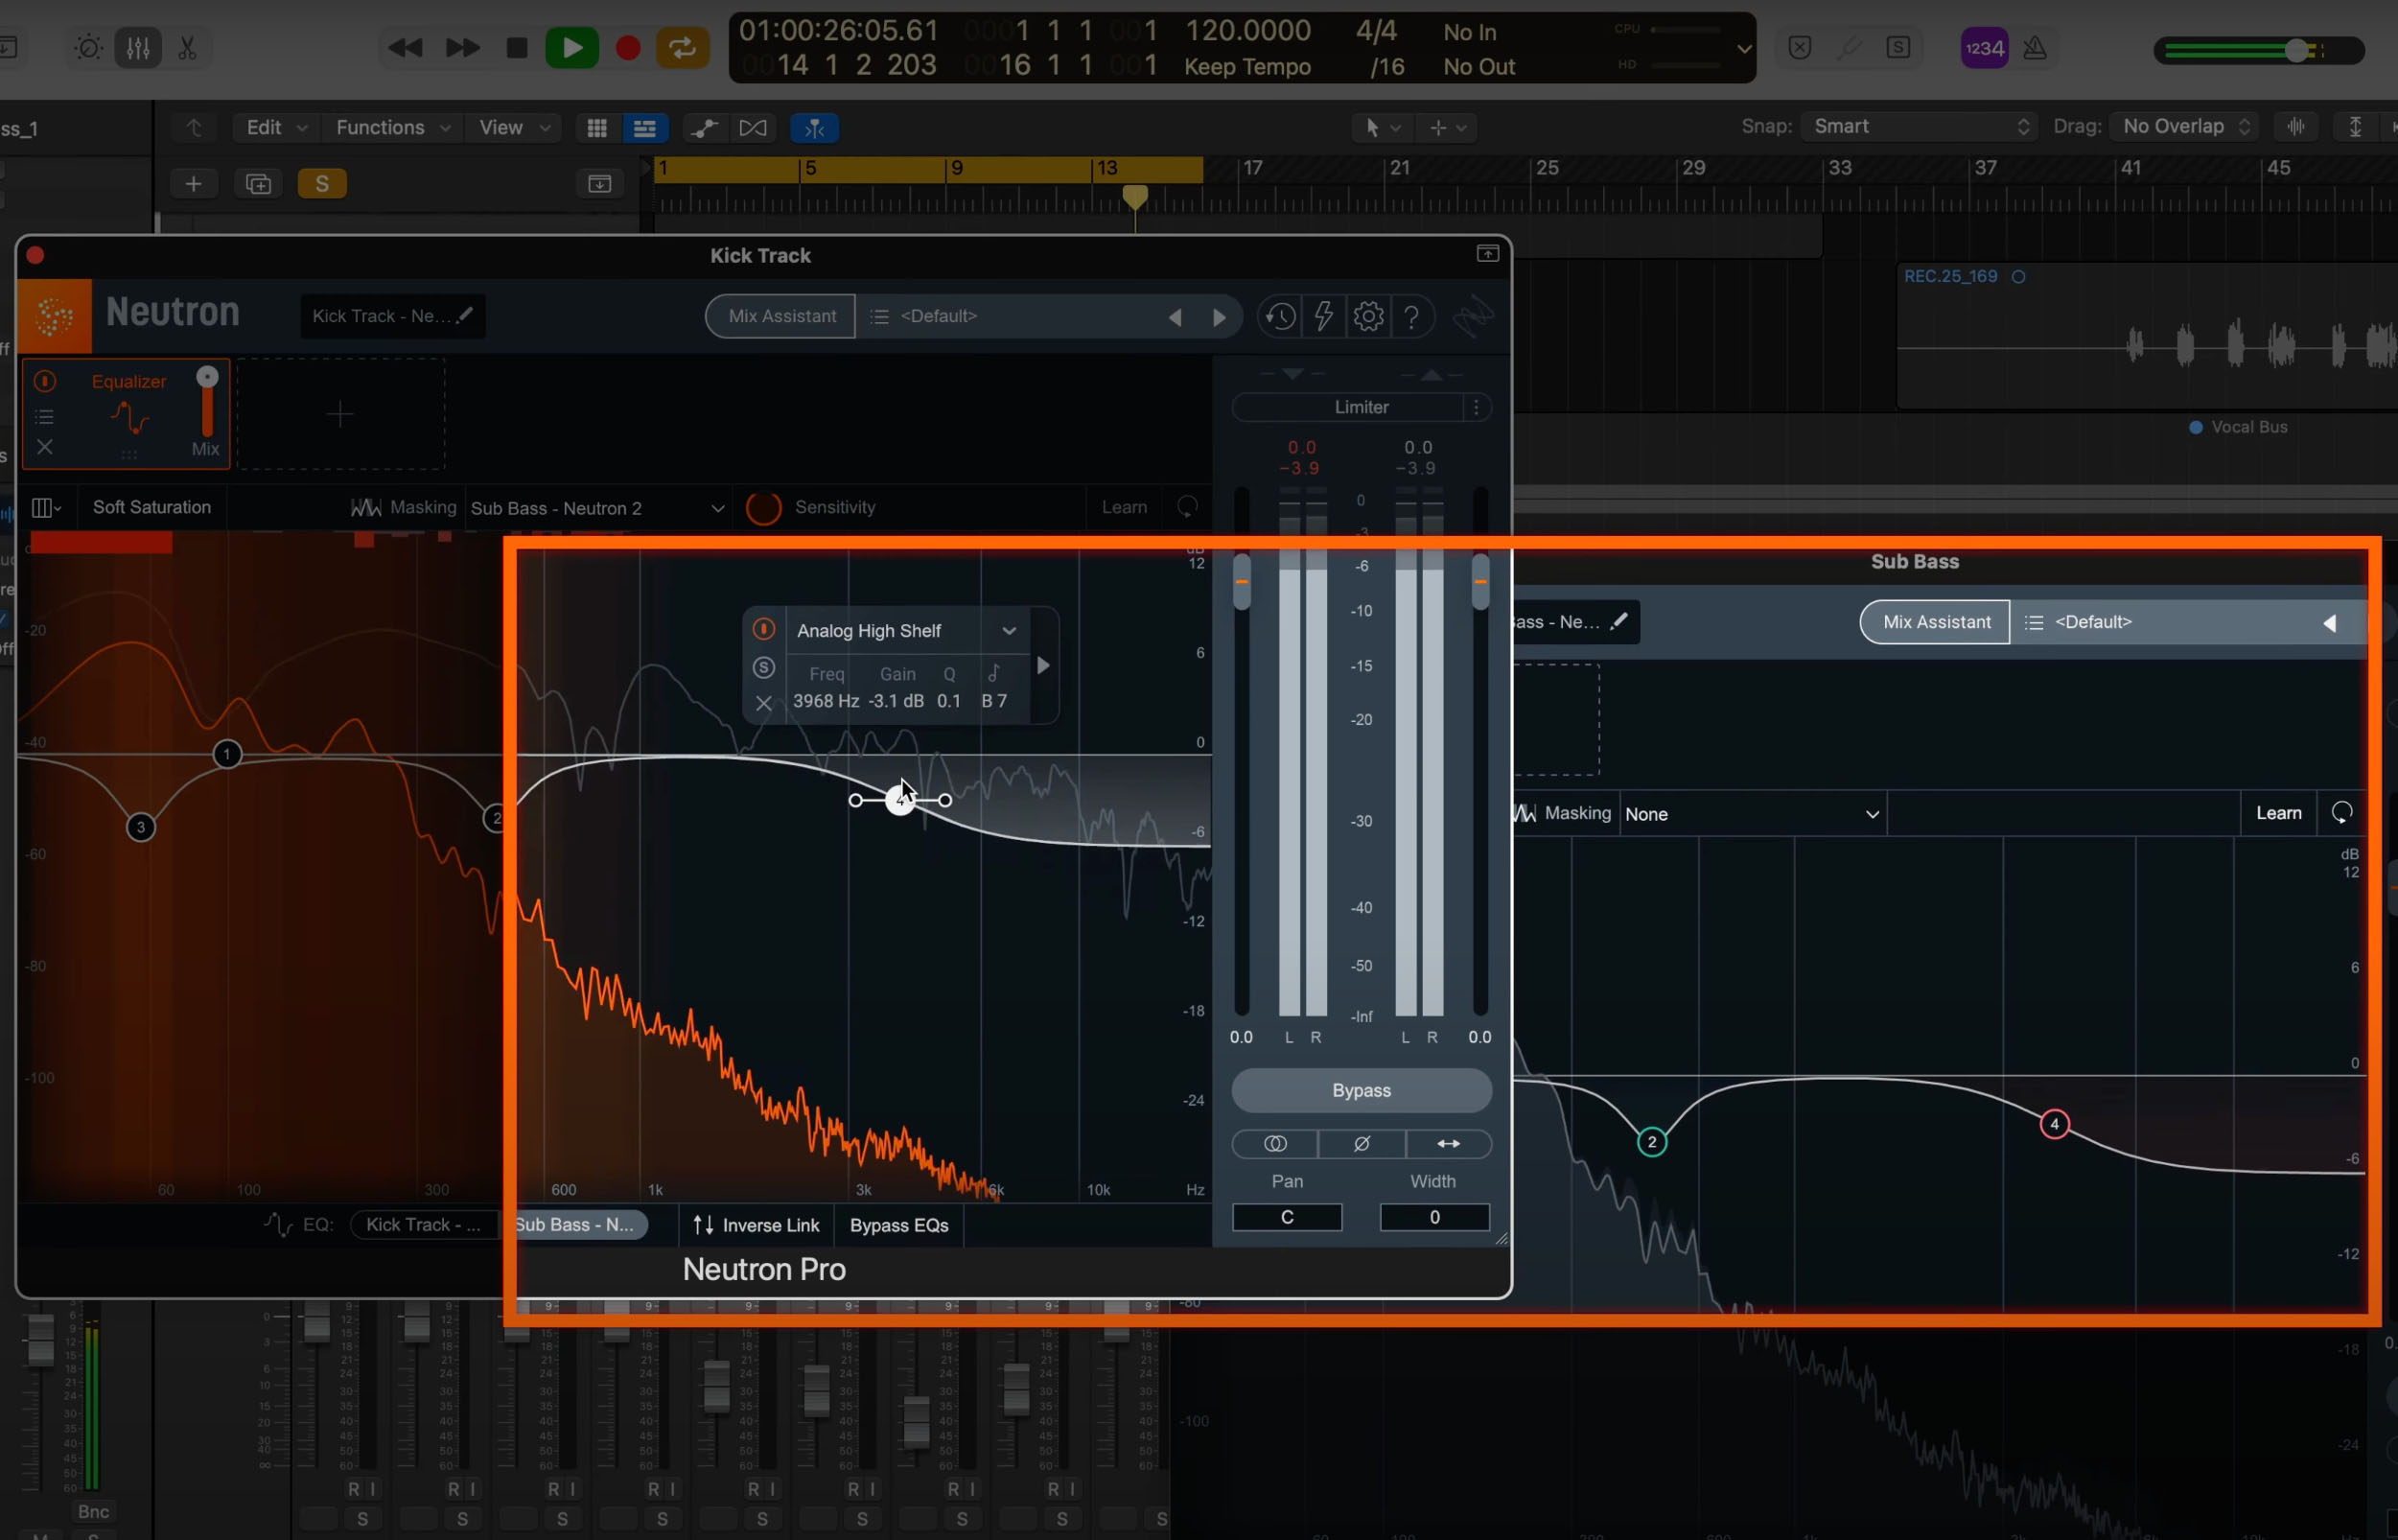
Remote controlling the bass track EQ with inter-plug-in communication
If you want to make specific boosts and cuts you can use the inverse link, which will cause a boost on one track to trigger a cut on the corresponding track in that specific area.
You can always use the bypass EQ to see what effect your EQ masking work has had on your mix by toggling it on and off.
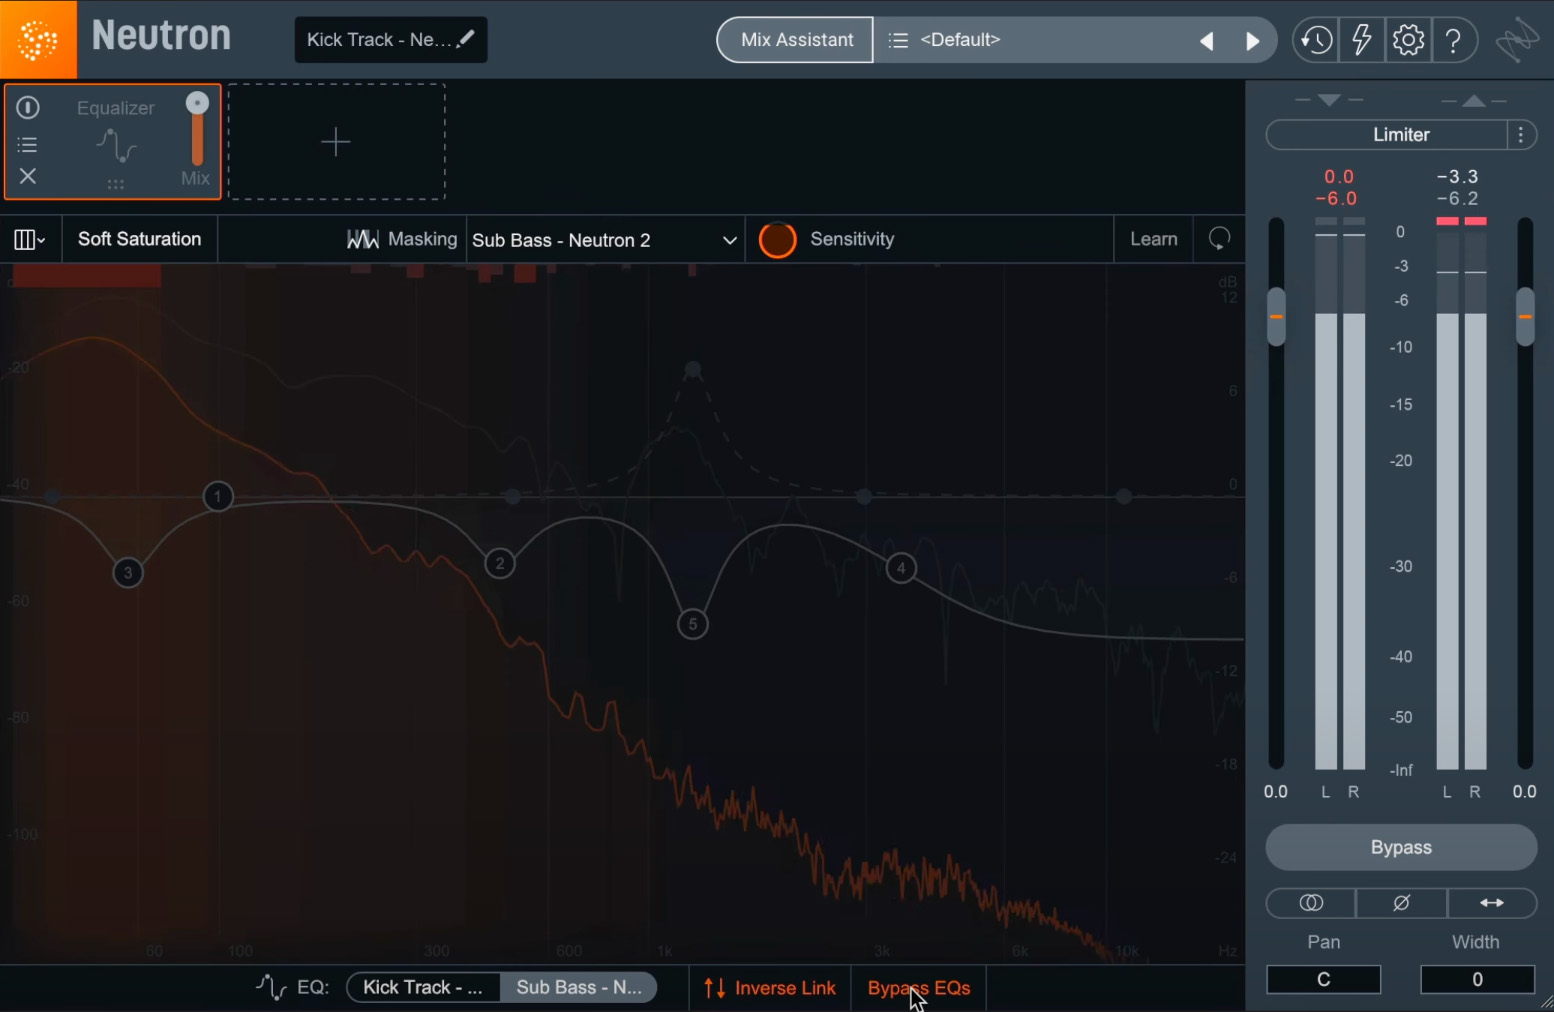
Use the bypass feature to see what effect your EQ masking work has had on your mix
By helping you to quickly find and remove these clashes, Masking Meter gets you to a balanced mix faster than ever.
2. Add analogue warmth with Soft Saturation
The EQ in Neutron is a powerful module. There’s dynamic bands, sidechaining capabilities, unmasking and more. But one of the lesser known features is the Soft Saturation tool, which is there to give you access to analogue warmth when you need it.
Soft Saturation adds harmonic excitement to the signal. It’s not like the exciter, however, which tries to emulate tubes, tape, and other sounds. This excitement is fashioned on a classic British console equalizer, which means to expect a delicate helping of sonic enhancement. Consider enabling it to add even more warmth to the bassline, or tone to a rhythm guitar.
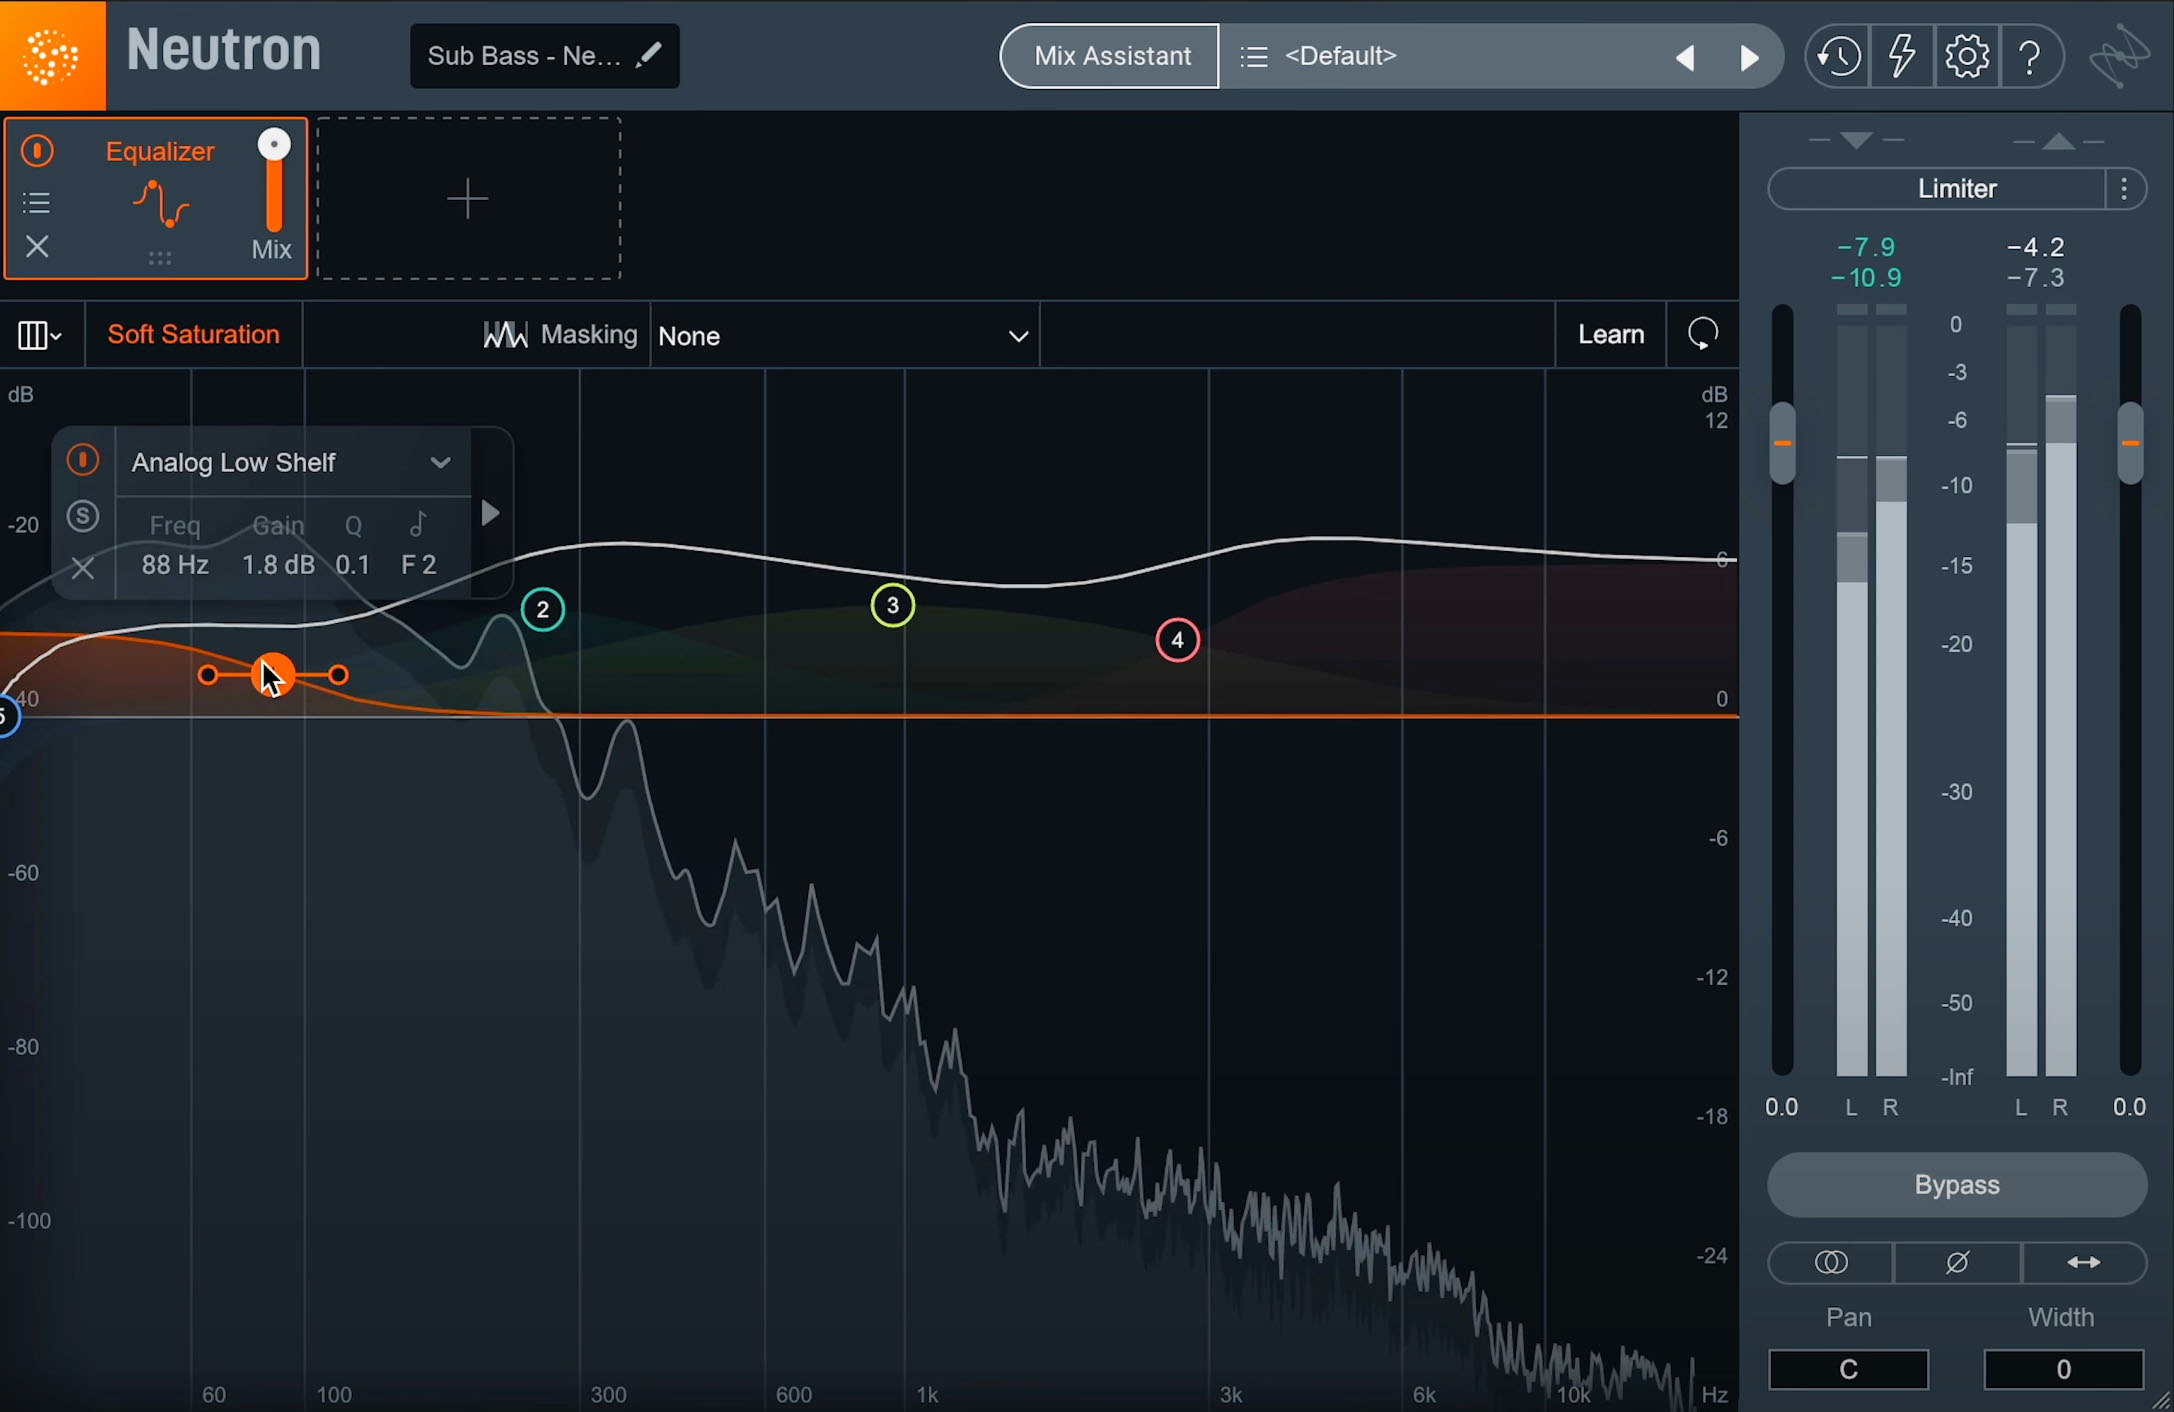
Use Soft Saturation in Neutron to add analogue warmth to your tracks
Ideally, to get the best of soft saturation you’ll want to be making more boosts than cuts, and you can always toggle the icon on and off to hear the difference that soft saturation imparts on a mix.
3. Use EQ Learn to get help with subtractive EQ
iZotope tools have always been assistive in nature. Our compressors and EQs offer rich, vibrant visuals that allow you to see what you’re compressing or EQing in real time against spectral information. Our AI-powered assistants listen, and then give you a great starting point. But did you know that there's a micro assistant built into the EQ to help you with your subtractive EQ work?
EQ Learn helps you quickly locate frequency areas of interest, such as harshness, resonance, and more so you know where to start cutting.
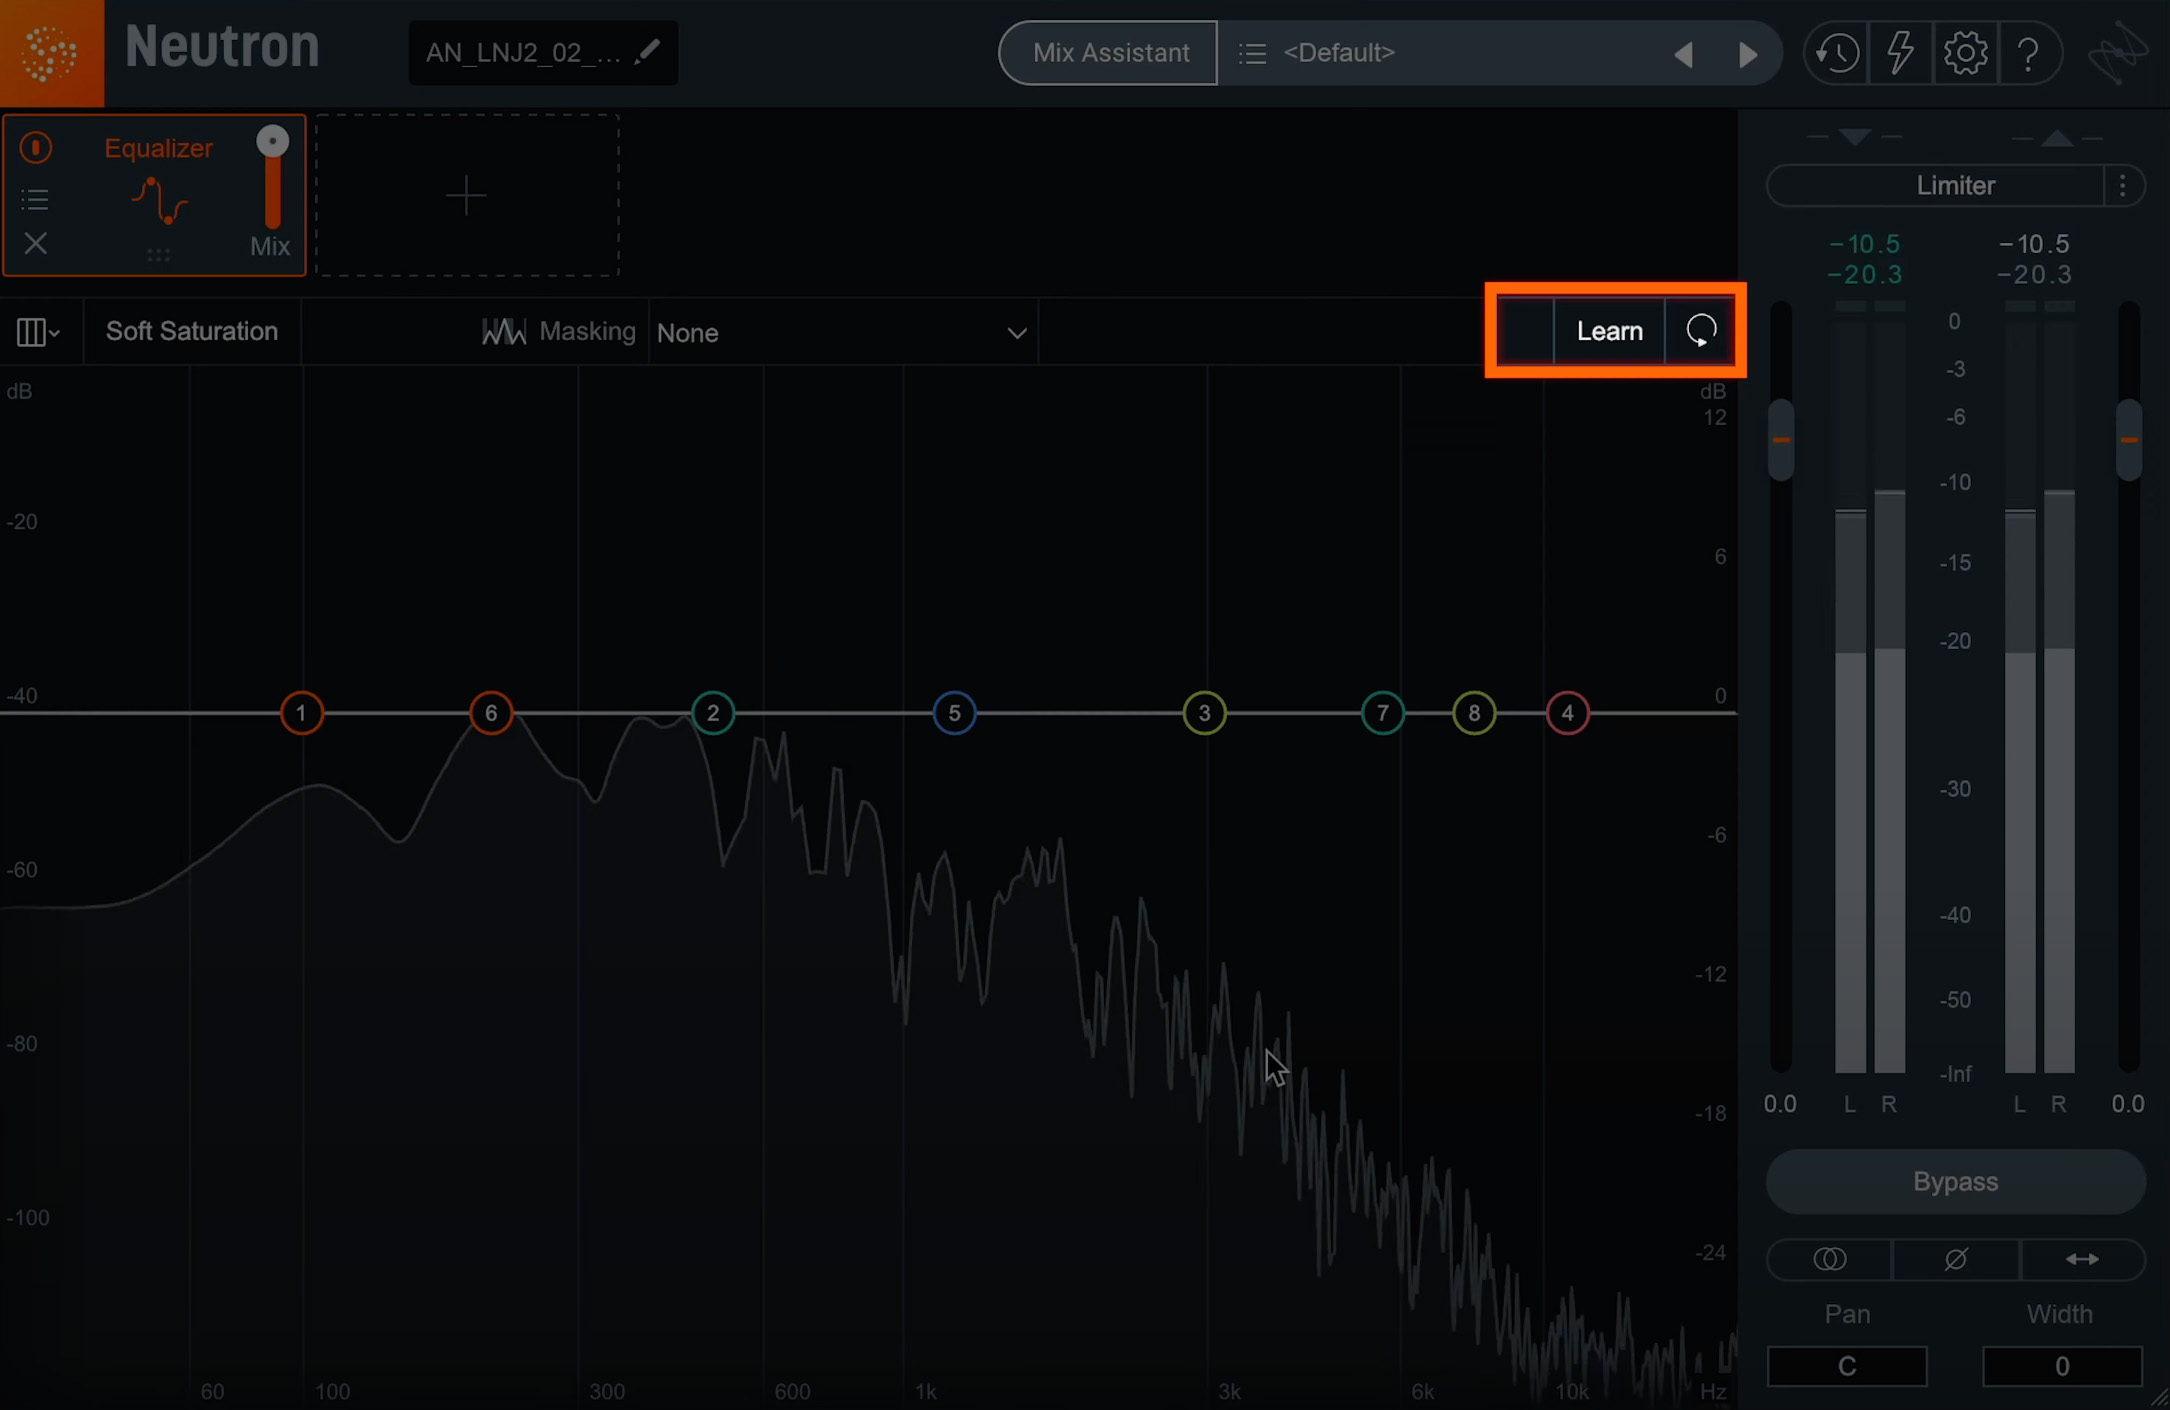
Toggle EQ learn to get help with subtractive EQ
To get the learning process started, make sure some audio is playing on a track you’re going to EQ, then press the EQ Learn toggle. Now, you’ll see the nodes move around as they listen for areas of sonic importance. After some time, they’ll settle and you can consider their resting spots as places you might want to cut by pulling down the node in static or dynamic mode.
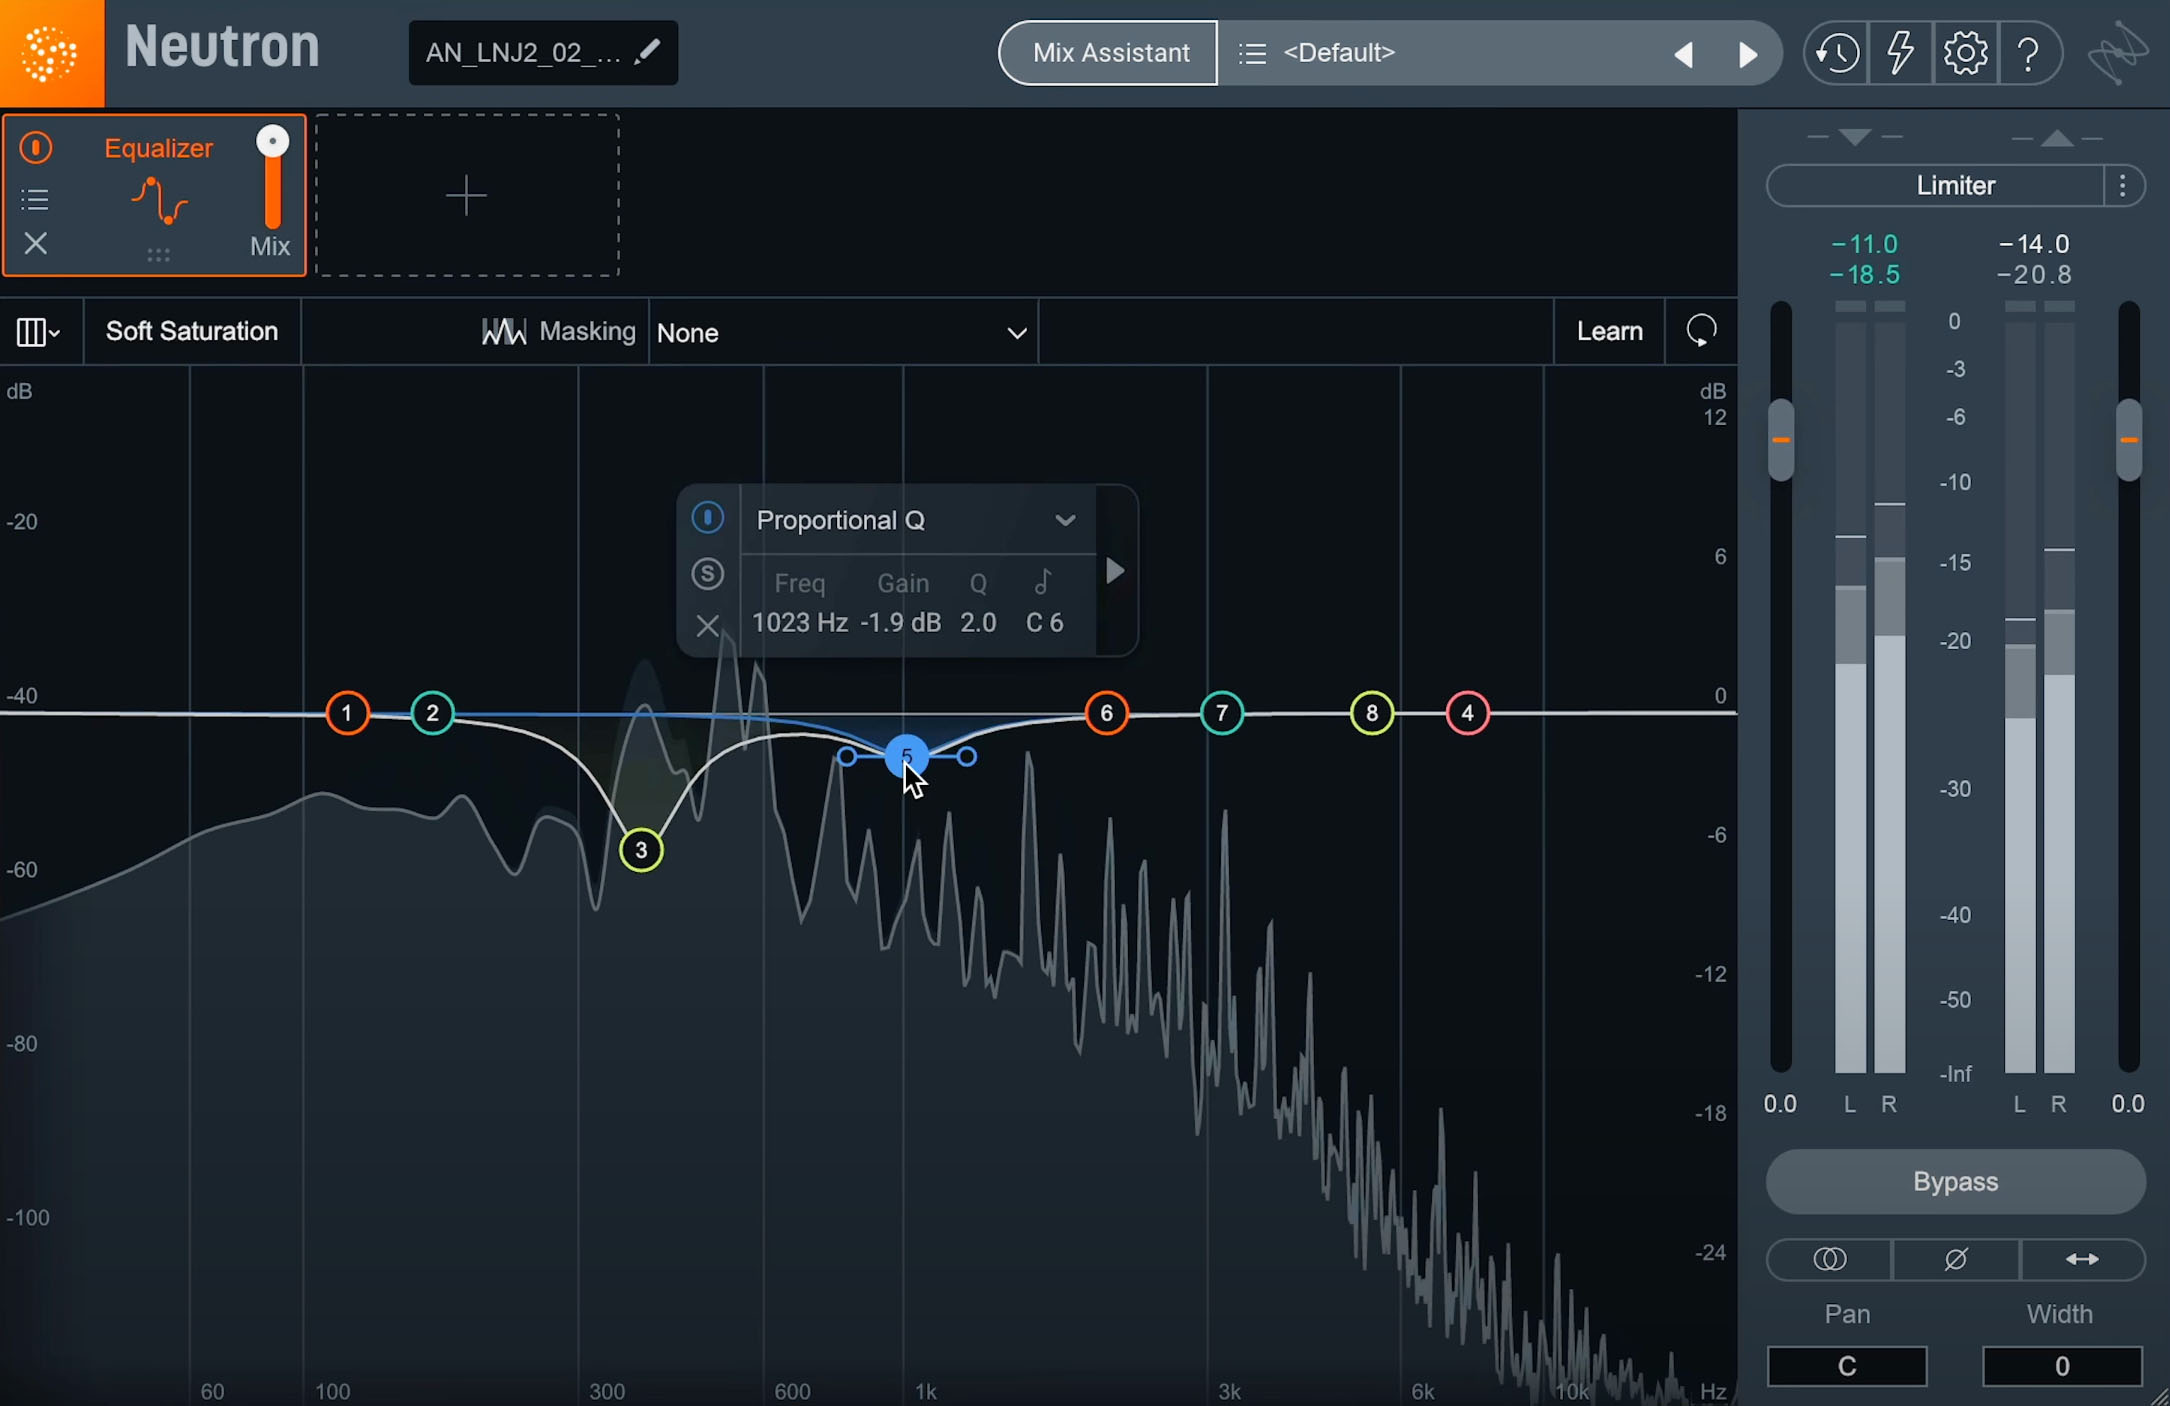
The resting places of the nodes are spots that you may want to cut the frequency
Be sure to listen back to your moves either by engaging and then disengaging the individual nodes themselves or by bypassing the module altogether. Remember, assistive tools are here to help by offering a suggestion, it’s up to you to make the final decision using your ears.
4. See your compression settings with Oscilloscope view
A relatively new feature to Neutron might have escaped your attention recently called Oscilloscope, and it offers a novel way to see how your compression settings are affecting your sound source.
You can activate the Oscilloscope view with a button at the top of Neutron’s compressor. The Oscilloscope meter appears as a scrolling visualization of a waveform. Use this view to scope the effects your compression settings are having as you make adjustments.
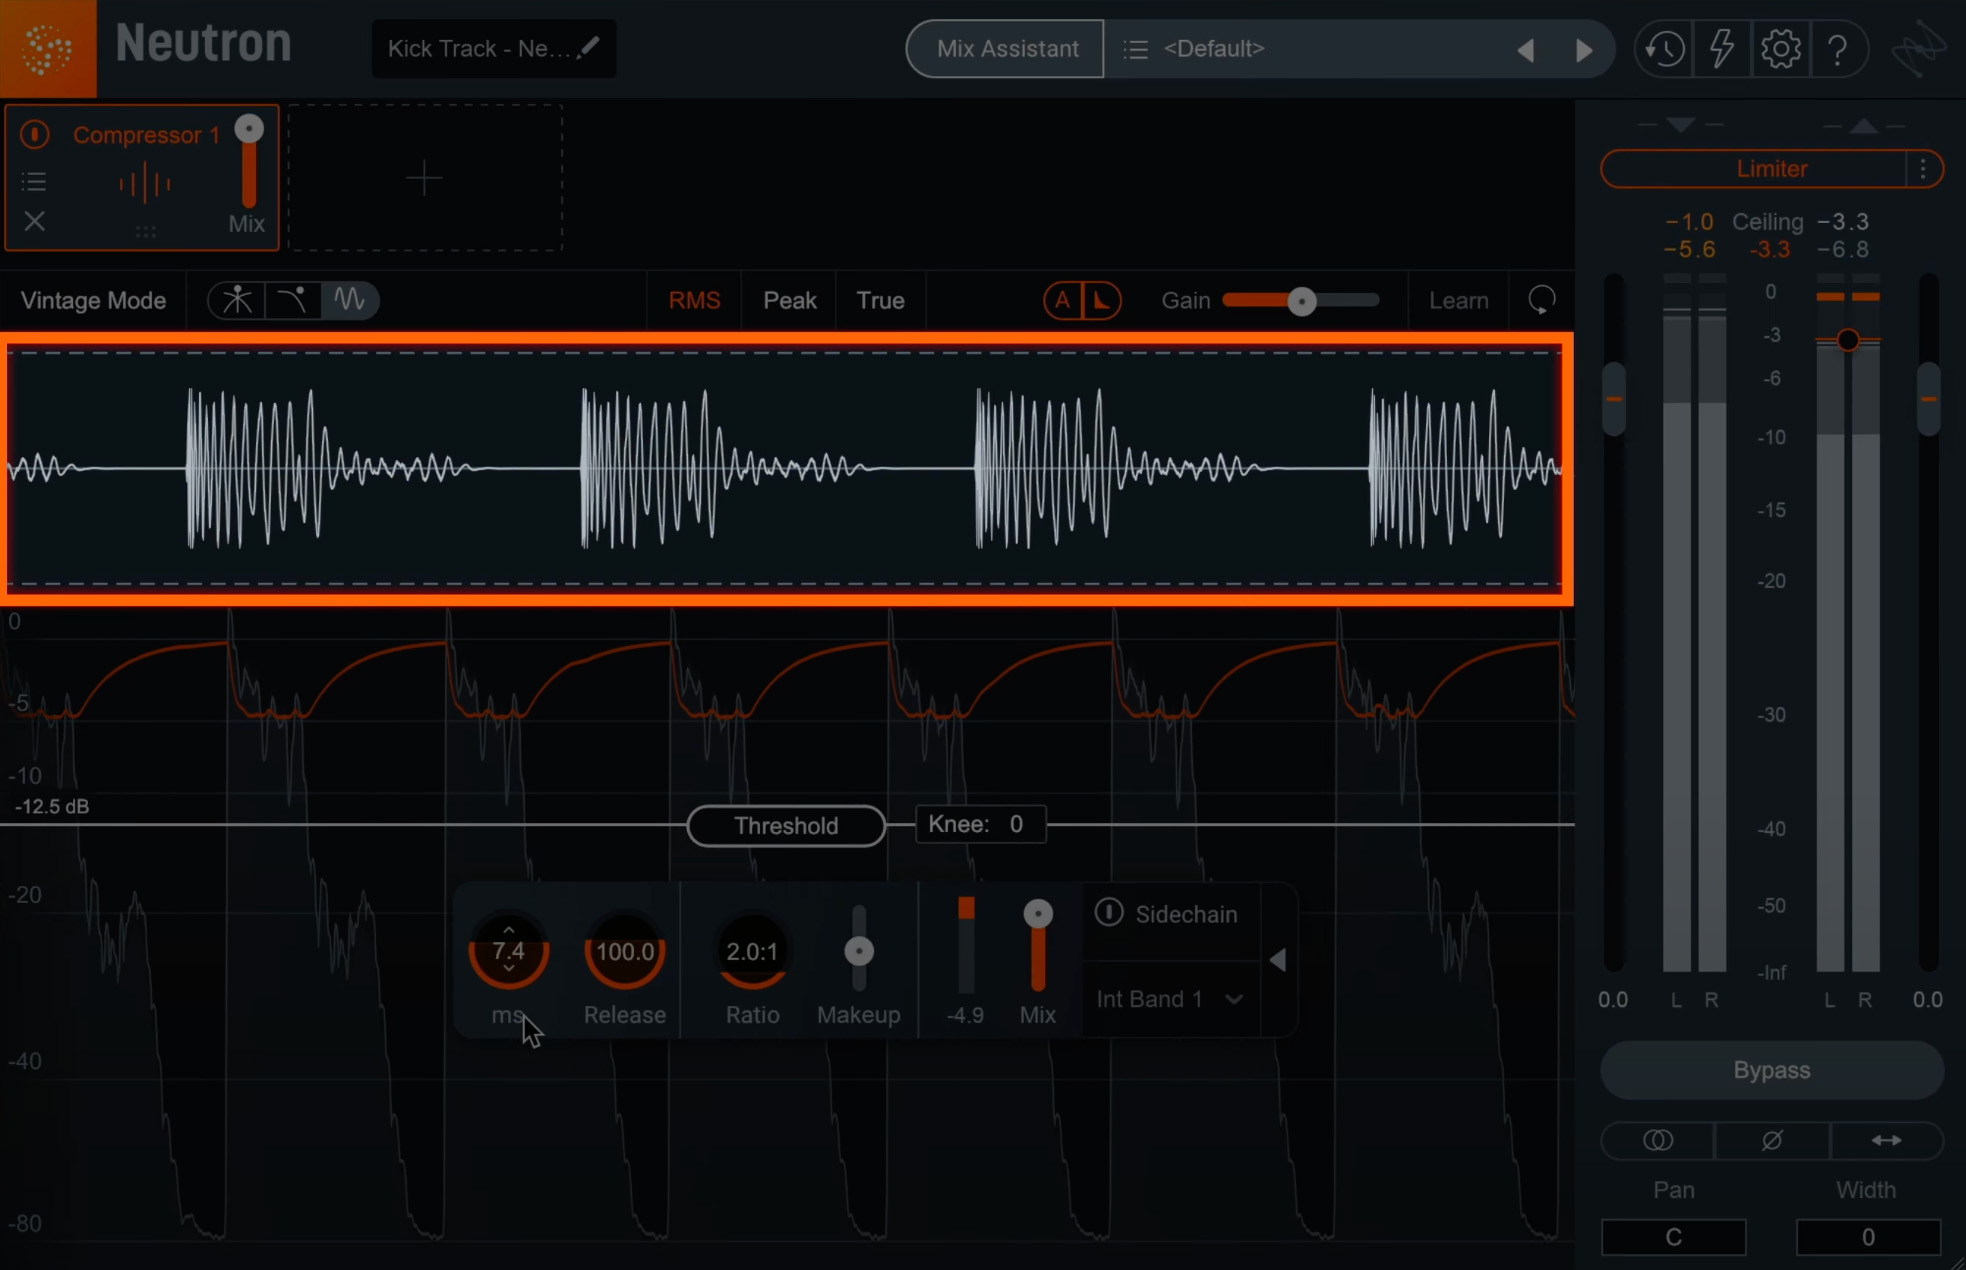
Oscilloscope appears as a scrolling visualization of a waveform
You can use it on a single sound source like a kick drum to see how your compression settings are affecting the waveform. Or you can use Oscilloscope view to dial in your perfect sidechain, as you’re better able to visualize your kick and bass together to see your compression as settings are applied to each instrument.
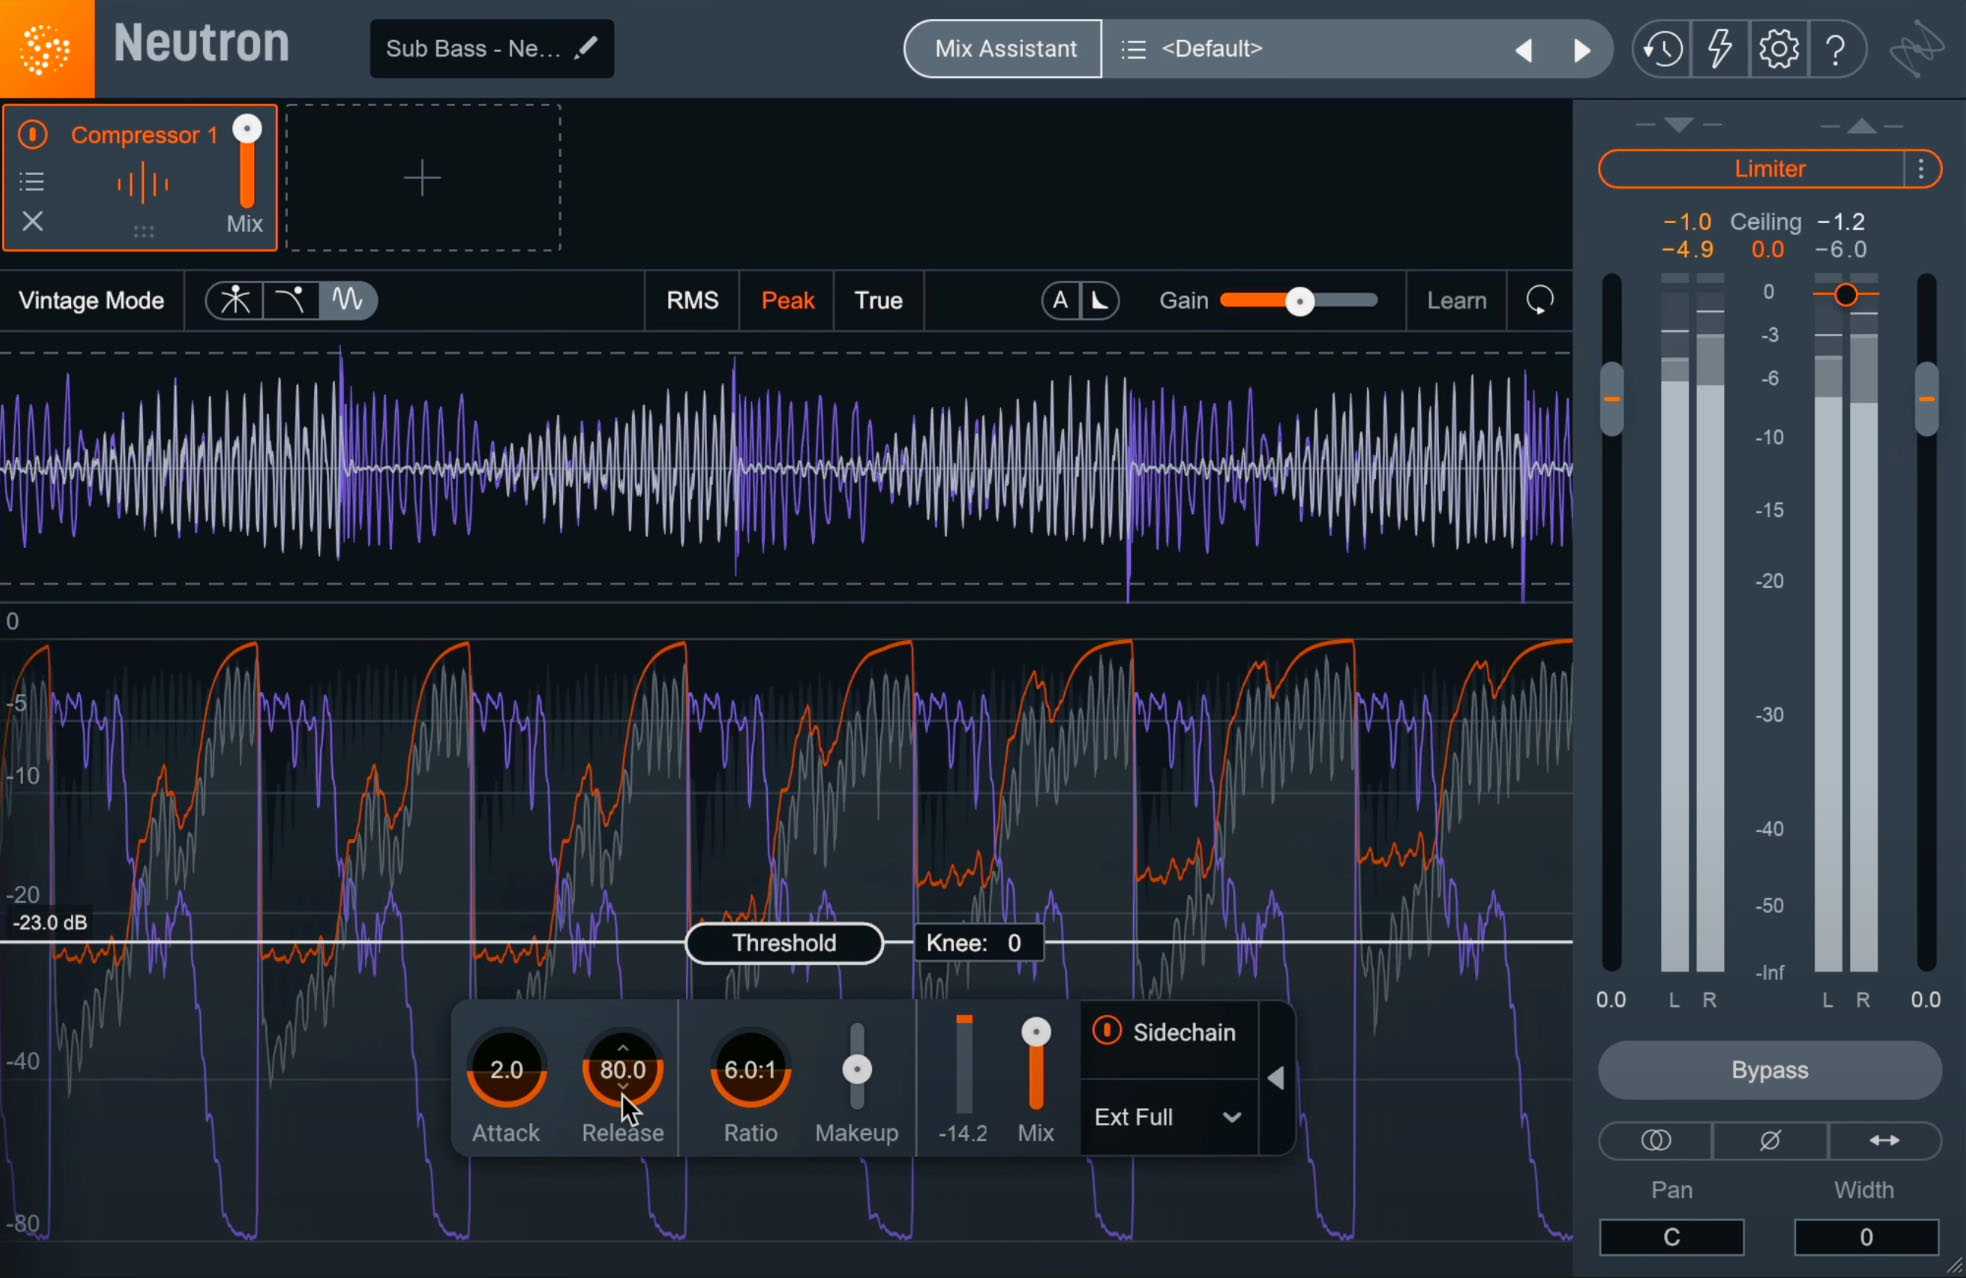
Oscilloscope view in Neutron
5. Sculpt your sound with range selectors
Sculptor is a powerful combination of equalization and compression technology that come together in a process known as spectral shaping, allowing you to sculpt your sound source toward an ideal profile of itself so you can better slot it into a mix. But there are additional features to Sculptor that many people miss.
To get started with Sculptor, just instantiate it on the source source you’re working on, go to the profile that matches your source, and then adjust the parameters to taste.
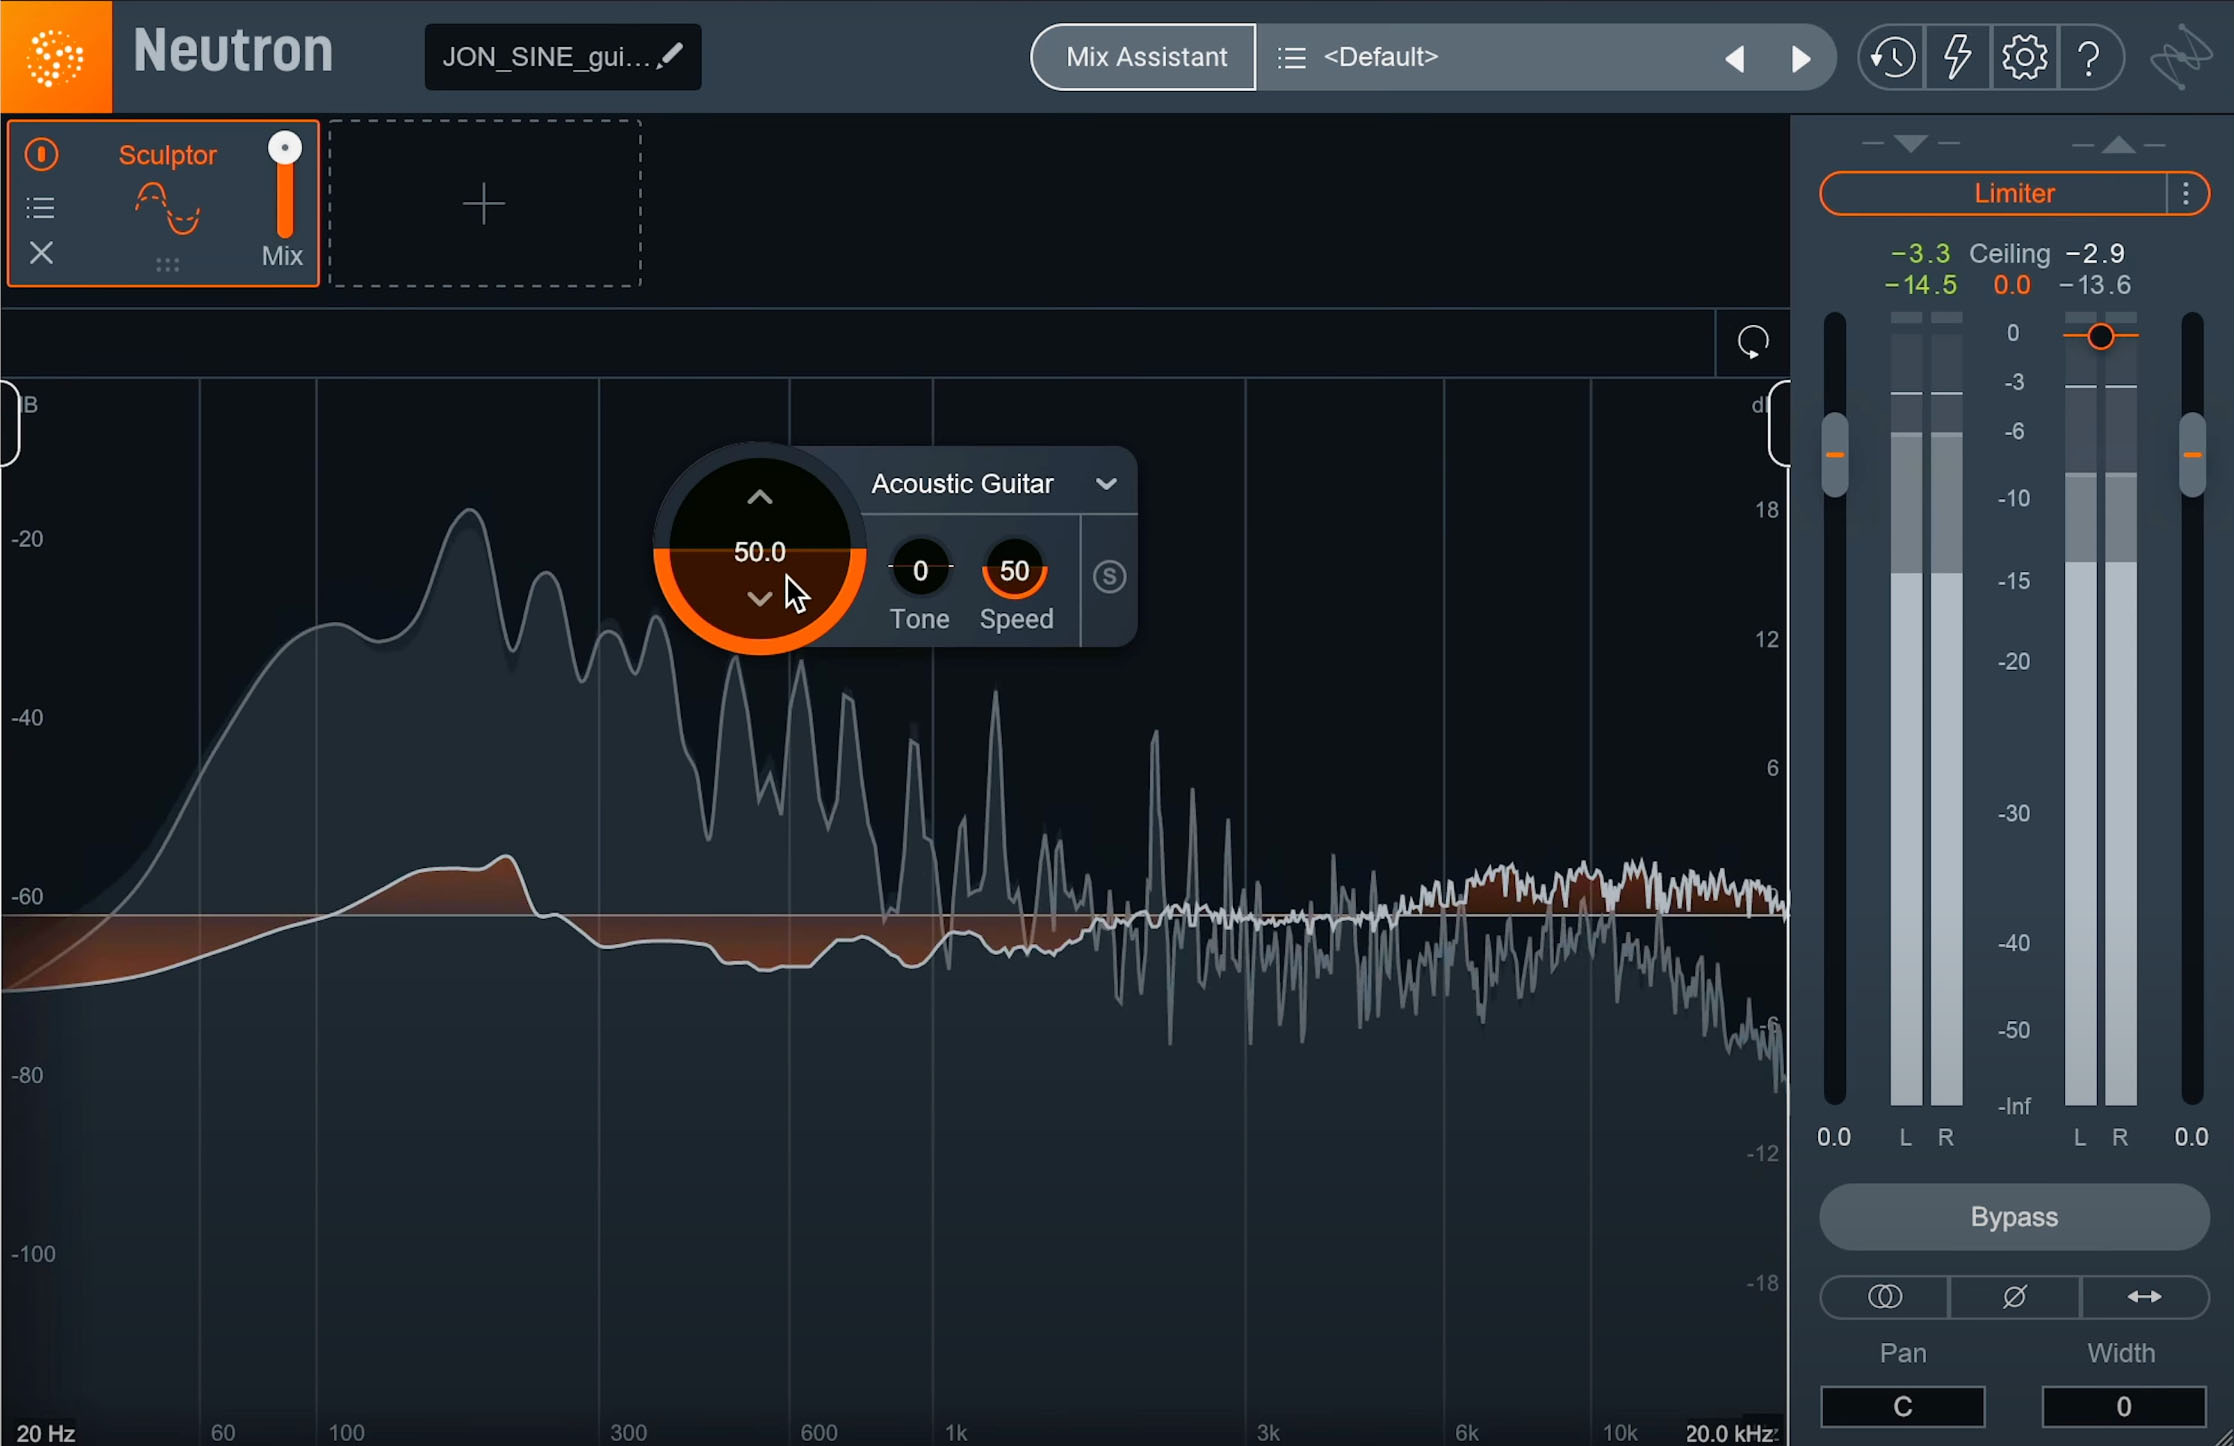
Sculptor on the acoustic guitar in Neutron
But what some people don’t realize is that you can omit parts of the frequency domain from spectral shaping using the built-in bands. To focus the processing on one area or another, drag out the bands to protect certain portions from processing. If you like what Sculptor is doing to the low end more than the high end, just drag the slider out.
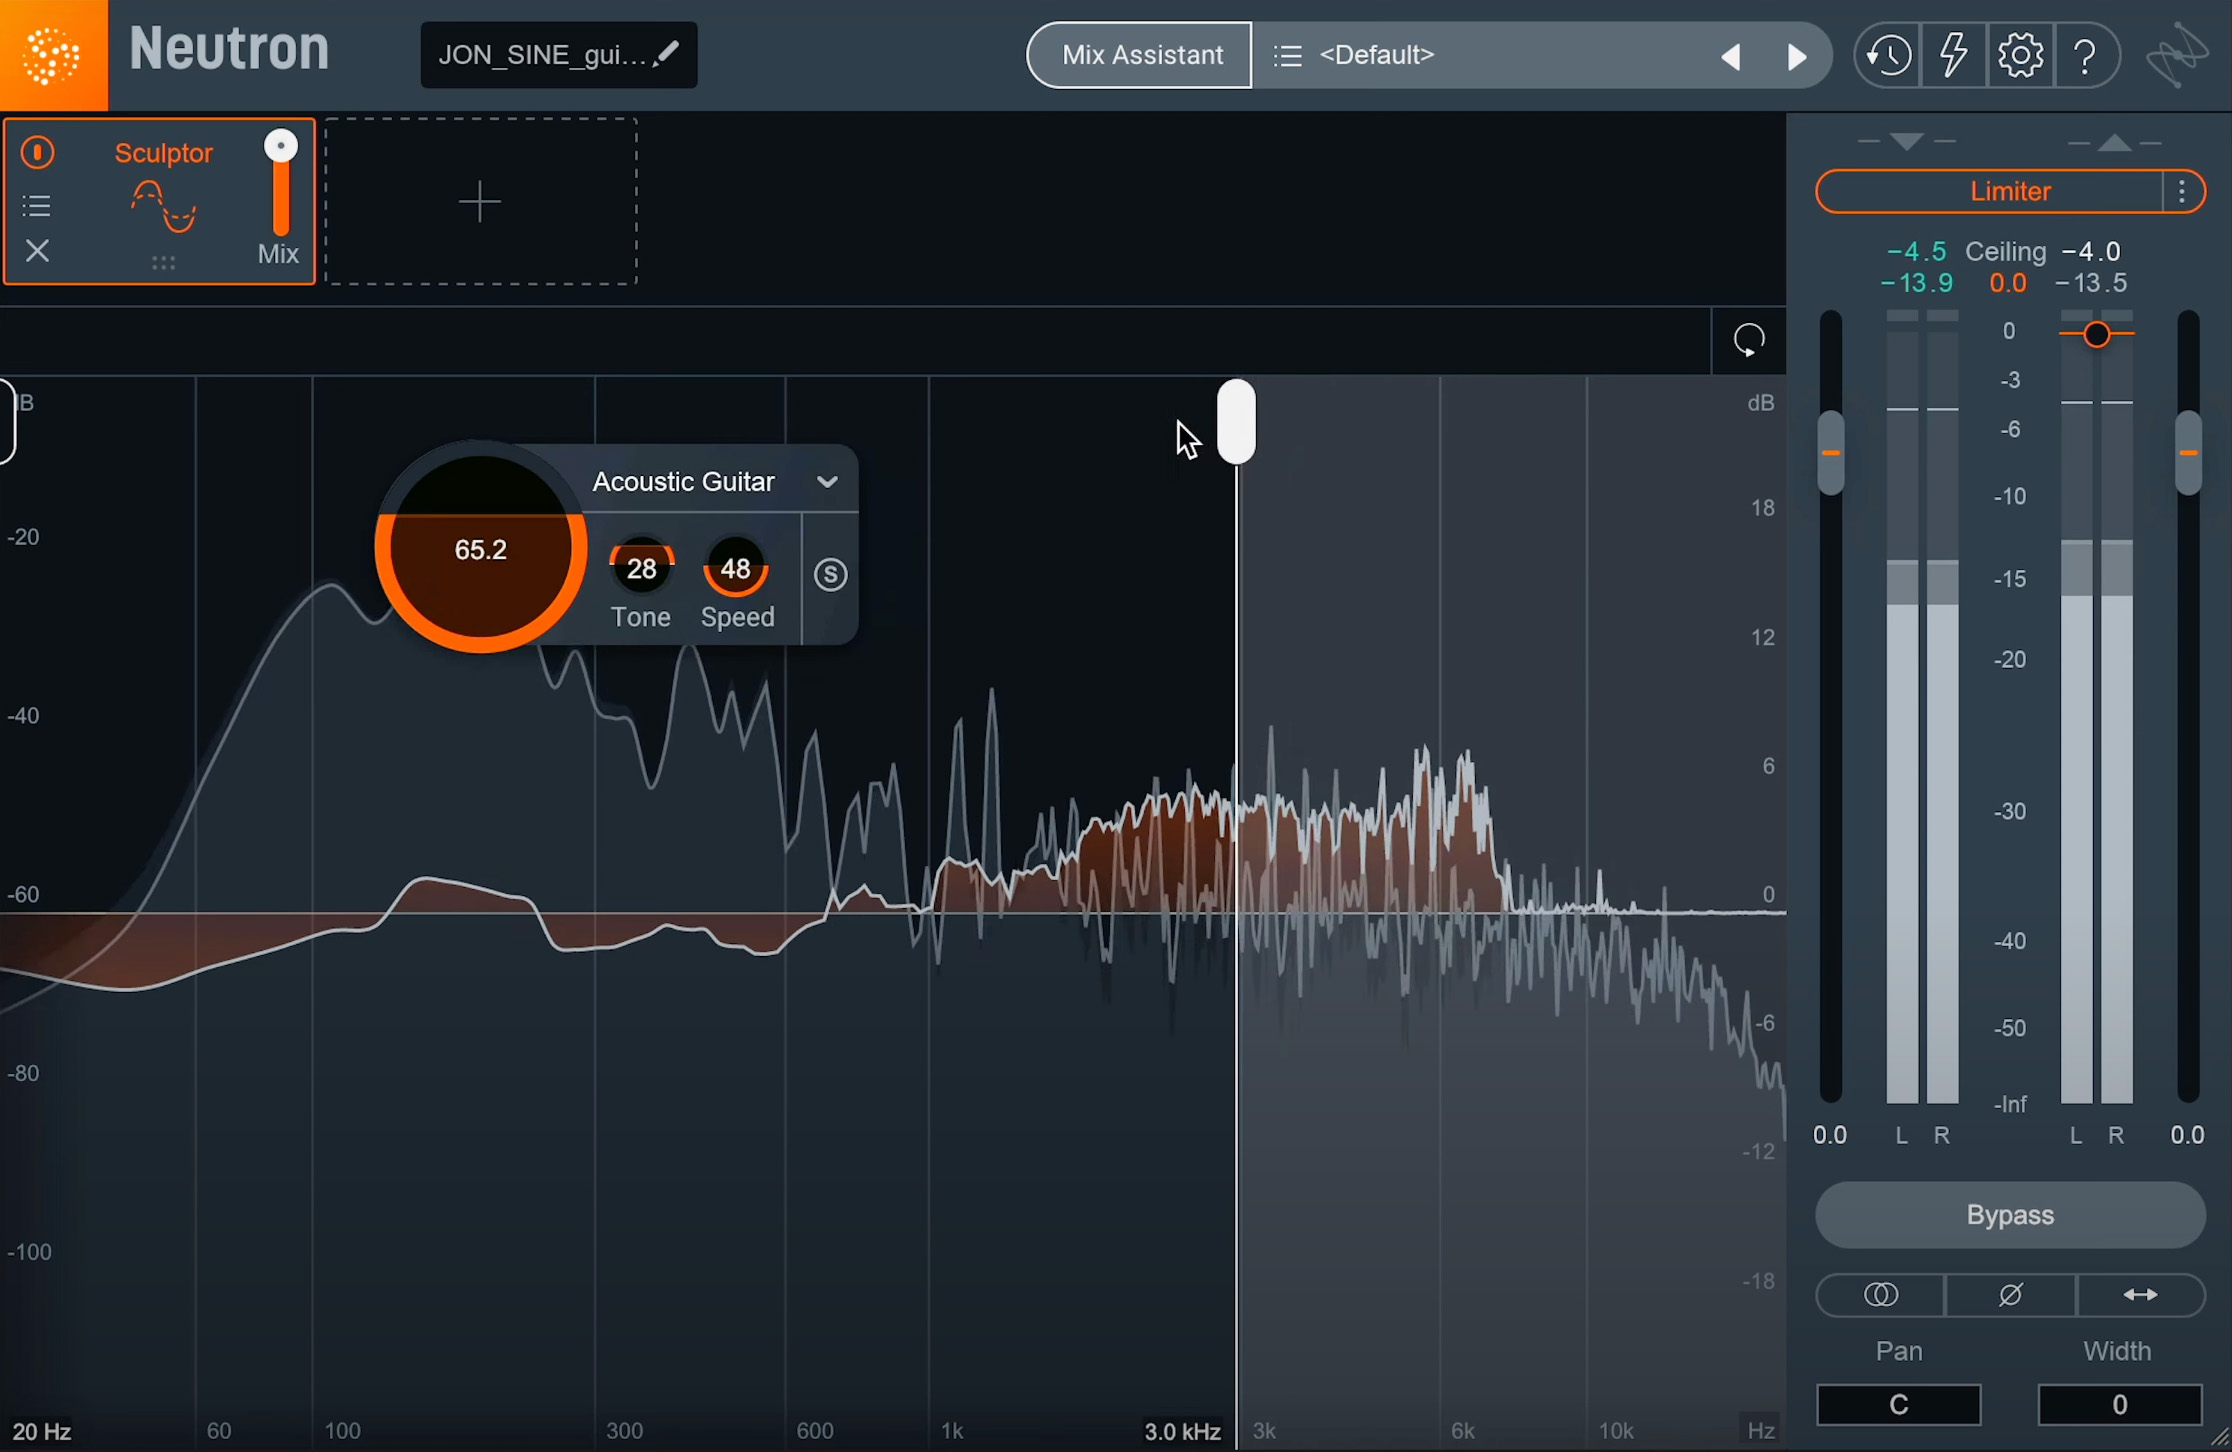
Cut out parts of the frequency domain with built-in Sculptor bands in Neutron
Another hidden workflow in Sculptor is the ability to use different profiles on different sound sources in creative unexpected ways. For example, try a guitar profile on a snare drum, or a vocal profile on a piano, and see what happens.
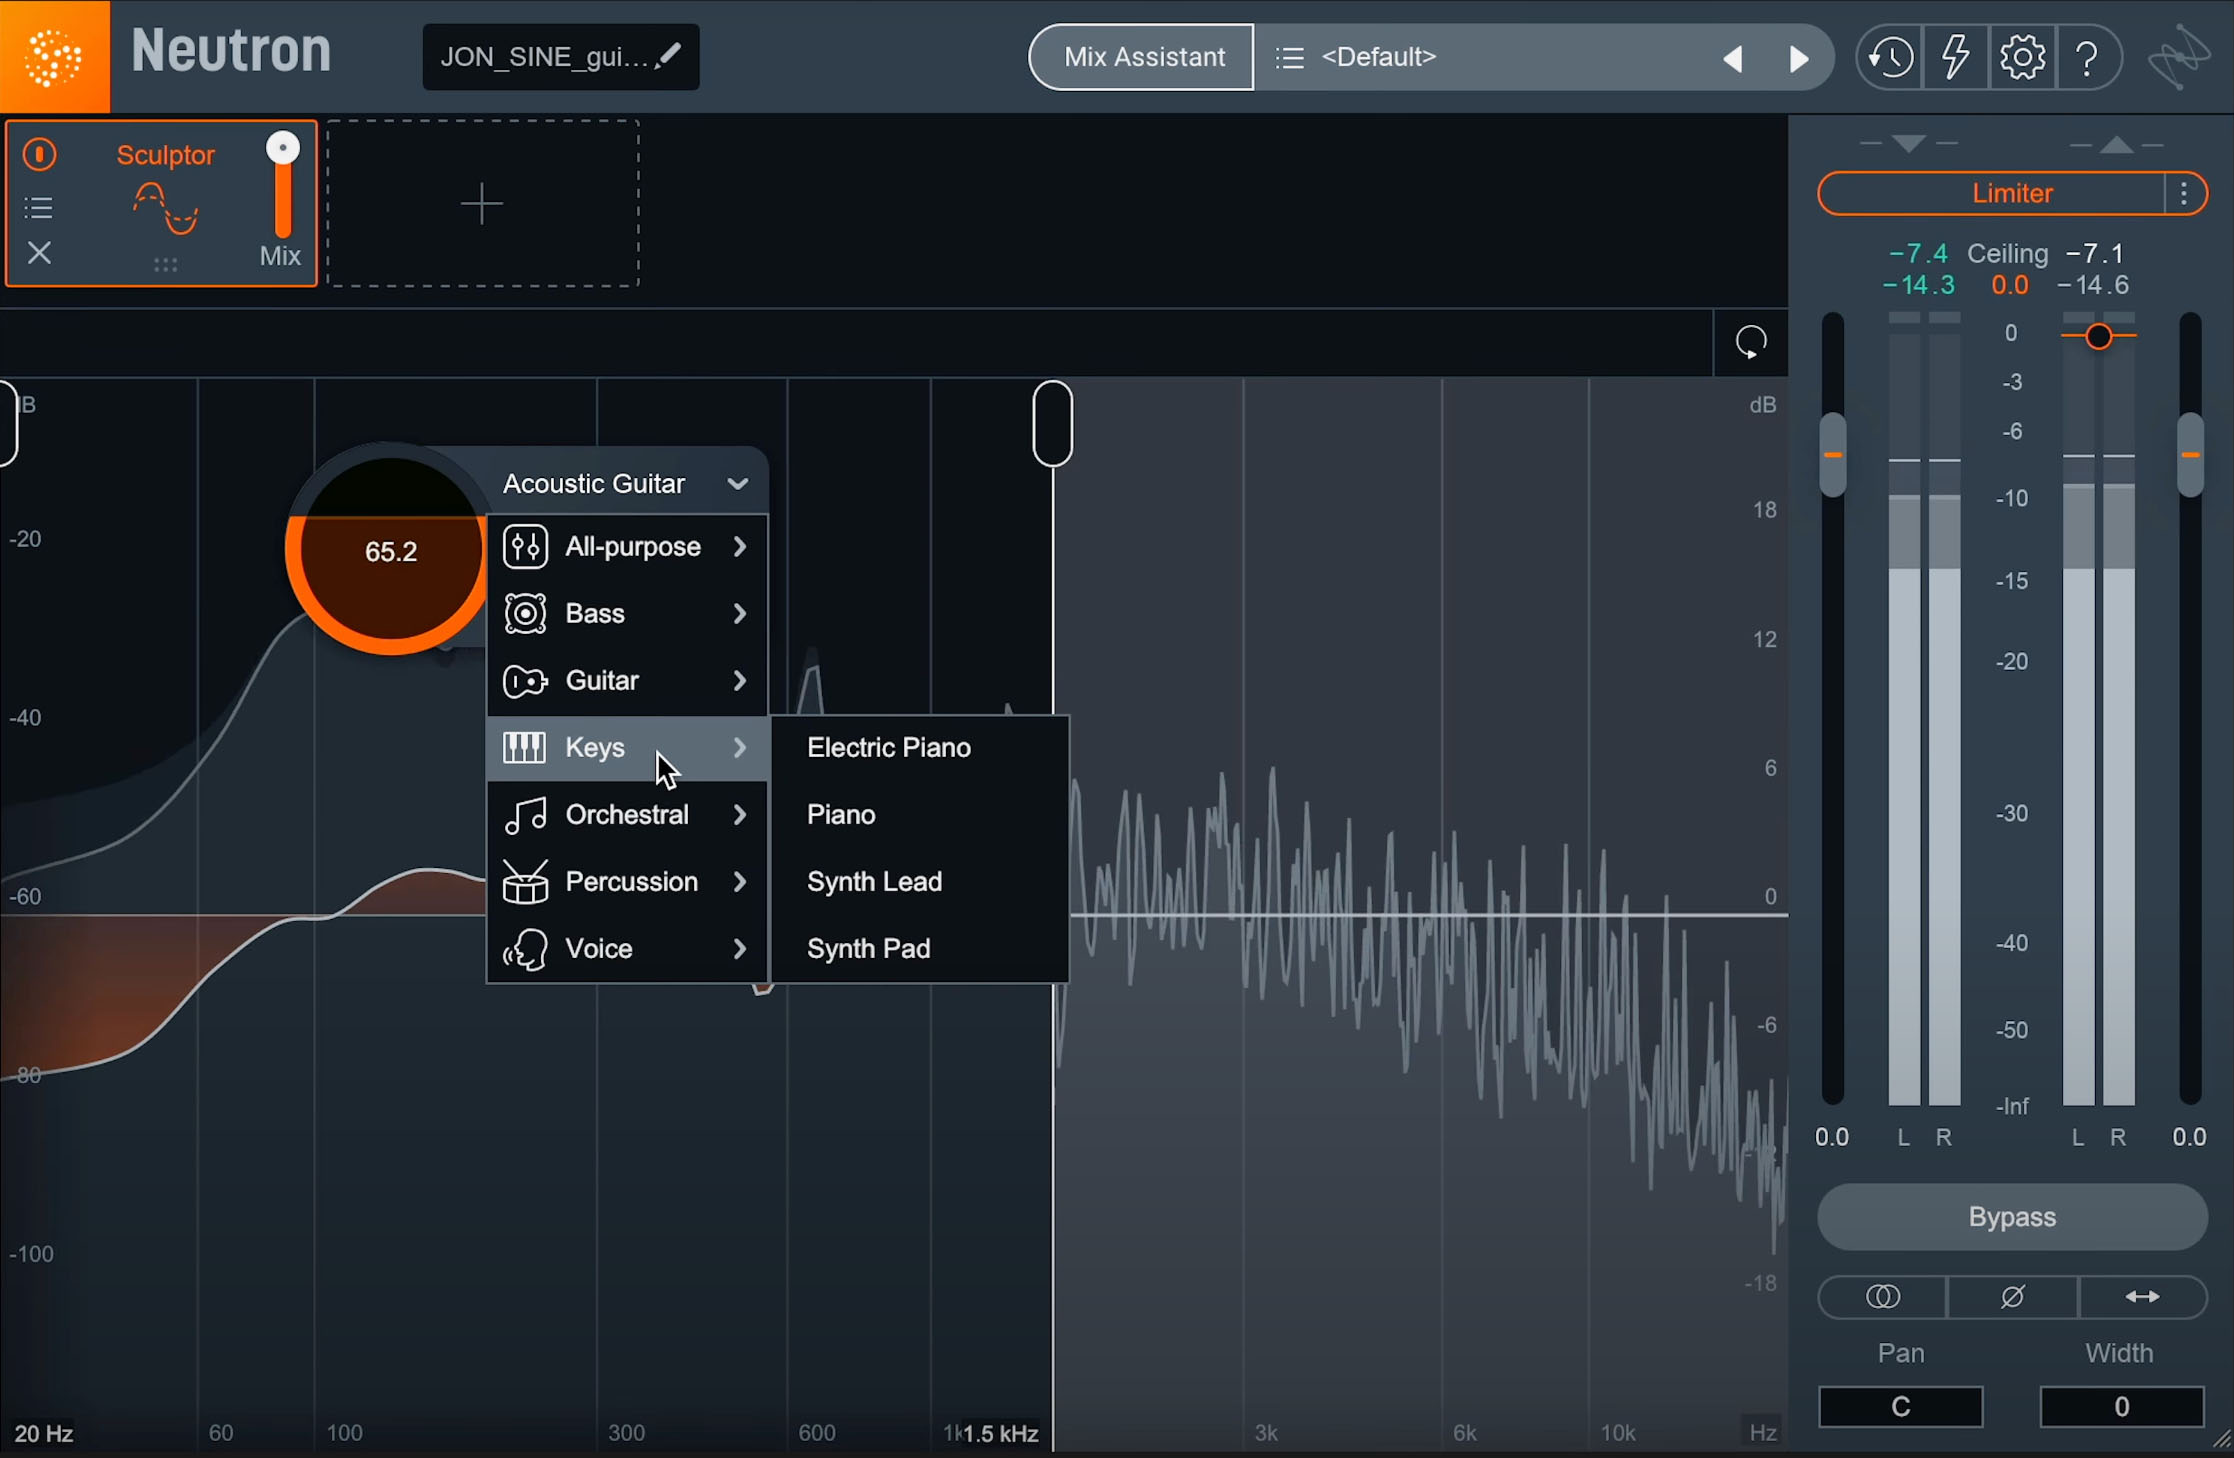
Use different profiles on different instruments in the Sculptor module
6. Tame high-end frequency response with Post Filter
The Exciter module in Neutron is there to give you blendable flavors of saturation, but there’s also hidden controls you can use to really tailor the enhancement you want on your sound source.
Saturation can add complex harmonic information overtop of what you’ve recorded. That could be a good thing or a bad thing, which is why you’ve got a filter to protect the high end from saturation.
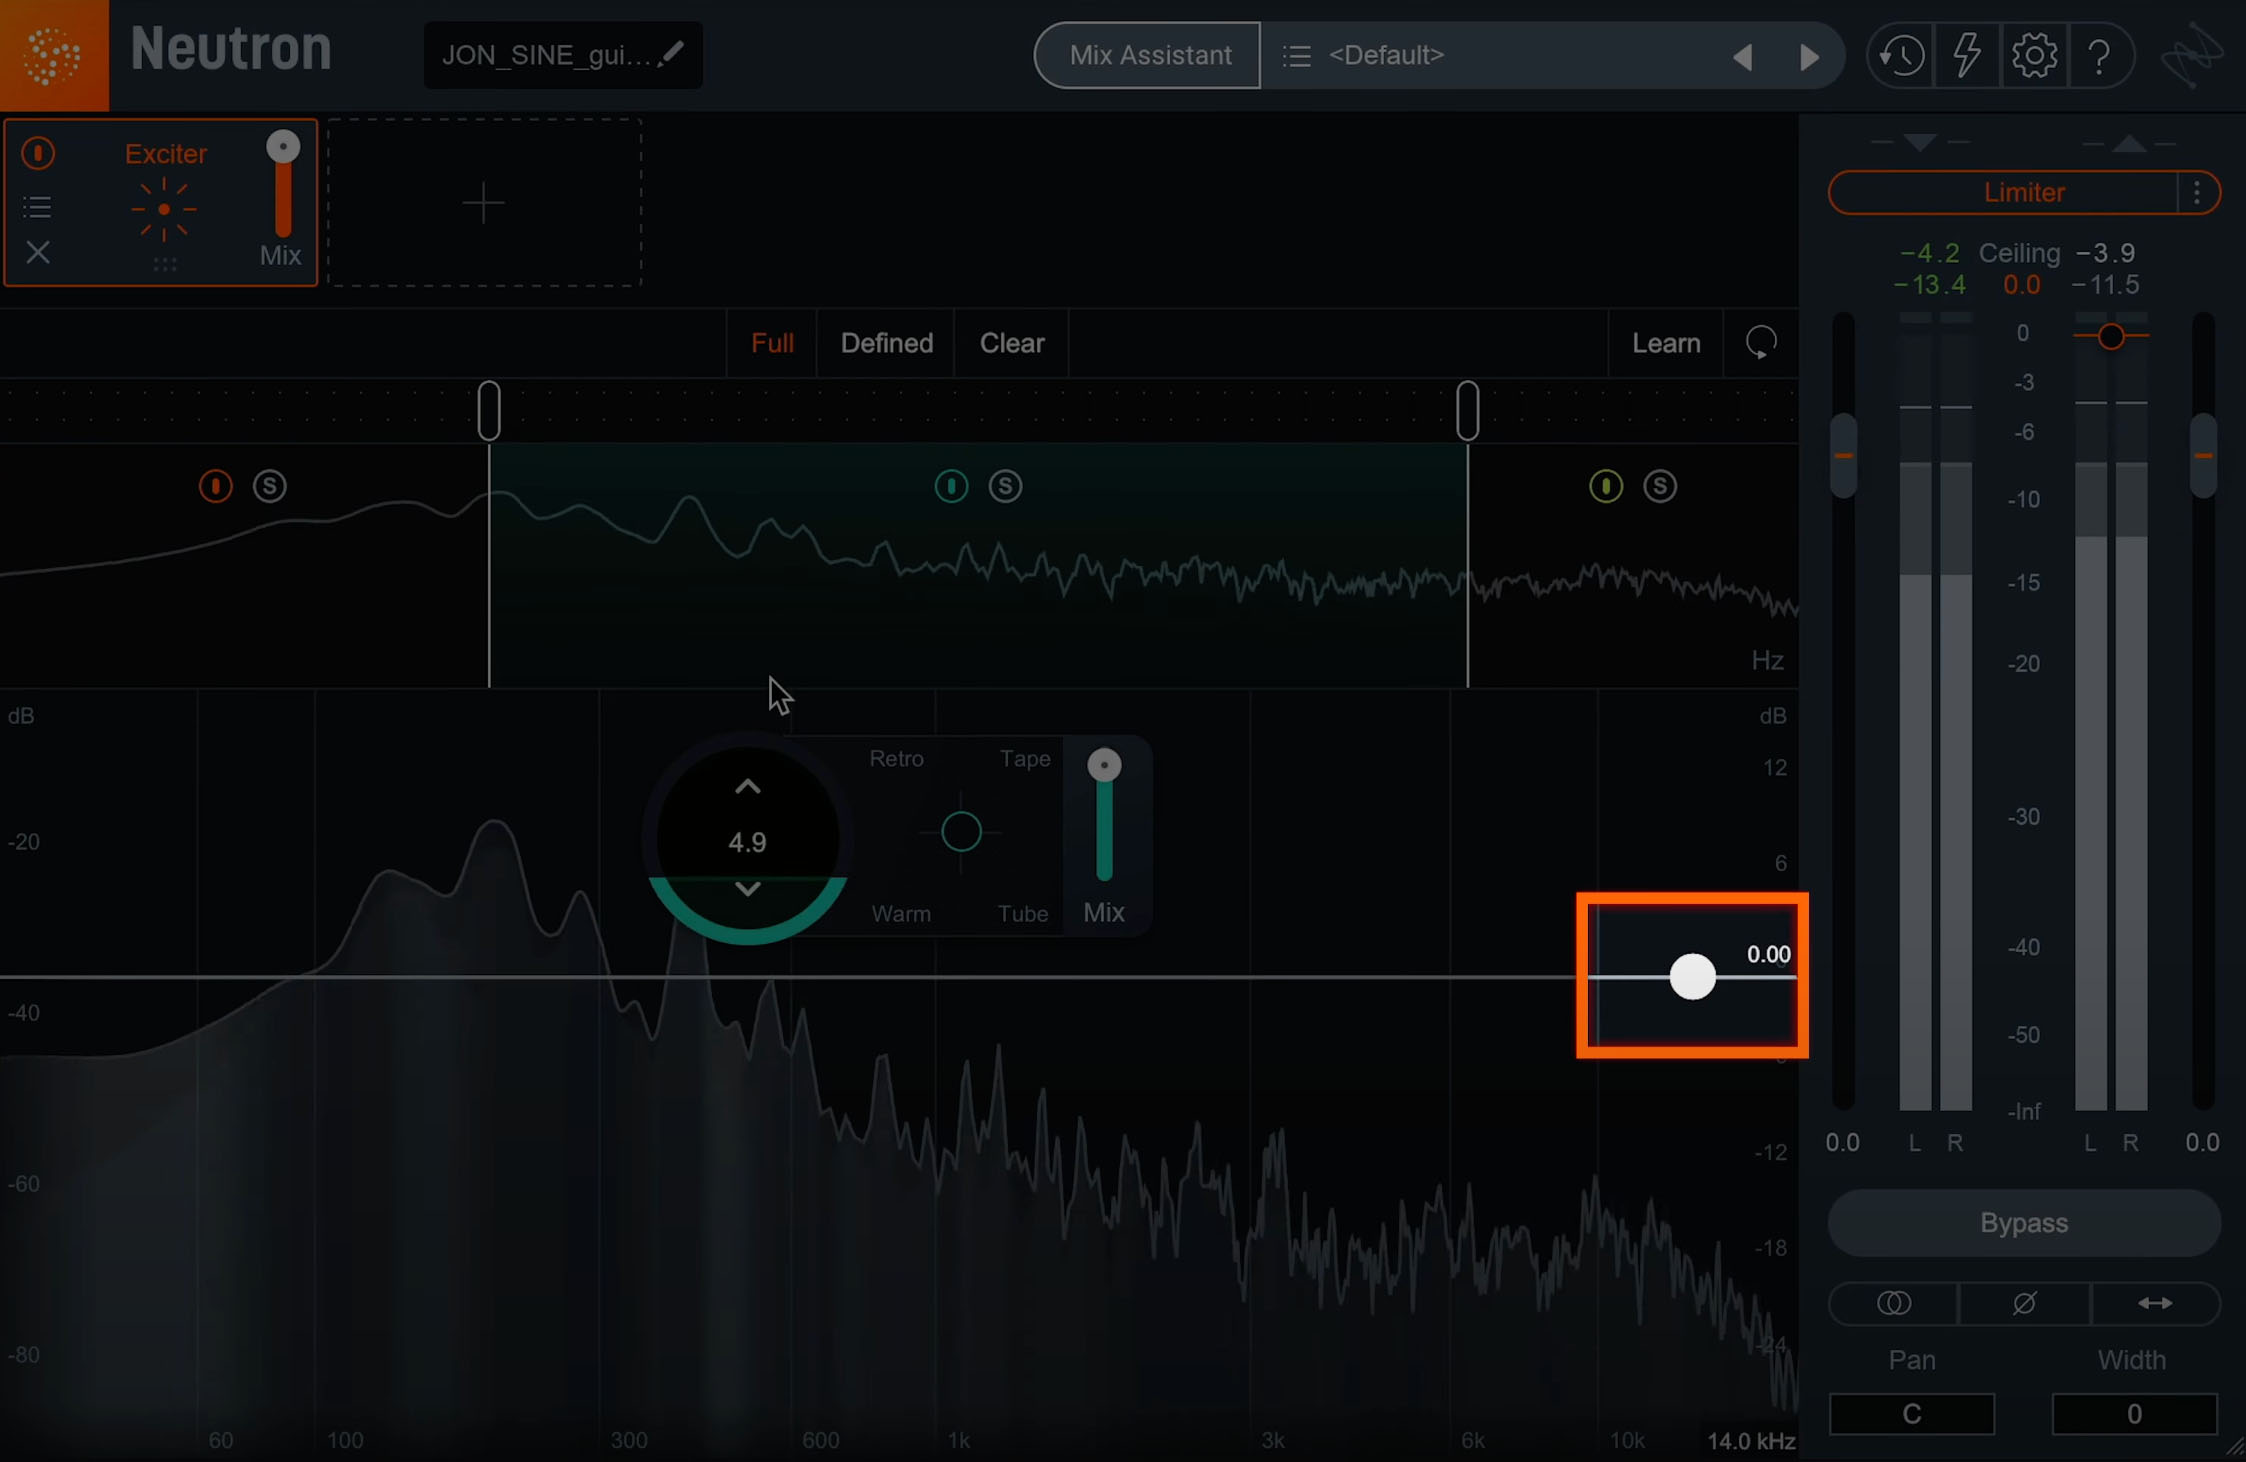
The Post Filter in Neutron’s Exciter module
The Post Filter applies gentle shelving for attenuation and is displayed as a high shelf icon overlaid on the multiband spectrum view. You can drag the Post Filter node to adjust the frequency and the gain of the filter. The Post Filter will affect the entire wet signal, which can help adjust, attenuate, and tame the Exciter module’s high-end frequency response.
7. Understand Limiter styles and Limiter modes
The limiter controls in Neutron are some of the most lesser known in our tools, by far, but there’s some incredibly powerful stuff in there if you take a minute to learn about the different modes and parameters.
Above the input and output meters, you’ll find the limiter and its controls. Click to enable the BS.1770 compliant True Peak Limiter to process digital loudness maximization of your output signal while preventing True Peak overflows across all of your mono, stereo, and surround channels.
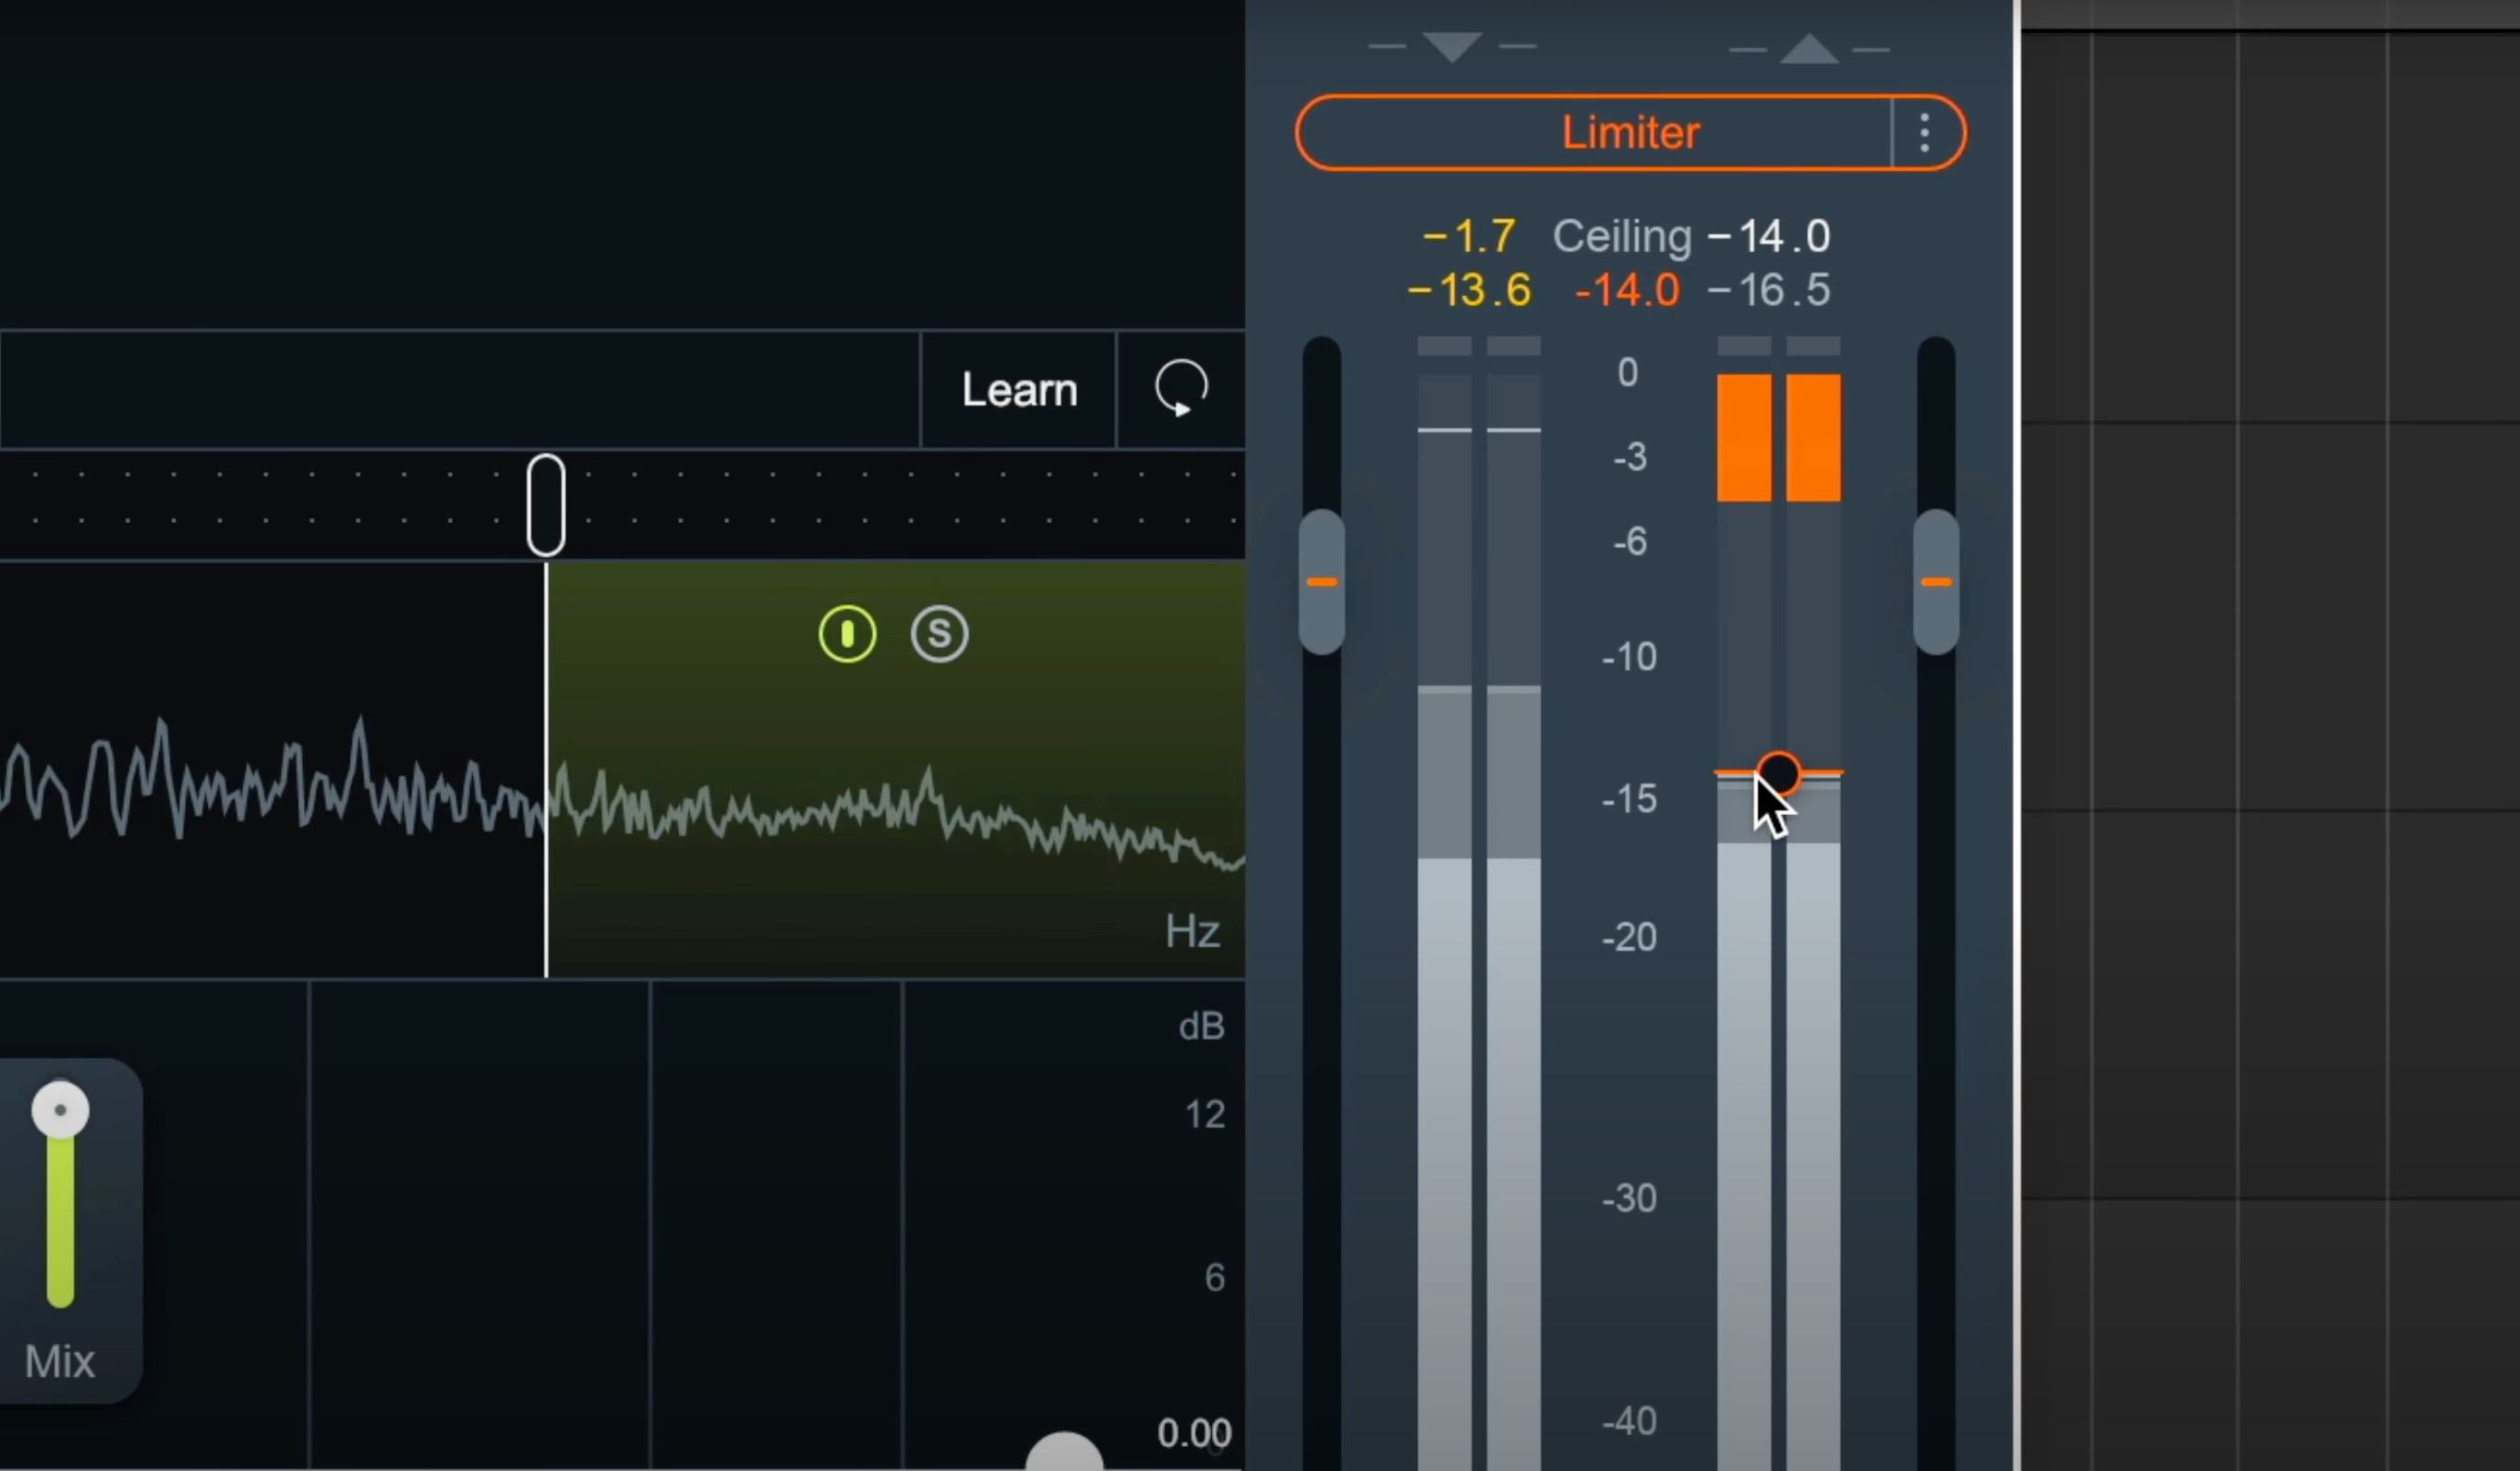
Neutron Pro’s Limiter and controls
You’ll see a couple of things when you enable the limiter. When the limiter is actively limiting audio, you will see the amount of gain reduction shown in orange from the top of the meter.
The output gain slider acts as the limiter input gain when the limiter is enabled. Slide up or down to increase the loudness of your audio up to 10dB of additional input gain to the limiter without affecting the True Peak level.
Let’s go over the styles. You can choose from one of three character options for more direct control over the adaptive, transparent nature of the limiting algorithm.
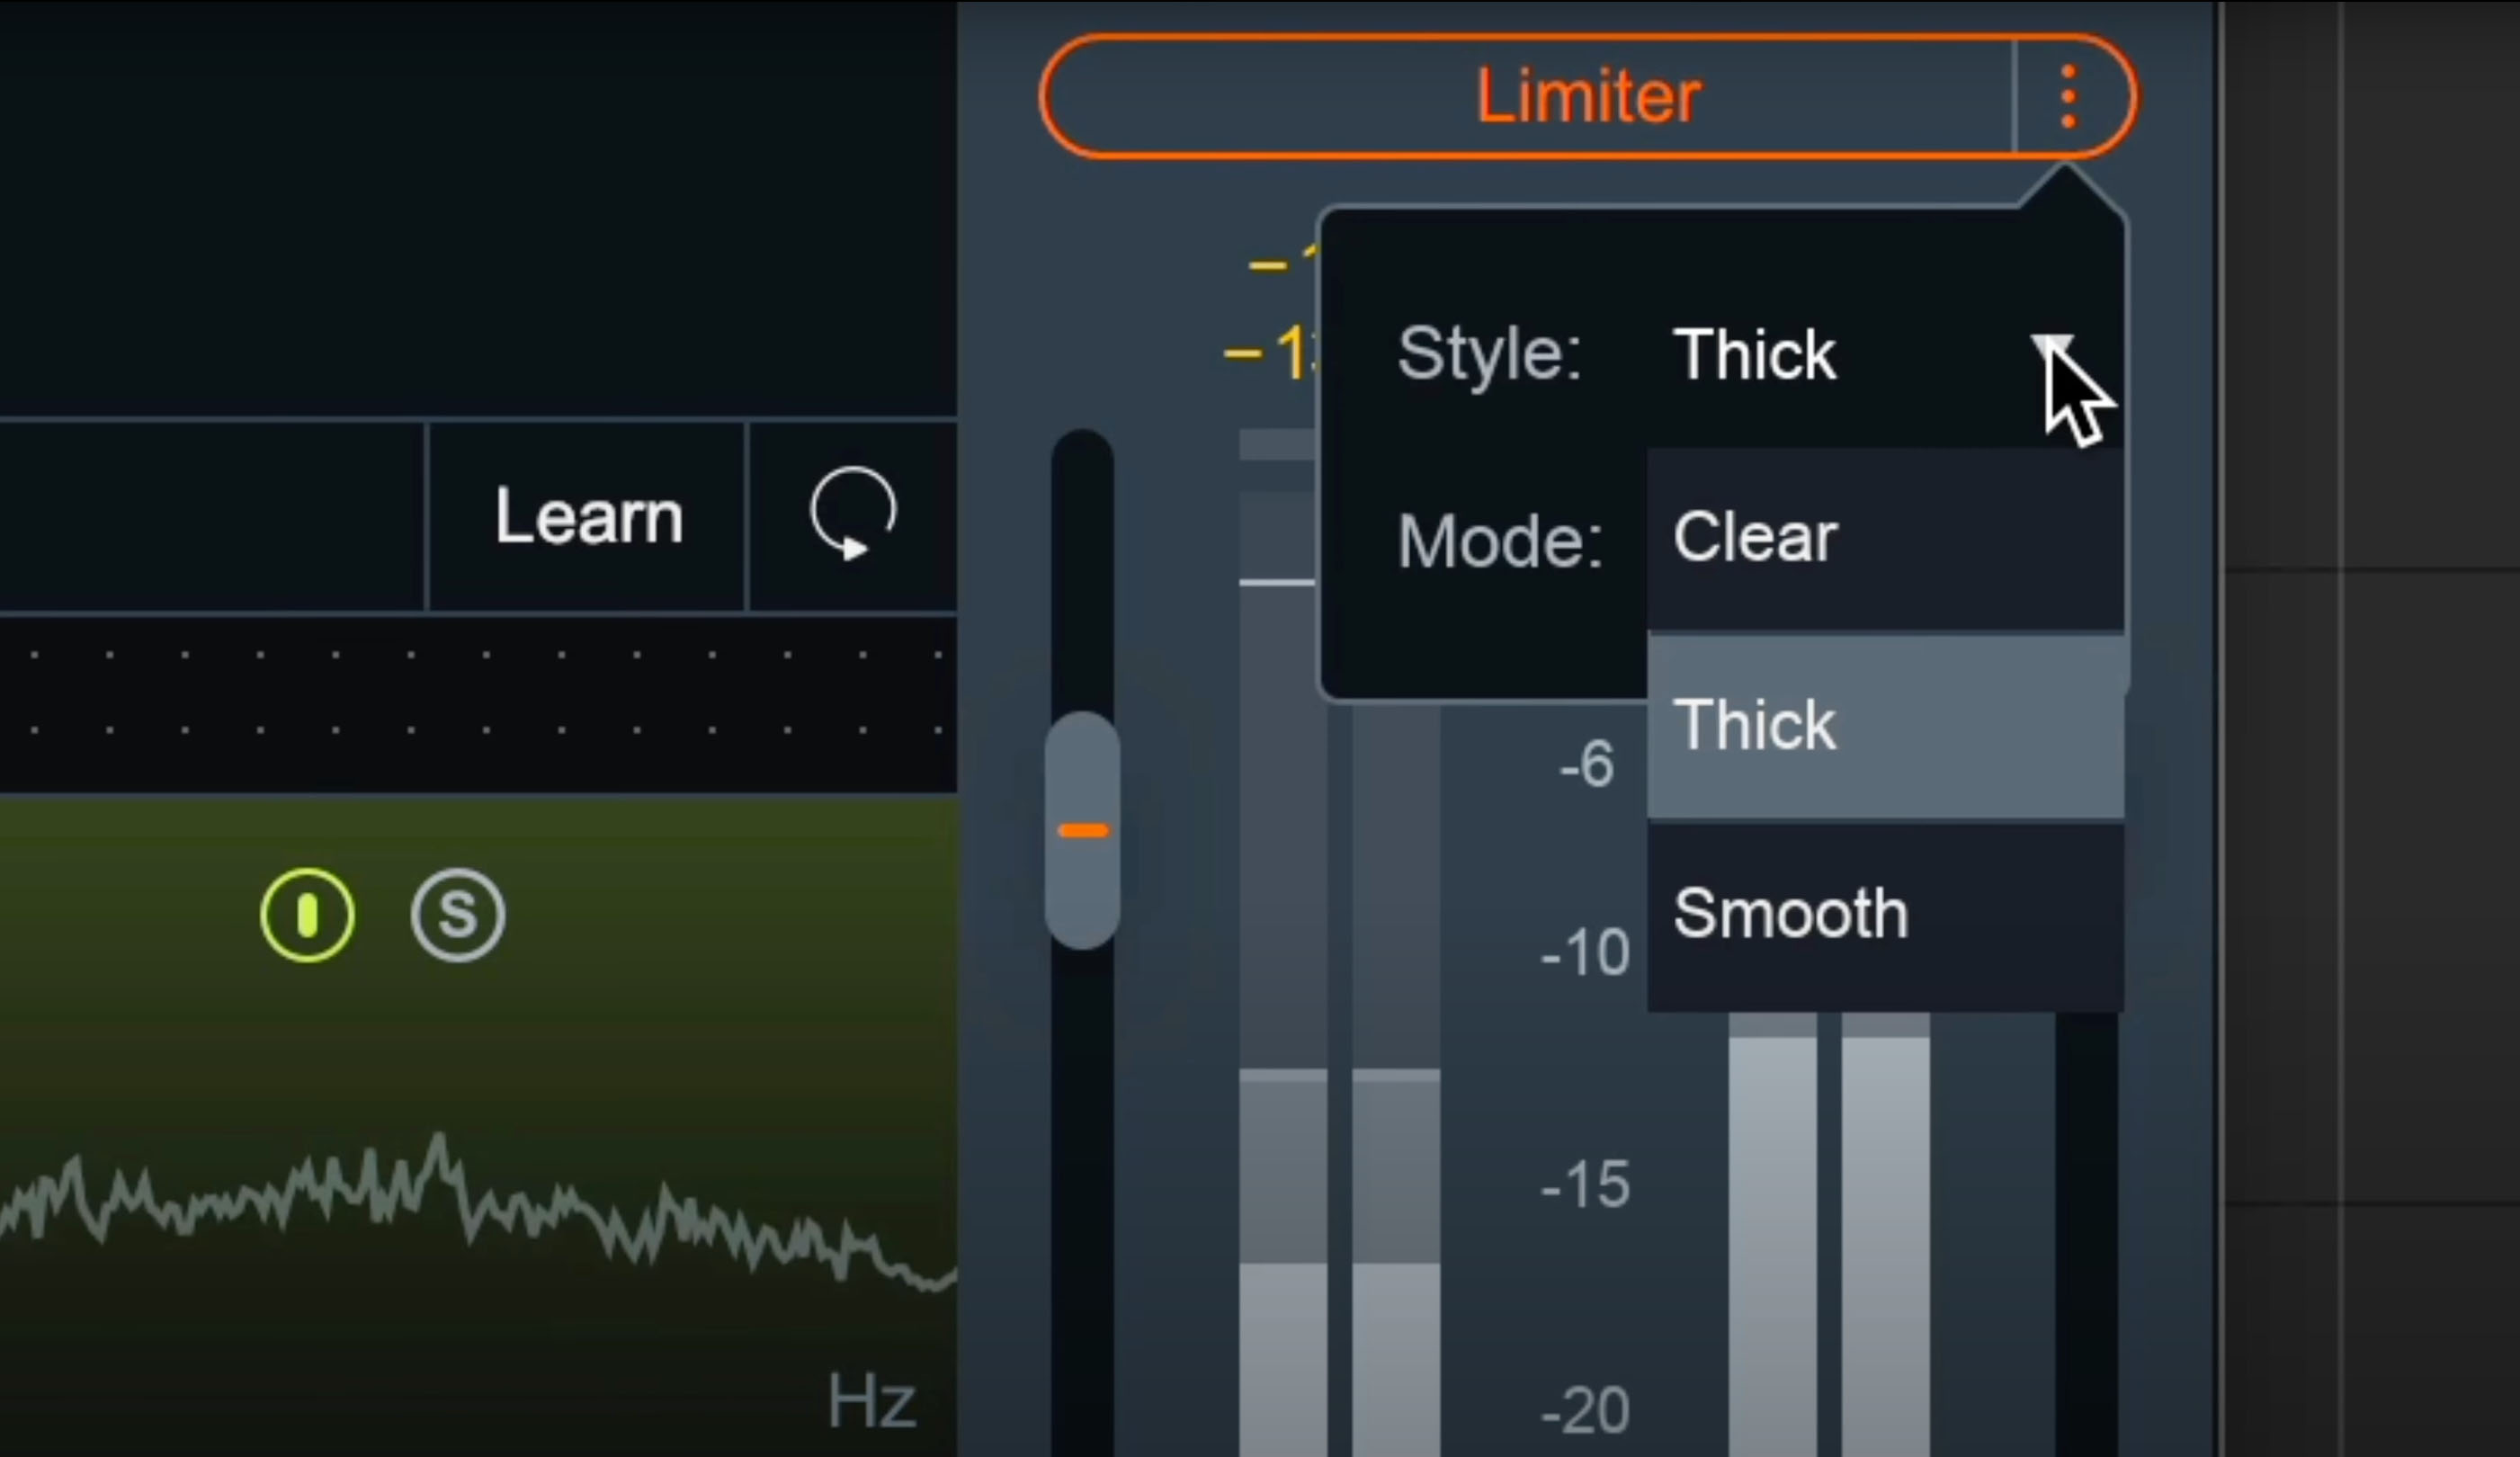
Limiter styles include Clear, Thick, and Smooth in Neutron
If you choose Clear, the limiter will respond more quickly in order to better present fast-moving transient material in the mix.
Smooth is the most common, best-sounding middle ground between Clear and Thick. It’s the most appropriate algorithm for the majority of program material, including most vocals and dialogue.
If you choose Thick, the limiter will respond to audio more slowly, useful for louder, slower-moving sounds like a big explosion sound effect, or a bass/low-frequency swell where you wouldn’t want an aggressive limiter to break the sound up.
like Ozone, Neutron has different algorithms you can choose for how the limiter behaves. You can choose to optimize the limiter in three different ways using the algorithms described in the table below. Each algorithm has a different sonic quality and latency requirement.
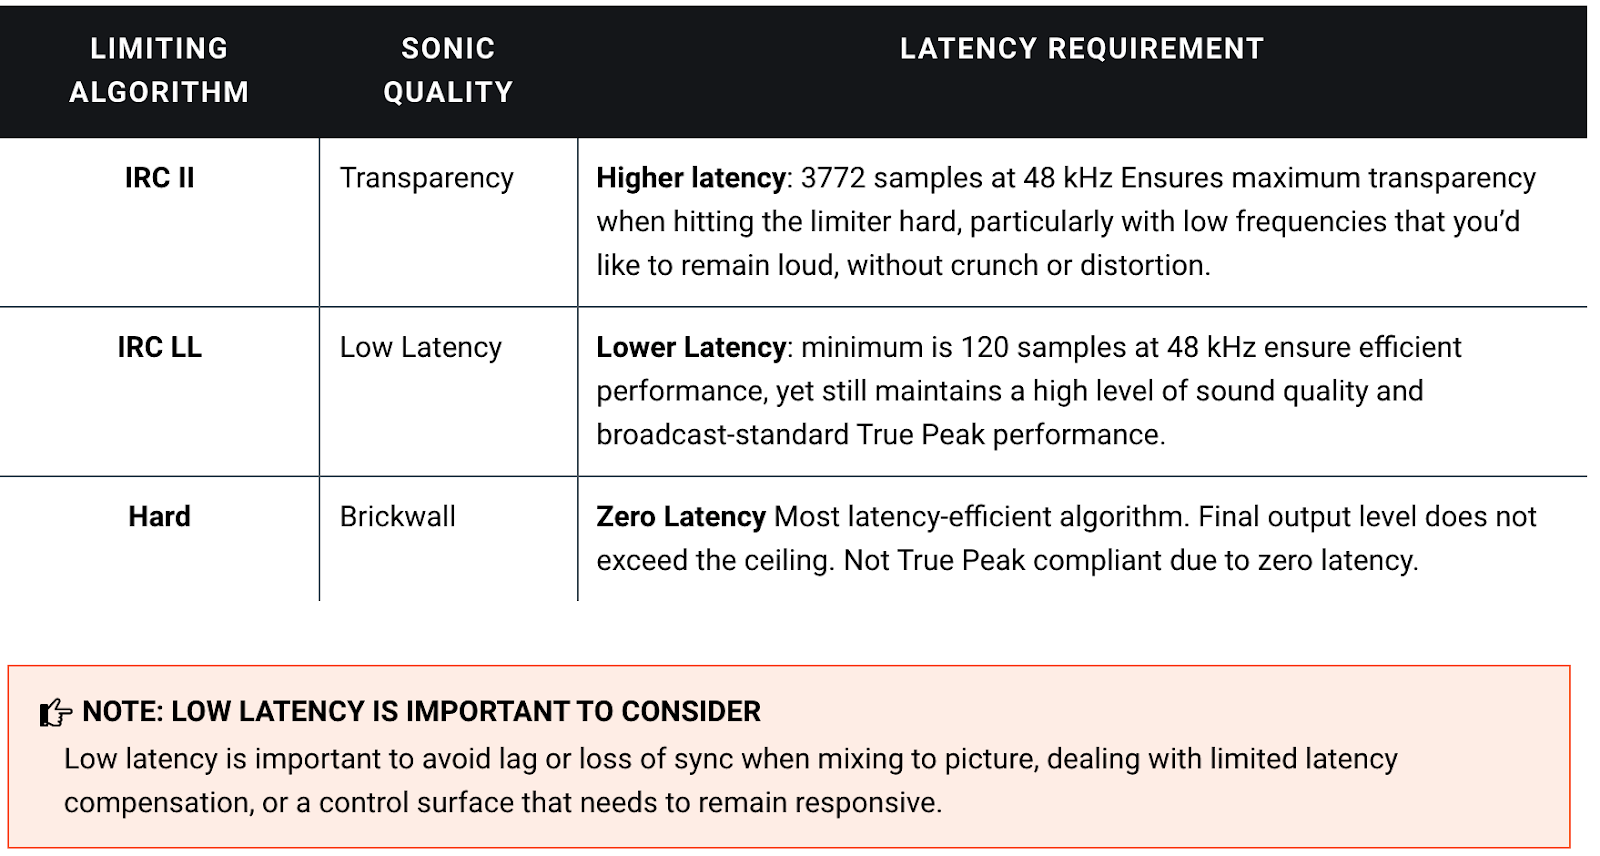
Limiting algorithm and latency requirements chart
8. Detection Circuit Filter in Neutron Pro’s Compressor and Gate
If you’ve seen our Hidden Features video on Ozone Pro, you might see this hidden feature coming. It’s about the multiband compressors in Neutron, and how to tweak them to control their ballistics when processing low end heavy track elements.
When you open up the Detection Circuit Filter, this allows you to adjust the frequency response of the detection circuit used by the Vintage Compressor so that it is more or less sensitive to specific frequencies. This is helpful if you want to prevent low frequencies from triggering the compressor to work harder than it needs to, often causing a pumping effect.
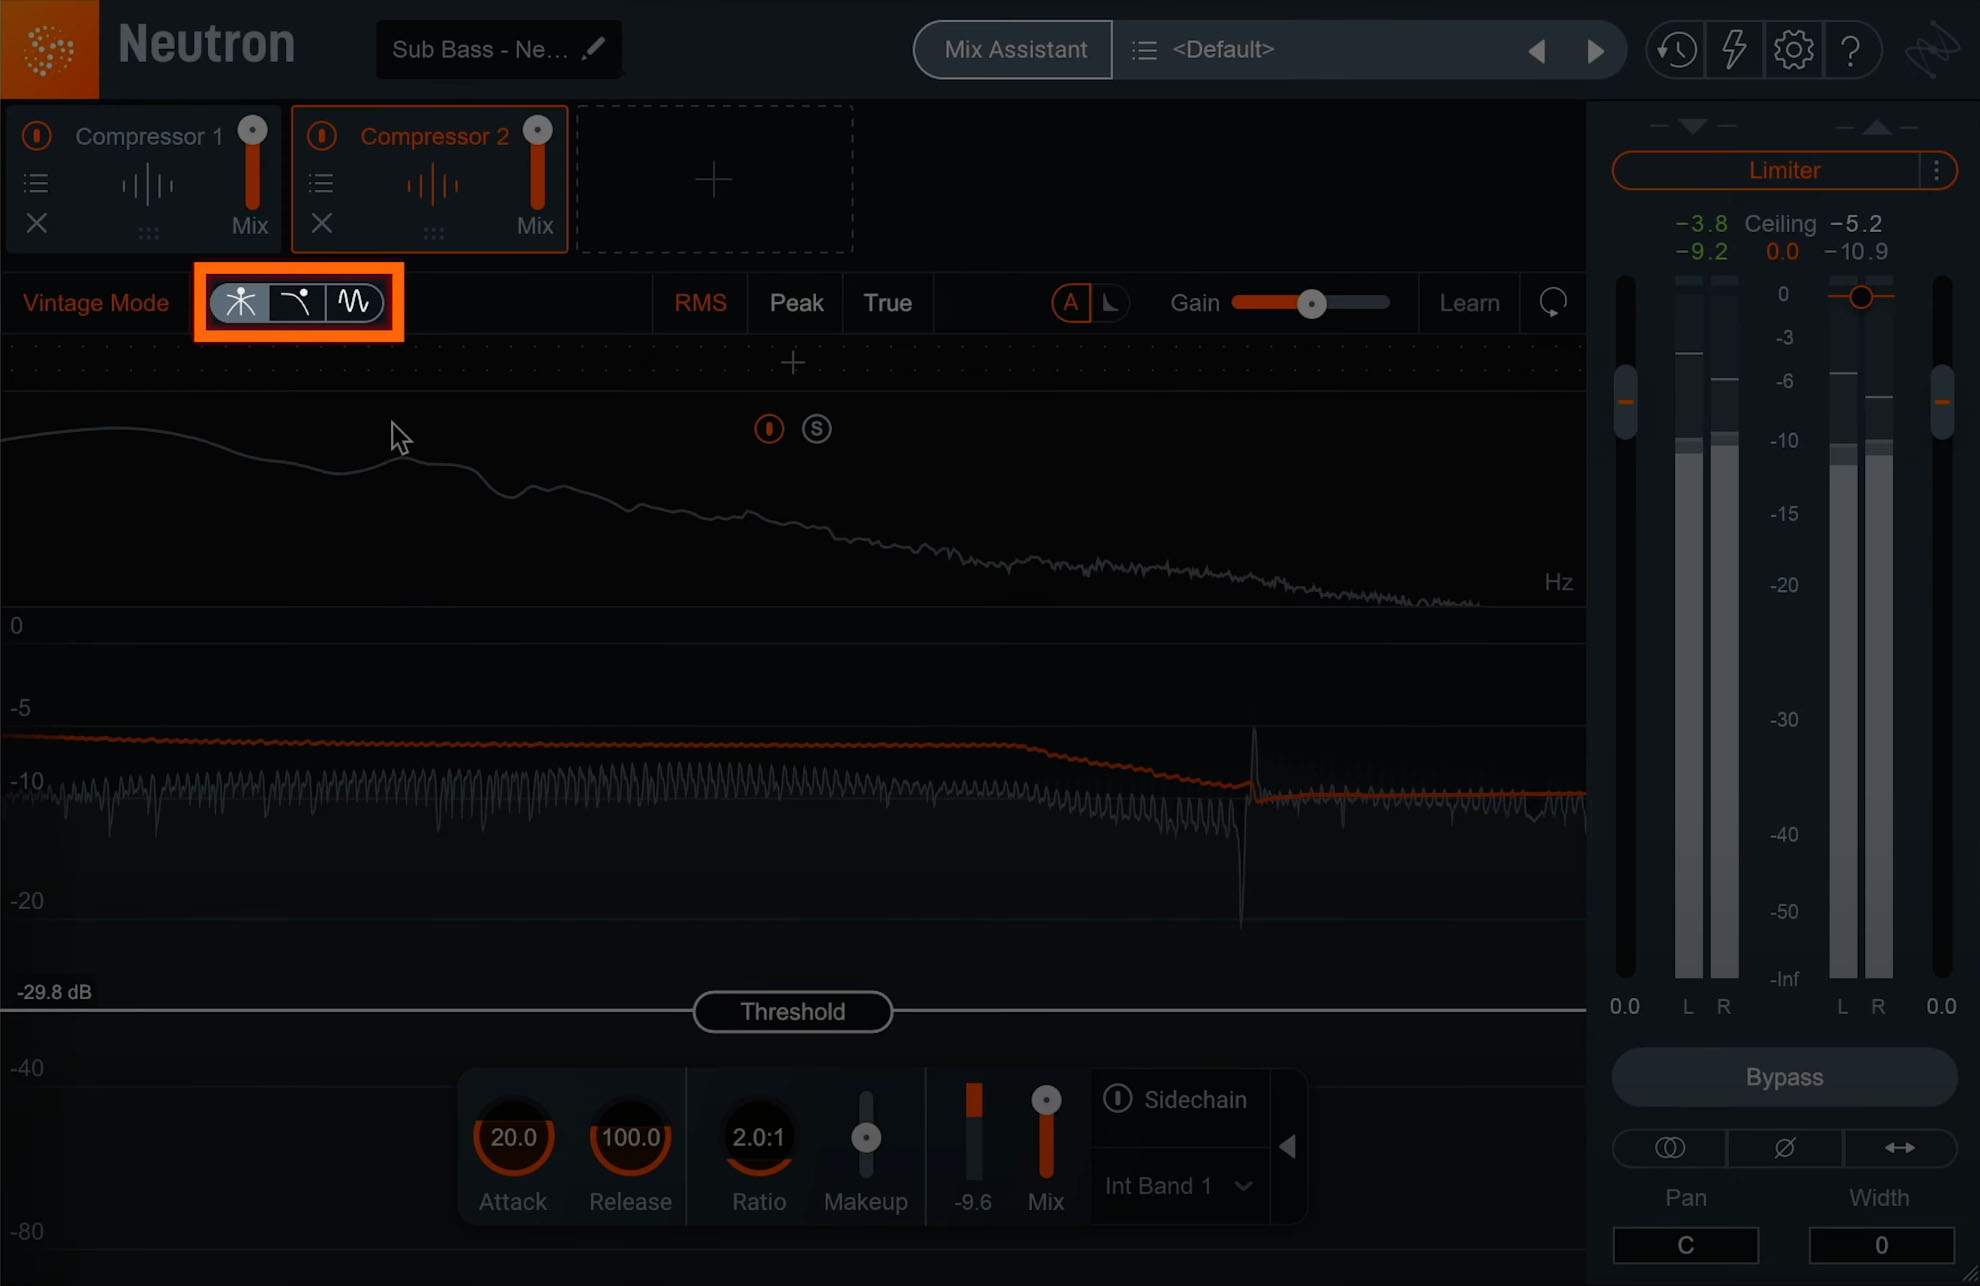
Detection Circuit Filter in Neutron
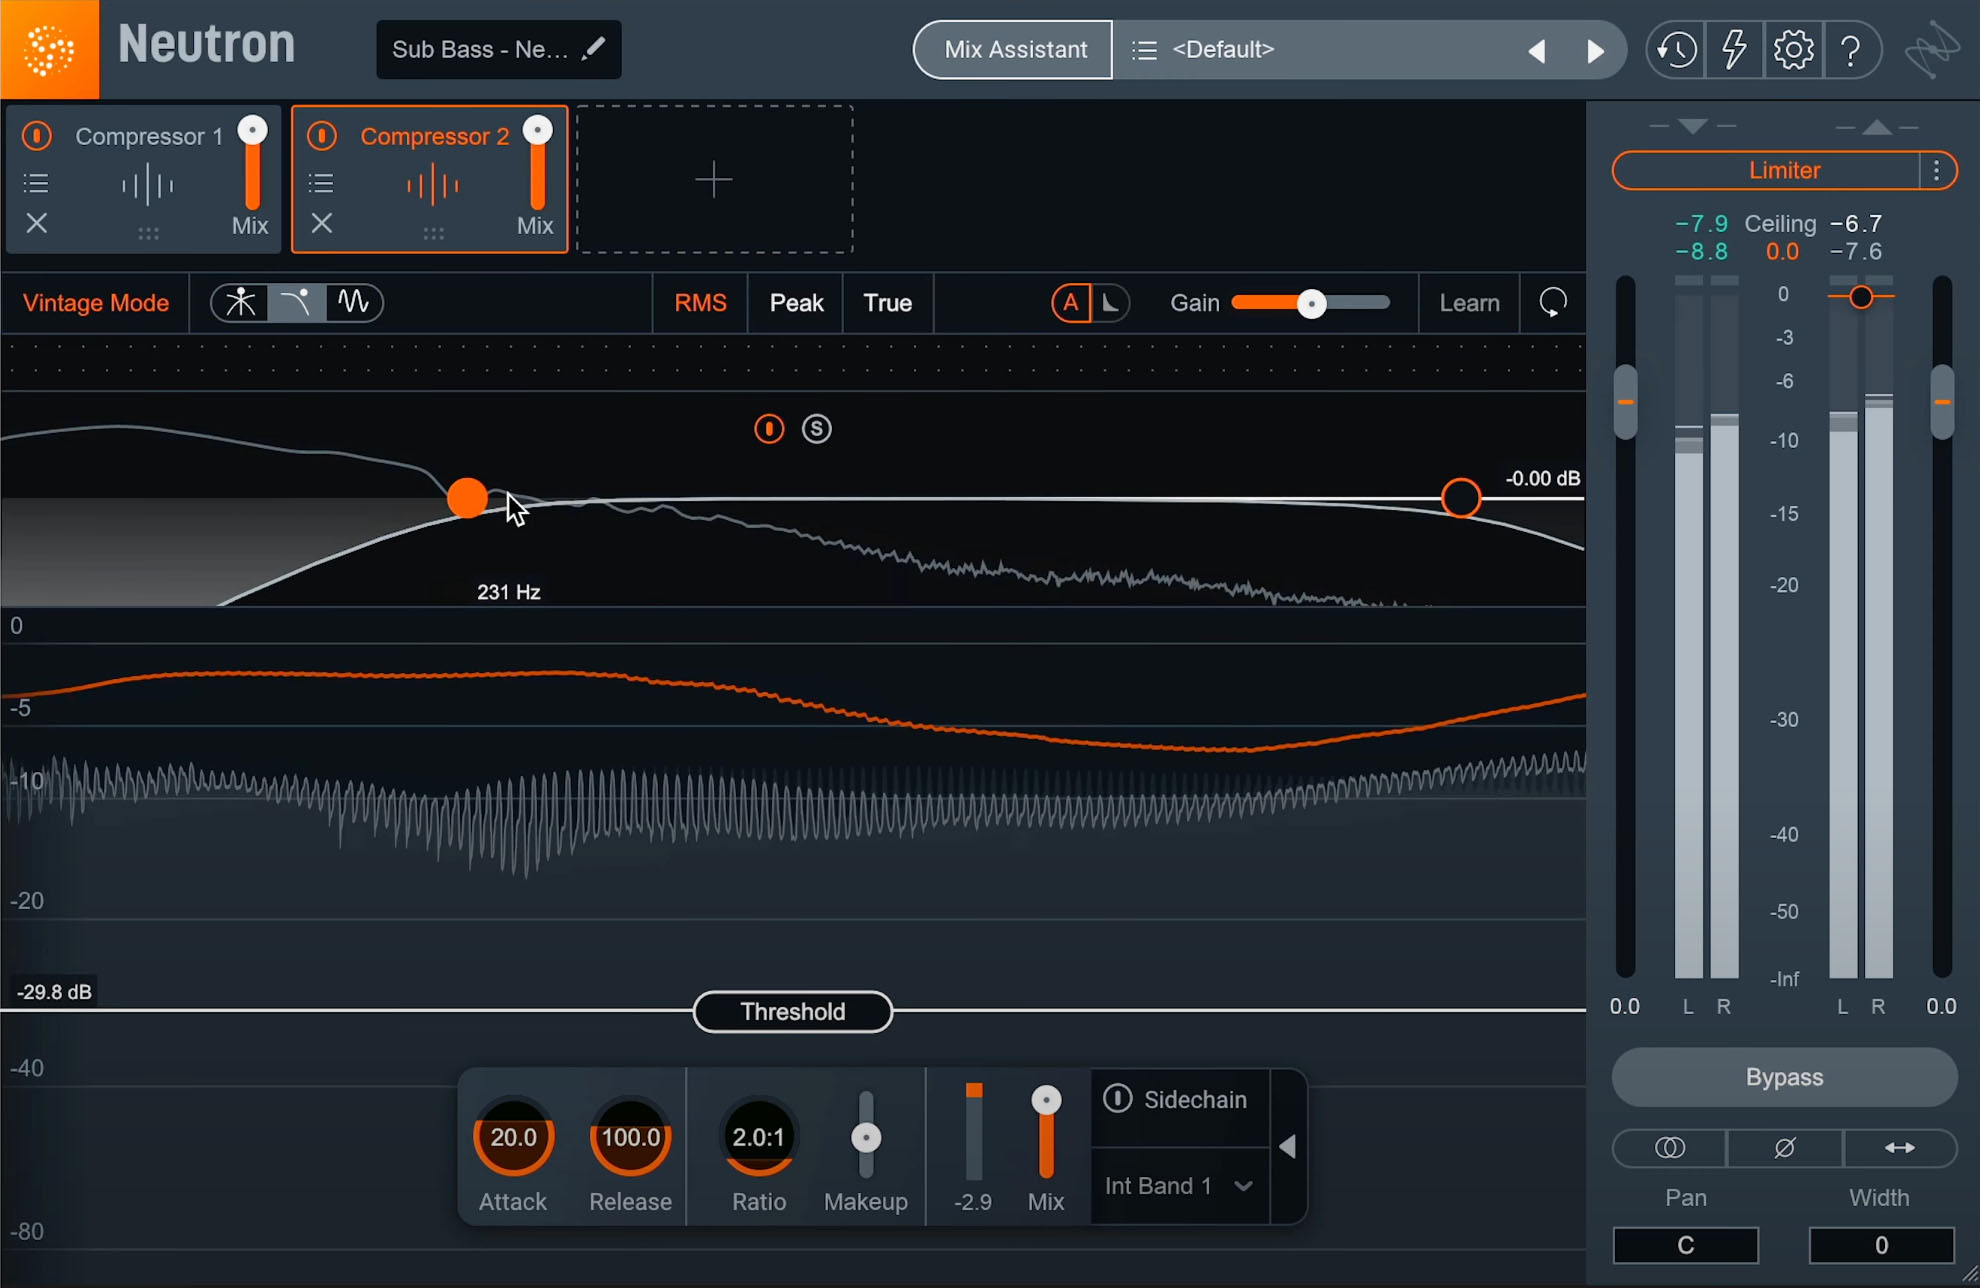
Adjust the frequency response of the Detection Circuit Filter
9. Instant parallel processing with mix sliders
Parallel processing is a great way to get the best of both worlds: the dry signal and the wet signal working together to deliver great sounding results which you can blend-in to taste. Creating parallel processing chains can be complex, but in Neutron the process is completely streamlined, with no routing required.
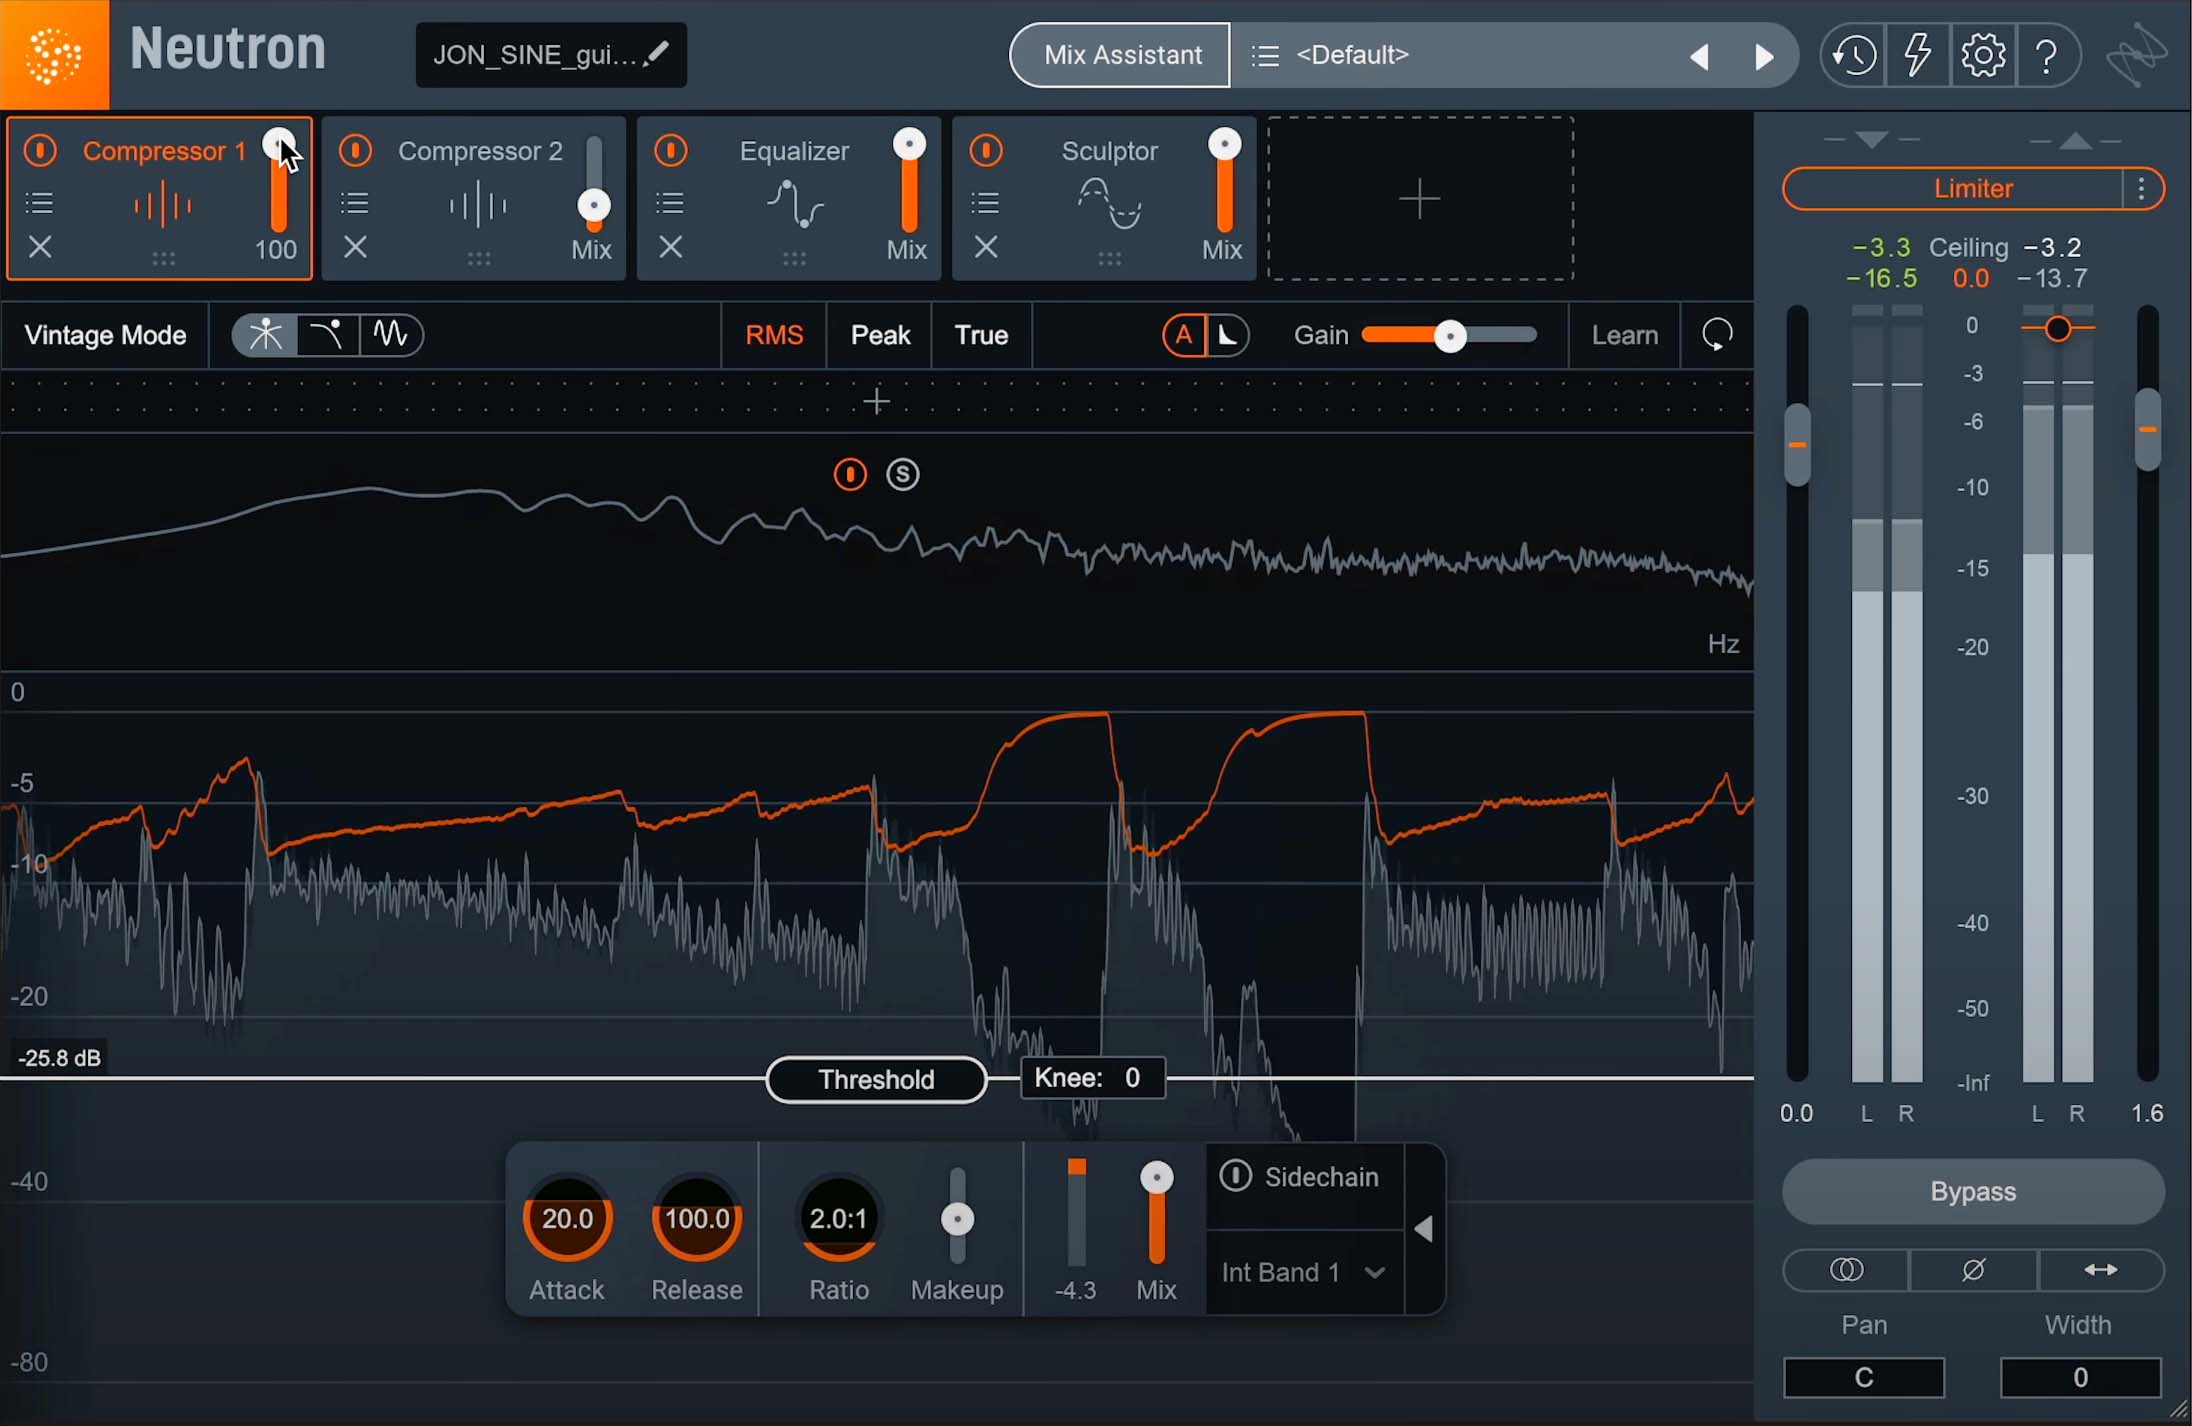
Get parallel processing with an adjustment of the sliders in the module section of Neutron
Parallel processing can happen at the module level by adjusting the slider. That’s it, one parameter and no routing required. This means you can really balance guitar levels with one compressor and crush them tastefully with another compressor.
Add sheen and sparkle to keys with Sculptor, and EQ with extreme settings in the upper hids and high end, and then blend them in subtly with the mix sliders. The possibilities are endless, and you can also find mix sliders across other products in Music Production Suite Pro like


Nectar Pro


Ozone 11 Advanced


VocalSynth Pro
10. Use Neutron Pro as a post production powerhouse
Many people working with Neutron are probably mixing music, but if you do any post production work, there’s a trove of hidden functionality for your post needs. For people for example, Neutron has loads of helpful presets and features, including up to 7.1 support for those mixing for post.
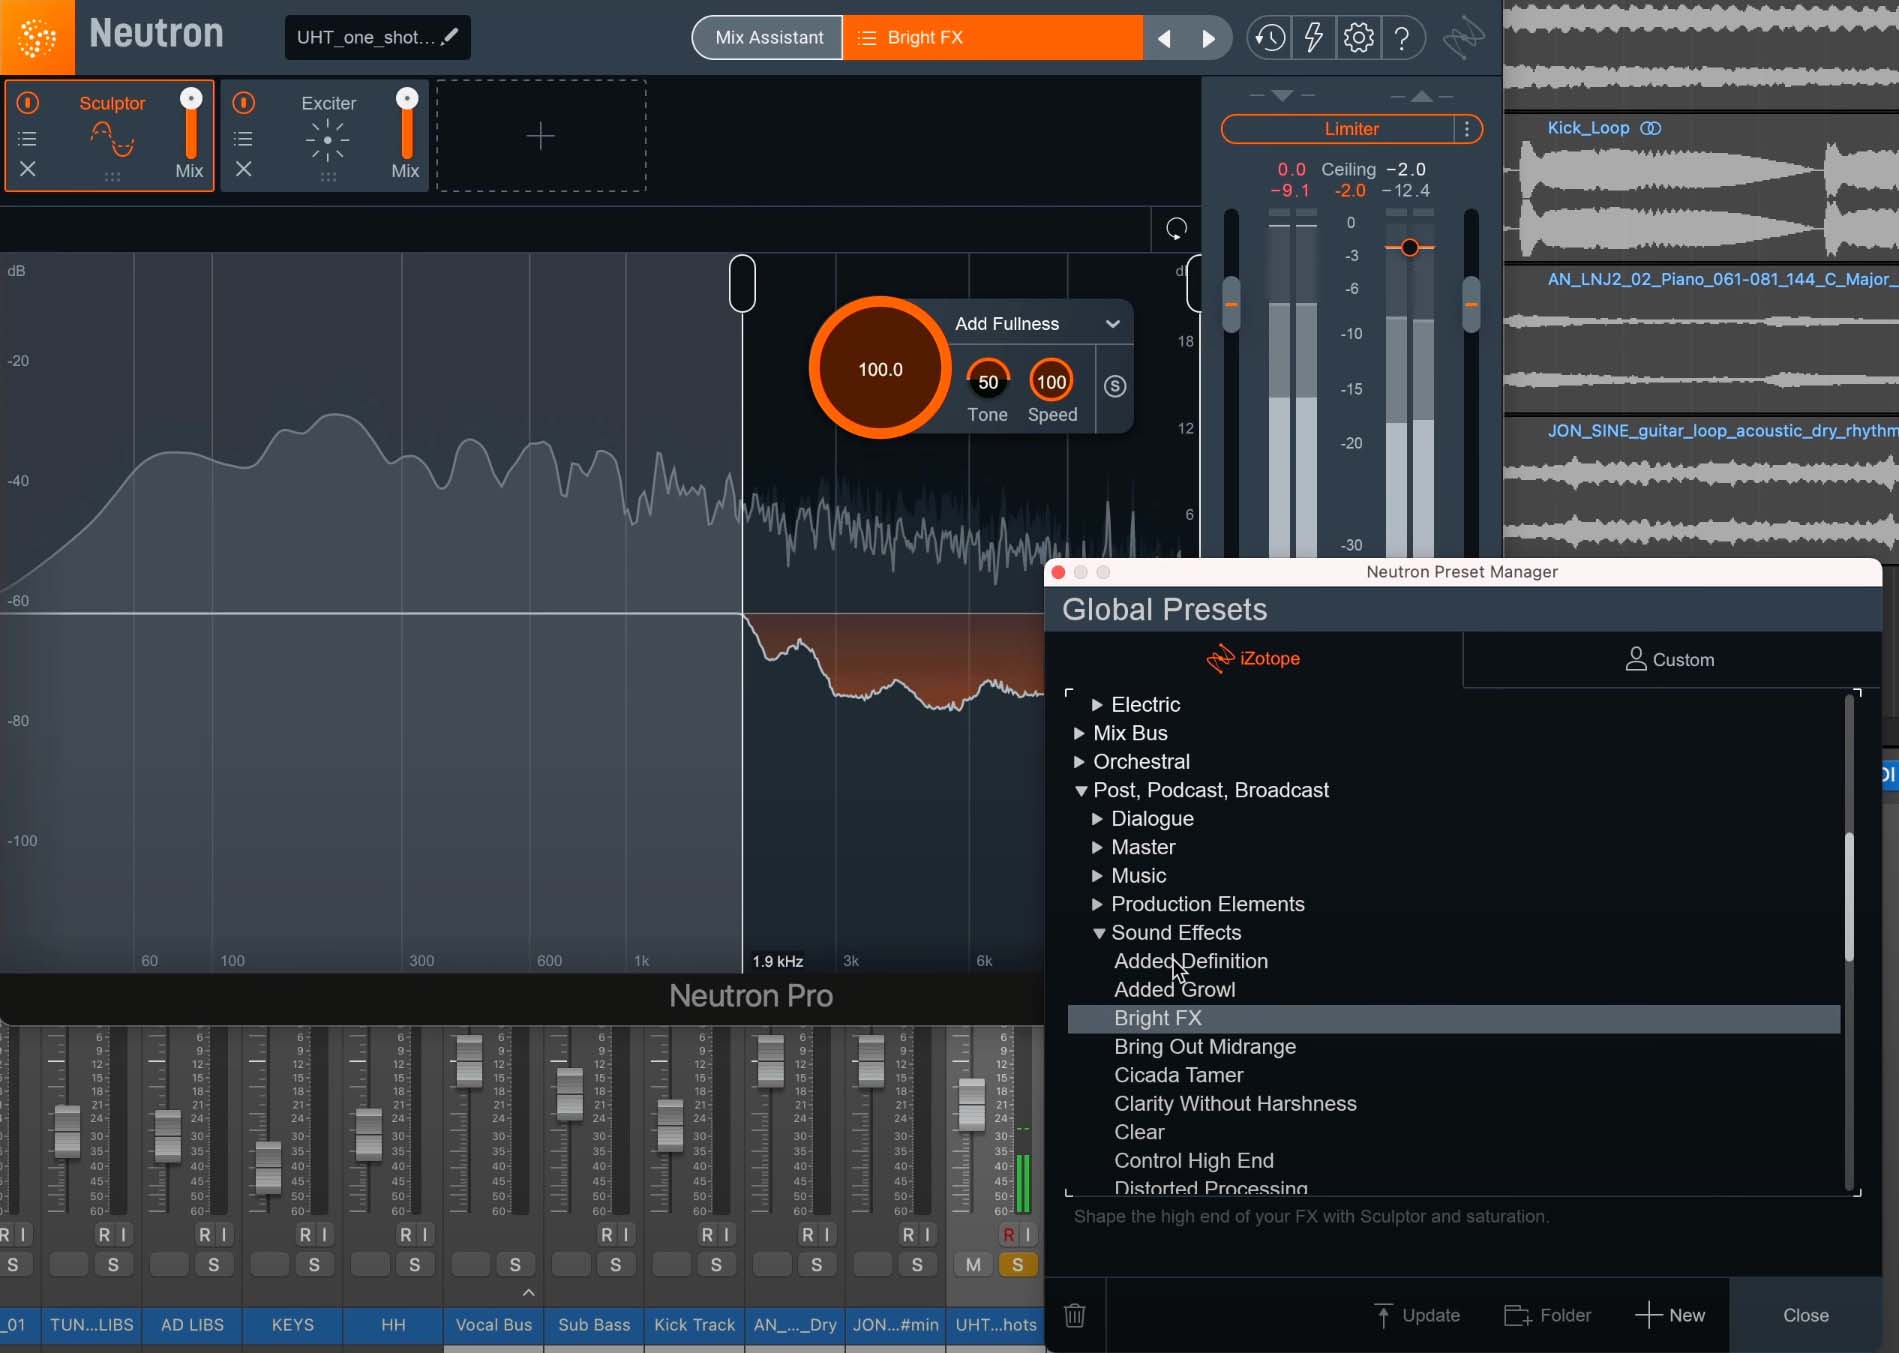
Presets for dialogue, master, production elements, and sound effects are included with Neutron
If you head to the preset menu, you’ll see that Neutron is stocked with presets for post production dialogue, master track, music, production elements and sound effects. You can preview these effects in real time as you scroll past them. Whether you’re working on a movie trailer, or foley enhancement, Neutron Pro has you covered.
Start mixing audio with these "hidden" features in Neutron
Now that you’ve discovered these "hidden" features in Neutron, it’s time to add them to your workflow. Try a free trial of Music Production Suite Pro to access Neutron and all of these new ways to make your audio mixing easier and faster.
