Mastering Music: 10 Hidden Features in iZotope Ozone
Whether you’re new to mastering in Ozone or you’ve been using it for years, learn about these ten “hidden” mastering features that can make mastering easier and faster.
iZotope


Ozone Advanced
In this article and video, we’ll cover ten lesser-known aspects of Ozone that will make mastering easier, speed up your workflow, and give you an edge in your next project.
Want to follow along as you learn about these new features? Start your free trial of


iZotope Music Production Suite Pro: Monthly
Please note: While these features are in Ozone Pro, many of these features are also included in


Ozone 12 Advanced
1. Set feature in Undo History controls
Ozone has a powerful Undo History Module that allows you to compare previously adjusted settings within the plug-in, so you can go back in time easily. Did you know there’s also a section in this module called Set?
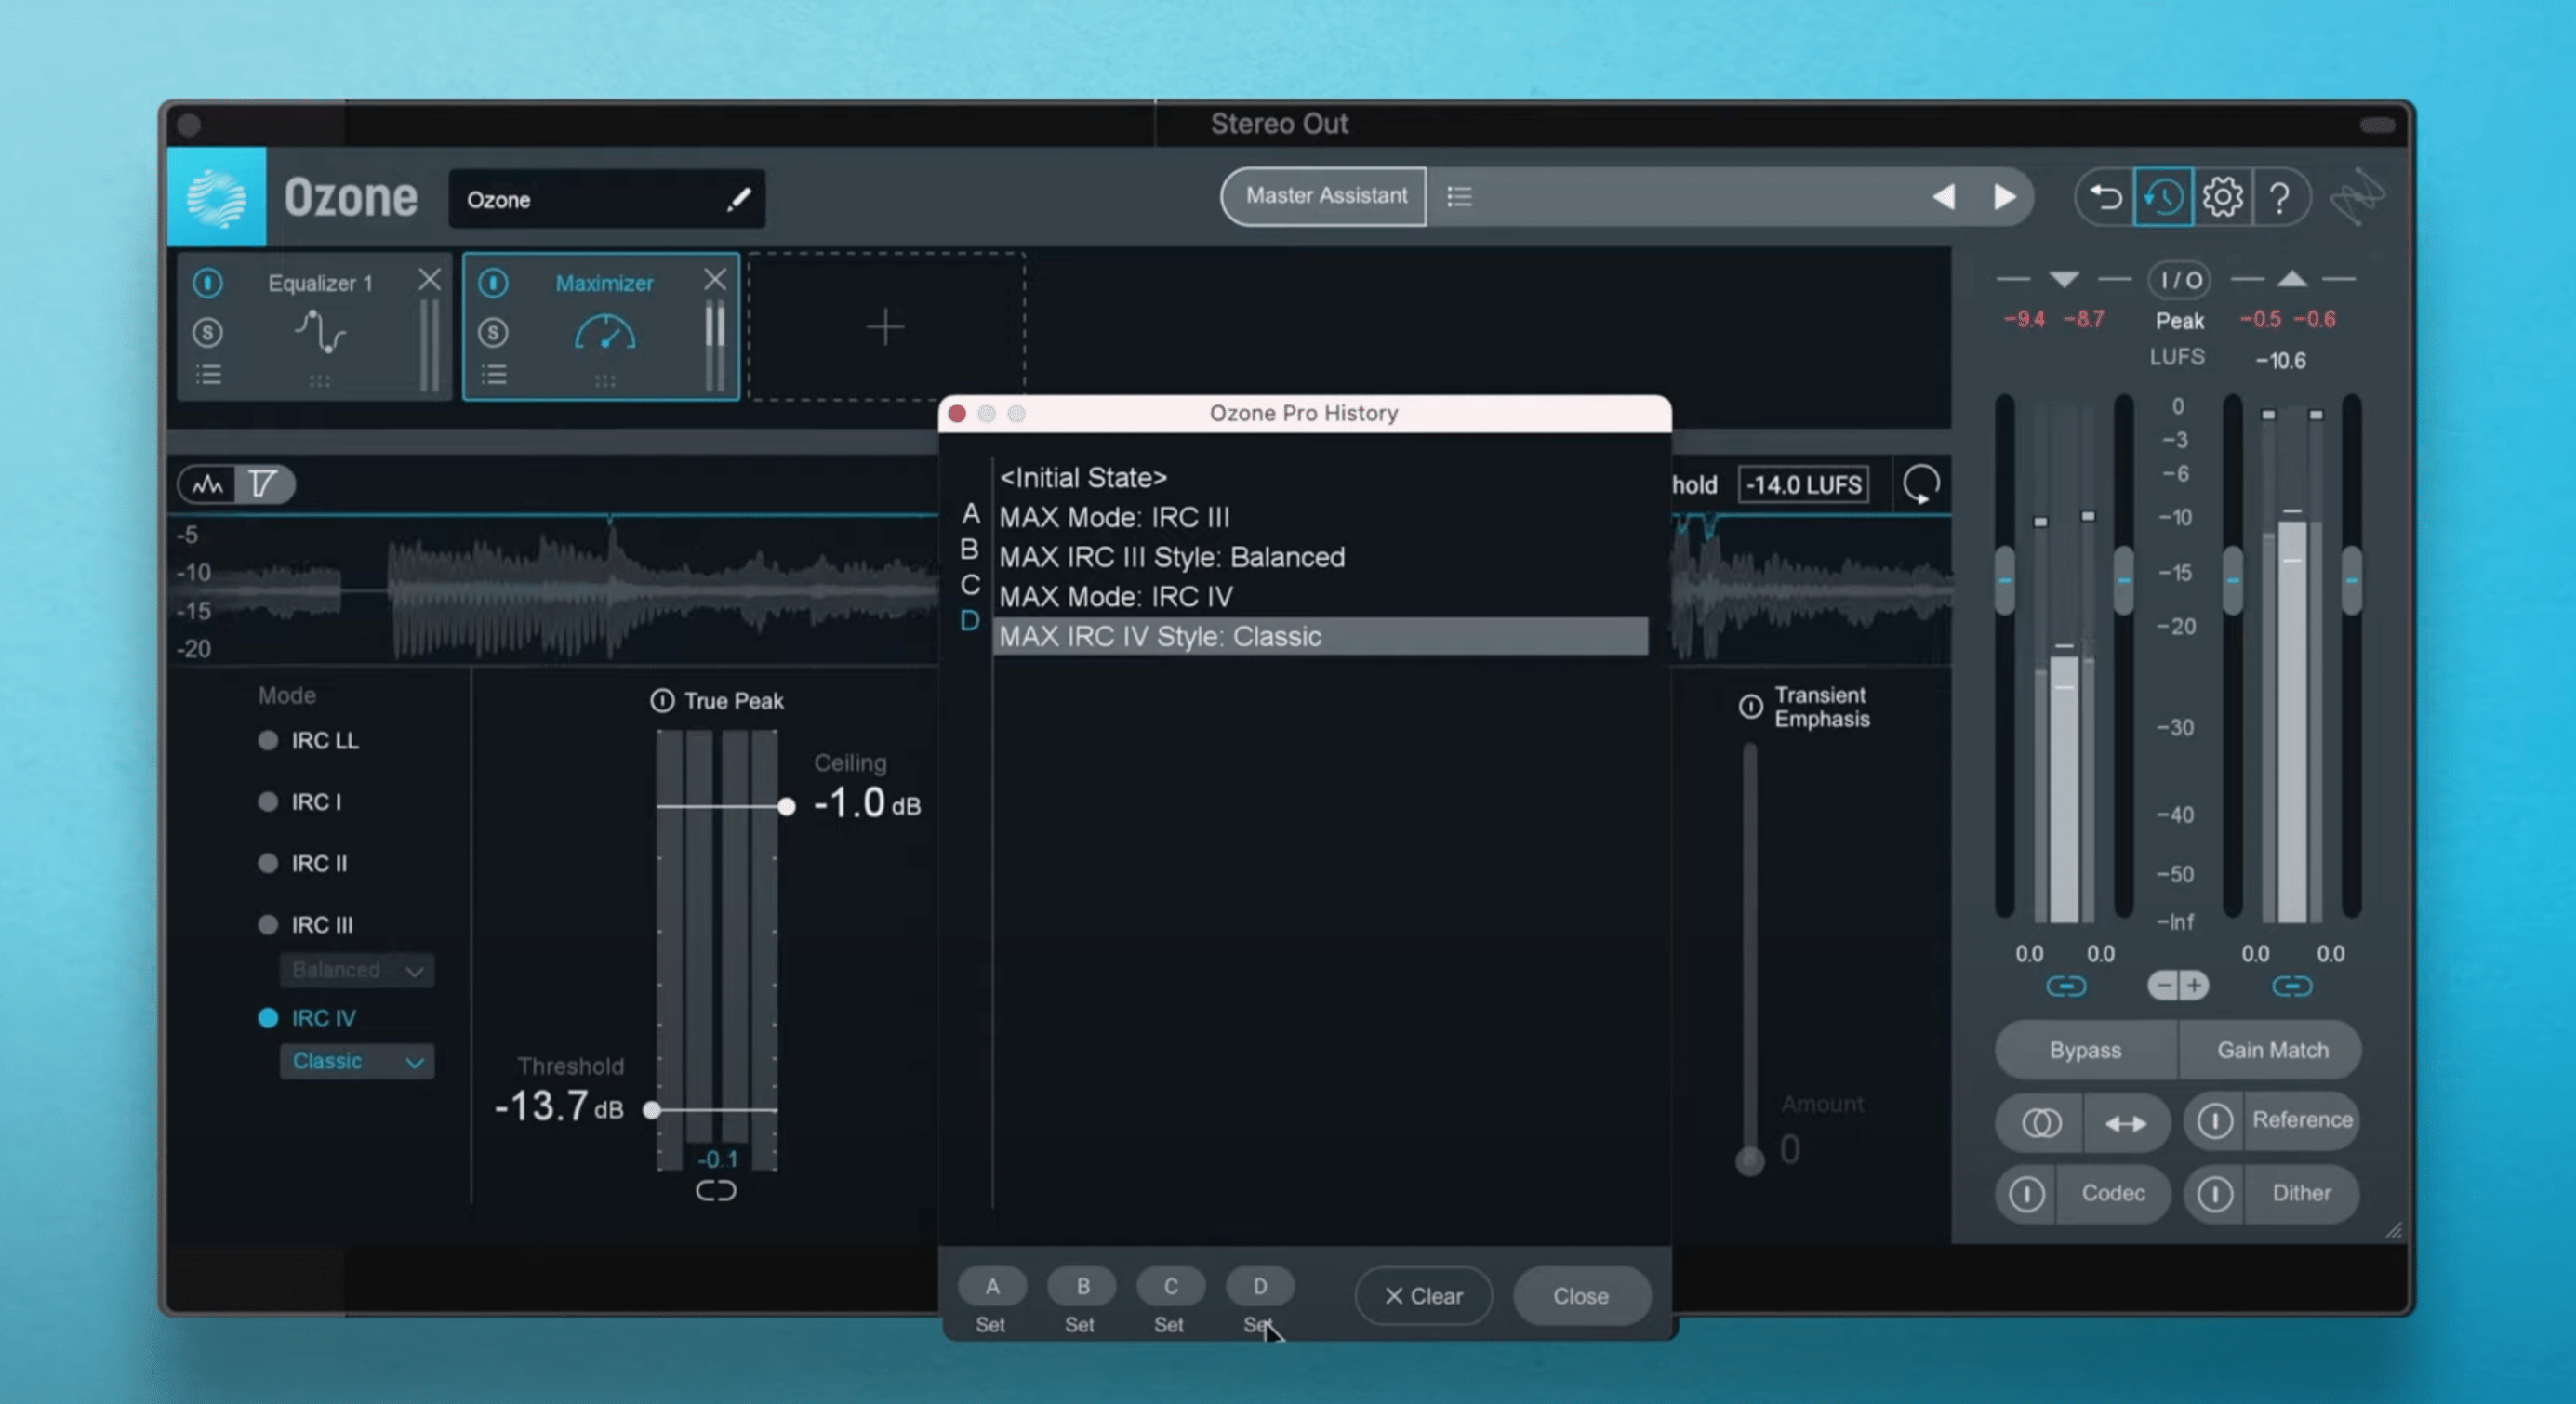
Use the Set feature in Undo History controls to compare different settings or complex chains
In the Set section, you can assign up to four points in the History list to sets A, B, C, or D. This is useful for comparing different settings at once.
For example, if we wanted to quickly audition four different IRCs, or Intelligent Release Controls in Ozone’s Maximizer without having to scroll through drop down menus to toggle them on the fly, just click on the ones you want to audition to them to make them appear in the undo history window, then assign each one to a letter. Now you can use your ears to see which IRC is right for you. You can also toggle clusters of processing and complex chains against each other too.
2. Phase correlation meter
Ozone’s Imager is one of the most popular modules for making tracks panoramic and wide. But did you know that you’ve also got a free phase correlation meter built into the module to use when checking your mix or master in mono?
A correlation meter is used in stereo to ensure that the left and right signals will sum to mono without any cancellation of frequencies. If you’ve ever heard someone recommend that you check your mix in mono, this is what they’re talking about.
Even without any widening processing employed by the module, you’ll see the correlation meter light up when audio is passing through Ozone.
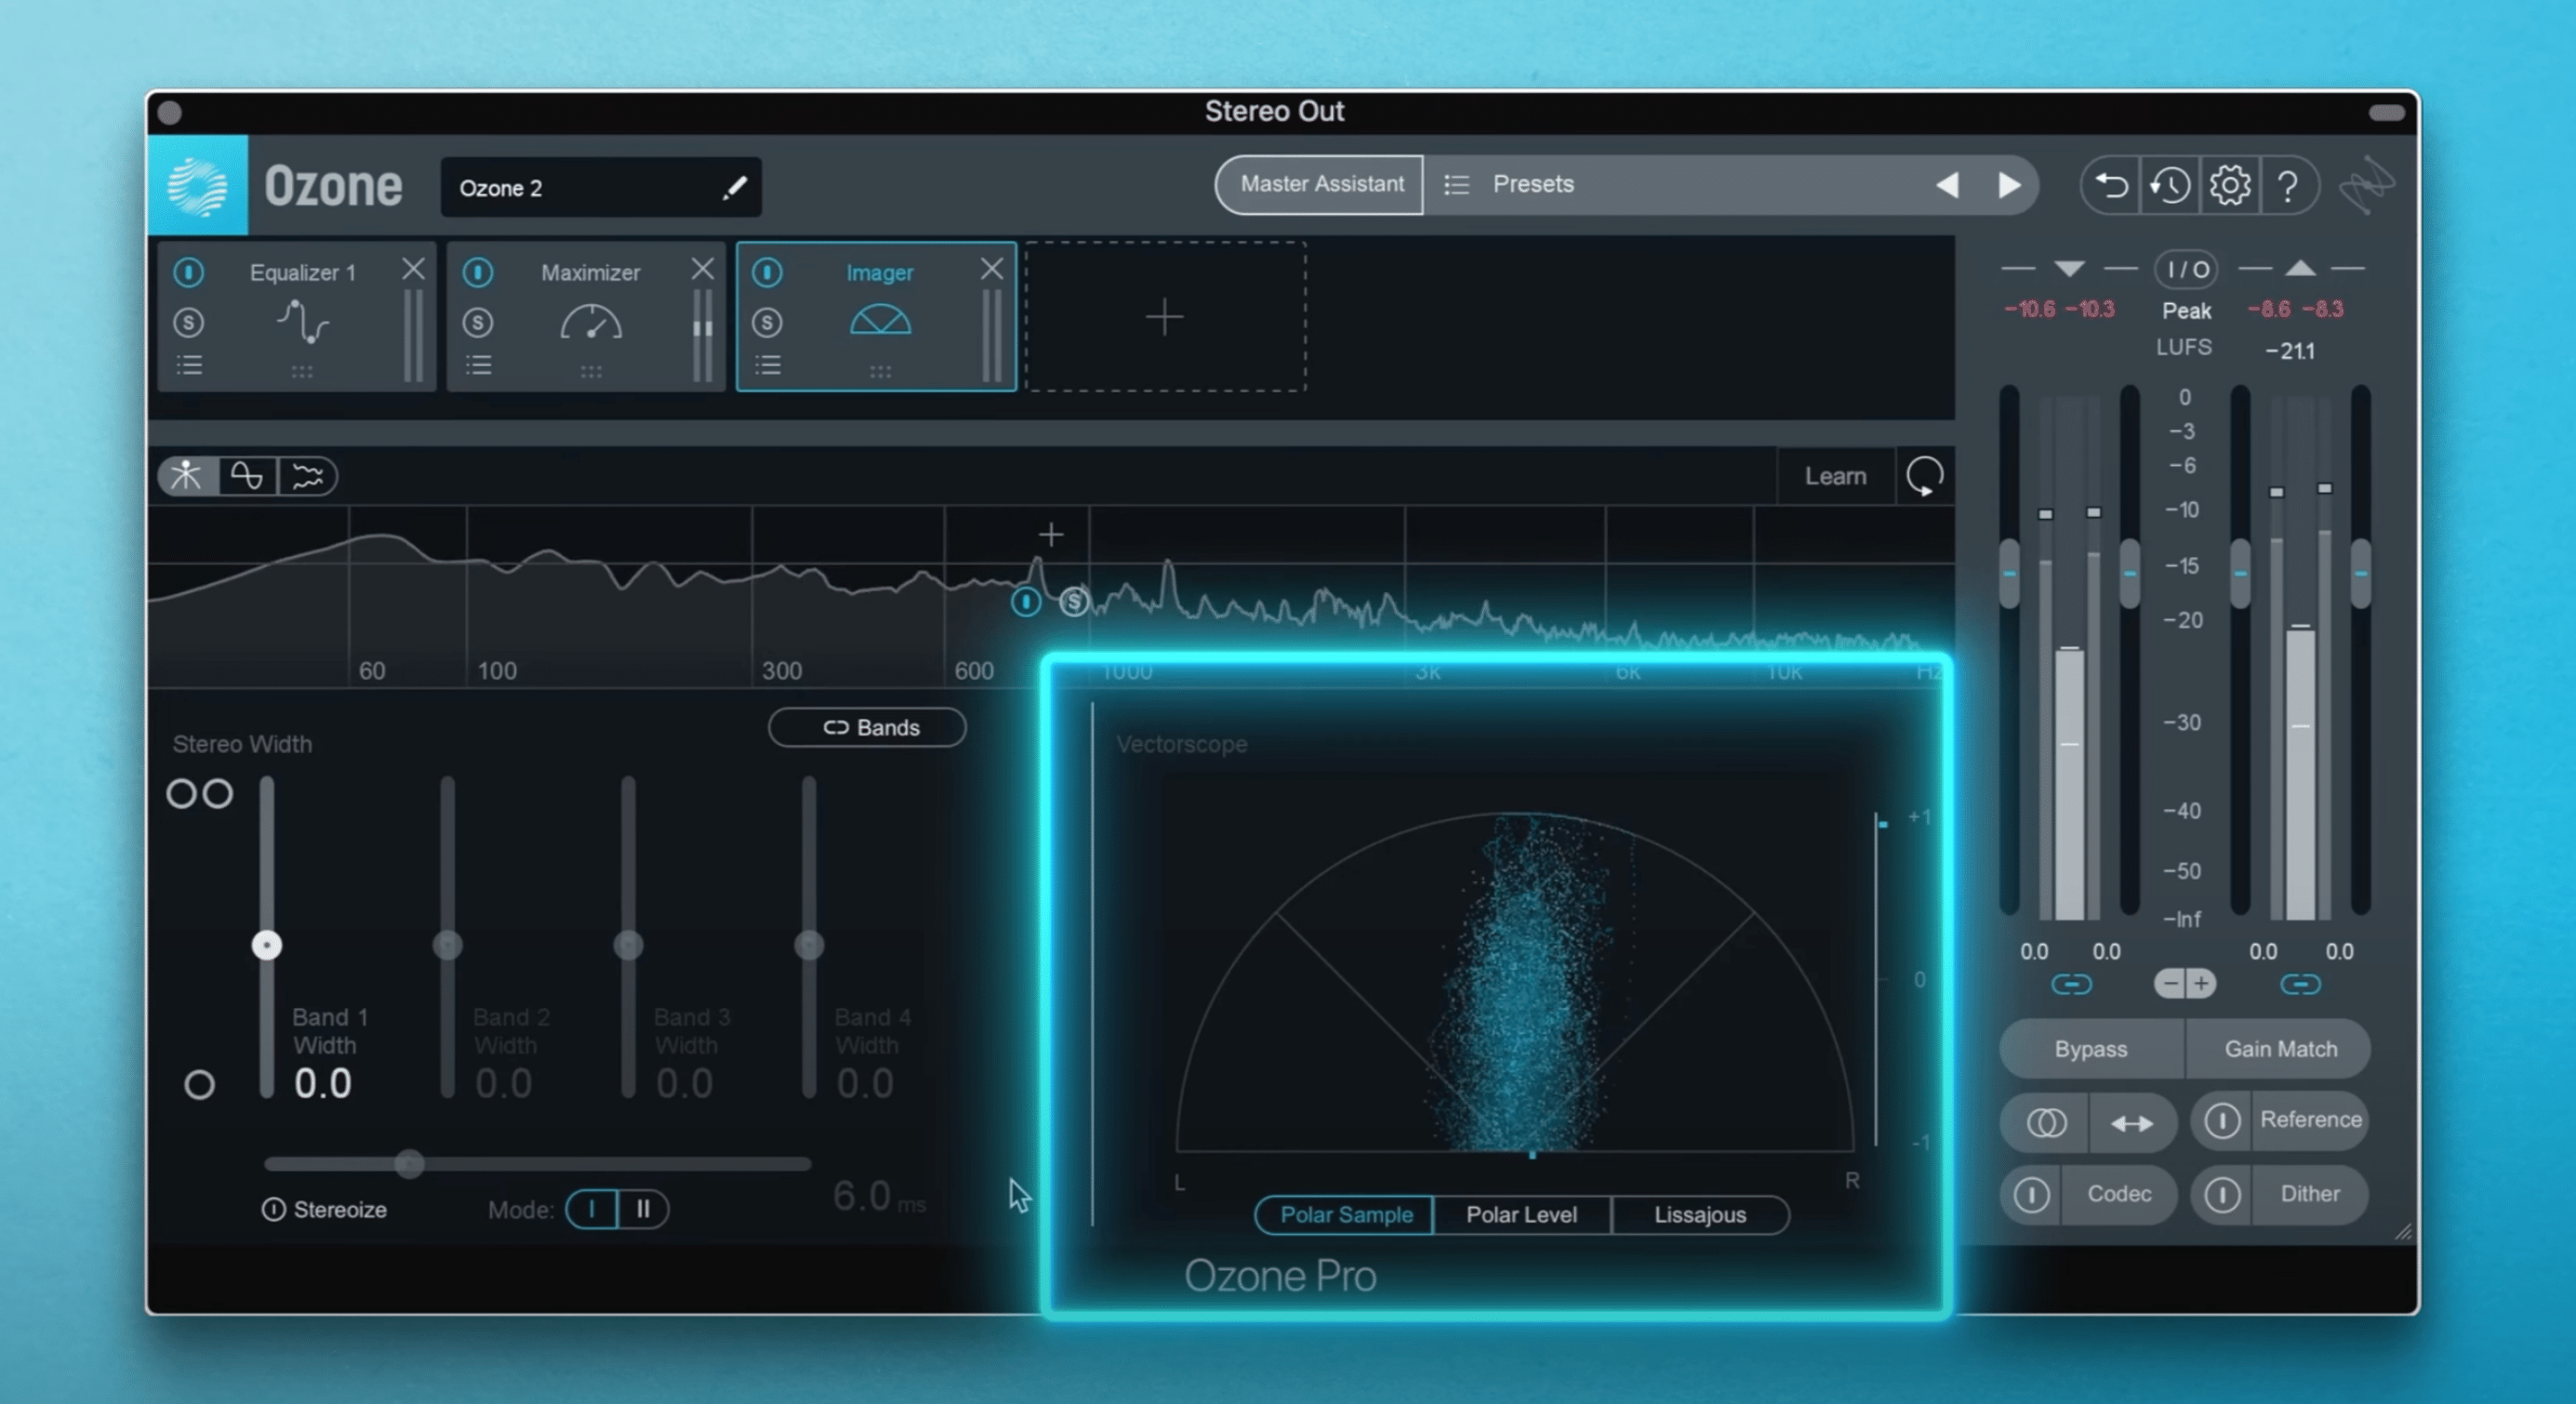
Ozone’s phase correlation meter
Maybe you’ve summed your track to mono and noticed that elements hard panned left or right in the stereo field disappear or are less audible than stereo. To avoid this, you’ll want to make sure this little meter is trending toward positive +1 values, north of the zero crossing.
Now there’s four ways to check the phase correlation of track or mix: polar sample, polar level, lissajous, and the correlation trace. If you see a trace dipping below the zero point in red, that’s an indication that you might need to rethink your panning structure. To be sure, hit the mono button on the bottom right side of the interface and listen for any instruments that disappear or become less punchy and powerful.
3. Detection filter
If the effects of the compressor in Ozone’s Dynamics module are too apparent on the audio file, there’s a feature called detection filter that makes the action of the compressor less apparent and more smooth.
First, head to the module, and click on the top left icons to adjust the frequency response of the detection circuit. When the detection filter is active, you can access the controls shown below.
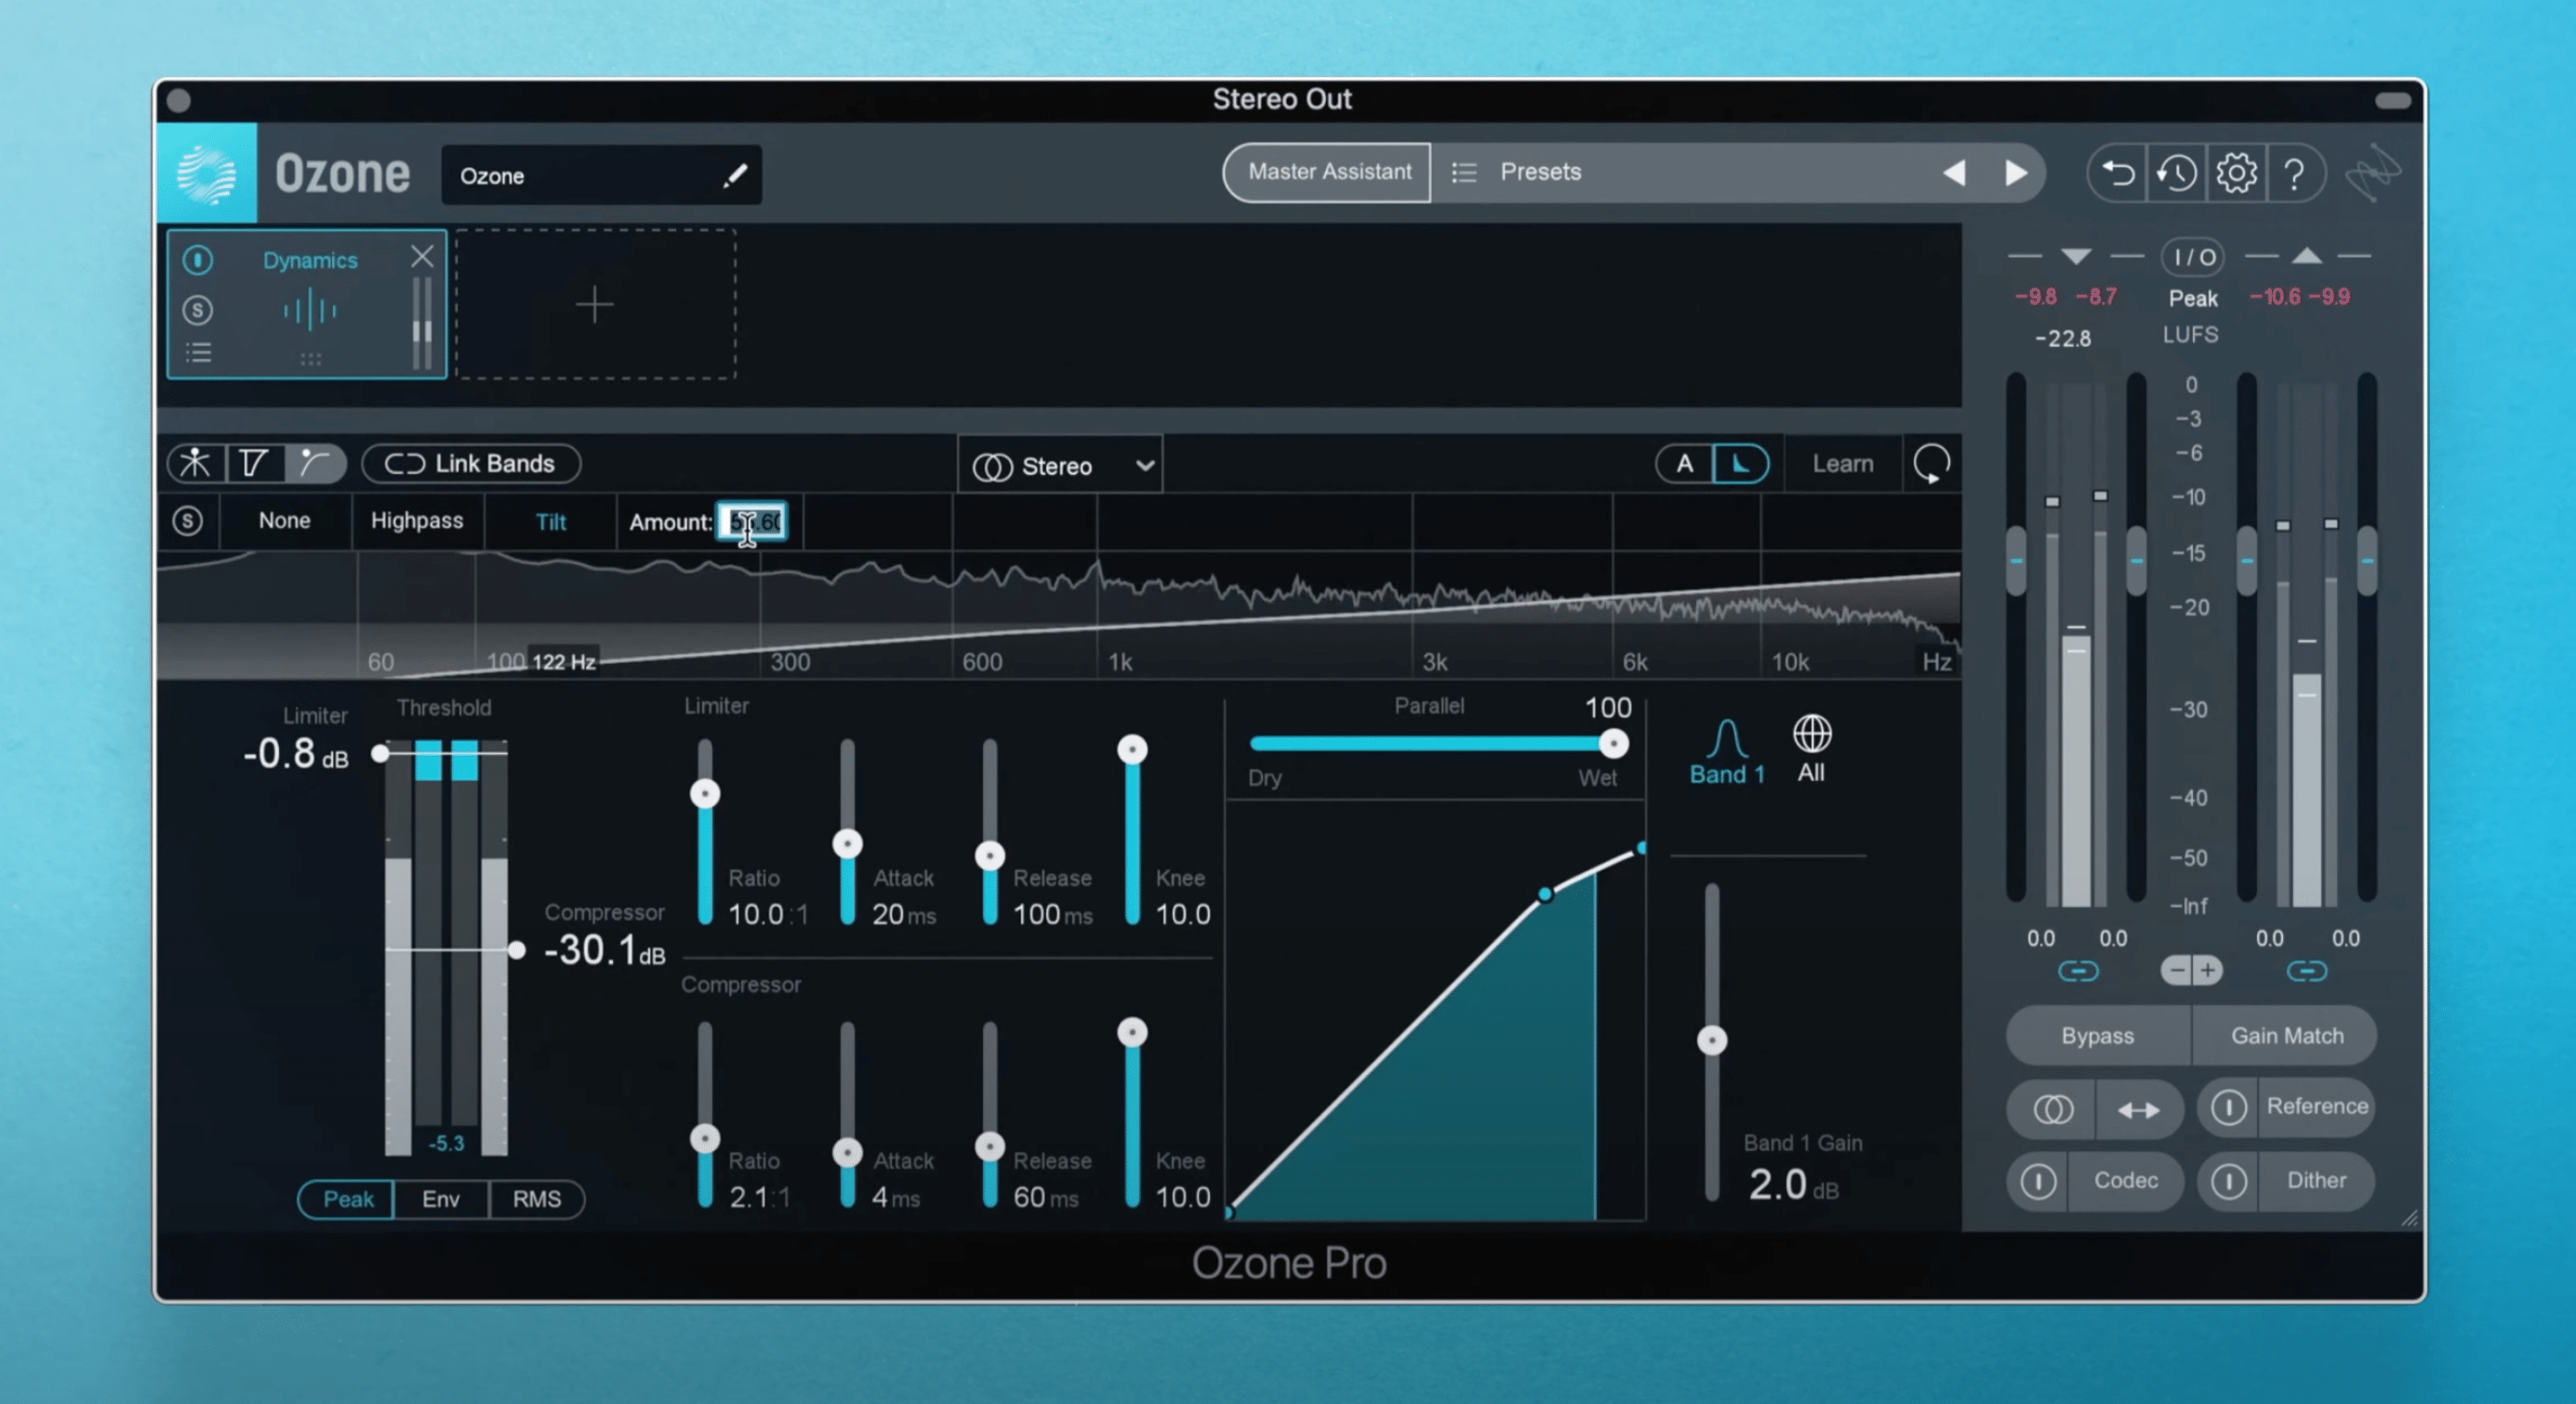
Using the detection filter in Ozone Dynamic’s module gives your music a cleaner sound
Most of the time, your track’s low end will be triggering the compressor, perhaps causing the compressor to behave in a way that sonically, you don’t like.
Pressing solo allows you to hear the signal that the compressors threshold is reacting to. From here, you can use a filter shape like high pass or tilt to ensure that sustained bass elements don’t trigger the compressor to work more than you want it to. In fact, the tilt control is similar to the THRUST circuit found on API compressors, preserving low frequencies using a high-frequency weighted filter curve.
Adjust the amount by clicking and entering a value into the text field to modify the slope of the tilt filter. Before enabling a high pass, you might have a muddy sound, lots of pumping, but once you enable the high pass filter, it will have a much cleaner sound with less audible pumping.
You can use this detection filter processing in the Dynamics module and Vintage Compressor module.
4. Region selector in reference panel
Most people don’t realize that Ozone is a powerhouse for track referencing, and there’s actually machine learning built into some of the referencing features in the plug-in.
When tracks are initially loaded into the reference panel, handles will appear overlaid on the waveform display. The handles represent boundaries of predetermined loop points, also known as the region selector tools. The loop boundaries are placed based on similar segments detected in the track, using machine learning technology.
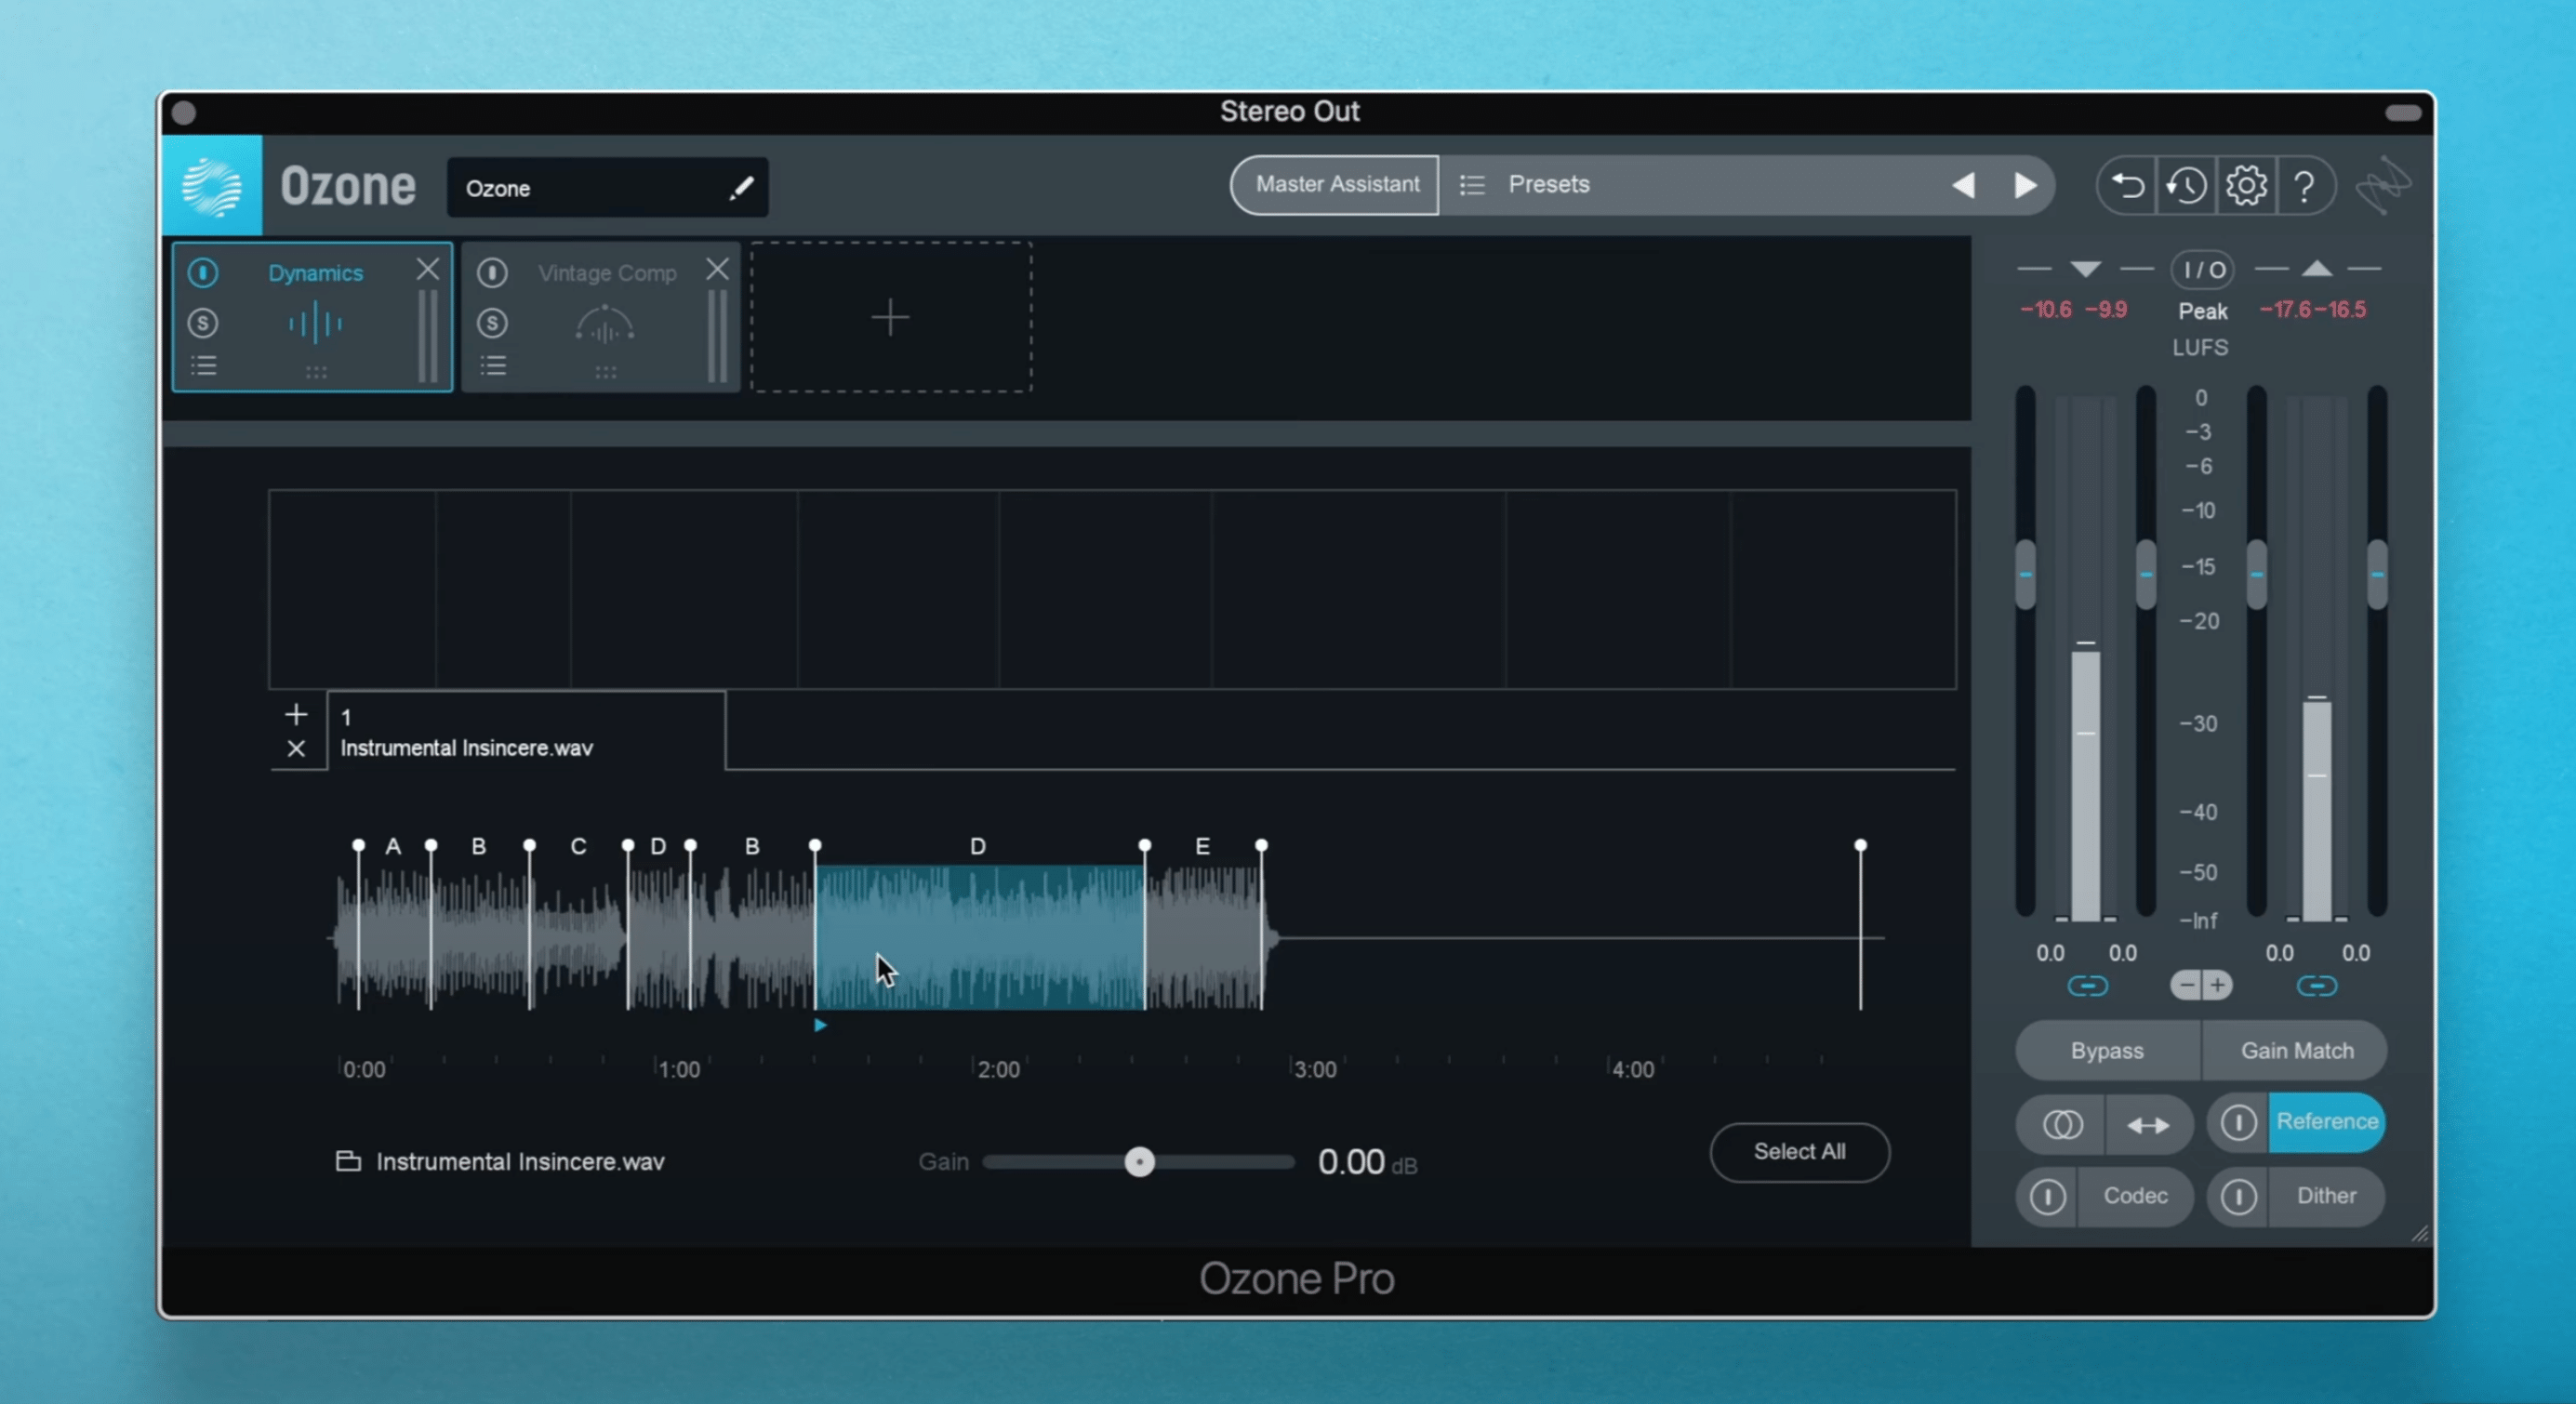
Ozone Pro’s region selector in the reference panel saves you time by identifying your song sections
This saves you time having to search the waveform to find the verse or chorus, as Ozone will know where the hooks and verses are and be smart enough to position loop points there with only some minor tweaking on your part.
5. Keyboard shortcuts
There are many hidden keyboard shortcuts in Ozone to help you fine-tune your processing or speed up your workflow.
For example, in the EQ section, you can lock adjustments to the vertical axis by holding the SHIFT key when dragging a node left or right to lock movements to the horizontal (frequency) axis, which allows you to make frequency adjustments without accidentally adjusting gain.
To alter the gain without altering frequency, just hold SHIFT and start moving up or down with your mouse.
To make coarse adjustments to the EQ, hold the shift key and use the arrow keys to make frequency or gain value adjustment in larger increments.
To make very fine adjustments, Hold the command or CTRL key on windows when using the arrow keys, up/down or left and right, to make frequency or gain value adjustments in smaller increments. This is helpful if you really want to dial your EQ to surgical precision.
6. Extra Curves and Phase Control
There are two lesser known, but powerful features hiding in Ozone’s EQ: Extra Curves and Phase Control.
Extra Curves
The time domain response of IIR (analog) filters contributes to the change in the overall sound, most clearly observed in broadband transients, where the “smearing” of different frequency components through a filter can ‘diffuse’ the sound, causing it to sound less sharp.
By enabling ‘Show Extra Curves’, in the options menu under the EQ tab, you will have more insight into whether this is happening, and whether you need to be more conservative with your EQ moves.
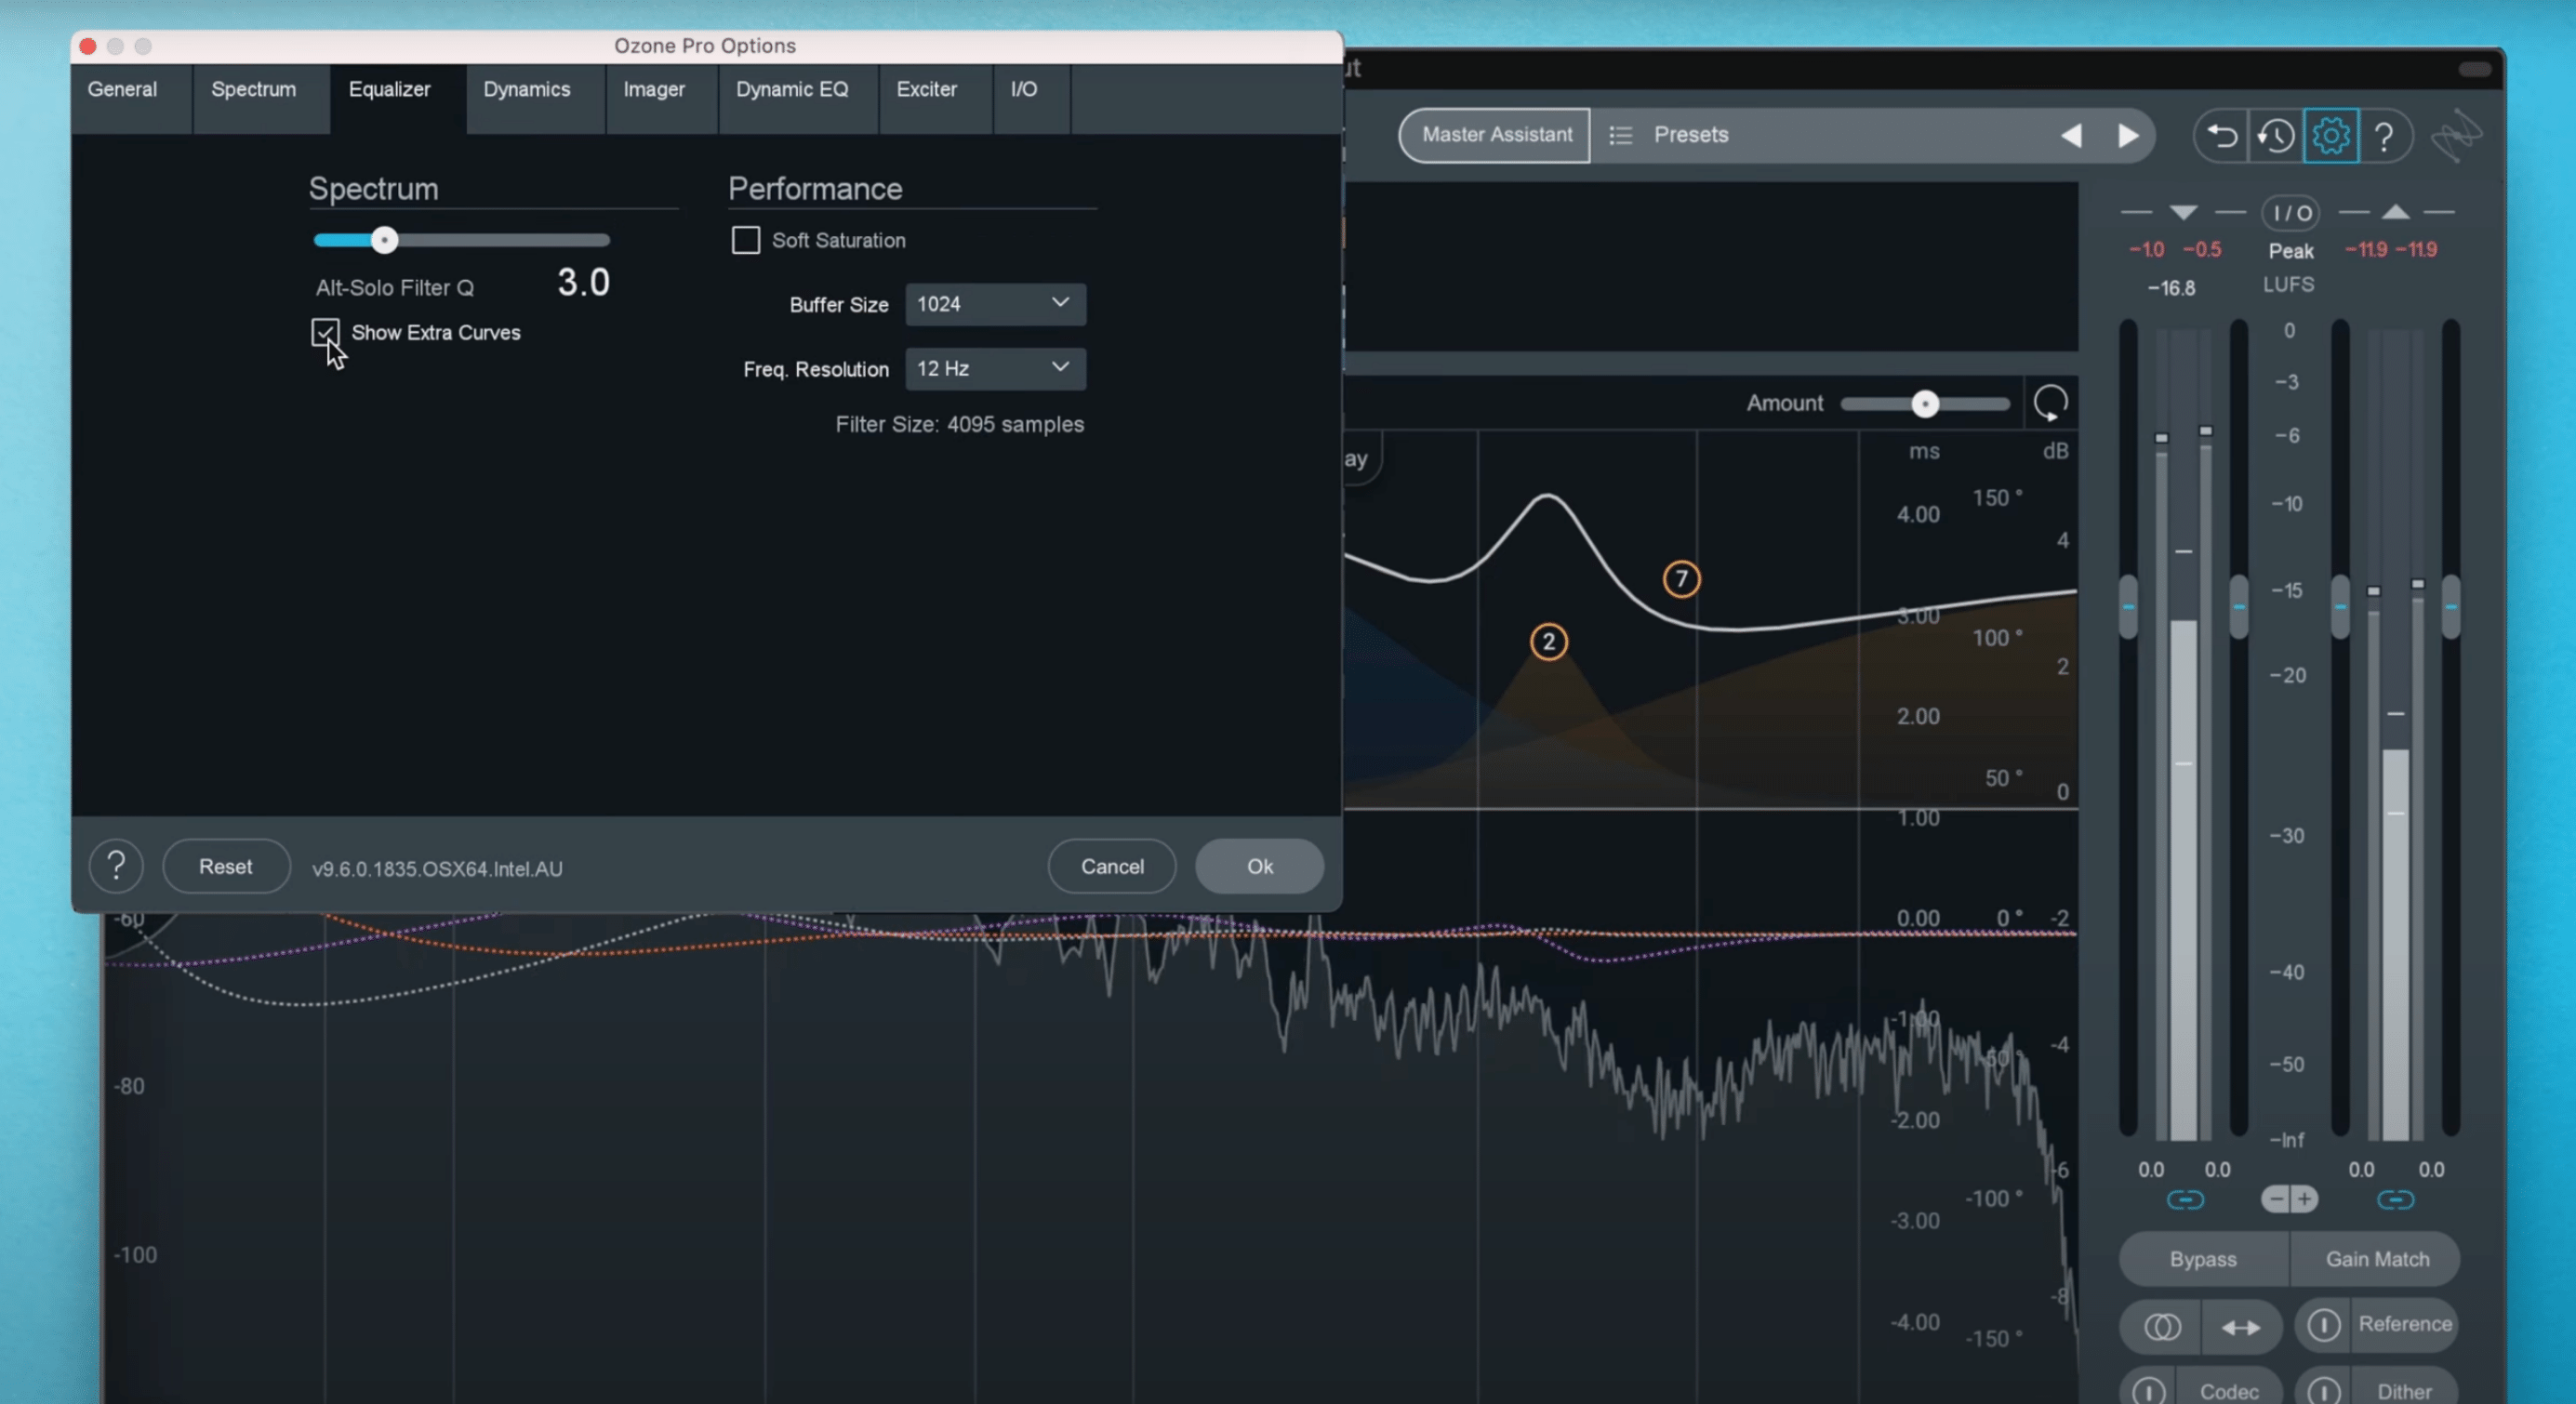
Check the “show extra curves” button to view the extra curves in Ozone Pro
Phase Control
Using Global Digital Mode gets you additional phase control filters in the EQ. Phase response let’s you choose, per band, what kind of phase adjustment is going to occur. Just open the filter, toggle this little arrow icon, and now you can adjust the phase response of that filter.
Note that 0% Phase means the selected band will have a Linear phase response, while 100% Phase means the selected band will have a Minimum phase response.
Pushing the phase toward 100% can be helpful if you notice unwanted audible pre-ringing in the source audio as a result of your EQ adjustments.
7. Showing the reference spectrum
Ozone is a referencing powerhouse, and in that spirit, another hidden feature is the ability to show the spectral information of your reference overlaid on top of your source audio’s file.
Load a track in the reference panel. To toggle the spectral information, head to the I/O options pop-up menu above the I/O meters. Now, the reference track spectrum will be displayed in the module spectrum meters alongside the spectrum meter of your current track.
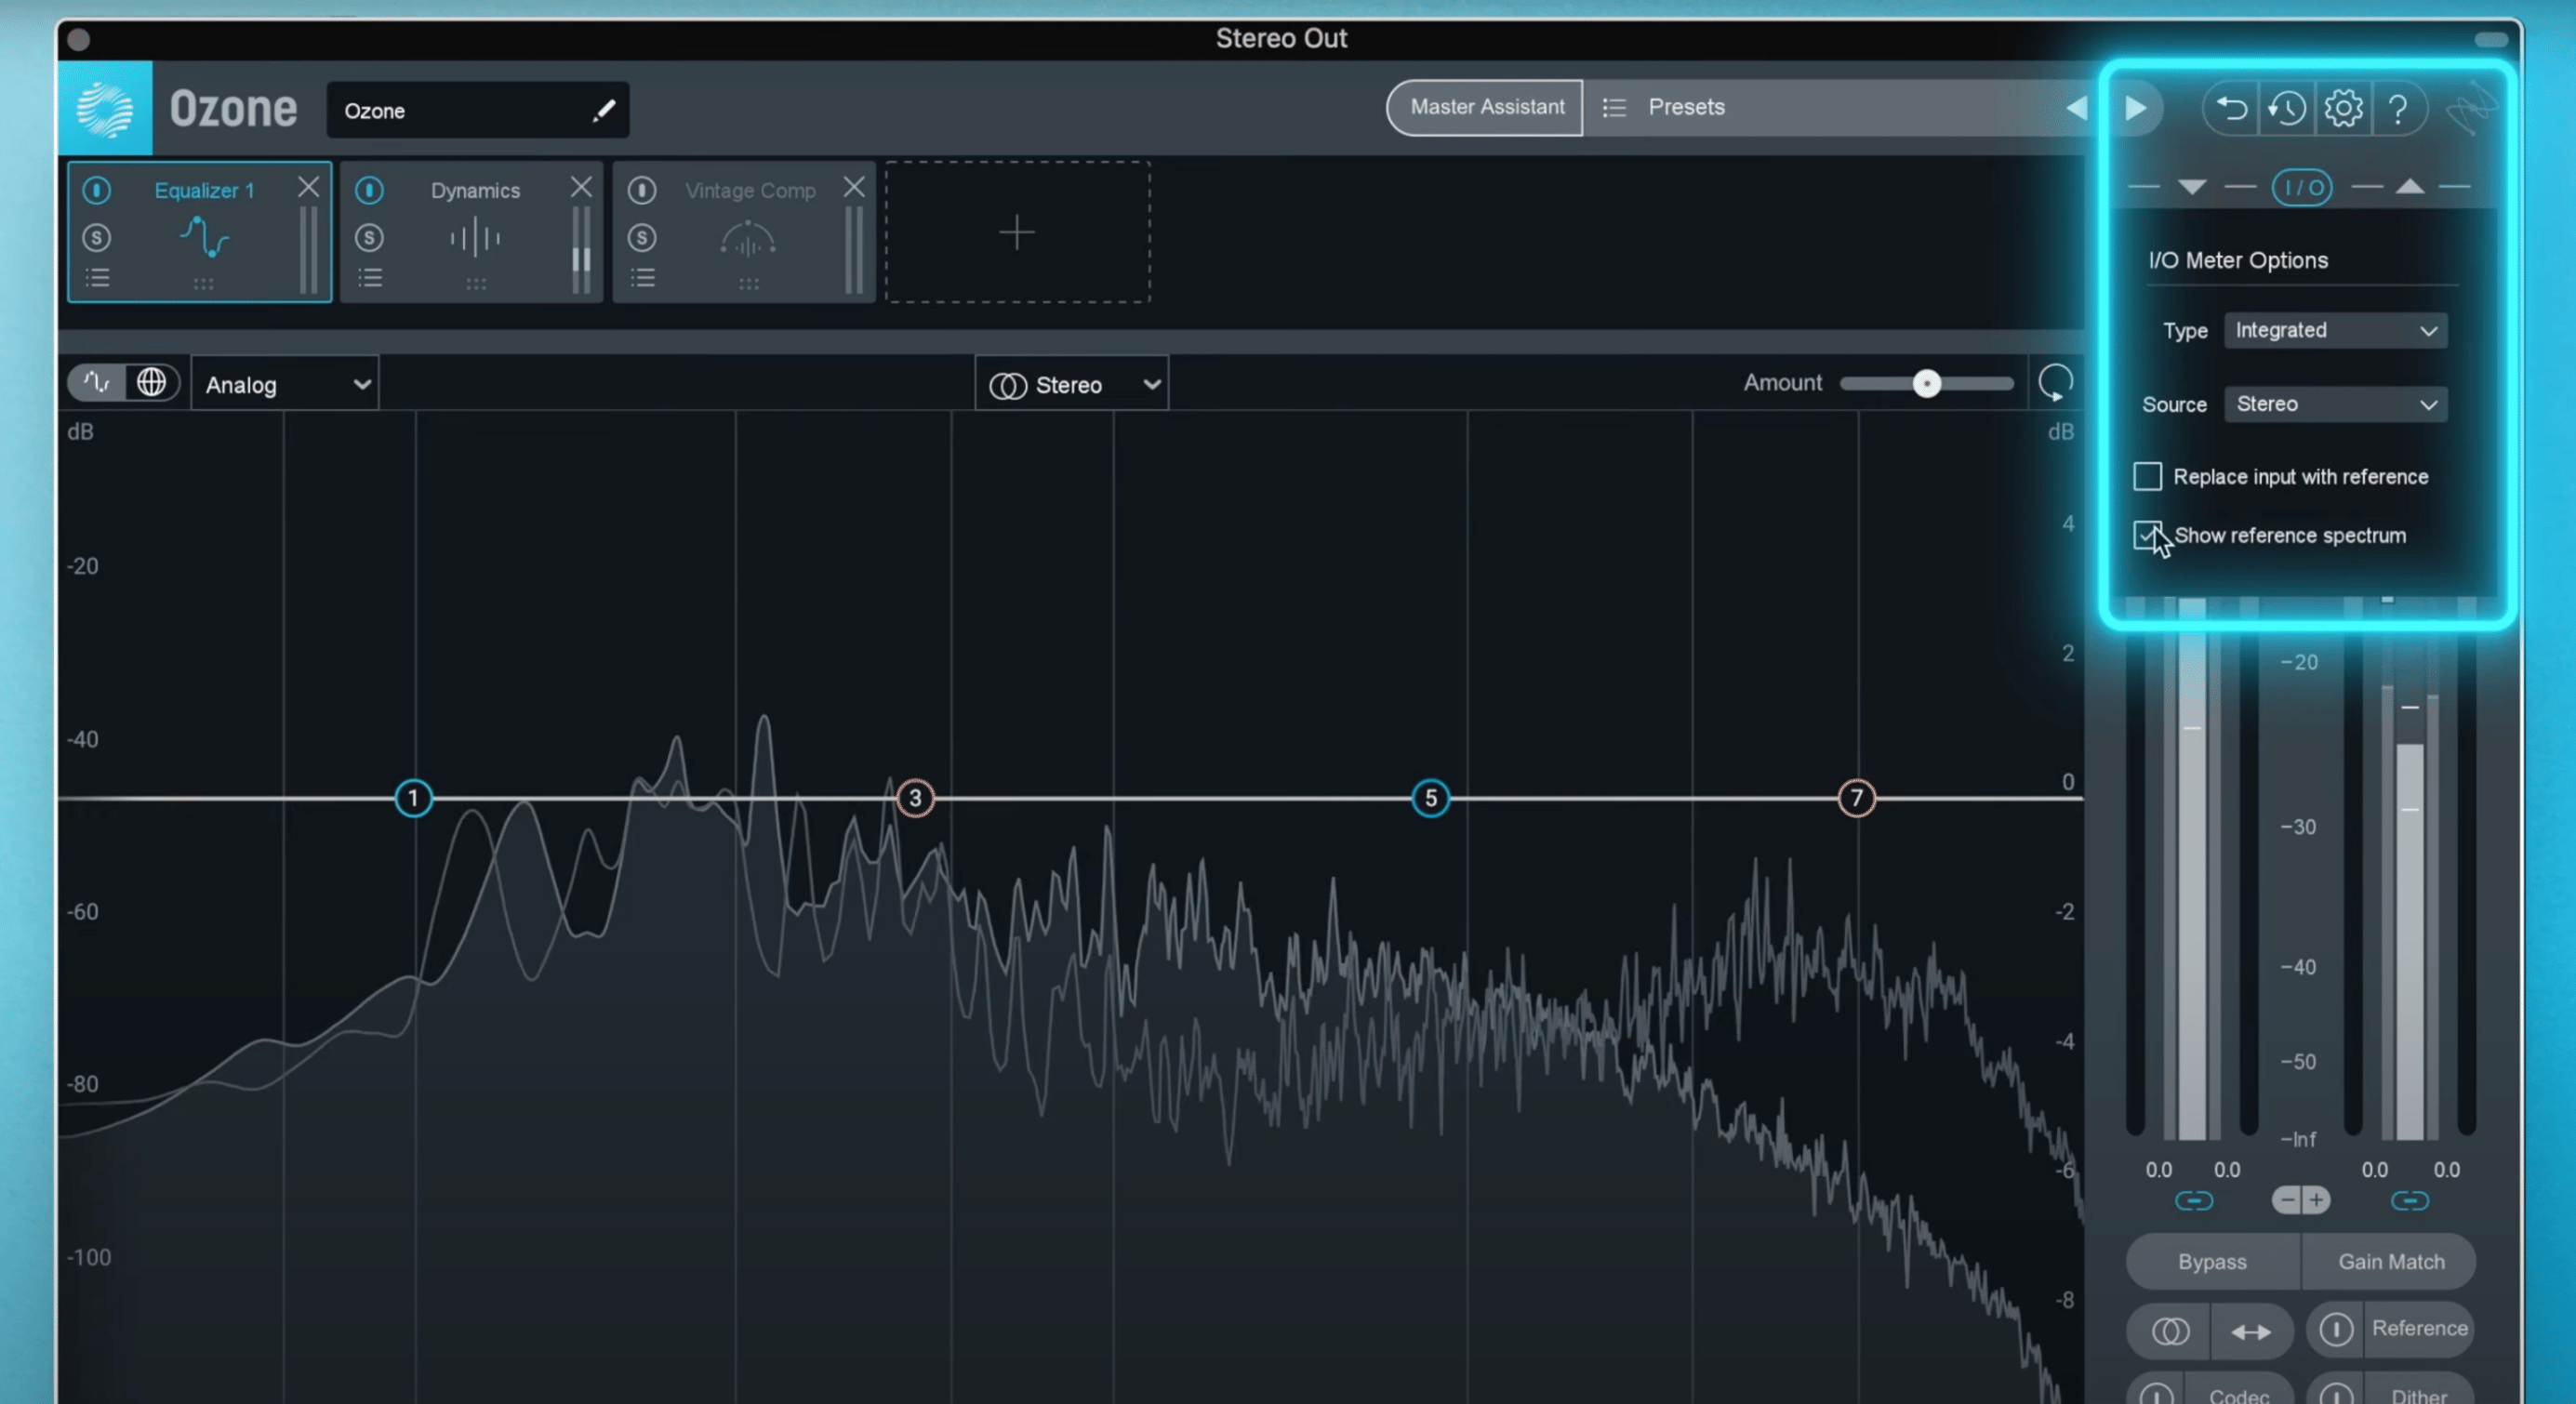
To remind yourself which is which, just remember that the reference spectrum will be the one that isn’t shaded, or filled in with grey. The one that’s filled in is your source audio.
This is extremely useful if you want to manually EQ aspects of input to match your reference or just see how your reference differs tonally from your source track.
Bonus tip: Navigate to the options menu, then to spectrum, and change the default average time from real time, to something slower like, 10 seconds. This will slow down the motion of both track spectrums allowing you to really see the tonal differences between the two.
8. Oversampling the exciter
Many people worry about aliasing, which is a nasty digital distortion when using saturation/distortion plug-ins. Check out episode 2 of Season 3 of Are You Listening?, where iZotope Director of Education Jonathan Wyner discusses the subject of excitation and oversampling in depth.
What many people don’t know is that Ozone has a feature called oversampling. And you’ll want to turn this on to reduce aliasing, that distortion we’re talking about, when using the module.
On a technical level, oversampling increases the sampling rate of the applied distortion to reduce aliasing. And when you turn this on, it's globally applied to all the bands in the module. Be careful though, as oversampling uses more processing power to increase the quality level of the exciter module, so keep an eye on your CPU.
9. IRC III pumping from Ozone 5
Ozone's IRC (Intelligent Release Control) technology lets you boost the overall level of your mixes without sacrificing dynamics and clarity. It’s one of the most popular feature sets in the plugin. But did you know that one of the IRC’s dates back to Ozone 5?
The IRC III pumping character style is the “legacy” setting and is the behavior used in Ozone version 5.01 and earlier. Many people still love the sound of Ozone 5, and that’s why this IRC remains in the plug-in today.
It’s a special one that represents the least aggressive style setting for IRC III and does not constrain the limiter’s release behavior. It can tend toward a slower release behavior and may result in pumping. So give it a shot the next time you’re auditioning IRCs with that Set feature we shared at the beginning of the article.
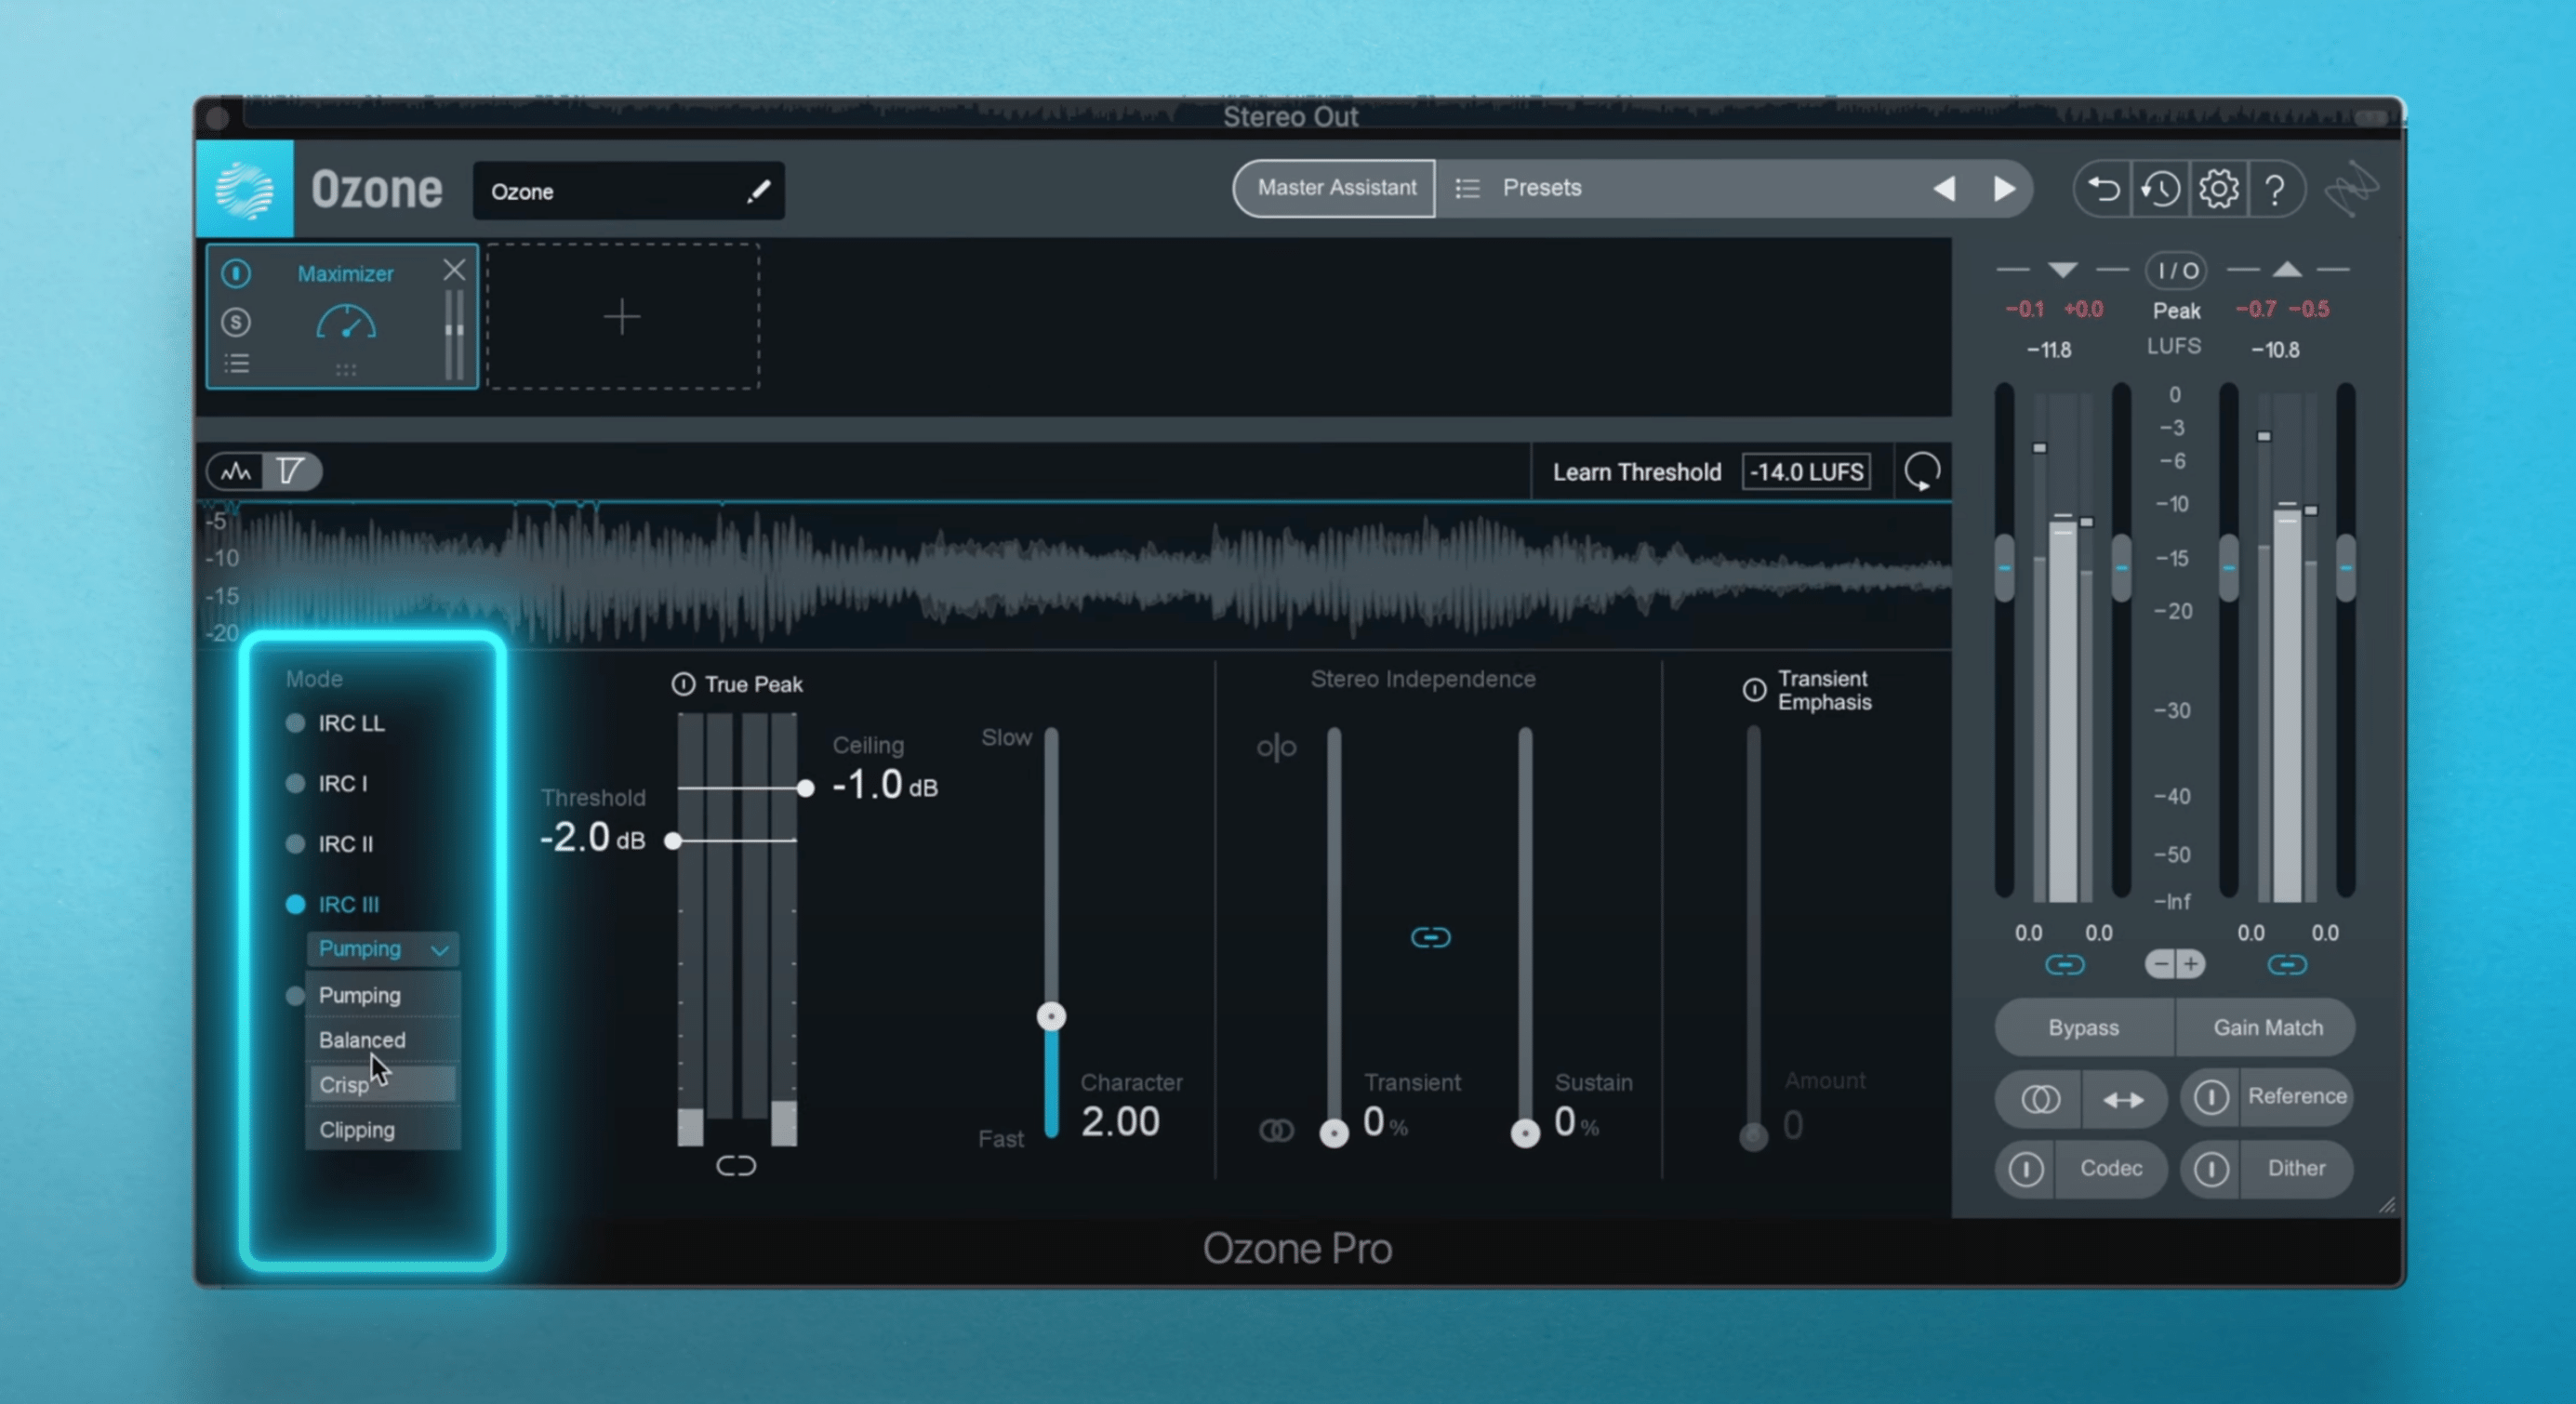
Select IRC III ‘pumping’ character style to get the legacy sound of Ozone 5
10. Master Assistant’s reference feature
You might be familiar with the Master Assistant in Ozone. It’s an AI-powered assistant that listens to your audio and suggests a great mastering starting point. But did you know you can tell Master Assistant to make your track sound like a reference track you love?
To get started, head to Master Assistant, select from here to choose any reference track that is currently loaded in the Reference panel as your target or by importing a reference.
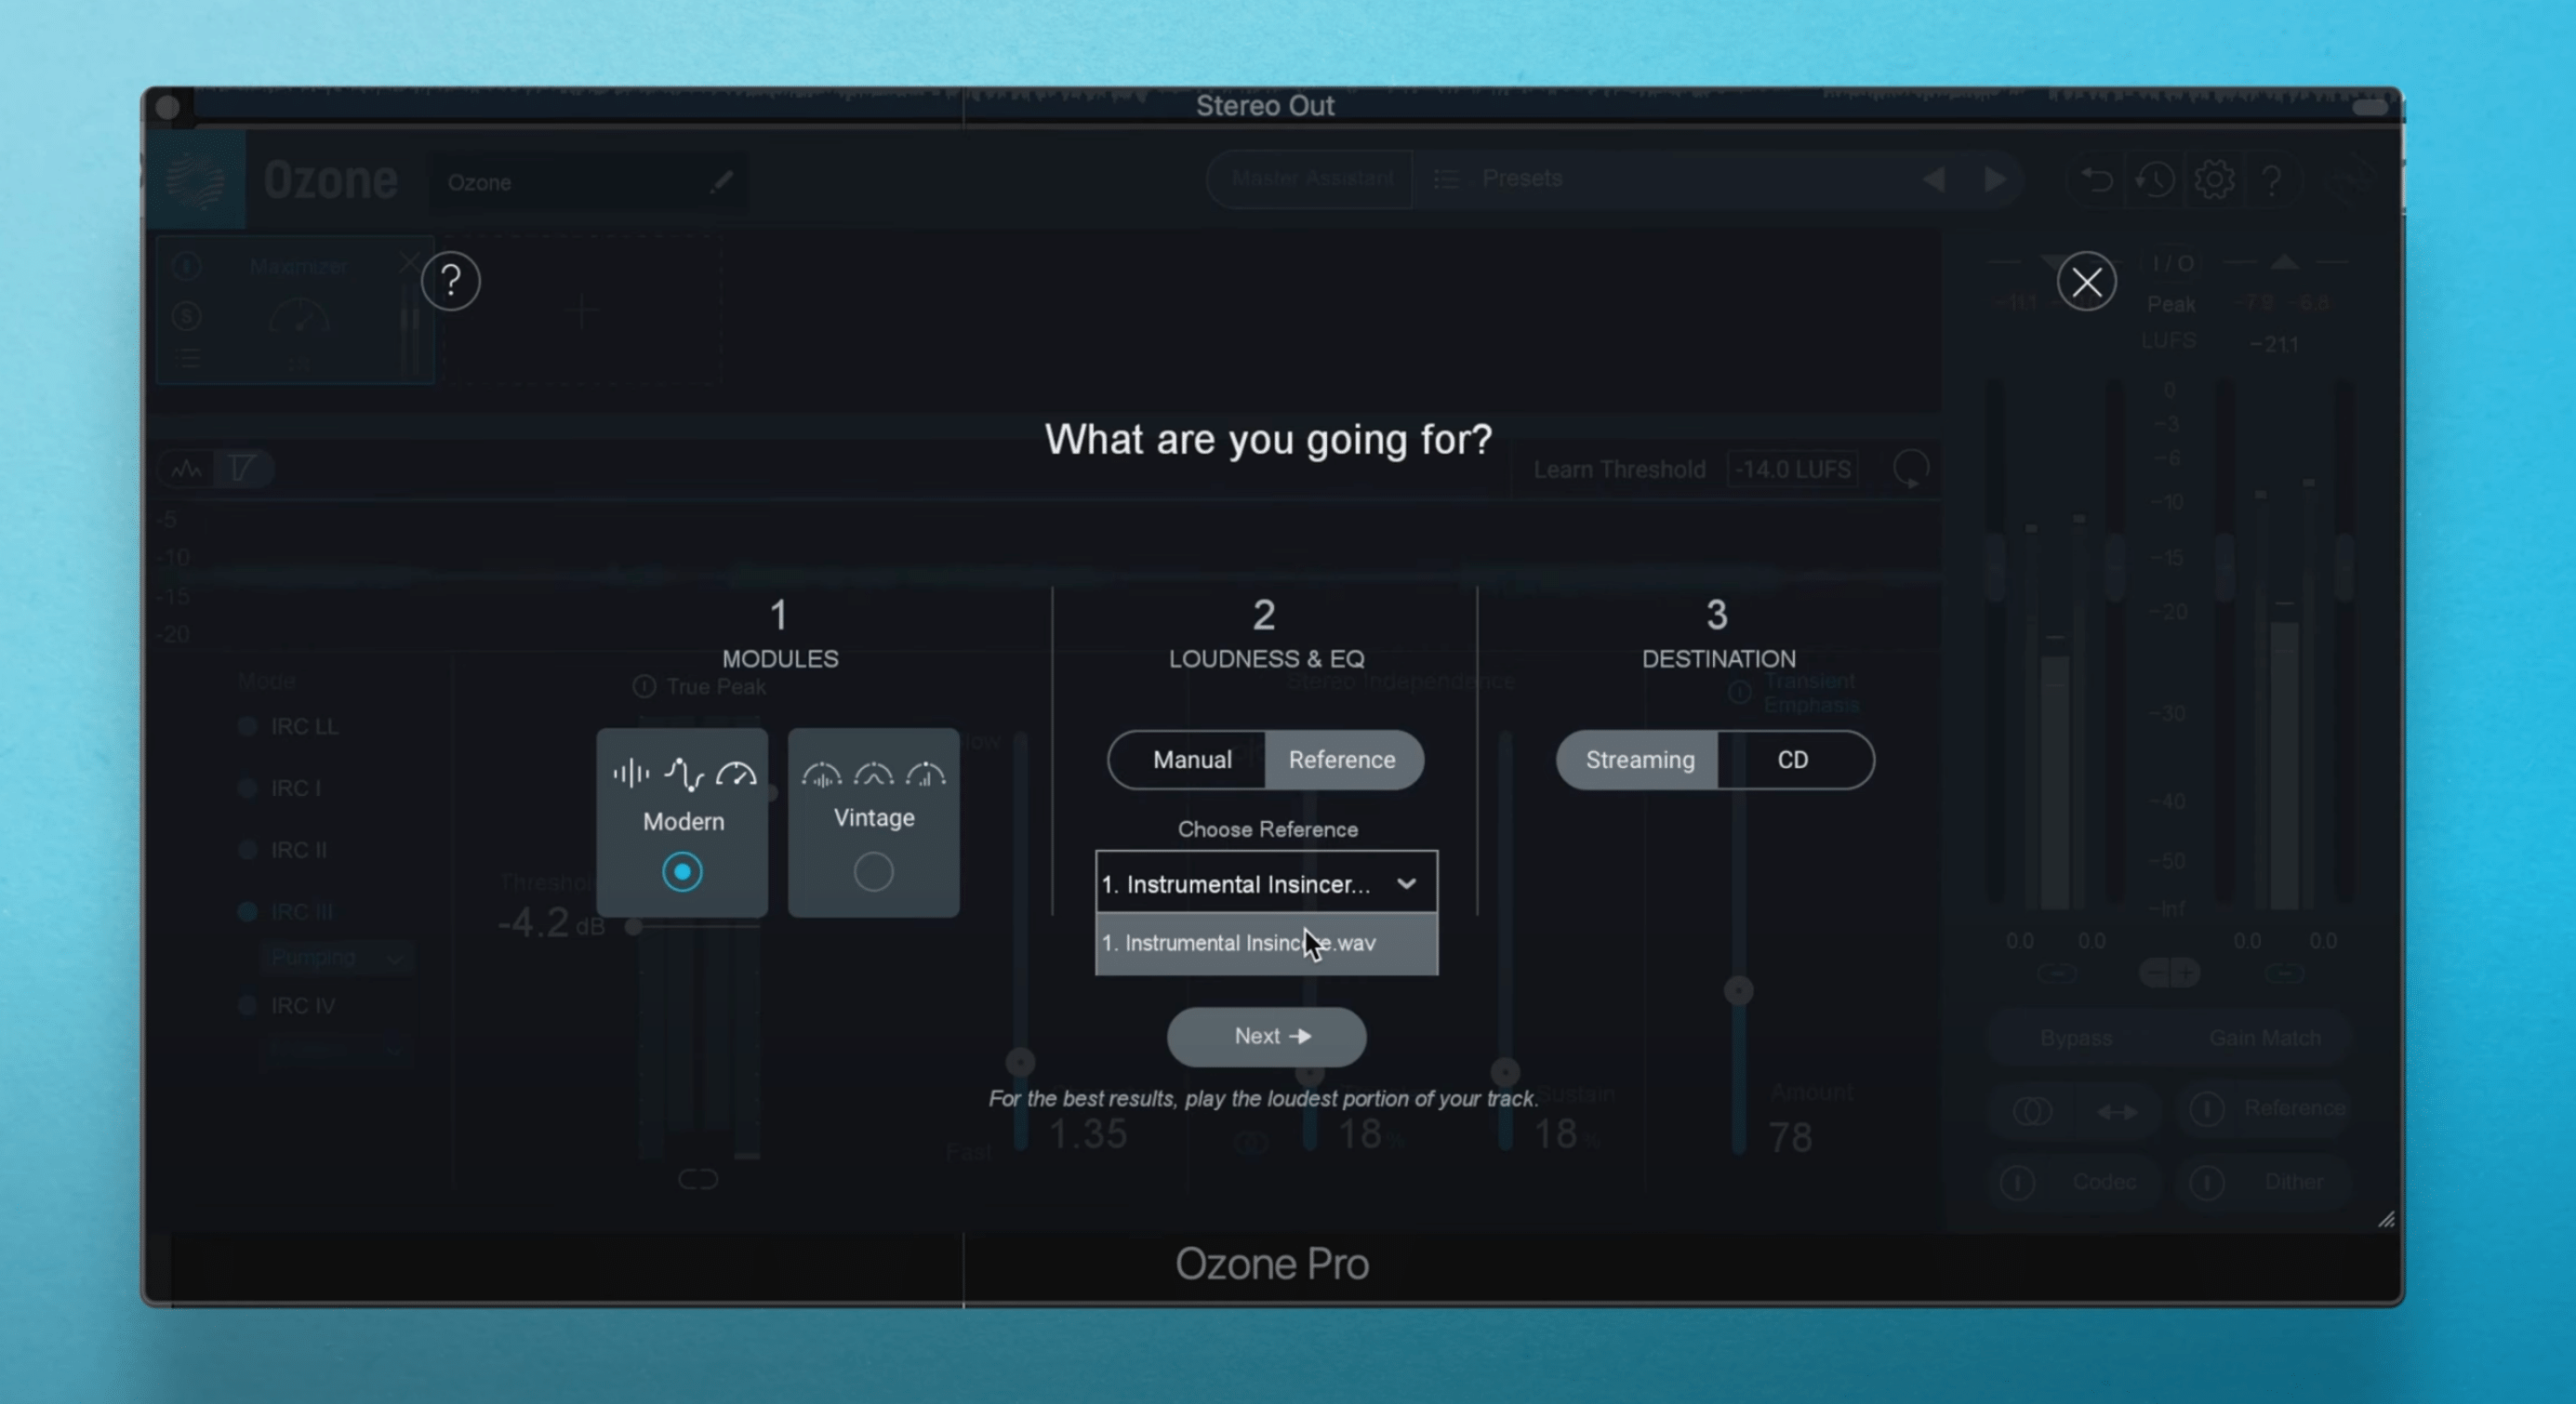
Make your track sound like a designated reference track with Ozone’s Master Assistant
Now, the target loudness and target EQ curves will be calculated from the loudness and EQ curve of the selected reference track. You can still choose modern or vintage. Your choice here will determine if Ozone will use modern EQs, compressor and limiters to make the track sound like the reference, or if the vintage EQ, compressor and limiter will be used instead. Next, pick your format, CD or streaming, and Master Assistant will get you closer to your reference’s tone and loudness.
Start using these hidden features in Ozone Pro
Now that you’ve discovered these hidden features in Ozone, it’s time to put them into your workflow. Try a free trial of Music Production Suite Pro to access Ozone Pro and all of these new ways to make your mastering easier and faster.

