
10 ways to fix a bad mix
You have only so much time to mix, but no matter what happens, everything sounds bad in your room and in your headphones. We’ll cover some ways to get yourself out of this frustrating situation.
Every engineer knows the frustration of a mix that just isn’t working. It's a special kind of frustration when you've tweaked every knob and fader, and the mix still isn't translating your vision. You start questioning your ears, your room, even your sanity.
Let’s dive into this guide for transforming an "off" mix into a polished, professional-sounding track, walking you through practical strategies to diagnose and fix a struggling mix – from the psychological as well as the practical.
Follow along with professional mixing plugins including
![]()
![]()
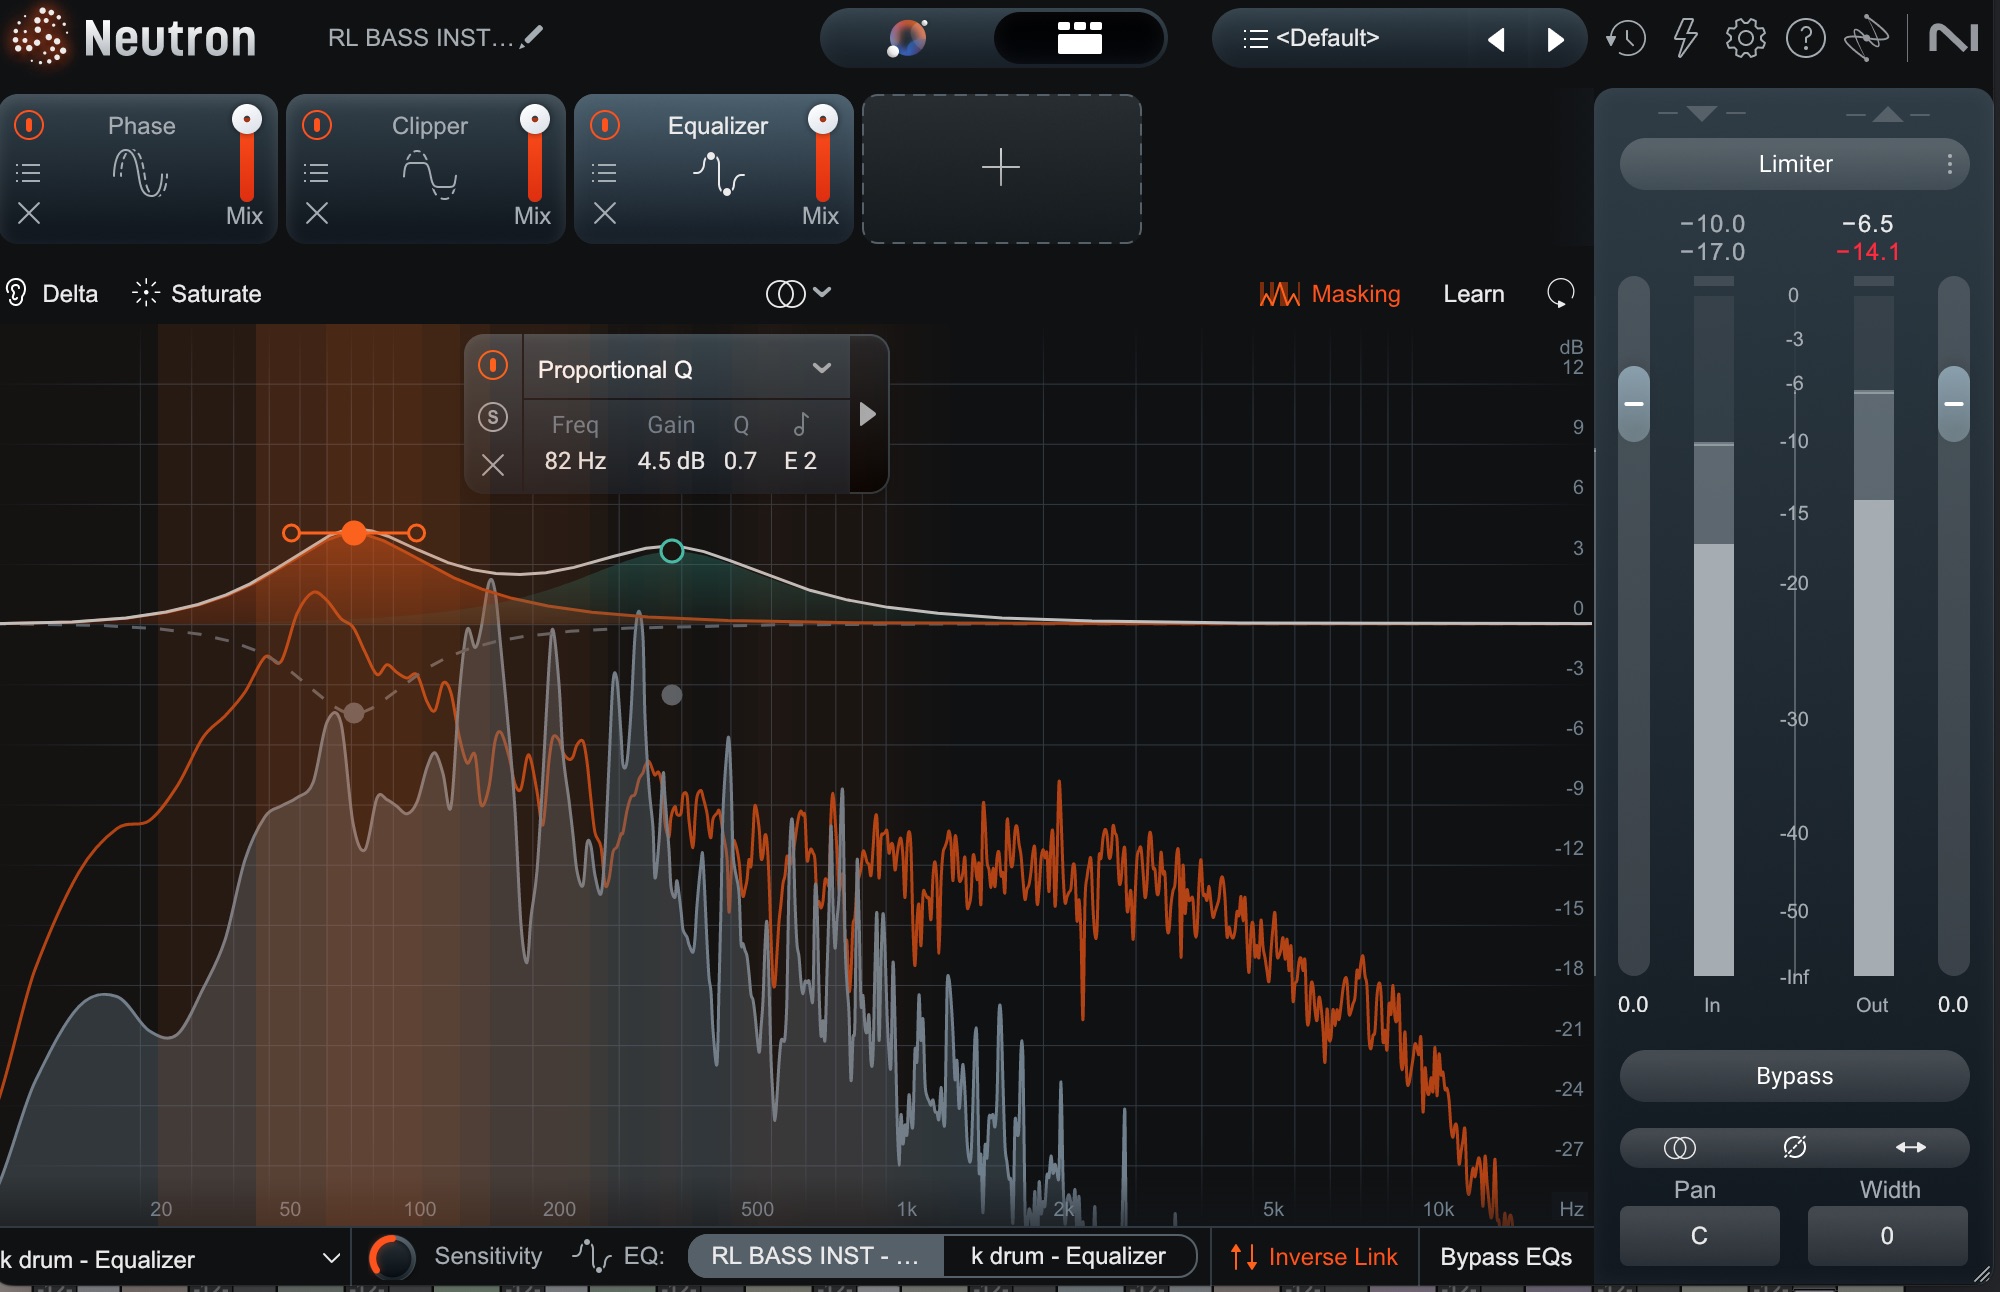
Neutron
![]()
![]()
Ozone Advanced
![]()
![]()
RX 10 Elements
1. Give yourself a moment
Time is one of the best things you can give yourself to fix a bad mix. Putting something away for a day, a week, a fortnight, or a month will ensure you see the issues from a distance, which makes them easier to spot and fix.
Yet it often feels like you can’t take time, either because of deadlines, or because of compulsions.
Dearest and most gentle reader, you’re doing brain surgery. Nothing is on fire. It’s just a mix: you’ve got a minute to clear your head.
Taking significant time might be impossible with deadlines, but even a quick five minute break can help. You need a reset, and a reset should be achieved.
Why does stepping back work? Our brains are wired to normalize what we hear repeatedly – a survival mechanism that’s great for tuning out background noise but terrible for critical listening. Time off from repeated listening will break that cycle, letting you hear the track closer to how a first-time listener would.
But it’s not just about auditory fatigue; distance also softens emotional attachment. That synth part you swore was essential? You’ll hear what it’s actually getting you in the mix with time.
2. Identify your own patterns and see if you’re in the middle of them
Most of us don’t realize we’re repeating the same mistakes until we’ve already made them.
I myself have my own little rut: my first pass is golden. Then, in a fit of overthinking, I overcook it. Only after that detour do I claw my way back to something I’m proud of.
The lesson? Learn your loop!
Keep in mind that your ears aren’t static machines. They’re subject to fatigue, circadian rhythms, and the cruel whims of subjectivity. For me, mornings and late nights are peak clarity; the afternoon is a sonic no-man’s-land where every decision feels questionable.
Your rhythm is likely different. So, track when your critical listening actually works – then use the data to your advantage.
Your patterns aren’t flaws. Once you spot them, you can stop fighting yourself and start working smarter. Maybe your "perfect first pass" is really your instincts outperforming your overanalysis. Maybe your "mushy wasteland" isn’t a wasteland after all: I frequently import the one or two things I liked about that second mix back into the first mix (since I’m always versioning as I go!)
The goal isn’t to eliminate your quirks, but to stop wasting energy.
3. Make sure something isn’t actually wrong
Before you spend hours chasing ghosts in a mix, ask yourself the following question: Is something actually broken?
Often, the problem isn’t your ears, your skills, or even the mix. It’s the gear falling prey to entropy – a natural law of the universe.
If you’re working with outboard equipment, something could be faulty in the chain or its cabling. If you’re working exclusively in software, maybe a plugin is hiccuping on you. They do actually do that from time to time. There’s a reason “have you tried turning it on and off again” is a cliche.
If you’re using a DAW with a dedicated monitoring chain – such as Reaper or Wavelab – maybe you’ve accidentally got your favorite headphone EQ loaded up for the main monitors. Maybe you’re so tired and stressed out that you didn’t notice it right away. This can happen.
As soon as you realize something is off, play a reference track you know inside out. If that sounds off, congratulations – your mix isn’t the problem. Your signal path is.
So again, before you tear apart a mix, do the boring stuff: check connections, test playback paths, swap out suspect gear. It’s not glamorous, but neither is realizing you’ve been "fixing" a problem that never existed in the first place. Save the creative panic for when you’re certain the problem is you.
4. Change your monitoring up
Some people prefer to listen to the same monitors in the same room to ensure they’re always hearing the same thing. They swear by this consistency. It works for them.
Lord how I’d like to be one of these people, but I’m not.
And you might not be either. And that’s okay!
My brain has a different relationship to my ears from day to day and hour to hour. I know I’m not alone in this – some of my favorite engineers have openly shared with me how their brains play tricks on them. They have hacks to “equalize” this phenomenon, as it were.
Often I need a context change to shake up my brain – and a different monitoring setup can get me that context change very quickly.
Upon feeling any sort of doubt or mental fatigue, I switch from my mains to my headphones. I’ll recalibrate with a moment of music I know like the back of my hand – a couple bars of "Everybody Here Wants You" by Jeff Buckley, or "Ferris Wheel" by Sylvan Esso.
I do about ten seconds of this, and then I go back to my mix.
5. Use the compressor stress test
This tip comes from Bob Macciochi, and ever since he shared it with me I use it whenever things get squashy. I also use it on straight mastering jobs if I’m having doubts about where the issue is coming from.
The tip goes like this:
You take a compressor and strap it across your whole mix, last in the chain. Adjust the settings so that it’s giving you 15–20 dB of gain reduction. Adjust the timing and high-pass sidechain filtering so that there is little to no pumping.
I have a preset for Ozone that you can use for this very purpose:
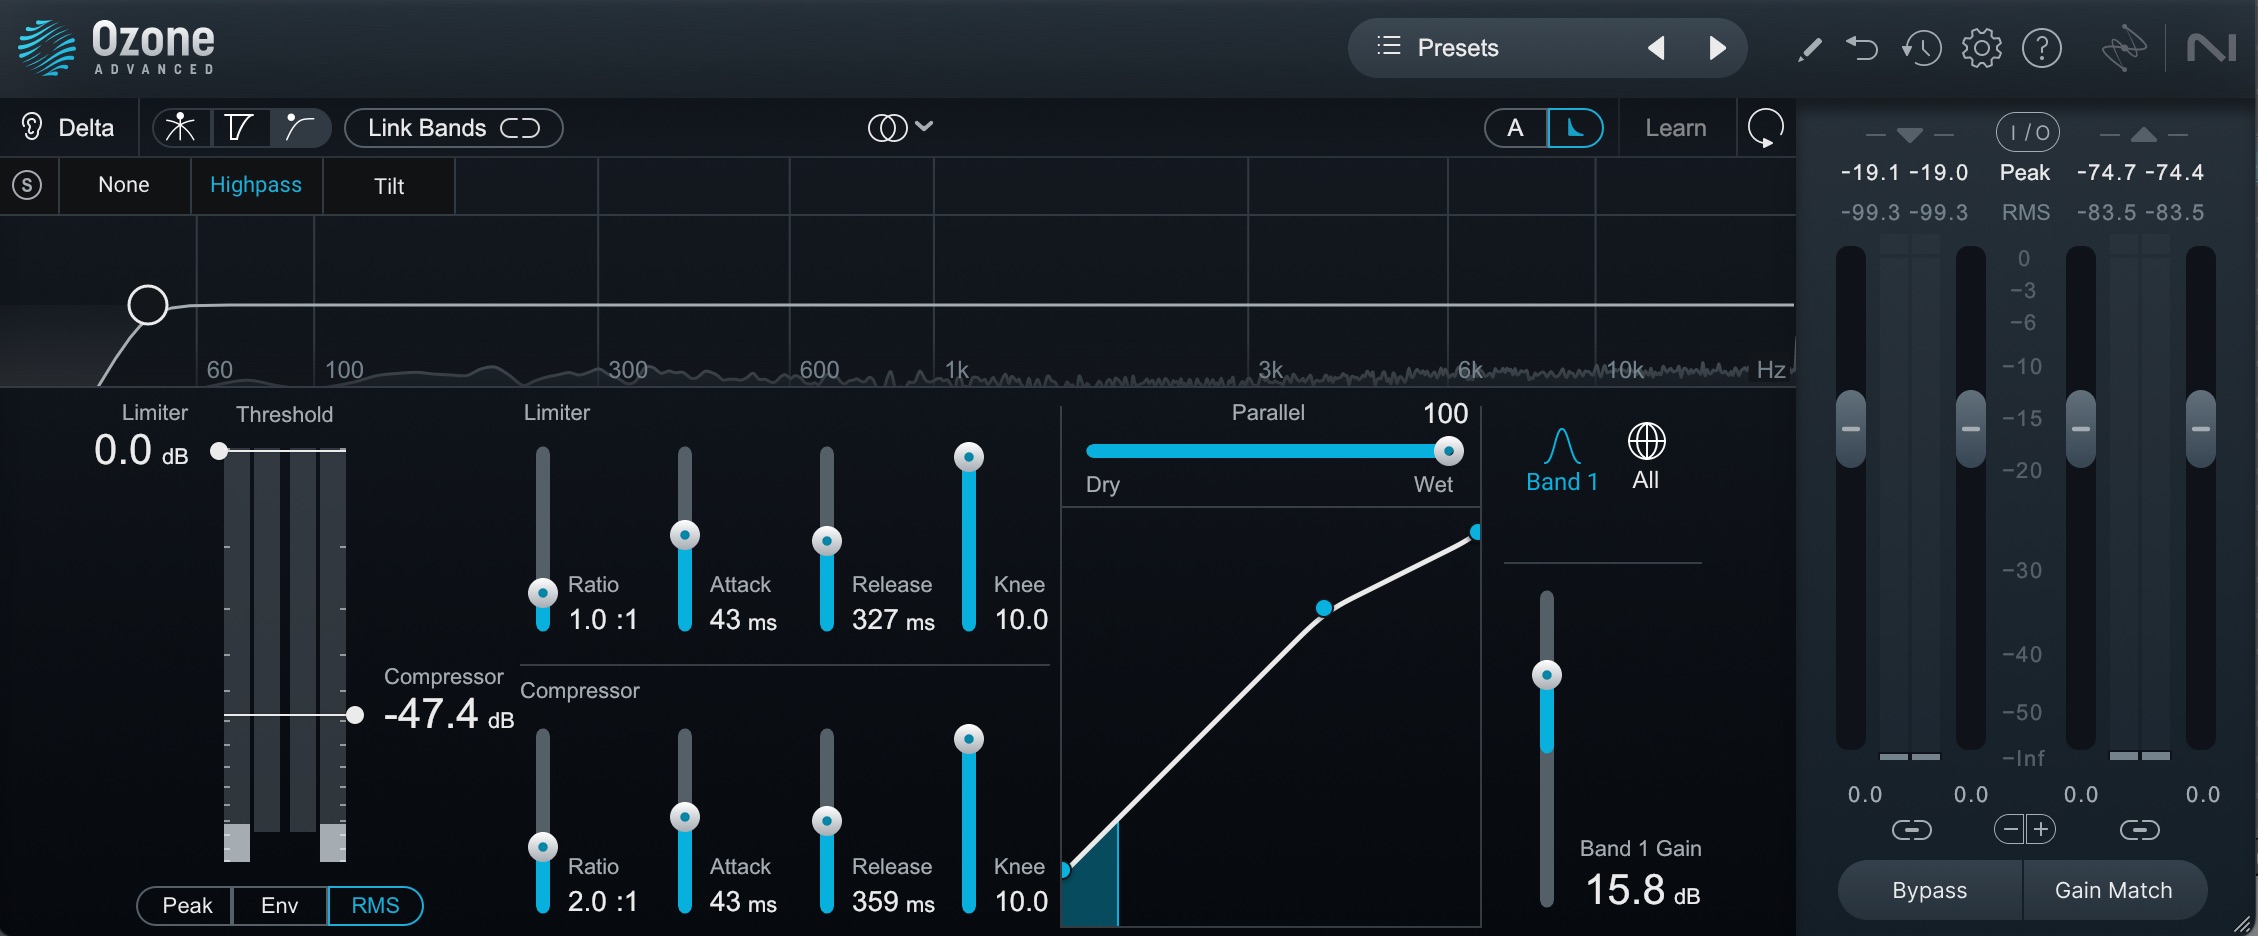
Compressor stress test preset in Ozone
This becomes a magnifying glass for tonal balance issues and instrument-balance issues. If you place an EQ before this compressor and sweep a parametric band, you will alight upon the troublesome issue very quickly.
Observe this mix for the upcoming song “Altered Kindness,” which is good, but needs a few spot checks in certain frequency areas. I’ll use EQ before my stress test compressor to point out where I need to cut resonance in the cymbals, where I need to cut resonance in the snare drum, and where I may want to sculpt the bass.
Now, I can fix those issues on the instrument level, and achieve a better sounding mix. Observe this before/after:
6. Remember that frequency extends over time
If the problem in your mix is mud, sometimes it’s not just a matter of frequency, but time. The resonance could be lingering for too long.
The meaty frequencies of the bass might be hanging around for longer than you’d like. This can create a bloated messy mix, but cutting the frequencies outright becomes a problem, because then you lose the very lifeblood of the music.
Luckily, Neutron and Ozone provide multiple tools for fixing this issue. Multiband gates, exciters, compressors, and dynamic EQs are on hand – but so are innovative transient/sustain signal splitting. You can, if you want, just use harmonic excitement on the sustain portion of the signal, or use a static cut just on the transient portion.
Observe this mix, which has some lingering issues.
The kick, specifically, lingers for too long, making trouble for the bass. The bass is playing a high line, making it anemic in the lows – but too much boosting gets us into trouble. The cymbals are bashing at a profoundly bad frequency, but we can’t take all the life out of them.
At the drum bus level, I’m making the following EQ changes to the transient portion:
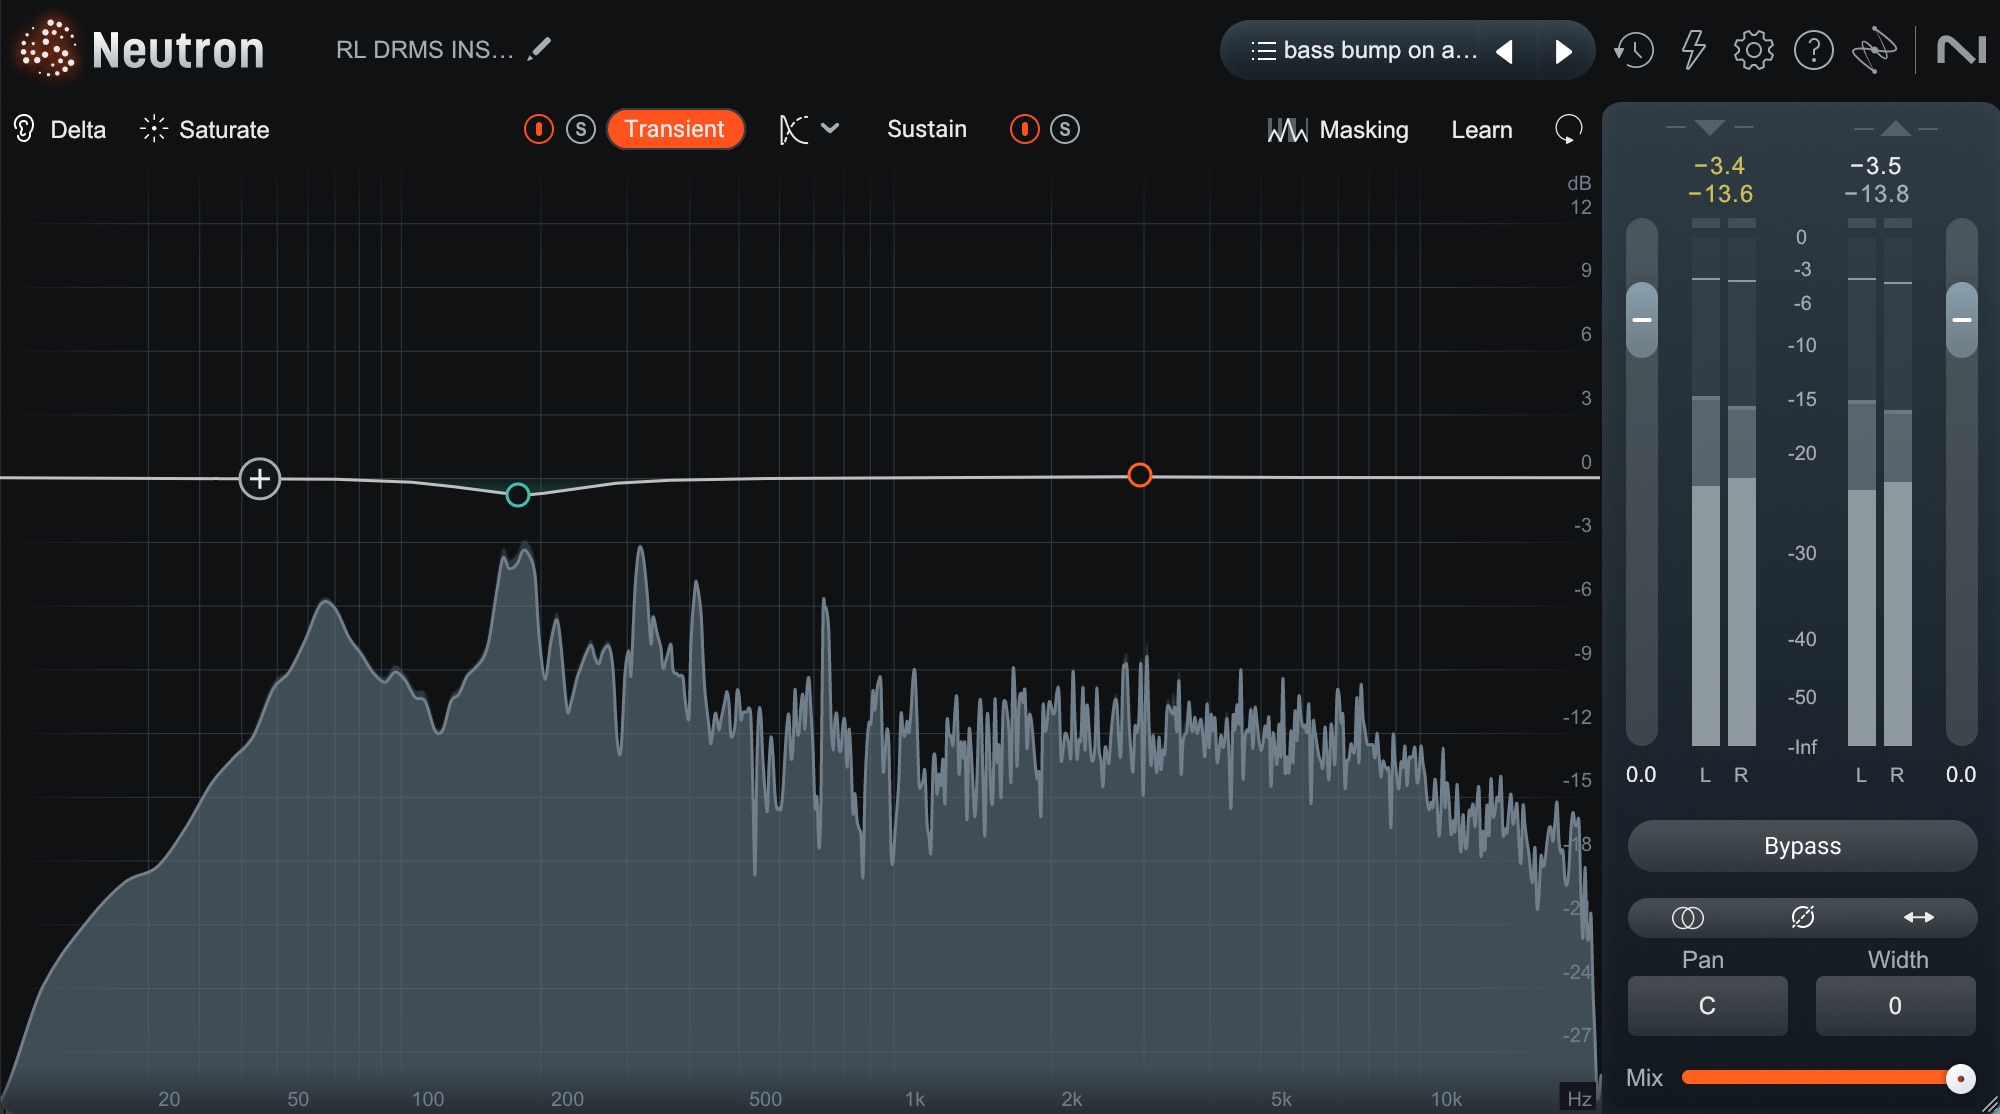
Making EQ changes to the transient portion of the drum bus in Neutron
This change handles a pokiness in the kick that we don’t need at the transient level.
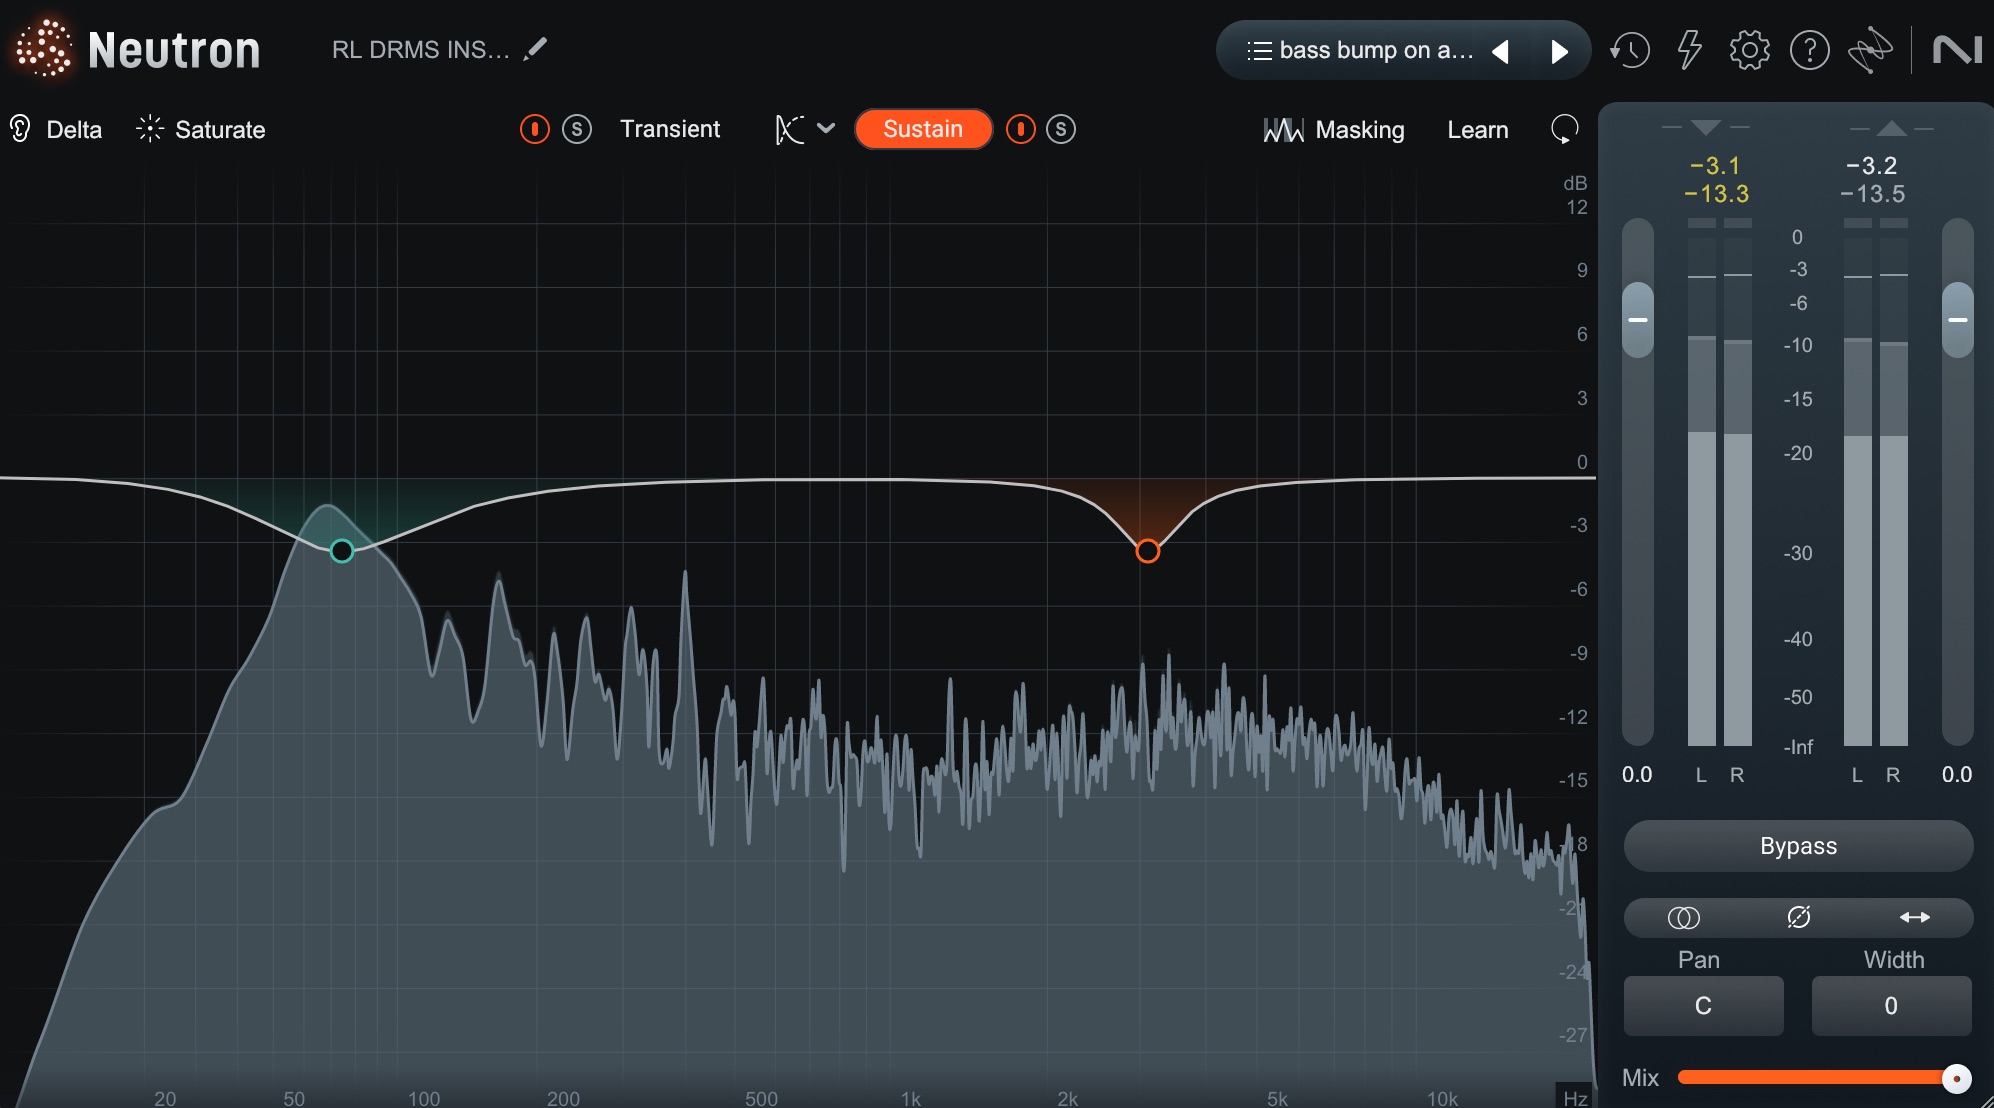
Making cuts to tame unruly kick bloom and cymbal wash
These cuts, in the sustain part of the signal, tame unruly kick bloom and that annoying cymbal wash.
The bass is doing something a bit more complicated, so I’ll have to use video to show you.
Ignore the clipper and phase rotator – I have those loaded by default, and by default they do nothing.
First we’re adding some warmth with an exciter. Then, we're boosting lows and high mids on the transient side of the bass, while cutting low mids in the sustain. Next comes a compressor that ducks the lows whenever the kick hits. This is followed by another exciter, one that fills out the lows more, post compression.
Here's what that sounds like after processing:
We get a nice, full bass that doesn’t interfere with the kick, and those cymbals aren’t tearing our heads off.
7. Make sure degraded audio isn’t contributing
If your mix sounds muddy or lacks clarity, don’t overlook the possibility of degraded audio adding to the problem. Crackles, clipping, or low-quality recordings can introduce unwanted noise and artifacts that eat up headroom and mask important frequencies.
Before you start carving out space with EQ or dynamic processing, it’s worth checking if the source material itself needs cleanup – otherwise, you might be fighting a battle that could’ve been avoided.
This is where RX Elements Repair Assistant comes in handy. Just load it onto a problematic track, let it analyze the audio, and it’ll suggest fixes for common issues like clicks, hum, or digital distortion.
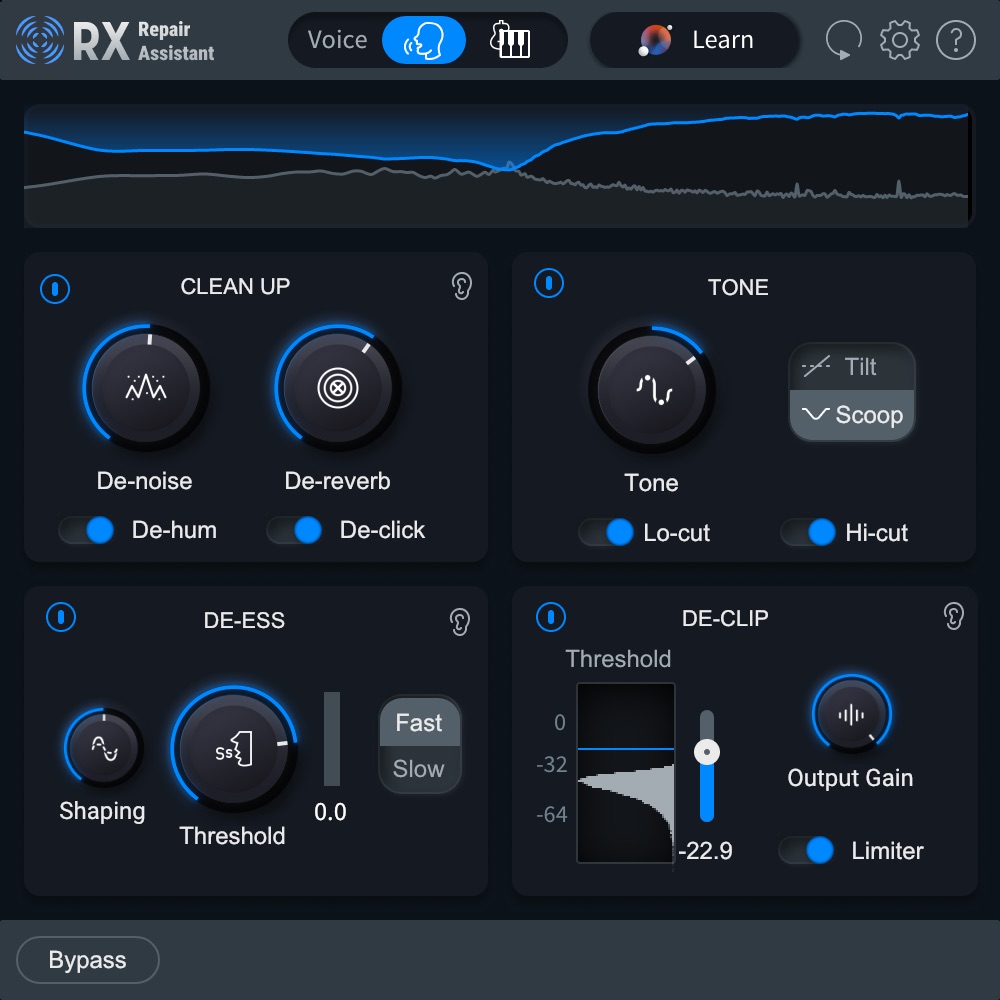
RX Elements Repair Assistant
For example, if a vocal take has background noise, it’s going to get way louder and more noticeable when you inevitably compress it. Then, it will get even louder when the submix it’s a part of gets compressed. Using mix-bus compression? Guess what – the noise will get more noticeable.
All of this will drive the mastering engineer nuts when it’s time for them to do their business, which often involves compression.
Use an easy tool like the Repair Assistant from RX Elements to remove this background noise, and the issue abates.
8. Watch your frequency masking
Frequency masking is the silent killer of clarity in a mix – when too many instruments crowd the same frequency range, the result is a muddy, indistinct mess where nothing punches through. A bass and kick fighting for dominance in the low end, or guitars and vocals clashing in the mids, can turn what should be a powerful arrangement into a fatiguing wall of sound.
But here’s the paradox: if you go too far in "fixing" these clashes – surgically carving out every overlapping frequency – you risk draining the mix of its energy and cohesion, leaving it thin and lifeless.
Neutron provides great tools for helping you keep the balance: the Masking Meter and the Unmask module.
Fixing a bad mix with Neutron’s Masking Meter starts with identifying the culprits – those frequencies that are clashing like two cymbals in a tiny closet.
The Masking Meter in Neutron shows you where instruments are fighting for space in your mix
The Masking Meter visually shows you where instruments are fighting for space, painting a clear picture of overlap. For example, if your bass and kick are both hogging the 80 Hz range, the meter will highlight this conflict in glaring yellow or red.
The trick is to put Neutron on your kick and bass track, play them both, and watch the meter:
Once you’ve spotted the clashes, Neutron’s Masking Meter helps you prioritize which battles to fight first.
You can also use the Unmask module in Neutron to take care of frequency issues that may arise.
9. If even the references sound bad, make everything sound as bad as the references
If even your references continue to sound horrible to you at this moment, then shift your thinking and try to make your mix sound as bad as the references. Match the harshness hertz for hertz. Make your mix as squashed-sounding as the references.
The thinking behind this one is simple: the references, selected by you/your client in a time of better judgment, are proven to work. They are proven to be what you need them to be. So if you make your work sound like their work, even if you don’t like how it sounds, you’re probably not going down the wrong path.
A caveat: only whip out this trick when time is of the essence. You can easily miss the small picture details – or risk making your tune feel lifeless in subservience to another mix – when trying to match in this circumstance.
Here, you’re simply going about the proceedings as efficiently as possible because you have to, and this is the best psychological conditioning/practical tip for the moment.
10. Invite someone into the space
This is probably the scariest tip, because it involves sharing failure with another person – but it’s one of the best. Because if even your reference tracks sound off, that’s a big clue you need help.
One way to recalibrate your ears can often involve inviting someone into the room for a listen, preferably someone who isn’t an engineer. Just a run of the mill civilian will do.
This is why, sometimes, it pays to have a roommate. Heck, even better if they’re a spouse or a partner – then they might just feel obligated to help you due to the constraints of your relationship (please note: while iZotope can give you tutorials on any number of topics, iZotope cannot provide relationship advice).
Whoever the person is, have them come into the room and sit in your mix position. Sit next to them, nearby, and play some snippets of a reference tune. After a few moments, ask them how it sounds. Don’t ask them if it sounds weird; just ask how it sounds.
My wife literally saved a mix the other day in just this manner: “I wonder what it would sound like with all the reverbs less loud,” she said. Luckily I have all my reverbs on their own VCA, so I did what she suggested – and the mix got better.
There is nothing good or bad – but thinking makes it so
Fixing a bad mix isn’t just about technical fixes – it’s about resetting your ears, recognizing your own habits, and knowing when to step back. It’s about relying on technique when the inspiration is gone. That technique extends to the mental part of things too.
So, the next time a mix feels broken, don’t panic. Instead, work methodically: check the basics, trust your instincts, and remember that even the most frustrating mixes can be saved with patience and the right adjustments. Happy mixing!