Drum Panning 101: How to Get a Balanced Sound
What is drum panning and why should we do it? Learn how to pan drums effectively, creating balance and width within your mix.
There are a few different ways to pan drums and percussion, but ultimately the goal is a balanced sound that doesn’t lean too heavy to either the left or right side of a mix. Panning drums helps the listener to localize sound and carelessly panned drums can be very disorienting! In this article, we’ll explore what panning even is, several reasons why you should be panning your drum tracks, and how to pan drums in your own mix.
Follow along with this article using iZotope


Neutron 5
What is panning?
When we listen to music on a stereo system, there are two channels of audio we hear; one that is sent to the left speaker or left headphone or earbud or whatever you’re listening on. The other channel goes to the right side. These left and right channels make up what we refer to as the stereo image.
Panning is the process of placing different elements of a mix within this stereo image. Tracks in your mix can be panned 100% left or right or anywhere in between. Tracks such as lead vocals, kick drum, or bass are usually panned in the center meaning the sound is reproduced in both the left and right channels equally.
So, should you pan drums? Of course! Drum panning makes the kit sound big and the interaction between cymbals adds a lot of stereo interest to the mix. We are going to do a deep dive into drum panning in this article, but for more broad articles about panning, check out our guides on panning in music and tips for panning music with intention.

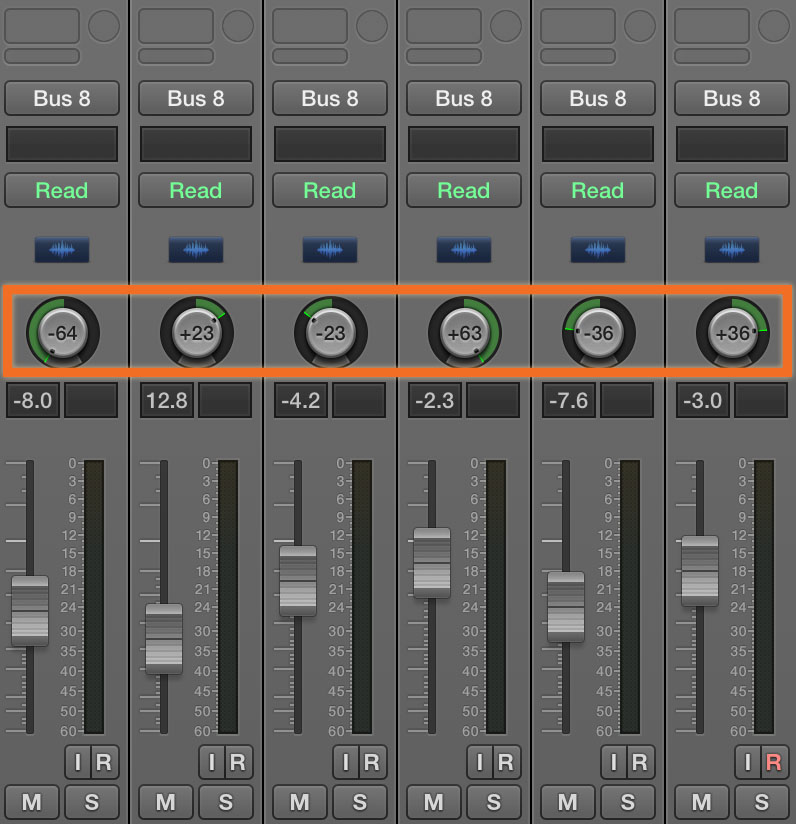
Pan knobs in a DAW
iZotope Neutron 4 also takes panning a step further with its


Visual Mixer

iZotope Visual Mixer in Neutron
How to pan drums
Do you pan drums left or right? Well, there are two main schools of thought when it comes to drum panning: drummer perspective and audience perspective. Drummer perspective is when we pan the elements of the drum kit as though we are the drummer sitting at the kit. For the more common right-handed drummer, the hi-hat will usually be on their left and the floor tom will be on the right, so we pan these tracks accordingly.
Audience perspective is when we do the exact opposite. We imagine the kit as though we are the audience sitting in front of the drum kit. The hi-hat in this case is now on the right and the floor tom would be on the left. Most mixers tend to use audience perspective when mixing, however there are no hard rules about which to use. As long as your close mics, overhead mics, and any room mics are all in agreement, use whichever perspective you like.
But, before you do any panning, make sure to listen to your drum mix in mono. Panning adds separation which is part of what creates a stereo image. However, this added separation may make phase or EQ problems less obvious, which is a good thing in stereo but once that mix is flipped back into mono, these underlying problems are still there. Starting a mix in mono and using EQ to create tonal separation between tracks will give you a more mono-compatible mix and make the stereo image even bigger-sounding when you do introduce panning.
Kick drum placement
The kick drum is the heartbeat of the drum kit. It’s the pulse that provides a foundation for everything else in the mix to move around. As such, the kick drum is usually panned right in the center. The kick drum adds weight to the mix and moving that sonic weight to either the left or right side can make the whole mix feel lopsided.
Snare drum placement
The snare drum works with the kick to provide the rhythmic groove of the song. I think of the kick and snare as calling and responding to each other. Since the snare is another foundational element, it’s most often also panned to the center though sometimes it’s panned slightly off center so that it agrees with the overhead mics.
Toms and overheads placement
Depending on the genre you’re mixing (more on that soon), drum panning can vary a bit. We talked about drummer perspective vs. audience perspective already and here’s where it comes into play. To start panning my drums, I’ll first pan my overheads 100% to the left and right, also called hard panning. Then, I’ll introduce my tom mics one by one, panning them to match their position in the overhead mics.
Cymbals and hi-hat placement
Any close cymbal or hi-hat mics should agree with the overhead mics as well. Once the overheads and toms are in position, introduce cymbal and hi-hat mics and pan them to match the overheads. Then, try panning them in a slightly more exaggerated way to add spaciousness to the kit. For example, let’s say there’s a crash cymbal that would be panned 20% to the left to agree completely with the overheads. Panning that to maybe 25% or 30% instead adds width.
How to pan drums for different musical genres
Depending on what genre you’re mixing, your panning choices will change but a couple of mixing principles will still apply. We should always have the goals of making sure things sound balanced between left and right, and not sonically confusing the listener.
Making sure overheads and close mics are panned in agreement is one way we localize a drum for the listener. If the floor tom in our overheads is on the left but our close mic is panned to the right, the drum tracks will sound messy and well, confusing! If we pan the kick drum off-center, it adds weight to one side, making us feel off-balance. Not confusing the listener is the bare minimum but we should also strive to keep them interested in the mix!
Playing with space and perspective is one tool we have for that. Check out our guide on getting better mixes with panning.
Rock and pop: energy and stereo spread
For rock and pop, I like to take the approach of “make it sound like real life, then better!” What that means to me is starting with a good balance between my left and right, then exaggerating elements of the mix to add drama.
Tom fills are a great opportunity to add stereo spread by panning these tracks maybe 20 to 50% to the left and right so they fill in the space between the overheads. Using iZotope Visual Mixer, we can drag around any of our drum channels to experiment with positioning. Visual Mixer gives us a better visual representation of the space each track is occupying as if it were a stage, and allows us to manipulate the positioning within the plug-in.
In this example, I have the drums panned drummer perspective which we can see based on the positioning of the tom tracks.

Drummer perspective drums in “Help Me With a Feeling” by Sob Dog
Jazz music: natural positioning
I’ve done jazz mixes using both drummer and audience perspective and had good results with both techniques. However, the main goal with jazz is a natural sound and representing the kit in an accurate way so audience perspective is more commonly used.
The tom panning tends to match pretty closely to the overheads as is the case in the following example. I’ve found most jazz groups prefer the main drum sound to come from the overheads with close mics adding definition when needed. However, close mics are relatively low in the mix compared to rock and pop.

Audience perspective panning in “Does Anyone Have the Time” by Feestet
Electronic music: pushing the limits with more unconventional placement, high energy
I’m a big believer in learning the “rules” that exist in audio production, then breaking them in an effective way. With electronic music, you can really get away with just about anything as long as we don’t confuse the listener unintentionally and everything sounds balanced.
While we most likely wouldn’t want to automate drum panning in jazz, automating a hi-hat sample to bounce between the left and right channels is definitely something you can get away with in electronic music. While kick drums are still mostly kept in the center, having two different kick drum samples hard panned might sound cool!
Start panning drums for a balanced sound
No matter the genre of music, an active stereo image keeps the listener engaged, puts them in the same sonic space as the performer, and adds energy to the mix. Whatever way you decide to pan your drum tracks, keeping heavier or key elements in the center such as kick and snare will help ensure your mix sounds balanced between the left and right channels while also giving cymbals and hi-hats room to sparkle on the sides.
Start panning drums using Visual Mixer in a free demo of Neutron.
