
At some point in your career as an audio engineer, you’ll come across audio that was either recorded improperly, mixed poorly, or was transferred to digital in a less than ideal way.
In these instances, you may be asked to (or you may have to!) remove these sounds. iZotope RX can help you remove these noises and help restore audio that was otherwise compromised. In this article we’ll discuss some of the most common instances below as well as link out to more specific instances.
The most important thing to remember when working with audio restoration and repair software is to NOT overdo it. Just like any other processing, it’s easy to get carried away. Use your ears, and remember certain sounds our brain filters out - and other sounds, like tape hiss - are part of the experience of listening.
Follow along with this tutorial using RX , the award-winning audio cleanup software trusted by top engineers to quickly remove background noise and restore damaged audio.
What is an artifact in audio?
Artifacts are sonic material that is accidental or unwanted, resulting from the editing, recording, or manipulation of a sound. Artifacts are often removed, as the goal of good audio repair and restoration is to render the best possible sonic result with the least audible human intrusion.
Your intervention should be transparent and not introduce new artifacts that distract the listener.
Common audio artifacts include:
- Ambient background noise is a general unwanted sound present in a recording. This can include constant environmental sounds.
- Tape hiss is a steady broadband noise originating from analog tape recordings. It appears as speckles in a spectrogram.
- Electronic interference encompasses issues like hum and buzz. Hum is typically a low-frequency tone (50 Hz or 60 Hz) caused by electrical noise, often showing as horizontal lines in the low frequencies of a spectrogram. Buzz is similar but extends to higher frequencies.
- Sudden background noises are unexpected sounds like coughs, ringing cell phones, or car horns that intrude on a recording. These are intermittent noises.
- Clicks and pops are short impulse noises that can arise from various sources, such as dust or scratches on vinyl records, CD skipping, digital errors, or even mouth noises like tongue clicks and lip smacks. They appear as vertical lines on a spectrogram. Crackle is a related artifact consisting of many quieter clicks occurring close together.
- Clipping occurs when an audio signal exceeds the maximum level a recording system can handle, resulting in a distorted, "squared-off" waveform.
- Gaps and dropouts are short sections of missing or corrupted audio, often visually obvious in both waveform and spectrogram displays.
- Plosives are low-frequency bursts of air captured by a microphone, typically occurring with "p," "t," "k," and "b" sounds in speech. They appear as bright, momentary bumps in the low frequencies of a spectrogram.
- Mouth noises (lip smacks, watery sounds) are clicks originating from the mouth. They can appear as short, bright areas across a wide frequency range on a spectrogram.
- Reverberation can be an unwanted artifact when it obscures dialogue or clashes with the intended sound. Overly enthusiastic denoising can also modulate reverb tails, leading to unwanted artifacts.
- Groove wall distortion is a specific type of distortion caused by wear on overplayed vinyl records.
- Wow and flutter are speed fluctuations in analog tape playback that can modulate noise, making it harder to remove.
- Musical noise is an artifact sometimes produced by aggressive noise reduction algorithms, often described as "chirpy," "watery," or "space monkey" sounds. Gating artifacts (pumping or surges of background noise) can also occur during denoising.
- Aliasing is a form of distortion and noise that can occur when reducing the sampling rate of digital audio without proper low-pass filtering.
- Quantization distortion can occur when converting between bit depths without using dither.
Artifact removal tools
To get started, I’ll just go over a few of the most common modules that I use on a regular basis when it comes to audio artifacts, and then illustrate some examples. I’m also going to focus mainly on general audio cleanup versus restoration.
If you’ve been given an old tape transfer with significant damage to the recording, you’ll most likely have to be more aggressive and creative with solutions. If you feel like you’re in over your head - it’s best to contact either an engineer that has more experience with audio restoration, or better yet, specializes in it.
1. Clicks and pops
Perhaps the most common kind of artifact you’ll come across is a “click” - these sounds can come from a digital source such as a bad cross fade or sync issues, for example - or acoustic clicks, ranging from mouth sounds to instrument noise. Faulty equipment can also introduce unwanted clicks or rattles into a recording.
RX Mouth De-click
These issues can be handled in a couple different ways. For mouth sounds, the Mouth De-click module is the way to go. Its algorithm is geared towards detecting human mouth sounds.

RX Mouth De-click
I like to use Mouth De-click in tandem with the De-plosive module for particularly egregious plosives. I remove the fundamental low plosive with De-plosive and tame the higher end with Mouth De-click on the “low” side of the frequency slider. And if things are still a mess….Spectral Repair! (but more on that later…)
And like all modules in RX, you can solo just the output clicks. It’s super handy to see if you’re being too aggressive with your settings or not aggressive enough!
A reminder: some mouth sounds and clicks help with intelligibility or natural understanding of the human voice. We don’t want to clean up sounds SO much that it introduces unnatural resonances or removes accents on words or phrases.
RX De-Click
In addition to Mouth De-click we have the more general De-click module.
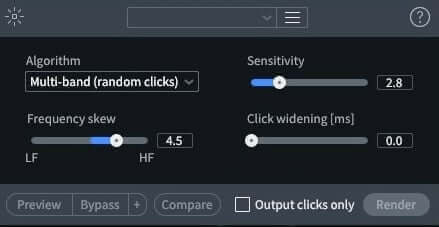
RX De-click module
The De-click module is broader and can be used in other various scenarios and offers a range of algorithms tailored to address different types of clicks, allowing for precise removal while preserving the integrity of the underlying audio.
By effectively eliminating these distracting sounds, De-click helps to achieve a cleaner, smoother, and more professional listening experience.
I find that using these “click” plugins BEFORE running other modules are helpful in preserving sonic integrity and letting the more processing intensive plugins - say, Spectral De-noise or any of the ambiance controlling plugins (De-reverb, Dialogue Isolate, etc.) have a better chance at adapting and removing noise without leaving artifacts.
Yes, noise removal can cause artifacts if done too dramatically. These artifacts can be heard in the form of “ghost like” echo, bumps, pops, or unnatural enhancement of the sounds you’re looking to remove!
Using processing over a whole song should only be done with conservative settings. If needed, go back in and spot check and clean up any extra sounds the gentle algorithm may have missed. These introduced artifacts are often more pronounced on more complex audio material (say, a full mix over an isolated track), so be mindful.
2. Complicated intermittent noise
Sometimes the sounds you’re looking to remove require a bit more specific finesse. Perhaps there’s a whine at 10k that you missed in the recording process, or a digital pop that De-click wasn’t able to get rid of.
Spectral Repair
The RX Spectral Repair module is great with honing in on noises that are a bit more complex and complicated, including intermittent noises like door hinges, traffic noises, and more.
Musical issues that Spectral Repair can handle include microphone bleed, upper harmonics that are too shrill, and dropouts from broken audio cables.
RX Spectral Repair module
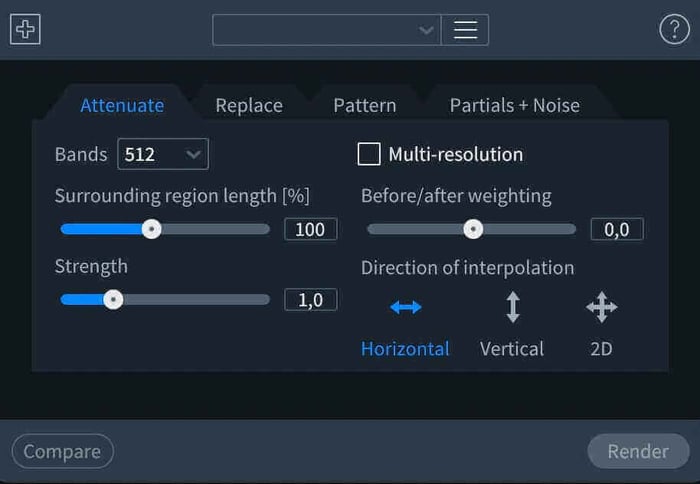
Spectral Repair is an extremely powerful tool - using the selection tools available in the audio editor (time specific, time+frequency, frequency specific, or the lasso or paintbrush) you can narrow in on specific noises to remove them more accurately. This is one way to remove intermittent noises in a recording.
The Attenuate tool is best used for the removal sounds; pops, clicks, acoustic noises, etc.
Some additional tips:
- Varying the surrounding region length along with before and after weighting helps the algorithm decide where to place emphasis.
- If I’m removing a sound from a fade out, I usually choose a fairly small region length with more emphasis on the after weighting, since I want the removal to fit in with the decay of the music.
- I’d recommend starting with the horizontal direction, as you want it to interpolate based on how the audio fades out, and if it feels unnatural, I’d try 2d.
- Vertical weighting is good for clicks, and frequencies that are consistent across a whole track - it uses the audio above the sound for interpolation.
Replace, Pattern, Partials and Noise: these options in the Spectral Repair dialog give you more freedom to not only remove sounds, but replace and rebuild audio based on the audio surrounding it.
These settings are best used on heavily damaged audio with dropouts or similar issues.
The controls look similar to Attenuate. I have used Replace to smooth a bad dropout, Pattern for audio where there’s background noise, and Partials and Noise for some fades where the harmonics of the instrument ring out over time.
3. Hum sounds
Different kinds of hum artifacts typically originate from electrical noise within a recording's signal chain. They can also be caused by external humming noises in a recording, such HVAC or a refrigerator. Let’s take a look at how to tackle these types of artifacts.
RX De-hum
RX De-Hum is pretty self explanatory in name. If the audio you’re working with has a particular hum caused by HVAC, or an amp, etc. this module will help you sort things out.

RX De-hum module
If you’d like a deeper dive into De-Hum, check out our De-hum tutorial.
4. Remove clipping with RX De-clip and De-crackle
Proper gain staging and use of dynamics processing is important in preventing digital clipping and unfavorable analog clipping. Sometimes it is realized AFTER the fact that those things slipped through the ears in the production chain. But what can you do if faced with those issues?
RX De-clip
One way of addressing areas of clipping is using the De-clip module in RX.
RX De-clip module
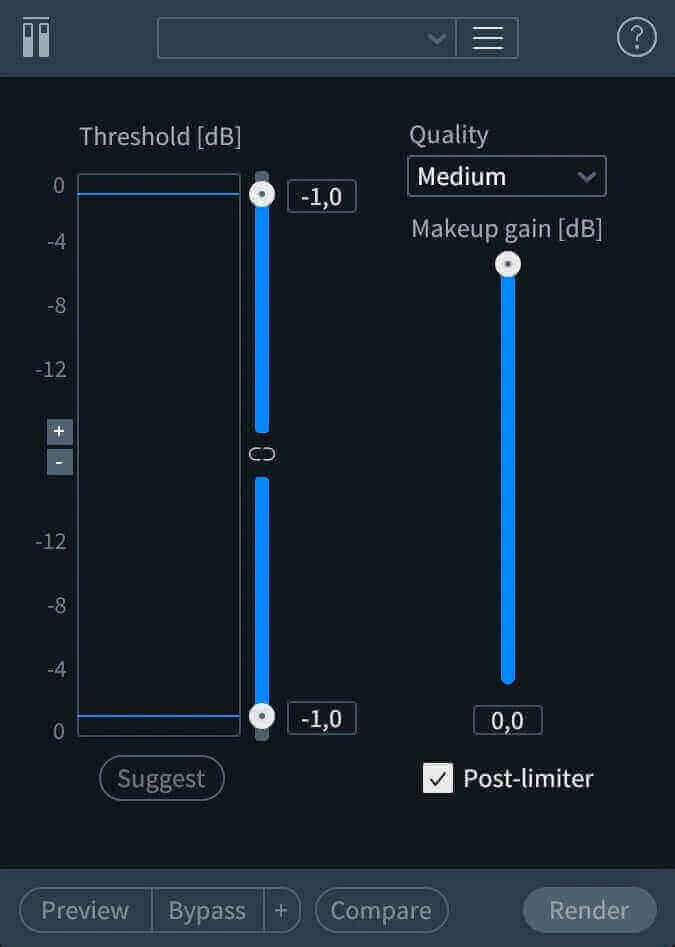
De-clip intelligently analyzes the clipped waveforms and attempts to reconstruct the original signal, effectively smoothing out the distorted peaks and restoring a cleaner, more natural sound. This can be invaluable for salvaging recordings where clipping was unavoidable or discovered after the fact, helping to reduce unwanted distortion and improve the overall listening experience.
De-crackle
RX De-crackle does a good job handling low level clicks that are close together and lower in volume.
RX De-Crackle module
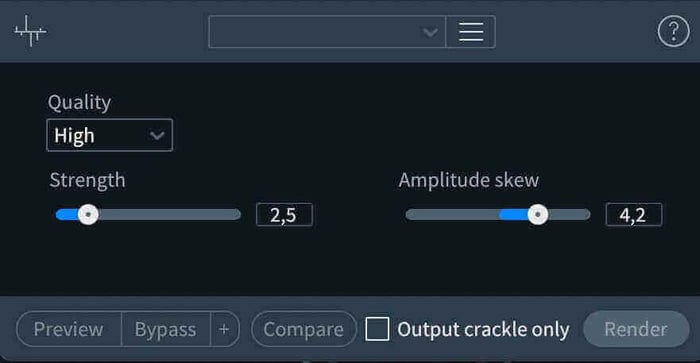
De-crackle intelligently identifies and separates these transient events from the underlying audio, allowing for their reduction or removal. By precisely targeting these disruptive sounds, De-crackle helps to restore clarity and smoothness to the audio, resulting in a cleaner and more professional listening experience without negatively impacting the desired sonic elements.
If the sounds you're analyzing are more related to the audio clipping, try adjusting the amplitude skew to the right. “Output Crackle” only is really helpful in this instance. Check the box and move the slider to see if the crackle you’re removing is affecting too much of the “good” audio.
I’ve used De-crackle to remove low level crackle on transfers of old vinyl records.
How to remove artifacts from audio
Let’s take a look at two real artifact removal scenarios. The first example is a recording done in a performance space where background noise from an air handling system was affecting the quality of the recording.
We’ll quickly see that removing artifacts is usually solved in multiple steps. Just remember, the goal is to correct audio problems and improve the overall quality and usability of a recording.
Removing background noise from air handling system
1. Sample the noise
The first thing I did was take a sample of the noise in the RX Spectral De-noise module. I knew that I wanted to shape the air handling noise such that it wasn’t negatively affecting the music. I also knew that using a high-pass filter after the noise removal processing would also clean up some of the really low noise.
Our brains filter out so much noise when we listen to things. The most important part is that in the very quiet sections, it isn’t TOO noisy. But, I also knew that as I brought up the overall level in mastering, the noise would become more apparent if I didn’t remove enough.
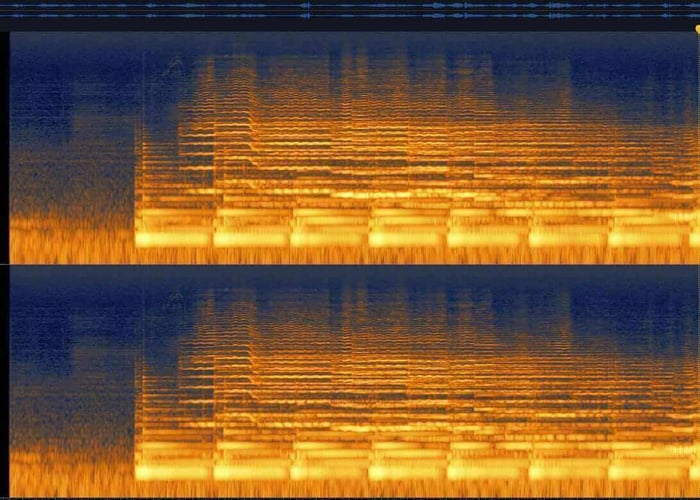
Audio with artifacts
So, here’s what we started with.
2. Use Spectral De-noise to shape the noise
Here’s the noise print I took based on that silent section at the beginning. I love some good room tones! It’s super helpful to have room tone to train the algorithm. I tailored the envelope to keep things sounding musical once the instruments came in.
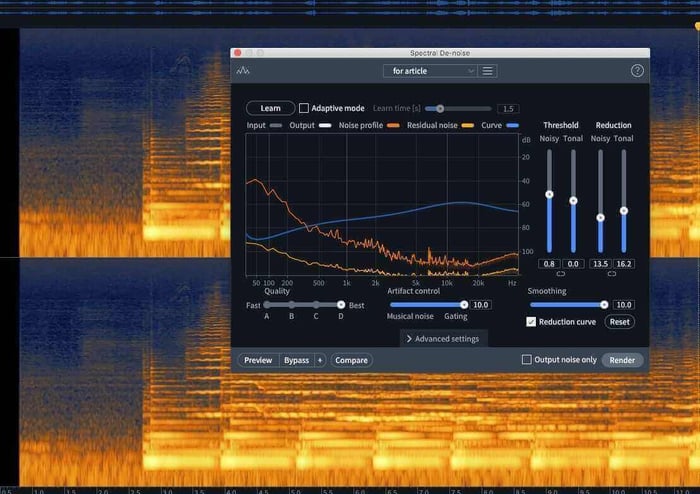
Using RX Spectral De-noise module
Next, I test out my Spectral De-noise settings. It sounds good, and I will process the whole track this way.
3. Remove additional noise with Spectral Repair
Even with the previous modules helping out, there’s still a little bump at the beginning that the algorithm didn’t get out.
I’ll remove this noise using Spectral Repair.
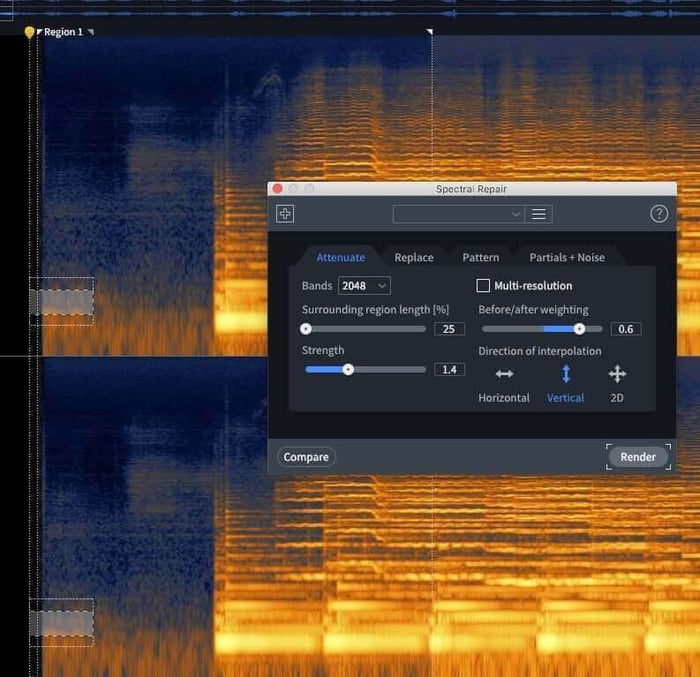
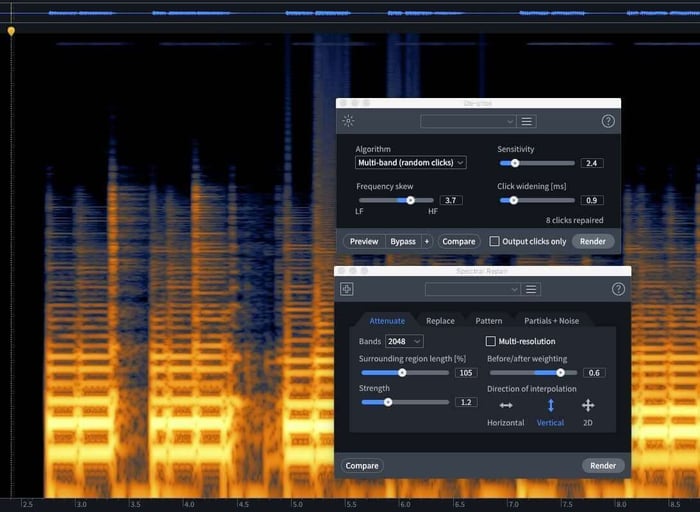
Using RX Spectral Repair to remove a bump
There we go! I used the vertical setting to have the interpolated audio mimic more of the frequency spectrum above the offending hum.
4. Remove clicks with De-click
But now I noticed a click at the beginning. Now, I am going to end up “fading in” this audio anyway, but why not remove it since I can?
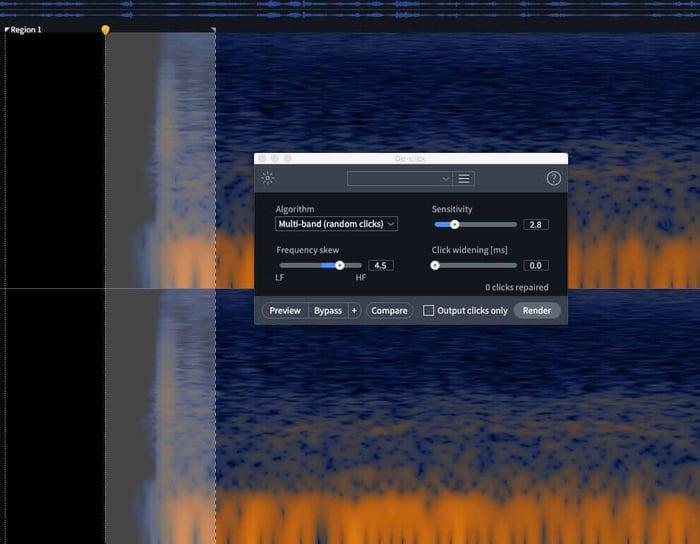
Removing click with RX De-click
Here's what this all sounds like:
There were a few steps in removing the air handler noise, but now our audio has the unwanted noise tastefully removed.
Removing clicks and pops that happened during the recording process
In the second example, a song was recorded where some pops and clicks happened during the recording process.
1. Remove clicks, pops, and plosives
The vocal part had a few serious clicks and pops as well as a few plosives, in the recording. Using De-click on each click individually, as well as Spectral Repair for anything left behind, removed much of the worst sounds. It was impossible to remove everything, but thanks to the fact this is one track within a number of tracks the leftover clicks weren’t audible.

Original vocal part

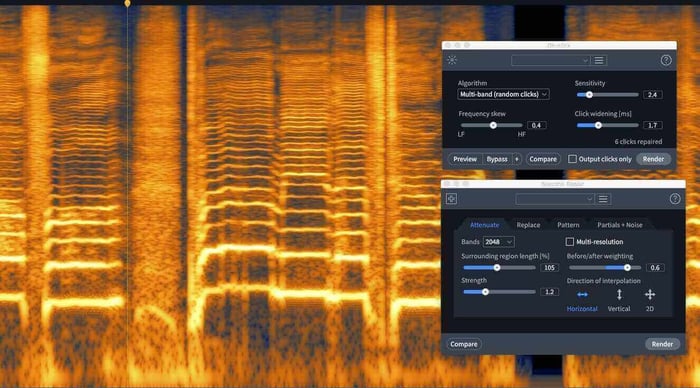
Using RX Spectral Repair to remove plosives
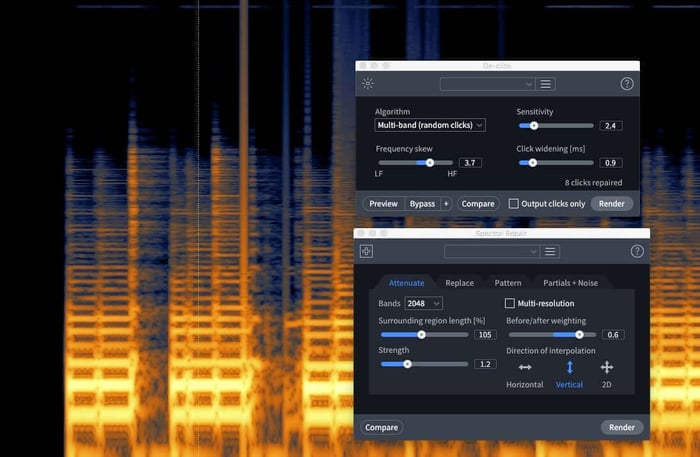
Using RX De-click and Spectral Repair to remove clicks
Here's what the vocal sounds like before and after:
2. Remove bass clicks
Similar issues were found in a few sections of the bass part. Those areas were also corrected using De-click and Spectral Repair. Had a guitar part existed in this track, knowing how to repair guitar tracks may have come in handy.
Original bass part
RX De-click and Spectral Repair used to remove clicks
Here's what the before and after sound like.
3. Check the recordings again
With these settings I was able to go and look at the rest of the bass and vocal parts for any other clicks. I used De-clip a bit on the last “for…” lyric to smooth out an overloaded transient, and the Voice De-noise module across the board for removing some background noise. I never use that module for a full mix, but when it is just a vocal part, it can come in handy.
Here are the final audio examples:
The results are pretty subtle in that they removed the noise but didn’t change the overall sound of the vocals or bass. When you solo a track, it’s harder to get the big picture. Noise removal is similar to equalization. Just because something sounds good solo’d doesn’t mean that when all is included the result will be as desirable!
Another thing to remember…
Noise removal in mastering is a bit different than noise removal in mixing. In mastering you are set with a stereo track, so unless I used a feature like the new Music Rebalance feature in RX, I wouldn’t have been able to isolate the vocal and pull out those plosives. In those instances, you’ll have to be a bit more cautious how you process an unwanted sound.
I use De-click on stereo tracks all the time, but I must be a lot more cautious to not lessen the effect of a transient or make things sound even worse. Spectral De-noise works well in the mastering process as long as considerations are taken. I rarely use the “adaptive” features of Spectral De-noise when mastering.
Start removing audio artifacts
Audio artifacts come in many shapes and sizes and varieties. iZotope RX can help you remove mouth clicks, clicks, pops, and digital noise so your projects can sound as polished as possible.
In almost every article I write I say things come down to taste, and with noise removal it is no exception. At the end of the day, some noise is better than going in too hard and making things sound unnatural. Expectations and aesthetic choices are some of the most important aspects of creating any art - or fixing it!