8 Tips for Taming Harsh Treble in the Mix
Struggling with the high end in your mixing session? Learn these eight tips for controlling harsh treble in your mix, including EQ moves, spectral repair, and harmonic distortion.
Harsh high end can be annoying to music producers and mix engineers. With that first application of the EQ, we hope against all hope that a simple low pass filter or parametric notch will do the trick.
Sometimes it does, but sometimes it doesn't: have you ever been left scratching your head over what to do when a simple static EQ just isn't cutting it? If so, try the following tips and tricks to easily tame harsh treble in your mix.
Learn how to:
- Assess the track’s function in your mix
- Use the multiband “duck” for top end control
- Use a dynamic equalizer to tame the high-mids
- Isolate the high end for processing
- Bump the low mids to offset peaking harshness in the highs
- Use harmonic distortion to tame harsh treble
- Manage your plug-ins for better high end
- Spot troublesome frequencies with RX
This article references a previous version of Neutron. Learn about 

Neutron 5
Use these mixing tips in your next session
Get access to all of the plug-ins used with these mixing techniques by getting your copy of


Music Production Suite 7


Neutron


Ozone Advanced
1. Assess the track's function in your mix
First ask yourself what the offending track is actually trying to accomplish. Is it a feature player, or a supporting cast member? Will it be pushed back into the soundstage, or does it carry a melody of the utmost importance?
Intention is everything, and answering these questions hones your intentions.
If the track is unimportant, then you often don’t need to worry about preserving its integrity; you have the freedom to low-pass it to high heaven, or to slice and dice it with notches galore—so long as it serves the mix.
When an instrument is not important to the mix, you’ll save yourself a lot of time and energy by relegating its frequency content to its bare essentials, like so:

High passing and carving in Neutron Pro
But if the element in question is a top-billed performer, then you’ve got your work cut out for you.
Read on.
2. Try the multiband “duck” for top end control
This technique shines on buses. It can work on solo tracks, but I tend to save this trick for submixes. As always, be careful and be conservative, as multiband processing can introduce a host of issues.
With a multiband tool, address the upper mids and highs, using your ears to find the exact crossover point.
If the multiband tool is a compressor, I tend to employ lighter ratios; if a range is offered, I go relatively easy on that as well. I don't want to clamp down too hard, too fast, and too often. Medium time constants are good, or better yet, you can time them to the tune’s tempo for a more invisible touch.
Use this technique to mellow out harsh frequencies when they peek through. One could think of this process as simulating the way analog tape seems to subtly shave off high end in the analog world.
Here’s a loop I made for the purpose of showing off drums that need taming in just this manner.
Wow, those drums are way too crispy! It’s almost like I engineered it that way.
We’re going to tame the high end using various processors available to you in Music Production Suite. For instance, we could use a multiband compressor in


Neutron

Multiband compressor in Neutron Pro
A Dynamic EQ in Neutron could also work:

Dynamic EQ in Neutron Pro
The Sculptor can also accomplish this effect (note the settings, emphasized for attenuation):

Sculptor module in Neutron Pro
This article references a previous version of Ozone. Learn about 

Ozone 11 Advanced
And finally, the Spectral Shaper Module in


Ozone Advanced
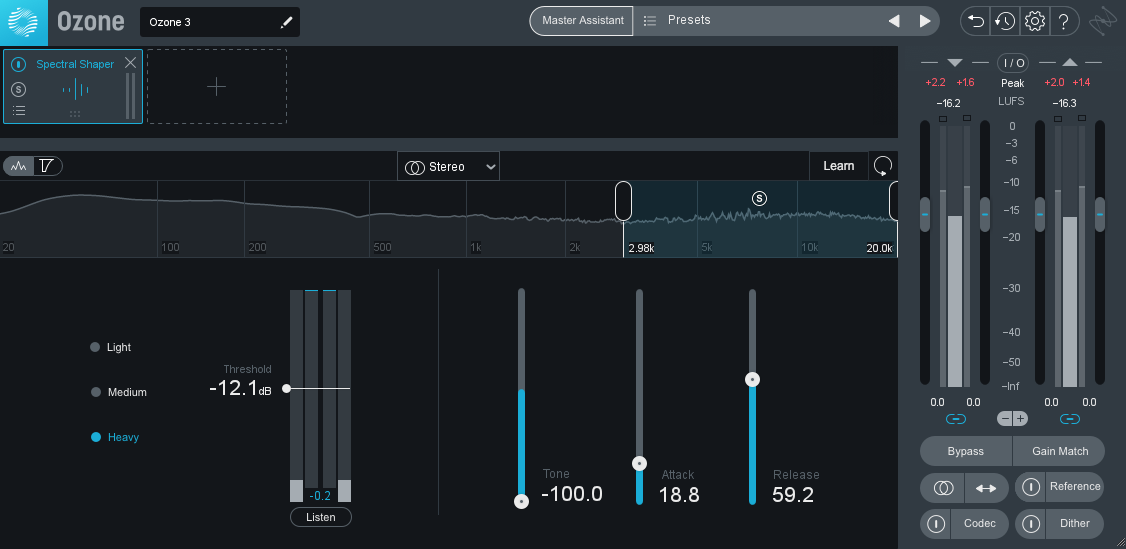
Spectral Shaper in Ozone Pro
3. Use a dynamic equalizer to tame the high-mids
Many times, frequencies we perceive as harsh highs actually belong to the upper-midrange—anything between 2.5 kHz and 8 kHz.
Sibilance can sometimes occupy this space, as can nasty cymbals, clangy guitars, or needly synths. Taming the high-mids can be problematic for EQ: a static cut at these frequencies often dulls things beyond repair.
A dynamic process, on the other hand, might do the trick. It'll clamp down only when told to do so. You'll be able to sculpt the attack and release, so you can let the initial portion of the transient in, and with it, sweet liveliness; dynamic cuts can often mitigate the harshness while preserving the sound's innate character.
Three different types of processors are suited to handle the task: a multiband compressor, a dynamic EQ, or a de-esser in split-band mode. If you have a dynamic equalizer on hand, and you’re new to this technique, I recommend going that route, as it’s arguably the easiest.
Say you've got a vocal annoyingly resonant between 3–6 kHz. Here's how it would go: you'd grab a dynamic EQ, set up a 1 dB–3 dB cut at 4 kHz with a moderate Q. Next, you’d keep the attack just slow enough to let transients through, all while using a fast to medium-fast release to recover quickly. Threshold you must set to taste. I keep the ratio—if it's offered—set relatively low. The trick is to keep the ratio or range value high enough to mitigate the problem, but low enough not to call attention to itself.
Here’s a vocal with a smidge too much 3.6 kHz for my liking:
We’ll use Ozone's Dynamic EQ to smooth the edge a little, like so:

Dynamic EQ in Ozone Pro
If you're using the de-esser in


RX 11 Advanced
4. Isolate the high end for processing
This is a dicey proposition, as it could have adverse effects on coherence; indeed, it's possible this trick could smear the source, so I wouldn't go about employing this mixing technique on a snare drum or a lead vocal. Still, it’s effective on background players: stereophonic background vocals, guitars, synths, etc.
In essence, you duplicate the element to a new track, low pass the horridness on the original channel with a gentle slope, high pass the duplicate to about 8 kHz or so, and then apply modulation, spatial effects, or ambience processing until the two tracks cohere nicely.
Envision this scenario: you're working on a pop or electronic track where the vocal will receive stereophonic treatment anyway—the kind of thing an Eventide would handle in the analog world, or


Ozone Imager V2
In this case, try taming the high end by separating the lows and highs of a signal so you can process the highs independently. Once you isolate the high end, you can de-ess it and add other spatial effects that will help disguise its imperfections and glue the two signals together. Here’s how to do it step-by-step:
- Duplicate the vocal track
- Low pass the original vocal with an exceedingly gentle slope
- High pass the duplicate track to around 8 kHz (again, with a gentle slope)
- De-ess the duplicate vocal
- Put a little stereo chorus on the duplicate and widen it out a bit
- Blend the two vocal tracks together carefully.
Will this sound natural? No. Will it smear? Probably.
But will it work within certain electronic or ethereal contexts? If done right, then yes.
If you want to hear examples of this trick in action, I’ll point you to a recent EP I mixed for Peach Face—specifically the song "No Windows."
5. Bump low mids to offset peaking harshness in the highs
There’s a yin-and-yang effect between high and low frequencies. Cut something in the low end, and you'll feel more presence in the highs. The opposite is also true. You can take advantage of this, using frequency bumps in the low midrange to offset the harshness peaking through the highs.
Be careful in doing so—you don't want to introduce tubbiness.

Boosting low mids to soften aggressive high mids with Neutron Pro
In my experience, this mixing technique works better in genres such as classical and jazz music, where you need to retain a natural sound. Here, only the most subtle tricks will work. In more electronic genres, where frequencies require more sculpting, this trick could introduce midrange bloat. You don’t want that.
6. Try a little harmonic distortion
This one is fun. Here, we’ll use a combination of corrective EQ and harmonic saturation. Dip the offending frequencies with a colorless, surgical EQ, like so:
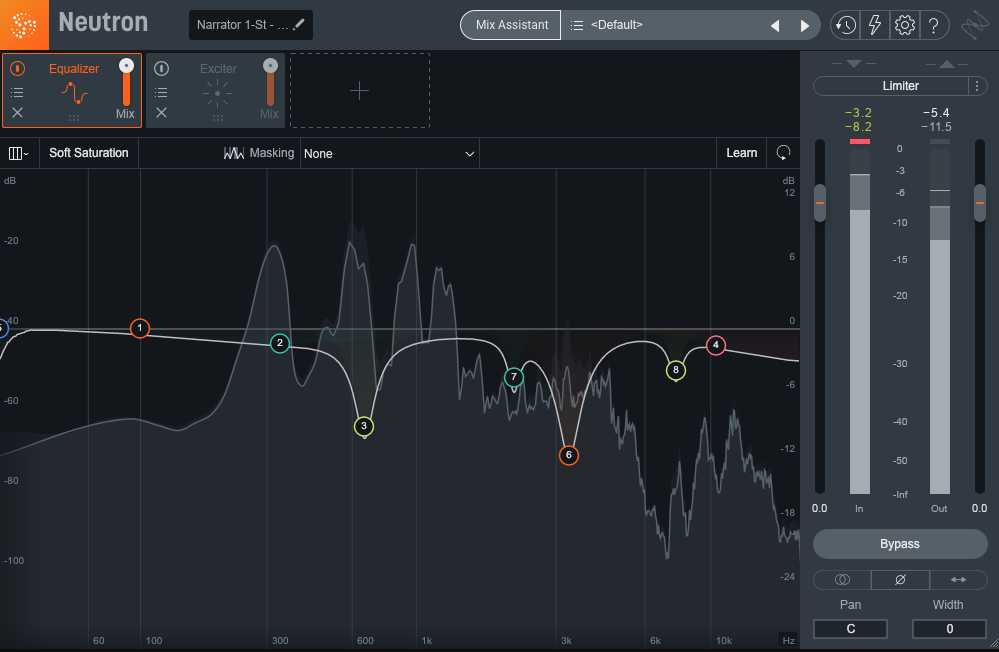
Making multiple EQ cuts in Neutron Pro
You should have a lifeless track at this point—one devoid of the harshness, but overly dull and clinical. Now, apply harmonic excitement/distortion of some kind, such as the Exciter processor in Ozone.

Exciter module in Ozone Pro
If you're using a multiband exciter, give some love to the low midrange. Don't go overboard here on the saturation; the aim of the game is subtle coloration, not screaming distortion.
Now, after this processing, put on another surgical EQ and restore the frequencies you cut originally. I like to duplicate the original EQ and change all my negative values to positive, so that a cut of -3.5 dB becomes +3.5 dB, etc.
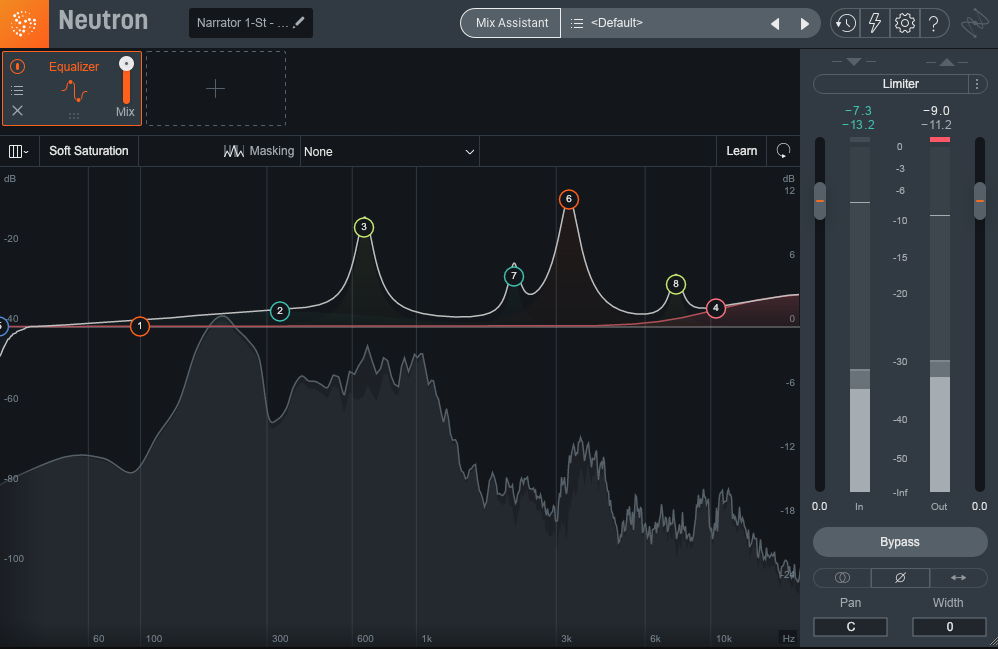
Putting back what we've cut in Neutron Pro
If all goes well, the track should sound much like it did before, minus the aggressive harshness in the highs, and giving you something more pleasant.
Here’s an example, with a clean vocal followed by the processed one. It’s subtle, but you should hear it.
7. Are you using too many plug-ins?
I realize the irony of putting this tip right after one that asked you to use three plug-ins, but here we go anyway:
Yes, it's happened to all of us—especially when we're starting out: we pile on plug-in after plug-in, and after a while, we begin to wonder, "Where's that horrible harshness coming from?"
Sometimes we apply too much processing, and the effect of all these color compressors rubbing up against harmonic exciters and vintage EQs is not pleasant.
There’s more than a few reasons for cold relations between different algorithms: Maybe you’re undoing one processor’s effect with another that isn’t so complimentary. Maybe you’re coloring a colored sound with too many colorful tools in series. The result isn’t glorious technicolor, but a drab and harsh mess.
Here's a tip: if you're wondering why your track sounds harsh, and you've got more than three plug-ins on the track, try bypassing all of them. See if the harshness goes away. If it does, that's your clue right there.
Next, start at the top: turn on the plug-ins one by one, and pay attention to when the harshness comes back.
For this tip you have my permission in solo—just don't spend a long time listening to the track all by its lonesome, or if you do, take a break for a moment.
8. Spot troublesome frequencies with RX
RX's combination of easy-to-read spectral editing and host of useful modules comes in handy for spotting troublesome frequencies. RX allows you to attenuate troublemakers with minimal risk to other bands. The Gain module and the Frequency Selector tool, in deft hands, can target issues with pinpoint accuracy.
Of course, there's also the Spectral Repair module, which, in Attenuate mode, can make demonstrable differences. You can train this module to observe better frequency-handling surrounding a selected region. Then, it attenuates the selection based on the behavior it observes.
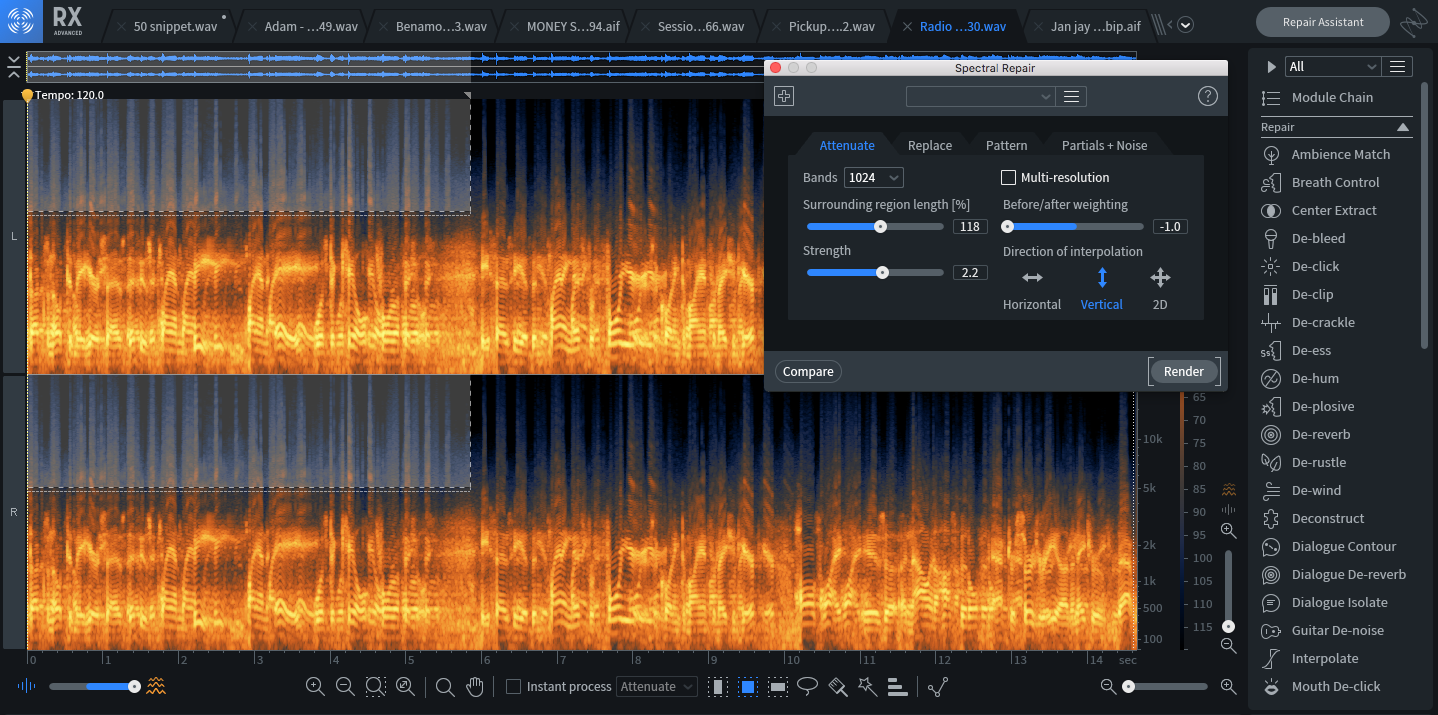
Spectral Repair in RX
Now, the caveats:
Be conservative, because overtones of frequencies you'd wish to preserve can exist in the bands you'd like to attenuate; too much processing here and you run the original risk of dullness from static EQ.
Also, be sure you're working off a copy of the file: Making a copy allows you to revisit the original if your first crack turns out to be wrong in the cold light of day.
Start taming harsh treble in your mix
These tricks don't represent the full breadth of how to deal with this problem—after all, every audio source reacts differently to every process. And whether you work in the box or out of the box, there's always ways to think outside the box. Still, this should be enough to get you going, along with trying all of the plug-ins in this tutorial by starting a free trial of iZotope’s


iZotope Music Production Suite Pro: Monthly


Music Production Suite 5.2

