
Mastering music is often seen as a “dark art,” but the phrase is really a misnomer – it isn’t any more of a secret than any other part of the production process. Learning how to critically listen and understand best practices to finish a mix are important skills for an engineer to learn, even if they aren’t always wearing the shoes of a mastering engineer.
The goal of mastering is to achieve a cohesive sound that stands up against other tracks in the same genre or playlist, or across an entire album. iZotope Ozone empowers you to make a quick master without compromising on quality, and the new features of Ozone 12 improve your workflow even further, so you can focus on the art.
In this article on mastering for beginners and experts alike, we’ll review the new and improved Master Assistant, how to control your low end with the new Bass Control, and explore some of the 25+ new Stabilizer targets, among other things. We’ll review these modules by revisiting mastering guidelines so you can work quickly and efficiently.
Follow along with iZotope Ozone, the ultimate collection of mastering tools to help you make your tracks release-ready.
Before we begin, let's take a listen to the difference mastering with Ozone can make for your track. Listening on good-quality headphones will give you the best audio experience when listening to subtle differences in mastering.
The song is "Basta" by the band The Braided Janes. The song has been level-matched so you’re able to hear the changes without being swayed by loudness.
Mastered Song
1. Prep your workstation & DAW for mastering
Having a trustworthy room and setup is important, but if your space isn’t dedicated to mastering, I find it helps to shift both my mindset and my environment into “mastering mode.”
This is especially true when I’m doing both the mixing and mastering on a project. In those cases, I like to export my mixes and start a brand-new session just for mastering. It makes the process feel fresh and helps me hear things more objectively. I also try to take at least a day off before diving into the mastering stage. Even a short break gives me some distance and lets me come back with a clearer perspective.
Monitoring, metering, quality assessment
Calibrate your playback monitoring to a fixed gain level for mastering. This is more crucial for a multipurpose studio environment because it trains your ears to develop an internalized compass for both loudness and tonal balance that effectively translates to the outside world.
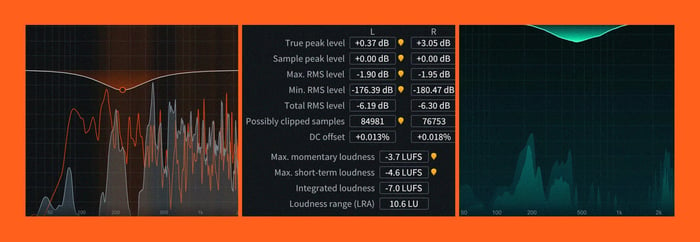
A well-rounded set of metering tools, along with properly calibrated monitoring, is crucial to giving you the most accurate picture of the sound you’re aiming for while mastering.
Tools such as Insight provide detailed information about:
But another metering tool that’s worth having in your arsenal is Tonal Balance Control , which gives you a contextual picture of your master’s tonal balance in relation to a reference target (album, genre, etc).
Another important step is making sure all your files are technically correct. I’ve had to reach out to clients or mixers for new exports more than once. Sometimes a file comes through in mono when it shouldn’t, a track goes missing, or there’s audible distortion that simply can’t be fixed in the mastering stage.
File & metadata check
Double check that you have the right files, and ensure that your mixes are at the optimal format/resolution for mastering. Although different mastering houses have their own set of preferred specifications, you’ll be well on your way by exporting mixes in the WAV format, keeping it at its native sample rate, and setting the bit depth to at least 24-bit or 32-bit float. Having the essential metadata on hand before mastering (artist name, song title, album title, sequence, ISRC if it’s available, etc) ensures a smooth, efficient session.
Dig deeper: Learn more about the importance of monitor gain in mastering and discover how to use metering in mastering.
2. Load Ozone’s Master Assistant as a starting point
Ozone’s Master Assistant helps you quickly analyze a song and determine what might be needed to have the mastering sit competitively against other tracks in the same genre.
This can be helpful if you’re new to mastering or perhaps a little less experienced with a specific genre. Before working on this track, I threw Master Assistant into my chain to get an overview of what might be needed in the mastering process.
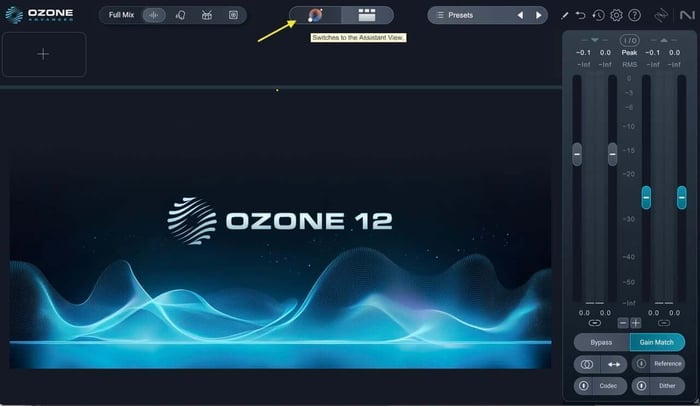
Ozone 12 Master Assistant button
I inserted the Ozone 12 plugin, and then clicked on the little colorful globe up in the titlebar. I chose the Custom setting as opposed to One-Click, which would allow me to bypass customizing all the information below and just perform an analysis.
Depending on the track, I might not want certain plugins to be considered, so I like the option of being able to take them out. For this track, I left all modules under consideration, set loudness to -9 dB, and engaged True Peak and the Maximizer.
In the latest version of Ozone, there are over 25 new targets to use in the Master Assistant. I chose “All-Purpose” for this track, but you have the option of really honing in on something more genre-specific, if you’d like.
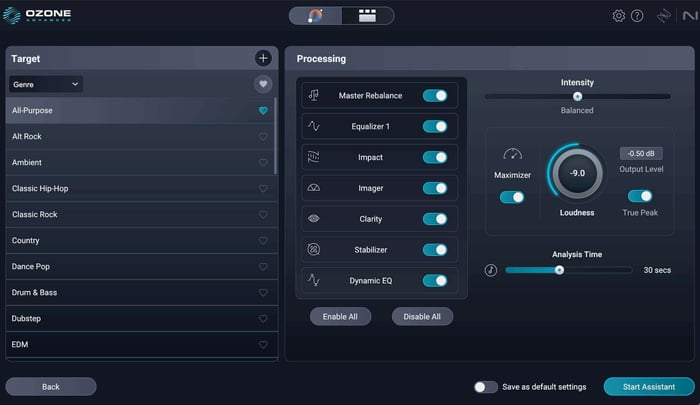
Custom Master Assistant settings
I set the Analysis time to 30 seconds to get a good cross-section of the chorus into the verse. Then I hit Start Assistant and pressed the spacebar. Be aware that there’s probably going to be a loudness jump as it analyzes the audio.

Ozone Master Assistant learning
Here's the results from the Master Assistant.
Master Assistant Results
I switched back over to the Detailed View to take a look at my plugins. While there was a lot I liked with the choices the Master Assistant gave me, there were some things I felt I could tweak better, knowing what the artist wants as well as what sounded more appropriate to my ear.
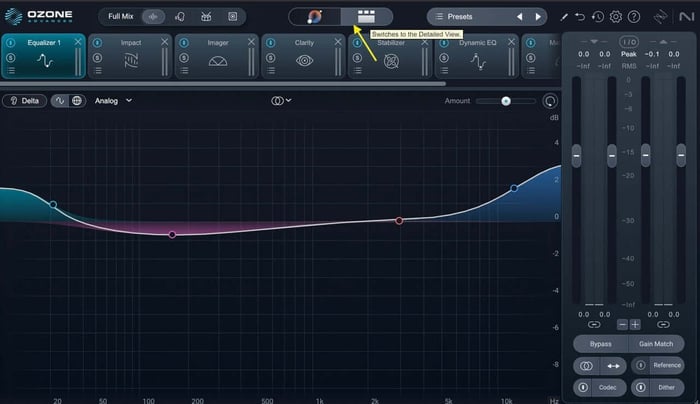
Ozone 12 Detailed View
Which leads me to…
3. Level matching and auditioning settings
As I said above, there are a few things about the modules I wanted to change. I heard a little bit of crackle on the loudest part of the chorus in the vocals, and I think adjusting the Clarity module may help.
I also wanted to adjust the Imager settings as I didn’t think it flattered the tightness of the midrange. I was able to make these initial choices by engaging Gain Matching and soloing, bypassing, and listening to different modules level-matched against the original mix. It’s important to match level, as even just increasing gain without any other adjustments can deceptively sound better, but on closer inspection, that may not be the case.
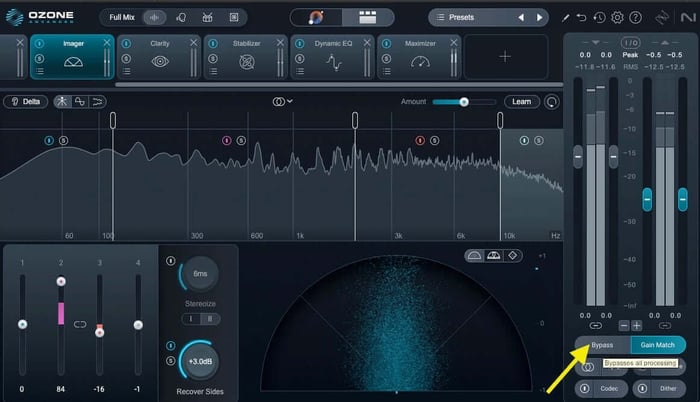
Clicking Gain Match to bypass level adjustments
From here, you may want to explore different settings. One way to accomplish this is through the Ozone mastering presets.
Dig deeper: Learn more below about 5 ear training exercises to listen like a mastering engineer.
4. Explore presets, adjust modules
Once you have an idea of what is needed or what you’d like to adjust, it can be helpful to start with module presets that come with the software. As an aside, I often like to start with a preset when auditioning a new plugin I’d like to demo before buying – it’s a good way to learn how something works without wasting time.
As with anything in the creative process, it’s important to listen and adjust to taste – but presets can be a good jumping off point.
For example, I wasn’t particularly keen on how the Stabilizer was working on this track, using the Master Assistant’s choice.
Initial suggested Stabilizer settings
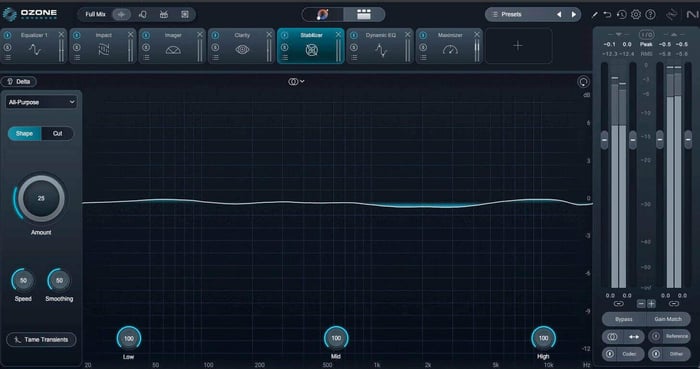
I brought up the Harshness Tamer preset and adjusted the settings while listening to the gain-matched and non-gain-matched settings, and found a better setup for what I need. I wanted to help shape the harshness of the vocals a bit, and I think it did the trick.

The Harshness Tamer preset of the Stabilizer
I ended up removing the Imager module. After adjusting my equalization settings, I might put it back in, but for now, it feels a bit unnecessary for this track.
5. Adjust your EQ settings and dynamics processing
EQ and dynamics processing are essential tools used to sculpt the overall sonic balance, shape the tonal characteristics, and control the dynamic range of a master, ensuring it sounds polished and cohesive.
Before I do anything else, I want to check the Equalizer 1 and Dynamic EQ settings that the Assistant lined up in my workflow.
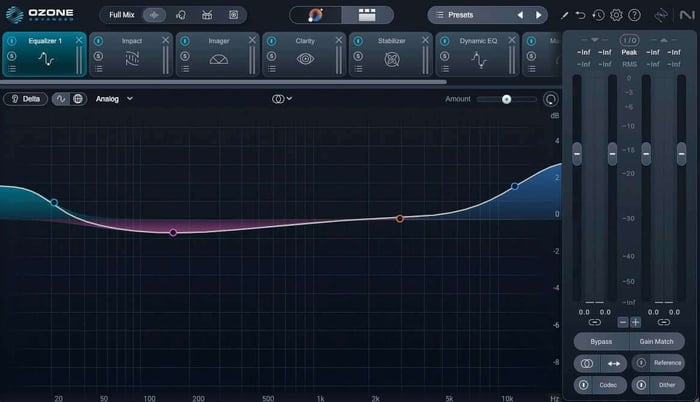
Initial Equalizer 1 settings
I think that the bottom and top shelf bumps are a bit much for this track, so I’m going to adjust that curve a bit. Again, I listened to the initial curve against the bypassed mix, and dialed back both settings and took out a little low end mud to tighten up the bass and kick. I listened to my changes against the level-matched mix and was happy with the changes.
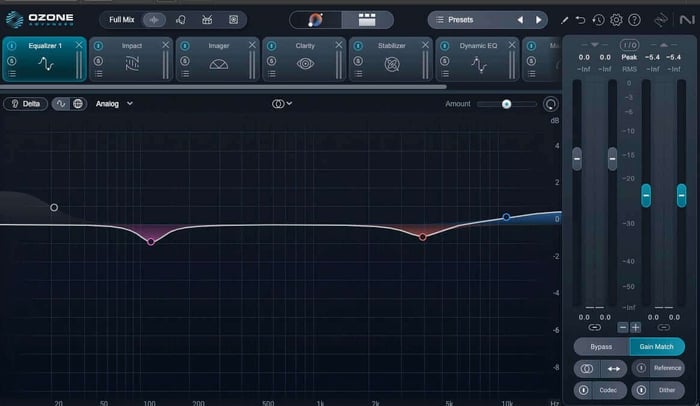
Adjusted equalization settings
With my Dynamic EQ settings, I didn’t want the little dips or the high cut shelf to affect the overall stereo image, as I liked those frequencies in the side information.
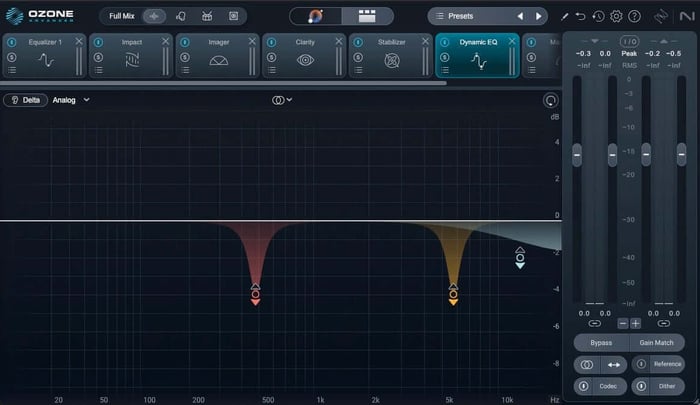
Initial Dynamic EQ settings
So, I kept the initial settings but adjusted the Dynamic EQ to only affect the mid channel and leave the sides untouched.
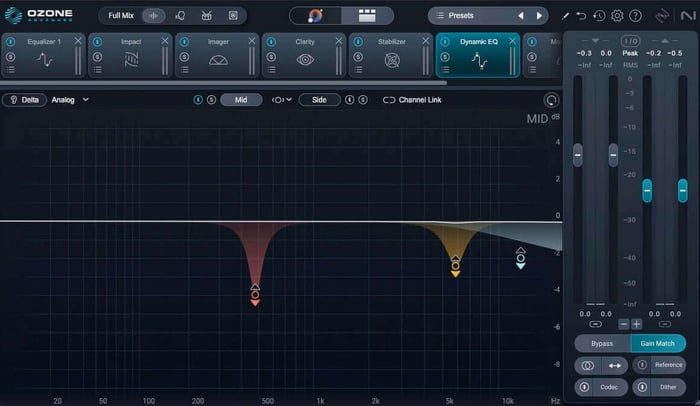
Adjusted Dynamic EQ
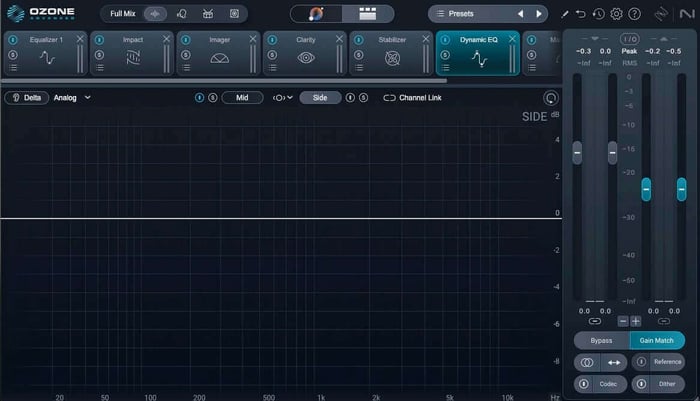
Adjusting the side channel on the Dynamic EQ
That way, the buildup of the frequencies I didn’t like as much in the vocals was still present in the rest of the mix. Learn more about mid/side processing if you need a refresher.
Also, rather than leaving in the Imager but just bypassing each band, I’m just going to bypass the modules entirely. After the equalization adjustments, it really feels like this isn’t really needed.
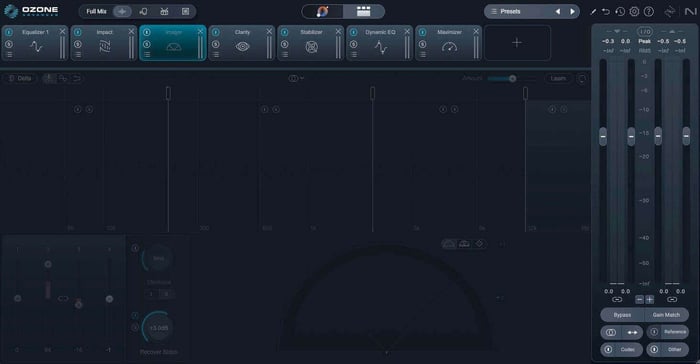
The bypassed Imager
I also made adjustments to the following:
Clarity module: I backed off on how much it was working, and it feels more natural now.
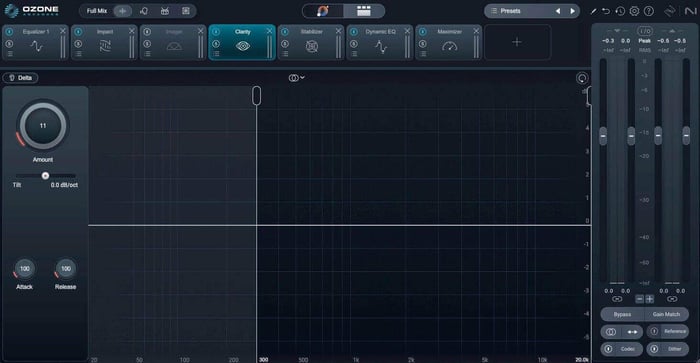
Adjusted Clarity module
Impact module: I adjusted the lower frequencies to help tighten things up.
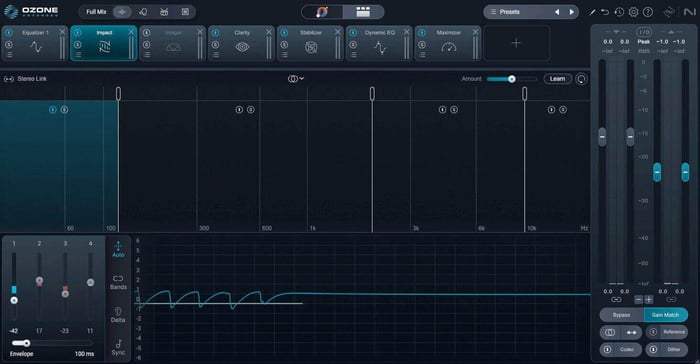
Adjusted Impact module
Stabilizer module: I also backed off on the settings to make it feel more natural and less pumping.
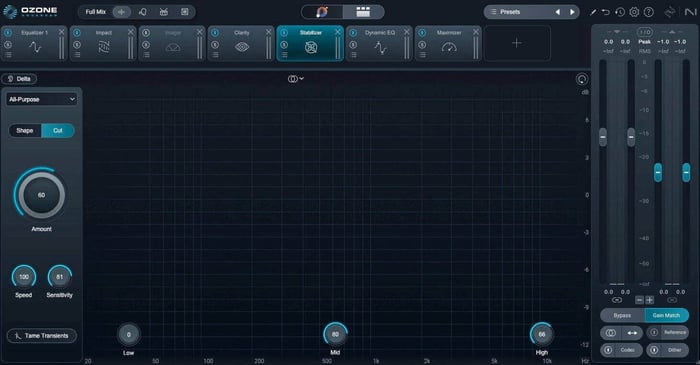
Adjusted Stabilizer
6. Manage low end with Bass Control
One of the new modules in Ozone 12 is called Bass Control, and I felt like this was a good opportunity to see how it works in a track where the beat is so important. I felt this mix would benefit from a little more control, a little more punch, and a little more sustain.
You can also control the peaks in the frequency range you are affecting. That way, each hit sounds even within the track. I’m using it subtly in this master, but the module offers a lot of control and room to create something more dramatic. I felt putting this before Impact in my chain would be most useful.
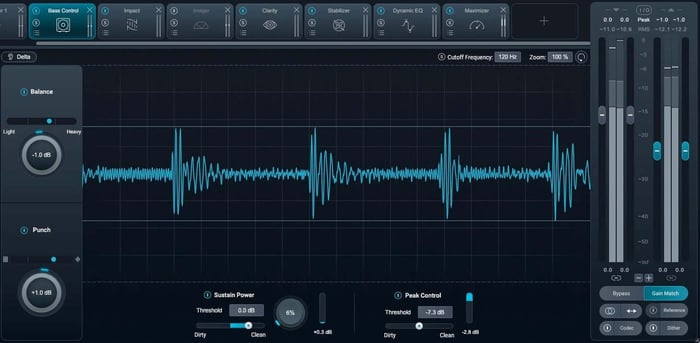
Giving the master more punch and sustain with the Bass Control module
7. Adjust the loudness and limiting with the Maximizer
We are getting towards the finish line with crafting this quick master.
Loudness is usually the first thing that comes to mind when people think of mastering, but every step that comes before the limiter also impacts the overall loudness and feeling of the track. When you drop that Maximizer track into your chain, everything – good and bad – comes more into focus.
I’m using the new IRC 5 algorithm, which is extremely transparent and is designed not to add pumping or other artifacts to get a loud master that isn’t fatiguing or harsh.
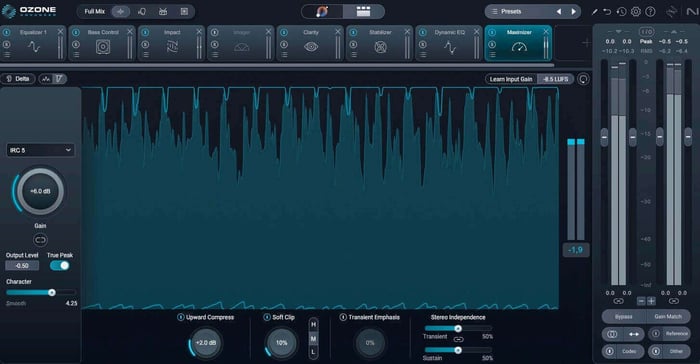
The adjusted Maximizer settings
I adjusted the settings a bit from what the Master Assistant gave me, but it wasn’t far off.
8. Preview your sound using the Codec Preview feature
The Codec Preview in Ozone is a nice way to double check how your masters will sound when converted to different audio codecs, such as AAC and MP3 at varying bit rates. You can also solo artifacts that might occur through conversion.
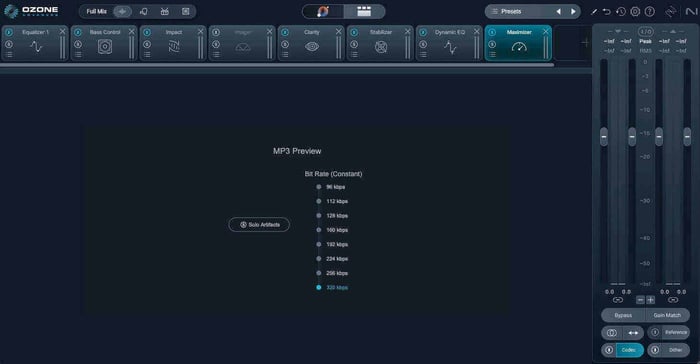
Previewing a 320 kbps version of our master
9. Export your master and listen back in various playback systems
Once you’re satisfied with your mastering adjustments, export your master to a lossless audio format. Avoid the mistake of exporting to lossy MP3. Different digital service providers (DSP) will have different specifications, but a common delivery spec for streaming and digital download is 44.1kHz / 24-bit WAV (a few DSPs still require 16-bit resolution so double check on your end).
Your mastering session doesn’t end here, however. Your critical listening continues outside your workstation. Remember that one of the goals of mastering is translatability—to make sure that your master sounds good across various commercial playback systems, whether it’s a high-end speaker system, headphones, car stereo or even a bluetooth speaker.
When listening, it’s good to preview on multiple systems, like:
- A car stereo
- Home stereo
- Your friend’s stereo
- Headphones
Also, reference the song against other songs in the same genre if you haven’t been doing that already.
Take note of anything that needs to be adjusted to improve your master’s translatability (e.g. low-end could sound a little less boomy, the master could sound brighter, the sibilance could be tamed a bit better, etc.) Make notes and revisit the master.
Dig deeper: Learn more about audio sample rate and bit depth and how those factors play into audio production.
10. Revise your masters if necessary
Revisions are a normal part of the process. While it feels great to get everything set right on the first go, sometimes mastering brings out elements in the mix that the client wants you to change. Sometimes they’ll even want to change the mix.
The more you practice, the more you fall into a good workflow, and the easier it becomes. Creativity is fluid, and music doesn’t work within a framework of a factory. But having a solid workflow makes all the revisions easier, and hopefully results in more emails that say “you got it!” on the first go.
Dig deeper: Learn more about revising masters in this interview with professional mastering engineers.
The final, mastered result
The files are level-matched, so you can hear the differences between the mixes and masters.
Once again, here is our original mix:
Here is the master with the Master Assistant’s suggestions, and the "after" is the final master, made from the Master Assistant suggestions and then further adjustments to taste.
Master Assistant results vs. final master
Start mastering your music with Ozone
iZotope Ozone 12 is a powerful set of tools that helps you work quickly and efficiently to master a track that is ready for distribution and can compete with other music of the same genre on playback systems.
Bass Control, Master Assistant, and the new IRC algorithm help take your track to the next level, but at the end of the day, these tools lie in your very human hands. Your ears should have the final say.
Download Ozone today and experiment with its newest modules.