Understanding Chorus, Flangers, and Phasers in Audio Production
In this article, you’ll learn all about chorus, flanger, and phaser effects. Identify the differences between them, how they work, and how to use them in audio mixing.
Most producers are familiar with the most common audio processors: EQs, compressors, reverb, and delay. These can be (and often are) used in every project, being the main tools in a producer’s arsenal. In a mixing context, these are the most important plug-ins you’ll be dealing with. In a creative or sound design focus, however, we can take advantage of more specialized processors to create interesting sounds.
While there are lots of unique-sounding audio effects for sound design, there are a few you’re likely to come across time and time again: chorus, flangers, and phasers. These processors are all related, and are often confused with each other, but they have notable differences that are worth pointing out. Simply put, delay time is what differentiates chorus effects, flanger effects and phaser effects. Chorusing uses a longer delay time than a flanger effect while a phaser uses an all pass filter to generate the desired effect without using delays at all. We'll go over each modulation effect in greater detail below so continue reading.
In this piece you’ll learn:
- What phase is
- What phase modulation is
- How to identify wave interference
- How to use these effects to add width to your mixes:
Chorus, flangers, and phasers are included in


Nectar Pro

Nectar Pro’s Dimension module
Bonus: Try these effects yourself with a free trial of iZotope’s


iZotope Music Production Suite Pro: Monthly


VocalSynth Pro
What is phase?
Before we jump into phase modulation, it’s important to understand what the phase of a sound wave is. One characteristic of sound is that it is cyclical. That is, sound waves repeat a pattern moving between positive and negative amplitude. The amount of time it takes for a waveform to complete one cycle is the signal’s frequency, expressed in Hertz (Hz).
Another important characteristic of a sound wave is the phase. Phase in audio is the position of a sound wave at a particular point in time, and we’re interested in the amplitude at that position. Think of a sound wave on a graph. The phase of a wave is its position along the x-axis (time) relative to the start of the wave’s cycle.

Oscillating sine wave
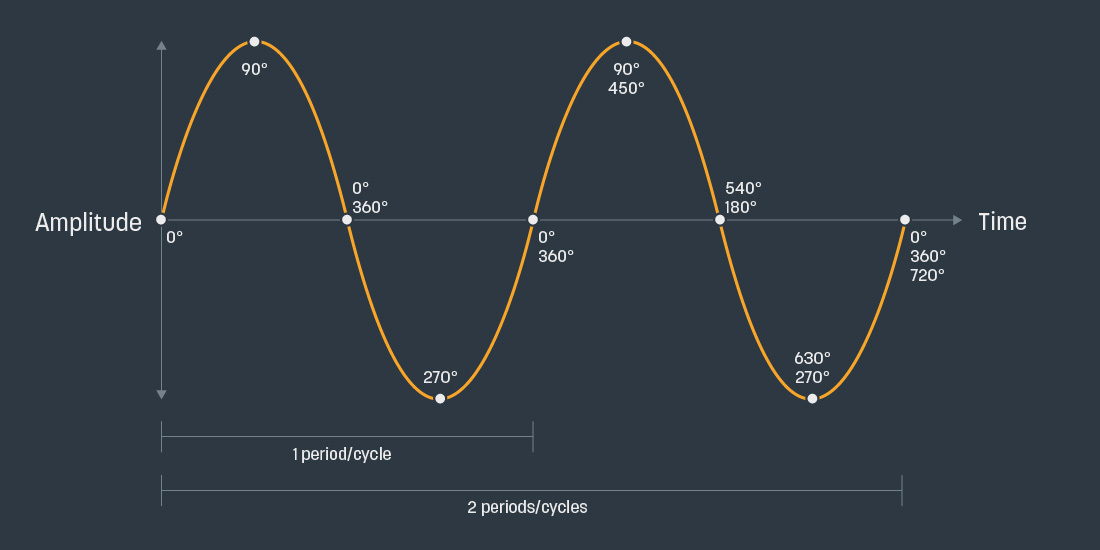
When discussing the phase of a sound wave, we usually talk about it in terms of degrees similar to how we think about position on a circle. One full wave period is defined as 360º and each multiple of 360º marks the beginning of a new wave cycle. To keep things simple, we’ll use a sine wave to illustrate this concept.

Sine wave
The beginning of a wave cycle is defined at 0, 90º represents the peak (highest point), 270º represents the trough (lowest point), and 360º defines one full wave cycle. The phase of a wave refers to a point within a wave cycle.
What is phase modulation?
Now, where things get interesting is when you combine copies of the same signal on top of each other and start phase-shifting them (moving their position along the x-axis). In audio signal processing, phase modulation is the process of gradually shifting the relative position of the waveforms in time.
For example, two sine waves being phase shifted against one another (A and B), will cause sine wave A to be 45° degrees out of phase with sine wave B.

Wave is ahead of B by 45°
Wave interference
When speaking of the phase relationship between similar waveforms, we can say that waves are either in-phase, out-of-phase, or anything in between. It’s these phase relationships between waves that causes the unique sonic qualities created by chorus, flangers, and phaser effects. Two important phase relationships to keep in mind are those that result in constructive (in-phase) and destructive (out-of-phase) interference which are more likely to occur when identical waves are stacked together, as is the case with chorus, flangers, and phasers.
Constructive interference: in-phase
When two waveforms are in-phase, it means that they are perfectly aligned in time, and have a wave difference of 0. Think of when you record a track and then you duplicate it without making any changes to differentiate them from one another. The end result is constructive interference: the identical waveforms will add together to produce an amplitude equal to the sum of the individual waveforms (+6 dB of gain on a meter).
Destructive interference: out-of-phase
When two waveforms are perfectly out-of-phase (technically called reverse polarity), on the other hand, it means one waveform’s peak (highest point) is being displaced, or canceled by another waveform's troughs (lowest point).

Diagram of constructive vs. deconstructive interference
Destructive interference: comb filtering
Comb filtering is a form of destructive interference in a complex signal where a copy is time shifted slightly. This delay can be anywhere from .1ms to 10ms. Depending on the time delay, this can cause a frequency response that looks like a comb.The teeth of a comb might represent blocking a small bit of the spectrum, resulting in the filtered sound we hear sweeping around in the flange.
While there are many ways you can go about modulating the phase of waveforms, here we’ll cover how you can accomplish phase modulation with the use of effects like chorus, flangers, and phasers. Let’s dive into how these signal processors work!
What is the chorus effect?
The chorus effect is by far one of the most popular phase modulation effects used in music.
“Chorusing” is meant to simulate the subtle pitch and timing differences that occur when multiple musicians or vocalists play the same note, but vary slightly in pitch and timing. We can describe the sound of “chorusing” as a doubling effect that adds thickness, shimmer, and helps a signal sound “larger” than it would on its own.
How does the chorus effect work?
You get a ‘chorusing’ effect by creating a copy (or multiple copies) of a signal, varying its period (pitch), and then mixing the modulated copies with the original signal. Rather than using a pitch circuit to modulate pitch, like a vibrato effect, a chorus achieves subtle changes in pitch by modulating the delay time of the waveform with a low frequency oscillator (LFO).
The timing differences cause a constantly changing phase-shift between the original signal and the duplicated signal(s). Furthermore, the longer delay times compared to those of phasers and flangers result in gradual changes in the frequency of the final signal which creates variations in the copy’s pitch. For the most part, a slower speed/rate will generate a subtle chorusing effect while a faster speed/rate will cause more phase-shifting and perceived pitch modulations of the original signal.
Choruses use much longer delay times than those of flangers, resulting in a sound that doesn't sound like a comb filter as much as it sounds a bit like two signals overlaid. Usually choruses use delay times of 15–35 ms.
Chorus parameters in Nectar Pro
Let’s take a look at the parameters available in the Chorus option of


Nectar Pro

Nectar Pro Chorus effect
Moving from left to right, you first have the option to set the Rate of the LFO. This will control the speed of the pitch modulation and ranges from .01 Hz to 4 Hz. The higher you set the rate, the more of a “wobbly” effect you will hear since the pitch will be modulated more dramatically. You can also set the Depth amount, which controls the frequency range of the pitch modulation. Again, the higher the rate, the more “wobbly” the effect will sound.
Although some chorus plug-ins lack a feedback parameter, Nectar Pro’s Dimension module allows you to adjust the amount of processed signal that is added back into the effect with the Feedback knob. Adding feedback will create more of a drastic chorus effect because more of the wet signal will be getting added back into the effect to then be processed again.
Lastly, you have the option to set the Width of the effect. The Width knob controls the stereo spread of the module. When you load the Dimension module, it defaults to 100% width to give the maximum amount of stereo spread, but you can narrow the effect by turning down the Width knob. If you set the width all the way to zero, the effect will be completely centered in the stereo field. Note that this parameter is not available in mono instances of Nectar Pro, for obvious reasons.
To better understand how the chorus effect sounds, check out the audio example below. First is a completely dry vocal, followed by the vocal processed with the default Chorus effect settings in Nectar Pro. For the sake of hearing the chorus effect clearly, I’ve cranked the Mix slider of the Dimension module all the way up, but you do have the ability in Nectar Pro to blend between the wet and dry versions of each module to better dial in the sound you’re looking for.
Of the three processors we’re discussing in this article, chorus is generally the most gentle. Chorus is best used to wash a sound out and make it more ambient. The effect can be overdone for some highly characteristic sounds, but doing so can cause them to lose presence in the mix. Therefore, a chorus effect can be a great addition to supporting layers.
It’s worth noting that


VocalSynth Pro
Flangers
Flanging is a popular effect that sounds like sweeping or “whooshing” across high frequencies. The inner-workings of a flanger are very similar to that of the chorus effect. In fact, it is exactly like a chorus: the main difference being that we’ll use much shorter delay times so the end result sounds like a sweeping comb filter if we set it up properly.
How do flangers work?
Similar to chorus, flangers work by creating a copy of a signal and modulating the delay time with an LFO. Where they differ is in their delay times and number of copies they create. Flangers use much shorter delay times (1ms to 5ms) compared to choruses (5ms to 30ms) and only involve one copy of the original signal while choruses can create multiple copies.
In choruses, because of the pitch and timing differences, the frequencies between the original and copied signals are rarely the same which helps to minimize constructive and destructive interference. With flangers however, the copied signal is identical to the original so significant frequency interference occurs.
The result of this effect is a single sound wave that resembles a comb filter because of the notches occurring as identical waveforms shift against each other and reach points of destructive interference. In other words, at some points in the phase shifting process, the phase of the waveforms become perfectly in sync, leading to constructive interference, while at others points, the waveforms are perfectly out of sync and cancel each other out.
Given that the notches in flangers are generated by frequency relationships within the signal itself, they will occur at harmonically-related intervals (based on the frequency content of the original signal).

The notches on the comb filter will appear to “move,” resulting in a searing resonance that sweeps to the rate of the LFO.
By using an LFO to modulate the copy’s delay time, these points of interference will change. The notches on the comb filter will appear to “move,” resulting in a searing resonance that sweeps to the rate of the LFO. Flangers also make great use of feedback, sending the output back to the input to receive more processing. This accentuates the notches and resonances, resulting in the harsh, metallic timbre characteristic of flangers.
Flanger parameters in Nectar Pro
In Nectar Pro, the Flanger effect has all the same parameters as the Chorus effect. The Rate knob controls the speed of the comb-filter modulation, Depth controls the depth of the modulation, and Feedback will control the amount of processed signal that is added back into the Dimension module. Again, Width will control the stereo spread.

Nectar Pro Flanger effect
Here’s the same vocal from above, first dry and then with the default settings in the Flanger applied:
The sound design capabilities of flangers are obvious, especially when parameters are automated in an interesting way. However, the constantly oscillating comb filter can become tiring to listeners quickly. Therefore, flangers can be great as transitional effects and momentary ear candy to keep the listener’s attention.
Phasers
Phasers have a similar sound that falls somewhere between a phaser and a chorus in intensity, but they differ from choruses and flangers in one key aspect: phasers don’t modulate delay time.
Like flangers, phasers generate frequency cancellations as an LFO sweeps the copied signal against the original. However, instead of delaying a copy of the original signal, it is passed through a circuit called an “all-pass filter.”
How do phasers work?
Phasers utilize a circuit called an all-pass filter to change the phase relationship among various frequencies of the copied and original signals. As the copied signal passes through the all-pass filter, certain frequencies get phase-shifted, and the output gets mixed back in with the original signal. As the outputs of the all-pass filters combine with the original, notches are formed at the frequencies where the all-pass circuits created phase-shifts.
Phaser parameters in Nectar Pro
Again, the Phaser option in Nectar Pro’s Dimension module has all the same parameters as the Chorus and Flanger, but with one addition: the Frequency knob. When you adjust the Frequency amount, you can control the starting frequency of the all-pass filters. The higher you set the frequency, the more transparent the effect will become.

Nectar Pro Phaser effect
Check out the Phaser in action on the same vocal from above. First is the dry vocal, then the vocal with the Phaser’s default settings applied:
As you can hear, the phaser and flanger create very similar sounds, and can be used more or less interchangeably. As mentioned, the flanger can sound more extreme than a phaser, so phasers can be used when more nuance is needed.
Start using chorus, flangers, and phasers in your productions
Often confused due to their similarity, these processors all incorporate phase shifting in different ways. Chorus combines it with pitch modulation, flangers use it to cause harmonic-based comb filtering, and phasers employ all-pass filters to phase shift without the use of delays.
While chorus, flangers, and phase shifters may slightly differ in their functions and application, all can be used effectively to create interesting timbres in sound design. Their ability to produce ambience, locationality, and modulating timbres (in ways that the standard processors can’t) should secure their place in any producer or sound designer's tool kit.
Try them out for yourself in Nectar Pro to hear the differences between these three different phase effects. If you don’t already have Nectar Pro, you can get access to it by signing up for a free trial of a Music Production Suite Pro membership. With your membership, you’ll also get the VocalSynth Pro plug-in mentioned above, as well as several other industry-leading plug-ins to help bring that professional, polished sound to your mixes.


