
As a mastering engineer, the variety of mixes you receive from clients can be all over the map, sonically. Some songs need a major overhaul, and others just need a gentle touch. In every case, the goal is the same: stay true to the mix’s essence, while preserving its overall feel and character. To do that, you need the right tools, ones designed for the nuanced work of mastering, which has different priorities than the mixing process.
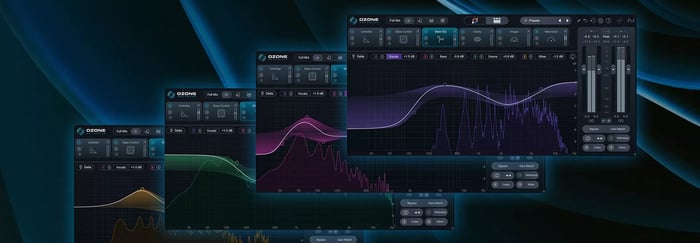
Ozone 12 introduces several new features to help make working with any mix easier and more creative. One standout is Stem EQ, which intelligently detects vocals, bass, drums, and other elements, letting you EQ them individually. Whether you’re fine-tuning the final balance between instruments or salvaging a problematic mix, mastering with Stem EQ gives you the precision and control to get the job done.
What is Stem EQ?
Stem EQ allows you to adjust the EQ of the individual stems of a track by separately detecting the vocals, bass, drums, and other (keyboards, guitars, etc, would fall under this category).
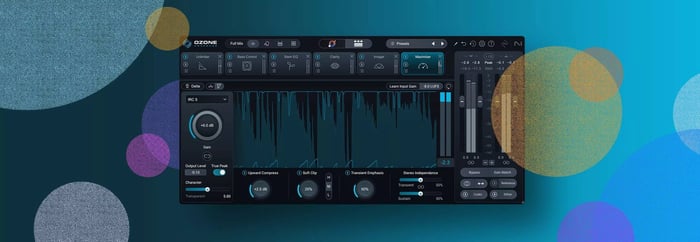
This is the Stem EQ module in Ozone 12, set to its default state. At the top, you’ll see the four available stem groups (Vocals, Bass, Drums, and Other), each with a gain control currently set to 0.0 dB. With this control, you can add or subtract stem level from the overall mix.
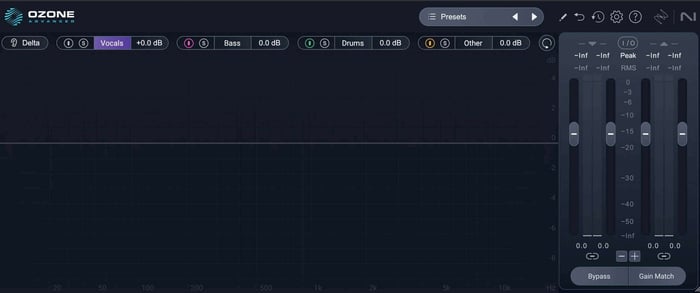
Stem EQ in Ozone 12
You can solo each stem as well, and listen to the “Delta”, or the difference between the bypassed signal and pot-processing.
On the right side, you’ve got your I/O (input/output) meters to monitor levels and make sure you’re not introducing clipping. The Bypass button lets you A/B your changes, and Gain Match ensures your perception isn’t skewed by volume differences.
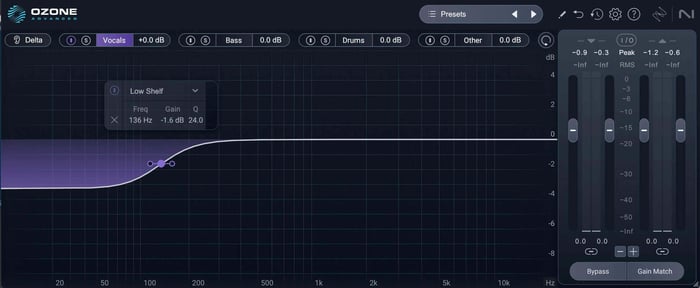
Stem EQ on vocals
If you select a band, it behaves as any other basic EQ. You can choose the EQ shape, frequency, and Q.
Why would you use Stem EQ?
So, when would we want to use this particular function?
Let’s say you have a case where you wish adjustments could be made to the mix, but you and the client aren’t in touch with the mix engineer. Perhaps you don’t have access to raw files or anything else pertaining to the mix. If you find the vocals are a bit too hot in the mix or need equalizing specifically, Stem EQ gives you the ability to surgically adjust these things.
Another reason is to allow more precision in what you’re affecting with your EQ.
Many engineers (myself included!) use M/S processing in mastering. The mid channel contains the information that’s identical in both the left and right channels, typically vocals, bass, kick, and snare. The side channel carries the differences between the left and right channels, which usually include stereo-panned elements like guitars, keys, effects, and ambience.
I’ll often use separate processing on the mid-channel. For example, if vocals are harsh, I can de-ess in the frequency range where I hear the most egregious sibilance and help mitigate that while not affecting the overall mix. The only problem is that I’ll probably also affect some of the hi-hat or any other information present in the mid-channel.
By using the vocal stem to apply a more general EQ curve on the vocals only, I can affect less of the other elements of the mix.
As with everything in mastering, nuance is key. Using Stem EQ too aggressively can work against the music and strip away its overall feel.
For an audio example, I’m using a short clip from the song “Treaty” by Cornelia Murr. It’s a dreamy, ethereal track with plenty of saturation and density.
What I find most interesting and useful about using Stem EQ off the bat is the ability to change the overall character with just a few changes.
Mastering techniques for Ozone 12’s Stem EQ
Let’s take a look specifically at how mastering with Ozone 12 can help you with fixing a bad mix.
1. Vocals
I started with the Vocal stem on this mix. I wanted to balance the sibilance as well as clean up the low mids a bit. For demonstration purposes, I was a bit more intense on the vocal EQ to take care of the sibilance. But even with more aggressive EQ’ing, I don’t feel like it comes off as unpleasant, just more as a stylistic choice.
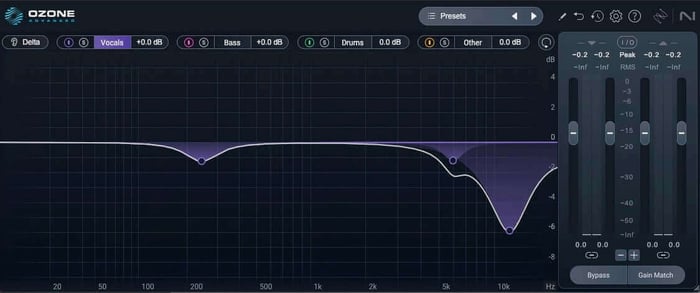
Stem EQ used on vocals
Here's the vocal stem EQ'd and solo'd:
2. Bass
With the Bass stem, I removed some sub-frequency clutter around 40 Hz, and used a wider Q around 100 Hz to clean up some wooliness. If I had wanted to do any more than that, I’d probably use another module to shape and control – perhaps the new Bass Control module available in Ozone 12.
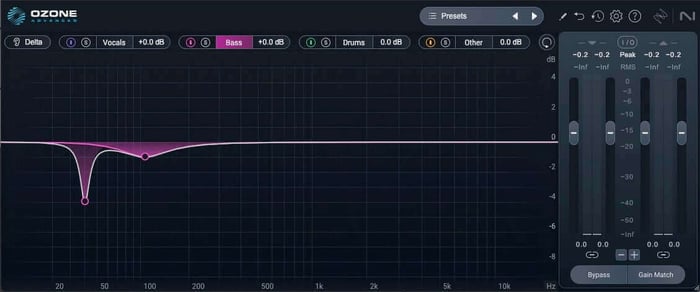
Stem EQ used on bass
Here’s the bass stem EQ’d and solo’d:
3. Drums
On the Drum stem, I removed some of the harsher cymbal sound, as well as some woofiness around 73 and 134 Hz.
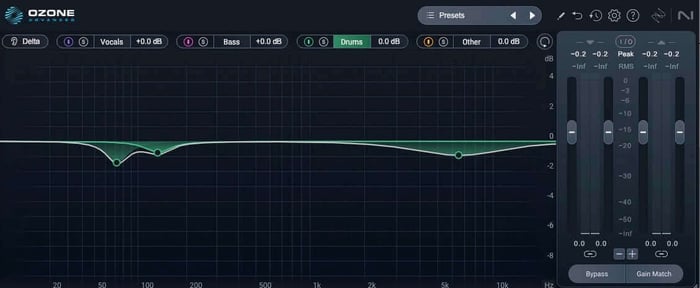
Stem EQ used on drums
Here’s the drum stem EQ’d and solo’d:
4. Other
The Other stem was an interesting one. What ends up in this stem would be highly dependent on what instrumentation the track was made up of. In this case, I heard a lot of stereo effects, guitar, and reverb. While I appreciated how lush it was, I also wanted it to be a bit clearer.
I EQ’d low mids on this stem as I felt it helped the vocals come through the mix. The dip I made at 2.7 kHz was to bring down the sharpness on the guitar.
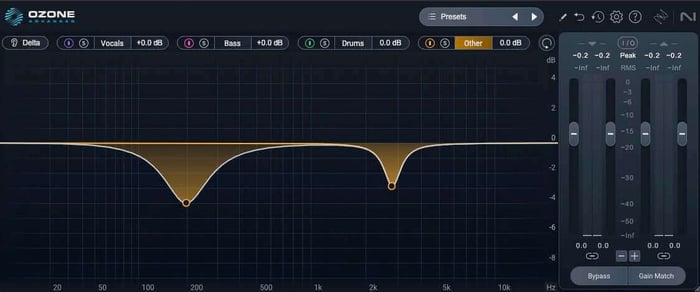
Stereo effects, guitar, and reverb with Stem EQ
Here’s the “other” stem EQ’d and solo’d:
5. Using Delta to hear the difference
All this time, I was paying attention to what I heard in the Delta. While I wasn’t making choices based solely on what I heard was being removed, it did help me listen for artifacts on what was being removed.
I didn’t feel the need to lower or raise any stem, but I could see this being useful in small increments to enhance a song that might just need a “bit” more of a certain element. It’s especially useful when asking for a mix revision would be complicated.
Here’s the result of the revisions with Stem EQ.
Before and after Stem EQ
Start using Stem EQ in your mastering workflow
Stem EQ, a new module in Ozone 12, lets you EQ individual stems within a track for precise, targeted adjustments. It’s a powerful tool for adding the final polish to a master or for working alongside other corrective processing to fix problematic mixes. As with any plugin, it’s all about using your ears. Taste and artistic vision go a long way!