Order of Operations: Audio Repair
RX offers a vast array of audio repair tools, but where do you start? Learn how to repair damaged audio by performing the right steps in the right order.
Audio repair is an inevitability for anyone who records music or dialogue at home. All kinds of problems can creep into your music, from a noisy environment or bad recording technique to mixing issues and sloppy edits. The fix may often be an easy one, requiring a single type of repair—but what if it isn’t?
There are going to be times when two or more of these problems come up at once, and that makes repair a tricky business. The order in which you use your tools is as important as the tools themselves, and each deserves equal consideration.
At first glance, that would seem strange—if all the tools are going to get used, does the order really matter? Well it does, and often drastically, so read on to learn how and why order of operations matters in audio repair.
This article references a previous version of RX. Learn about 

RX 10 Advanced
Crud isn’t mud (and vise-versa)
In my article 5 Tips for Better Audio at Home, I discussed some basic principles for thoughtful studio work rather than reactive. One of those principles is that “Mud Flows Downstream.” As presented in that article, the idea is that much like mud travels downstream and accumulates in greater and greater amounts, distortion and artifacts—the technical term here is “crud”—will build up as you go from micing to tracking to mixing.
The important point here is that crud doesn’t build up the way actual mud does. If you dump a bucket of mud on another bucket of mud, you have two buckets of mud, right? But if you have a little bit of extra crud in the low-voltage signal coming from a microphone, that crud is going to get massively louder when your signal hits the preamp. A tiny bit of noise that you could have dealt with earlier has a disproportionately large impact on your final audio, so the cleaner you keep earlier stages in the chain, the less crud builds up.
When we do multiple audio repairs, we’re using this process in reverse – peeling away layers of crud to reveal the clean audio underneath. To disassemble the crud so it comes away cleanly, we must choose the most effective order in which to work our audio repair magic.
Engineers love to argue, and there are several different prevailing ideas about which precise order of audio repair actions will work best. Being a fan of science rather than voodoo, I’m going to focus on a well-accepted convention that’s based on a clear, central idea: always try to tackle the deepest damage first.
To clarify, "deepest" refers to the most pervasive or numerous throughout the audio file. Even if other damage is more immediately audible, the key is to address artifacts that affect subsequent audio. Learning to rate various audio artifacts by the depth of their damage, rather than the amount, is critical to this process. For the rest of this article, I’m going to lay out those “deep damage” ratings, and a plan of attack based on them.
First and deepest: clipping
So where do we start? Here’s an example chunk of dialogue that we’ll take as far as we can with our new strategy.
When we listen to the audio, by far the most obvious thing we hear is some kind of broadband noise—possibly wind, or an HVAC system in the background. That’s the place to start, right? Nope. Before we get to that noise, we have to get the deeper damage out of the way.
Listen carefully to the audio again. The noise is really obvious, but there’s something else… Do you hear that tiny crackle here and there on the loudest words?
Let’s open the file in


RX 10 Advanced
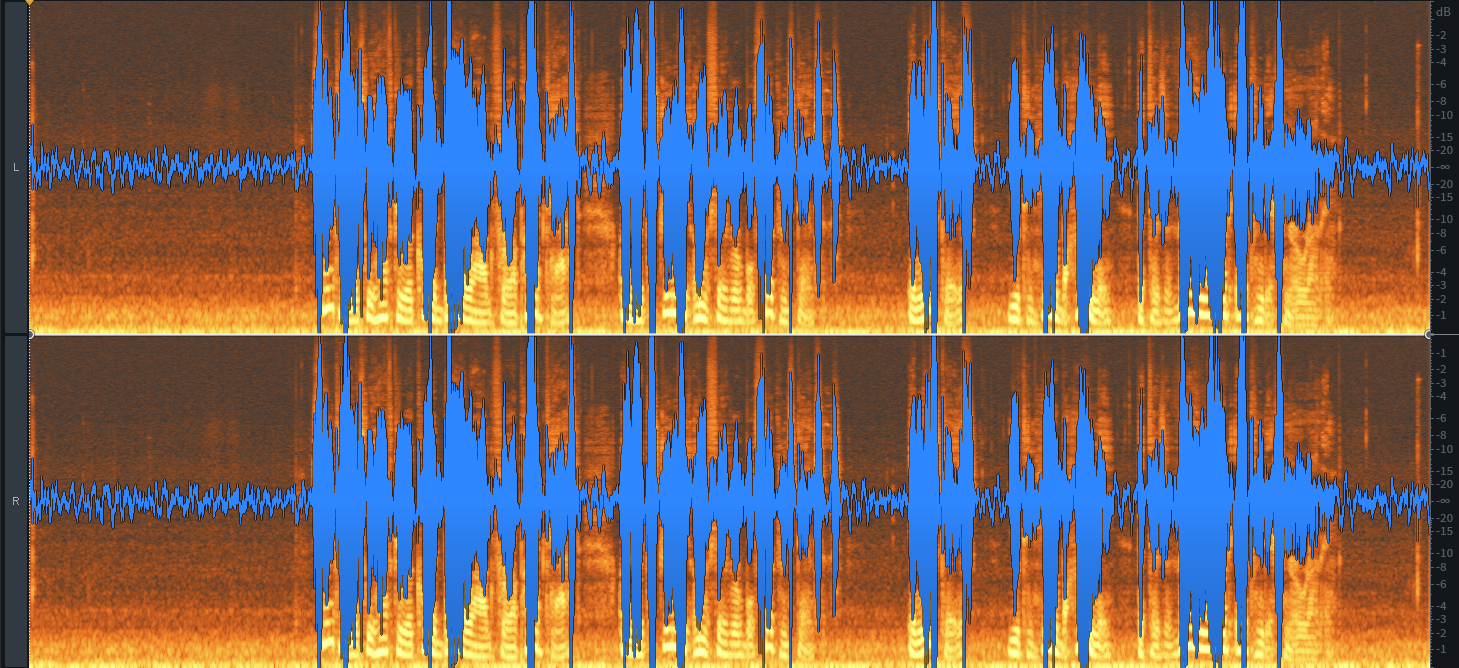
A quick look confirms the audible clipping.
Of all the different forms of crud out there, nothing cuts deeper than clipping. The waveform you’re supposed to have isn’t just obscured by noise or weird harmonics: it’s chopped off, it’s gone, and nothing can put it back—well, almost nothing. It’s time to reach for one of RX’s most popular audio miracle-cures: the De-clip module.
So how bad is this clipping, actually? Here’s an easy way to find out. In the Window menu of RX 8, there’s something called Waveform Statistics. Here’s what it looks like:
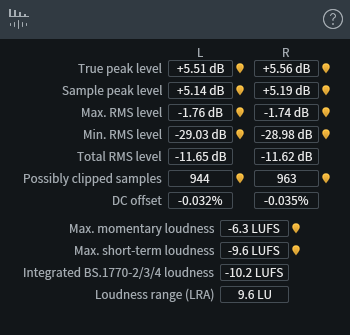
Waveform Statistics
Wow—that’s a lot of clipped samples!
If you don’t already use Waveform Statistics, you should start every audio repair job by popping it open and looking at the numbers. RX can detect clipping that's too subtle to be picked up by human ears, and will let you know about it here.
This raises a question: if clipped samples are inaudible, why would you bother fixing them? This is because later operations will magnify their damage—"mud flows downstream,” remember?
Now it’s time to run De-clip. We open the module and let it analyze the audio, after whick it makes the (unsurprising) suggestion that we deal with everything above 0 dBFS. As you can see on the Histogram, the distribution of levels goes all the way up to 0 dBFS and gets cut off—everything above that is clipped.
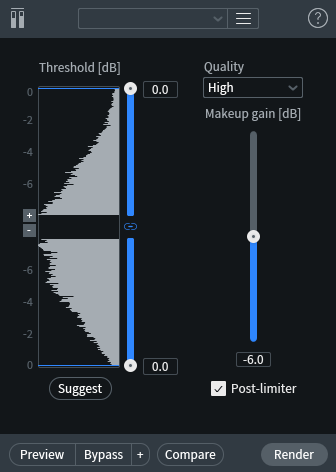
De-clip settings
Notice that we have chosen a pretty drastic gain reduction for the process; remember that we have to leave room for the reconstructed peaks!
We run De-clip with these settings, and here are the results. Here are the resulting Waveform Statistics after our processing:
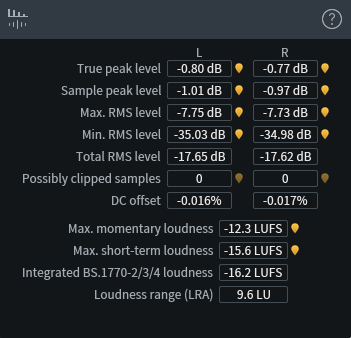
Waveform Statistics post-De-clip
And then, the resulting waveform:
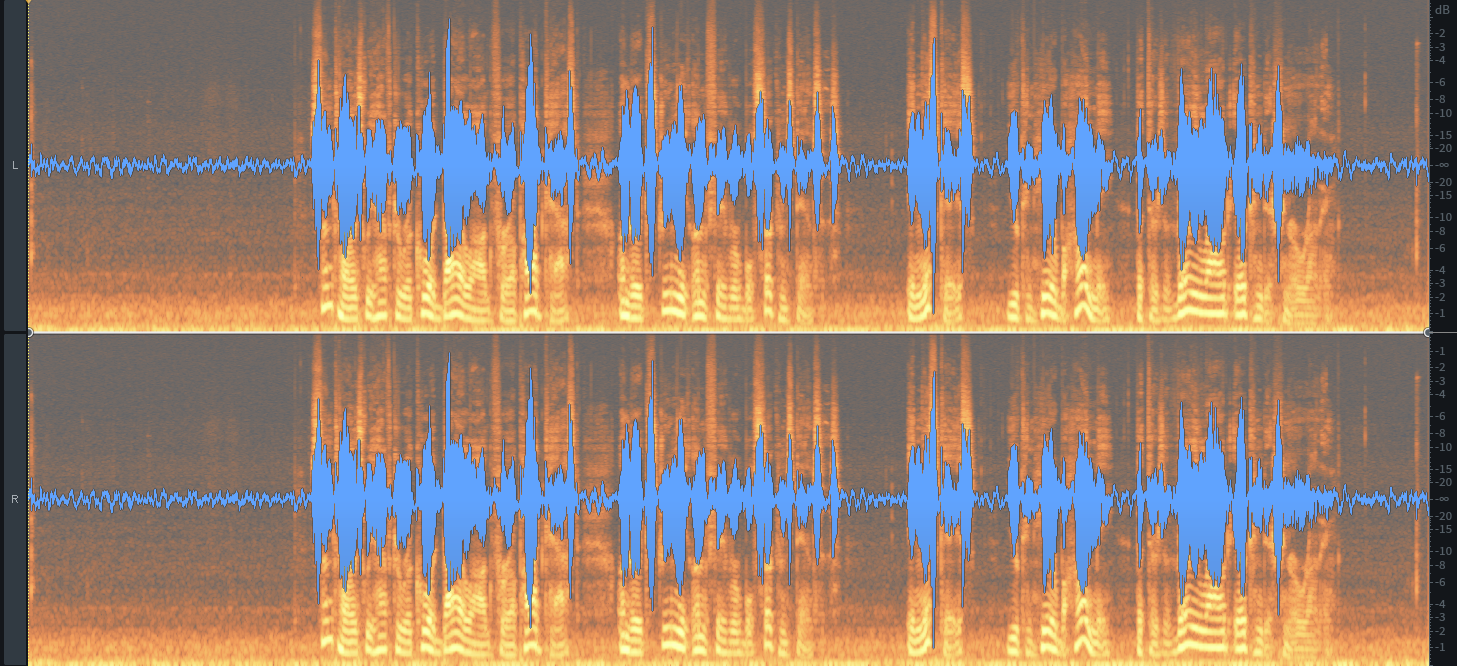
De-clipped waveform
Looks way better, doesn’t it? Sounds better, too:
A surprising second: stereo issues
Okay, so now we can go after the noise, right? Wrong. Once we have a waveform that’s no longer clipped, we can address the next deepest issues.
Next up, we should make sure that our left and right channels don’t have any weird mismatches, like different amounts of delay that could cause phase issues.
This kind of crud is rare, but if it’s there, this is where we have to deal with it. The first module we try in this case is Azimuth. Azimuth checks levels and delay between the left and right channels, and suggests adjustments to line them up better. Here’s what the module sees:
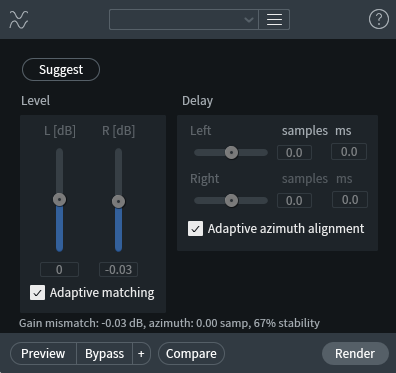
Azimuth
Nothing there, effectively, so we can move on.
Third and fourth: clicks and hum
We’re still not ready to go after the noise yet. Paradoxically, in order to do their best, the various modules we use to take care of broadband noise need to work with the cleanest possible audio. Here, of course, by “cleanest,” we mean audio that’s had as much as possible of the deepest effects removed.
At this point, with clipping and stereo issues taken care of, there are still two types of crud that go deeper than broadband noise: very short transient effects (clicks, crackles, pops, and the like) and fixed-frequency tones (hum). Those are next to go.
To handle distinct clicks, there are two obvious modules: De-click and Mouth De-click. The latter is optimized for the sorts of noises you’ll get from vocals or dialogue: dry mouth clicks and snaps, that sort of thing.
Note: This module often works well for music, so it’s worth a quick experiment in those cases.
Here are the settings for both modules, after some back-and-forth to get optimal settings without adding artifacts.
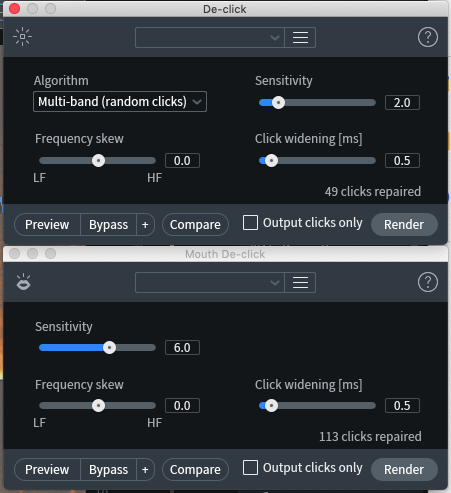
De-click and Mouth De-click
In this case, I went with Mouth De-click. Here’s the original waveform and the result of the process—note that I am focusing on the left channel for more clarity in the pictures:
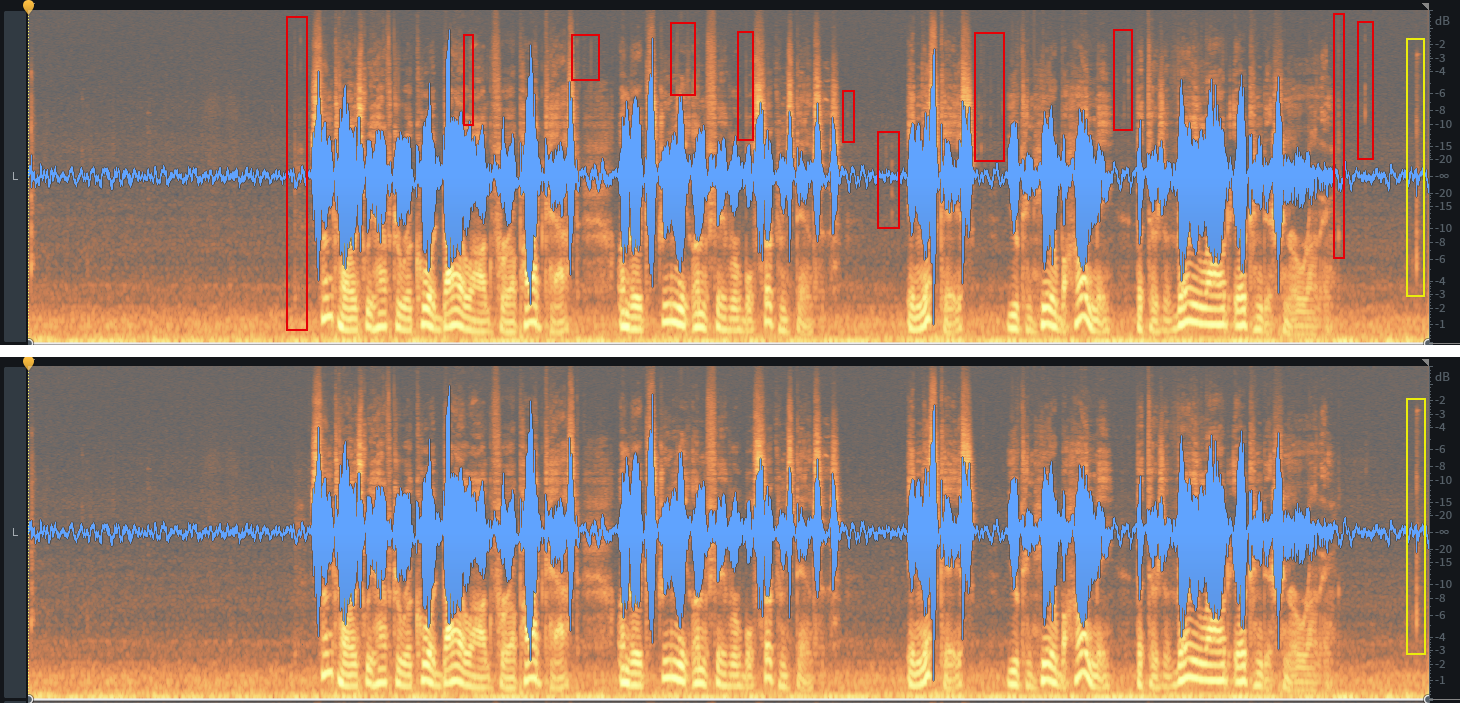
Before and after Mouth De-click
Note the red boxes indicating some of the most obvious clicks that have been taken care of by Mouth De-click… but notice that last thump (in the yellow box), which was too broad for the module to recognize. In this particular case, the fastest way to eliminate it would be to cut off the end of the clip, but that would be cheating; instead, we’ll use the Interpolate module.
Interpolate takes audio on either side of a transient and figures out what the audio in between would sound like if the transient weren’t there. It has only one setting: Quality. When you’re using it to get at thumps that are hiding among audio events you want to preserve, you'll want to experiment with the Quality setting to get the best result. In this case, with no surrounding words and just a bit of background audio behind the transient, we expect it to do an excellent job when we crank the Quality all the way up.
In the screenshots below, we can see what happens as we turn the Quality up from 2 to 400. The low-quality settings mangle the audio; at Quality 200, we have to look and listen carefully for harmonics that it didn’t quite get right (the yellow box), and at Quality 400, the edit is seamless.

Before and after Interpolation
And here’s what the clip looks and sounds like after the Mouth De-click pass and the Interpolate pass:
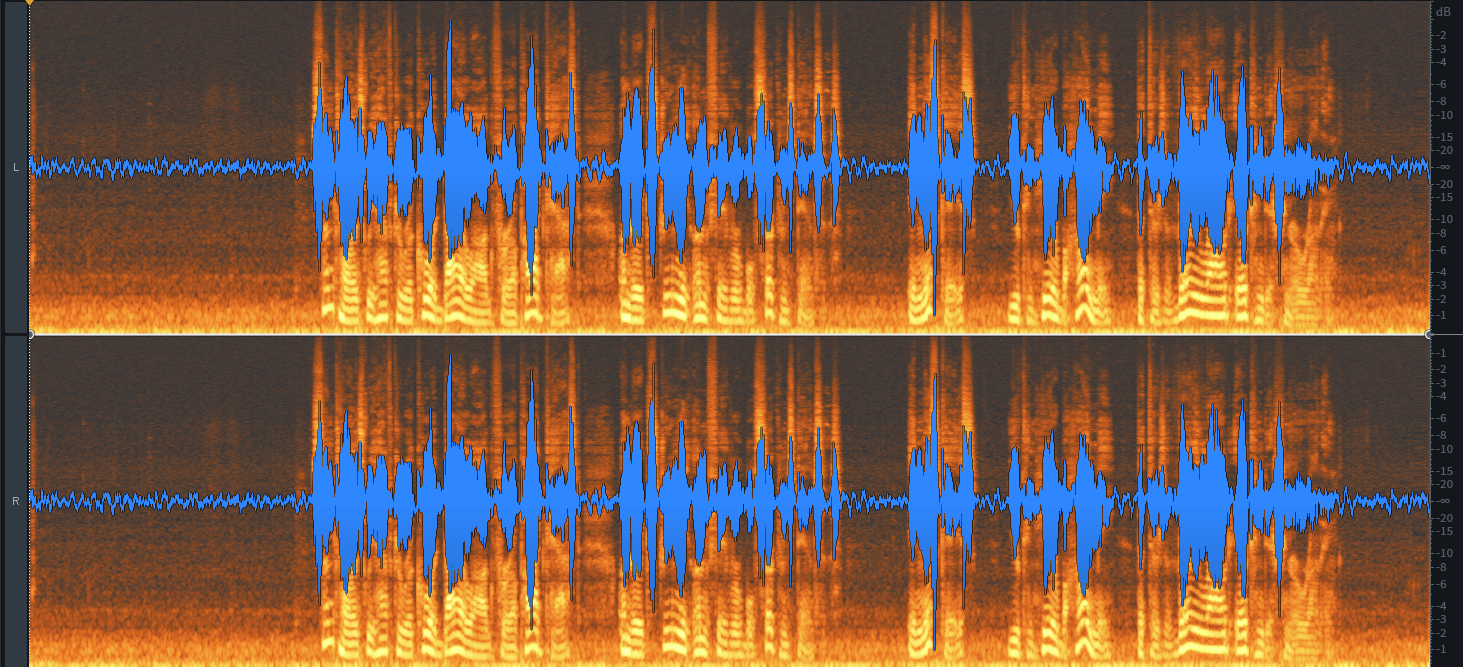
After Mouth De-click
Hum is next on our list. The De-hum module is a powerful tool for getting at steady tones with harmonics in series; you can go for just the fundamental, or up to 16 harmonics, you can link them so adjustments to one affect them all, and you can even work with odd and even harmonics independently.
However, for De-hum to actually remove hum, there has to be hum to remove. In this case, De-hum can’t really find any hum to fix, so it makes an educated guess. Here are the settings:
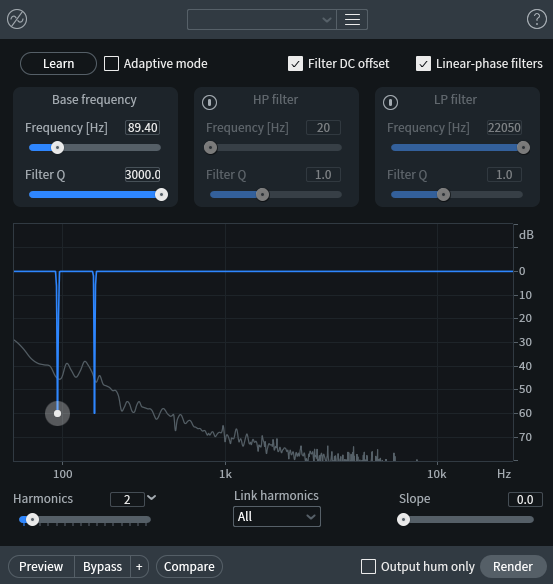
De-hum settings
There’s just nothing there. What does it sound like if you run it anyway? Here’s an audio clip demonstrating these settings, the fundamental and one harmonic:
Can you hear the whistling resonance under the voice? The more harmonics you add, the worse it gets, until everything sounds like it’s being heard through a metal tube, due to all that comb filtering… Hey, we just re-invented the flanger! Cool!
But not useful. Time to hit the Undo button and move on.
Believe it or not, fixing noise comes last
Okay, so can we go after the noise now? Yes, we can, and this is where


RX 11 Advanced
First we’ll take care of steady noise with little or no variation in amplitude over the course of the audio track. This would include the HVAC noise here, as well as things like jets flying overhead or cars slowly passing by. If you stop to think about it, the ordering of this next step makes sense, as the last thing we fixed—hum—was also a steady-state sort of thing.
Here, our two most effective tools are Spectral De-noise and Voice De-noise, noting once again that the latter can sometimes be useful on non-voice material. When we use these modules, they obey slightly different rules than processes like De-clip; it’s possible to get less obtrusive, more effective results by running a module twice at lower settings, rather than in one big hit. Here are a few examples:
First we'll try one huge serving of Spectral De-noise. These are our settings based on analysis of the background noise before the voice, giving us a whopping 18 dB of noise reduction. Spectral De-noise can do as much as 40 dB, but it can have a dire effect on voice quality—for this reason, it's mainly used in audio forensics.
Here, I chose 18 dB because it minimized the slightly hollow effect on the voice, which is actually part of the raw audio, while knocking down the noise effectively. Here are the module settings:
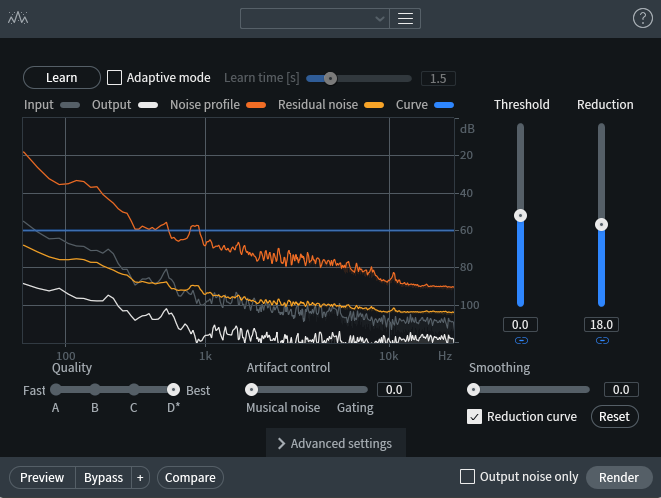
Spectral De-noise settings
Here are the waveforms before—top—and after—bottom—with the top image showing our selection area for the Spectral De-noise plug-in to learn the noise signature. Once again, showing the Left channel only:
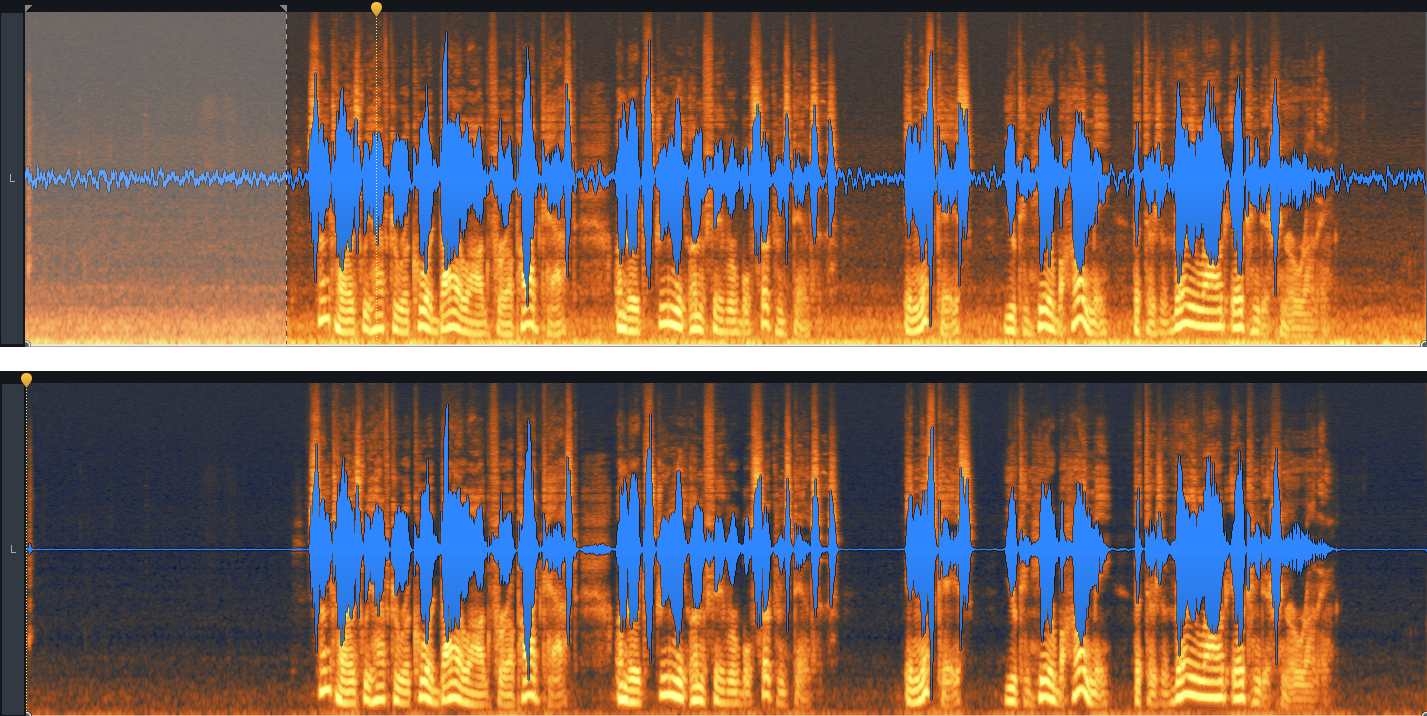
Before and after Spectral De-noise
And here’s what it sounds like:
This is really good for a fast pass, but note the slightly phasey artifacts that have crept in at the softer parts of the vocal (mainly the ends of phrases).
If we have a bit more time, can we do better? Let’s see what happens if we run Spectral De-noise twice, first at a gentler 15 dB and then again with 6 dB. The result sounds like this:
There is a tiny improvement in background noise, but the hollow phasing artifacts are worse, so it doesn’t look like running two passes will help us in this case. However, this approach might work well for musical passages where we can grab a bit of exposed noise for overall treatment.
Since this is isolated dialogue, Voice De-noise seems like an obvious thing to try. Here are our settings for a single pass:
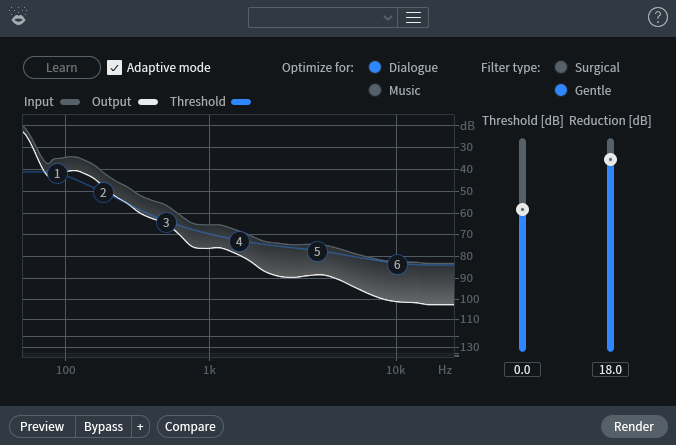
Voice De-noise settings
And here’s the resulting audio:
We notice two things right away: first, the background noise isn’t reduced as much as it was before, and second, the voice is way more intelligible! We could stop here and call it good, but as we’re pushing the limits, let’s run another pass of Spectral De-noise after this one, set to a comparatively conservative -12 dB to knock down the background without hurting the vocal.
Now that’s an improvement! The hollow tone of the -18 dB Spectral De-Noise pass is replaced by much milder artifacts, there’s no weirdness at the ends of phrases, and the overall background noise level is about where it was on the other pass, but with a lot less high-end content—it’s muffled in character, and less obtrusive—and now we can move on.
Last but not least, in the shallow end of the audio-repair pool, we have what we could call variable noise: neither steady like hum or background noise, nor near-instantaneous like clicks. This is where all the stuff that we usually think of as “noise” lives: mic bleed, wind gusts, sibilance, plosives, rustling, even unwanted reverberance.
The only thing these types of noise have in common is their variable yet non-transient nature, so RX has to attack each one on its own terms, usually with a module that’s specifically designed for the job.
Upon listening to our latest pass, there are two things that leap out at me: breaths and esses. The question is, which do we attack first?
Well, by the time we’ve gotten to this point, the easiest way to find out is to try both possible orderings and see which sounds better. Neither process takes more than a second or two, and it’s easy to undo and try again.
We start with Breath Control, and follow it with De-ess, but what we hear is that Breath Control adds unpleasant artifacts at the end of phrases that De-ess makes worse. So we swap the order, and suddenly we’re there: nicely smoothed esses that aren’t overly squishy, with just enough breath control to sound realistic rather than gated. Here are the settings:
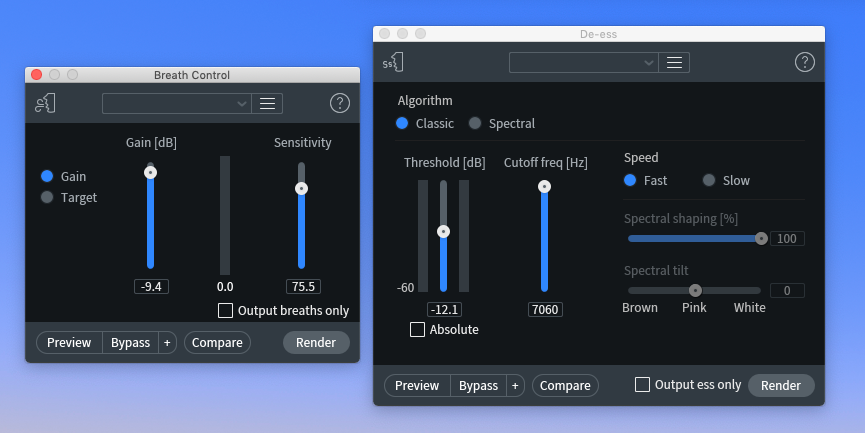
Breath Control and Voice De-noise settings
And here is the result, which I think is pretty good considering where we started!
From here, we can dive into particular trouble spots—like that initial inhalation, which Breath Control didn’t pick up—but by and large we can hear that our chosen order of attacks has served us well.
Just for curiosity’s sake, I fed the original audio to Repair Assistant, and was informed that there was significant noise but no significant clipping, clicks, or hum. While Repair Assistant can sometimes be a gift from Heaven, other times it misses things that your ears will catch. As it turns out, none of the three chains of suggested module settings did as well as our piece-by-piece process, but if you were in a tearing hurry, you might find something here that could serve you in a pinch.
On the other hand, one of the treatment suggestions did include the Dialogue Isolate module, which we hadn’t played with this time around. So we have Repair Assistant to thank for one more piece of advice: be sure to consider all your options!
Conclusions
There are heavier approaches that go beyond this article: for example, applying Center Extract after Azimuth to tighten the stereo image, or mixing back a tiny bit of untreated original audio to add realism. If you want to learn more about these deeper tricks, there are extensive tutorials available to


iZotope Music Production Suite Pro: Monthly
If there’s a takeaway from this article, it’s to understand the concept of “deepest first.” To review:
- Clipping
- Stereo issues
- Clicks and crackles
- Hum
- Broadband noise: first steady, then variable
Hopefully you’ll find your audio repair work to go more smoothly and effectively if you apply this ordering convention… and understand why you’re doing it this way. Have fun!

