5 Tips for Noise Removal with RX Elements
RX Elements provides a great set of basic tools for noise removal that anyone can use. Here’s a rundown of what they are and what they can do for your tracks.
Fixing audio issues like clicks, buzzing, harsh plosives, and background noise can be time consuming and near impossible without the proper tools. iZotope


RX 10 Elements
1. Remove mouth noises in podcasts with RX De-click
First up is the RX De-click module, which provides an easy way to go after one of the more traditional artifacts in digital recording: the infamous click.
But did you know that you can also remove non-digital clicks with RX De-click? Mouth noises such as lip smacking, tongue movement, licking noises, are all frequent (and unpleasant) parts of recording with the human voice, particularly in podcasting.
Watch below as Joe from the Guitar Nerds podcast uses RX De-click from the RX Elements plug-in to completely remove mouth noises from his podcast audio.
Here’s the interface that Joe is using for the De-click module:
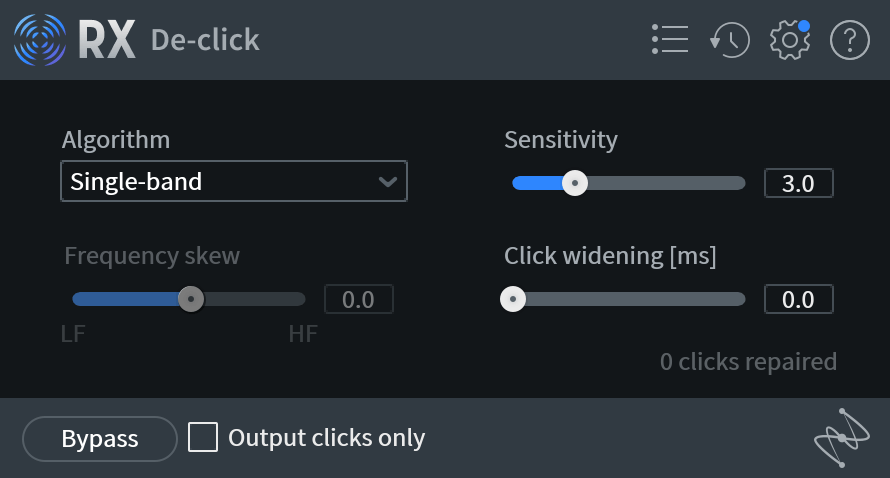
The De-click module is easy to set up for detailed de-clicking: the critical parameter here is Sensitivity.
The Algorithm dropdown provides options for adjusting the configuration and processing quality of click interpolation, depending on the types of clicks, pops, and mouth noises present in the audio. In podcasting, high frequencies are often to blame for the unpleasant noises. Low Latency is a good algorithm option to try first, as it is suitable for real-time work in the RX De-click plug-in.
Sensitivity determines how many clicks are detected in the signal. Increasing sensitivity can impact plosives, which can in turn reduce or damage the original signal. Using a medium sensitivity (5.5) can be a good starting point as to not incur artifacts in the processing.
The Frequency skew adjusts the weighting of click removal toward higher or lower frequency clicks. Negative values are more suitable for generic clicks such as those found on vinyl recordings. A setting of zero or above targets mouth clicks in the middle frequencies, which is what we're looking for.
Click widening extends the repair area around detected clicks, compensating for mouth sounds such as lip smacks that have a decay. If you're processing isn't getting all of the click removal, try increasing the click widening parameter.
2. Fix audio clipping in podcasts with RX De-clip
One of the problems with podcasts is that they are long–oftentimes an hour or longer of people talking. You and your guests will may move around and your conversations can be passionate (or dare I say dynamic and loud), making monitoring mic gain a difficult task.
All of this can result in audio clipping. Audio clipping is when you push the loudness of your audio signal that you’re recording past the threshold your system can handle. It’s called this because your equipment will actually “clip” off the top of the waveform—meaning that whatever audio information was supposed to be present there gets lost for good.
It was previously believed that once waveforms suffered severe clipping, they could never be recovered with anything like the accuracy of the original unclipped waveform. RX De-clip takes advantage of the enormous power of even the most inexpensive modern computers to make this formerly-esoteric process not only feasible but easy.
Take a listen to a piece from the Guitar Nerds podcast filled with audio clipping, and learn how to repair it using the RX 10 Elements De-clip plug-in.
Interested in learning more? Here’s the user interface for the De-clip module:
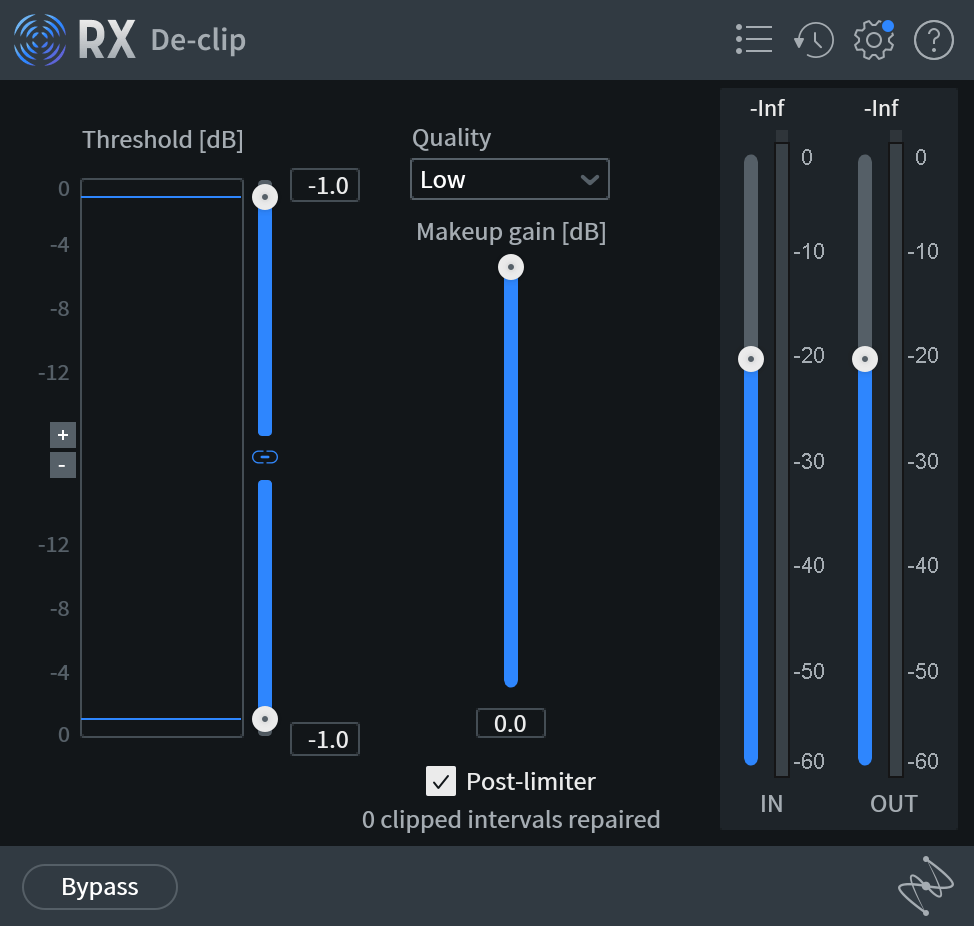
RX Elements De-clip
The Threshold diagram features a histogram (a fancy word for a distribution of values of a given parameter) for waveform elements in the piece of audio we’re examining. For podcast audio, you can adjust the Threshold in real-time until the audio smooths out. Move the Threshold slider until it lines up with the place in the histogram just below where clipping is concentrated to set the Threshold.
The Quality options control the interpolation processing quality. Low quality mode processes very quickly. High quality mode processes slowly but can achieve better results.
The Makeup gain slider reduces the final level of the audio, as the repaired peaks may (and often will) be far above the dynamic range of the existing audio.
The Post limiter applies a true peak limiter after processing to prevent the processed signal from exceeding 0 dBFS.
The Bypass button allows us to hear the audio with and without the De-clip processing.
Pro tip: You can use RX De-clip on an isolated piece of audio or you can have it detect repeat occurences of clipping in your podcast audio.
3. Remove hum from podcast audio with RX De-hum
The trick to using the RX De-hum plug-in is to realize that it’s tightly focused on cleaning removing one and exactly one kind of audio nastiness: hum, a (usually) neatly-ordered series of harmonics that comes from the presence of an unwanted source of interference in a piece of recorded audio, whether it be air conditioners, fans, or the recording equipment itself. This can come up frequently in podcasting, as guests can be sitting near various HVAC systems in less-than-ideal settings.
Fortunately, RX De-hum does a great job of removing hum. Watch Joe from the Guitar Nerds podcast use it on his podcast audio to quickly and easily remove hum.
For those that want to take a deeper dive into the process, this is what the De-hum interface looks like:
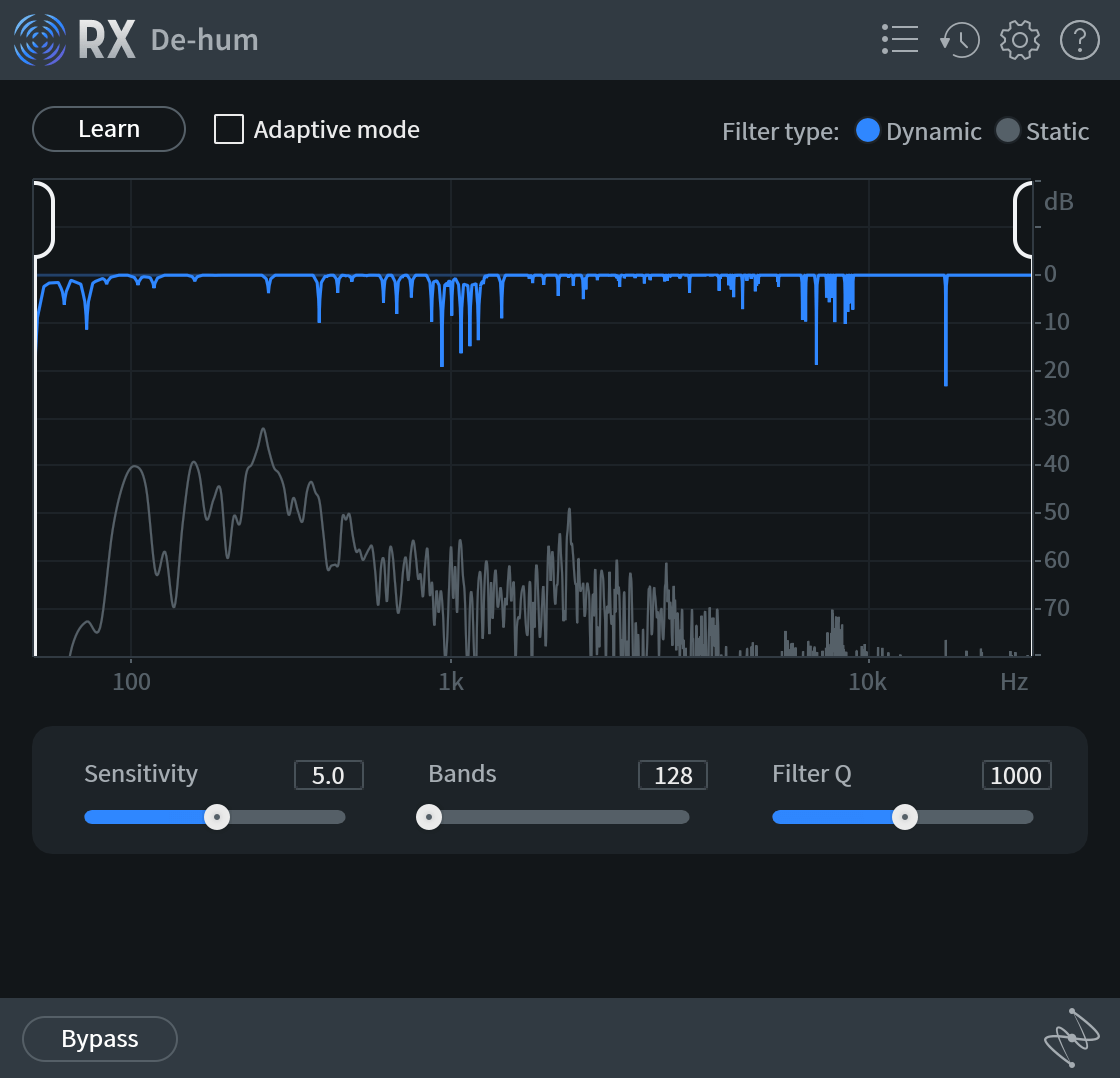
RX De-hum plug-in
In the plug-in, enable Learn and play back the section of audio containing the hum. If you cannot find a selection of hum in isolation, RX can analyze any audio with prominent hum, but the results may not be as useful.
Adaptive mode allows De-hum to adjust the notch filters based on changes in the audio over time. In this mode, RX will analyze incoming audio to determine what is hum and what is desired audio material. Adaptive mode will work better with hum that changes in pitch throughout the file.
Note the displayed waveform under the filter type. It shows where the analysis has found the worst hum and what the final waveform will still contain after processing.
Sensitivity adjusts the amount of hum that will be removed. Bands controls the number of dynamic notch filters, which can be adjusted to higher values for complex hums at the expense of transparency.
Filter Q controls the bandwidth of the notch filters.
4. Remove noise from dialogue in podcast audio with RX Voice De-noise
Getting the best quality in our podcast dialogue is paramount. The human voice is the first thing we learn to listen for as babies, and it leaps out at us as something we instinctively need to understand. Our ears are actually tuned to the frequencies of human voices—check out the Equal Loudness Contours to learn more about the “built-in EQ” that our ears have.
As a result, when something’s wrong in a someone's voice, even an untrained listener will notice it immediately. This can include EQ issues as well as other noises, including steady-state background noise and consistent background noises.
With the explosion of podcasting, getting the cleanest possible dialogue is something everyone needs. RX Elements provides a comprehensive solution in the form of the RX Voice De-noise plug-in. Voice De-noise can intelligently analyze speech signals and determine the best noise threshold for your signal.
Watch Joe from the Guitar Nerds podcast use RX Voice De-noise to remove excess noise from his dialogue in a podcast recording.
Let's take a deeper look at the RX Voice De-noise plug-in:
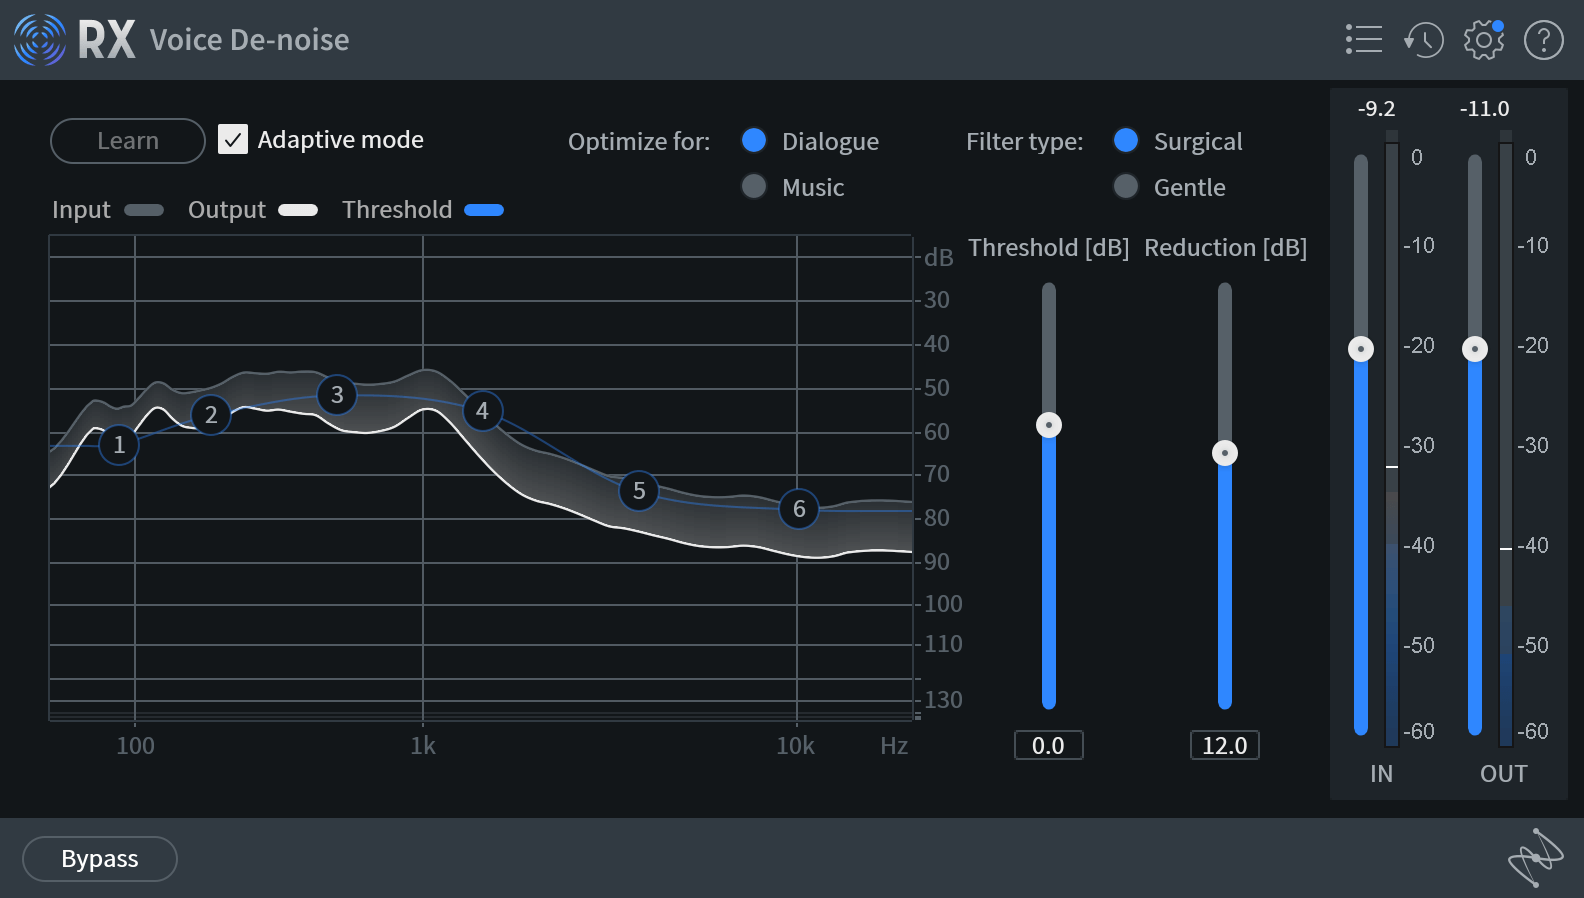
RX Voice De-noise plug-in
Within RX Voice De-noise you can optimize for Dialogue or Music (sung) voices. Once you have selected what you're optimizing for, select Learn and let the module analyze the voice.
Threshold allows you allows you to offset all Threshold Node values by the same amount. If you find that processing is too aggressive or processing is affecting audio you want to leave unprocessed, try adjusting this control.
Adaptive mode allows the threshold nodes to be adjusted automatically in real time.
The Filter type changes the bandwidth of the noise reduction filters. Surgical filtering removes more unwanted noise than Gentle Mode, but makes some sacrifices in terms of timbre and can lead to noise artifacts. Gentle filtering provides more transparent noise reduction than Surgical, but removes less high end “sizzle.”
Reduction provides control over the maximal depth of noise reduction (in dB) that will occur per frequency band while a signal component is below its threshold. If you have your thresholds set properly and don’t like the results you’re getting, try adjusting this control.
When you are pleased with your results, you can press Render. It sounds complicated, but with only two buttons and two sliders, it shouldn’t take more than a few tries to preview and then apply the best results.
5. Remove unwanted reverb from podcasts with RX De-reverb
One of the big problems with podcasting is recording on location in churches, a big hall, or areas that will create unwanted reverb. Too much reverb can cause dialogue to become less defined. The reverberated noise can also sit at odds with the rest of your co-hosts' audio.
Luckily RX De-reverb can give you control over the amount of ambient space captured in a recording. Watch as Joe from the Guitar Nerds podcast demonstrates how to remove reverb from podcast dialogue recorded in a echoey chamber.
Here's a more extensive overview of the RX De-reverb plug-in:
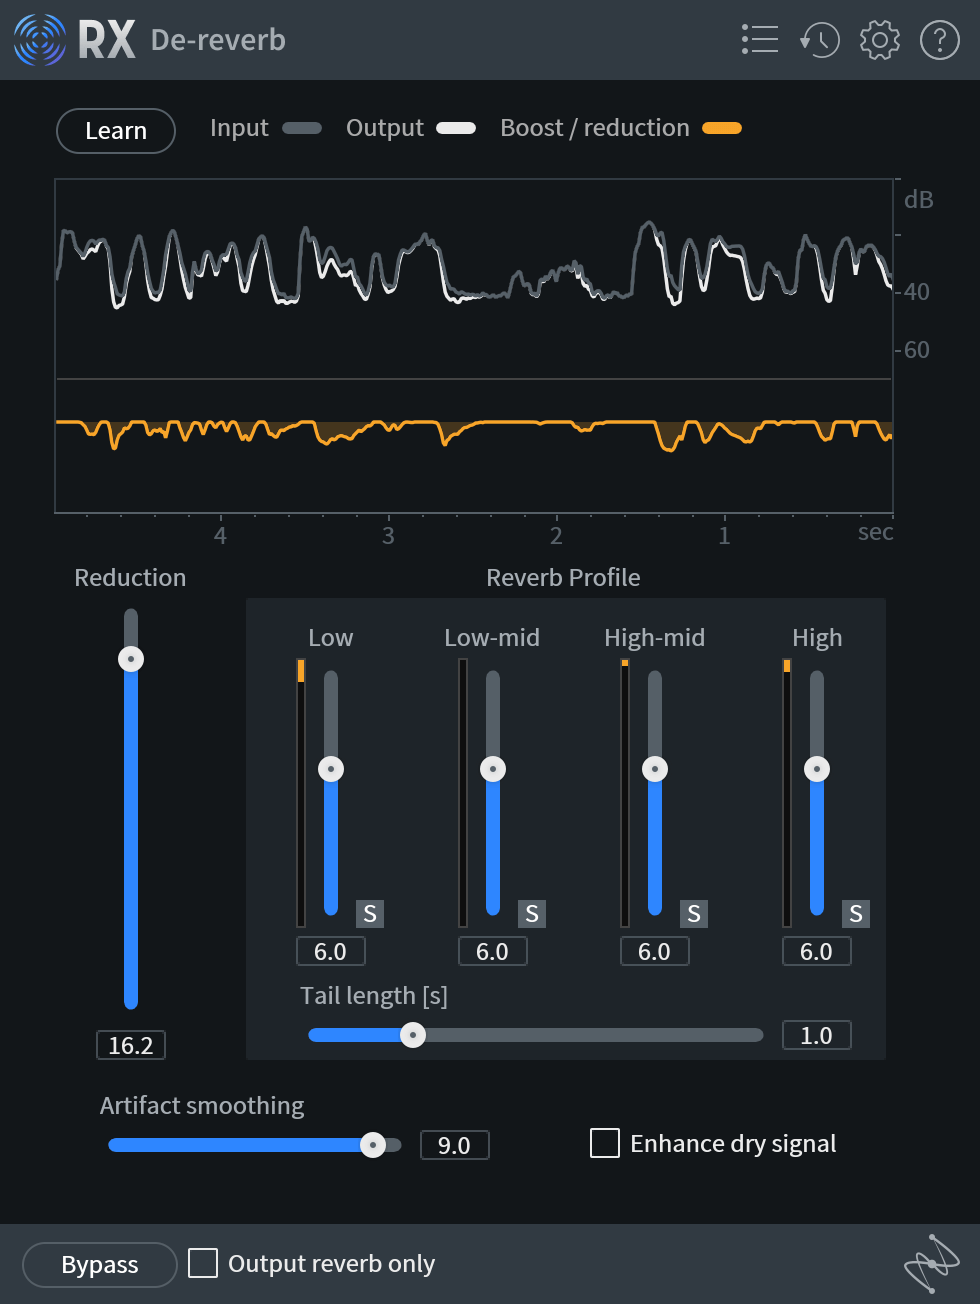
RX De-reverb plug-in
RX De-reverb processes audio according to the reverberant/direct ratio (also known as wet/dry ratio) detected in the signal. It can learn your audio to suggest some frequency and decay time settings, or you can estimate these yourself.
Learn teaches De-reverb how much reverb is in your audio. When using RX De-reverb, select Learn on a selection of audio with some room tone first to teach it the reverb amount in the signal.
The meter at the top of the plug-in shows a comparison between the input and output signal energy over the past five seconds of playback. The bottom meter shows the amount of reverb reduction over time. It is the difference between input and output plotted on a flat line.
Reduction controls the applied amount of De-reverb. Larger amounts mean more reverb is removed, while smaller amounts perform less processing.
The Reverb profile controls the amount of De-reverb effect applied per band. These are automatically set during the Learn pass.
The Tail length controls the decay of De-reverb processing, also automatically set by the Learn feature. You can increase this control if reverb tails reappear after processing, or if early reflections are too apparent. You can also decrease this control if reverb tails and noise floors sound over-processed, or if the processed audio sounds dull.
Artifact smoothing controls the frequency accuracy of De-reverb processing. Because reverb is generally smooth across the frequency spectrum, the default value of this control is very high.
Enhance dry signal increases the level of the direct signal. Boosting the direct signal can help create more dynamic range in the signal, and is a good option to try when working with voice or transient material.
And lastly, Output reverb only changes the output of De-reverb from the processed signal to the wet reverberant signal. This is useful for monitoring the processing to get better results. Hearing just the reverb helps you understand the impact of controls like Reduction, Reverb Profile, Tail Length, and Artifact Smoothing.
Bonus tip: Get all of these plug-ins in the new RX Elements Repair Assistant
RX Repair Assistant is designed to detect common audio problems in a recording and quickly provide suggested settings for removing them. The plug-in analyzes your audio as you play audio.
Joe's got a video for this one, too! Follow along as Joe from the Guitar Nerds podcast demonstrates how the Repair Assistant plug-in works in real-time to fix and clean up any audio issues your podcast is experiencing.
Here's how to use the RX Elements Repair Assistant plug-in:
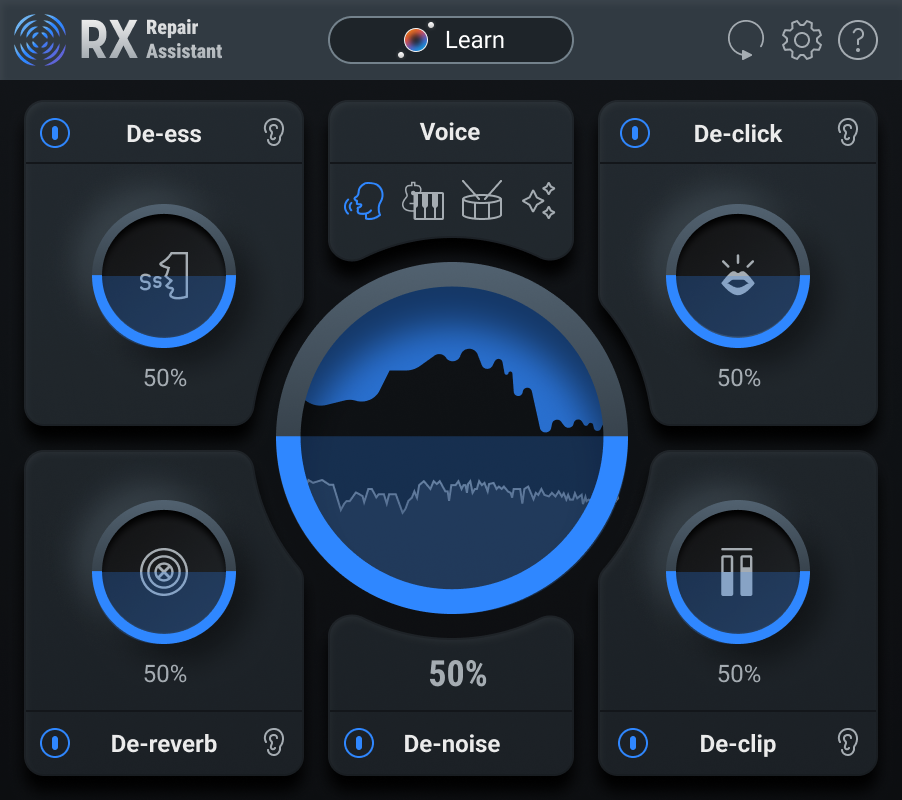
RX Repair Assistant plug-in
To use the plug-in, simply choose your Source Type, click Learn, and play your track. Keep playing it until Repair Assistant has finished listening to your audio and creating a suggestion.
After analysis is complete, you are able to adjust the effect of each module using a single gauge. Each module has a Power button which will bypass that module when deactivated, and an Ear button which allows you to hear only the elements that are being removed by that module.
To bypass analysis by any of the Repair Assistant modules, click on the gear button in the upper right-hand corner of the Repair Assistant window to open the Assistant Preferences. All modules are selected by default, and deselecting any module will remove it from Repair Assistant’s analysis.
Start cleaning up your audio with iZotope RX Elements
With five useful modules that address the most common noise problems in podcasts, small studios, on-site recording, and more, iZotope


RX 10 Elements


