
Mixing is often thought of as a long and tedious process—involving countless hours tweaking, refining, and sliding faders until your ears bleed. But, it doesn’t have to be that way. With the right mixing plug-ins, mixing can be simple, easy, and fun.
In this article, I’ll walk you through how to mix with plug-ins in order to get better sounding mixes faster. I’ll be using several different mixing plug-ins along the way, but you can get access to every plug-in in this article by getting your copy of iZotope Music Production Suite .
In this piece you’ll learn
This article references a previous version of Neutron. Learn about Neutron 5 and its powerful features including Assistant View, Target Library, Unmask, and more by clicking here.
Let's take a listen to the mix we’ll be starting with:
How to mix bass with Neutron
When approaching a fresh mix, I always like to start from the bottom up. The low end of your mix is what everything else sits on, so it helps to get this locked down tight early on. In my track, I’ve already got a nice Reese bass to work with, but I’ll be using Mix Assistant in Neutron to help me sculpt the sound so it fits better in my mix. Here’s the bass before:
Using Mix Assistant in Neutron
When you put Neutron on your track, you can click “Mix Assistant” toward the top right of the plug-in window, which will bring up “Track Enhance” and “Balance.” When selecting “Track Enhance,” Neutron will then intelligently listen to your audio and automatically create a custom preset for you. When I used Mix Assistant on my bass and selected “Track Enhance,” it accentuated the low frequencies with the Sculptor module, cut out all of the low-mid resonant frequencies with an EQ, added some harmonic distortion with the Exciter to brighten it up, and then tamed the dynamics with a compressor.

Neutron Sculptor module on Reese bass
Mix Assistant’s Track Enhance provides you with an excellent jumping-off point within just a few seconds, saving you tons of time, energy, and ear fatigue. Here’s what my bass sounds like before and after Track Enhance via Mix Assistant in Neutron:
Within just a few clicks, my bass sounds more warm, rich, and full. We’ll dive more into some other great uses of Mix Assistant later.
How to mix drums with Neutron
Neutron ’s Mix Assistant is a big help when it comes to mixing drums. In this particular mix, I have three drum tracks: a kick/snare loop, a hi-hat loop, and an extra percussion loop. This time, I’ve run each of them through Mix Assistant’s “Balance” module in separate instances of Neutron to balance the levels. As expected, they now punch through the mix nicely with the bit of extra polish Mix Assistant gave them.
Using a transient shaper to mix drums
The only thing I decided to do manually was to use Neutron’s Transient Shaper in order to add some extra impact and clarity to the percussion loop. By increasing the Attack and decreasing the Sustain levels, it adds more punch and power to the percussion sounds, while also cleaning up the ambience of the drums’ reverb. Hear the transient shaper in action below.
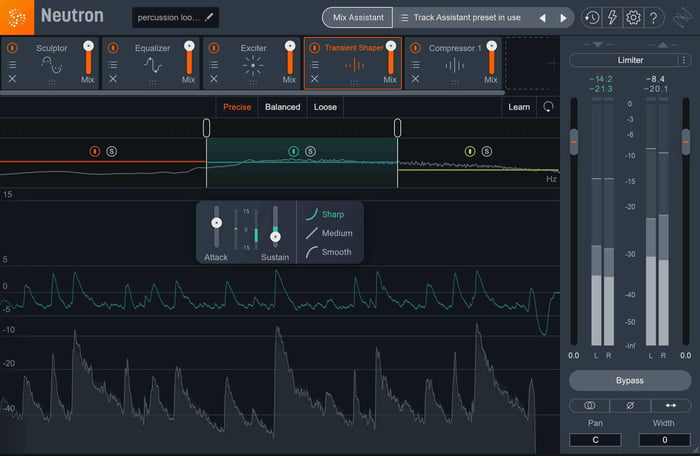
Neutron Pro Transient Shaper
For a deep dive on how to effectively use transient shapers on drums, give this article a read.
How to create space for your instruments with mixing plug-ins
Creating a sense of space is an important step when taking a mix from good to great. After running Neutron’s Mix Assistant on my guitar and synth tracks, I decided they could use a little better placement in the mix.
Adding width to an instrument in Neutron
Mix Assistant’s Track Enhance added some extra body and clarity to the guitar track, but in order to give it a little extra width, I simply increased the “Width” amount at the bottom right corner of Neutron. This feature will add stereo width to your audio, which really helps breathe some extra life into it and also gets it out of the way of the other instruments that live right down the middle. Check out the guitar before and after in these samples:
Adding reverb with Neoverb
Another trick for creating a sense of space in your mix is to add reverb. After Neutron Pro, I added an instance of Neoverb , iZotope’s mixing plug-in for reverb, to my synth track. It really brightened up the sound and added some ambient texture—bringing the synth to life by allowing it to exist within a space.
Much like Neutron, Neoverb has its own Reverb Assistant that can help you tailor your reverb to the style you're after.
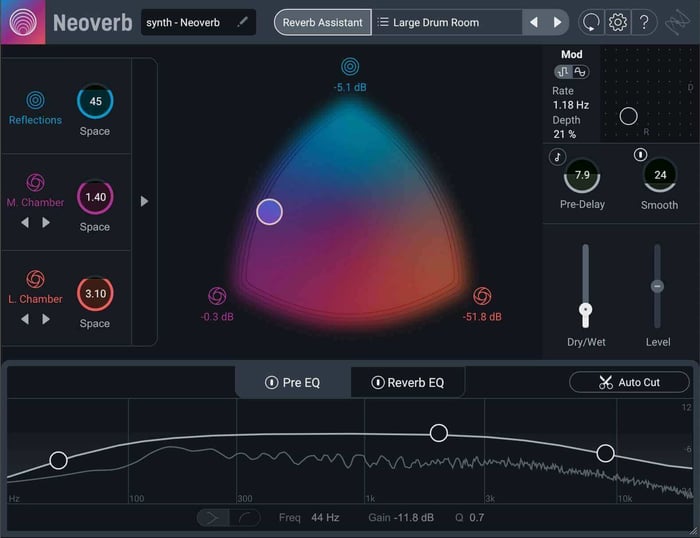
Neoverb reverb mixing plugin
Here’s a before and after comparison:
How to use plug-ins to mix vocals
For vocal mixing, I use Nectar to help me sculpt and dial in my sound. It has a lot of the same functionality as Neutron Pro, but is specifically designed to get your vocals sounding great in the mix. Instead of Mix Assistant, Nectar comes with Vocal Assistant, with two different options: “Enhance” and “Unmask.” Enhance creates a custom preset based on your vocal and can even carve space out in the rest of your mix so your vocals come through crisp and clear (check out this article on how to unmask vocals using Nectar), while Unmask carves out space for the vocal by listening to another audio track and correcting frequency masking.
You can also use Nectar to add creative vocal effects like delay, reverb, and pitch correction. And, you can even create your own vocal harmonies with the Harmony module. For my mix, I ran the vocal through Vocal Assistant’s Enhance module and then added some echoes with the Delay module to give it a bit more depth.
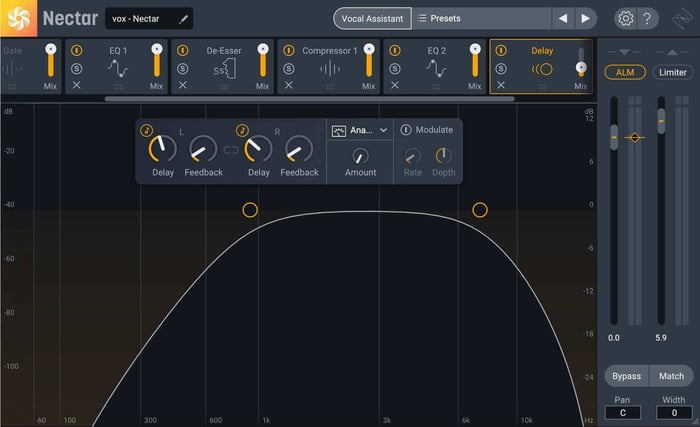
Delay module in Nectar
Finally, in order to give the vocal just a bit more space, I added an instance of Neoverb using the “Small Dark Vocal” preset. Here’s the before and after:
How to master a mix with plug-ins
Once your mix is sounding great, it’s time for mastering. Mastering helps glue your mix together and brings it up to industry loudness standards.
Check your mix with Tonal Balance Control
It’s useful to double check my mix using Tonal Balance Control . This mixing plugin shows the frequency curve of your song compared to other songs in the same genre, allowing you to make educated mixing and mastering decisions.
This article references a previous version of Ozone. Learn about Ozone Advanced and its groundbreaking new features including the new AI-powered Master Assistant, adaptive mastering EQ with the Stabilizer module, and more.
Master your mix with Ozone
Like Neutron's Mix Assistant and Nectar's Vocal Assistant, Ozone comes with a Master Assistant to intelligently apply a mastering signal chain automatically. You can set your desired loudness, and Ozone will apply all the processing needed to get your track mastered and radio-ready.
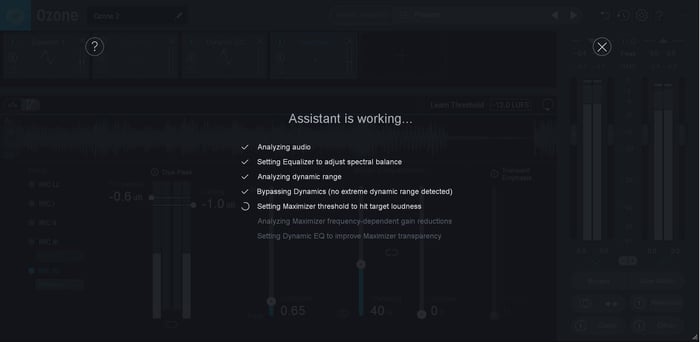
Master your mix with Master Assistant in Ozone
Listen to before and after with Ozone: you’ll notice the mix is punchier, clearer, and louder. Ready for the dance floor!
Start mixing with plug-ins
Mixing doesn’t have to be stressful or time consuming. But an artist is only as good as their tools. With the right mixing plug-ins, you can have a mix ready for radio in no time at all. Ready to give mixing with these plug-ins a try? You can get access to all of the mixing and mastering plug-ins mentioned in this article with Music Production Suite. Happy mixing!