Making a Custom Sampler Instrument
Sampling audio is one of the most useful tools for producers. In this article, we’ll cover sampling techniques and how to create a custom sampler instrument.
Sampling is one of the most important aspects of modern music production. It is the basis of the sampler, one of the most common types of software instruments. Many software emulations of real instruments, like string, horn, and woodwind plug-ins, are possible through sampling and samplers.
The sampling process is relatively simple, and using this process we can create a new instrument out of nearly any sound.
In this article, we’ll go over the general process to create a custom sampler instrument. We’ll discuss everything from the simplest setup to full multi-sampling. As demonstration along the way, we’ll create a custom instrument from a percussion hit and a realistic-sounding piano.
A brief history of sampling
Sampling, by definition, is simply repurposing existing audio. As early as the 1940s, musicians have been using existing recordings as musical material in new projects.
Check out this infographic, which shows the use of sampling by genre over the past century.
You’ll notice that, on most of the graphs, there is a sudden increase in sampling between the 1970s and 1990s.
During this time, the development of cheap sequencers and samplers allowed for musicians around the world to sample audio on their own. This accessibility resulted in an explosion of art and the study of previous musical traditions. The origins of hip-hop and electronic music (sampling genres like soul and R&B) are deeply rooted in these advancements.
Given how prevalent hip-hop and electronic trends are in modern music, sampling could very well be one of the most influential advances in music.
During their development, samplers themselves have taken many forms. The first samplers were designed to function similarly to wavetable synthesizers, using a sample of the wavetable as source audio.
Others were used in a looping context, used to record and play audio back in a performance setting.
Drum machines, which were monumental in the development of hip-hop and electronic music, function as samplers. Each pad was able to fire off different percussive or melodic samples, allowing for new possibilities like live remixing and the creation of custom drum kits.
The most involved type of sampler emulates a realistic-sounding instrument. This can be done with simple audio samples of the instrument, allowing any average producer to create custom instruments.
Developers for high-quality sampled instruments may even use a combination of sample playback and synthesis to recreate these types of instruments.
Our main focus today will be these sampler instruments with melodic capabilities. We’ll be working in Ableton Live’s Simpler and Sampler plug-ins, as well as the sampler in Native Instrument’s Kontakt. Don’t worry if you don’t have access to these plug-ins; all of these functions are common in the average sampler.
Basic samplers: one sample pitched
In the simplest terms, a sampler instrument functions by firing off a sample at different pitches.
We can play audio at different pitches. Pitch can be changed by playing the audio file at different speeds. Therefore, the simplest sampler would have one sample, which is pitched relative to playback speed.
We’ll be demonstrating this process with Ableton’s Simpler plug-in and this percussion hit:

Simple pitched sample
With this setup, the audio sample is pitched by the sampler using this playback speed approach. Notes that are higher than the original sample’s pitch will sound shortened, while notes lower will sound stretched. This results in audible differences in note length, which are especially noticeable at the extremes of the keyboard.
For some purposes, this could be perfectly viable. But a real instrument wouldn’t react this way. It would be more accurate if the sample could be pitched without the sample duration being affected.
Thankfully, with a process known as granulation, this is possible. We won’t dive too deeply into granulation in this article, but it is able to effectively decouple pitch and playback speed. This way, independent pitch-shifting and time-stretching is possible.
Ableton’s audio warping features and Kontakt’s sampler use granular processes to do this with audio samples.
By engaging the “Warp” mode on Simpler, the percussion hit will change pitch without getting shortened or stretched. The sample will be pitch-shifted to play other notes. Our sampler now acts more like a playable instrument, and seems to respond more accurately to MIDI input.
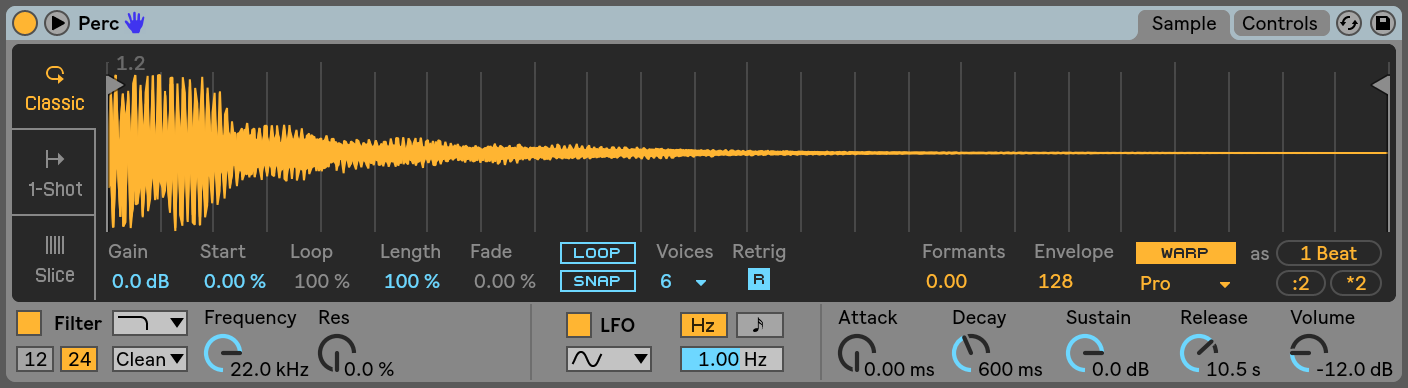
Perc sampler with warping
Now, the length of notes will be mainly determined by how long the note is held and the amplitude envelope settings.
Basic samplers: adding sustain
As this is a percussion sound, it’s not a problem that we can’t sustain each note. However, other sounds like keys, strings, and horns should have the ability to sustain.
Some samplers allow us to do this by looping certain sections of the sample. A sustained sound will output a relatively consistent waveshape, therefore looping a waveshape could theoretically mimic the sound of a sustained note.
Let’s test this out with our percussion sample. Because the percussion sample is a transient drum hit, there is not an obvious repeating waveshape to loop. This will make it easier to hear how the sample is being looped.
We’ll be using Ableton’s Sampler for this, a slightly different sampler than Simpler, which has access to the looping functions that we’re after.
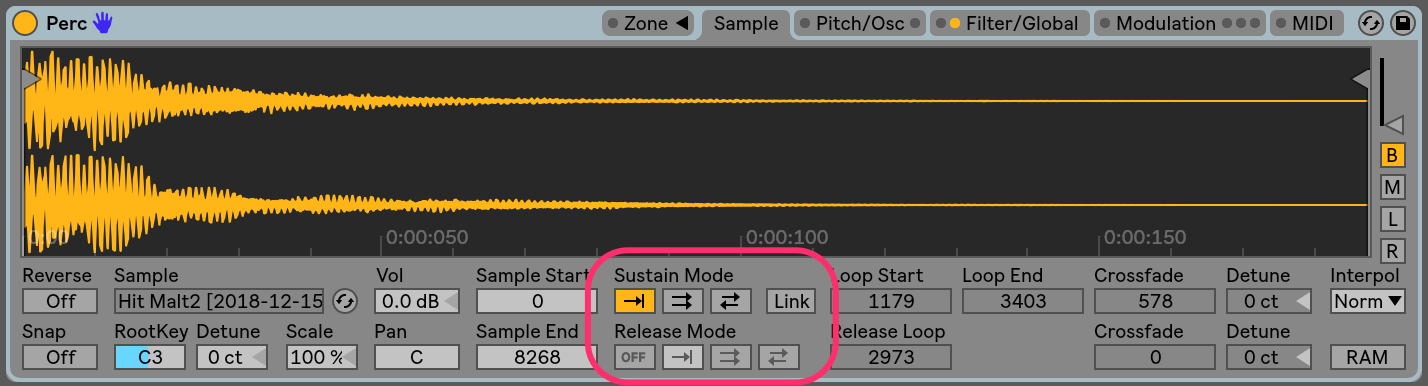
Percussion sample in Sampler
In Sampler, we’re able to set Sustain and Release modes for the sample. Based on MIDI input, certain sections of the sample will occur and / or loop.
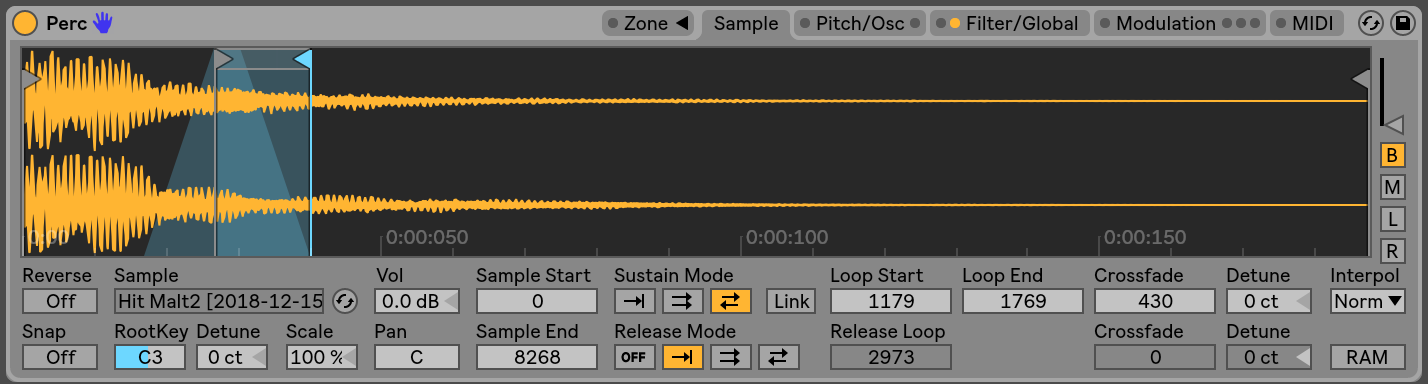
I set the sampler to play the beginning transient in the sample as normal. Then, as a MIDI note is sustained, the tail of the percussion hit is looped. This is smoothed out with crossfades. Once the MIDI note ends, the release phase begins, and the rest of the sample after the loop plays.
Looping allows us to create a sort of sustain that responds to MIDI input, and the release phase creates a natural-sounding tail after the loop.
Sampler gives us a couple options for the Sustain and Release modes. Either section can restart at the beginning or perform a ping-pong loop going back and forth. The two examples below have normal and ping-pong looping respectively during the sustain phase.

Normal looping

Ping pong looping
Notice that, with a percussion sample like this, higher notes have a bit of a stuttering effect. We can create a shorter loop to “sustain” these higher notes.
When transforming transient percussion samples into instruments, I like to smear the sample out so it really sounds like a played instrument. Long loop times, some reverb, and some delays can go a long way. Here’s an example with this sampler instrument and a drum loop.
Now, we have a sampler instrument that changes pitch and sustains like a real instrument would.
However, as you can hear, this instrument still does not sound as organic as a real instrument. The same audio sample is used for every note—no human would ever be able to play so consistently. Additionally, while granulation does a pretty good job of pitching the sample, it introduces unnatural artifacts as audio is pitched further from the original pitch.
Multi-sampling
We can avoid these problems through the use of multi-sampling. This is just what it sounds like: using multiple audio samples to populate the sampler rather than just one. This is the way that many high-quality instrument emulations are made.
Developers record countless takes of real instruments, covering all possible velocities and articulations. MIDI input will tell the sampler which of these many samples to fire, creating a note with the proper pitch, velocity, articulation, and more. As a result, MIDI input is able to recreate a realistic-sounding version of the instrument.
Theoretically, the perfect sampler instrument would have an independent recording for every combination of pitch, velocity, etc. This would essentially call up the most “correct” interpretation of MIDI input.
However, this process is time-consuming (this would require several thousand individual samples) and is generally more of a luxury than a necessity. We can greatly strip the process down and still create a convincing sampler instrument.
In the following example, I created a multi-sampled piano instrument in Kontakt’s sampler. Each of the blue cells that you see in the grid below represents a unique audio sample.

Multi-sampled instrument
I first decided that I didn’t need to record every single note on my piano. I would take advantage of pitch-shifting, just not take it as far as before. I decided to record one sample for every three notes of the keyboard, pitching each sample down and up one semitone to cover four octaves of notes.
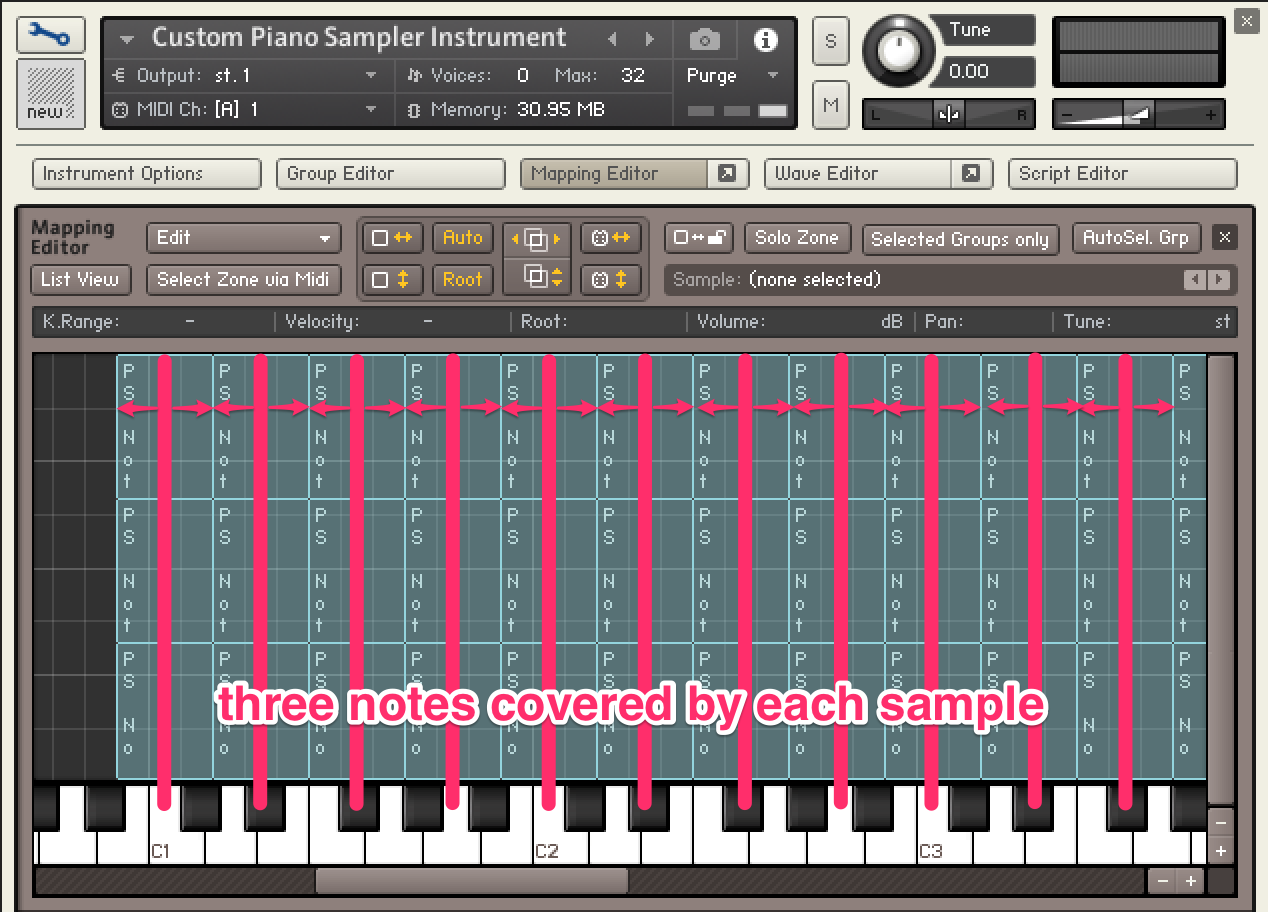
Kontakt pitch-shifting
Additionally, I didn’t need 127 takes of each note to capture every possible velocity. Most samplers account for changes in MIDI velocity input by adjusting the level of the sample. Lower velocities are just the same sample played quieter; higher velocities are the sample played louder.
Because of this, I only captured three velocity levels for each note that I recorded. Essentially, for each note, I recorded a “quiet,” “medium,” and “loud” take. I split the total velocity range (effectively 1–127 in this case) into three relatively equal sections, assigning each of my takes to the proper velocity range.
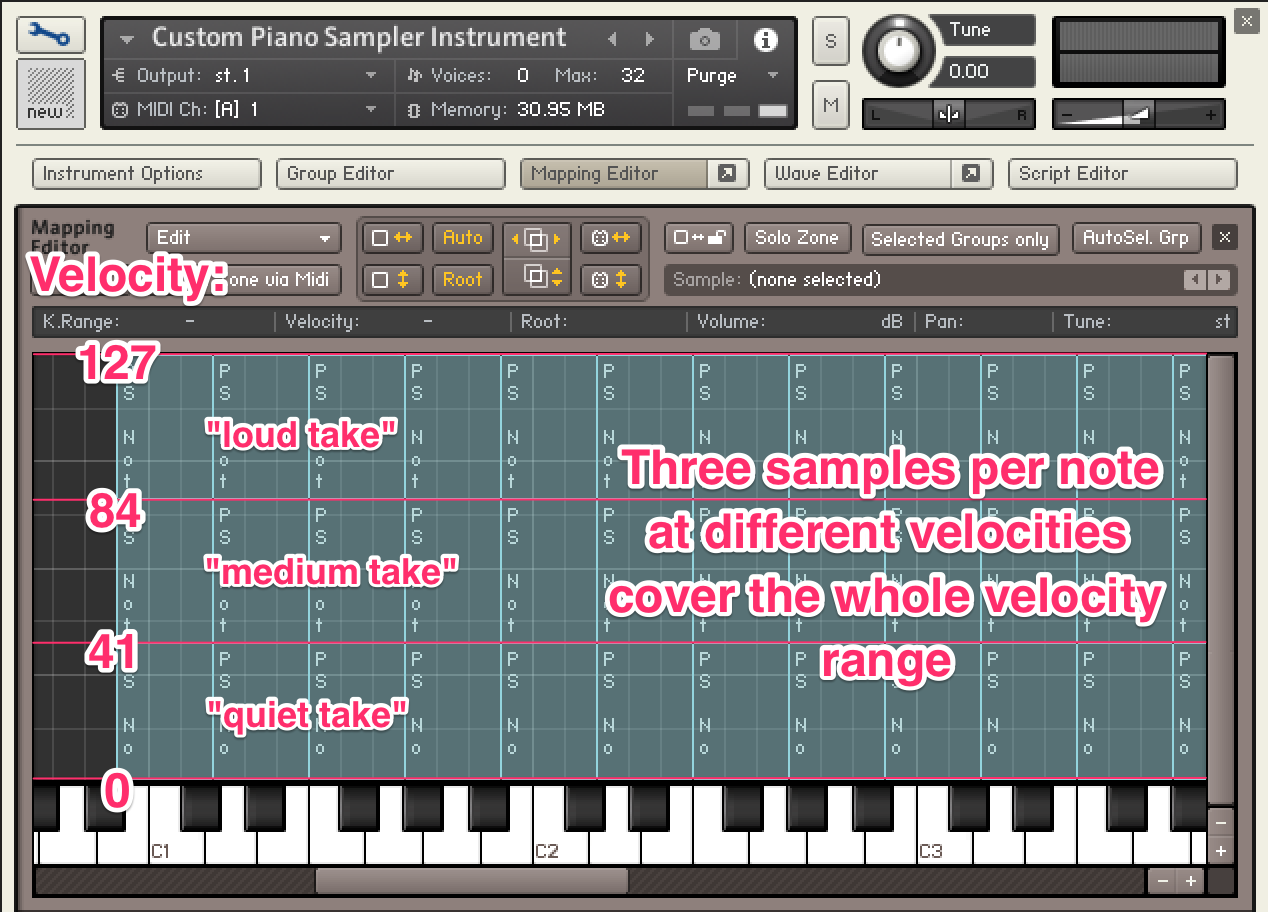
Kontakt velocity mapping
In total, I recorded 16 notes with three velocities each—48 total samples. I dragged these samples into the grid in Kontakt’s Mapping Editor, setting the note and velocity ranges that would trigger each sample.
Multi-sampled instrument
Within the Wave Editor, I set a loop at the end of each sample. This has the effect of “sustaining” a held note.
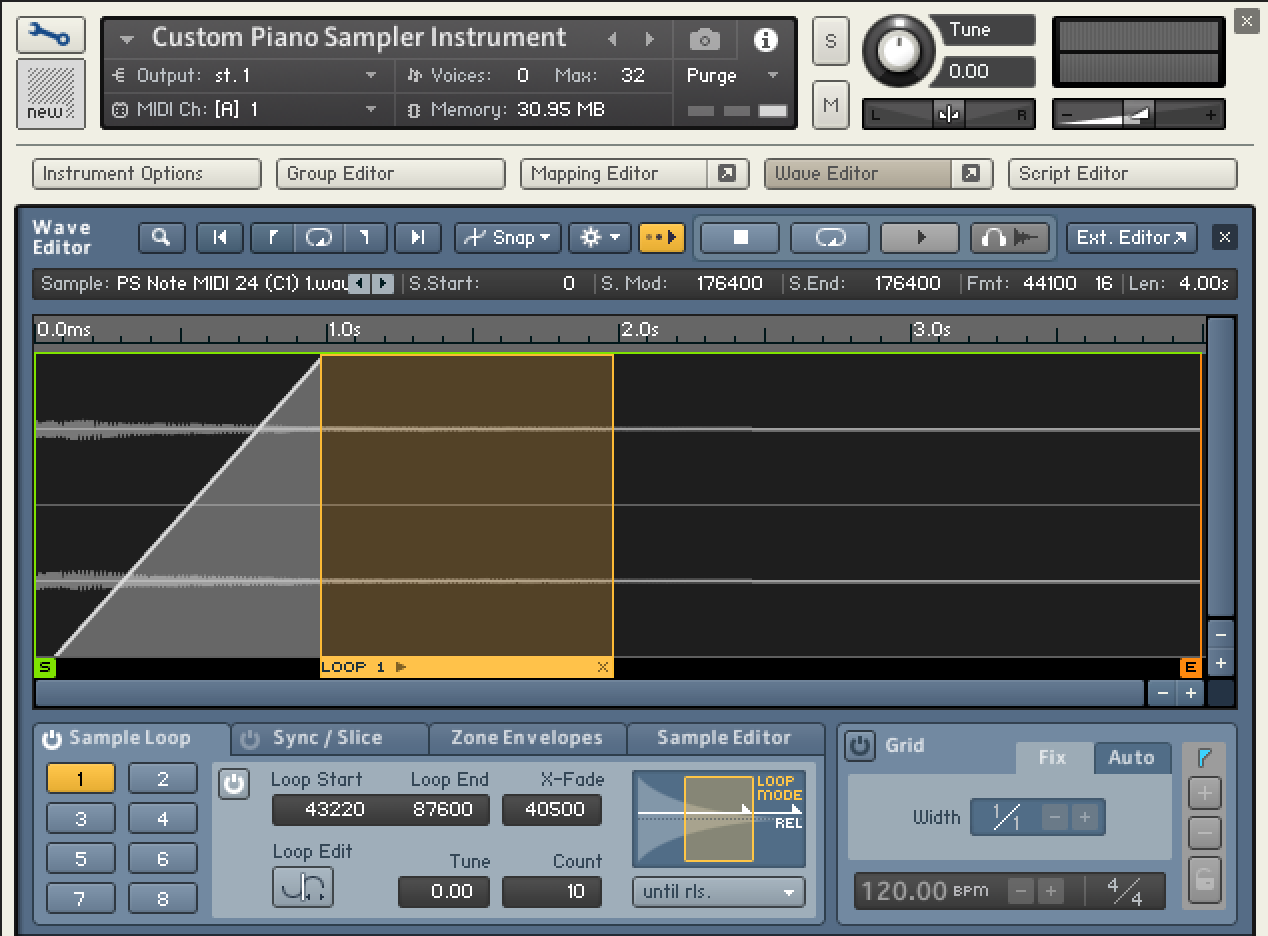
Kontakt Wave Editor
While it’s not perfect, this looping sounds like a pretty convincing sustained piano. The more precise loop regions and crossfading found in a professional-grade sampler can allow sustained sounds to be indistinguishable from the real thing.
Overall, these 48 samples can be used to convincingly cover over 6,000 possible note/velocity combinations. While a more meticulous recording process would yield a more convincing instrument, this is a pretty robust software sampler than anyone can create themselves.
Sample-based instruments
Other types of software instruments, other than classic samplers, function with audio samples as their source material. Most of these function in the way that the first samplers were used—using bits of sampled audio as the basis for synthesis. Granular synths function much like this.
Iris 2 is one of these sample-based instruments. Technically, it’s a four-channel sampler, able to play and independently manipulate each sample simultaneously. Some of the modulation and playback options are quite unique, so it doesn’t quite fit into the “sampler” box.
For a 20-minute tutorial guide on Iris 2, head here.
Conclusion
For decades, sampling has been one of the most useful techniques in music production. Its malleability allows producers to repurpose audio in a variety of ways, from looping to creating custom instruments.
Try using the above techniques to make your own instruments. You can use anything from downloaded samples to recorded sounds around you, creating something that’s truly your own.
By repurposing sounds from the past, we’re able to capture their characteristics, triggering the same responses in listeners that they originally did. This makes sampling a powerful tool for sound design, composition, and arrangement.
If you want something unique, sampling allows for the creation and manipulation of totally new sounds. With the infinite number of potential samples, it’s possible to create something that’s never been heard before. All it takes is a microphone and some patience.