How to make your voice sound better when recording
From the room you’re in to the position of your microphone, learn some fast and easy ways to make your voice sound better when recording and how to enhance the quality of your audio.
People are often surprised the first time they hear a recording of their voice. How our voices sound to others is very different from how we think it sounds. Some of this is due to how our voice resonates within our bodies and heads. Sometimes, however, it can be due to an unflattering recording highlighting parts of our voice that we don’t like such as mouth noise.
In this article we'll explore some important tips for recording voice so you never have to wonder “Why do I sound so bad in voice recording?” again!
I’m often asked “How can I make my voice clearer in audio?” Keep in mind, If you start with a high quality recording, any processing you add later on won’t have to do as much heavy lifting to get the recording to sound good, giving you a better-sounding end result. With just a few simple considerations in choosing where you record and with what, you’ll be enhancing audio recordings and making the whole process easier.
Factors that impact audio quality when recording your voice
The problems I often hear in poor vocal recordings are extra reverb or room sound, background noise such as air conditioning, plosives and mouth noise, and artifacts from recording in low-quality formats or with low-quality devices.
The good news is that most of these problems are an easy fix and will work even if you don’t have the budget to upgrade your gear. I’ll demonstrate these tips with recordings done using only an iPhone and then with a microphone that costs less than $100.
How to make your voice sound better when recording
Discover how to improve audio quality of a recording with these tips.
1. Consider the space you’re recording in
Not all spaces are created equal when trying to get a good recording. Think of how different a clap sounds in a school gymnasium vs. in your bedroom closet. Sound is created and travels outward from the source and interacts with the environment around it. If that environment is full of hard, reflective surfaces, the soundwaves are going to bounce all over the room until they run out of energy. These bouncing waves can create a host of problems such as resonances and reverb that can make a vocal less clear and harder to understand.
Recording in a room full of soft material such as blankets, clothing, or carpeting will help absorb these soundwaves, preventing them from bouncing back into the microphone. Try to avoid rooms with parallel surfaces too as soundwaves like to ping-pong back and forth in these areas. Improving the sound of the room you record is in the biggest and cheapest way to improve the quality of a recording right away.
2. Make the most of your recording device
Not everyone has access to the best equipment around. I always say the best microphone is the one you have, meaning that even a bad microphone is better than no microphone at all. We’ll get to microphone placement in a bit but any microphone still needs a device to record whether it’s your iPhone Voice Memo app or a mic plugged into an interface running into Audacity.
No matter the device there are likely settings you can change to improve your recording quality.
Record in a high-quality audio format
When working with digital audio, capturing more data will help the recording sound more realistic. Some audio formats like WAV are lossless, meaning that they are bigger files that include more data. Lossy formats such as MP3s employ data compression, meaning that in an effort to make file sizes smaller, the device will ignore data that it thinks is redundant. The result is a lower resolution file which translates to lower quality audio that sounds thin and harsh.
To bump up the quality of an iPhone recording using the Voice Memos app, go into Settings and choose Voice Memo. Then, change the audio quality from the default “Compressed” to “Lossless.” With fancier systems, you can change the sample rate and bit depth in addition to the file format. In programs such as Audacity, Logic, or Pro Tools be sure to record in a WAV format and use sample rates of 44.1 or greater.
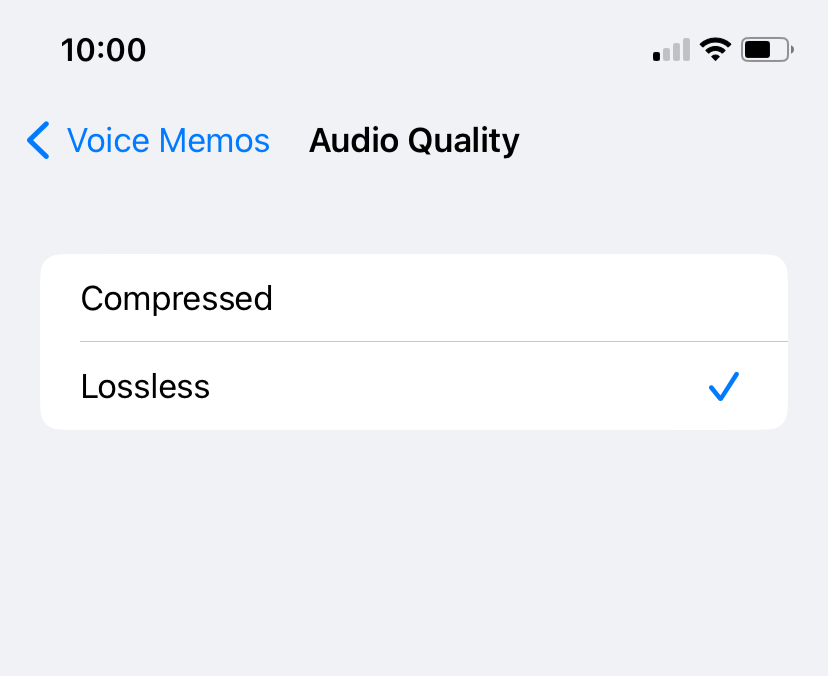
Upgrade your audio quality by recording in a high quality, lossless format
3. Use proper microphone technique
I mentioned earlier that microphone placement is an easy and quick way to improve your voice recordings. Let’s get into how! The main thing to experiment with is distance. Placing a microphone too close to your mouth will result in distracting mouth noise that sounds like pops and clicks. It will also make plosives more likely and enhance sibilance. Position the microphone too far away and you’ll end up with a less direct sound and will pick up more room reflections.
The sweet spot tends to be about 8 to 12 inches away from the mouth.
Reduce plosives and sibilance
Plosives and sibilance are among the most distracting of mouth noises. Using a pop filter will help absorb the puff of air that happens when we pronounce certain consonants. Otherwise this puff of air gets directly into the microphone’s capsule and sounds like a big, low-frequency boom. Conversely, sibilance happens on the high-frequency side of things, making esses sound particularly harsh. For tips on dealing with plosives, check out removing plosives from a voice recording.

Plosives are the result of a puff of air hitting the microphone, causing distortion
4. Employ noise reduction techniques and software
Even with an ideal room and proper mic technique you still might need to polish the sound of your voice recording to get it to the next level, especially if you’re using a phone as a microphone. I’ve done three recordings using different scenarios to demonstrate how we can clean up even a “worst case scenario” using VEA.
VEA is a 3-in-1 tool that combines EQ, de-noising, and compression into one plugin with three controls: Clean, Shape, and Boost. Clean applies de-noising processing based on what VEA detects in your audio. Shape applies an EQ curve that helps to smooth resonances and add frequencies your original recording may be lacking. Boost is your dynamics control and adds compression to your signal as you turn it up. For a more detailed look at what you can do with VEA, check out our guide on getting started With VEA.
In this first recording, I held my phone too close to my mouth and recorded myself in a subpar environment. Listen for the sound of a hand dryer, passing traffic, and rain in addition to the room reflections. Here is a before and after of the original recording compared to one being cleaned up with VEA. This is our “worst case scenario” recording.
Voice recording in a
bad-sounding room with VEA
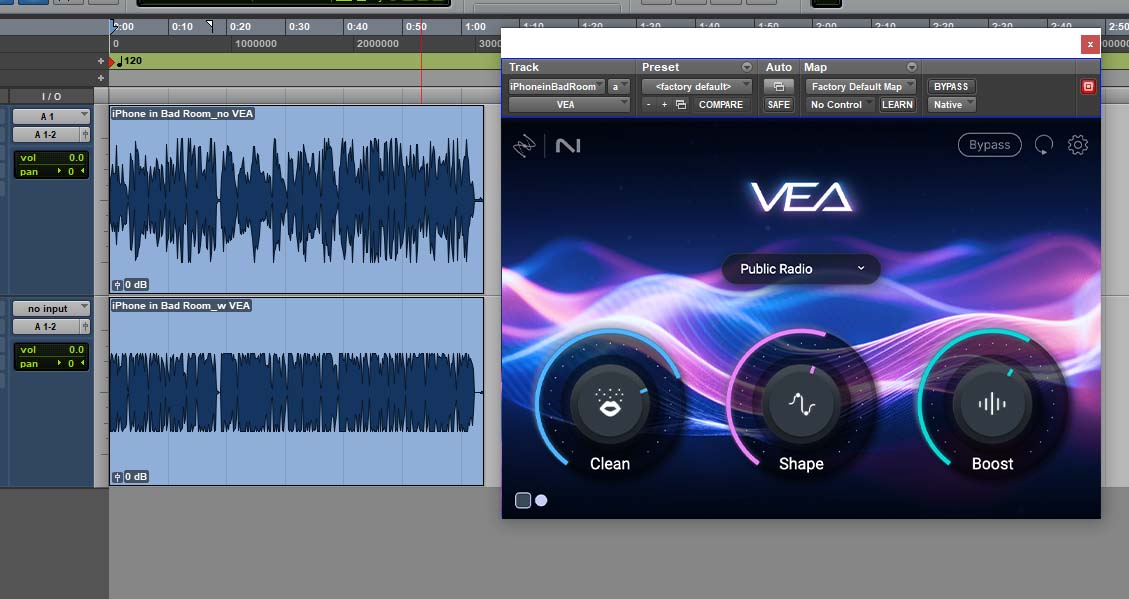
A look at the VEA settings to clean up an iPhone recording done in a bad-sounding room
With this iPhone recording in a bad environment, I turned up the Clean control quite a bit to remove the room noise. My voice also sounded quite harsh so I opted for the Public Radio preset which emphasized the lower mids and balanced out the harshness. Looking at the waveforms in the above screenshot, the original recording on the top track is quite dynamic. With the microphone placed so close, the volume differences that occur naturally in a vocal recording are a bit more dramatic and needed to be evened out.
In the second recording, I’ve continued to record with the iPhone, but now we are in a room that’s been acoustically treated. To mimic this environment record in a bedroom closet! The clothing helps to absorb sound and prevent it from bouncing around. You can also hang blankets or curtains on the walls of your recording space. I’ve also positioned my phone about 8 inches away rather than 2-3 inches away from the mouth.
This is our second-best case scenario. We’ve made free improvements to the overall quality by changing locations and mic position but it still needed a bit of love to get the most out of the recording. The iPhone microphone has a very high noise floor meaning that we hear a bit of hiss in the recording that wasn’t present in the room. I ended up using VEA to remove this hiss with the Clean control, and to again tame the harshness and add some low end with the Shape control.
The dynamics were less of an issue with the improved mic placement, but we still needed to add a bit of compression by turning up the Boost control.
Voice recording in an
acoustically-treated room with VEA
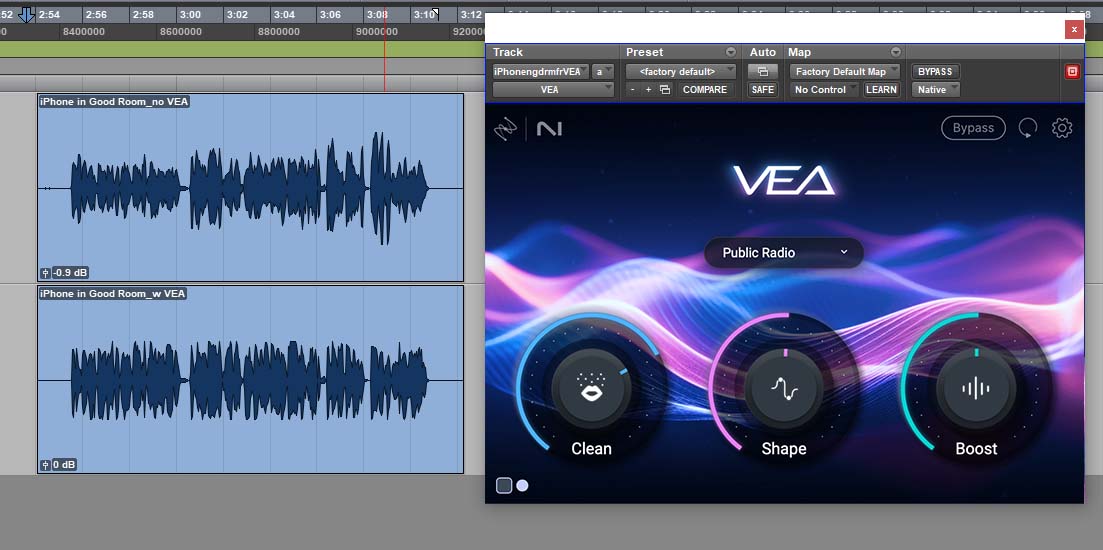
A look at the VEA settings to clean up an iPhone recording done in an acoustically treated room
The last recording was done with a Shure SM58 microphone, one of the most common vocal microphones, especially in a live sound environment. I recorded through a consumer grade interface and preamp into Pro Tools. Definitely not my preferred vocal chain, but I wanted to demonstrate that even small upgrades to your recording system can make big differences.
The original SM58 recording sounds much better than our iPhone recording and as a result, I ended up needing less processing to get it to sound more professional. Most of the processing done was using Boost to add some compression and a bit of Clean to get rid of some mouth noise.
Voice recording using an SM58
in a treated room with VEA
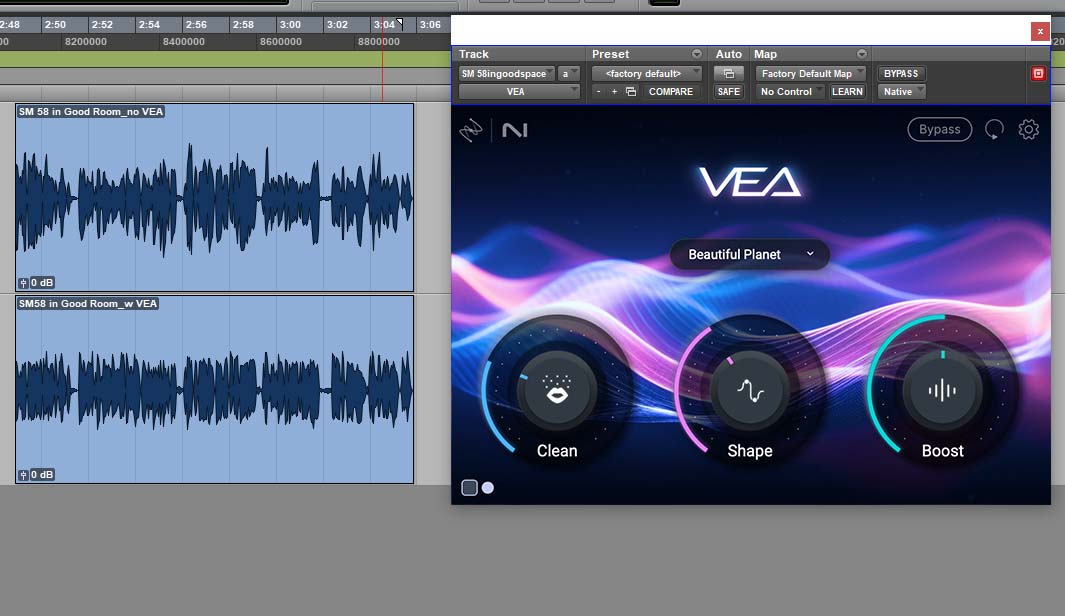
A look at the VEA settings to clean up an SM58 recording done in an acoustically treated room
Sound better in your podcasts, content creation, and more
We’ve gone over some quick tips to get a better-sounding vocal recording such as recording environment, mic technique, and gentle de-noising. While these tips will work a lot of the time, no tool or technique is appropriate for every single situation.
For more techniques for cleaning up common issues with Zoom and remote recordings such as clipping, check this article out on how to clean up Zoom or phone recordings. For tips on dealing with intermittent audio issues such as dog barks or coughing in the background, we have our guide on the basics of audio cleanup and background noise removal.

