Beat Making 101: How to Make a Beat
The beat is the basis of rhythm and momentum in contemporary music. Discover the tools you’ll need for beat making, what makes a good beat, and how to make a beat from start to finish.
Most beginner producers learn to make music by creating simple beats. And in the world of music production, beat-making can be an entire career in itself (and a lucrative one at that). For the inexperienced producer, however, even a simple beat can seem a bit abstract. Beginning to make original beats can, therefore, be more intimidating than it needs to be.
In this article, we’ll discuss what makes a good beat, and I’ll even show you how to make a beat from start to finish that ends up sounding like this:
But first, let’s cover what tools you’ll need to get started.
In this piece you’ll learn:
- What tools you need to begin making beats
- What all good beats have in common
- How to make a beat from start to finish
Looking for a little extra inspiration?
Experiment with beat making using the plug-ins in this article that are included in


Music Production Suite 5.2


iZotope Music Production Suite Pro: Monthly
What tools do you need to make a beat?
To begin on your beat making journey, you’ll only need a handful of tools to get started. Some of the tools I’ve listed below are optional, but I’m including them because they can speed up the creation process and/or really help bring your beats to the next level.
Sample library
A deep sample library is the most helpful tool when first learning how to craft killer beats. Inevitably, the samples available to you will affect your composition decisions. Recording your own samples can be pretty tedious, so consider using a sample database like Splice or Sounds.com will provide quick and broad access to tons of sonic possibilities.

Example of a sample library
If you really want to get into making your own samples, watch the video below to see how TOKiMONSTA uses RX to create her own samples for her beat-making arsenal.
DAW
A DAW (digital audio workstation) is software you can use to record, edit, and produce your beats. There are many DAWs on the market, so you’ll need to do a bit of research to find which is the best for you. But, this software is what will allow you to stack multiple instrument tracks on top of each other to craft your unique beat.
Beat sequencer
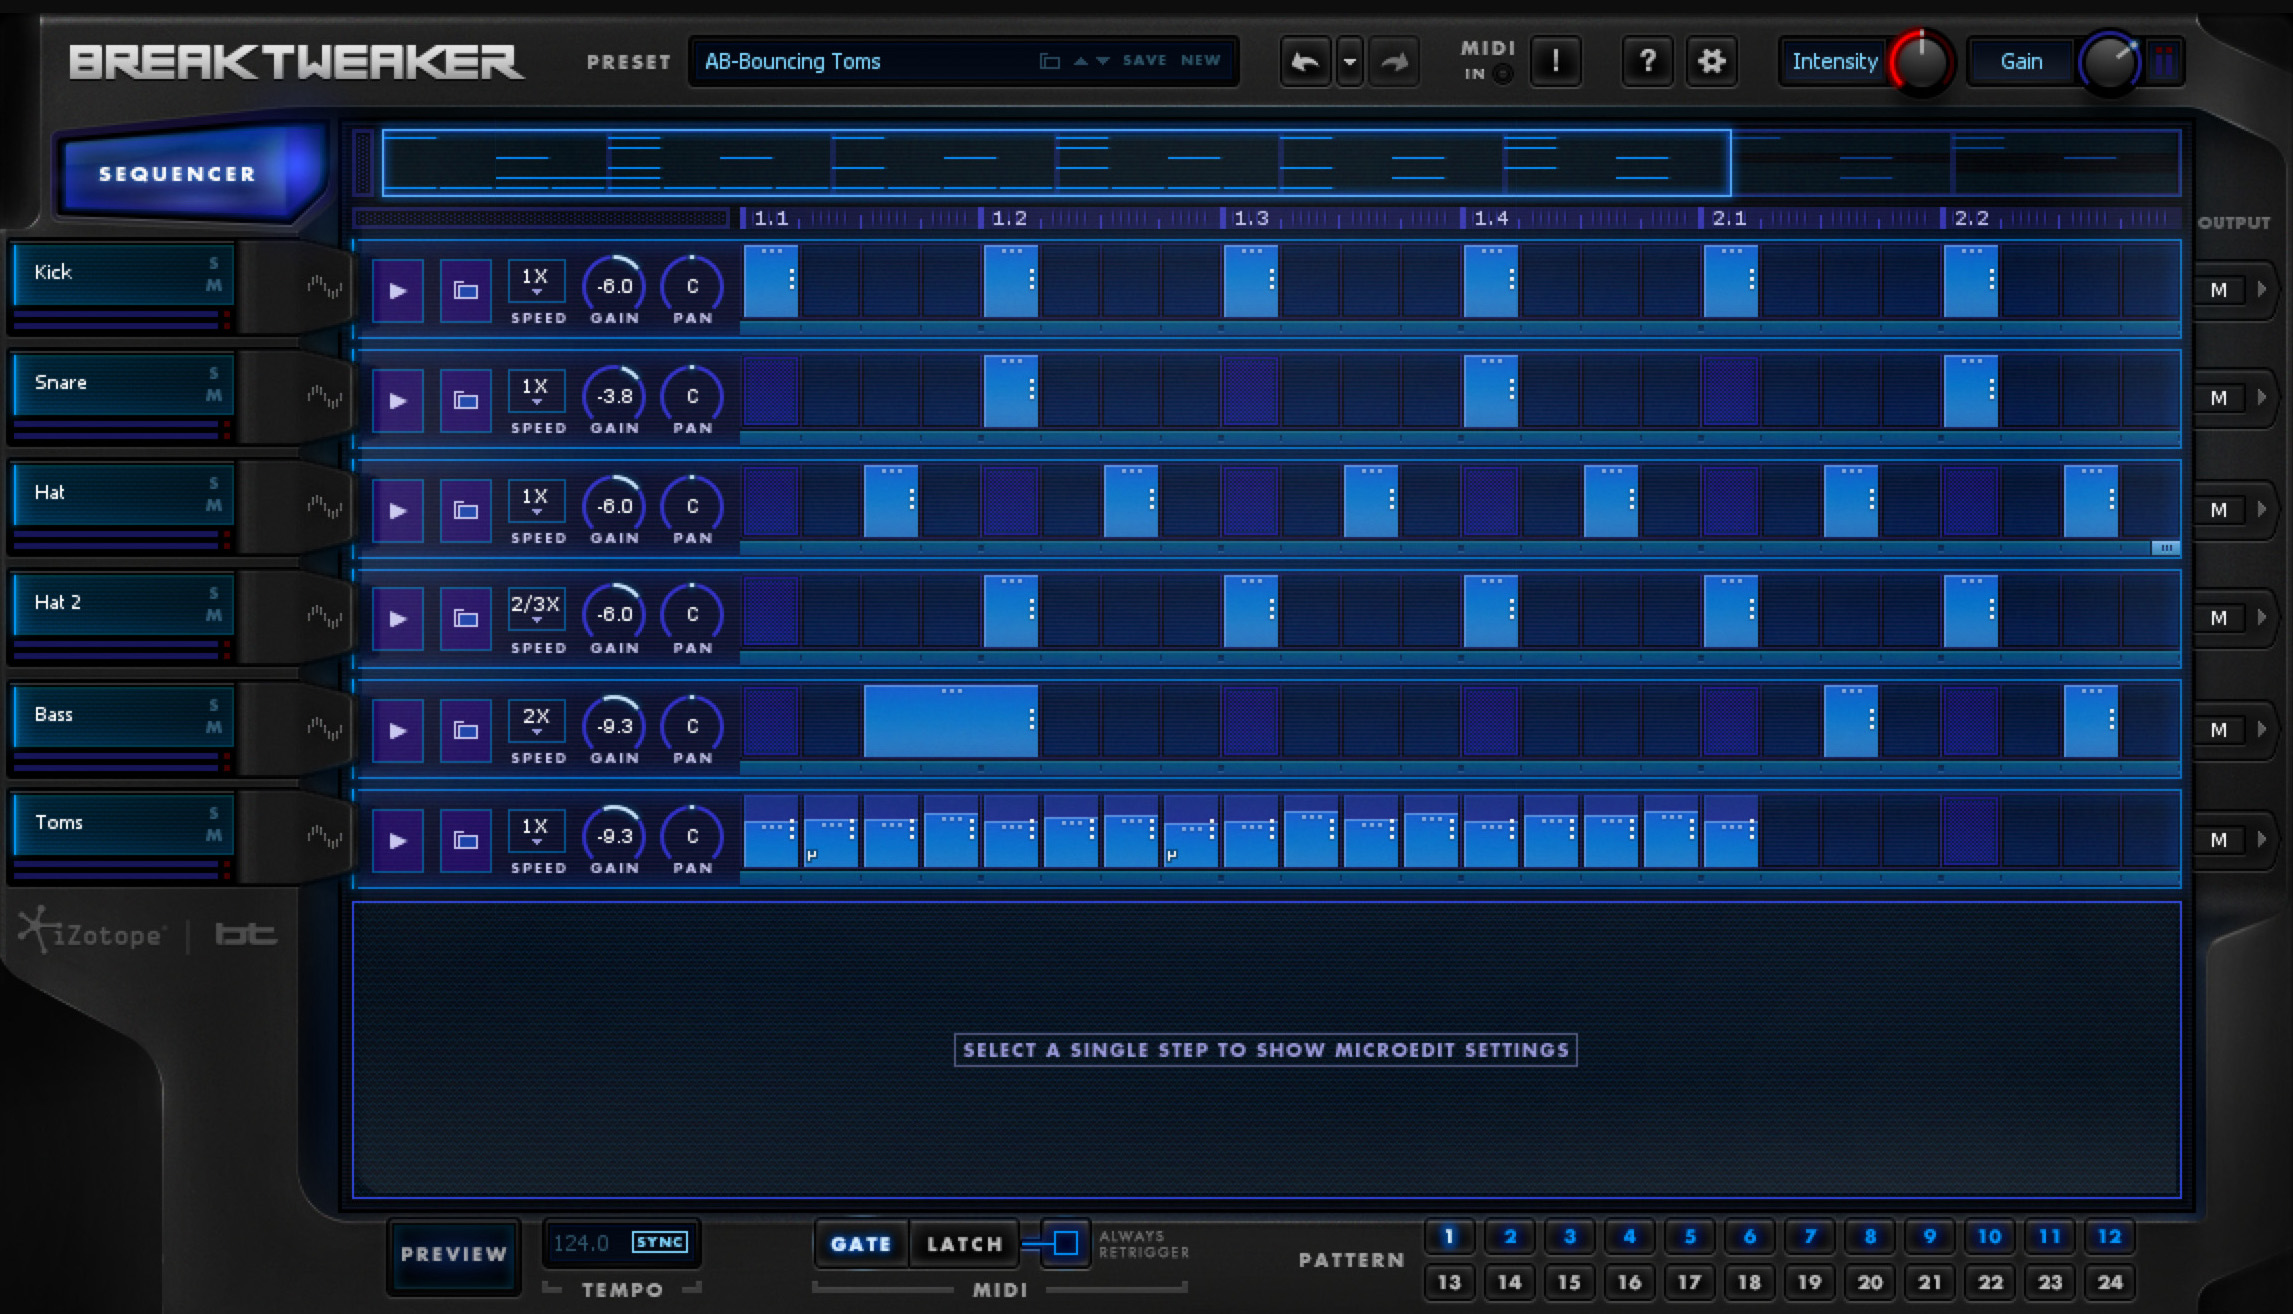
Some DAWs come with their own beat sequencer built in, but for the step-by-step tutorial below, I used


BreakTweaker Expanded

Arrange your samples on a grid and loop it over several bars with BreakTweaker
Important notice: Breaktweaker is no longer available for purchase from iZotope. We are continually developing new products, services, and solutions to enable and innovate on journeys in audio production. We occasionally need to retire older products in order to focus our resources and development efforts on building new, innovative products and features. Support for this product will remain in effect for 12 months from your date of purchase up through October 27, 2023.
MIDI controller
Whereas you can certainly set up a drum groove by clicking MIDI notes into your DAW, being able to play the drum groove really helps to internalize the process of creating rhythms. The more you feel the rhythm, rather than simply conceptualize it visually, the easier it will be to create beats that resonate with people. That’s why I recommend using a dedicated MIDI controller that you can plug into your computer and use to trigger your samples.
Mixing and mastering software
Mixing and mastering software will really help bring that extra level of professional polish to your beats. In the beat below, I used


Neutron


Tonal Balance Control 2


Ozone Advanced


iZotope Music Production Suite Pro: Monthly


Music Production Suite 7
What makes a good beat?
Good beat making, in general, is finding the balance between variation and repetition. Without any variation, the listener can get bored (and will likely skip to the next song). Without any repetition, the listener doesn’t really have anything to latch onto, which can cause the music to feel unstructured. It’s the producer’s job to find the right compromise between variation and repetition to create something that’s interesting but still relatively accessible to a non-musical listener. In the world of beat-making, where repetition is so prevalent that it can become overwhelming, finding this compromise is especially important.
The majority of modern beats can be broken down into only a few standard elements: a kick, a snare, some high-frequency percussion sounds, a bass, and at least one melodic element. When crafting my own beats, I prefer to begin with the bass line. Then, I’ll add my kicks, snares, and high-frequency percussion. Lastly, I’ll add in some melodic elements and foley sound effects to fill in the gaps. Keep in mind, though, that these elements can be added in any order you like. The only requirement is that all elements work together rhythmically.
How to make a beat
I’ll walk you through the basic steps for how to make a beat using one of my current works-in-progress: “I Like it Raw.” Although this song leans more EDM, these concepts are applicable across any genre that involves programming beats, including rap, hip hop, and more. Let’s get started!
Step 1: Define your vibe
Before you sit down to make a beat, it helps to first think about the vibe you’re going for as this will help you with your sound selection and in determining the right tempo for your project. The tempo of a track can totally change the feel of a beat, so make sure you select a tempo that is appropriate for the genre and style you’re going for. For my track, I’ve set my tempo to 130 BPM.
Step 2: Create a bass line
One reason I like starting with the bass line is because it not only helps set up the rhythm of the beat, a bass will help to provide some tonality and outline the chord progression within the beat. Your choice of bass sound will vary depending on the genre, but for mine, I’ve layered a clean sub bass with a gritty synth sample. Check it out:
To bring a bit more depth to the synth bass, I added some echoes using some delay.
Fun fact: That decaying, distorted sine wave that you’re hearing in the bassline is generally referred to as an “808”, a sound first popularized by Roland’s TR-808 Rhythm Composer. This legendary drum machine was instrumental in the development of hip-hop production during the early 1980s and continues to impact the industry to this day.

Roland TR-808
Step 3: Add in the drums
Once I have a catchy bass line, then I add my main drums. These typically include the kick, snare, and hi-hats. Most beats will also have a higher-pitched drum sound to outline the groove. Keep in mind that the rhythm of any high-pitched percussion is going to set the overall “feel” of the groove, and often dictates the most natural-feeling rhythmic subdivisions for a singer or rapper to reference. The high percussion can be anything from a single closed hi-hat or percussion instrument to a whole group of interplaying percussion sounds.
I like to actively listen to the bass while playing with the placement of the drums in the


BreakTweaker Expanded
And, here it is with the bass added back in:
Step 4: Add melodic elements
With this foundation in place, a melodic element helps to round things off. What you end up choosing for this melodic layer is up to your own imagination and composition, but should make harmonic sense with the bassline. Again, your sound selection here will vary based on the genre you’re working in. But for my track, I decided to go with a synth pluck playing a simple riff. Give it a listen:
Since this synth pluck doesn’t quite fill up the space like I want it to, I decided to add a bit of reverb using


Neoverb

Create a reverb that fills the space without muddying the mix with Neoverb
Here’s what those synth plucks sound like after Neoverb:
Notice how Neoverb helped widen the sound and give the plucks a sense of space? Here’s how they sound in context with the rest of the beat:
Step 5: Fill in the gaps
After I’ve got the drums, bass, and melody of my beat figured out, I like to fill in the gaps with extra sounds. These sounds aren’t really necessary for the beat to maintain its rhythm and vibe, but adding in some foley or sound effects can really spice things up. If your beat is feeling stale, try playing with some unexpected sounds to add a new level of sonic interest. Just make sure, if the sounds have a definite pitch, that they fall within the same key of your song.
Here’s what my beat sounds like with a few random sound effects thrown in:
Step 6: Expand the beat
Now that I have all the elements of my beat in place, it’s time to expand upon it and turn it into a full song. To do this, I like to loop the beat several times in my DAW and then remove different elements from the various sections. This helps create some variation even though the core of the beat continues to repeat throughout. During this step, you can also add in extra transition effects to breathe a little more life into your beat and help it keep moving forward without getting boring. Here’s what my beat sounds like once I expanded it:
Step 7: Mix and master your beat
I won’t get too detailed when it comes to mixing and mastering since there are several other great articles on the iZotope blog that cover mixing tips and mastering tips. But, if you want your beats to sound professional and polished, using mixing and mastering software is a surefire way to get them there. Check out the following guides:
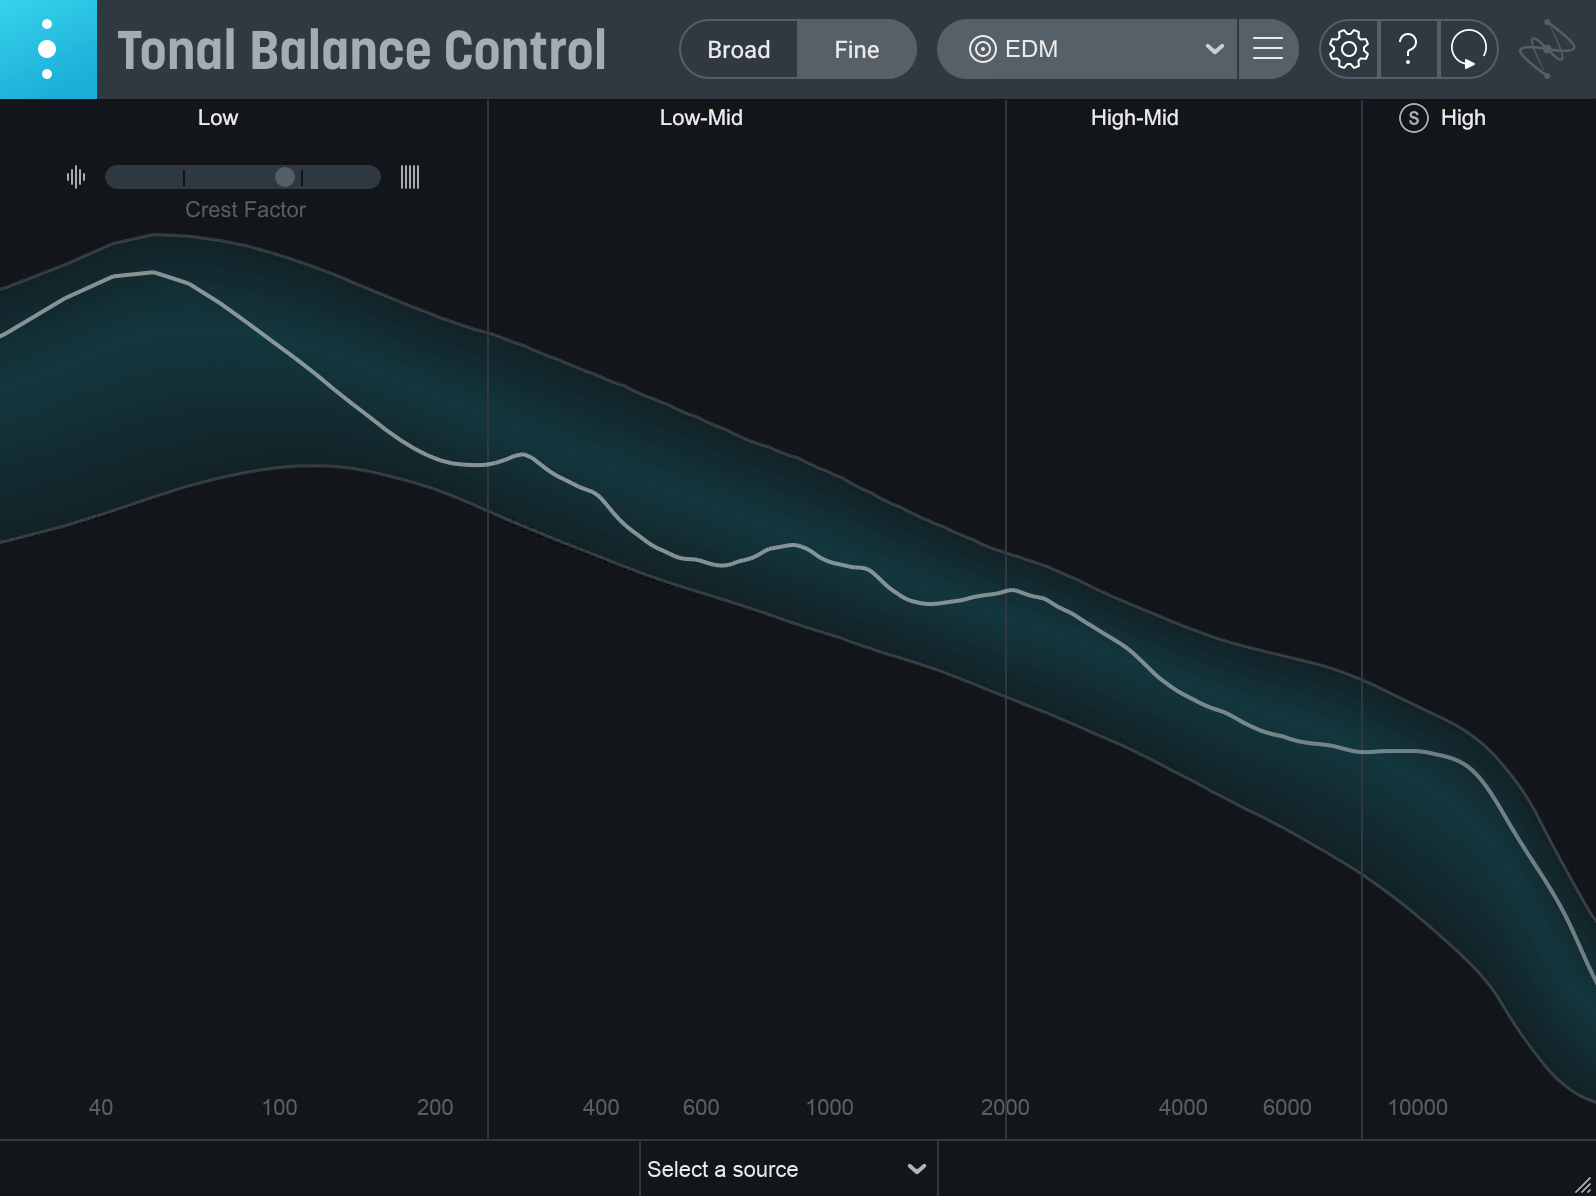
For mixing my beat, I used


Neutron


Tonal Balance Control 2

Use a plug-in like Tonal Balance Control to check for any problems across the frequency spectrum.
This article references a previous version of Ozone. Learn about 

Ozone 11 Advanced
Finally, I used


Ozone Advanced
To show you the difference mastering a beat can make, take a listen to the audio examples below. The first is before mastering, and the second is after using Ozone.
It’s like a night and day difference, right?!
Start making your own beats
I hope this article has been helpful in showing you the ropes on how to make a beat. Beat making is truly an artform. And like any artform, if you want to create quality work, it takes a good balance of practice and having the right tools for the job. Like I’ve mentioned, you can get access to nearly all the plugins mentioned in this article with a


iZotope Music Production Suite Pro: Monthly


Music Production Suite 5.2
Are you interested in evaluating new features and helping to develop iZotope software products? iZotope is seeking music producers, composers, mixing engineers, and audio enthusiasts to participate in our Software Beta Programs!


