An introduction to limiters (and how to use them)
Learn what a limiters are in audio processing, including when to use them, how to use them, and how to recognize when you’re over-processing.
The limiter plays a vital role in shaping the final loudness and preventing digital clipping in music production. However, achieving a commercially competitive level without negatively impacting the sound quality requires a deeper understanding. In this article, we’ll define what a limiter actually is, along with when to use them, how to use them, and how to train your ears to tell if they’re mangling your original sound source.
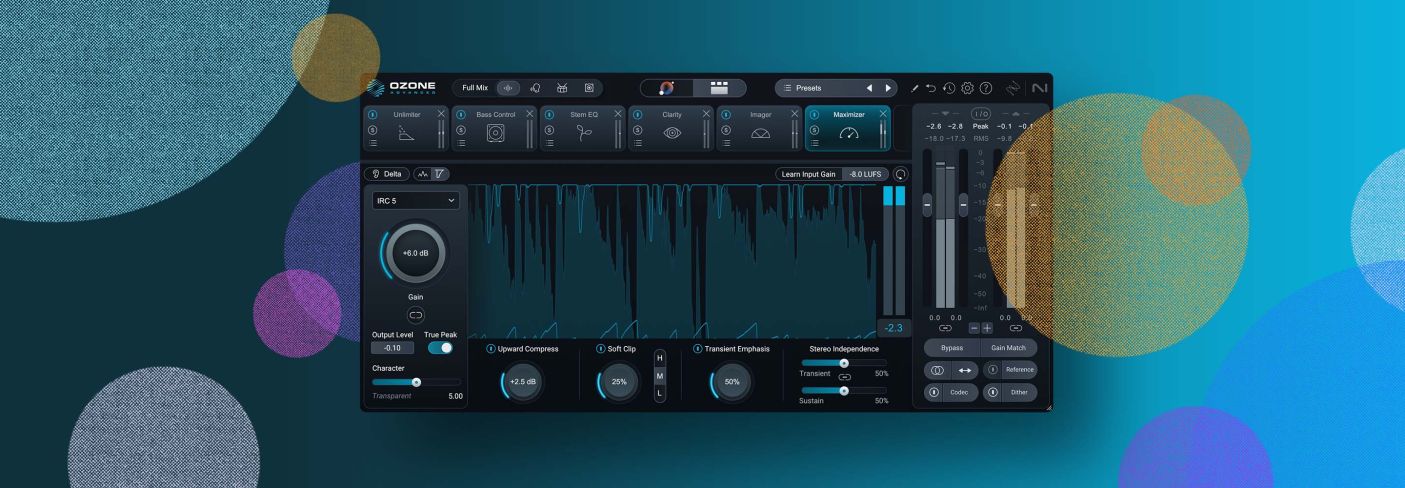
Follow along with the intelligent limiter included in
![]()
![]()
Ozone Advanced
What is a limiter?
A limiter catches the highest peaks of an audio source and applies “brick wall” compression that prevents them from exceeding the digital clipping point of 0 dBFS – or any other threshold you set. Limiters are often used to increase perceived loudness by raising the quietest parts of an audio signal while preventing the peaks from clipping.
Limiting is also the final, and perhaps the most easily recognizable, step in mastering a song, allowing you to turn up the master to commercial loudness without unintentionally clipping.
Limiters generally fall into two categories:
Analog-style limiters, which are essentially very aggressive compressors that may not behave in the ways described above. The Manley Vari-Mu and Fairchild 670 have limiting applications, for instance.
Then, we have brickwall limiters – the digital beasts used to tame peaks in mastering (or on groups of percussive instruments). These will be the focus of this article and will be covered in depth.
When to use limiters
The most archetypal use of a limiter is at the very end of your mastering chain, applying no more than 2 dB or so of gain reduction in order to achieve a commercial loudness level.
Of course, rules are meant to be broken, so people use limiters in all sorts of ways these days – especially in the more aggressive genres, such as metal and EDM.
It’s not uncommon to see limiters on kick drums, on grungy metal basses, on snares, and other things that need to feel loud but also be tamed.
Still, the majority of limiter-talk tends to center on mastering and this makes sense: limiters are ubiquitous at the end of a mastering chain.
Think of the limiter as a bouncer, standing just outside the door of a club, keeping harsh digital overs outside of the proceedings, and doing so with the force of a brick wall, which brings us to…
Brickwall limiters
Now let’s talk about why we call them “brickwall limiters,” though the reasoning is fairly self apparent:
These processors catch the highest peaks of an audio source and ensure that nothing gets above the ceiling – or in other words, past the “brick wall.”
These limiters were an integral part of mastering In the CD era to make sure nothing got above 0 dBFS, the absolute limit of 16-bit and 24-bit formats. Above 0 dBFS there is nothing but distortion.
Even today, brickwall limiting is usually the final – and perhaps the most recognizable – step in mastering a song, helping engineers push the material to a commercial loudness without distorting the listener’s playback system.
These limiters have a ceiling control, usually set to between -1.0 and -0.1 dBFS to help avoid intersample peaks, which we’ll cover in a moment.
These limiters operate with infinitely high ratios, and implement a delay in the signal in order to see any peaks coming down the pike so that they can react smoothly to them – otherwise they’d just be clippers. Sometimes you can even tweak how far the limiter peers into the future with a dedicated lookahead parameter in your DAW.
Whichever kind of limiter you have, know that it won’t always protect against clipping. You might need a different meter to keep track of intersample peaks or true peaks, like
![]()
![]()
Insight 2
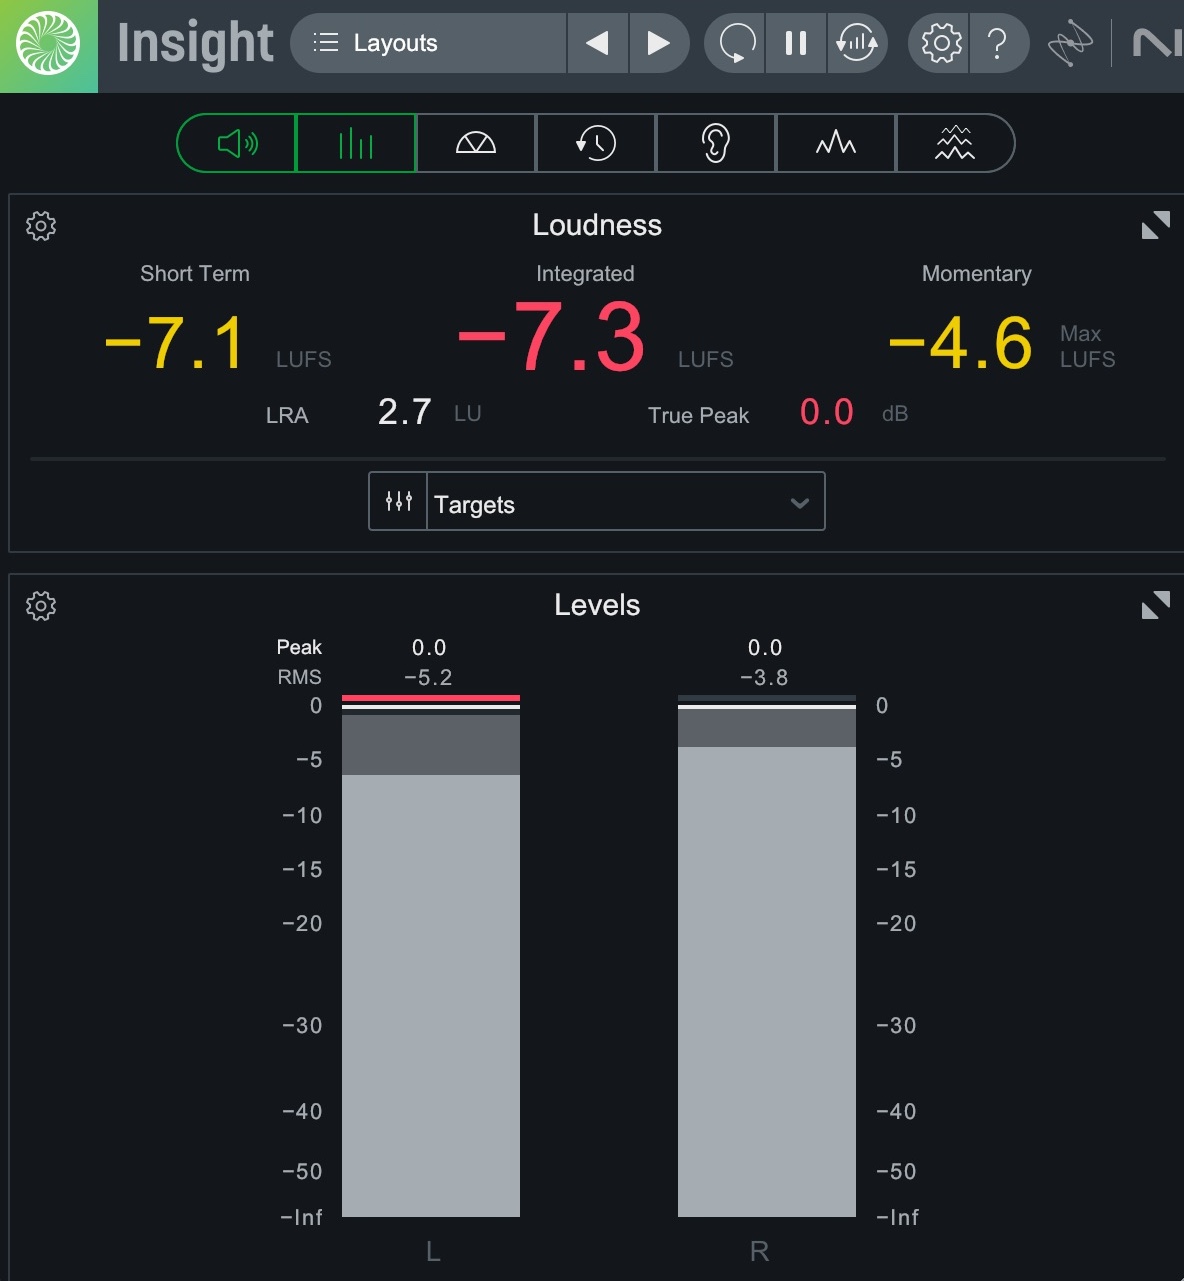
Limited material still hitting 0 dBFS
Intersample Peaks and True Peaks
We all know digital signal comprises many individual samples, roughly analogous to the many different images that make up a movie.
Our limiters ensure none of these samples go over 0 dBFS. But here’s the thing: sometimes the signal can jump over 0 dBFS in between samples. These are called intersample peaks—and limiters that aren’t set to handle them can’t protect against them.
People sometimes mix up the term “intersample peaks” with “true peaks,” but they are not synonymous.
Think of it this way: “True peak” is the be-all-and-end-all measurement of the signal, taking intersample peaks and everything else into account.
So if you want to guard against intersample peaks, you flip your limiter into True Peak mode.
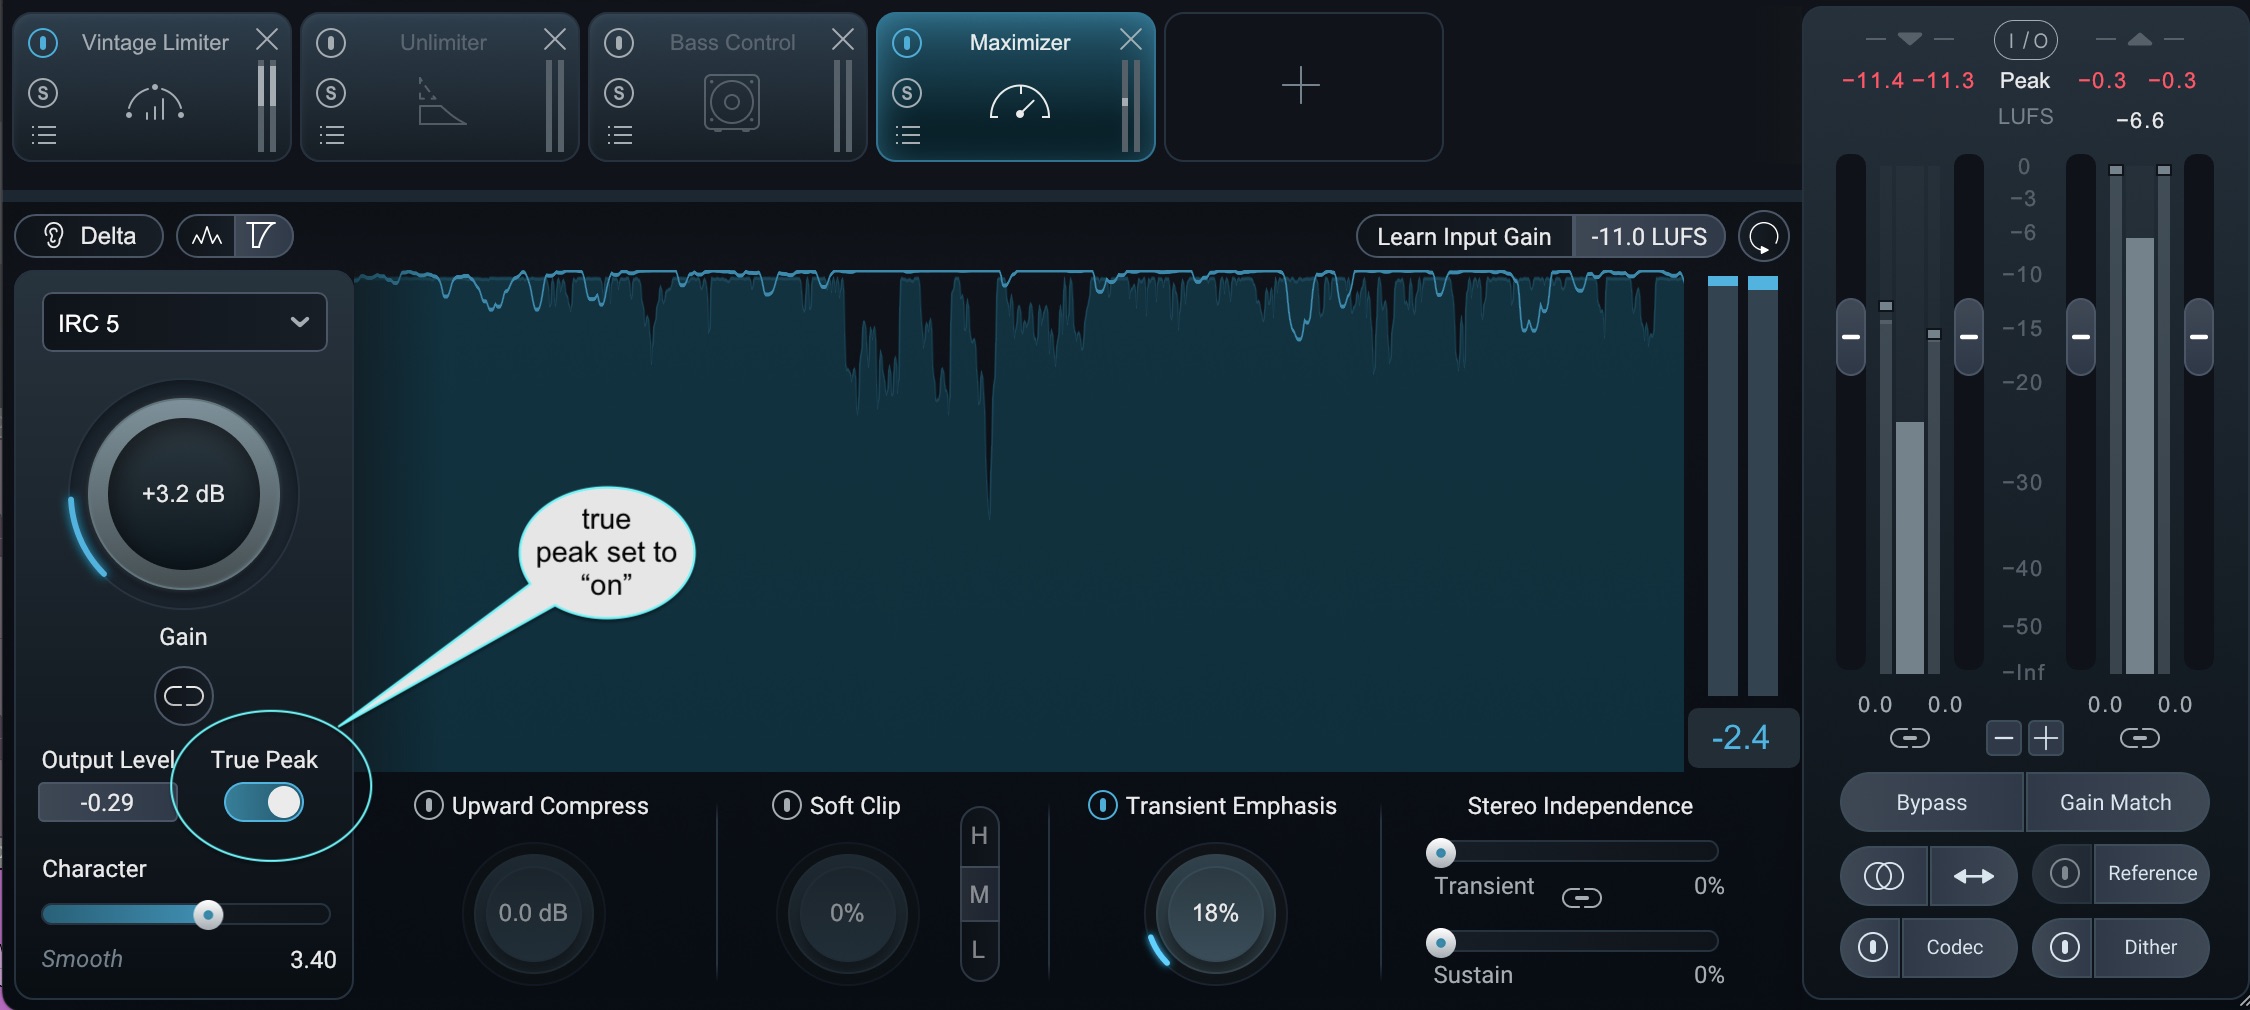
True Peak in Ozone 12
Within the last few years, True Peak technology has come to be expected in any modern limiter. Nearly every viable limiter now offers true peak mode.
Still, we arrive at a controversial point:
Many mastering engineers use True Peak limiters, but just as many professional mastering engineers decidedly don’t. They dislike the sound of True Peak limiting, claiming these limiters affect the material in an adverse way.
Some would rather lower the output ceiling to ensure nothing got past 0 dBFS than submit a louder master with a True Peak limiter deployed.
Others don’t even care about True Peak distortion at all!
Bob Ludwig mastered many records over the years that peak as high as +3 dBTP, and yet is still considered one of the all-time greatest mastering engineers.
Take lossless versions of your favorite tunes from the last two years and open them in the iZotope
![]()
![]()
RX 11 Advanced
Personally, I go on a case-by-case basis, depending on the needs of the client and the needs of the song. Over time, you do begin to recognize the sound of peak limiting. Let’s see if you can hear it below:
Whether or not you want to use True Peak limiting is up to you or your mastering engineer. Use True Peak whenever you want to make absolutely sure there is no clipping when your audio is run through a D/A converter – or whenever the delivery specs require you to use True Peak limiting. Otherwise, it’s completely up to you.
For what it’s worth, I usually don’t, unless the delivery specs require it, which is seldom the case in the indie world.
How to set up a limiter
Place the limiter as the last effect on your mastering signal chain and dial in the settings while listening to the loudest part of your track.
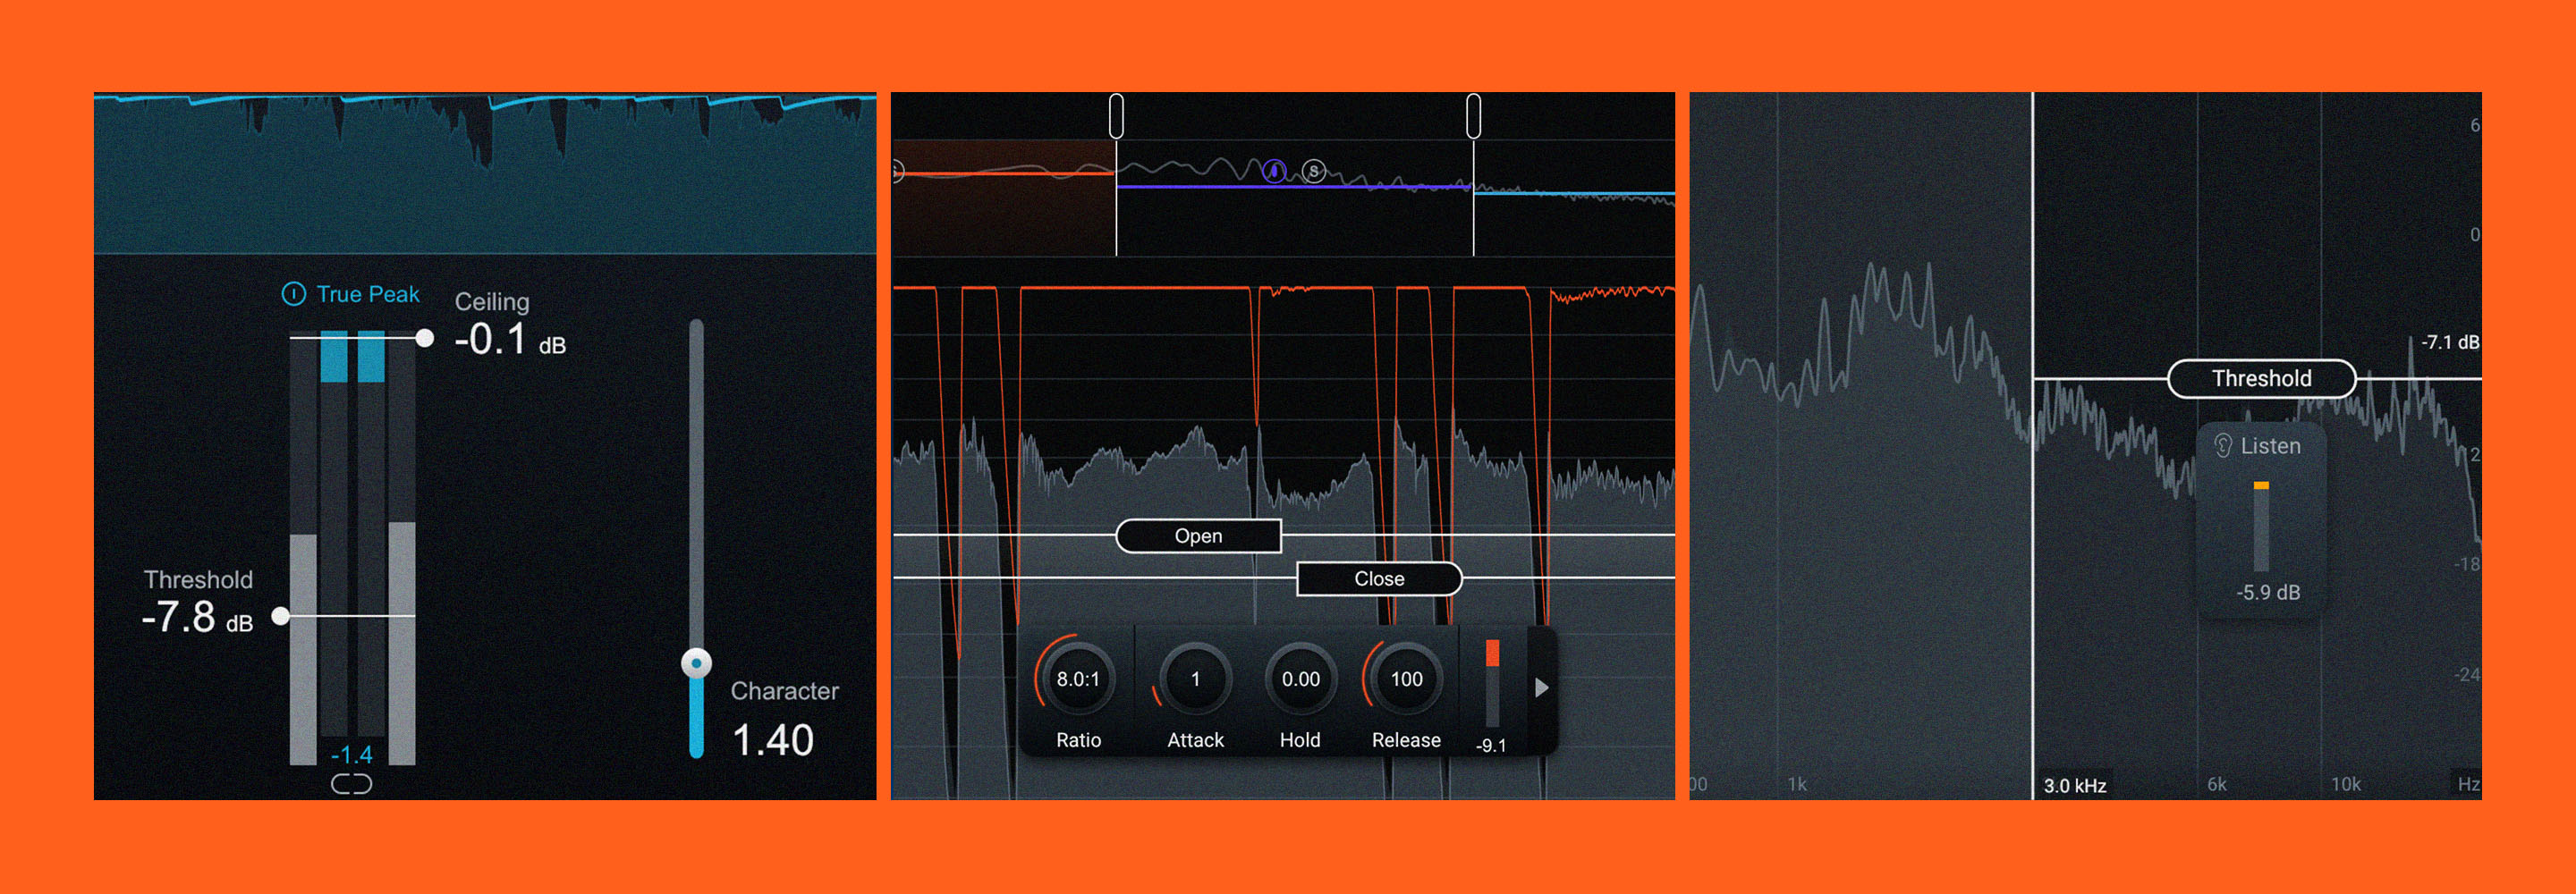
Limiters typically have three main controls: threshold, release, and output ceiling.
Gain/threshold: this control sets the level at which the limiter applies brick wall compression. If it’s a gain control, like it is in Ozone, it first allows you to make up any remaining headroom, getting your peaks right up near 0 dBFS. From there, the more you push it, the more limiting you’ll have, and the louder your signal will be. If it’s a threshold control, it works in reverse: the more you pull the threshold down, the louder it’s going to get.
Yes, that is confusing. It’s a bit like the whole “high-pass filter/low-cut filter” fiasco. But these days, many manufacturers are moving away from labeling the control as “threshold.”

Gain control in Ozone 12
Output (sometimes called Ceiling): this parameter establishes the maximum level the limiter will allow. You often want the peak levels of your track to sit close to 0 dBFS without clipping, so the first thing you want to do is set your output/ceiling level at a level below 0 dBFS.
Engineers typically set this control to anywhere between -1.0 and -0.1 dBFS. Think of this control as the exact placement of the “brick wall.”

Output in Ozone 12
Release: this control sets the amount of time it takes for the limiter to stop working after the signal level drops below the threshold Some limiters have different release styles – Ozone is a perfect example.
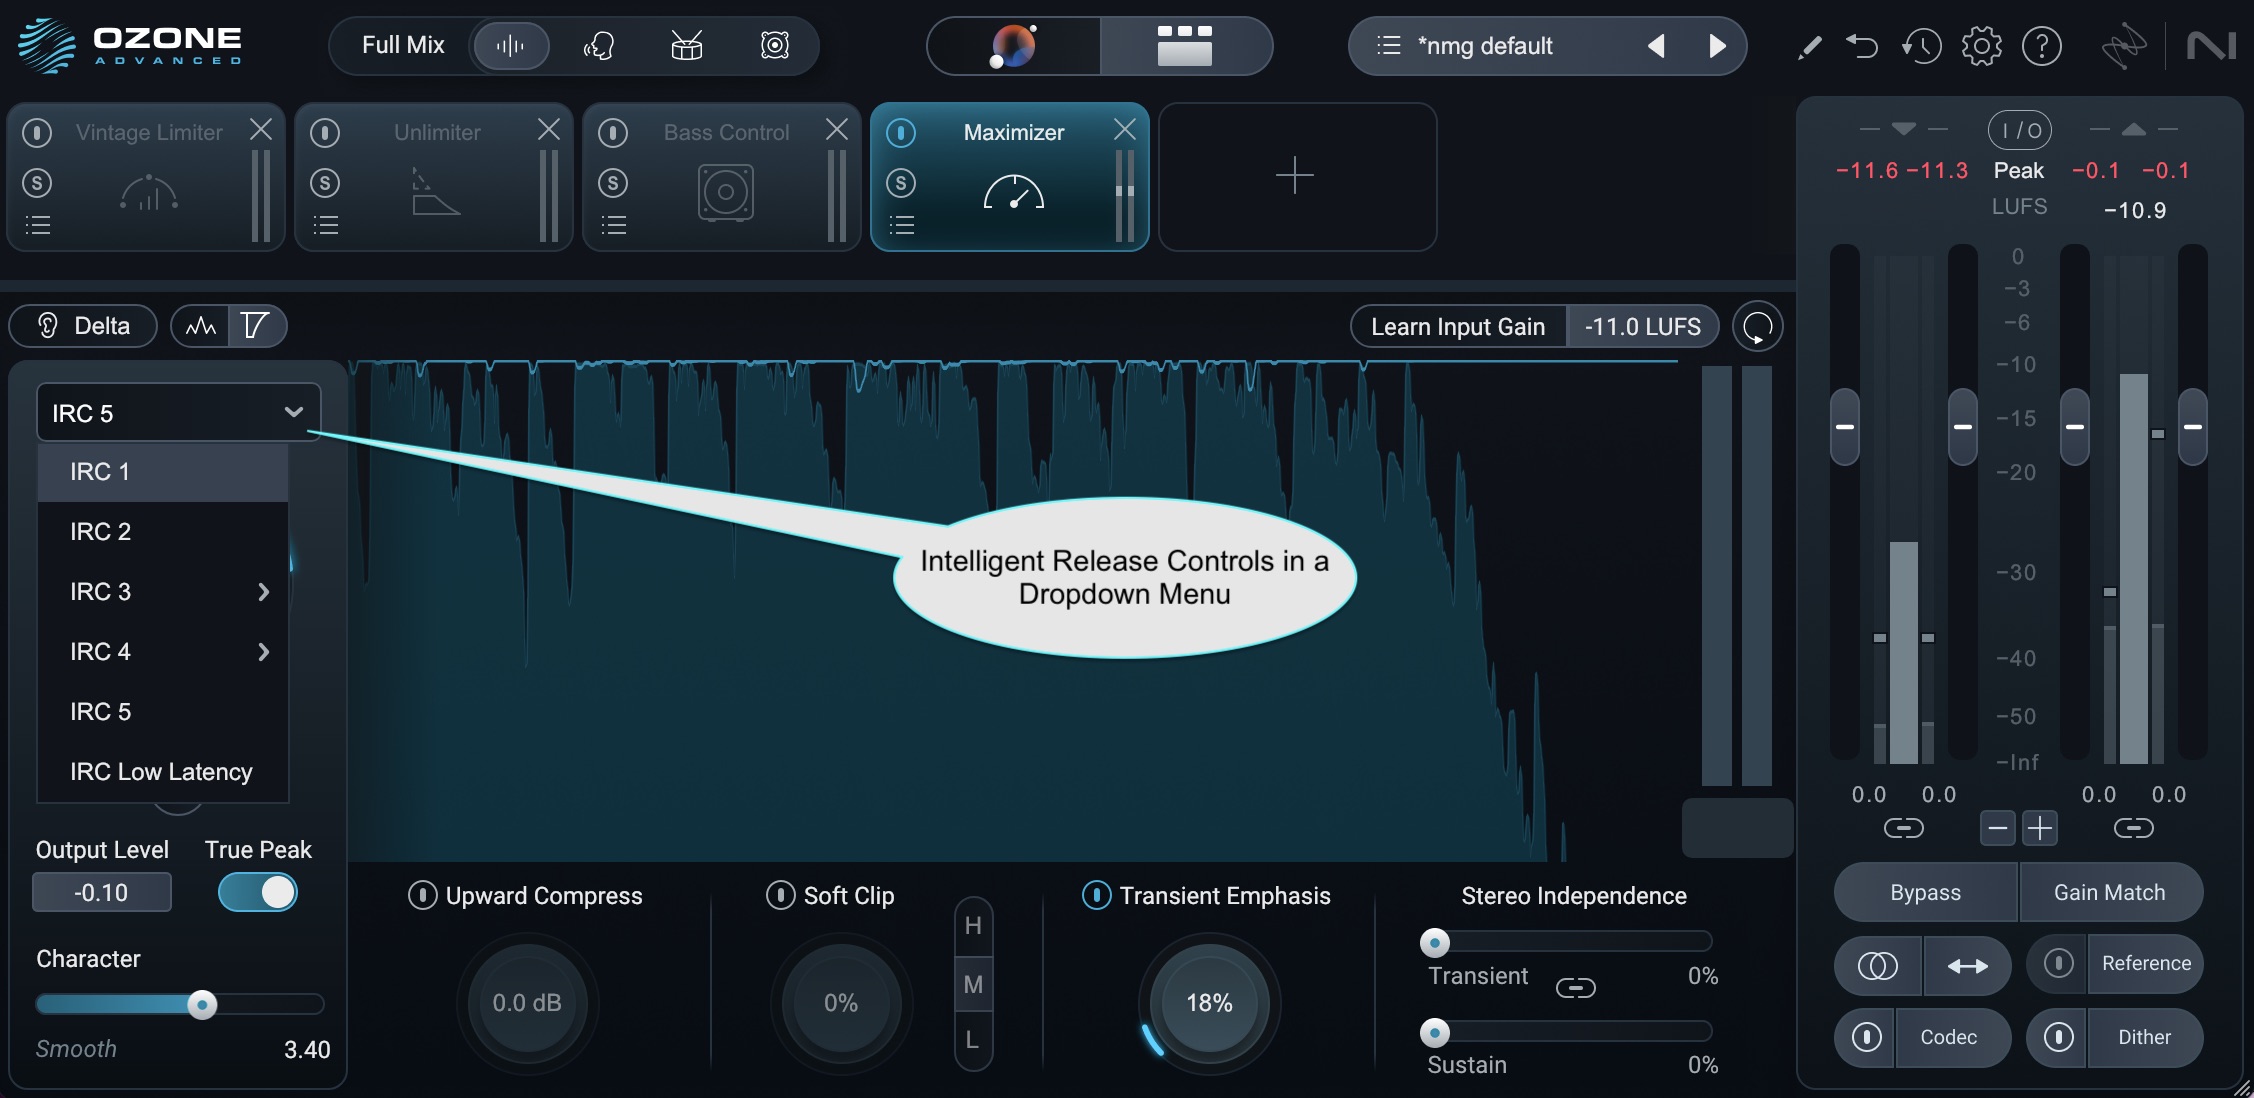
IRC modes in Ozone Maximizer
Ozone lets you select among numerous different release modes that automatically adjust the limiter's release times to your audio's characteristics. Its IRC (Intelligent Release Control) technology lets you boost the overall level of your mixes without sacrificing dynamics and clarity. It uses an advanced psychoacoustic model to intelligently determine the speed of limiting that can be applied before producing audible distortion.
These modes are worth experimenting with as they each have their own sound. What’s more, you can customize this sound with the Character control, which blends a few different parameters into one slider. It simultaneously modifies the attack speed, the lookahead of the limiter (how far it looks into the future while operating), and the speed of the release curve.
A word on IRC5 - Ozone’s new intelligent release curve
Ozone 12 comes with a brand-new release curve, which, I believe, is the first new release curve since Ozone 6. It’s dubbed IRC5.
A bit of background on IRC5 Maximizer mode: this curve had its genesis in refining the special character of IRC2. Many engineers (myself included) found that IRC2 was a solid choice for bass-heavy material; predominant low end can often be what a limiter “sees” first, causing it to work harder than it would if the bass were tamped down. IRC2 could forgive a certain amount of low-end.
The engineers at iZotope analyzed the special sauce behind IRC2 and developed it into IRC5, and the results are spectacular. I can say that in my working life, it has become a default limiter choice. It’s my default setting in Ozone’s Maximizer.
IRC5 has an innate ability to preserve low-end material while also allowing a mix to maintain a certain amount of its dynamics at higher levels.
I can demonstrate this by using a text mix. The following song has way too much bass – I mixed it intentionally that way so I could have a reference of “too much bass”, and also, so I could test new limiters as they arise.
Observe what happens when I try to get this mix higher in level using IRC4:
We’re seeing up to 5 dB of gain reduction, with obvious distortion on the vocals at times.
Now watch what happens with IRC5:
It’s just as loud, but sounds clearer. Somehow we’re only getting a maximum reduction of 3.3 dB. In the Delta, we can hear that IRC5 doesn’t bite down into the vocal nearly as much.
Let’s take the phrase “find my way back home to you” with both modes and show off just how much cleaner IRC5 is in the following before/after video:
You can see the differences on the graph, and you can hear them with your ears.
Some limiters offer esoteric controls like transient shaping options, stereo linking controls, and other ways of helping your signal out at this final stage of the process.
Ozone’s Maximizer has a bevy of these controls. First, it has a soft clipper, which introduces a small amount of distortion that can boost the apparent level without messing with the actual limiting.
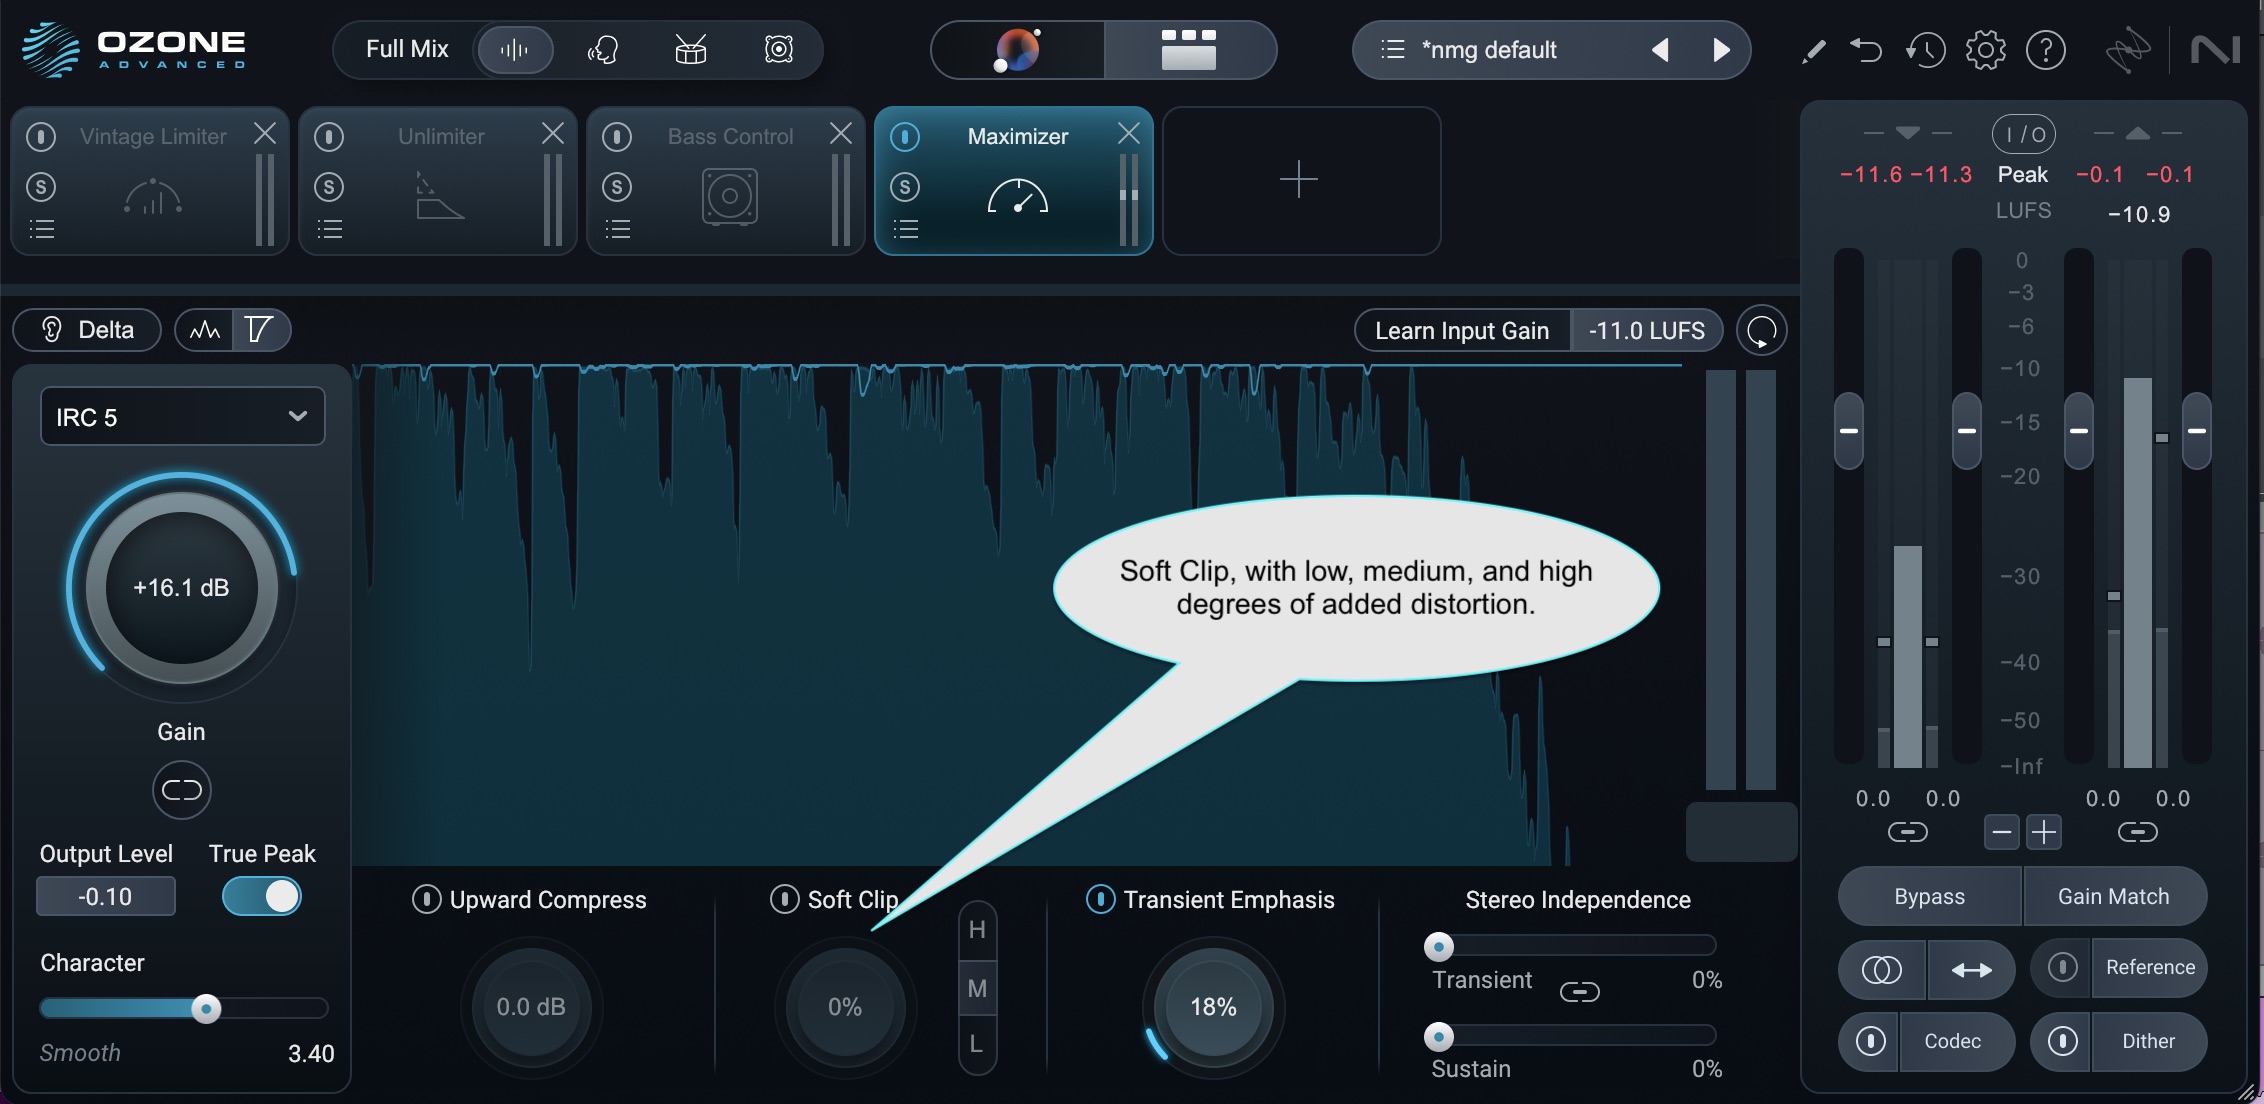
Soft Clip in Ozone Maximizer
It’s worth flipping back and forth into Delta mode when using this clipper. You’ll be able to hear the distortion it’s adding, and then judge whether or not this distortion is helping or hindering. Often this control is not needed, and when it is, I find a small amount (under 6%) is all you need.
Next, Ozone’s Maximizer has an Upwards Compress knob. This intelligent control can boost low-volume information in a way that, once again, shouldn’t interfere with transients. It can help lend a feeling of density to the master.
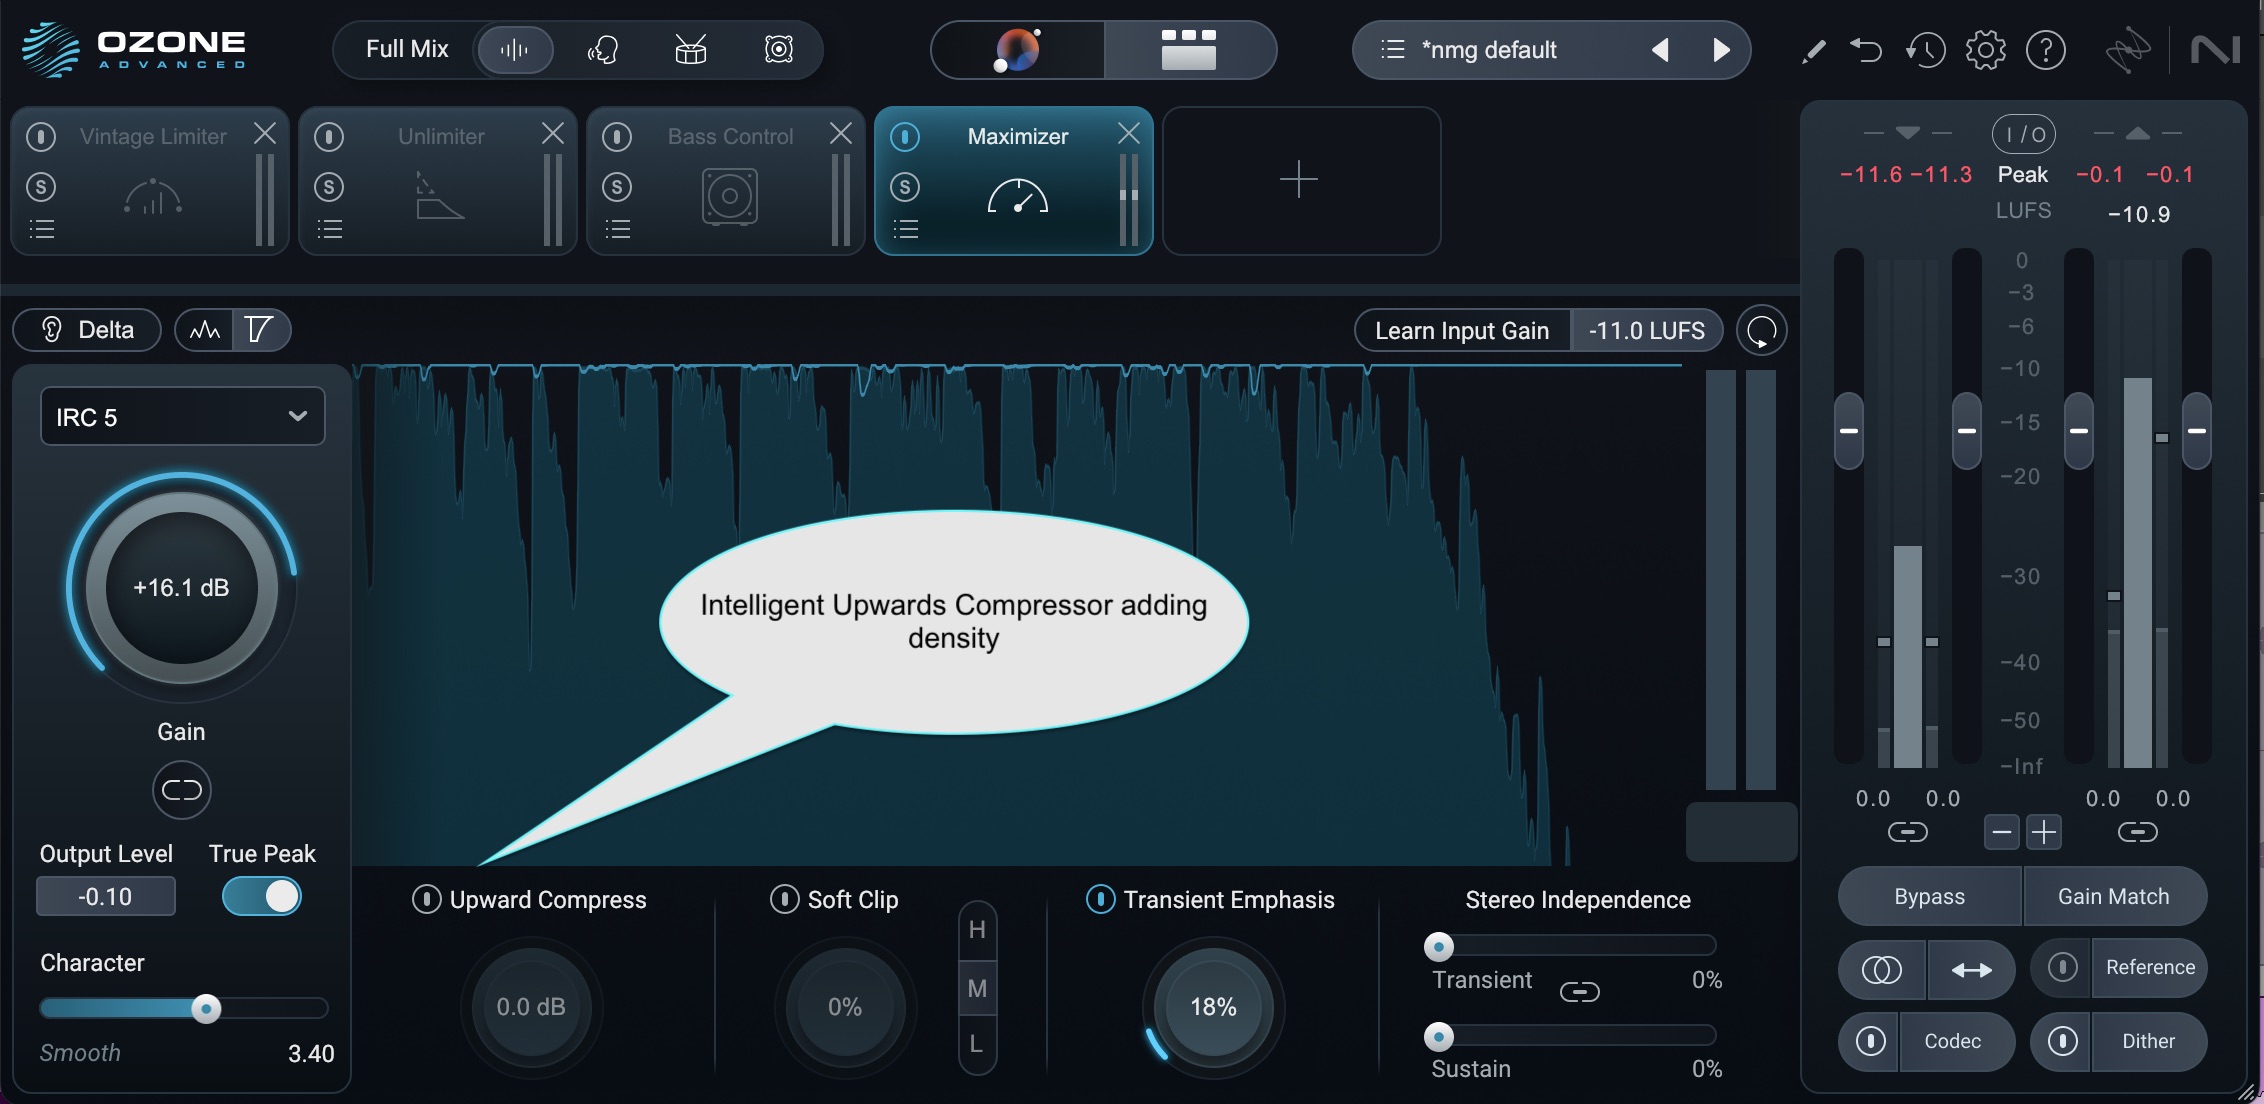
Upward Compress in Ozone Maximizer
Like the clipper, it should be used sparingly. Again, the Delta button helps in judging whether or not it’s helping.
Ozone’s Maximizer also offers two stereo linking controls: one that focuses on the transient portion of the signal, and another that centers on sustained material over time. At zero percent, the maximizer is linked, left and right channels will experience the same amount of limiting. At 100%, the limiter is completely unlinked, operating in dual-mono mode.
Definitely play with these controls: unlinking the limiting (to a degree) can really help preserve or even subtly enhance your stereo separation.
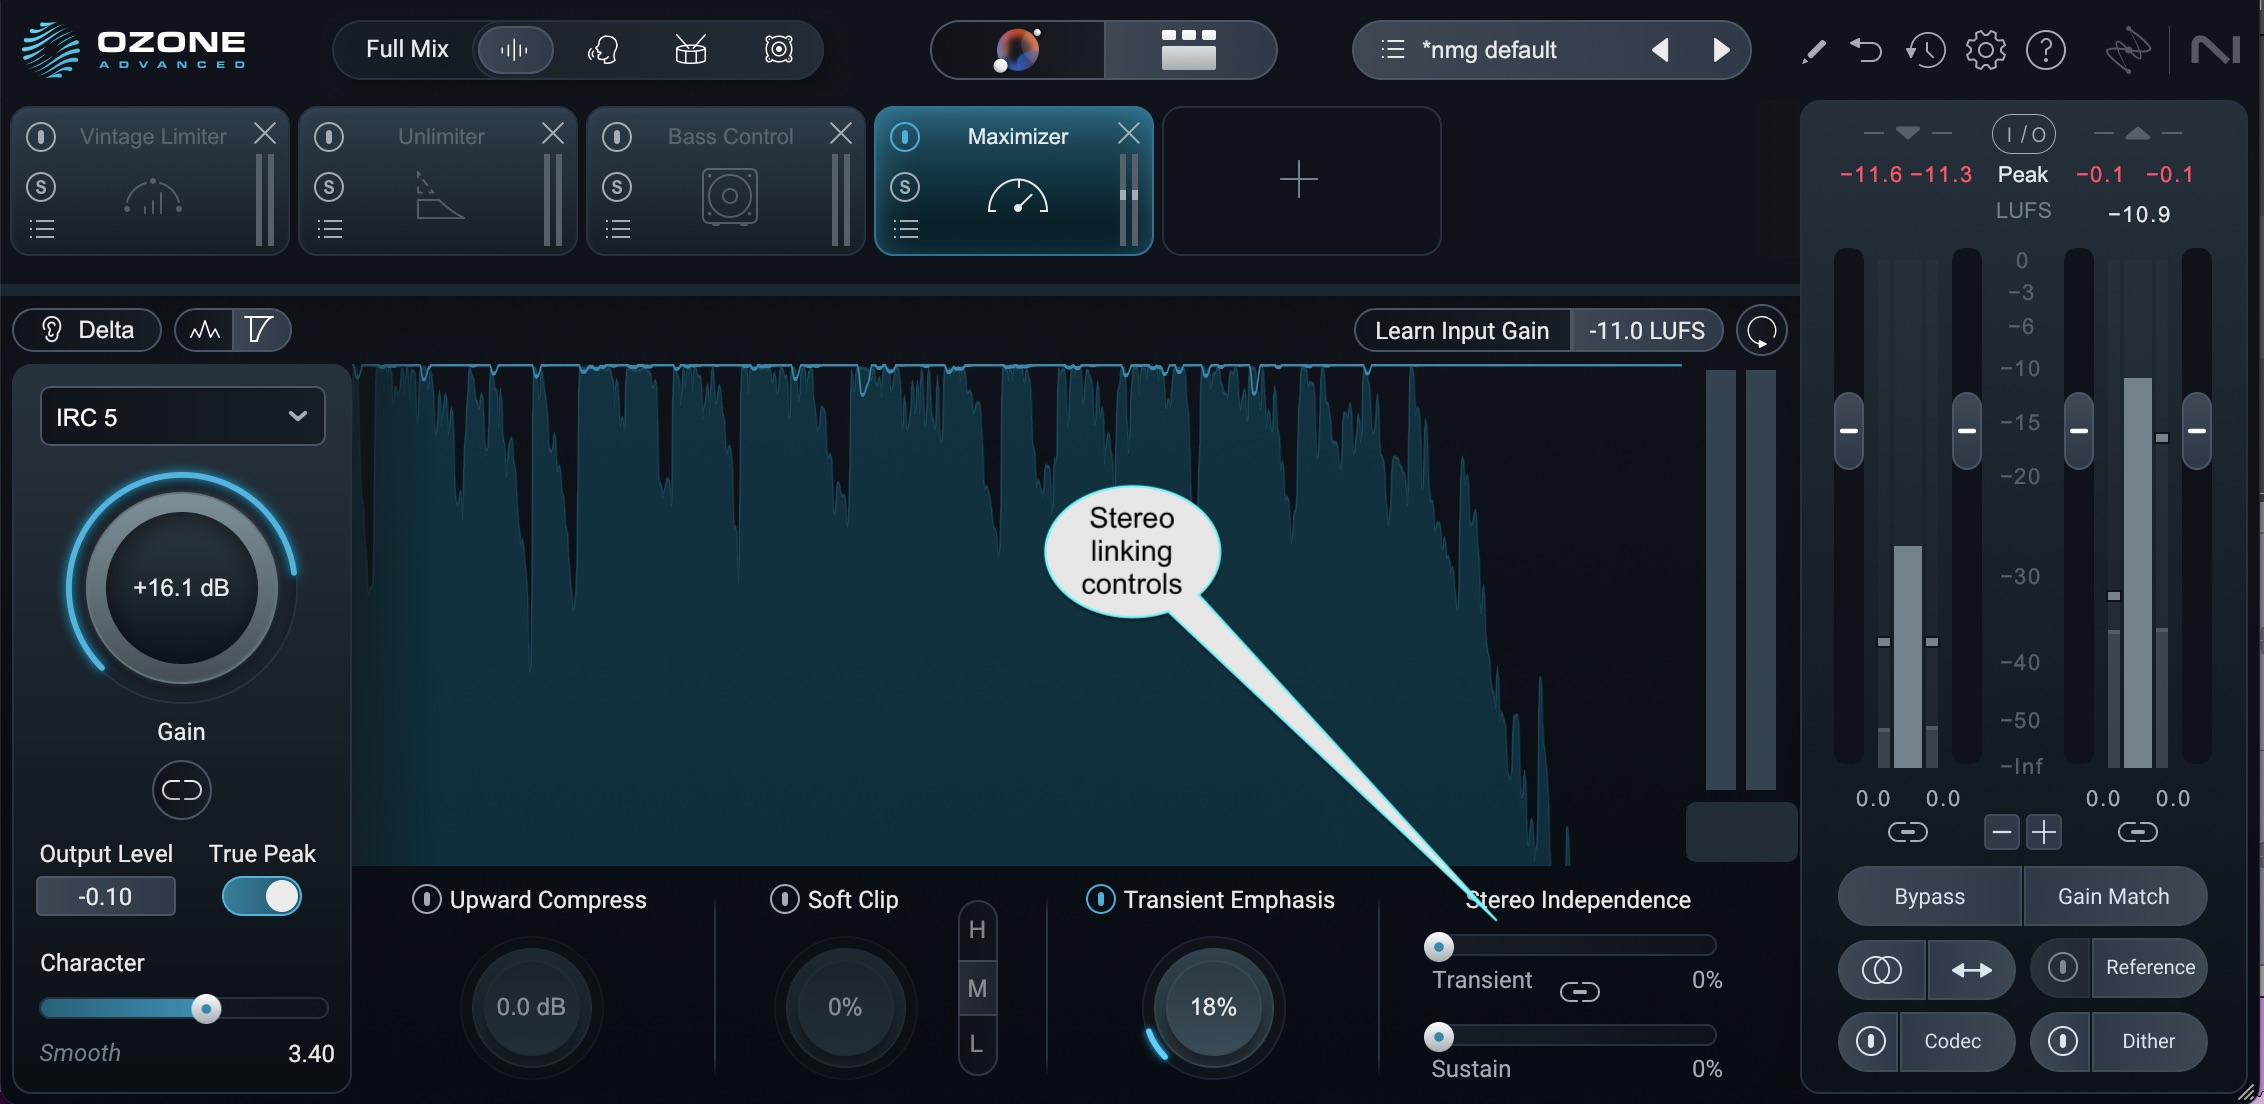
Stereo independence in Ozone Maximizer
You’ll also note the Transient Emphasis slider next to Stereo Independence, which applies transient preservation before the limiting stage. This feature has been with Ozone for many years and is similar to adding clipping distortion to the transient to make it stand out more. Again, use it sparingly.
How to hear the difference in 5 easy steps
Here’s a step-by-step guide for tuning your ears to the sonic specificities a limiter imparts on your mix or master. I usually go through some iteration of this process every time I demo a newly-released limiter.
1. Link the limiter’s input and output as you tweak
Many limiters allow you to link the input gain or threshold control with the output ceiling, so that as you push one, the other comes down in level. This way your ears won’t be fooled by a satisfying, yet deceitful, jump in loudness, and you can better judge the moment you’ve gone too far.
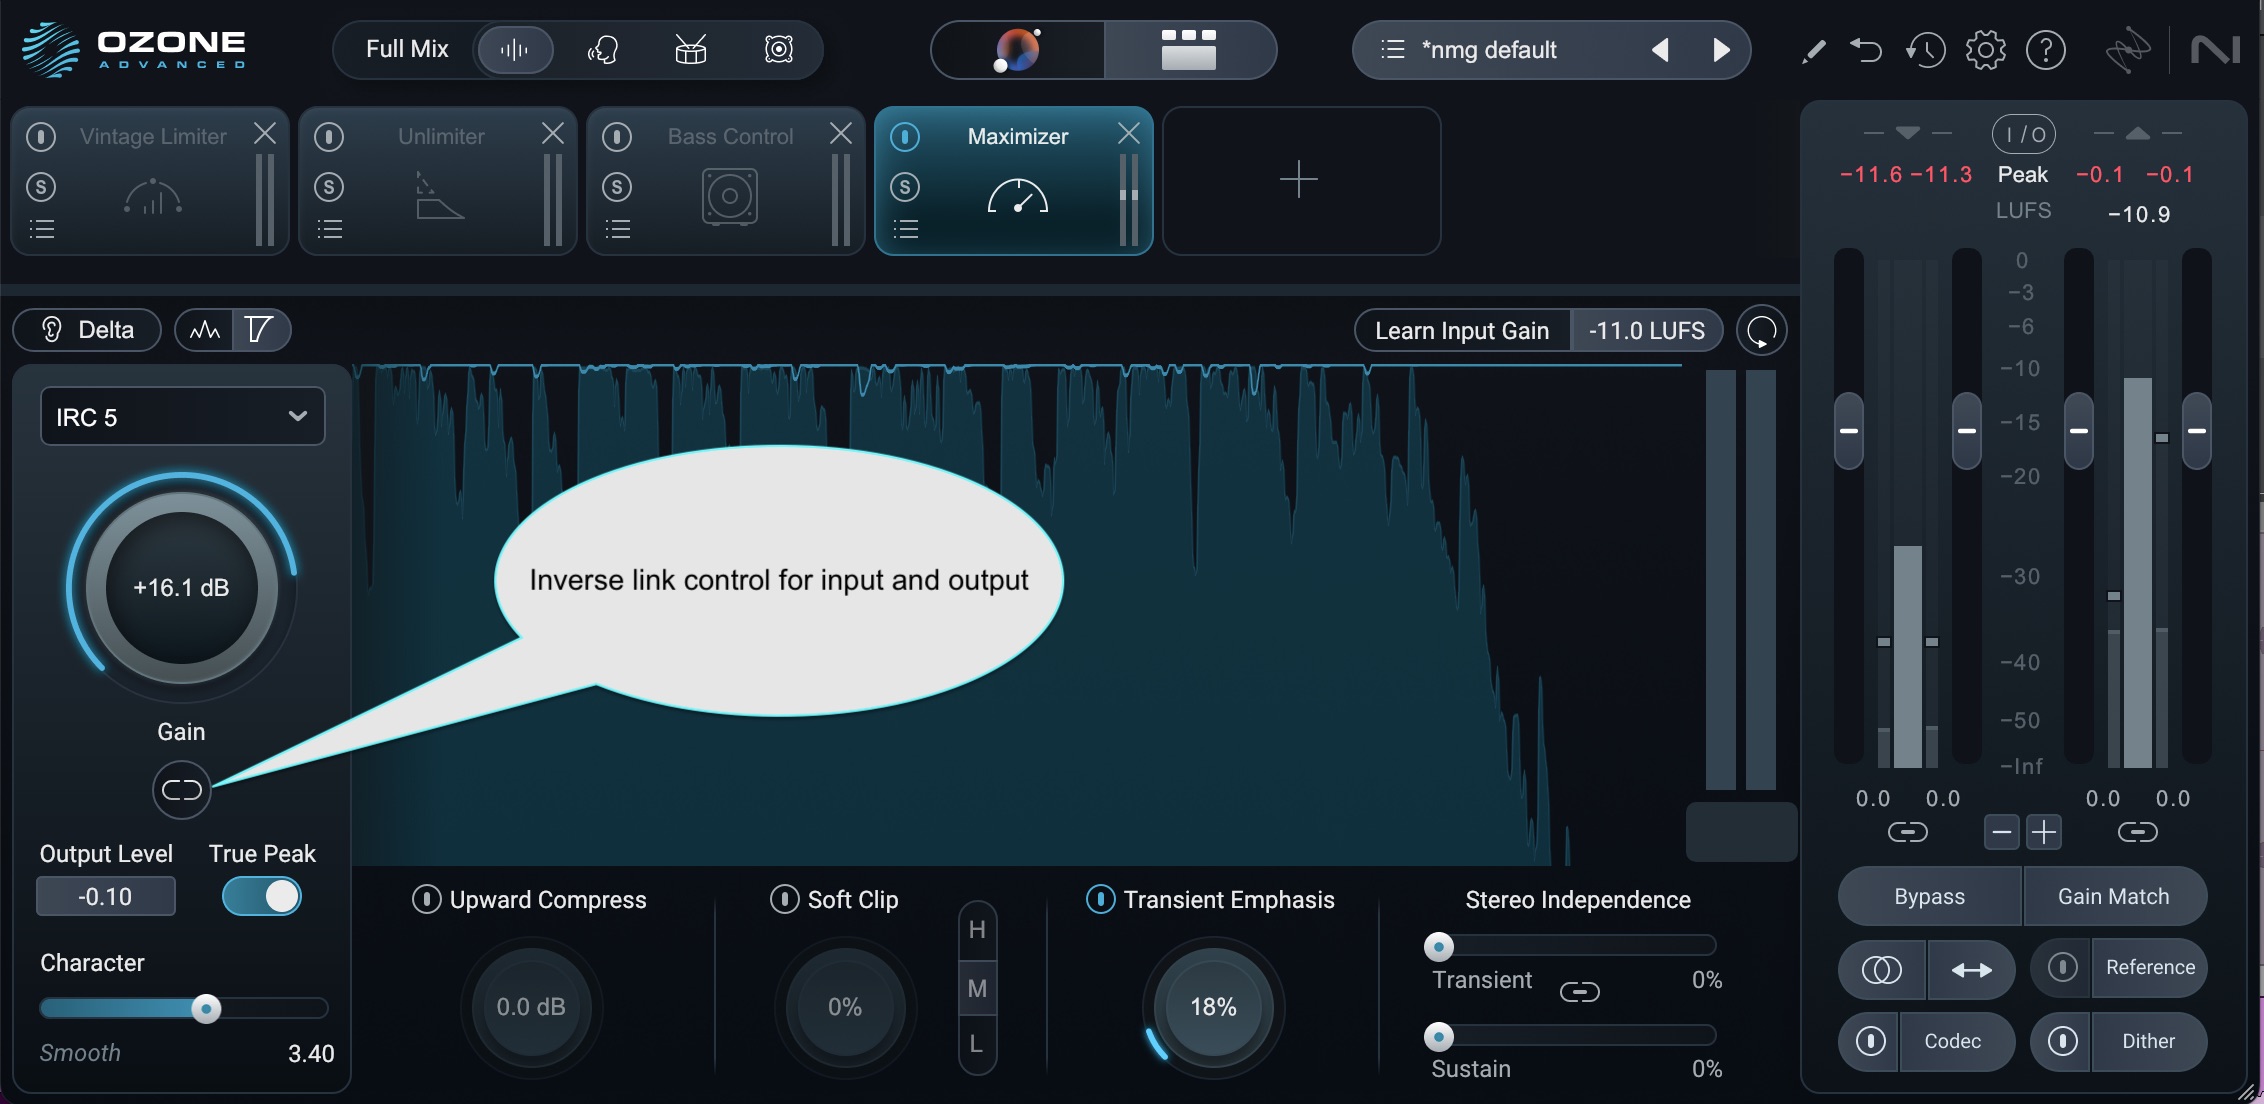
Inverse Link in Ozone Maximizer
Now that the input and output are linked, notice the output goes down in volume as you push the gain. The effect should be no change in loudness to your ear.
This makes it easier to identify distortion and over-limiting:
In this example, by adding 18.3 dB of input gain and up to 4 dB of limiting, we can definitely hear some distortion digging into the vocal. This is usually a sign that it’s time to stop.
That’s great. We know we can’t push this hard. We’ve gone beyond our sweet spot.
But what if you’re a beginner or you don’t know how to find the sweet spot by ear?
Read on to train your ears to the distortion.
2. A/B between gain-matched bypass and limited signal
Let’s back the limiter down 2 dB and do an A/B comparison with the original signal.
Compare the limited signal with its bypassed variant and listen for the differences in timbre.
Does the track feel narrower with the limiter on? Are the transients pillowy, softer, or otherwise altered? Does the groove of the whole piece seem different? Is everything now stagnant and lifeless with the limiter on? Does it feel farther away?
3. Hit the delta button
Ozone Maximizer now comes with a Delta button, which lets you solo the effects of the limiting. It’s very, very useful for teaching yourself to hear limiter distortion.
Let’s listen to the limited track and compare it with the Delta:
4. Go back to the A/B comparison
That’s right: go back to step two and compare the limited mix to its bypassed counterpart. Now that you’ve identified, heard, and internalized what the limiter is taking away, you should be able to hear the differences between the two more clearly.
Start moving parameters around and you’ll find you’re hearing what they’re doing. Less guesswork will go into tweaking the limiter’s time-constants and stereo interdependence options as your ear attunes itself to what the limiter is taking away.
5. Turn off gain link and set the ceiling you desire
Now all you have to do is uncheck the Gain Match button and reset the ceiling somewhere sensible. For this mix, I’m going to choose the following settings:
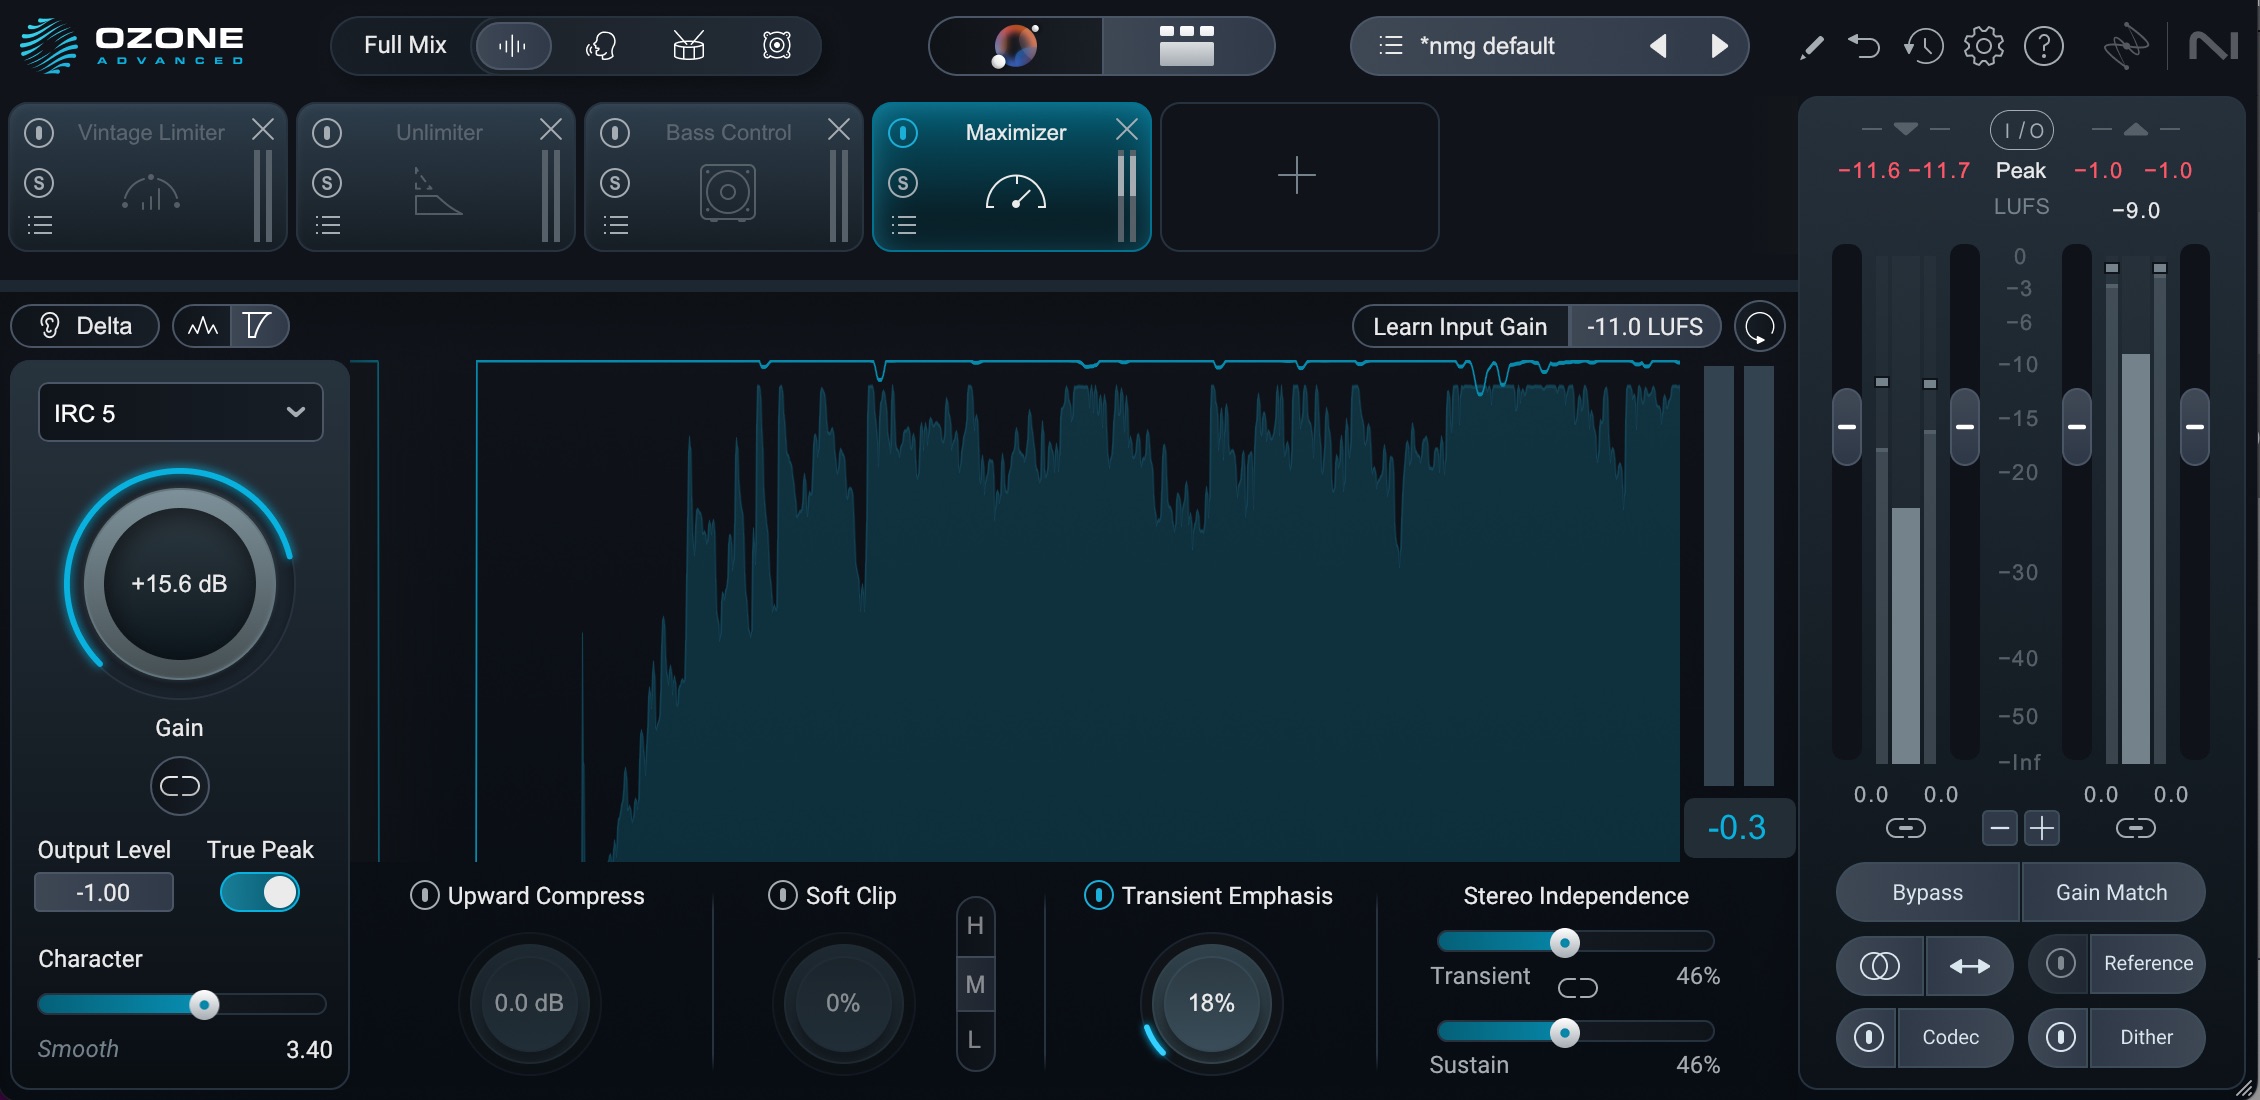
Maximizer settings in Ozone
This mix hasn’t been crushed too badly, and it’s giving a readout of -9.3 LUFS Integrated with a max short-term LUFS readout at -8.3 LU.
If I wanted it to be louder than that, I would have to employ creative tricks.
Some of these could be accomplished at the mix level, with limiting or clipping on the drum bus to shear off the kick and snare, as well as parallel compression to individual submixes to reduce their peaks without adding to their overall loudness. Saturation can also achieve this effect.
Be careful with clipping in mixing though, and make sure you’re doing it for tone rather than straight level control. The flat tops incurred by clipping end up like scars in the waveform, and any phase shift or mixing of signals down the line can undo any peak level benefits, leaving just the scars, or tone – often on the side of the waveform rather than the peak.
At the stereo bus level, your options are a bit more hamstrung and usually involve compromises to the mix. You could run into a clipper first, before the limiter, or you could run two limiters in series. Again though, proceed with caution if there will be a discrete mastering stage once the mix is finished, for the same reasons outlined above.
I frequently use iZotope’s Vintage Limiter running into its Maximizer if I want to try two limiters in series.
iZotope’s manual indicates that the Vintage Limiter models the characteristics of several famous analog limiters from the twentieth century. I prefer to think of these limiters as exhibiting a different kind of distortion characteristic to the Maximizer.
When extreme loudness is the name of the game, distortion is frequently unavoidable. The trick is figuring out the best distortion for the music at hand. The best distortion will be masked by the music, or add something pleasurable to the music.
The Vintage Limiter provides three modes that, when pushed to the right degree, offer their own kind of distortion. Again, the Delta button becomes very useful here: you listen to the distortion, and then the music, to see what works and what doesn’t.
In this experiment, I took a couple of minutes and deduced that the character of the modern limiter worked the best for this case.
Now, when I add one or two more dB of limiting with the Maximizer – also using the Delta to judge clipping distortion – I can get the material to a louder target than before:
This mix is now reaching -6.8 LUFS short term, and -7.9 LUFS integrated, and with only a dB of limiting shared between two limiters. To get this kind of readout with one limiter, I’d have to push for 3 or more decibels of gain reduction into the maximizer, resulting in heavy artifacts.
Unlimiter: a new feature in Ozone 12
Ozone 12 has a new module that bears talking about, especially if you’re a working mastering engineer. It’s called the Unlimiter, and it can be a lifesaver in very specific situations.
Quite frequently, you’re called upon to remaster material that has already been mastered. Maybe the label only has the 16-bit CD masters for re-release. Maybe the client lost the original mixes. Maybe the mix engineer mixed it into a limiter and couldn’t be bothered to turn it off.
Go ahead and try to remaster a song off its limited, 16-bit CD file. You’ll find, very quickly, that you run into diminishing returns: as soon as you do anything besides subtle, tone-shaping EQ movements, the mix will “feel” wrong. That’s because so many of the tools we use in mastering are dynamic, be they compressors or spectral processors. Changes in level allow these processors to work.
When a limiter is applied, much of the transient information is lost, or at least made ineffectual, in the detector circuits of these processors. So the compression, the spectral shaping, and the re-limiting just feel wrong. Even stereo widening feels wrong, because a good sense of the transients helps preserve width. We’ve lost all true transients here.
The Unlimiter, however, can restore these transients. It’s more than an upwards expander focusing on what “used” to be a transient – it’s a neural net that reconstructs the transient into shape based on what’s been left behind.
It’s one of the rare cases where machine learning – in this case, feeding an AI with thousands of mastered and unmastered tracks for direct comparisons – yields a tool that is actually useful for humans.
Observe it in action: I’ve got a mix that was mastered by a good mastering engineer in the pre-streaming era, when loudness was the main concern. The track runs hot – an integrated loudness of 7.6 LUFS with -6.7 in the short term.
Say I wanted to attempt a 10-year anniversary remaster, and say nothing but the 16-bit original masters remained. In this situation, the Unlimiter would be my first line of attack.
The Delta sounds an awful lot like the Delta of what we’d take away with a limiter – but in this case, the Delta shows us what we’re adding back: about 2.5 dB of transient material that sounds pretty good. I adjust the output down by 3 dB here, but I’d probably take it down further to give myself more headroom for a remaster – maybe 6 dB.
With the dynamics restored, I can now build myself a chain in Ozone 12 that will get me something I like. I’ll do it just like I outlined in this article, starting with the Maximizer first.
We’ve got one more dB of level out than before, but without the artifacts. It doesn’t sound worse than before.
Let’s see if we can use EQ to make it sound a bit rounder without sacrificing high end or presence.
I’ll arrive at an EQ like this.
Now we’ve reached a place where it’s rounder without being less bright, but we have some bass bloat. Let’s see if a little compression can help us there.
A little multiband compression on the mid channel between 56 and 166 Hz is doing a good job of reigning in the bass. Compared to the original, we’re in a good place. We can easily call it a day.
It’s your turn to experiment with limiters
Limiters are getting better all the time. Ozone, for instance, employs assistive tech which intelligently sets your limiter, and goes farther by placing a dynamic equalizer before the limiter which helps achieve an even more transparent operation.
As limiters are changing all the time, it’s important to understand their basic functions and how you can use them in mixing and mastering to get the most out of your audio.