
Reverb can be a desirable characteristic, adding emotion and ethereal qualities to a recording. But what happens when reverb makes a recording sound unfocused or is a distraction? Is it possible to remove reverb from a recording? The good news is that reverb can usually be dampened or removed entirely from a recording in post-production, giving you more flexibility when you mix.
Let’s take a look at what causes reverb so you can avoid it in your recordings and what to do when you need to remove it after the fact.
Follow along with iZotope RX , a powerful audio repair and background noise removal tool for your audio productions.
What is reverb?
Reverb, or reverberation, is almost always added in post production to give a track a sense of space. Reverb helps us imagine the space in which a sound is made and the texture of that room. More reverb tells our brains that the sound was made in a bigger, more reflective room.
If reverb is often added in post production, why not have it present in the original recording? For some recordings like classical music recorded in a great-sounding room, there’s no issue. However if you’re collaborating with another artist and their recording environment is very different than yours, the different reverbs are confusing for the listener, making it hard to imagine the performers in the same room. There are also some recording situations like audiobooks or podcasts where being able to hear the room reflections is not appropriate so reverb is removed when it’s present.
What causes reverb in audio?
Reverb happens when sound waves bounce all over the walls and surfaces of a room and blend together to create a sound that is more sustained than the original sound. It’s the sonic difference between singing in a church hall and your bedroom closet. Parallel walls and floors made of hard, non-porous materials such as stone, treated wood, and laminate allow soundwaves to bounce around quite a bit before running out of energy. Recording in an environment like that will result in the reverb being baked into the recording.
If it’s a great-sounding room it might not be much of a problem. However, if you’re wanting to add or change the reverb later on, you’ll want to dampen the reverb or remove it before adding your own in the mix.
How to reduce reverb in audio
Here is a recording I did in the lobby of my recording studio. This room is the most reverberant in the building and I actually quite like the sound of it so I use it as an echo chamber. However, we are going to remove the reverb from my voice over recording to demonstrate. Here is the original recording.
1. Open RX De-reverb
This process is actually super simple. I’m using the RX De-reverb module as an Audiosuite plugin in Pro Tools but this can be done using RX Connect and other DAWs as well.
Open De-reverb and click Learn to have it listen to the audio that has the reverb you’d like to remove. It will analyze the reverb characteristics like length of tail and color of the reverb (more on that below) and give you a starting point that you can refine.
There are a couple of presets you can use as well to either enhance the dry or non-reverberant signal, or you can even enhance the reverb that’s there if you want to hear even more or it in your track.
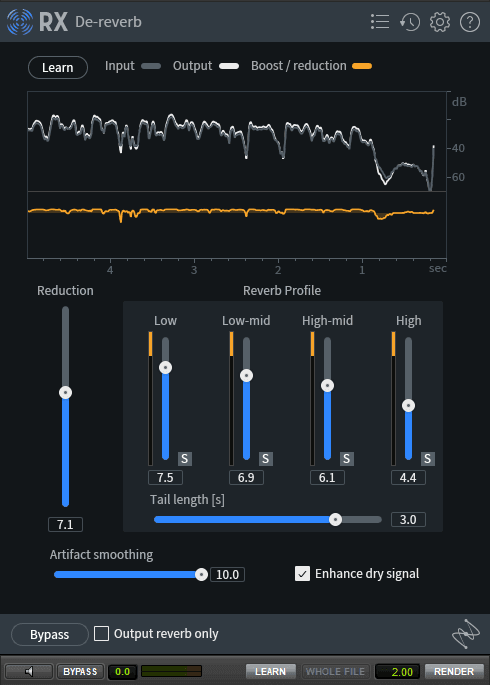
RX De-reverb learns the reverb characteristics that are present in a recording
2. Identify the characteristics of the reverb
Depending on the size, shape, and texture of the walls in the room, different frequencies will respond in different ways. This is the color or tone of the reverb. Is it full of dark-sounding low frequencies or is it a brighter sound?
For example, in the room I used, the frequencies that were most prominent in the reverb were lower in pitch so I turned up the sliders for the Low and Low-mid frequencies to specifically target those areas more aggressively. I also listened to the length of the reverb, or tail, to dial in the De-reverb Tail Length control. This control is a measure of time, so if your reverb lasts about three seconds after the original signal has died down, set the Tail Length to about three seconds.
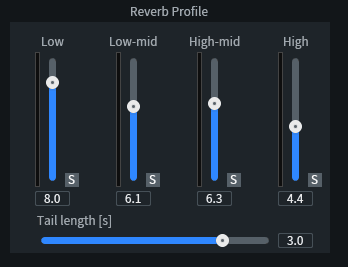
De-reverb allows you to target the different frequencies of the reverb
3. Dial in the amount of reduction
Now that you have customized how De-reverb should remove the reverb, you can dial in how much reduction you want. Pulling the Reduction slider up applies more reduction but can introduce artifacts if you overdo it.
I usually pull the slider up until I hear a little weirdness begin to happen, then lower it just a bit so that I get maximum reduction without artifacts.
Like most denoising processes, doing a little bit of reverb reduction in multiple passes is more transparent than doing one pass with the settings maxed out. Here is what the vocal recording sounds like after De-reverb.
Voice with RX De-reverb
For more on cleaning up audio in a transparent way, check out our guides on How to Clean Up Audio and Remove Background Noise and How to Remove Background Noise from Dialogue Recordings.
Start reducing problematic reverb in your audio
Now that you know what reverb is, what causes it, and some of the characteristics that make up the reverb we hear, you can tailor your approach to remove reverb in a transparent way.
Demo RX for free to start cleaning up your audio.