Ultimate Drum Compression Guide
Learn how to apply compression on drums in this complete drum compression guide. Discover the best compression settings for drums, how to use parallel compression, drum sidechain compression techniques, and more.
Drums are the backbone of any great song, providing the rhythmic foundation that drives the music forward. However, capturing the perfect drum sound is no easy feat, and often requires a variety of tools and techniques to achieve.
One of the most important tools in a mixer's arsenal is compression, which can help to control the dynamic range of the drum kit, add sustain or punch to individual hits, and bring out the subtle nuances of the performance.
Let’s learn about drum compression. By the end of the article, you’ll know how to use compression techniques like parallel compression, sidechain compression, and more on your drums in the mix.
Follow along with iZotope


Neutron
Do you need compression on drums?
Drums don’t automatically require compression. Assuming otherwise would miss the point of what compressing drums actually gets you.
It would also negate any consideration of the recording process: if the engineer compressed the heck out of the drums while capturing them, you better know your reasons for adding even more compression!
So, it behooves us to look at why we add compression to drum tracks and drum submixes.
Reasons to add compression to drums
Here’s a list of reasons we might compress drums:
- To even out the dynamic variances of an inferior drummer
- To change or reinforce the groove of the song as a whole
- To add punch to a drum or group of drums
- To add a sense of cohesion (aka glue)
- To sink certain elements further back in the mix
- To add a certain recognizable tone or character to the drums
We’ll be referring back to this list as we go over each individual drum. But first, you have to take care of some basic things before compressing your drums.
How to use compression on drums
1. Clean up what isn’t needed
Compressing a drum recording tends to shine a light on every element of that recording. Take a snare drum, like this one.
There is so much bleed in this track, so much prevalent kick and cymbal information. Compression will bring these elements to the forefront, and we’ll risk losing control of our overall drum sound rather quickly: if you’ve ever found yourself wondering why your drums don’t sound right after a long day of mixing, this issue could be the culprit.
So, treating the drum with gating, expansion, or manual editing before compression is frequently a good idea.
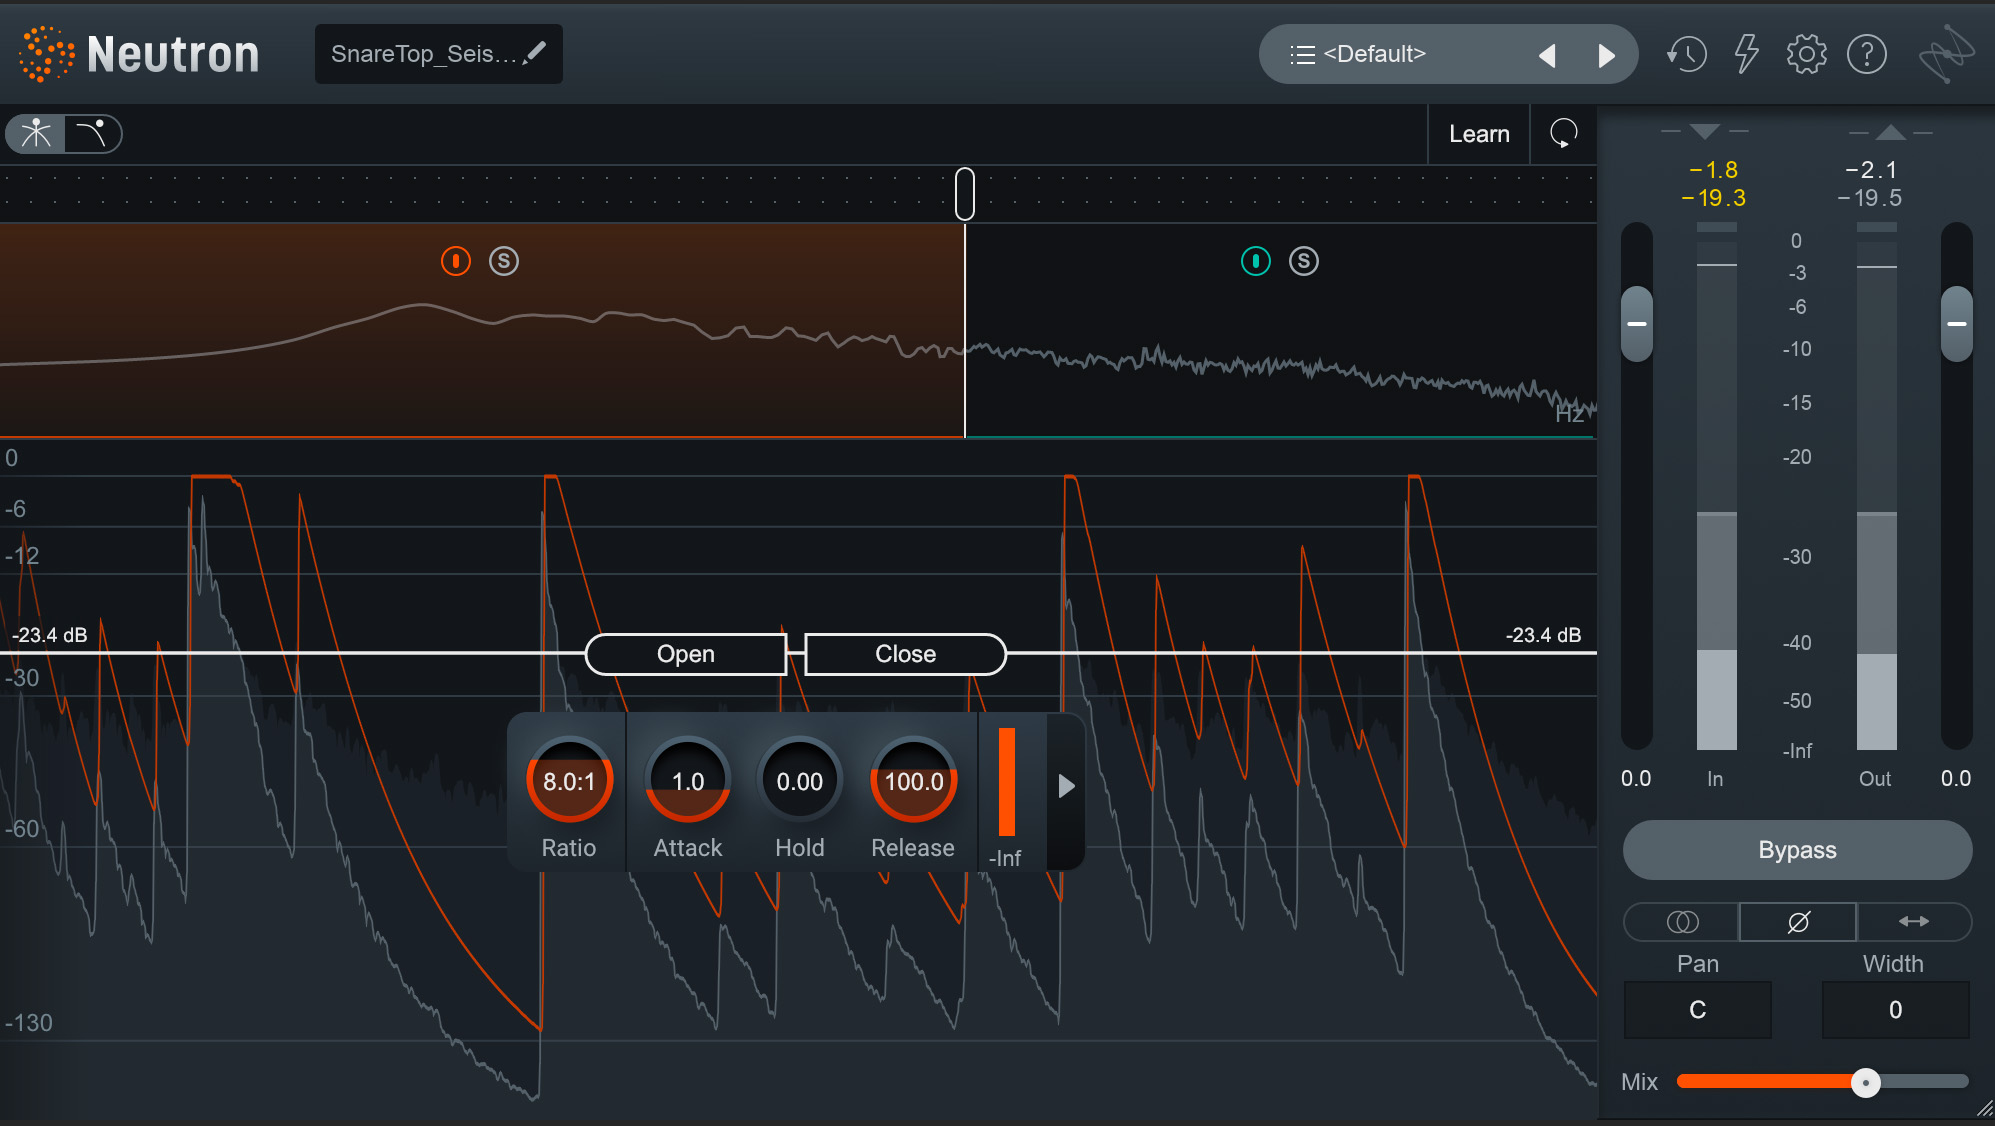
Using a multiband gate on the snare drum to tamp hi-hat bleed in Neutron
Snare Drum Before & After Multiband Gate
This is a multiband gate helping to chomp down on hi-hat bleed. Note the position of the Mix control: you don’t need to cut out everything that isn’t important. You just want to tamp it down so it doesn’t take up as much focus.
If you want a more old-school approach to gating, the downwards expander in bx_console SSL 4000 G or bx_console SSL 9000 J from Plugin Alliance also works well for the job.
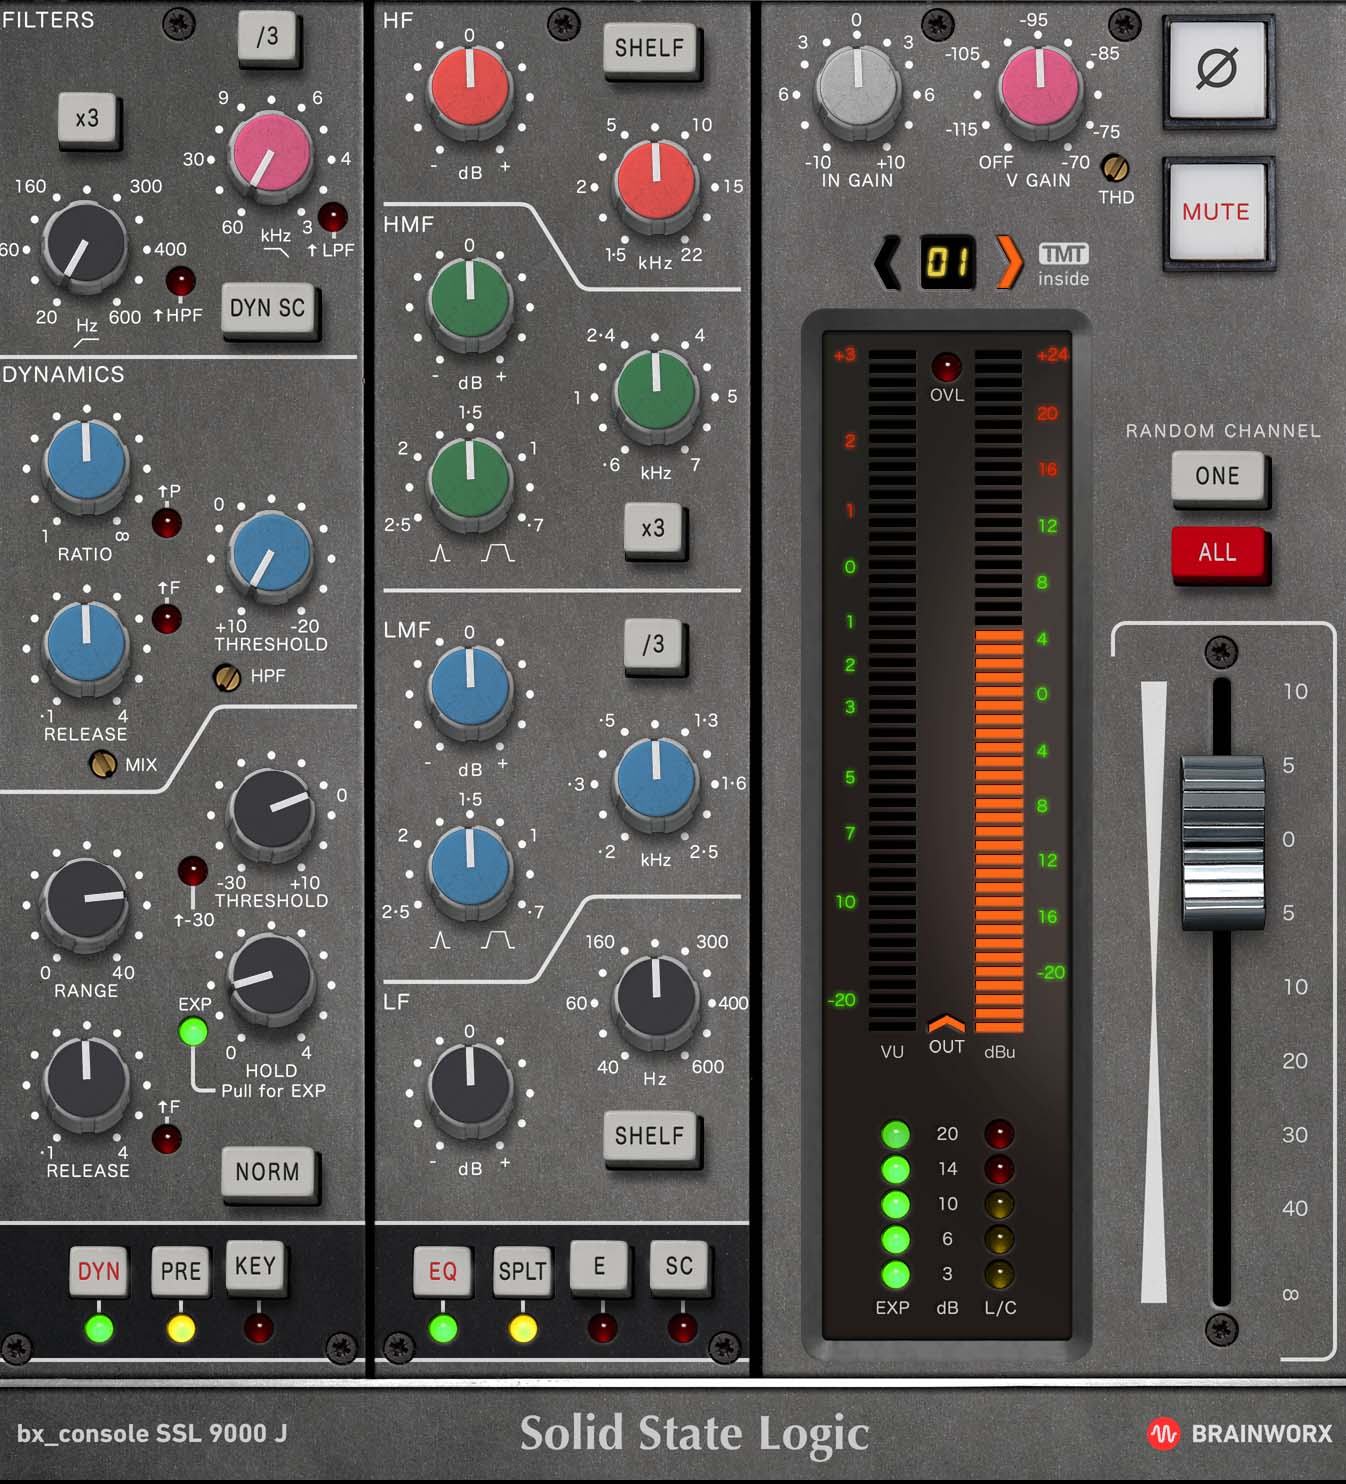
bx_console 9000 J Expander
Snare Drum Before & After Downwards Expander
You can also clean up audio simply by cutting out regions you don’t need. Maybe there’s only a handful of tom fills in a song, like so.
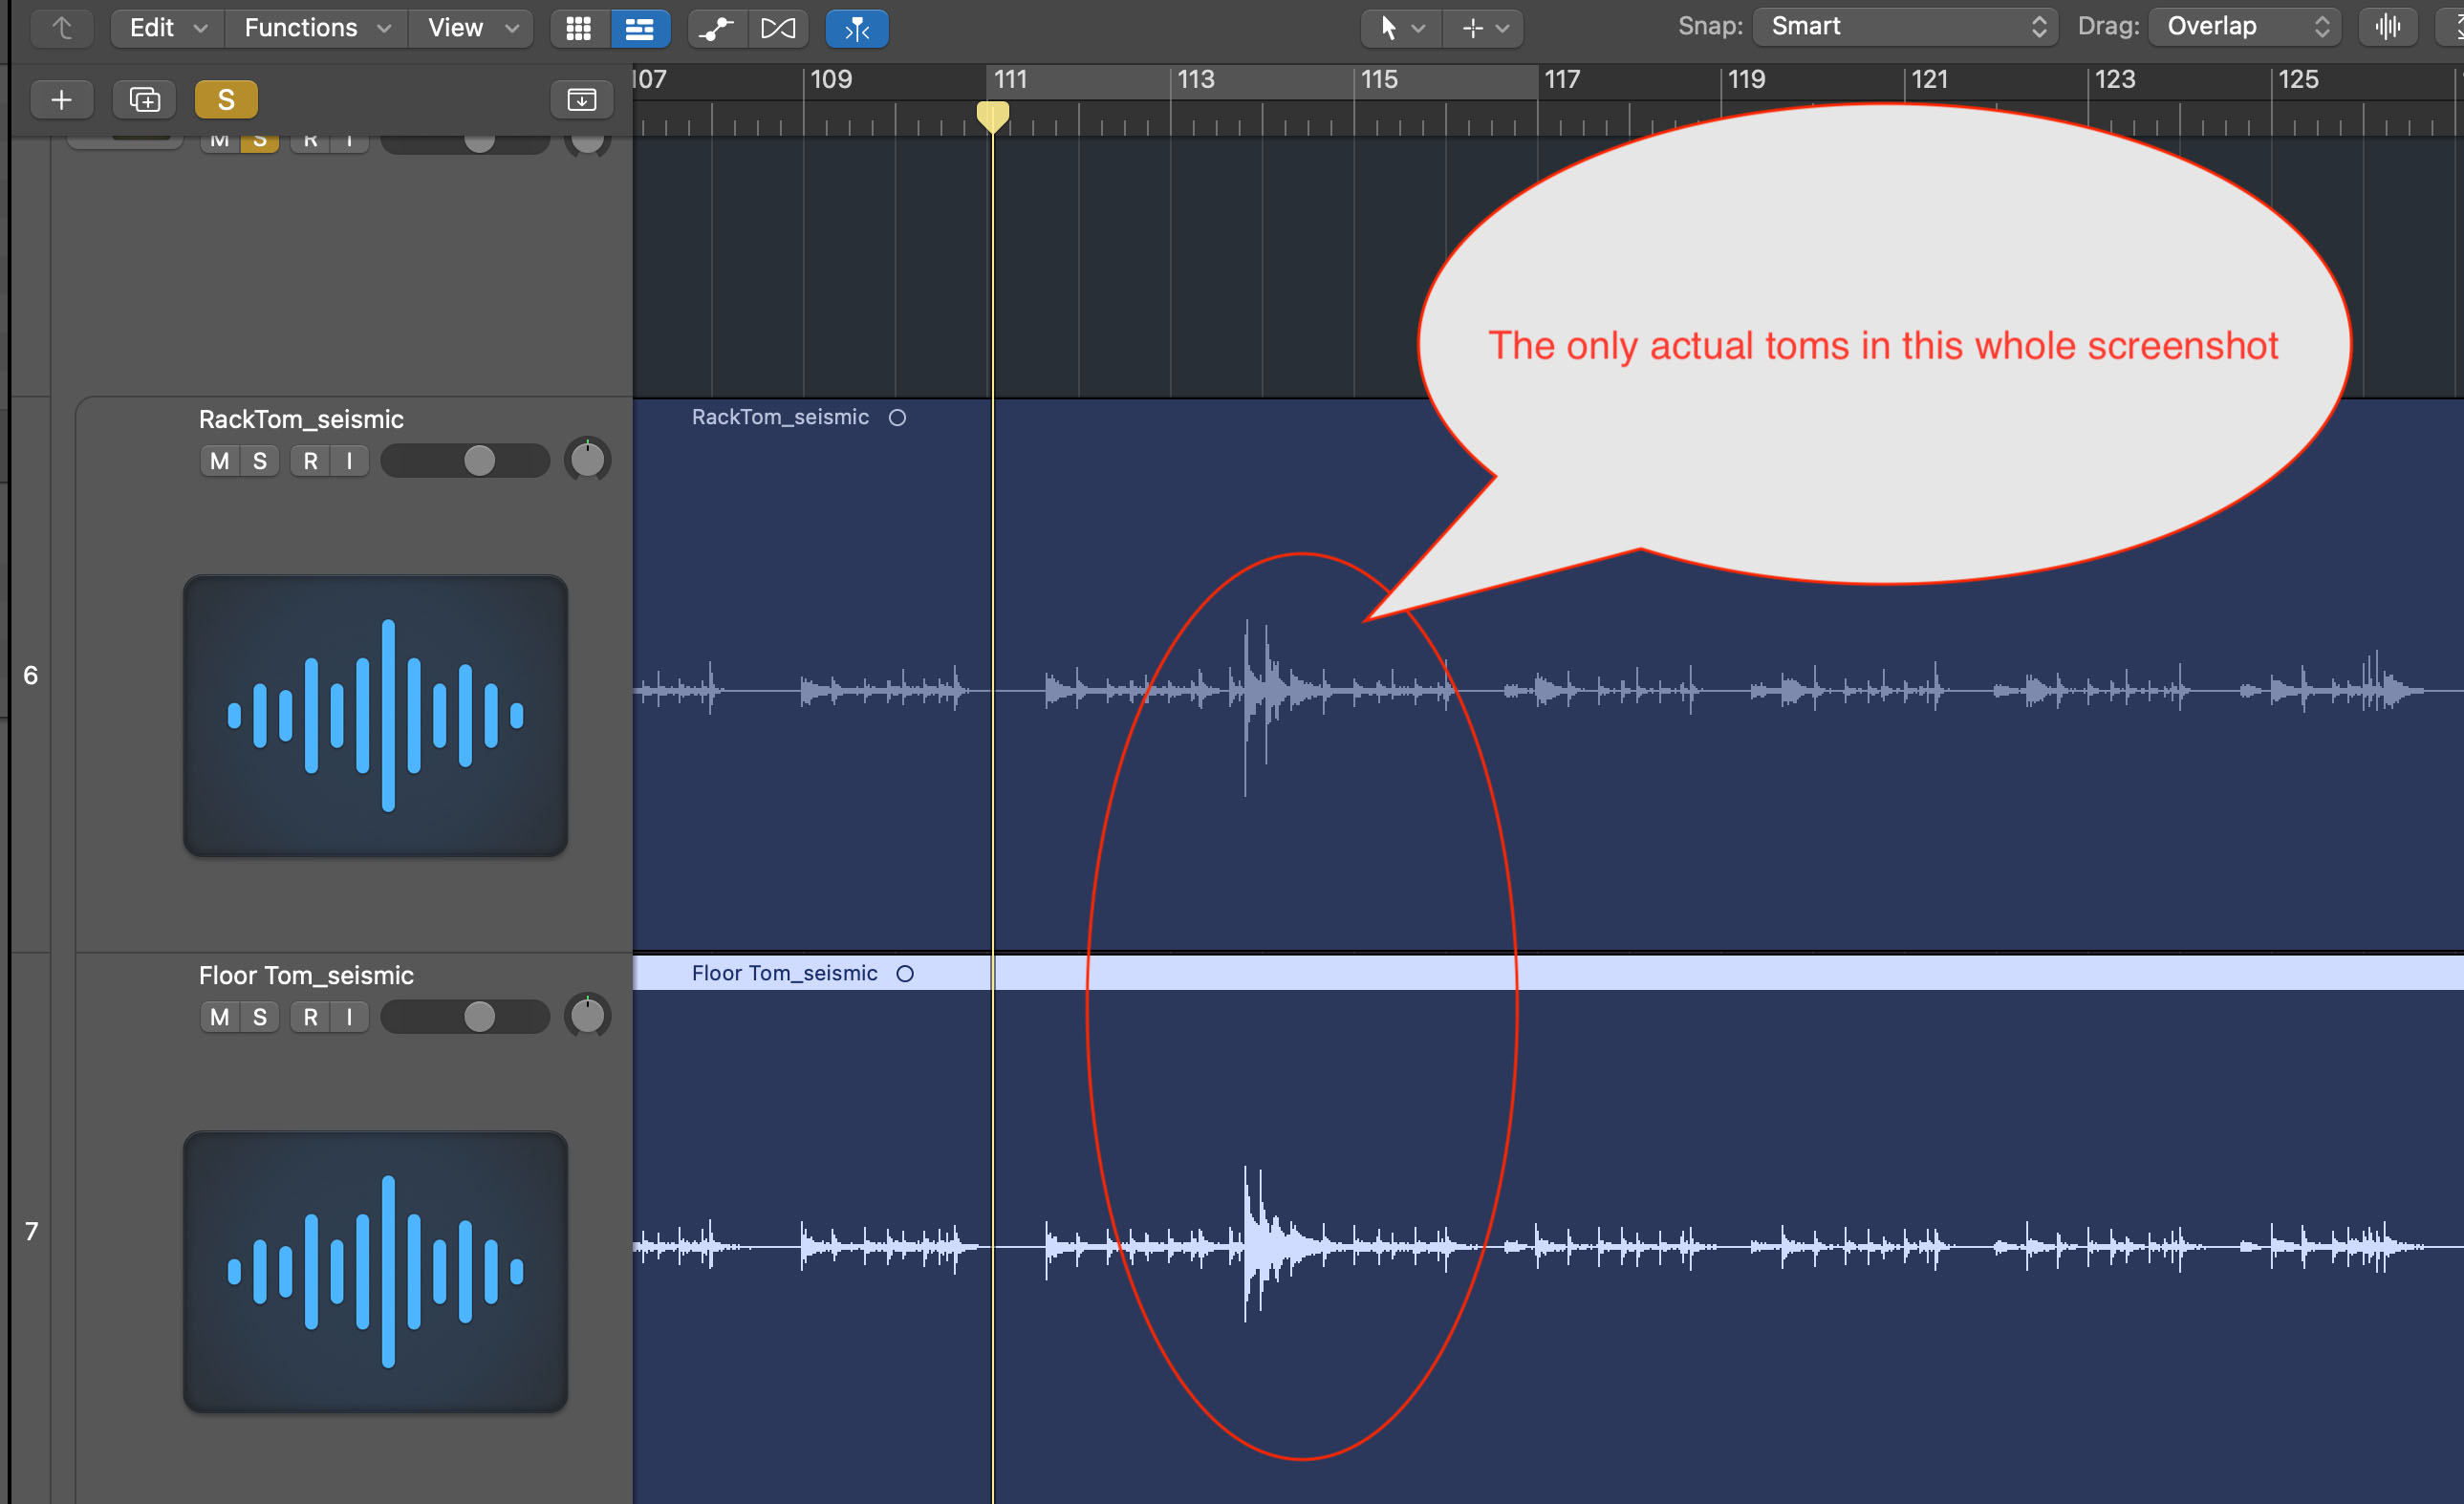
Waveform of the toms in the mix
You can simply cut out what you don’t need around the tom fills.
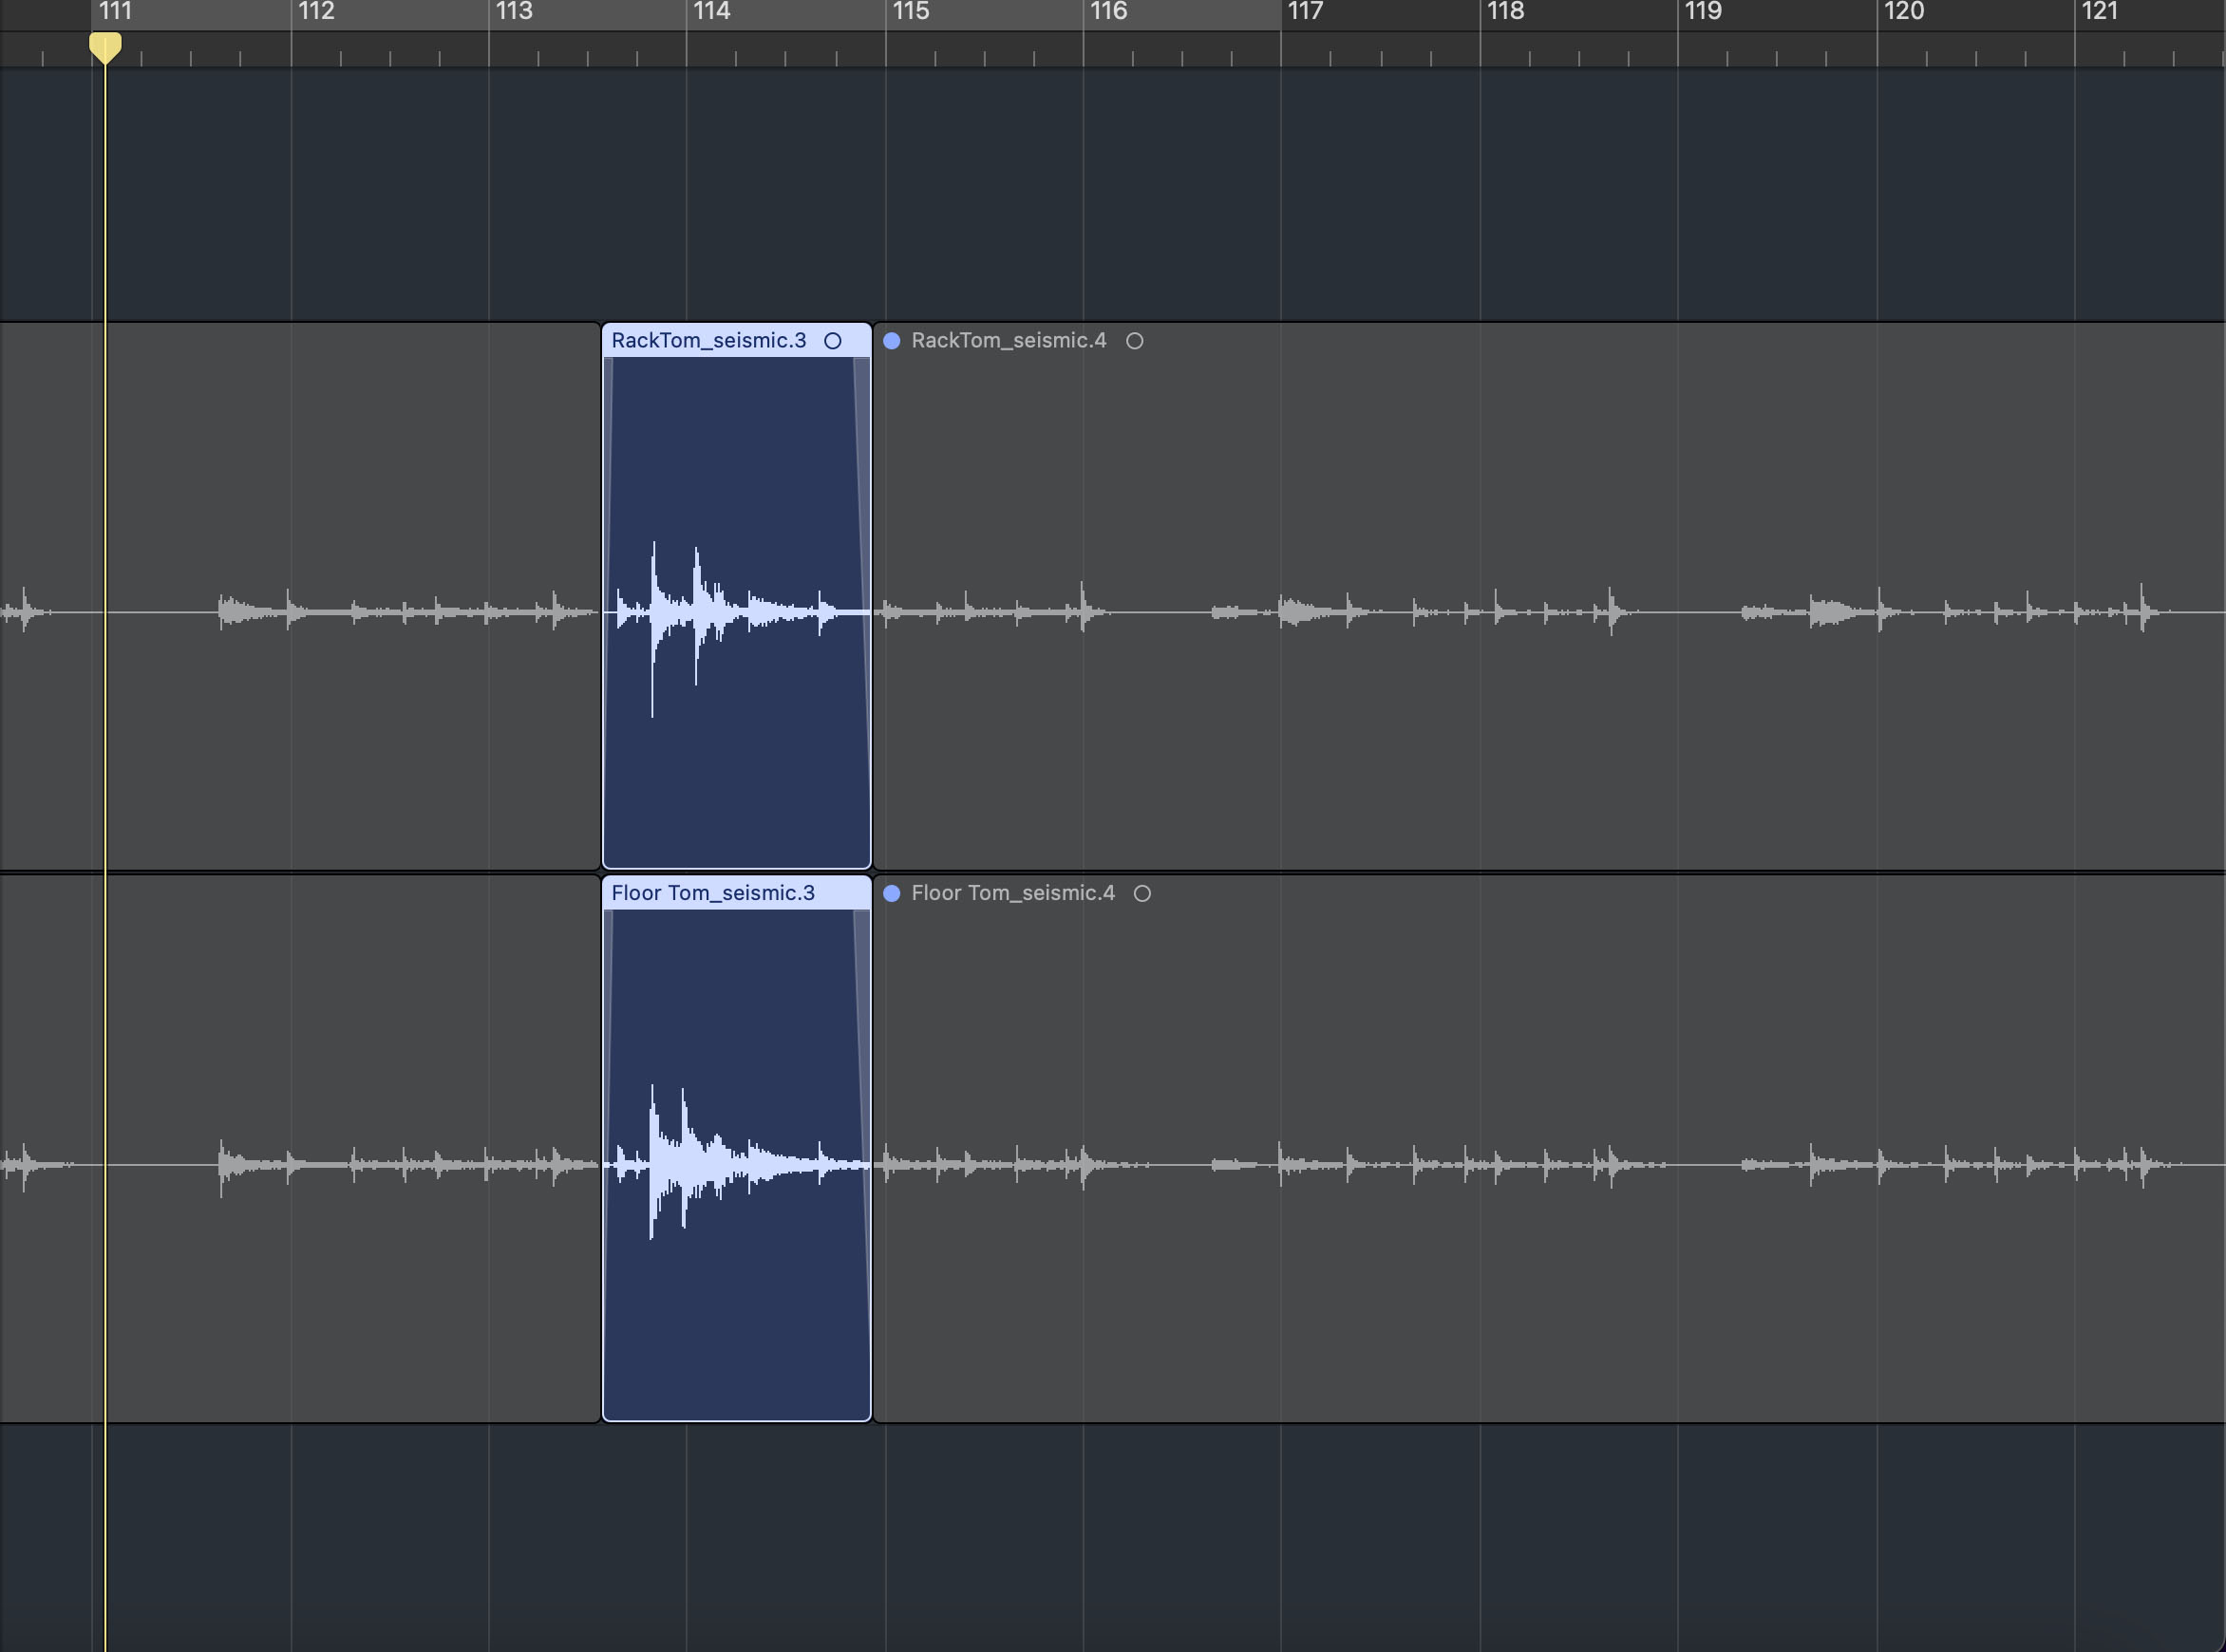
Cut out the unneeded noise from the toms
With clean-up accomplished, it’s time to concentrate on compression of individual drums.
2. Drum compression settings for individual instruments
Kick, snare, toms, high hat, overhead mics, and room mics—these are your most common recorded drum elements.
Now, remember, there are no hard and fast rules. But it’s often a good idea to address compression needs on an individual basis before going to the bus.
The majority of this article will be spent in this section, going over each individual drum piece, listing reasons to compress, and offering compression solutions.
Before anything else: if you have multiple mics on the kick drum, route them to a bus so you can process all the tracks at the same time. This helps mitigate any phase issues!
Kick compression settings
Compressing the kick to even out dynamic variances
Sometimes a drummer isn’t as strong with their feet as they are with their hands. The kick suffers, feeling sloppy and uneven.
In this case, you can start with compression on the kick drum that has a medium attack, a medium release, and a moderate ratio. Try a threshold low enough to cut into every drum hit, but not so low that gain-reduction continues into the next hit. Again, this is a guideline that should be ignored if it doesn’t work, but something like this could be a useful starting point:
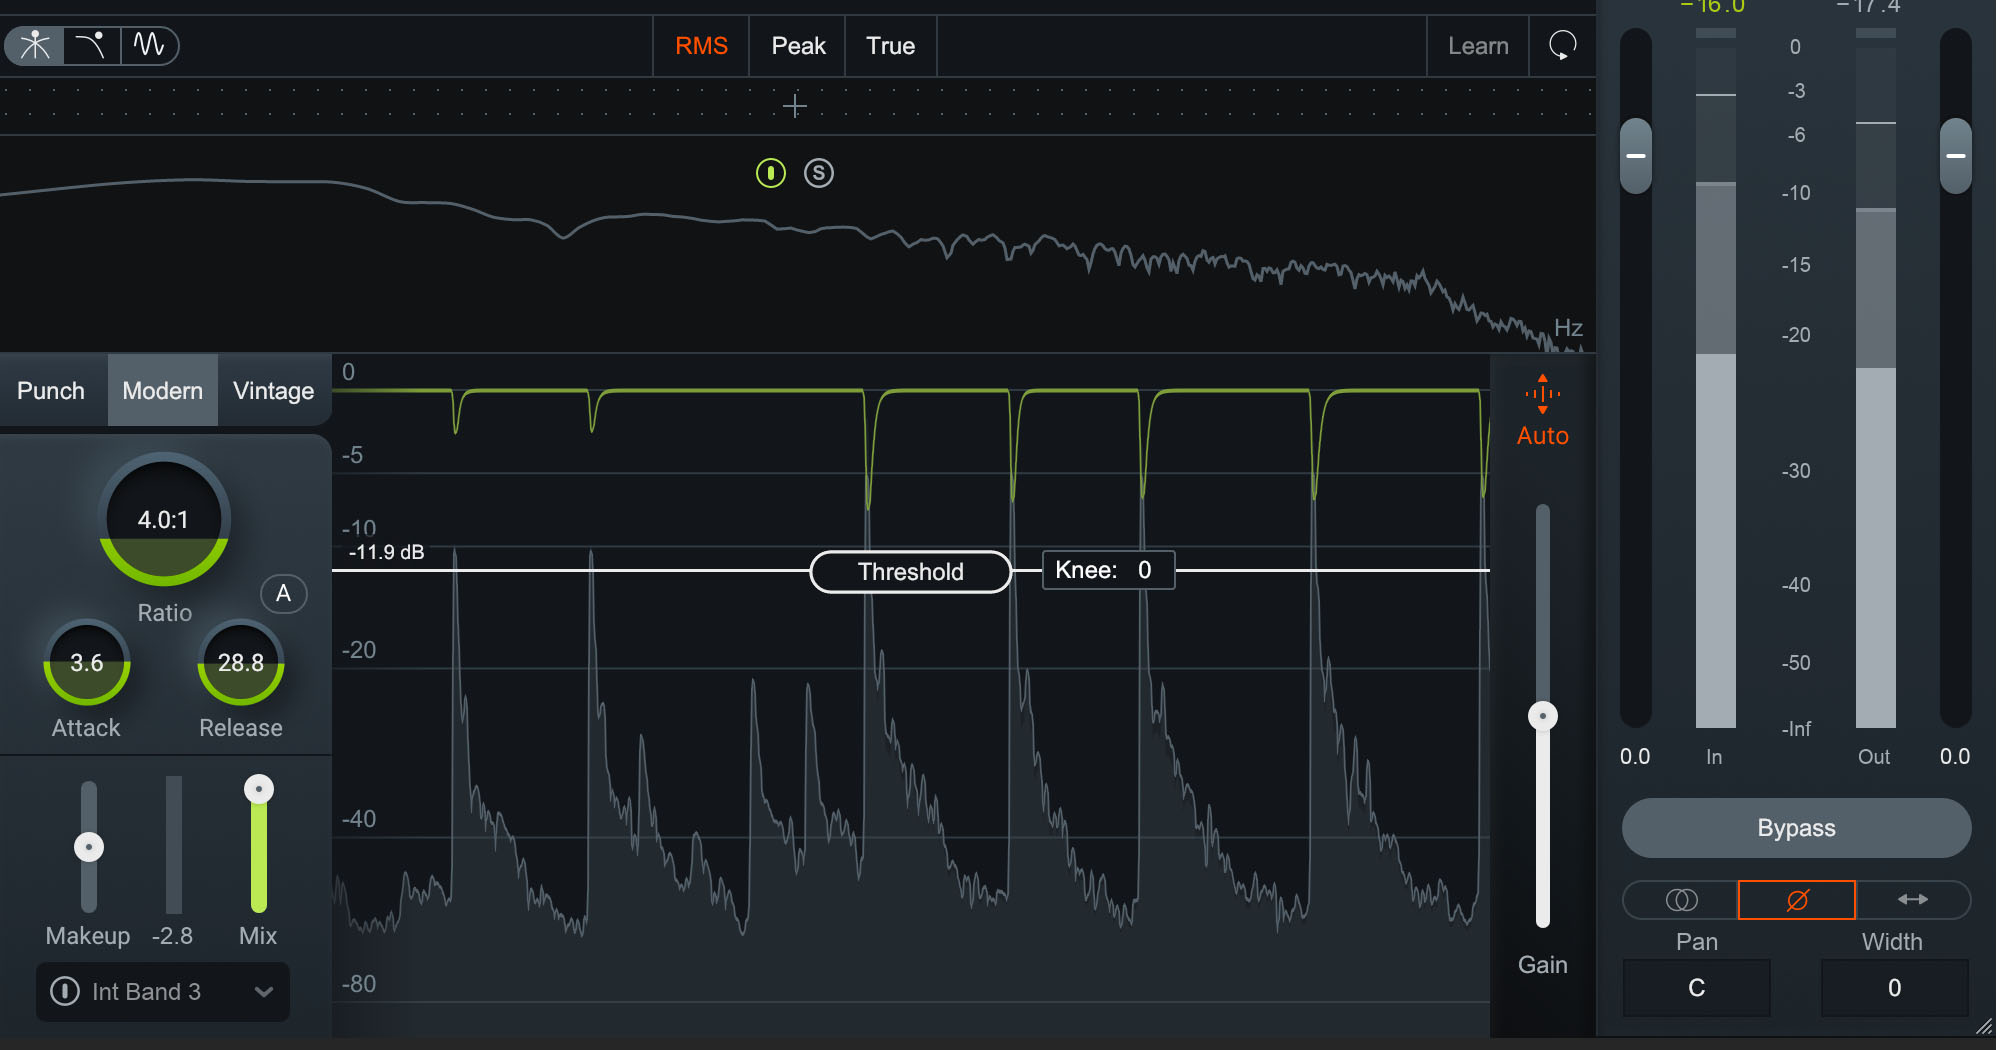
Using compression on the kick to even out dynamic variance with Neutron
Add punch to your kick drum
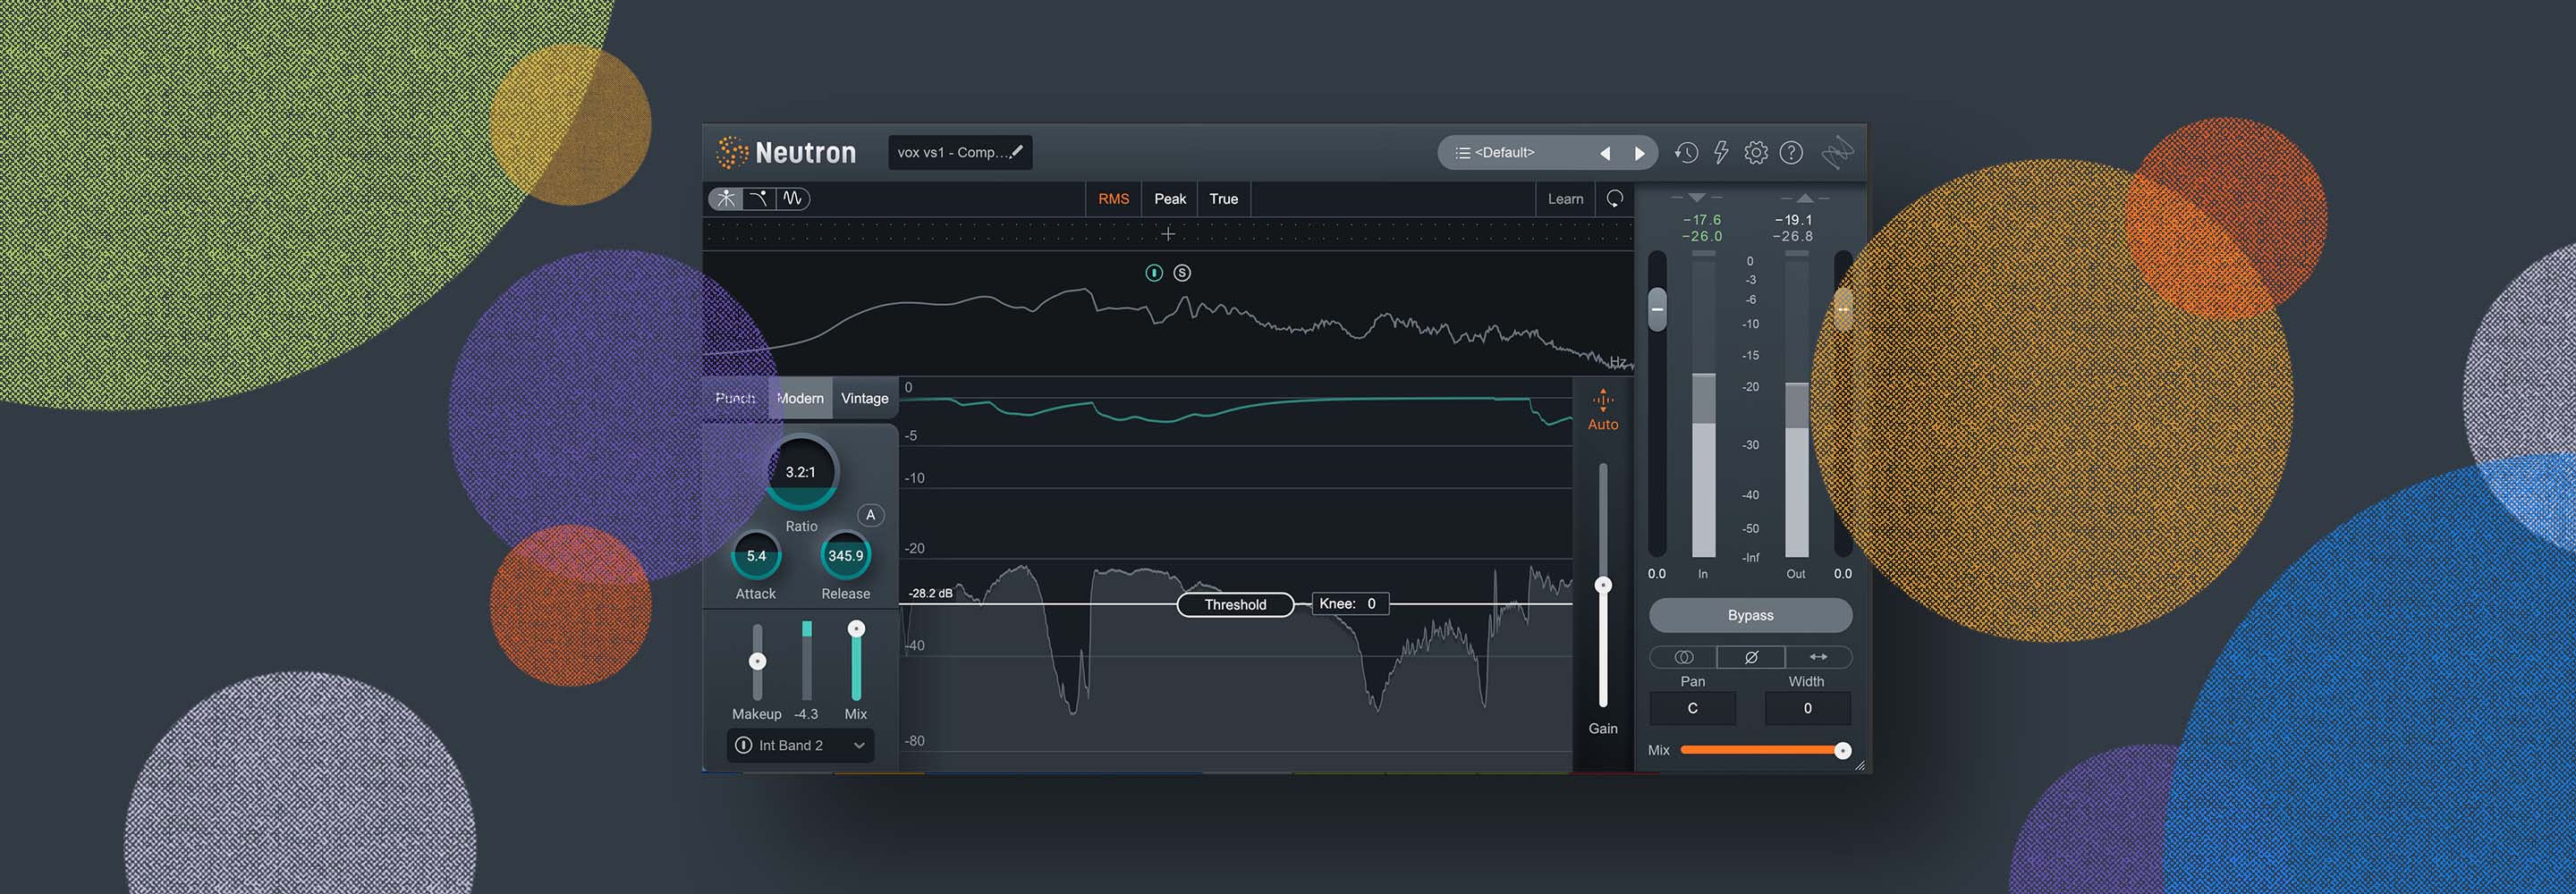
Punch comes from shaping the transient. The classic way to emphasize a sense of punch with a compressor is to employ a slow attack, a fast release, a moderate ratio (4:1 is a good starting place), and a moderate threshold (low enough to cut into every transient, not so low as to affect the next kick).
Something like this with Neutron’s modern compressor would work nicely.
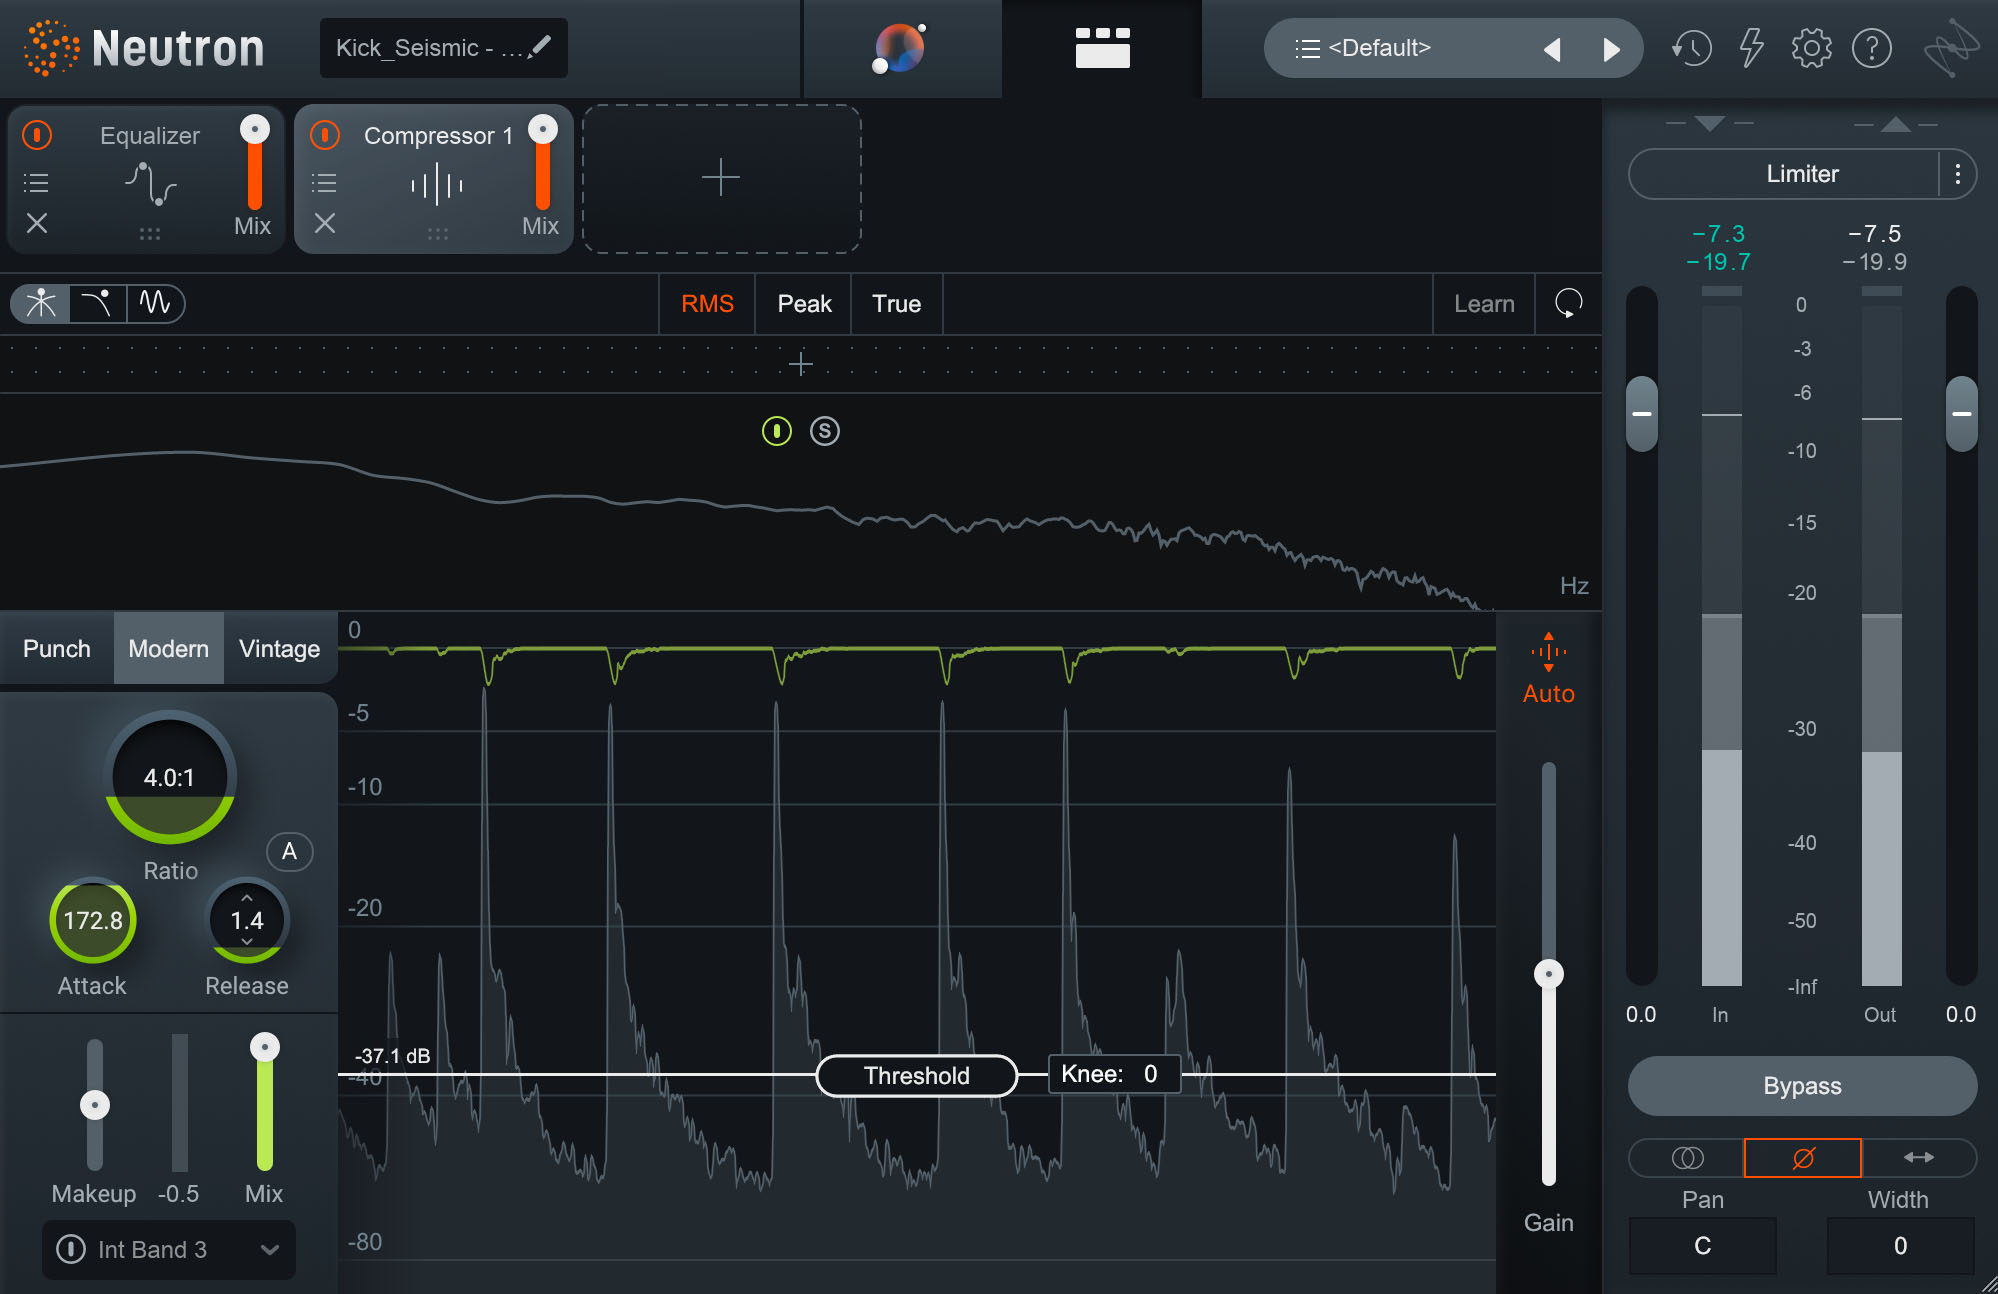
Using compression on the kick for punch with Neutron
However, Neutron has several other dynamics tools that accomplish this job in other ways. The first is a transient shaper.

Using a transient shaper on the kick to add punch with Neutron
A transient shaper is another type of dynamics processor that simplifies the control set to just two: an attack parameter, and a sustain parameter. Emphasizing the attack control on a transient shaper can help achieve a punching effect.
Here’s our dry kick compared to a kick that has the transient shaping applied.
Kick Drum Before & After Transient Shaper
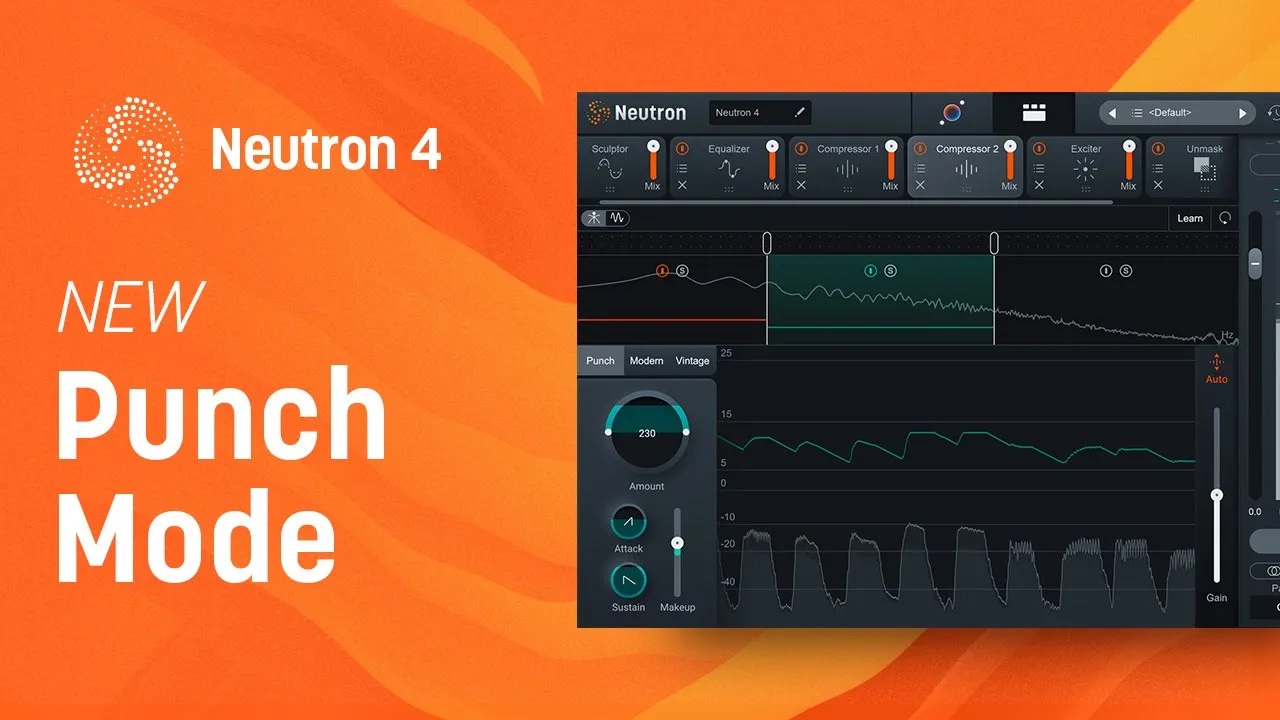
Lastly, Neutron offers a Punch mode in its compressor module that can be tweaked to add punch to kicks. These settings will get you the following sound.
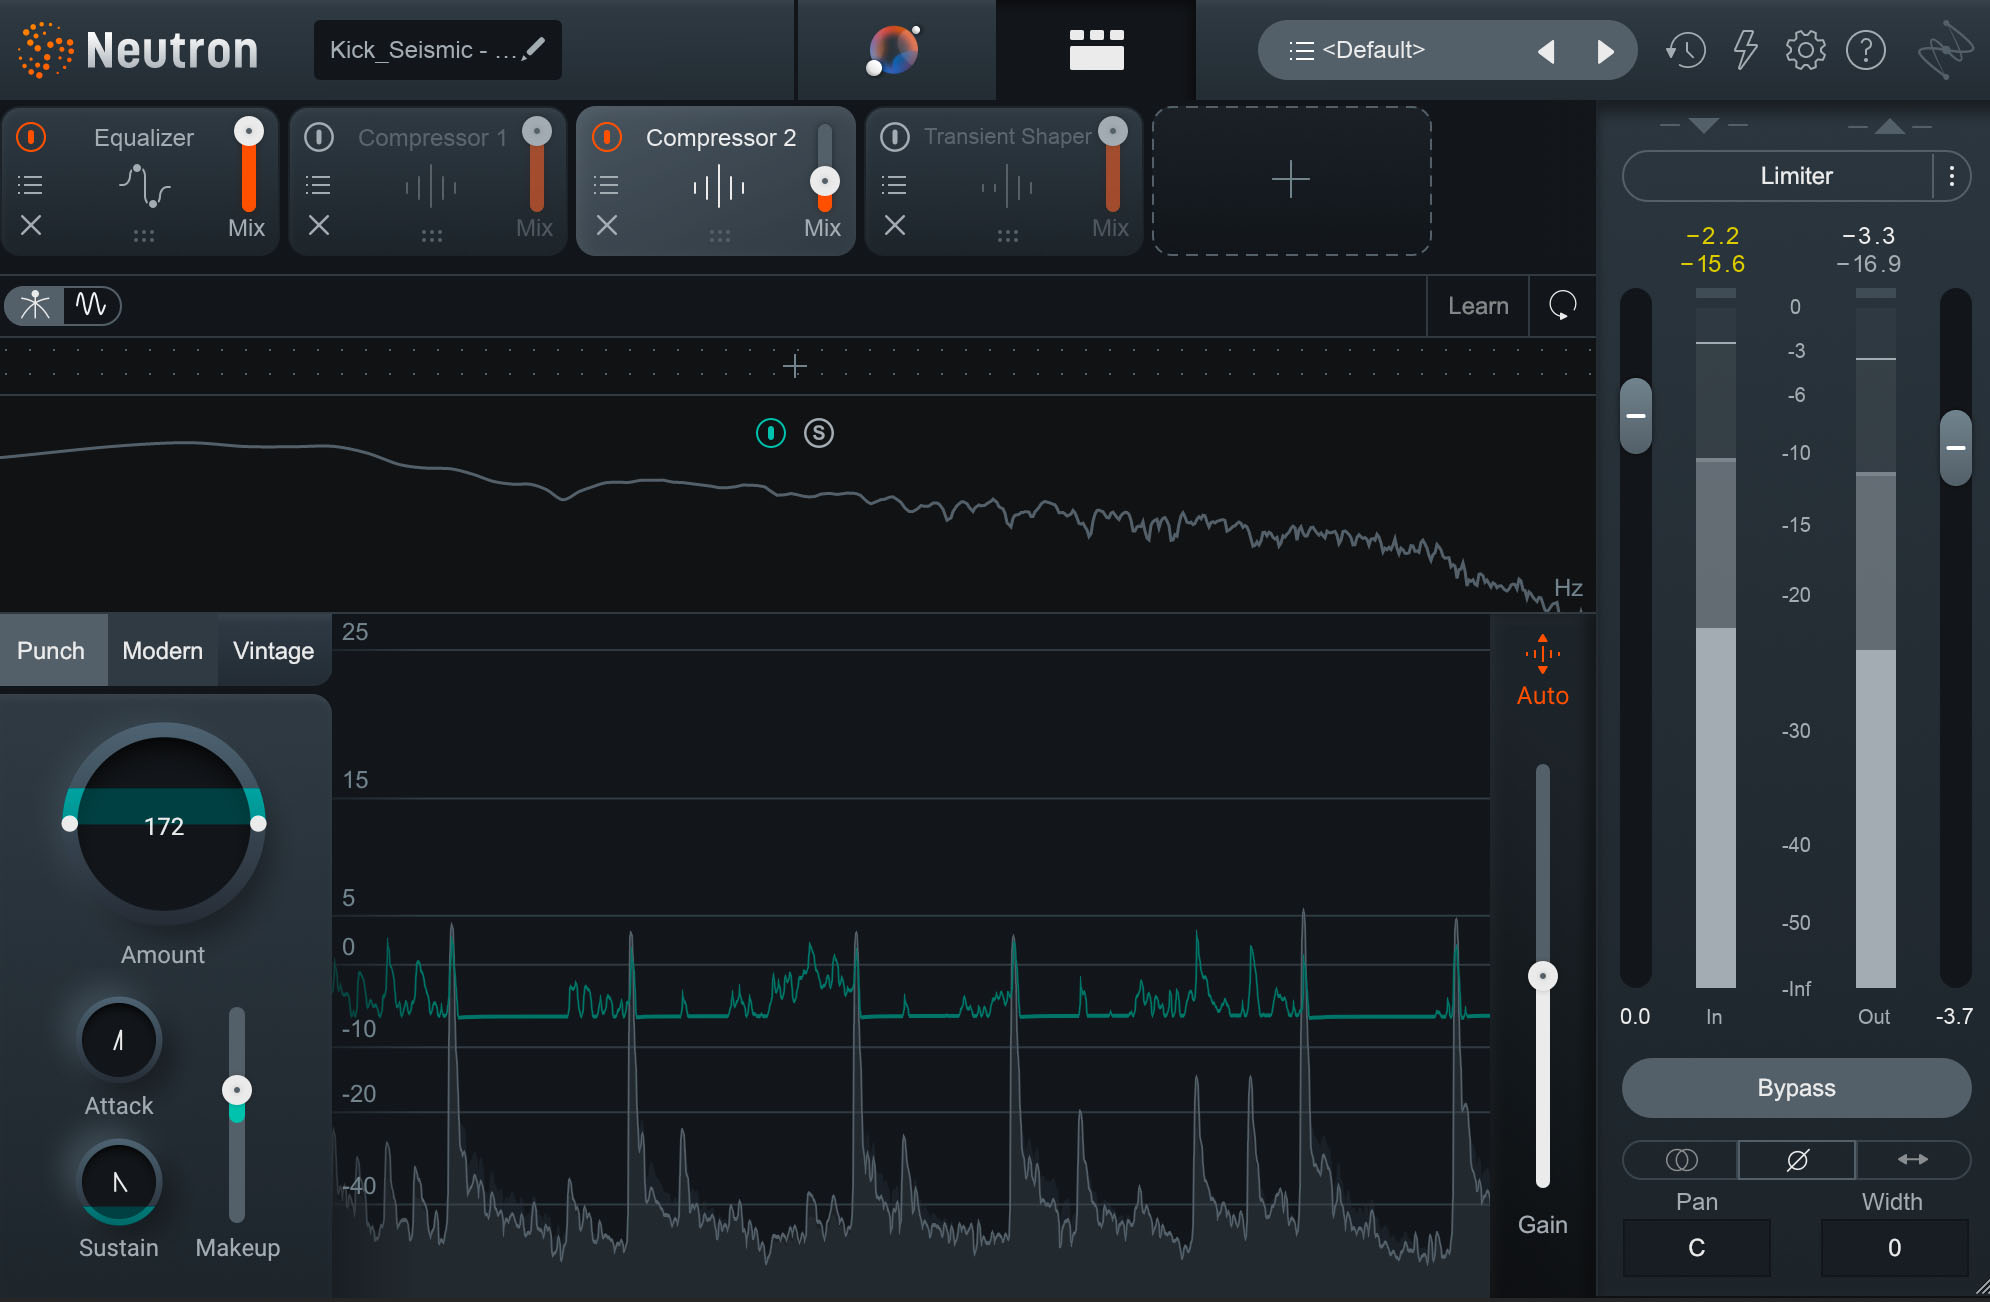
Neutron's Punch mode on the kick
Kick Drum Before & After Punch Mode
Note the mix knob here: I’m creating a clicky hit using the Punch mode to add expansion, and then I’m edging this clicky hit into the mix. This is an example of parallel compression, which we will cover in depth later.
Sink the kick further back into the mix
Kick drums can certainly be too poky. And things that are too poky can grab way too much attention, competing with elements like vocals or other melodies. Here we can try compressing with a faster attack, a faster release, an easier ratio (try 2:1) and a higher threshold.
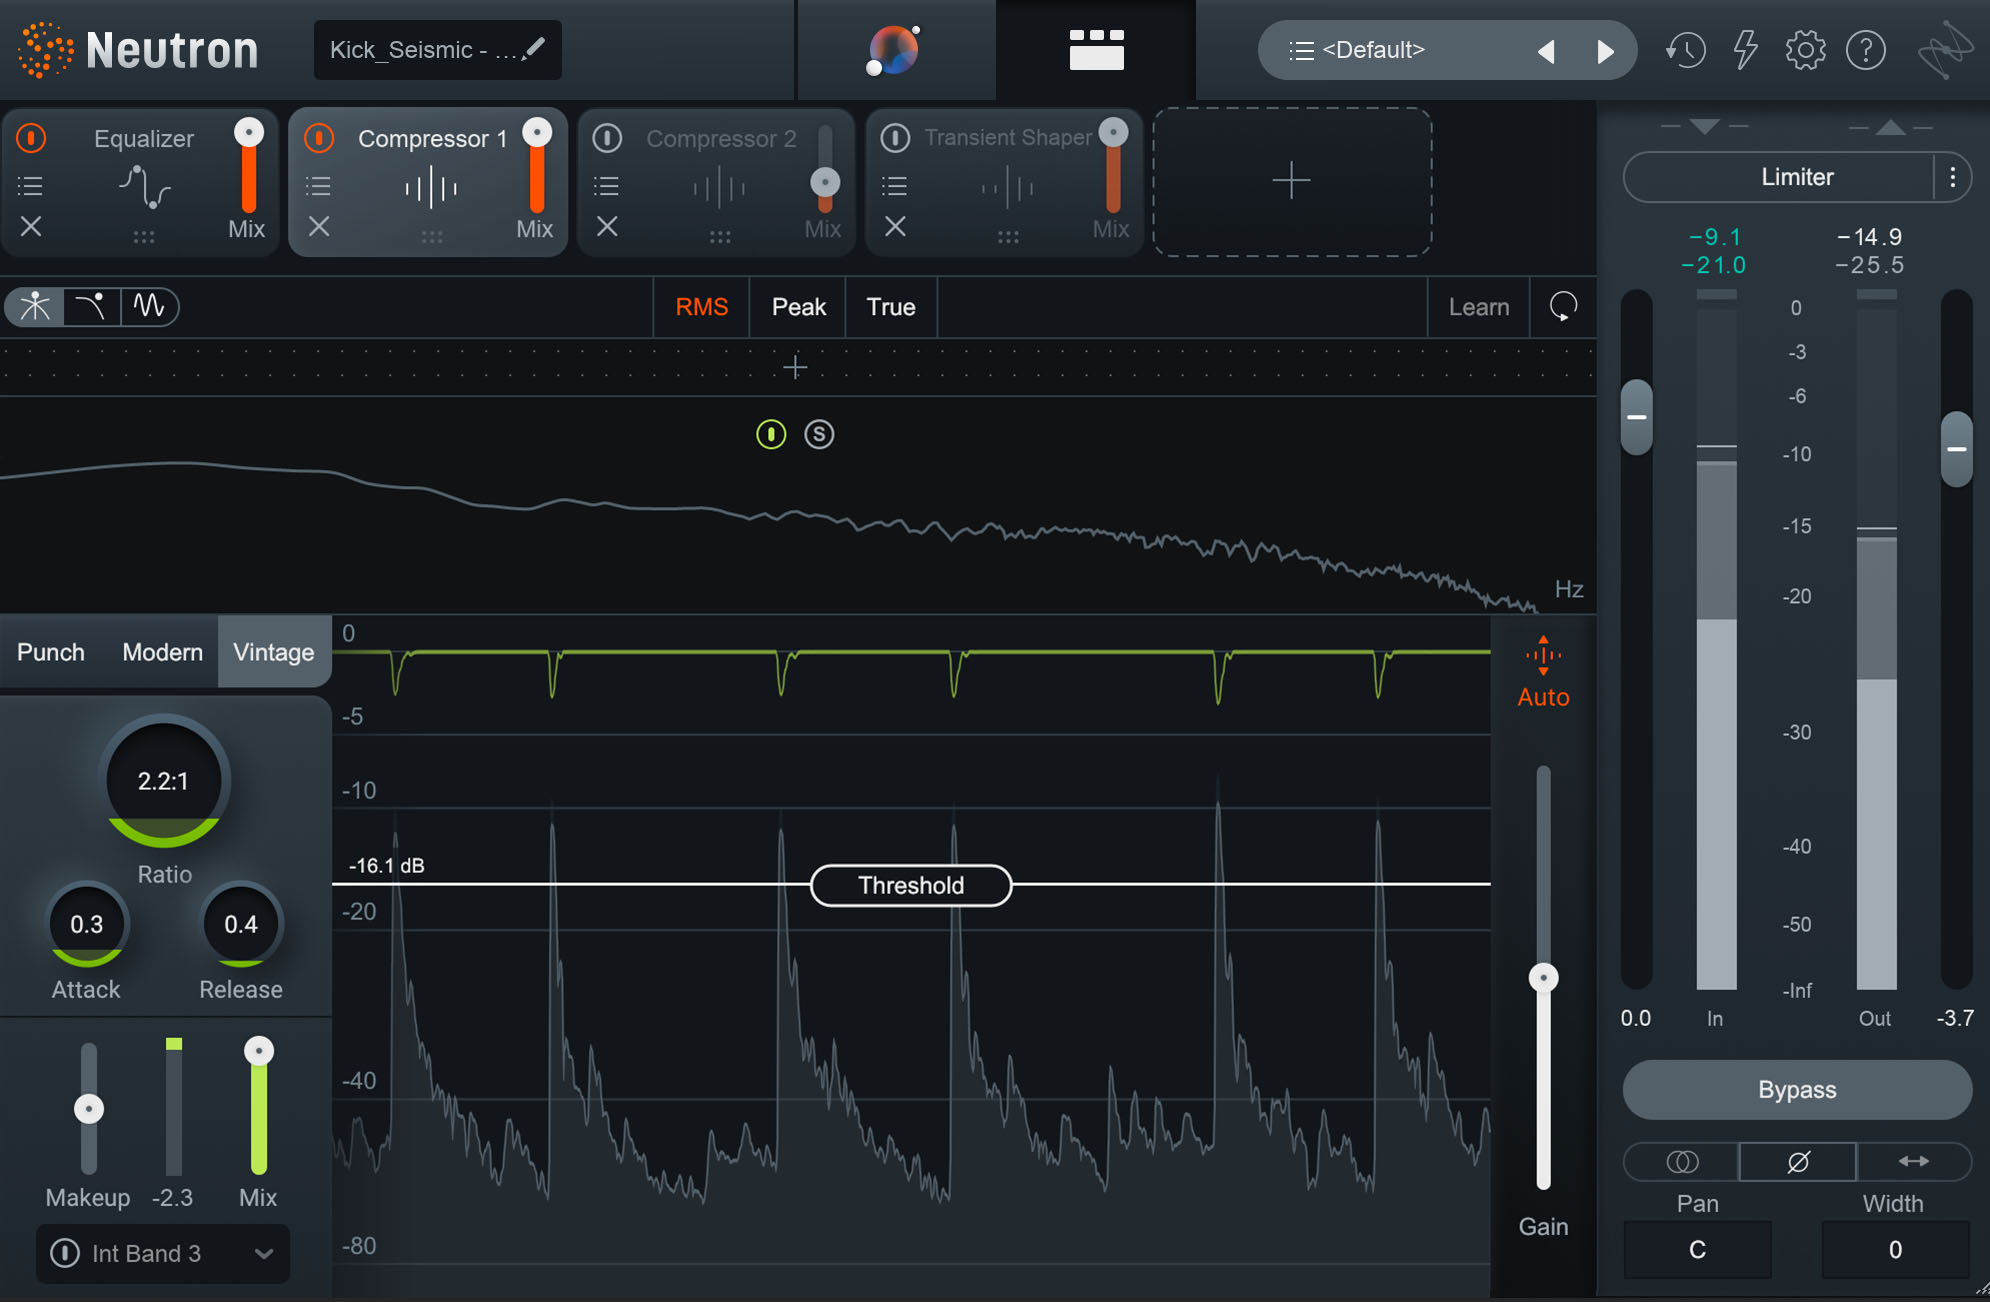
Using compression to tame pokiness on the kick with Neutron
Something like this should shave off the poke. Remember, these are not hard and fast rules.
Add a certain recognizable tone or character to the kick drum: Sometimes a compressor is more than a compressor; sometimes it’s a vibe. With kick drums, a few examples come to mind.
The original UREI 1176 flavor has a recognizable bombast that adds explosive energy to a kick. A vari-mu style compressor, in limit mode with a fast attack, can smooth out a transient in a silky, musical way. A diode-bridge compressor can add a snap unlike anything else. A channel-strip VCA compressor of the SSL variety adds its own unique punch.
These phenomena can be measured, but that doesn’t change their magical shorthand: knowing “I want a ‘76 sound on this kick” is way faster than trying to tweak it out of a digital GUI. If you have access to Soundwide’s Plugin Alliance tools, you can try these colors out on your kick drums and see what I’m talking about for yourself.
Snare compression settings
There are several reasons why you would want to add compression to your snare. Let's explore some of them now. We'll share some audio examples of them in the context of the kit as a whole.
Even out dynamic variances on the snare
Drummers might not be consistent enough with their snare hits, in which case compression can come to the rescue. Try the same settings listed above for snare, but go with slower attack/release times; snares tend to ring out longer than kicks, and you don’t want to mess with that. Additionally, you might need a higher threshold, thanks to the slower release.
Remember that these are guidelines, not rules.
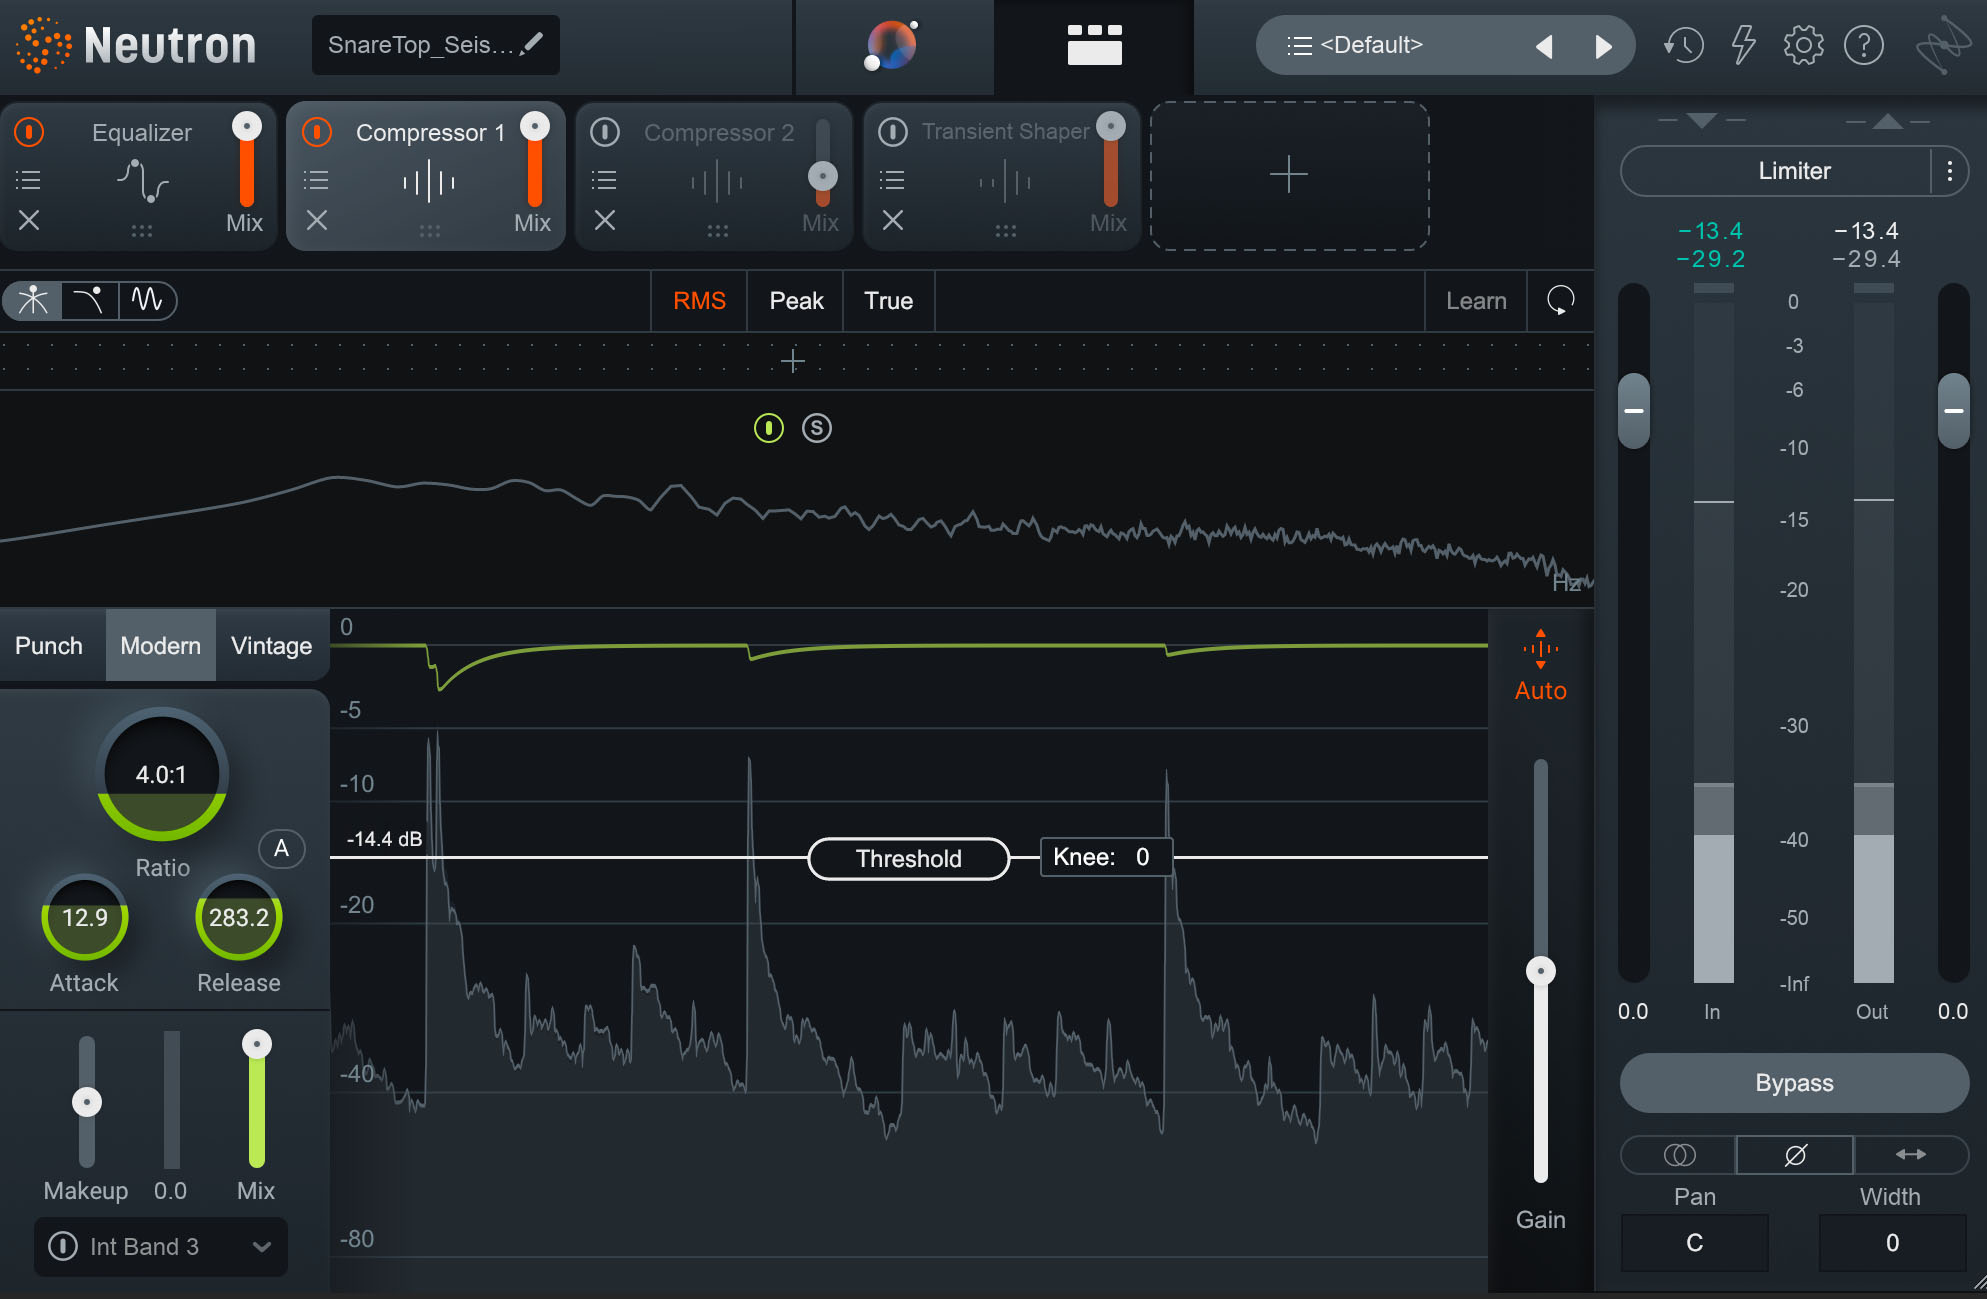
Using compression on the snare drum to even out dynamic variances with Neutron
Add punch to your snare
Again, punch is a matter of transients. Look at the settings I offered above in the “kick” section, which include employing a slow attack, a fast release, a moderate ratio (4:1 is a good starting place) and a moderate threshold (low enough to cut into every transient, not so low as to affect the next snare hit) but try slower attack/release controls, as well as a higher threshold since snares take a longer time to decay than kicks.
Something like this could work.

Using compression on the snare for punch with Neutron
Snare Drum Before & After Compression
Neutron’s Transient Shaper and Punch compressor are also good tools for the job.
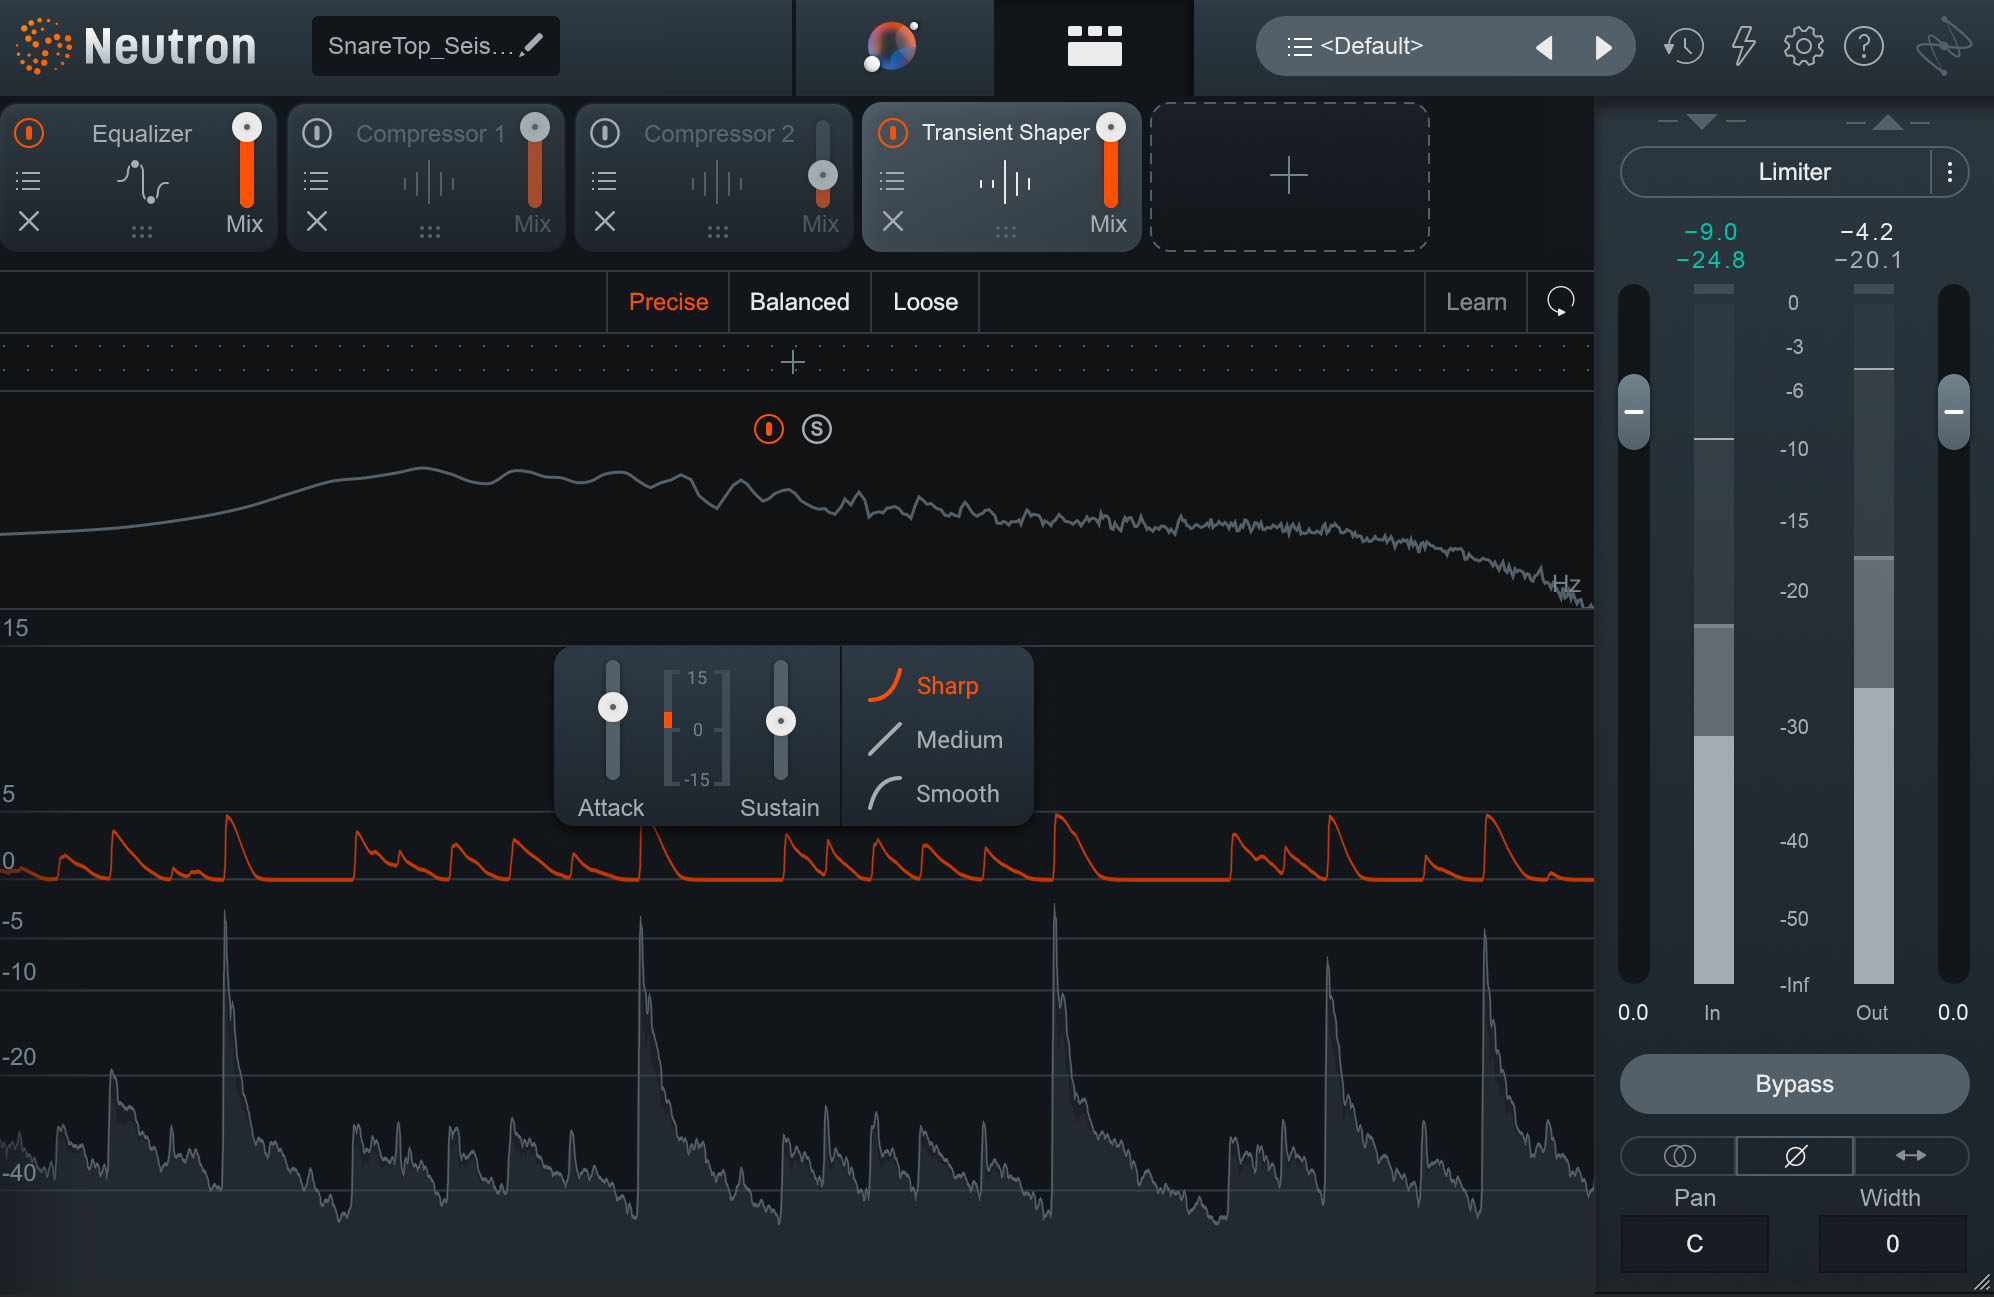
Using Neutron's Transient Shaper on the snare for punch
Snare Drum Before & After Transient Shaper
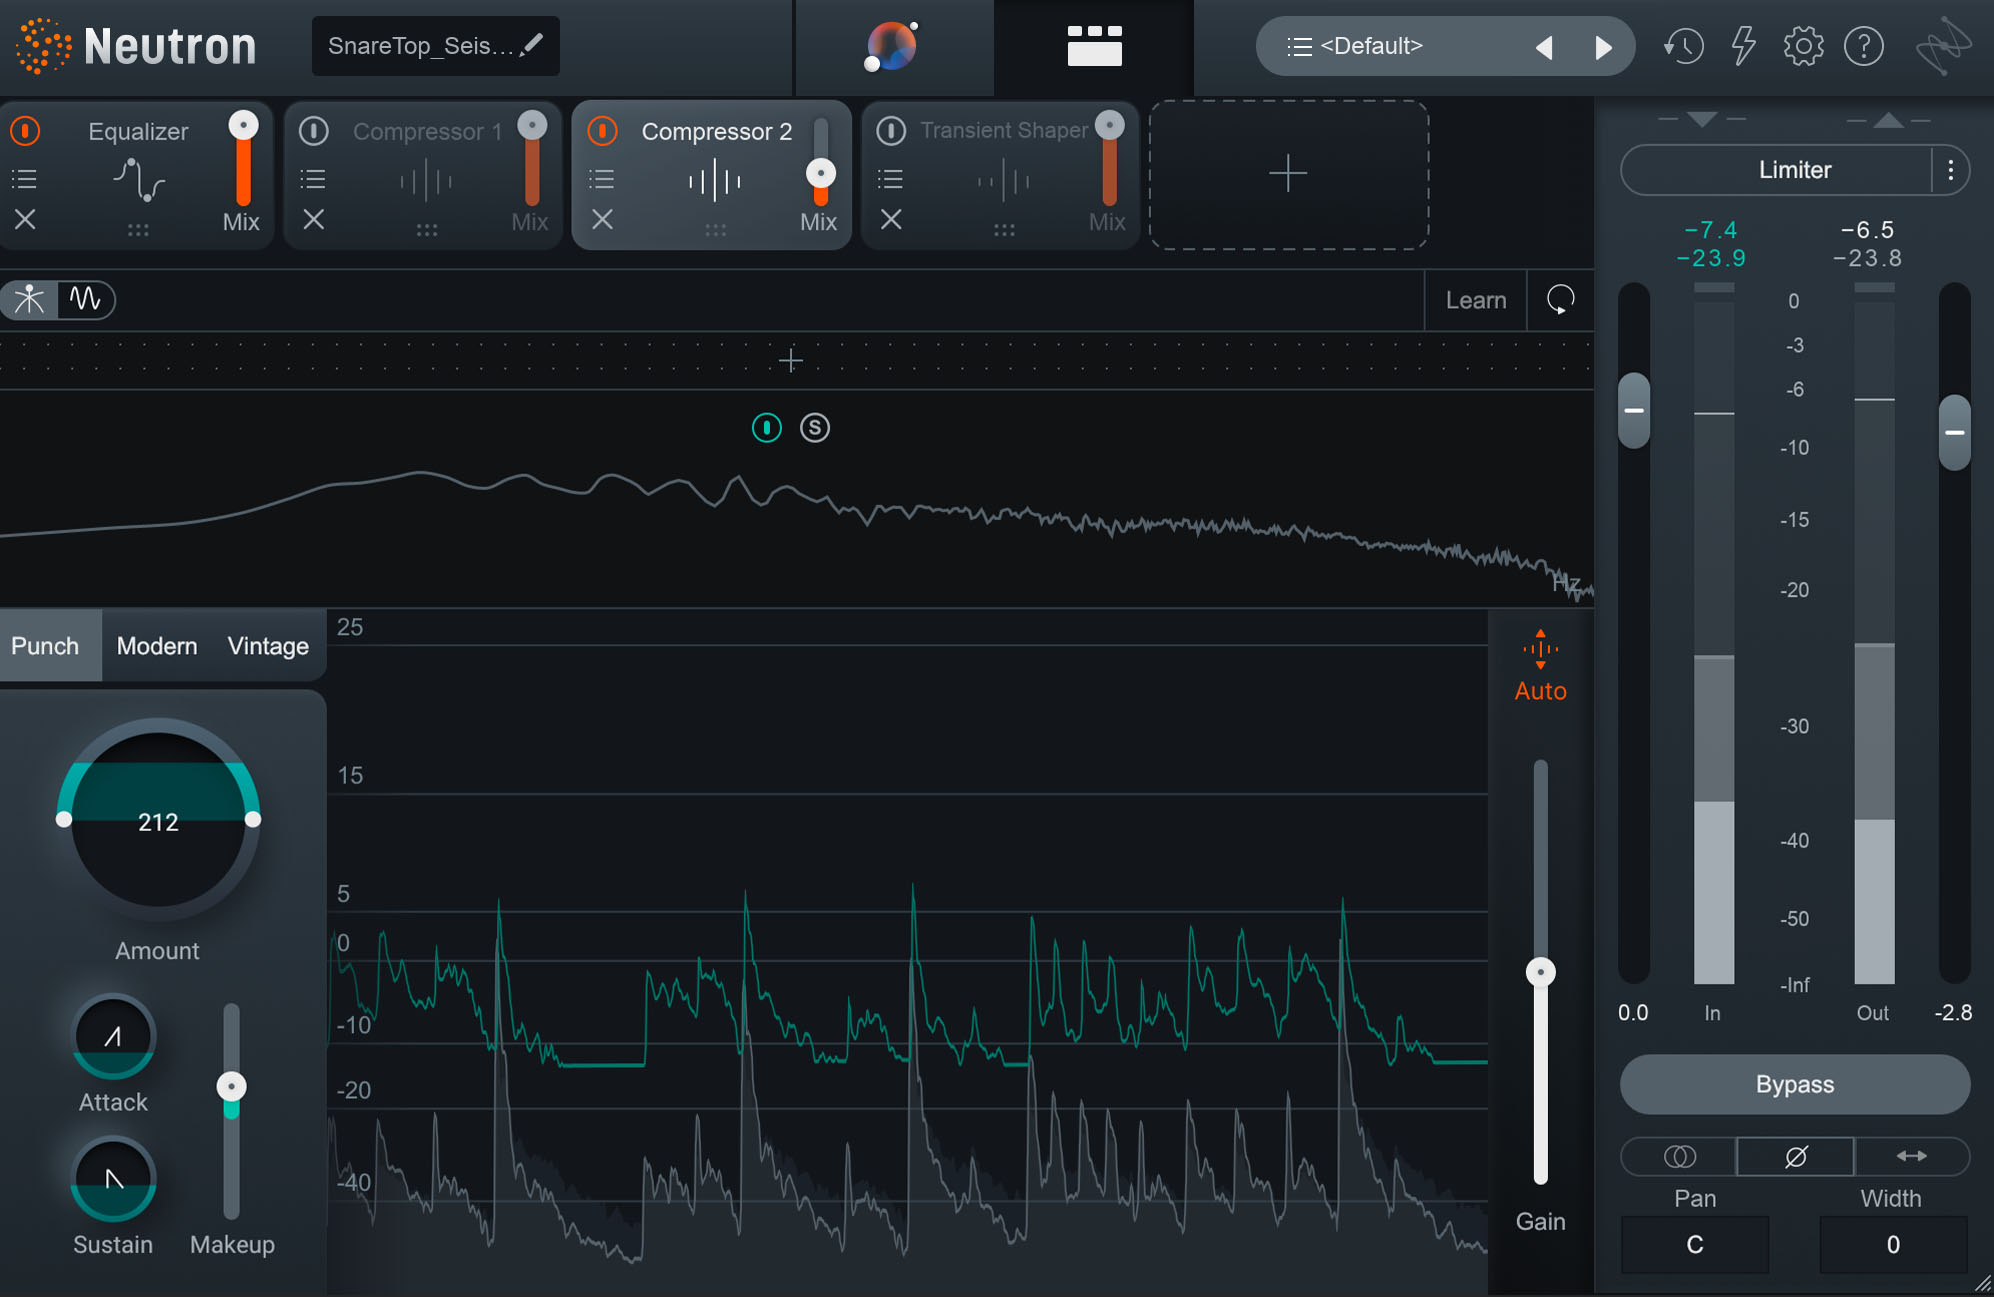
Using Neutron's Punch mode on the snare for impact
Snare Drum Before & After Punch Mode
Again, we’re basically using the Transient Shaper and Punch to add expansion in parallel.
You might notice these different punch compression options go in order from subtlest amount of punch to most noticeable.
Add a certain recognizable tone or character to the snare drum
Color compression can work wonders on snares. Remember that with color compressors, you’re going to know pretty much right away whether or not it’s working.

Using the Purple Audio MC 77 on the snare for punch and color
Snare Drum Before & After Color Compression
Yes, the settings matter. But how it sounds immediately upon inserting the plug-in will tell you a lot right out of the gate.
Note that with most ‘76 style compressors, the attack and release settings go from slow (fully counter-clockwise) to fast (fully clockwise).
Hi-Hat compression settings
You may want to compress hi-hats for a few reasons.
Even out dynamic variances in the hi-hat
Inexperienced drummers might have a problem playing hi-hats too dynamically. Sometimes the hits will be too strong and overpowering; other times they’ll be too weak. Compression to smooth out dynamic variances is par for the course here. A great tool for this is Neutron’s Punch compressor—except we’ll be taking punch out of the hi-hat.

Using Neutron's Punch mode for evening out the hi-hat
Change or fix the groove with the hi-hat
Sometimes we compress the hi-hat so that the part has a little more groove and attitude. We do this with sidechain compression.
Commonly, we send the snare, kick, or both drums to a bus. The bus has no output—it’s a dead patch, as it is colloquially known. We put a compressor on the hi-hat, and assign its sidechain input to our dead patch, as shown below.
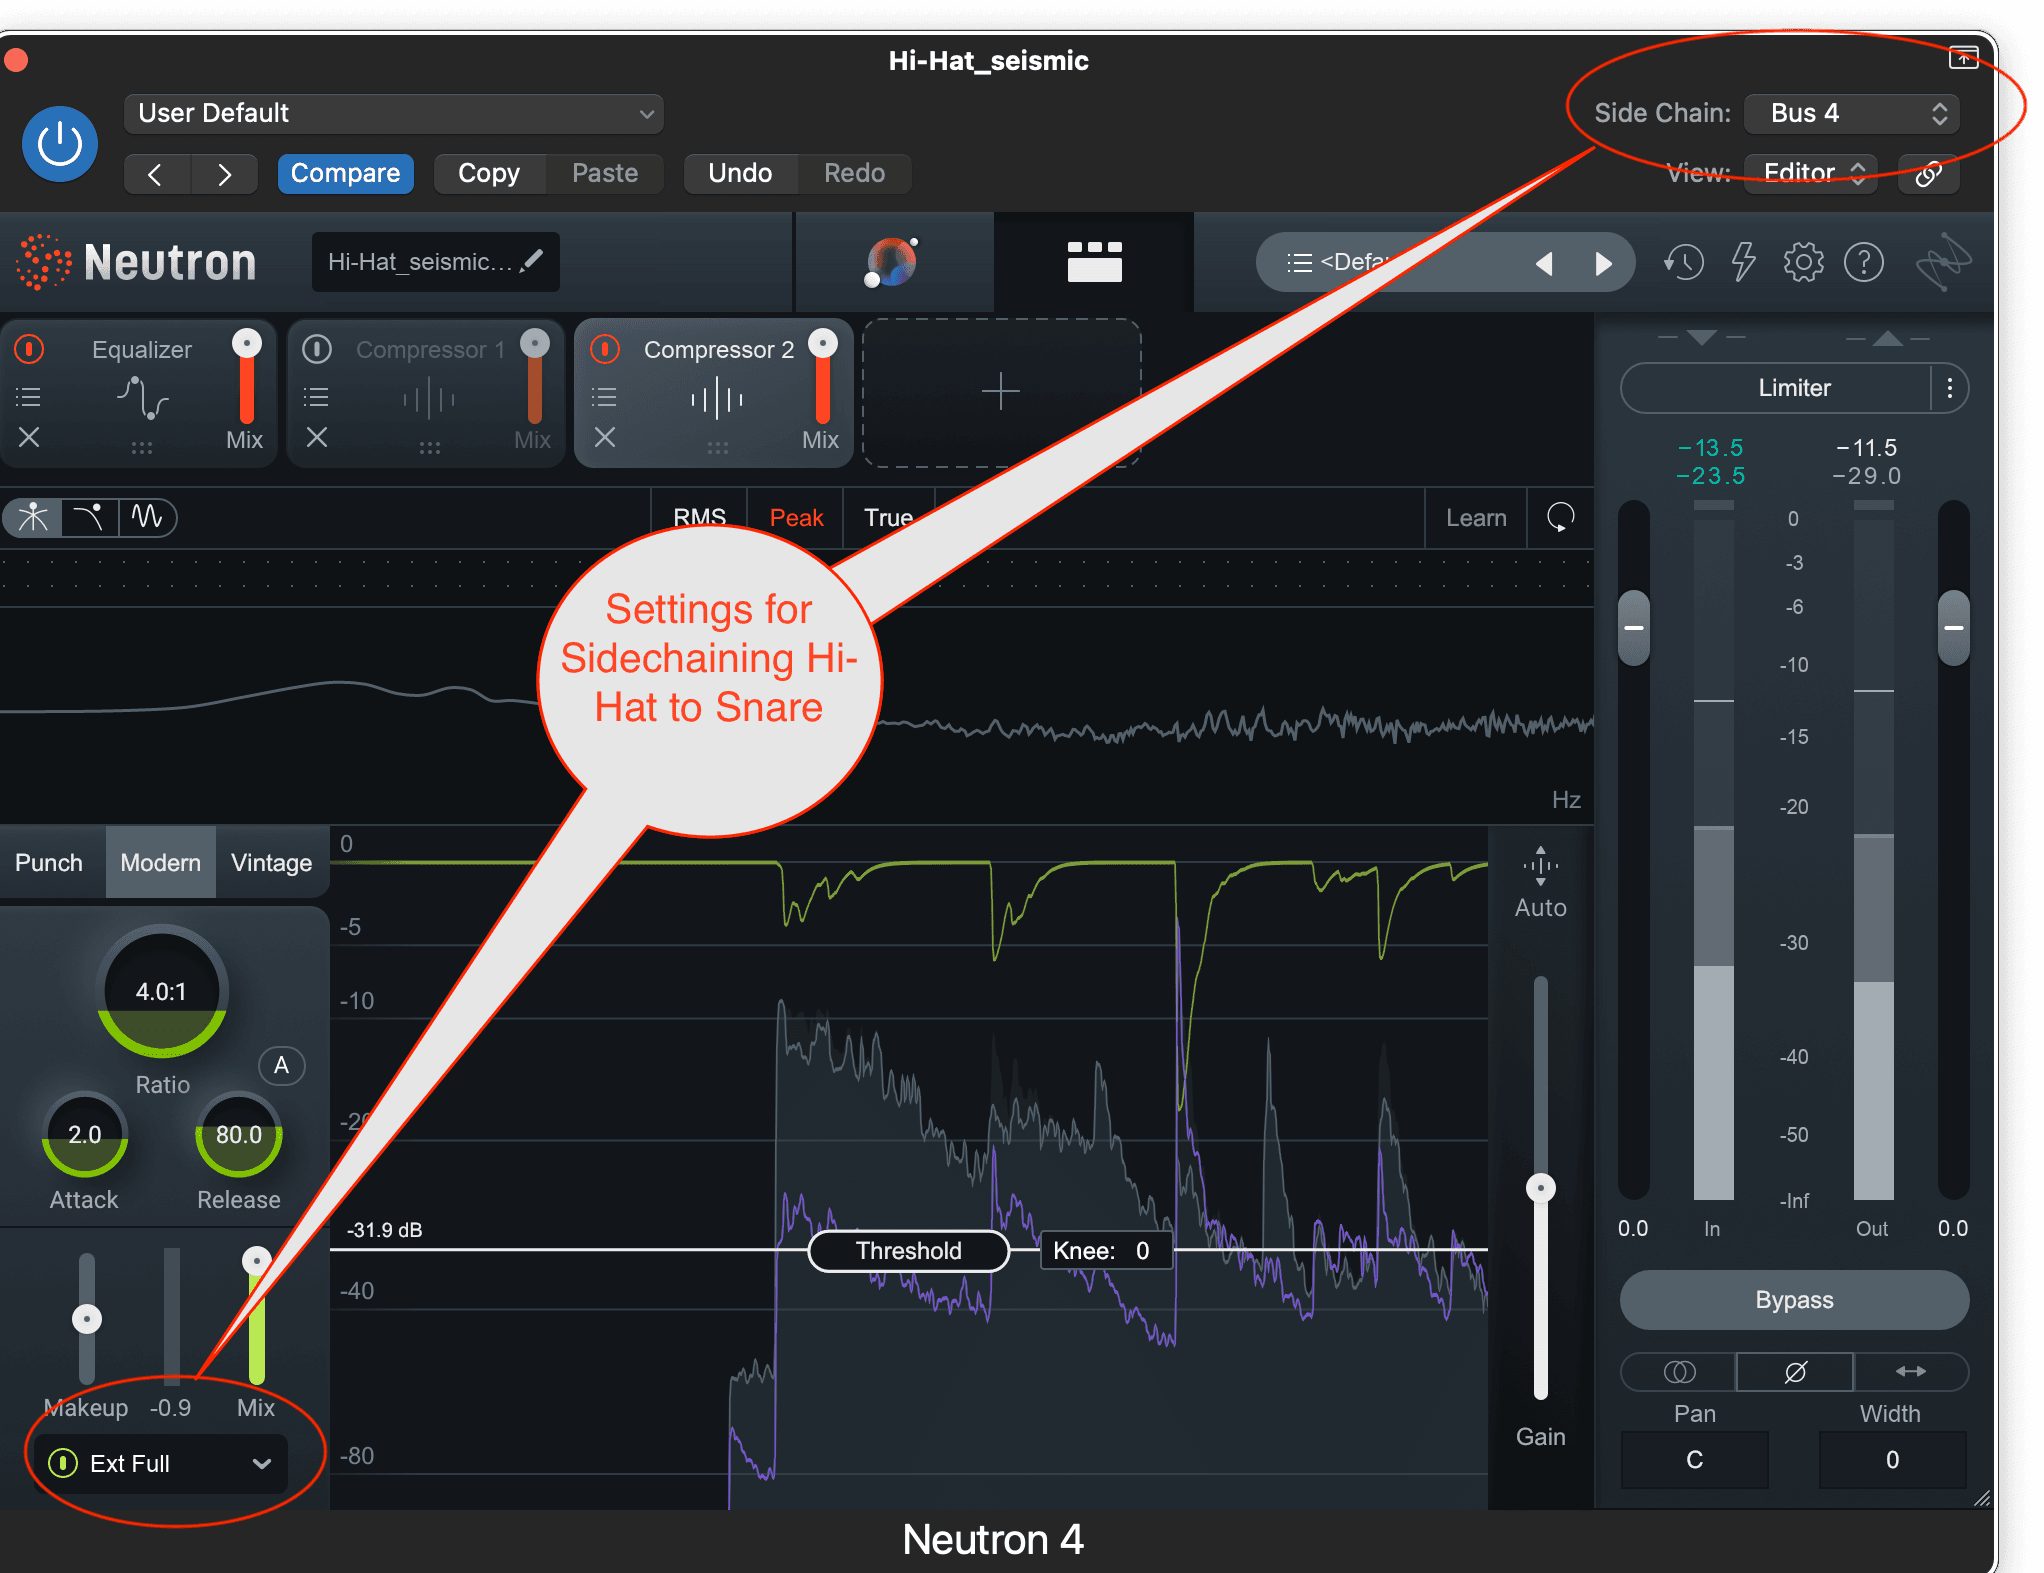
Hi-hat sidechained to the snare for groove
Bus 4 is our snare that goes nowhere. Now, the hi-hat will duck in volume when it detects signal in bus 4. Playing with the attack and release times of our hi-hats compressor will add a sense of groove to the part.
Observe a relatively straight-laced hi-hat part before sidechain compression, and then listen to it sidechained to the snare.
Hi-Hat Before & After Sidechain Compression
When the snare hits, the hi-hat ducks in amplitude, and then gradually rises back to a higher level. The timing of this rise and fall is quite groovy.
Fight bleed with compression on the hi-hats
Sometimes the hi-hat mic can pick up a ton of snare bleed. When that happens, it can be advantageous to use sidechain compression to duck the hat channel a lot when the snare plays.
We can use these compression settings to curtail the snare bleed.
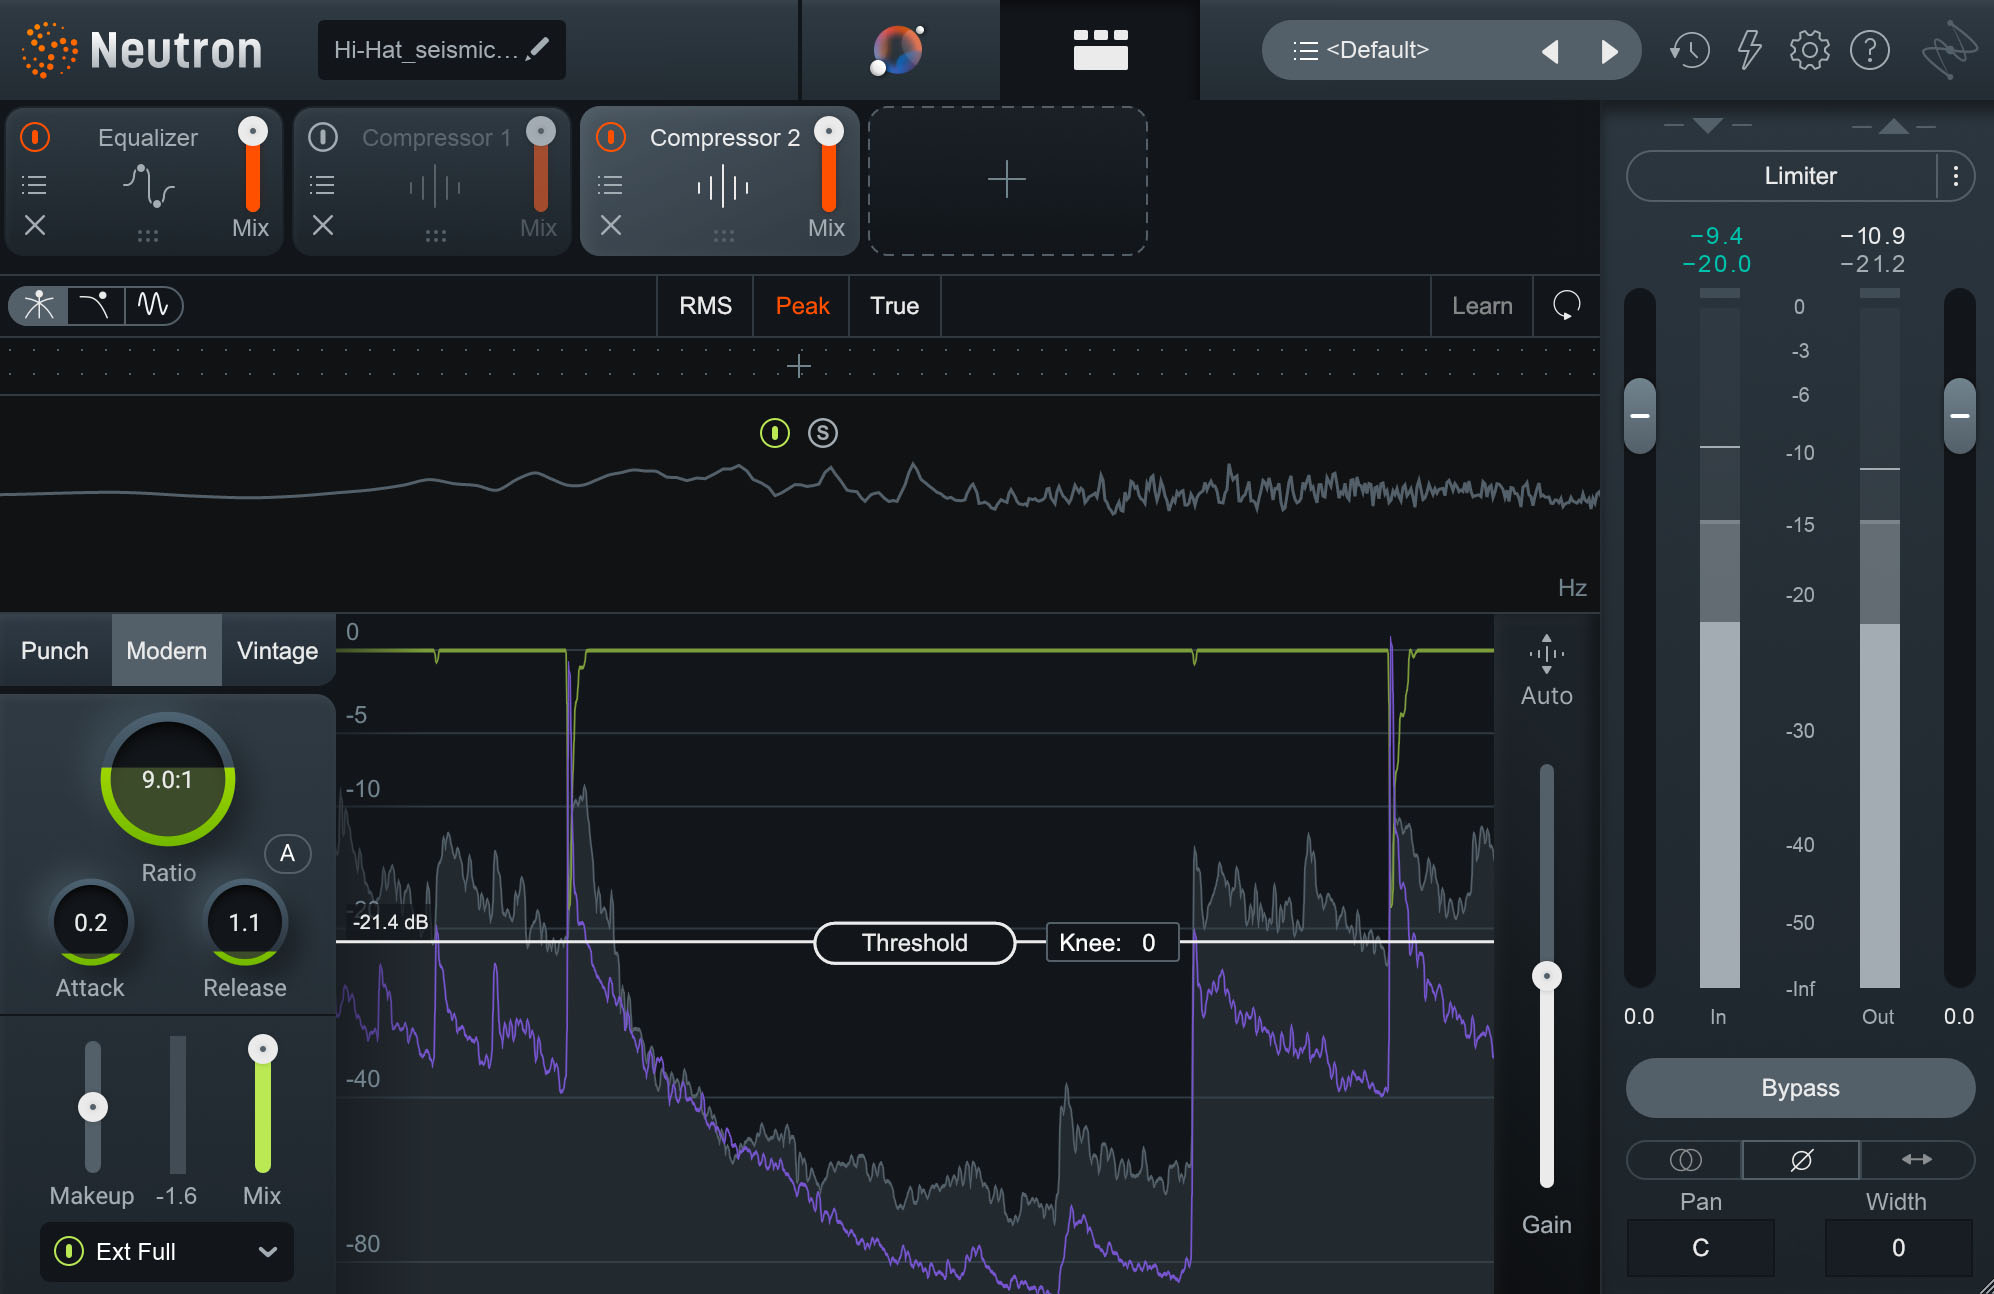
Hi-hat compression settings to mitigate snare bleed with Neutron
Here's what the hi-hat bleed sounds like before and after the compression settings are applied. Note the quickness of the attack and release, so that we don’t lose too much hat.
Hi-Hat Before & After Compression Settings for Snare Bleed
In the overall picture, the compressed hi-hats will sound like this.
We don’t lose the hat too much, and the snare doesn’t shift to the left of the stereo image.
Overhead mic compression settings
Compressing overheads can get you in a lot of trouble very quickly. In fact, compressing overhead mics got me in a lot of trouble early on in my career. Maybe you’ll be different.
Careless compression on the overheads results in weird washy cymbal activity—a big crash drum will trigger the compressor, whereupon it will clamp down and rise up in an annoyingly noticeable way, sometimes shifting the image of the whole kit.
For me, the problem went away with experience: experience taught me that color compression is the answer to most of my overhead compression woes.
All our reasons for compression apply, but going for color always seemed to win out.
Need punch? I’m far better served using the emulation of a classic FET or diode-bridge compressor in parallel than I am using a stock digital plug. Need glue? I might go for something emulating an opto, a mu, or VCA comp, depending on the vibe I want.
Need to sidechain for groove? I’ve done that from time to time, keying the overheads to the kick. But even then I’ll tend to opt for a classic VCA style compressor, such as the Lindel SBC, a very good emulation of the classic American 2500—a compressor I know and love well.

Lindell SBC on overheads and sidechained to the snare
I could cover how to use compressors like Neutron to achieve a similar effect, but I’d like you to trust me at my word: character compression, in a subtle hand, tends to work quicker and more effectively on overheads.
If you don’t want the character, consider not compressing the overheads, because it’s quite hard to hide the fingerprint of compression in overheads; overheads are really, really revealing!
Sometimes, I may exaggerate the compression a whole hell of a lot, and then back it off with a mix knob; this gets into parallel compression, which I’ll cover later on.
Room mic compression settings
The standard move for room mics is to smash the hell out of them for character. Keep in mind that the room mics you receive might’ve already been smashed in the recording. If not, again, go for the emulations first: trust me, it’s the classic move. A ‘76 on a room is pretty glorious, changing this dry sound to the smashed sound below.
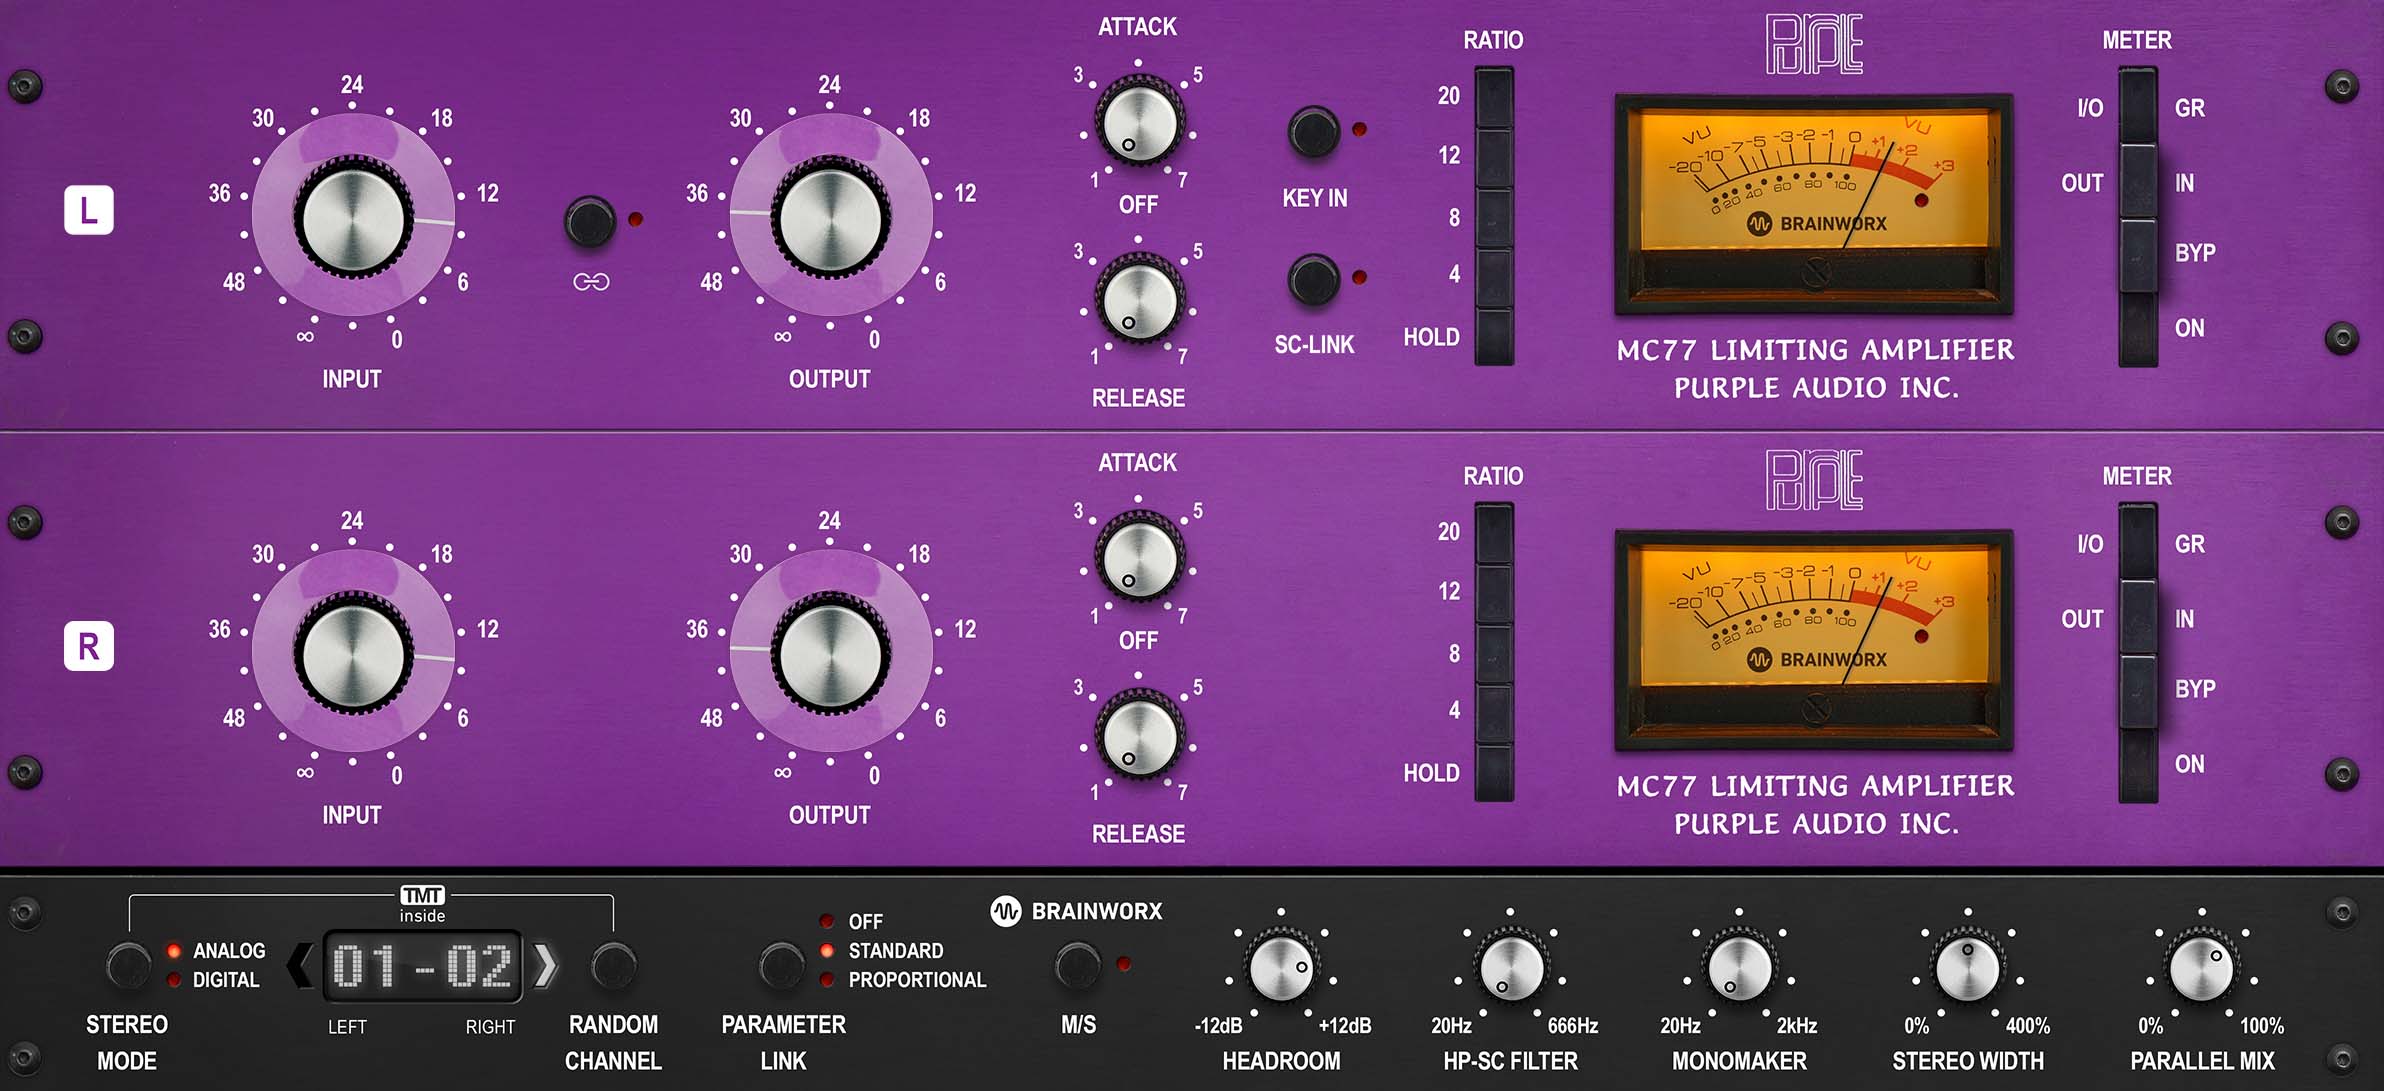
Room mic compression settings with Purple MC 77
Room Mics Before & After Compression
Notice that the sidechain link is turned off, meaning this works as a dual-mono, unlinked compressor.
Neutron’s Punch compressor is also pretty great on room mics. This setting can give you that classic room sound.
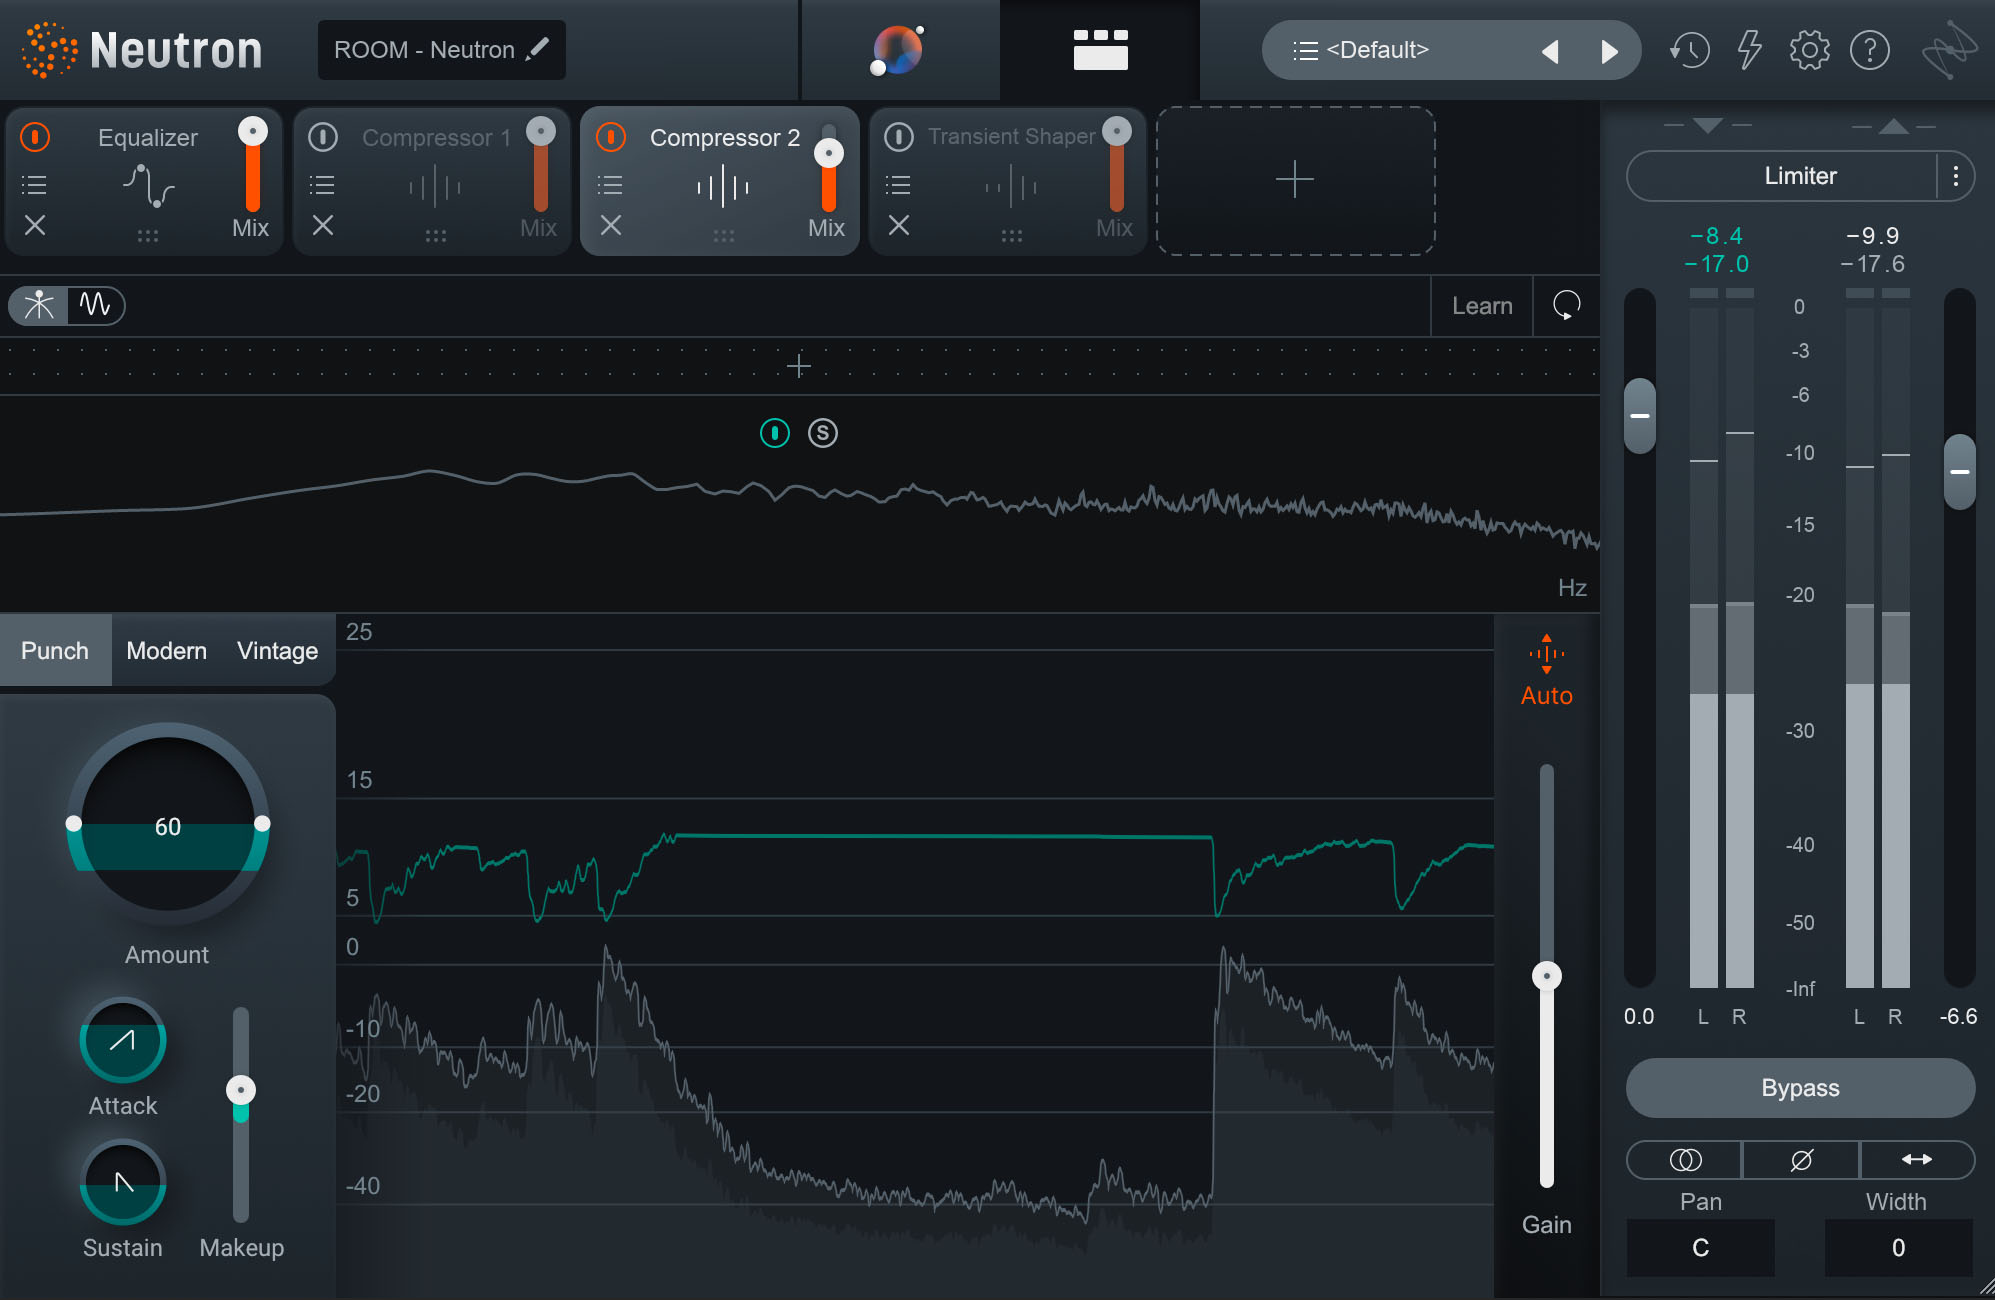
Room mic compression settings with Punch mode in Neutron
Room Mics Before & After Punch Mode
Tom compression settings
A whole article could be written on compressing toms, as they can be troublesome to newbie engineers. But I’ll give you a couple of pointers:
Evening dynamic variances
Start with the settings I recommended for snare, which include a medium attack, a medium release, and a moderate ratio. Try a threshold low enough to cut into every drum hit, but not so low that gain-reduction continues into the next hit.
Adding punch: Again, Neutron has a compressor module devoted to creating a sense of punch, and it excels on toms.
Listen to this section in this song.
The toms sound roomy, but I want more punch out of them.
In these next steps, let's listen to them on their own, then gate them a little to take care of that bleed.
Toms Before & After Gate to Tame Bleed
This will already help to add punch in the mix, but let’s add Neutron Punch compressor to expand their thwacky transients.
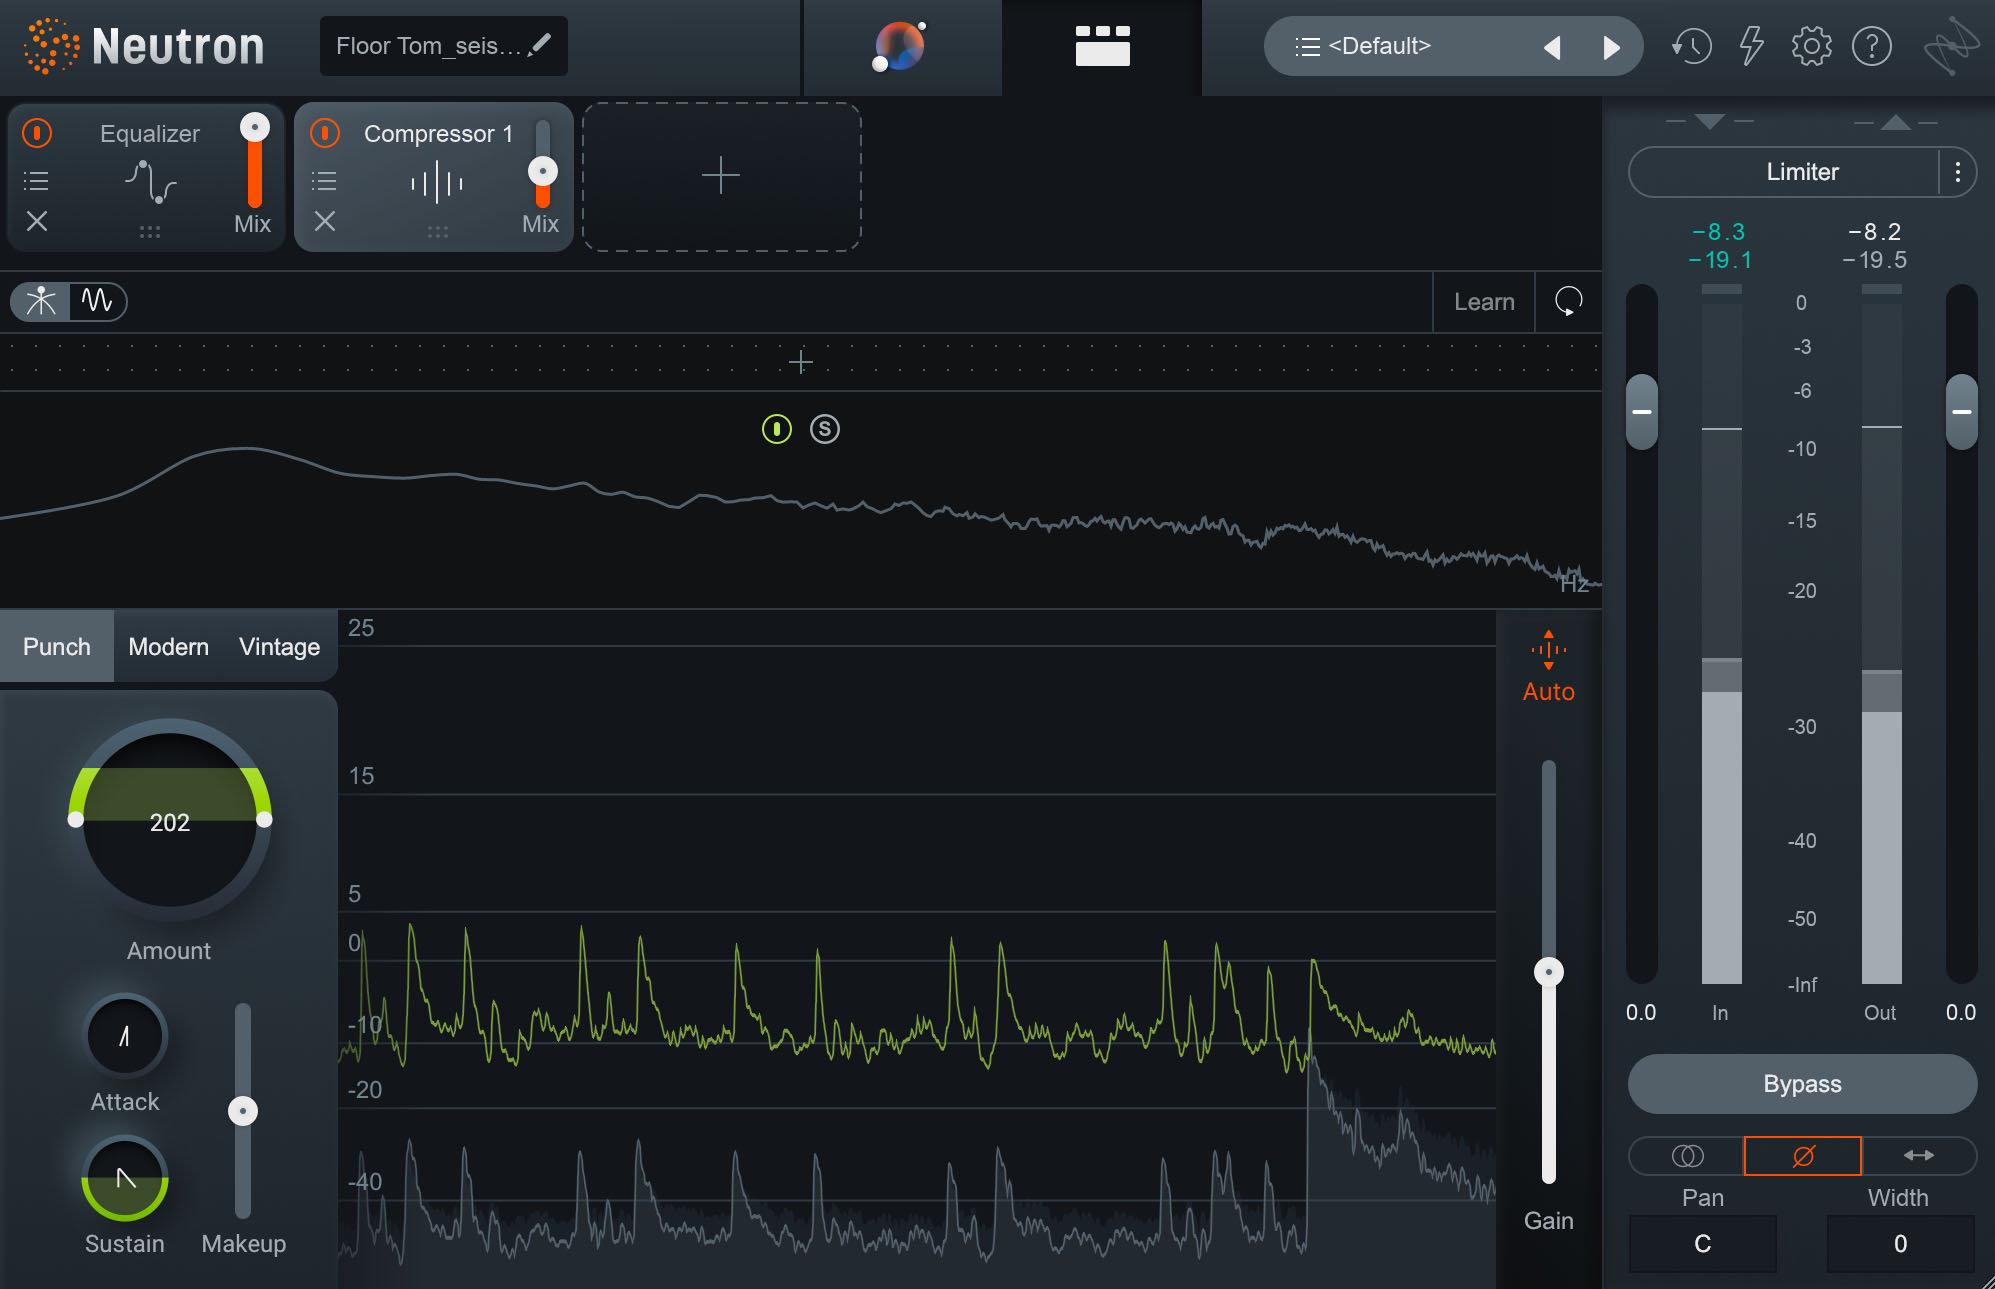
Tom compression settings for transient expansion with Neutron
With these settings on the two tom microphones, we can get the following sound in the context of the kit.
Adding cohesion to toms
Here, try routing all the toms to a bus and using a VCA style compressor with light settings (slow attack, fast release, 2:1 ratio, sensible threshold).
We’ll take our drum example from above, and do just that using Neutron’s Vintage compressor.
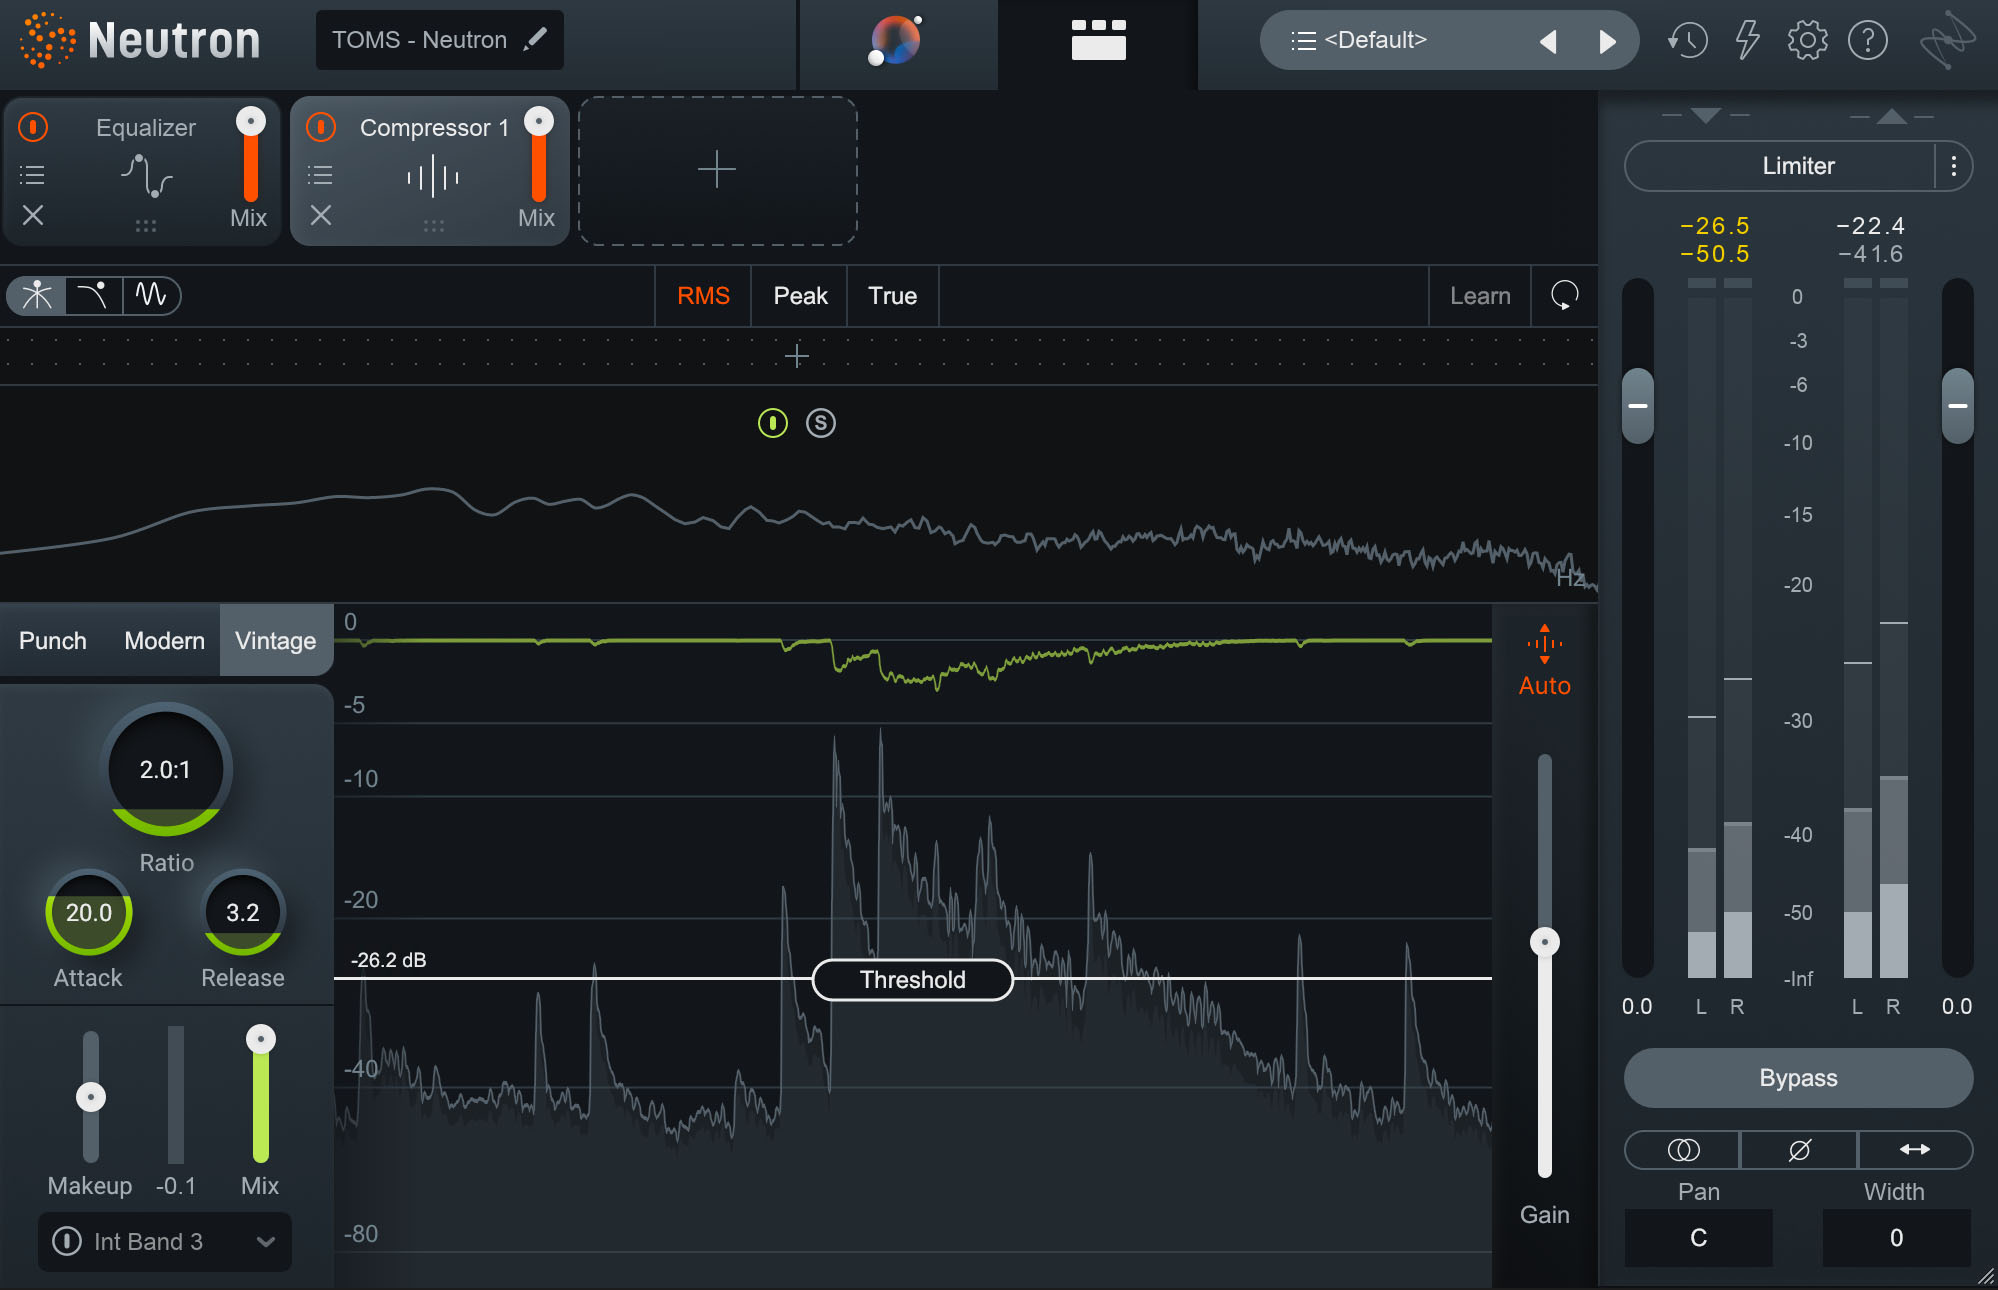
Neutron Vintage compressor on the tom bus
Adding a certain recognizable tone or character to the drums: I love using console-style plug-ins for this purpose. The compression section of the bx_console SSL 4000 or bx_console SSL 9000 both sound great on toms. You can get a lot of smack out of those compressors with a fast attack.
3. Drum bus compression settings
A whole article could be written about how to compress the drum bus—especially when you consider that the drum bus is made of so many different drum set parts and microphones. The wrong choice here could undo all the previous work you previously spent on the elements in the kit.
Here are some general pointers for your drum bus:
- Drum bus compression, on top of individual treatment, is a kind of serial compression: one compressor feeding into another. One must be quite careful with serial compression, because the effects tend to be compounded exponentially.
- Thus, it’s wise to accomplish the least amount of compression that will suffice, all while keeping your general compression goals in mind (i.e., smoothing dynamic variance, adding punch, adding glue, enhancing the groove, etc).
- As with overheads, color compression can get you to a polished sound quicker than digital comps. Indeed, I like to combine color compression with my goals.
Adding a sense of glue to the drum bus
I might try a classic VCA comp, offered here in the bx_townhouse Buss Compressor.

If I wanted more of an aggressive pump or punch, an 1176 emulation could be my friend.
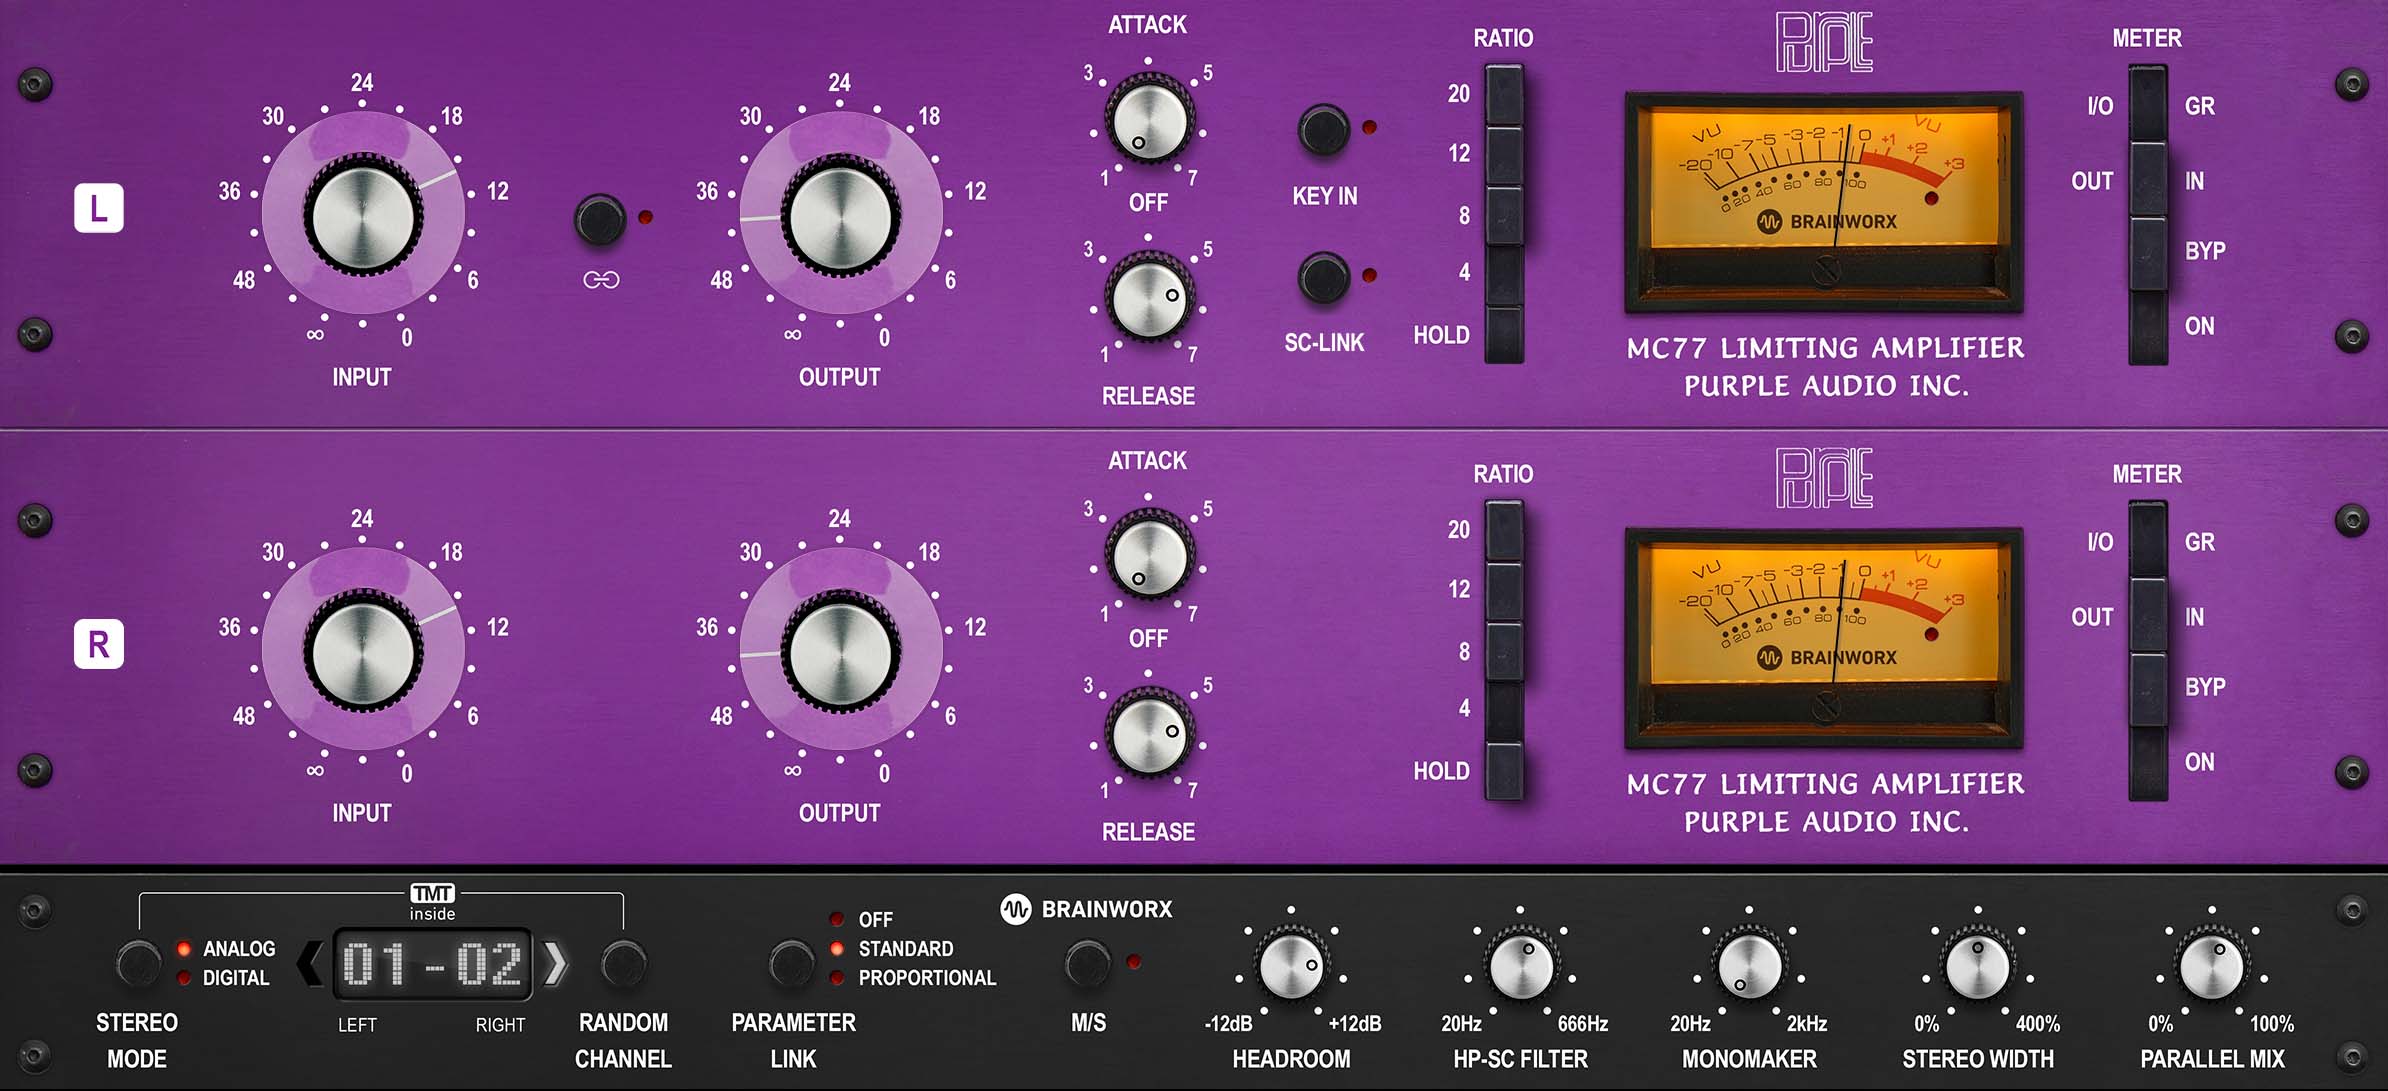
Aggressive pump on the drum bus with Purple MC 77 compressor
I know you’re wondering, “What are the best drum bus compression settings?” But there’s no cut and dried answer. You have to consider your intentions, because different intentions get you different results.
For example, all of these sound different:
Is any one of them more correct than the other? It’s impossible to say without the context of our overall mix, and knowledge of our overall intentions!
4. Looking for punchy drums? Try parallel compression
You may have noticed that in the above examples, I’m using parallel compression a good deal of the time—that’s what the mix knob in all over those screenshots is affecting.
You might be wondering what parallel compression is, and why we’d use it.
Parallel compression refers to copying a signal, compressing the copy, and balancing the compressed signal with the original, dry sound.
Parallel drum compression can help us get more punch and aggression out of the kicks, snares, and toms without overcooking our mix.
Take our dry drum bus again. We'll now bus the kick, snare, and tom mics to an auxiliary track, and slap Ozone’s vintage compressor on that bus.
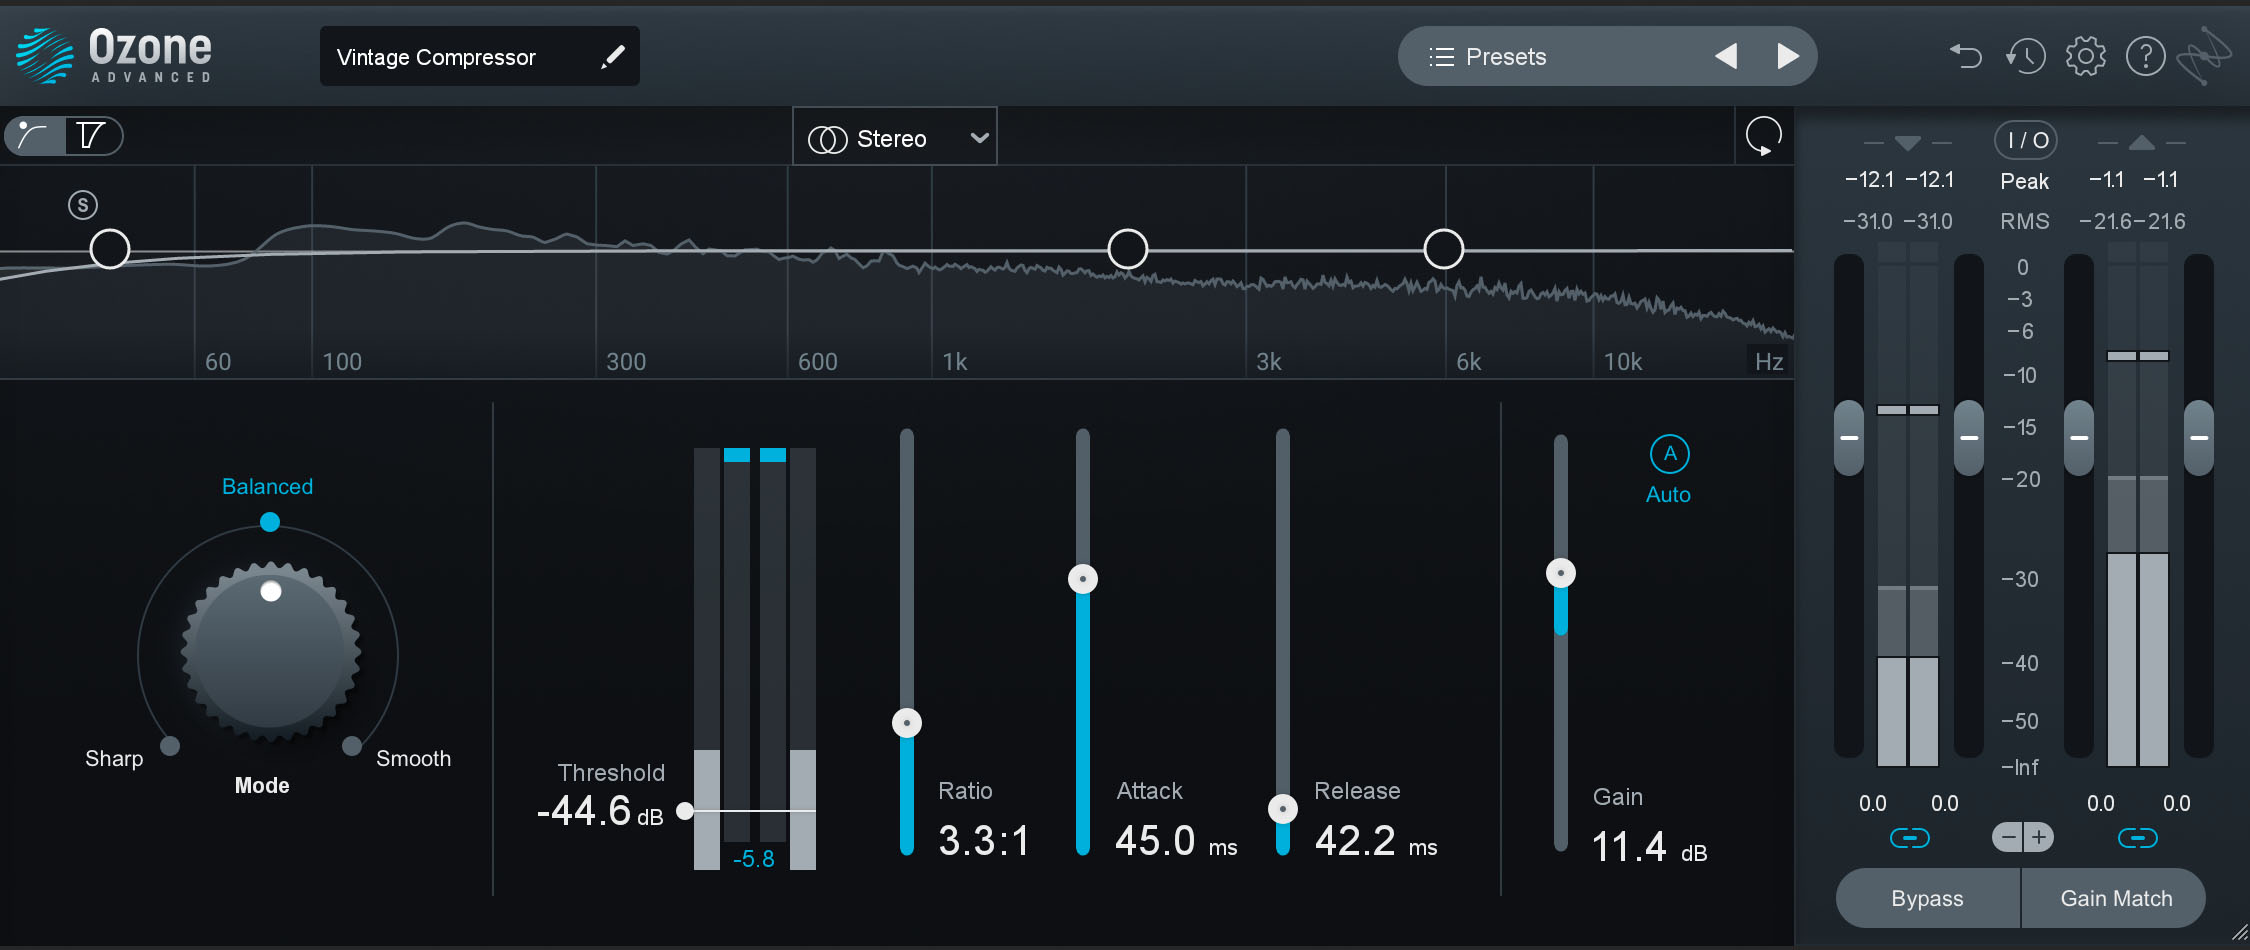
Ozone Vintage compressor on drum bus in parallel
Listen to the before and after example of the drum section before without compression, then as it sounds blended together with parallel compression.
Drum Bus Before & After Parallel Compression
That’s a lot of punch, all thanks to parallel drum compression!
I want to show you one more invaluable setting for parallel drum compression, often quite valuable for the mix process.
When you’re nearing the end of the mix, you might find your drums are lacking the punch they had before, what with all the rest of the instruments going at the same time.
Here, you can edge in a little parallel snap courtesy of the Punch compressor in Neutron.
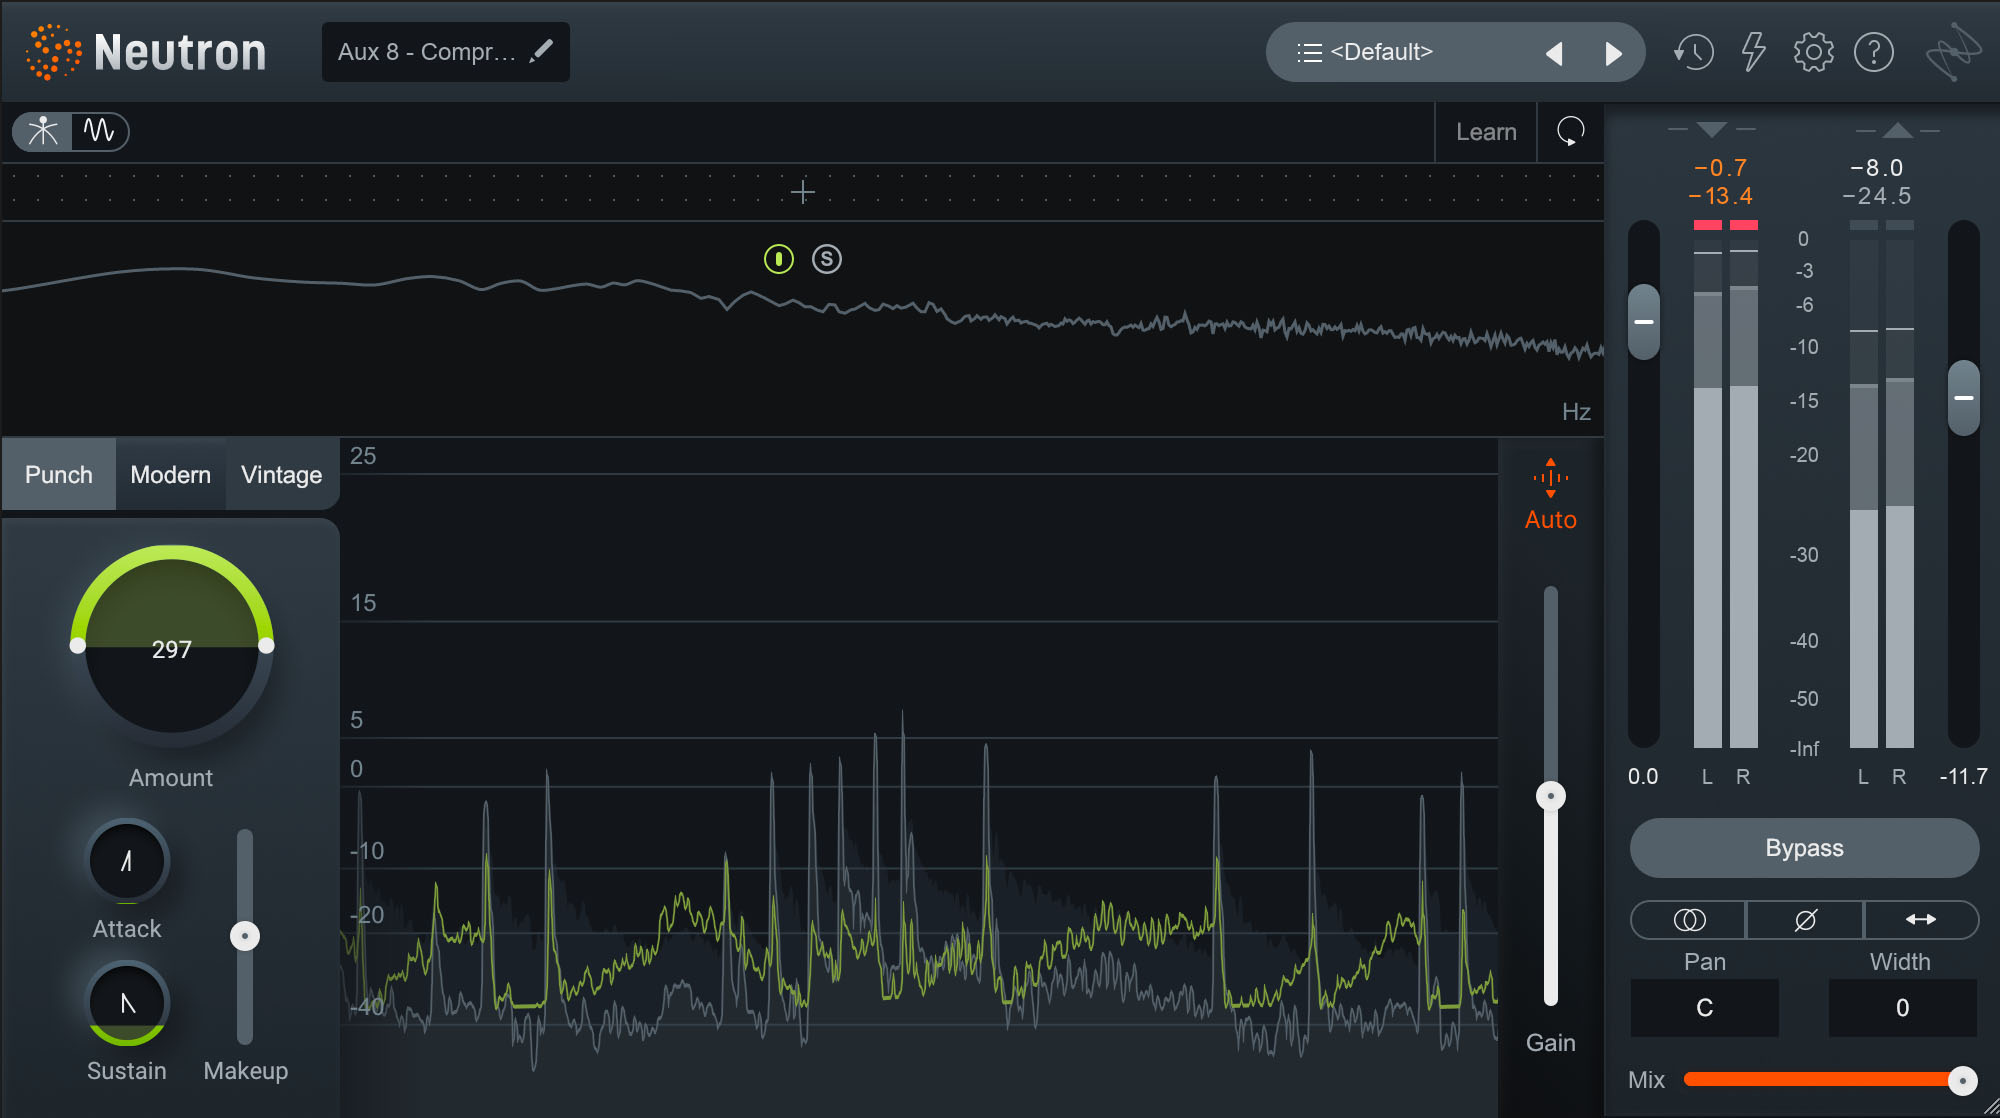
Parallel punch expansion on drum bus with Neutron
On its own, this doesn’t sound very good. The trick is to blend this into the mix until it gives you just enough cut.
Here's what it sounds like before and after.
Drum Bus Before & After Blended Parallel Punch Expansion
Of course, you need to have the full mix in to really dial the effect into the right place.
Get crackin' on compressing drums
There’s more we could cover when it comes to drum compression, but this is already a lot of information for a 101-style article. Armed with this information, you should have everything you need to begin getting the best compression out of your drum sounds.
If you haven’t already, you can demo iZotope Neutron for free to start experimenting with these drum compression techniques in your mix.
