
You've spent hours EQing your kick drum for that perfect thump, compressing your snare for snap, and balancing your cymbals just right. Yet, when you listen to your full drum mix, does it still feel like the individual parts are just... there? Lacking that sense of unity and impact?
If this resonates, then you've reached a critical concept in music production: bus-processing. And today, we're zeroing in on one of its most powerful applications – the drum bus. Get ready to discover how this technique can be the missing ingredient in achieving the tight, punchy, and cohesive drum sound you've been looking for.
Follow along with this tutorial using Music Production Suite , a comprehensive kit of plugins that include everything from creative effects and sonic shaping, to assistive mixing, vocal production, intelligent mastering, repair, and balancing.
The problem with mixing drums
There are countless ways to mix drums. But sometimes, no matter what you try, your drums still feel disconnected – like they’re not part of the same kit or not living in the same space. This is where processing the drum bus, as a whole, can really help you. Many times one simple manipulation of the whole drum bus can net you a better result than tweaking each individual element.
It’s not just about gluing things together with compression (though that’s part of it). It’s about making your drums feel intentional, unified, and powerful. In this article, we’ll show you how to set up a drum bus and walk through some beginner-friendly tips.
First we need to ask a question:
What is a bus?
A “bus” is a signal path that combines multiple audio tracks, routing them to a single channel for collective processing. In practical terms, a bus lets you treat several sounds as one – whether it’s a group of background vocals, guitars, or in our case, drums.
The term “bus” comes from the world of electrical engineering, where a "bus" is a circuit that transfers data or power between components. In many analog consoles, each channel could be routed to one or more dedicated “buses.” Engineers could use these buses to create submixes, applying processing across a group.
As digital audio workstations (DAWs) became the norm, the idea of the bus carried over into the software realm. Most DAWs let you create auxiliary (aux) channels or group tracks, which essentially act as buses.
These days, the terms “bus” and “submix” are often used interchangeably – especially when we talk about something like a drum bus.
So when we say “drum bus,” we mean the place where all your individual drum tracks – kick, snare, overheads, rooms, and so on – come together so you can shape them as one.
What instruments are routed to the drum bus?
There’s no one right way to set up a drum bus. It all depends on the material and your mixing goals.
Some producers split acoustic drums (kick, snare, toms, overheads, rooms) into one bus and electronic percussion (samples, 808s, claps) into another.
Some keep everything together in a single drum bus, but mult the kick drum to the stereo bus for additional control. Others route all drums – acoustic and synthetic – through a drum bus, but send auxiliary percussion like shakers and tambourines to a dedicated aux percussion bus. Some people vary it up on a song by song basis.
In my own mixes, I usually create an “acoustic drums” bus and a “synthetic drums” bus. These feed into a third bus labeled “all drums,” which then gets some sort of console emulation, and in rare cases, EQ or compression. This layered setup gives me flexibility and a clear overview of what’s happening across my drum section.
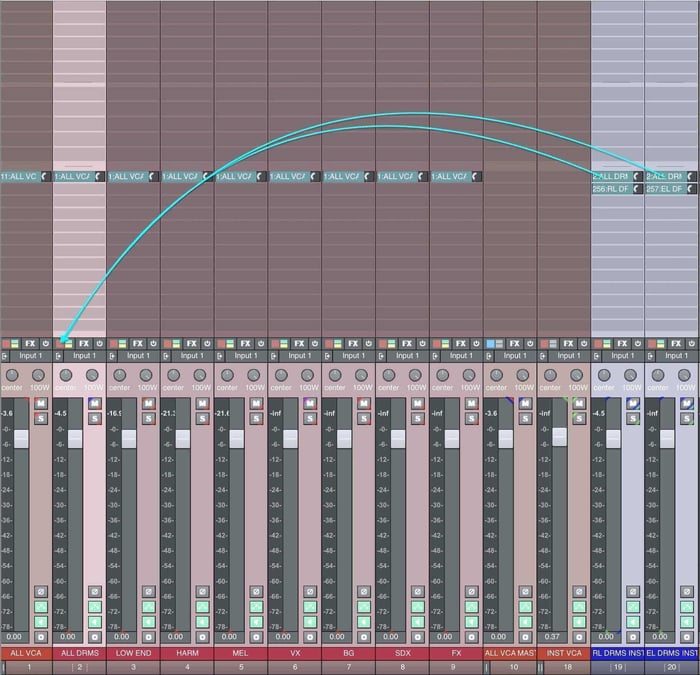
Example of a drum bus in a DAW
What effects go on the drum bus?
Many effects can go on the drum bus! Think of the drum bus as the junction where you shape the collective tone and dynamics of your entire drum section.
The drum bus is a natural place for EQ, compression, saturation, tape emulation, console emulation, and even a touch of clipping or limiting.
Let’s examine these elements of drum bus processing on their own.
1. Compressors
Compression is probably the most common tool people use on the drum bus, so we’re going to delve into it now.
Groove
Compression across the drum bus can get us a few possible results. We can enhance the groove of the drums by playing with attack and release times – as well as the sidechain filter that feeds a compressor – adjusting them all musically to enhance the feel of a song.
Observe how the groove changes as I play with these timings here:
Glue
We can also add a sense of cohesion or “glue” by combining medium time-constants with gentle ratios. Try a medium slow attack, a medium fast attack, a ratio of 2:1, and use the threshold slider to get around 1 to 2 dB of gain reduction.
I’ll demonstrate this using Ozone Dynamics module, starting with clean acoustic drums, and manipulating the compressor until we get the settings described above.
Here’s the before:
And here is what we will turn it into.
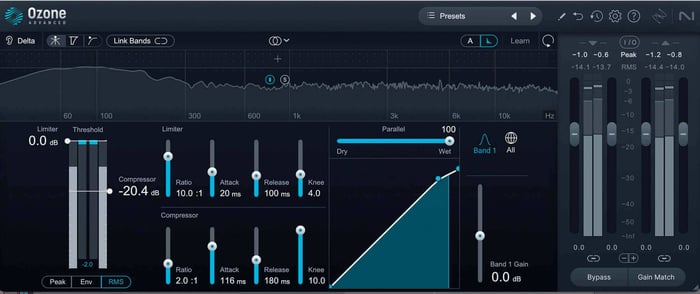
Glue compression settings in Ozone
Crush
We can also slam the ever loving heck out of the drums – reshaping their transients in the process – and blend it in with the dry signal.
Emulations for harmonic texture and nostalgia
We can also use the harmonic and temporal peculiarities of vintage compressors to add their own qualities to the drums. These qualities could be evocative of certain eras, or have their own take on the groove/glue/crush triad I outlined above.
For instance, VCA compressors – the type made popular by SSL – are a favorite for adding cohesion with a recognizable style all their own. In Native Instruments land, you can do this with Guitar Rig Pro’s Solid Bus Comp, the Brainworx bx_townhouse Buss Compressor, and the Vintage Dynamic section of Ozone.
If you want to try playing with groove or parallel crushing, an 1176 style compressor can be just what the doctor ordered. These are available by means of the Purple Audio MC 77 and Guitar Rig’s VC 76.
Sometimes, a VC 76 compressor in mid/side mode can do fun, larger than life things to your stereo image, shifting you out of the realms of the real and giving your drums a larger-than-life quality.
If you’re seeking out a British-invasion style vintage effect – something reminiscent of the post-pepper Beatles – a vari mu compressor can help get you there on the drum bus.
Vari-mus are tube compressors with their own unique take on groove and pump. Often, you can get away with faster attack and release times with these compressors, as they are inherently slower than solid-state dynamics processors. The fast options can be very groovy indeed.
Let’s look at the SPL Iron, the SPL IRON in M/S mode (again, its own vibe), and the NEOLD WUNDERLICH.
2. EQ
EQ on a drum bus helps to sculpt the overall frequency balance of your combined drum sounds, enhancing clarity, punch, and cohesion by addressing problematic resonances or emphasizing desirable sonic characteristics across the entire kit.
A broad, tone-shaping EQ often helps tie things together on the drum bus. It can have its own kind of cohesive effect.
Passive style EQs, inspired by the classic Pultec hardware, often find their way to this particular submix. Observe what the Vintage EQ in Ozone can get us, as well as the Passive EQ provided.
By all means, feel free to use more aggressive EQs if that’s the vibe. API EQs are regarded to have a fastness to the way they handle transients – something that can help add more slice to a drum bus – while SSL’s have their own brand of aggression; they sound more snappy to my ears. Plugin Alliance provides good emulations of both brands.
3. Saturation
Saturation on a drum bus can add harmonic richness, warmth, and subtle compression, making the drums sound fuller, punchier, and more glued together by introducing pleasing distortion.
Console emulations, tape emulators, tube exciters, and other nonlinear processors fall under the umbrella of “saturation,” and these can also make their appearance on a drum bus.
Saturation can be used heavily or subtly. To be sure, you could go with a bold and broad use of saturation, but you better be sure it works, because overt saturation can tire the ear if painted on with a thick brush. You could wind up ruining your entire song.
Used subtly, however, saturation can work wonders – specifically in achieving three goals:
Reconfiguring your peak to loudness ratio
Saturation can reign in peak energy without sacrificing life – if you do it right.
A subtle amount of saturation, used in a broadband capacity, can boost your RMS level while keeping the peak energy the same.
Why does this matter? In a word, headroom: if saturation boosts your RMS level by 1 dB, but keeps the peaks exactly the same as before, you can now pull your drums down by a dB and lose nothing in terms of power or perceived volume.
This will result in a louder track, come mastering time: Since the peaks of the kick and snare tend to be the first thing a limiter sees, a lower peak level on your drums means you can push the whole mix that much further!
Observe how this might be done:
Rebalancing the tone of your kit
Saturation can rebalance the tone of your drums – emphasizing some frequency ranges over others – in a manner different to equalization. Indeed, the results can feel subtler, and have less of an effect on phase relationships as well.
A different kind of stereo trickery
Finally, saturation, applied in mid/side mode, can be a lovely way to enhance stereo separation without resorting to artificial widening techniques – which tend to sound really bad on drums.
4. Limiting/Clipping
If your kick and snare are a little louder than the rest of your drums – but you like the drum balance – try some clipping or limiting on the drum bus to shave these transients down just a bit.
Warning: You have to be careful while doing this, and furthermore, you have to know why you’re doing this.
The main reason you’d use a clipper or limiter at the end of your drum is to shave off a few peaks as transparently as possible so that your overall mix has more headroom.
I usually let a clipper handle this job, though some people prefer limiters. Either way, don’t think of this processor as something to change the tone or impact of your drum bus. You’ll be in real trouble if you think that way.
Instead, go for the opposite: use the clipper or limiter here to change the drums as little as possible.
Observe in this video.
5. Other effects
I’ve shown you the basics, but there’s no need to stop here. You can do whatever you want to your drum bus – as long as you’re confident it sounds good!
For instance, I often use reverb on a drum bus, but in very small amounts. Observe this video, which uses Equinox, a compressor in Guitar Rig, and the Ozone Exciter module to do some fun stuff on drums.
Those are effects all available in the Music Production Suite bundle from iZotope, but there are other plugins outside that collection that sound great on drums. I love driving the limiter section of the Bettermaker BM60 on a synthetic drum bus, for example. Take the electric drums from example 18:
It’s funny, I wound up bringing the processed drums lower in volume when compared to the dry signal – but it still sounds thicker and better to me.
Start using the drum bus for a professional sound
Hopefully this article has provided you with valuable insights into using effects on your drum bus to achieve a more polished and professional sound. Remember, the beauty of music production lies in experimentation, so treat these techniques as guidelines rather than rigid rules. Don't hesitate to explore and discover what works best for your unique sound. For further exploration of drum mixing and production, be sure to check out the related articles below and experiment with your drum bus using Music Production Suite.