
9 tips for mixing if you're not a mix engineer
Are you mixing a song for the first time? Discover these tips for getting a professional sounding mix when you’re not a mix engineer, including gain staging, track referencing, EQ, and more.
So you have an interest in mixing music. Maybe you make your own music, and necessity has become the mother of invention: “I gotta mix my song,” you say, “because no one else will!”
This is a common issue for many bedroom musicians and producers who don’t want to shell out for professional services but are looking for a polished sound. Some are even lured to the dark side, and become mixing engineers outright.
Here are nine tips for mixing songs if you’re not a mix engineer.

Follow along with this tutorial using
![]()
![]()
Music Production Suite 7

1. Make life easy on yourself by organizing your session
Staying organized in your music production sessions can save you time and reduce frustration. That’s why it pays to color coordinate every track by its instrument.
Assigning distinct colors to different instrument groups – blue for drums, brown for bass, red for vocals, and so on – makes it easy to navigate your project at a glance.
Labeling tracks is another essential habit for keeping your session tidy. Instead of leaving tracks named "Audio 1" or "MIDI 3," rename them clearly: "Lead Vocal," "Kick Drum," or "Synth Pad." You can also abbreviate so you can easily see them on the fader: “k in,” “k o,” “sn t,” “sn b”, etc.
This helps you stay organized and helps others too, if you’re collaborating. A well-labeled session ensures that anyone – including your future self – can understand the layout without confusion.
Vertical organization also helps maintain workflow. I always have my instrument groups in the same order: bass, drums, guitars, keys, synths, orchestral stuff, lead vocals, background vocals, and sound design.
Don’t forget about horizontal organization either: it pays to put markers at the verses, pre choruses, bridges, choruses, and more.
If your DAW allows for screensets, make use of them. In Reaper, I press the number 1, and there are all my drums. I can do similar things in Pro Tools and Logic as well – and so can you.
Here’s what my Reaper template looks like these days:
2. Choose your reference mixes
Mixing engineers use reference mixes to stay inspired and hit their targets. If you made a hip hop track, there are certainly going to be other hip-hop tracks you want this mix to compete with.
Think of a Spotify playlist: when you make your own music, you would hope your songs would work well on a playlist with other material of the same genre or style.
Once you select your reference songs, you’ve got options. You can put them in your session, or use a dedicated reference plugin, such as ADPTR AUDIO's Metric AB:
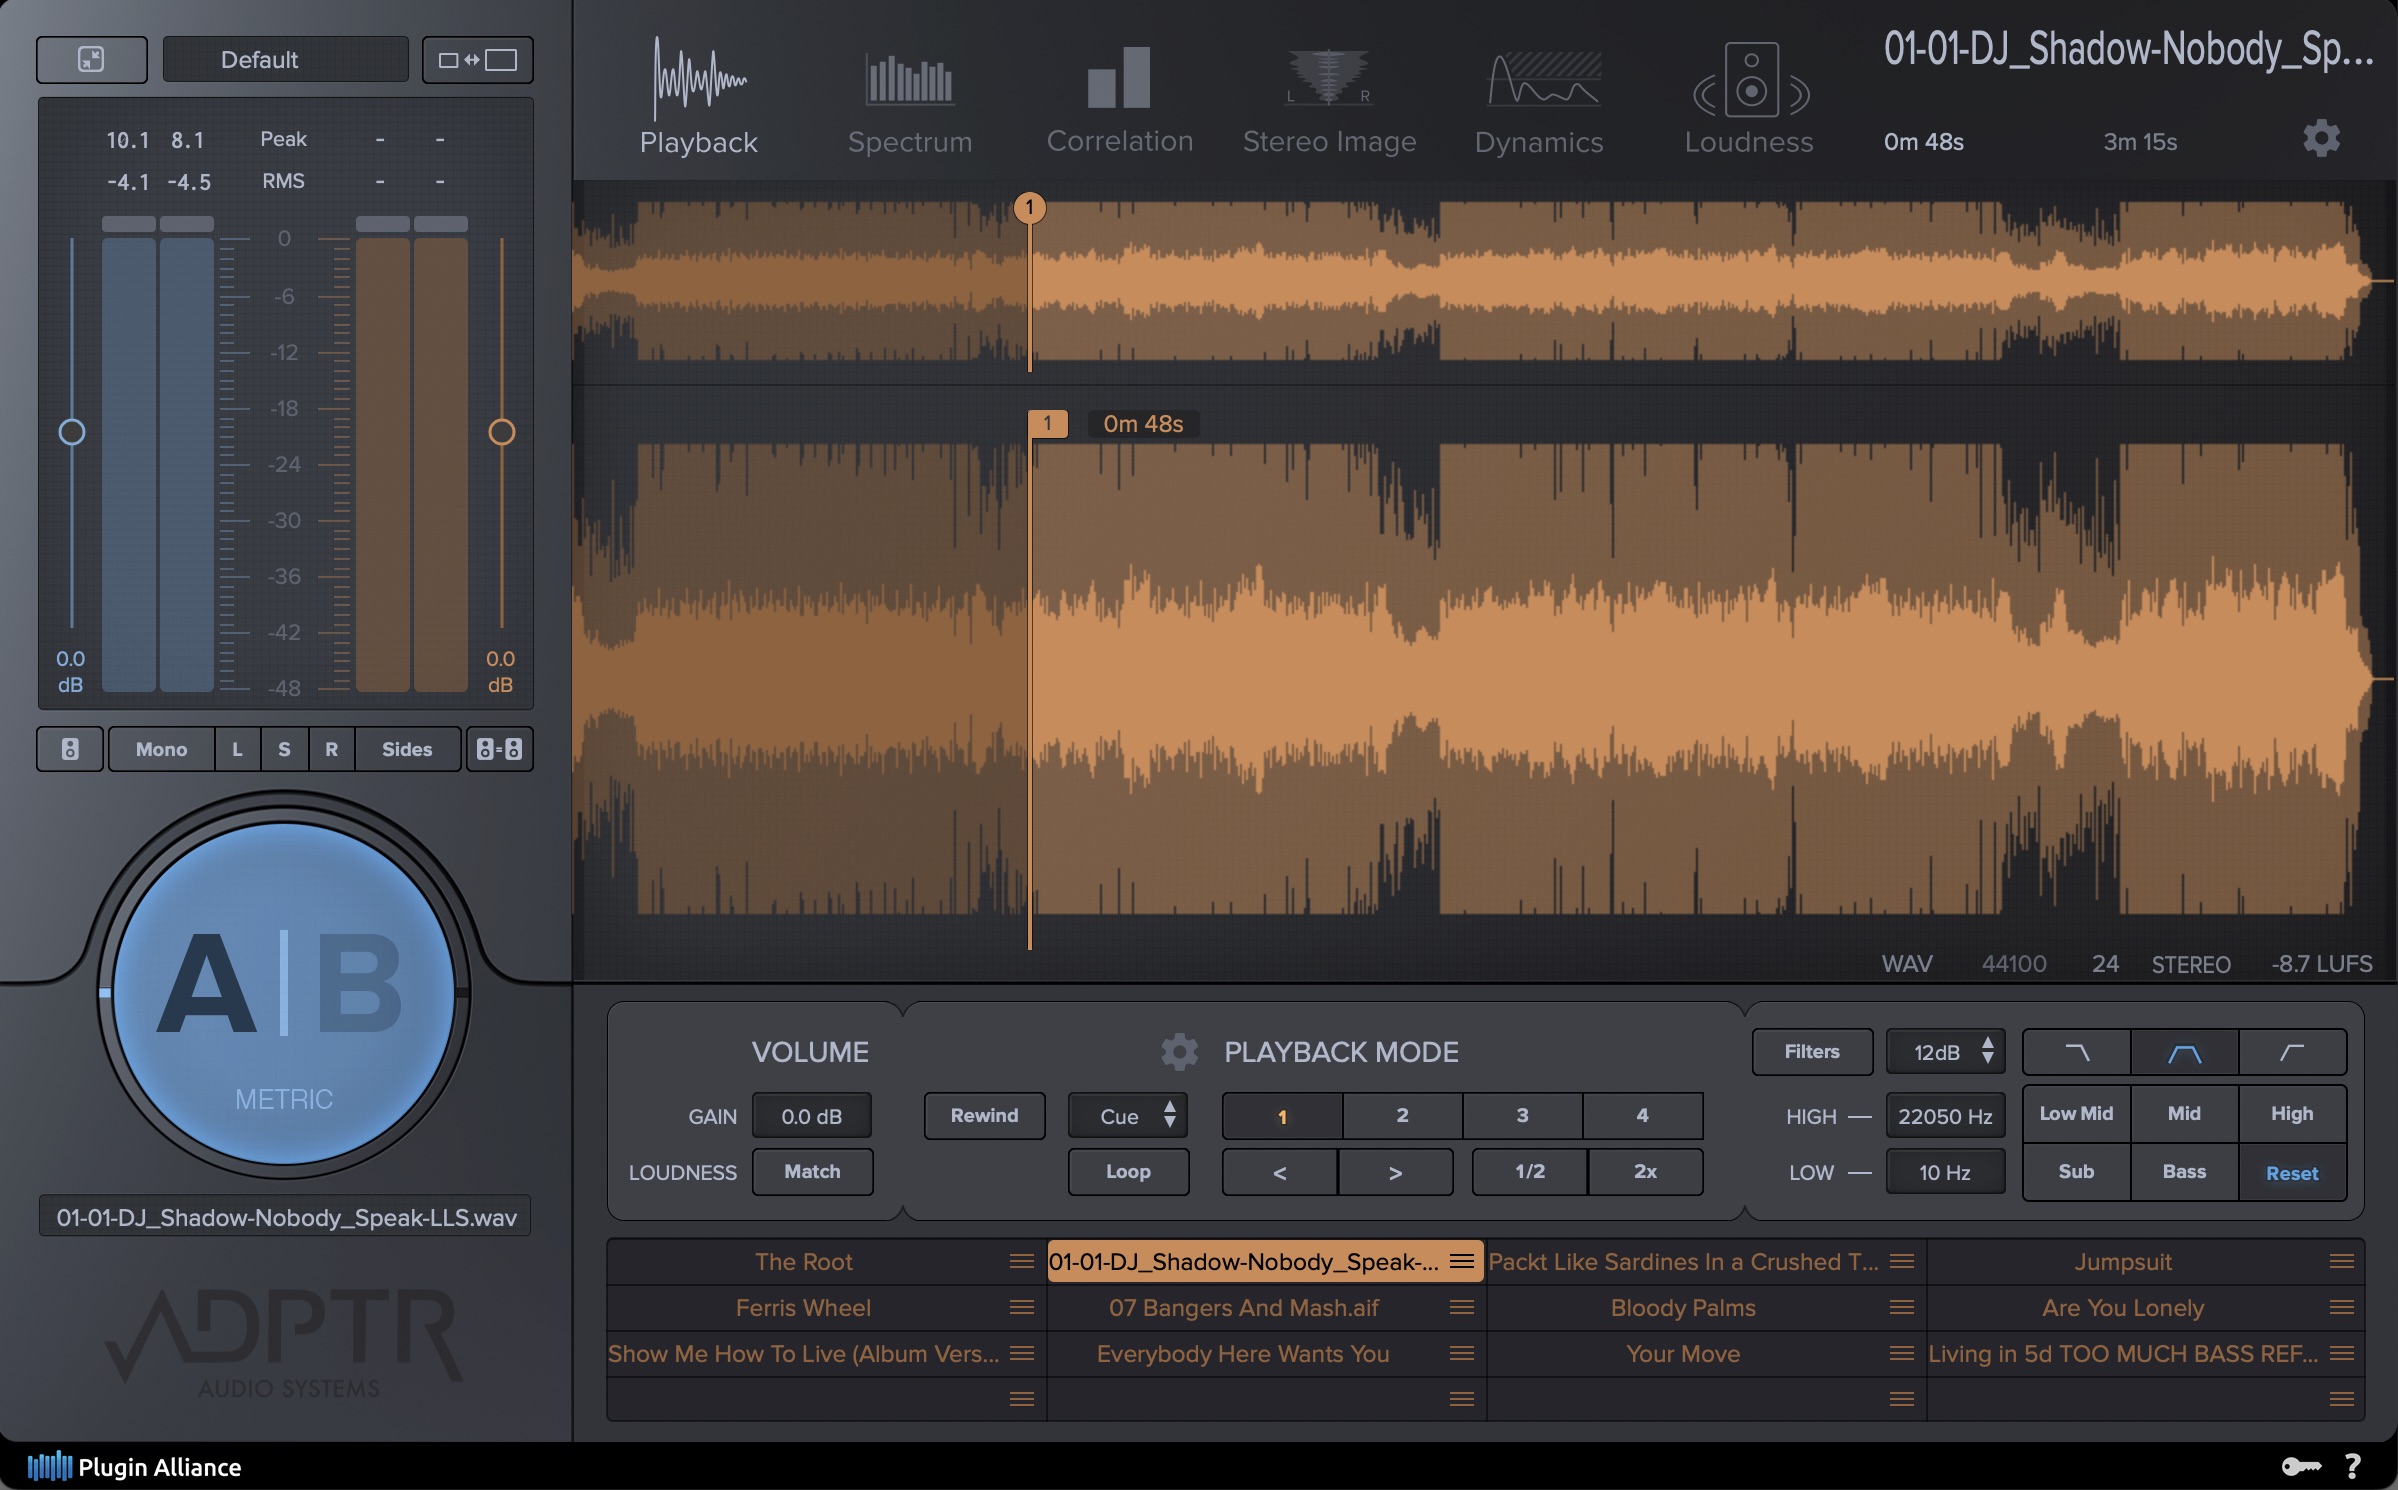
Metric AB
You can also use iZotope
![]()
![]()
Ozone Advanced
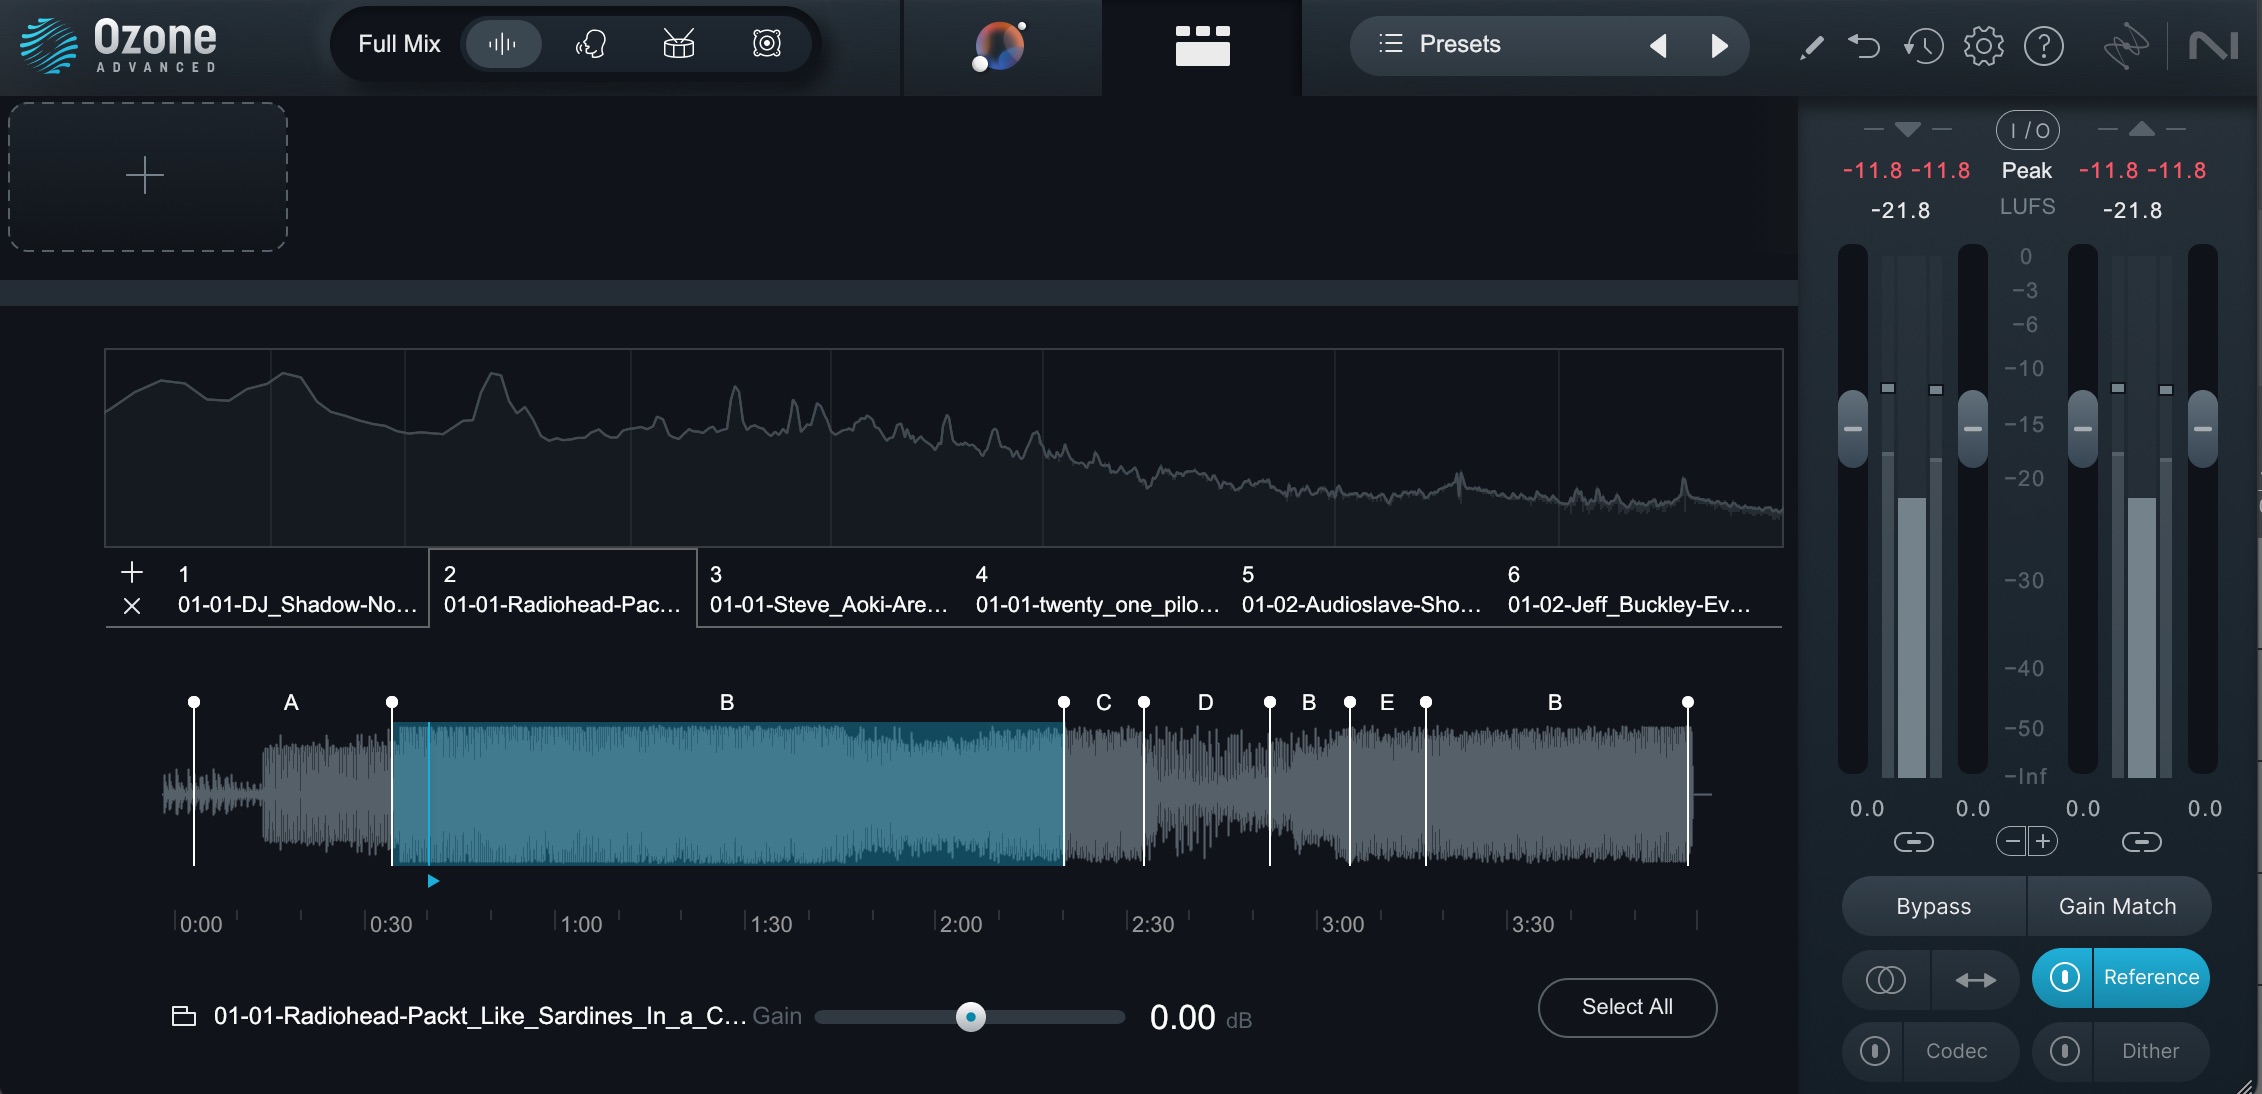
Reference panel in iZotope Ozone helps you compare and contrast audio in your DAW by allowing you to import up to 10 reference tracks, visualize differences in your music with overlaid spectrum metering, and quickly A/B your audio
Now you’ll be able to flip between your mix and the reference mixes as you go to glean inspiration. Make sure to level-match the masters to your mix!
A word on files: your own music collection is a good place to start, but you may need to download a few songs as well. Be sure to secure a lossless file (.WAV or .AIFF) and avoid low-quality YouTube or SoundCloud streams that lack the details you’ll need for accurate comparison.
3. Get yourself a good static mix
Mixing is often about achieving balance, and in most cases, you can get to an initial balanced state with just two controls: level, panning, and polarity flipping. That’s a static mix, and that’s it.
So for 10 minutes at the start of your mix, forget about analog-modeled compressors, dynamic EQs, and all of the other fun tools in your arsenal and return to the basics.
Keep in mind that it doesn’t matter so much what each individual track sounds like, but rather how everything fits together in context.
This is why I often dissuade people from mixing in solo over long periods of time. Also bear in mind that “balance” doesn’t mean “everything equally loud.” Some of the most interesting mixes have unusual sounds pushed to the front, or intriguing sounds that you really have to lean in to hear. This process is called the static mix.
It’s worth noting that
![]()
![]()
Neutron
Click that “Mix Assistant” button, play your song, and Neutron can balance your mixes for you.
However, this might be overkill for your specific purposes: you already have something of a static mix from the production side of things. Your goal, at this point, is to refine the balances with the mix in mind – and to check it against level-matched references from time to time.
4. Think about gain staging in the simplest terms possible
Gain staging is the process of making sure the audio is set to an optimal level for the next processor in the chain in order to minimize noise and distortion. Unwanted distortion can wreak havoc on your mix, including nasty distortion that you definitely don’t want – such as unintentional clipping.
How mixers approach gain staging depends on a lot of factors, such as whether they’re using analog hardware, or how close the producer expects the mixer to stay to their vision.
You’re the producer in this scenario, however. You’re the one making the music. Your session already has plugins, faders at various levels, and other things approaching a mix. Do you just reset all of that and start from the beginning?
No.
For you, I think a far better way to go is to funnel your mix into submixes.
Route all your acoustic drums to an acoustic drum bus. Route all your electronic drums to an electronic drum bus. Go category by category:
- Acoustic drums
- Electric drums
- Auxiliary percussion
- Real bass
- Synth bass
- Electric guitars
- Acoustic guitars
- Real keyboards
- Synths
- Horns/Brass
- Strings
- Lead vocals
- Background vocals
- Sound design
- Effects (reverb, etc)
You can, of course, modify this list however you choose. But this is my system.
Besides reinforcing good organization – and helping with certain tips we’ll cover later – this workflow makes gain staging exceedingly simple:
As a producer mixing your own work, you’re not necessarily worried about the optimal signal level for the fancy outboard gear in your rack. You’re likely staying in a digital, floating point world. And, you’re likely facing the following common problem: your stereo output bus – the final summation of all your music – is probably clipping.
You’re probably hitting values in excess of 0 dBFS, incurring little red warning tracks on this all-important fader.
In your DAW, this might not be a problem during the production stage. But it will be your chief enemy during the mix – and the main reason I’m encouraging you to think about gain staging.
This is why using submixes is so ingenious: by routing everything to submixes, you can instantly lower your levels to something that won’t distort your stereo output.
It’s simple. You select all the submix faders at once, and you bring the faders down until your mix is no longer clipping.
Your relative balances are the same, but you won’t be in danger of distorting.
Bonus points if you can route all these instrument submixes to a single VCA fader.
Explaining exactly what VCAs are is outside our scope – and setting them up changes depending on the DAW you’re using. But a VCA fader will effectively lower all the instruments of any channel it commands with one single move of the mouse, like so:
5. Try a top down approach
Instead of redoing your mix from scratch, use these submixes you’ve just created to shape things to sound better.
Let’s keep using the song we’ve got – "Altered Kindness," by Micah E. Wood. I’m working off his static mix, and I'm just going to do some simple moves to the buses to get the thing where I want it to go. I’ll loop the end vamp for this, and we’ll go from this:
To this:
Will it be perfectly mixed now? No! But the vibe is closer to where it needs to be.
Now, for some more granular tips:
6. Manage frequency buildup and clashes
One of the hardest things about mixing is figuring out what should clash and what shouldn’t. That’s right, some things should absolutely clash in a mix. You don’t just carve out frequencies to sit other instruments in there and expect a good mix to happen – sometimes a bass guitar rubbing against a distorted guitar gives the needed density to a mix.
But often things clash in a bad way, and even though you did your best with your producer hat on, in the mixing phase, you’ll listen to references and see that actually your vocal is getting buried, or your kick drum is obfuscated by the bass – this is also known as frequency masking.
Luckily iZotope has multiple tools in Neutron to help with this, such as the Masking Meter:
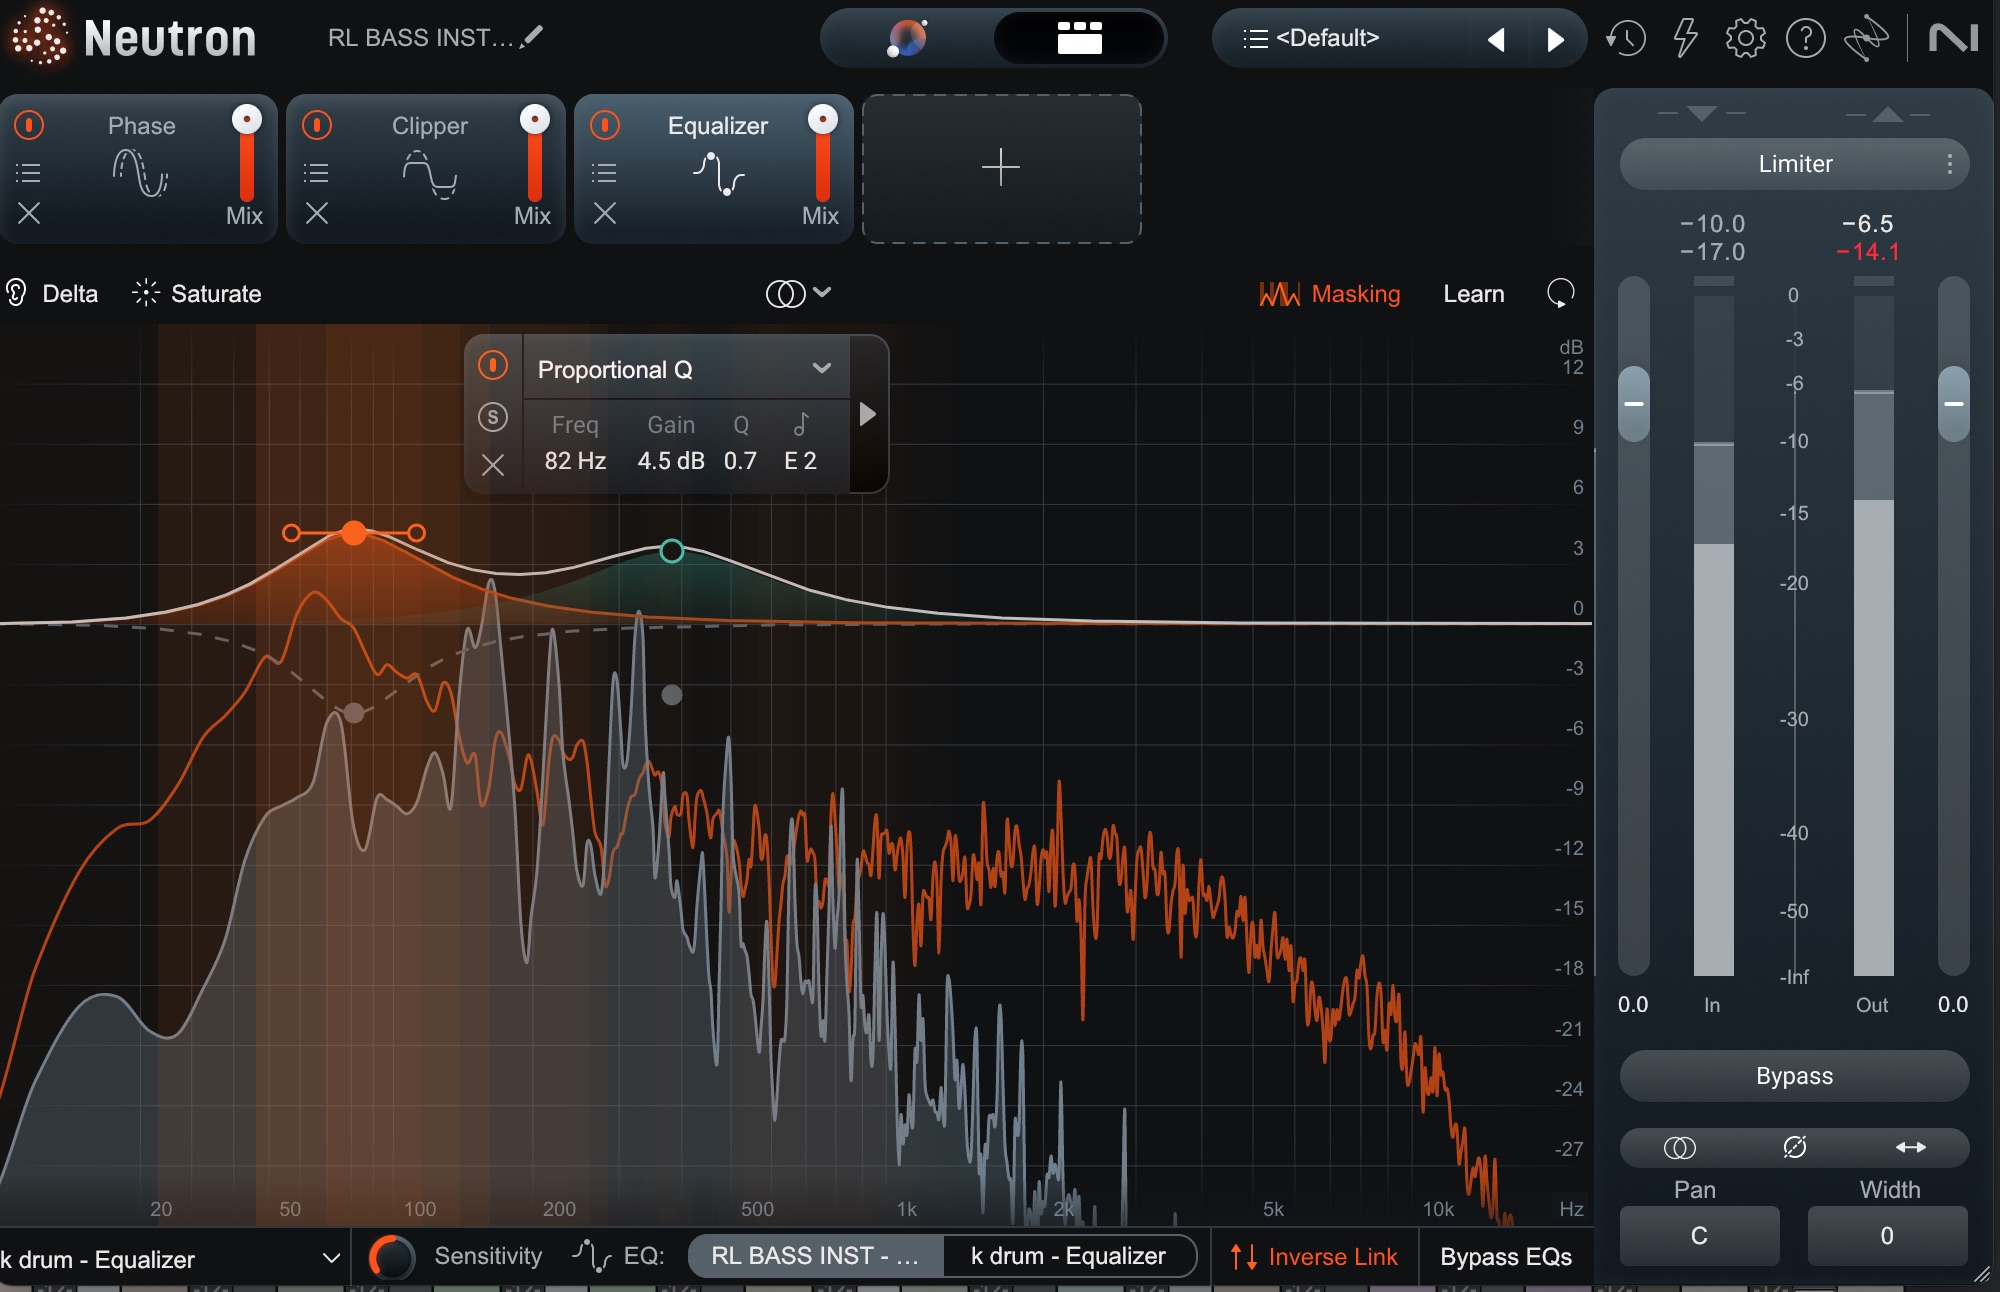
The Masking Meter in Neutron can be used to quickly and easily see where there are tracks competing for space in your mix
The Masking Meter provides a visual representation of frequency clashes, making it easy to spot overlaps. So if your bass drum and bass instrument are both dominating the same range the meter will flag it for you, as it has done in this screenshot.
Load Neutron onto both your kick and bass channels, hit play, and observe the meter’s feedback:
Let this tool teach you how to get started managing frequency buildups – but don’t forget to use your ears. If the clash sounds good, keep it!
There’s also the Unmask module available in Neutron that provides a fast and high-quality method for creating space between two tracks.
7. Understand compression
Of course, equalization isn’t the only facet of mixing. Compression – or dynamics management, in other words – is a very important part of the process.
You probably heard about compression in audio mixing, the tool every engineer loves to talk about. A word to the wise: you will overuse compression. It’s a seductive tool.
So let me make this very plain: don’t use compression just because you think you should. Instead, take the time to learn what compressors do, and the different ways they can help your mix.
I’ve written a ton of material about compressors on this website. It will boil down some things you should know below.
Audio compression can:
- Be used to restrain a part that is wildly too dynamic, so you don’t have to mess with automation for every single bit of the song.
- Bolster a sense of groove where there wasn’t a groove before.
- Cohere several parts together into something more pleasing (this is called “glue”).
- Change the tonal balance of a song due to how it’s compressing (make vocals sound more sibilant, or thicken them up).
- Change the overall color of a sound by virtue of its circuit or modeled-circuit path.
- Enhance, or tame, transients and sustain
That’s a lot to keep in mind, and we haven’t even covered multiband compression, dynamic EQ, or iZotope’s spectral processing which dynamically shapes bands of frequencies.
Indeed, Neutron and Ozone have compressors, and they all sound and work differently.
And we haven’t even covered the other tools provided in Music Production Suite, many of which give you emulations of classic colorful compressors.
One bundle, many tools – and perhaps a confusing number of choices. That’s why we have so many articles on compression in these digital pages. We can sort you out for any compression need, from taming a wildly dynamic part, to adding color.
I recommend starting with this guide on compression mistakes to avoid.
8. Abide by the law of contrast
Though by no means a strict rule, following the law of contrast will serve you well. What this means is that no one effect is the key to unlocking your mixes: instead, it’s what any effect stands in opposition to that makes the difference.
Reverb is a great example. Reverbs can create a mood like nothing else. But if everything has the same reverb on it, the mix will sound like mush. Indeed, reverb will get you nowhere without dry material contrasting against it.
Contrast and balance: those are the keys. If too many channels are sent to a reverb, you will lose all sense of detail and shape, whereas too many dry elements will come off as flat and boring. You can read more about this in my article about mix depth.
This also applies to the overall song: sections should feel different from each other – and since you’re in the producer’s chair wearing a mixer’s hat, you can change the arrangement however you want to provide contrast, all while maintaining balance.
9. Listen at healthy levels
This tip applies to all stages of the music creation process, but it’s particularly important in mixing. It can take awhile to mix a song – sometimes it takes a few hours, but it can easily stretch out to a day or more, particularly for those new to the sport.
If you crank things up at an early stage, subs woofing and all, you will quickly tire your ears and lose perspective on the mix. I imagine you’ve heard and read many cautionary tales about this topic before, so I won’t go into detail except to provide you with our article on listening fatigue and how to prevent it.
That being said, it can be useful to bring up your playback level now and then – this will reveal the harsh frequencies, particularly in the mids and highs. But do this sparingly. I’d even go as far as taking a break after to reset your ears.
I’m a bit of a freak about this. Every day I go to mix I make sure I have my monitors calibrated to play back my reference mixes at 79 dB SPL, C-weighted, in my room. I listen to some references to tune my ears for the day, and then I get to work, keeping my levels and monitoring in check.
This means if I’m mixing at -18 LUFS, my monitors will be set to play -18 LUFs back at 79 dB SPL. When I want to blast, I know what setting on my monitor controller will take me up to 85 SPL. When I check in headphones – or mix in headphones, as is more and more the case with a small child in the house – I have set levels for that as well, to make sure I don’t tire.
Adopt practices like these to save your hearing and save your mind.
Bonus tip: Don’t think about mastering yet
If you’re reading this, you’re probably at the beginning of your journey mixing music, which means you honestly shouldn’t think about audio mastering yet. Mixing is hard enough without worrying about the game of subtlety and compromise that mastering necessitates.
Most professional mixing engineers work with mastering engineers for a reason: it gives them a safety net. The engineers that do tackle both disciplines at the same time hopefully have the training and expertise to make it work. But really, it’s hard to get things balanced, moving, grooving, loud – but not harsh – the closer you get to mastered levels.
So don’t think about mastering until you’re happy with the mix – and when you do plan on releasing the track, see about hiring a professional mastering engineer. At least at first.
However, you can use Ozone to give you a ballpark estimate of how your mix would sound in the real world, at real-world levels, with moves made to help with balance and translation.
Ozone has a Master Assistant which does a really good job at that. You tell it a few basic things about how you want your final product to compete, and it will supply a balanced, translatable result at healthy levels.
Observe what it sounds like in real time. You’ll see me loading it up, analyzing the results, tweaking it, changing tonal profiles, and level-matching it to the mix as I compare the two.
I can see the choices it’s making to get to a louder level, and many of them involve sacrificing low end to get to competitive volumes. I can take it as a guide while I mix, if I want, or I can ignore it. In this case, there are brightening things I like about it, and choices made to the lows that I don’t.
It can be an assistant of sorts to get your mix to a better place.
What it cannot do, however, is quality check your mix for errors that escape your listening environment – like clicks or pops. Likewise, it won’t help an EP of material flow seamlessly. It will not supply you with perfectly topped and tailed files at various sample rates and formats.
And it won’t call you up to say “you don’t have to be so cagey with things in the 3 kHz region,” or “you did a really good job with this one.”
Start mixing your track
Remember that making the leap to engineering from production is a matter of balance and mindset. In the mixer’s chair, you leave production behind and set upon a new task of goals. Keep these goals in mind, follow the roadmap laid out above, and you should do fine.
And if you haven't already, check out iZotope
![]()
![]()
Music Production Suite 7