8 Tips for Mixing Rap and Hip-Hop
Learn mixing tips that work especially well for mixing rap and mixing hip-hop, including delays, stutter edits, reverses, parallel processing, and more.
Mixing rap and hip-hop can be both liberating and challenging. On one hand, you have the opportunity to try more creative mix techniques like vocal throws that you'll hear across many of the most popular hip-hop tracks today. On the other hand, mixing rap comes with a unique set of challenges like balancing the vocal against the beat, dialing in the right amount of vocal polish against a full low-end presence from the kick and bass.
To help with your pursuit of both, I’d like to share eight tips for mixing hip-hop and rap that can give you the polished sound you’re looking for in your production.
Before we get started, though, I should note that I’m going to be referencing a lot of mixing plug-ins throughout this article. With the exception of one I couldn’t not mention, every plug-in I talk about below comes with a


iZotope Music Production Suite Pro: Monthly
In this piece you’ll learn how to:
- Avoid audio clipping
- Get a hard-hitting sound by splitting the bass
- Keep vocals tight with timing and clean reverb
- Play with pitch and formant for a unique sound
- Delay specific words to fill in the gaps
- Chop it up to get a stutter edit
- Flip and reverse tracks for smooth transitions
- Use parallel compression to get a punchy sound
This article references a previous version of Neutron. Learn about 

Neutron 5
1. Avoid audio clipping
In an effort to have the loudest track possible, one of the most common problems in rap and hip-hop recordings is audio clipping. Audio clipping is distortion that occurs when signal levels are beyond the limit of a device. In rap and hip-hop, it’s especially common that vocals in particular will be recorded “too hot,” meaning they’ve crossed the threshold of 0 dBFS, which causes unwanted distortion to the recording.
The first (and easiest) way to avoid clipping is to make sure your levels are set properly when recording. But, if you aren’t able to re-record the audio, it may be necessary to apply some processing to repair it. If you receive vocals (or any other recordings) that have clipped, you can run them through


RX 10 Standard

iZotope RX Pro’s De-clip plug-in
Another thing to consider is that, even if your files aren’t clipping, they can still be so hot that clipping can easily occur later in the signal chain. For example, let’s say the lead vocal peaks at -1 dBFS but then you do a 3 dB boost when EQing it. This will cause your vocal to pass the 0 dBFS threshold and cause clipping. So make sure you allow plenty of headroom for your instrument tracks before you begin applying any processing.
Also, don’t be tempted to think you can fix clipping by just turning down the volume fader of a track. A track’s fader typically comes after its inserts (where you insert plug-ins) in the signal flow. So, if clipping has occurred in a track’s EQ plug-in for example, lowering the fader after it will only attenuate the clipped signal, not reduce the amount of distortion. So, it’s always better to turn down the signal before the clipping occurs.
2. Get a hard-hitting sound by splitting the bass
If you want your bass to really hit hard and clear, here’s a clever trick: split your bass in two. Make a duplicate of your existing bass line and have this duplicate played by a pure sine wave. Then, shave off the low end of your original bass (everything below about 60–90 Hz on down) with a high pass filter in an EQ. Here’s an example of the EQ in


Neutron

High-pass filter on bass in Neutron
I know what you’re probably thinking. Won’t this take away from the character of the bass? The thing is, subwoofers have a much easier time playing a pure sine wave than playing a signal with a lot of information. So, if you can leave the lowest of low frequencies up to the sine wave, your subs will sound much “subbier.” And, by keeping your original bass to play only the top end, you’ll still get all the grit and texture coming through.
Don’t believe me? Check out the audio sample below to hear what it sounds like before and after splitting a bass note. Make sure you’re listening on good headphones or mixing monitors, though, so you can fully hear those low frequencies.
3. Keep vocals tight with timing and clean reverb
One common mistake when mixing rap and hip-hop is having a messy vocal section. It’s standard practice for rappers to record a lead vocal, a double of it, and some vocal throws (a track in which only certain words of the original vocal are performed to highlight or emphasize them), but sometimes the vocal production can be much more complex.
If layered vocals are panned in the same position and have timing discrepancies beyond about 20 milliseconds of each other, the result can sound like stutters, slapback, or echo, which is distracting when the goal is clarity. Before you begin mixing the vocals, make sure each vocal track aligns with the main vocal to keep things nice and clean.
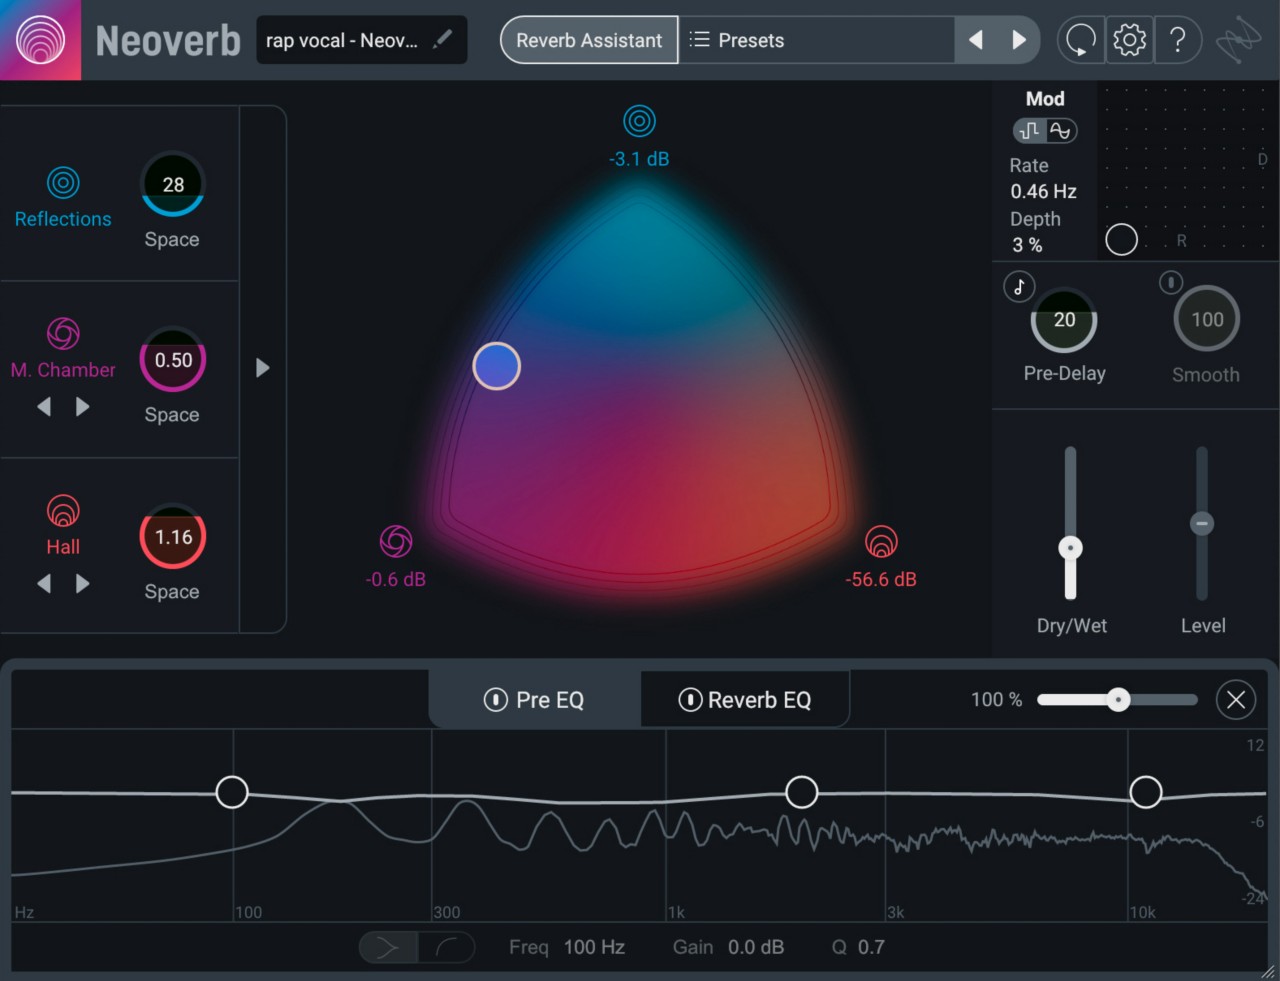
Another common problem with mixing hip-hop vocals is adding too much reverb. Reverb can give a vocal a good sense of space by adding ambience, but make sure you aren’t drenching the vocal in it, otherwise it will wash it out and make it unintelligible. For mixing rap vocals, I like to use


Neoverb Pro

Use Neoverb Pro to add ambience to rap vocals
Below is an audio example of what Neoverb Pro sounds like on some rap vocals (first dry, then with Neoverb Pro applied).
In the end, the vocal is typically the central focus of hip-hop and rap tracks, so you want to make sure the vocal stays clean, clear, and in focus.
4. Play with pitch and formant for a unique sound
A cool way to draw attention to certain words and phrases, or to create variation where it previously didn’t exist, is to pitch-shift them. For example, if the vocals in the second verse rap the same line back to back three times, adding a pitch-drop to one of them might prevent it from seeming too repetitive.
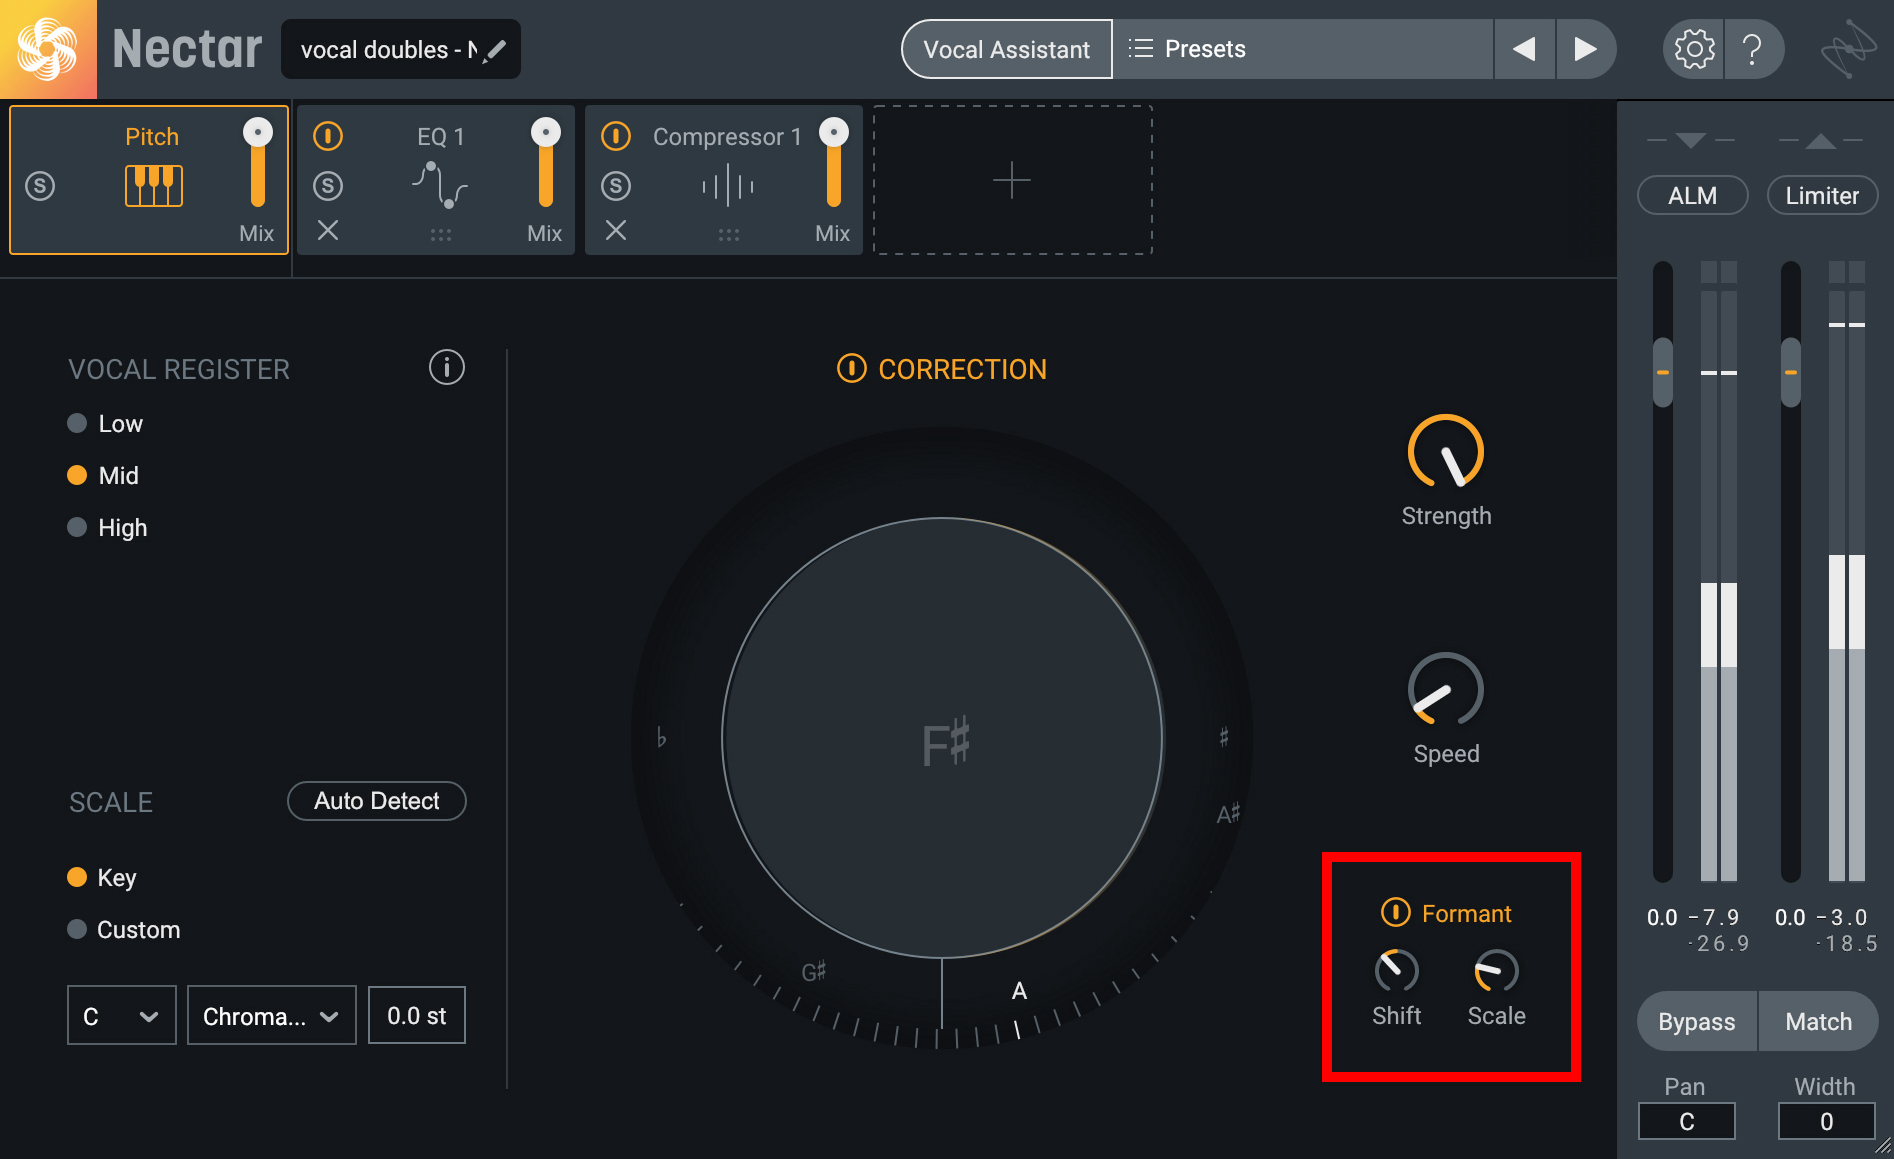
Another way to add a creative flavor to a track is to play with the formant of the doubles or vocal throws. In


Nectar Pro

Nectar Pro’s Pitch module allows you to change the formant of a vocal
When you apply formant shifting to vocal doubles or vocal throws, it helps them stay out of the way of the main vocal while still providing the vocal section with more bulk. Hear it in action in the audio clip below.
Get creative with pitch and formant changes on vocals to breathe a little extra life into your hip-hop mixes.
5. Delay specific words to fill in the gaps
A nearly unavoidable effect that you’ll hear in rap and many other genres is called “vocal delay throws.” It’s a fancy phrase used to describe the process of repeating very specific words via echo or delay. It’s a go-to hit because it’s a fairly easy way to fill in gaps between vocal phrases. This technique is most often applied to the last word in a particular phrase. Check it out in the example below:
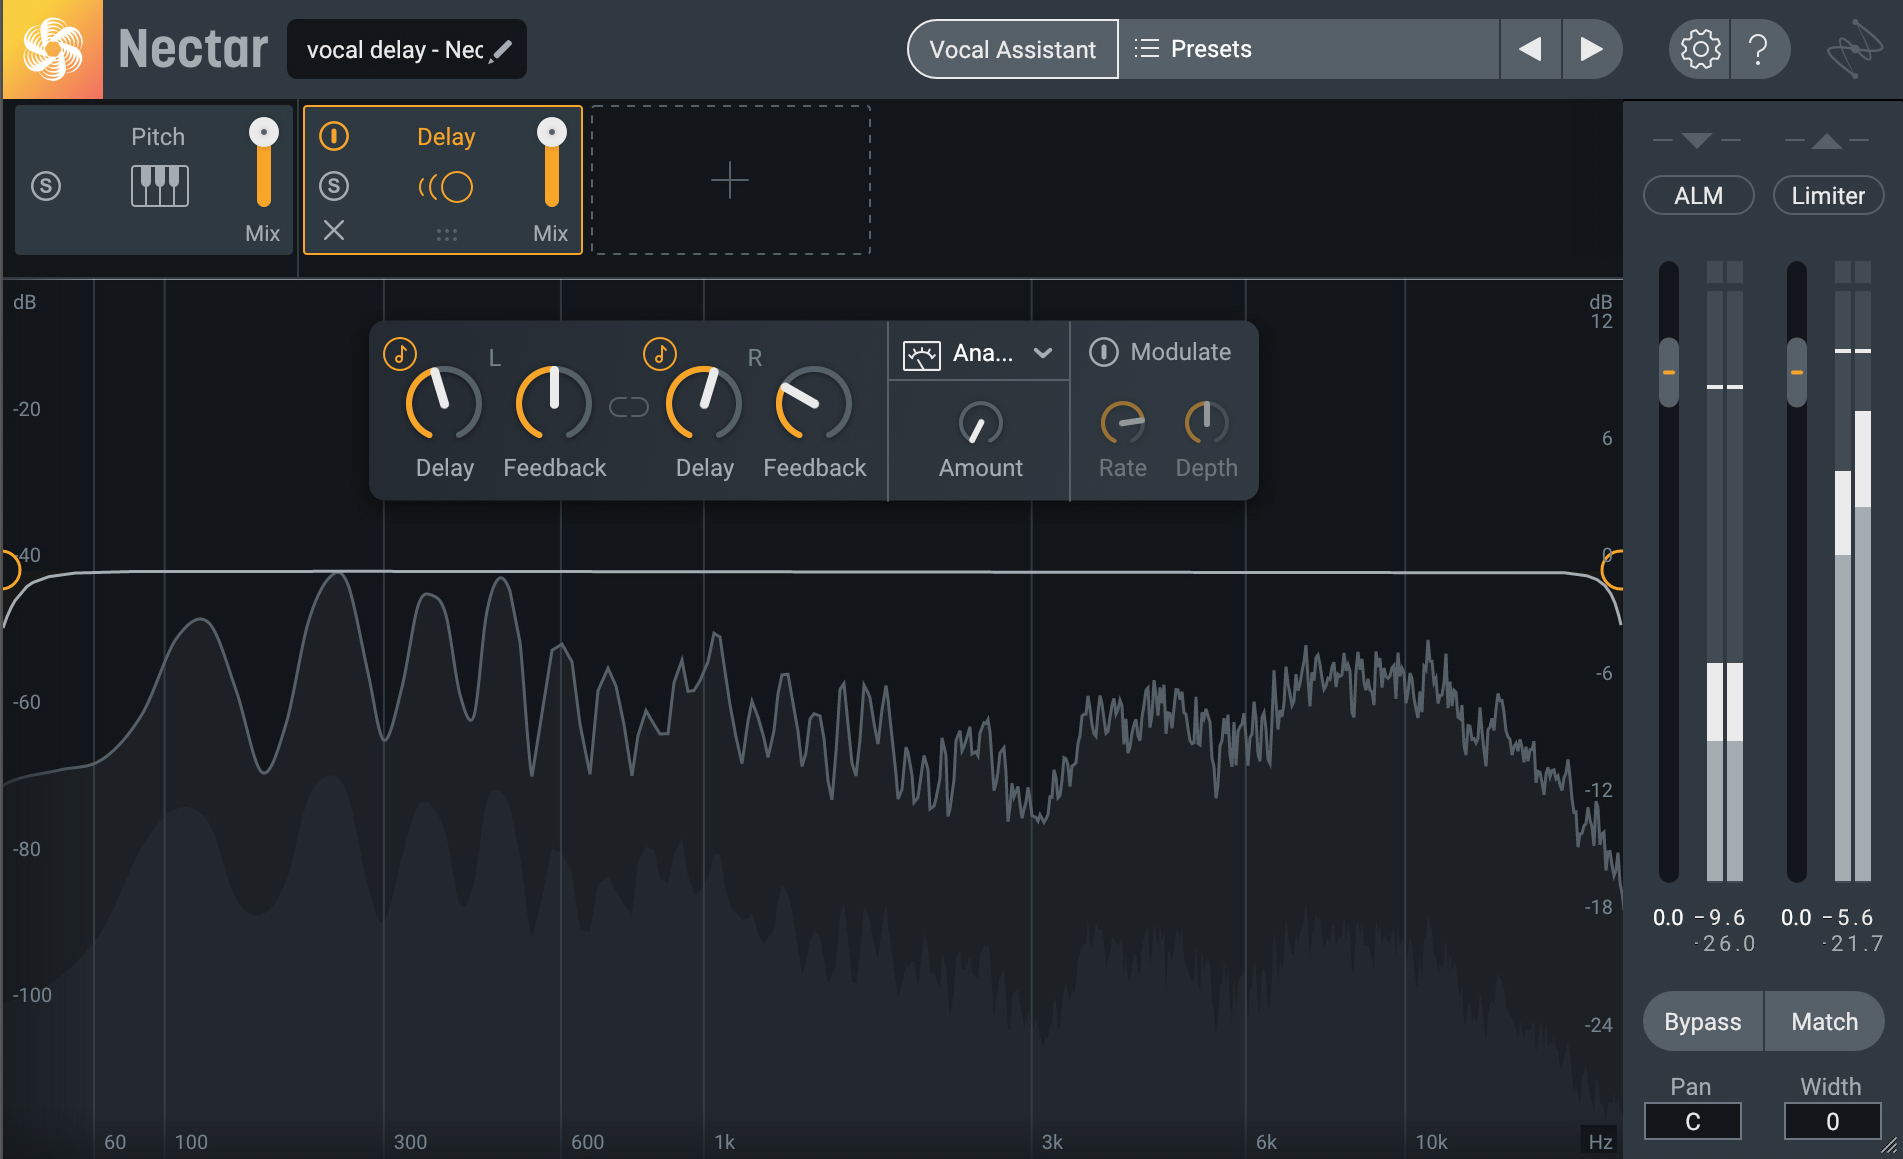
To achieve this effect, I created a duplicate vocal track with only the word “do” on it and then used Nectar Pro's Delay module to add some echoes. When doing this, it’s important that you turn the module’s Mix amount all the way up to 100% so that you don’t actually hear the initial word—only the delays. It can add even more of an interesting texture when you delay the left channel at a different rate than the right (as heard in the audio example above).
Here’s a screenshot of the instance of Nectar Pro I used to create this effect.

Using the Delay module in Nectar Pro for vocal throws
To take it one step further, you could even add additional module effects to the delays in Nectar Pro to create a more unique sound. Adding the Dimension module after the Delay module could give the echoes more width. You could also add some grit with the Saturation module or even create harmonies with the Harmony module. Nectar Pro really is a vocal processing powerhouse that inspires some really creative sound design, so feel free to get pretty wild with it.
6. Chop it up to get a stutter edit
There is another cool special effect and it can be done with or without special plug-ins. On the streets, it’s known as the “stutter edit.” It involves editing the vocal to make it sound like an obvious stutter or stammer. If this is done in rhythm with the song, it can sound very cool. Check it out in action:
Stutter edit without plug-ins: Imagine that you are working on a vocal phrase that starts with the word “get.” You’d select a small portion of the word, just the “g,” for example. When possible, select a musical amount of time like a 16th note or 32nd note; it’s easier to keep it in time with the music. Copy and paste the small section before the original word. By pasting it multiple times before the original word, you can create rhythmic patterns. You could easily end up with “g-g-get,” “g-gg-get,” or any number of other iterations.
Stutter edits don’t have to be at the beginning of words; they can be used to slice up the middle and end of words, too.
Stutter edit with plug-ins: iZotope’s


Stutter Edit 2
Stutter Edit 2 isn’t just great on vocals. You can use it to glitch up drums, instruments, FX, or just about anything else! Please note: Stutter Edit is the only plug-in mentioned in this article that does not come with a Music Production Suite Pro membership.
7. Flip and reverse tracks for smooth transitions
No surprises here! The reverse effect achieves the sorcerous result of playing audio backwards. I personally find this is best applied to a low-volume layered vocal, reverb, or drum hits in intros, breakdowns, bridges, and outros.
Select a word, phrase, or instrument part and reverse it! Yep, it’s really that easy and immediately rewarding. When applied to drum and cymbal hits or reverb, the reverse effect gives you a dramatic swell—it starts quiet, then fades into a loud and abrupt end. This effect works best to help transition between sections of your track, but can be used anywhere you want to build tension and hype. For example, here’s an audio sample of a cymbal crash:
And here it is in reverse:
Reversing drums, vocals, and other instruments can definitely add some unique sonic flavors to any hip-hop mix.
8. Use parallel compression to get a punchy sound
Parallel compression, also called “New York compression,” is the process of adding a compressor to an audio track and then blending the compressed signal back in with the original signal. Parallel compression allows you to get the best of both worlds because you get the punchy, in-your-face sound that the compressor gives, while still keeping the transients and dynamics of the original audio. When mixing hip-hop and rap, I recommend using parallel compression on drums to make sure they really pack a punch. But you can also use it on vocals or other instruments to help them pop in your mix.

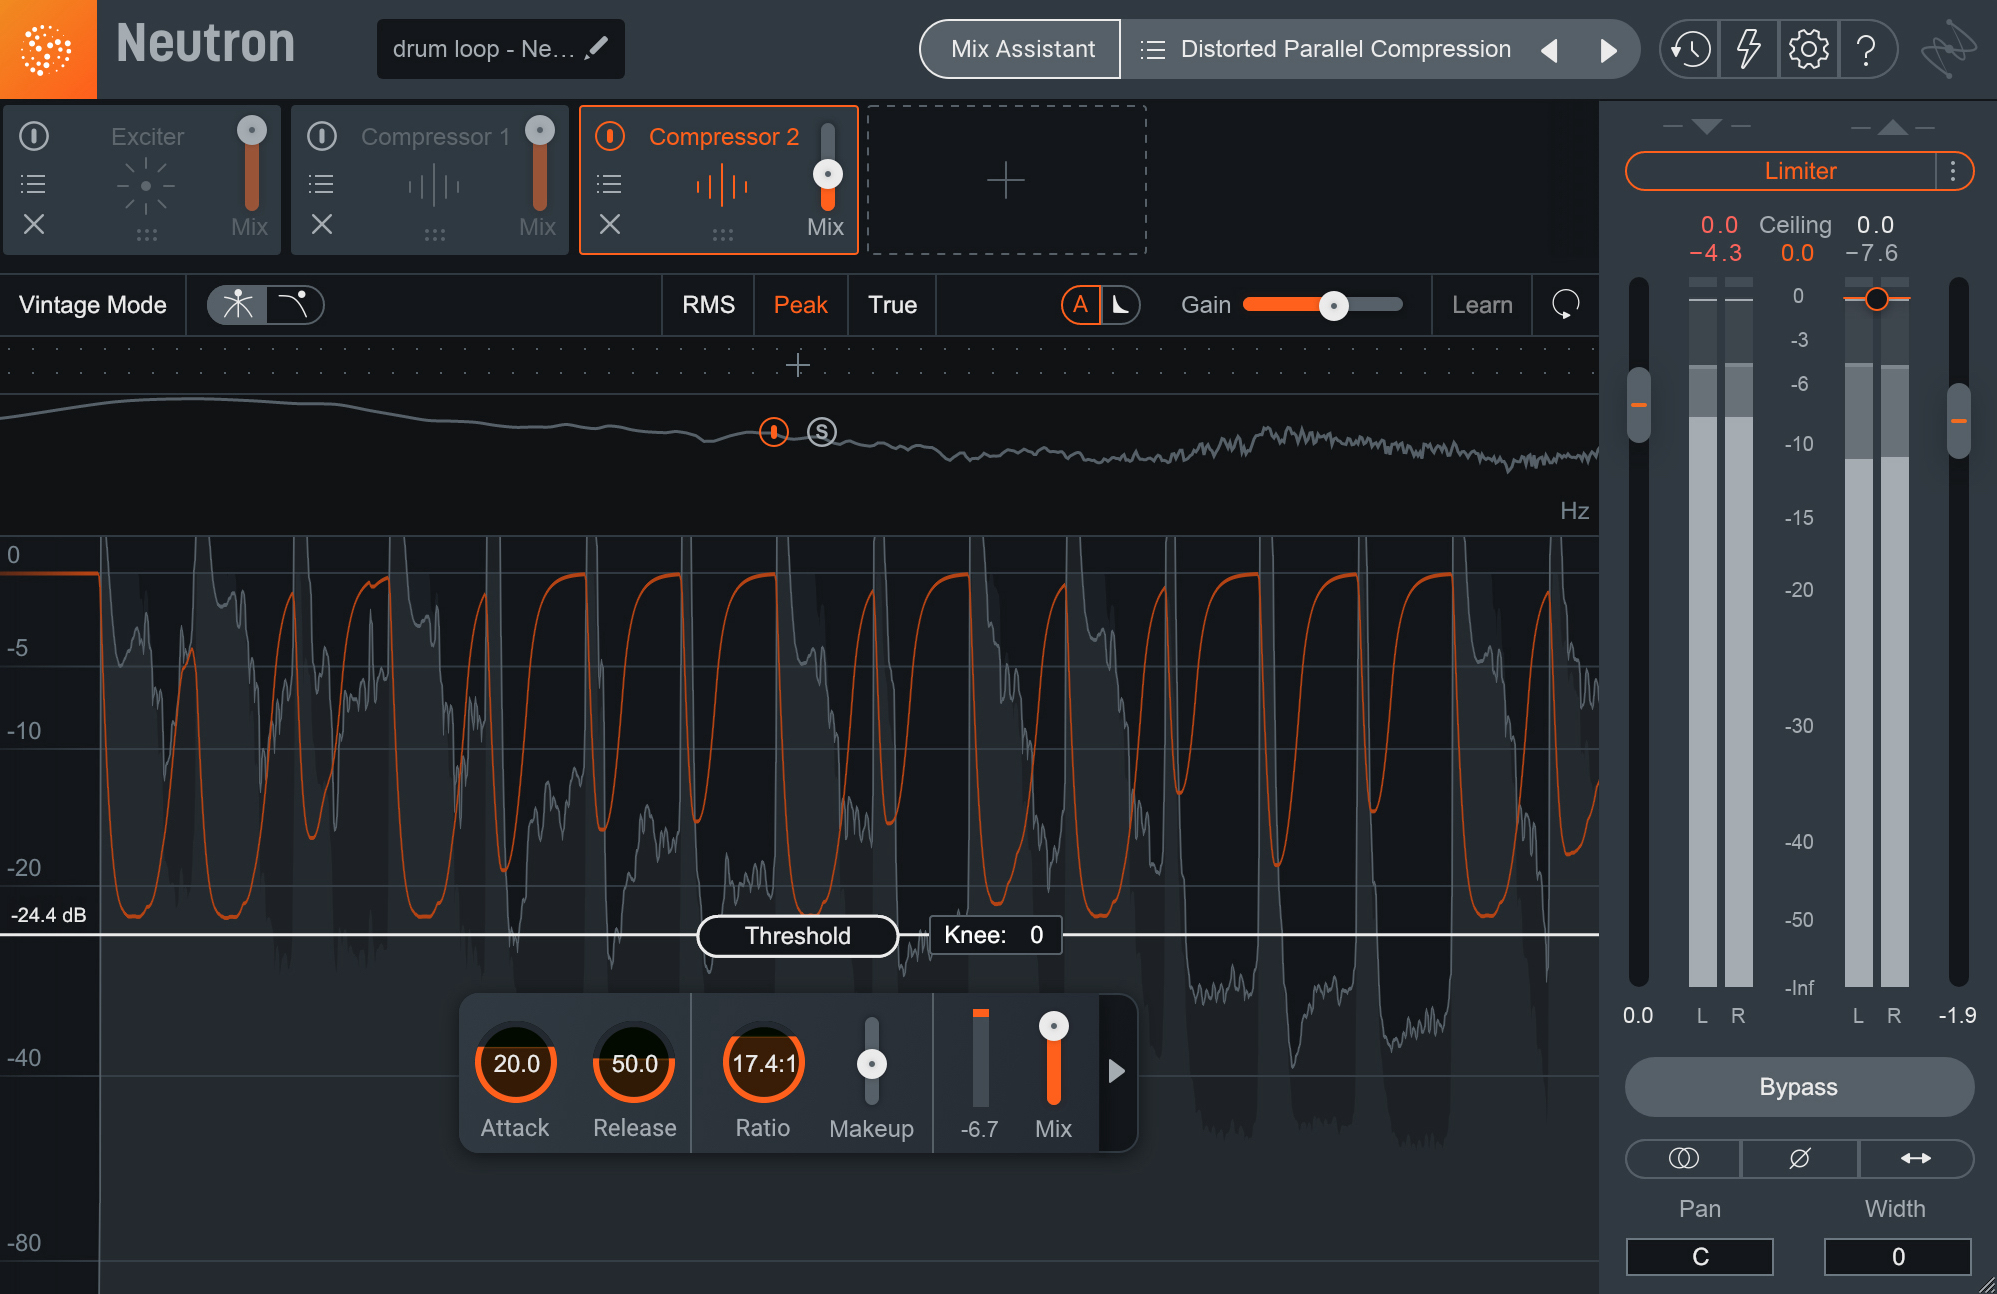
Parallel compression in Neutron
With Neutron, parallel compression is as easy as sliding a fader (‘cause that’s literally all you have to do). Simply apply compression with one of the two Compressor modules in Neutron and then drag the Mix slider down for the module to blend back in the original audio. Here’s an example of a drum loop before and after adding parallel compression in Neutron:
Using this technique can really help elements stand out in your mix, just be careful to avoid these parallel compression mistakes.
Start mixing rap and hip-hop
Hopefully these tips will help you level up and bring some fresh ideas to your next rap or hip-hop mixing session. Again, all the plug-ins mentioned in this article (with the exception of Stutter Edit 2) come with a Music Production Suite Pro membership.


