What is tape emulation, what does it actually do to your audio, and how should you use it to achieve professional analog warmth?
Tape emulation is one of the most popular tools in modern mixing, yet many producers treat it as a mysterious "magic button." This comprehensive guide will demystify the process, providing you with a practical framework for using tape emulations effectively.
We will break down what tape saturation and tape compression are, define the function of every common control (like Bias, Speed, and Wow/Flutter), and demonstrate the incredible versatility of this effect – from subtle "mix glue" to all-out distortion.
Finally, you'll see a real-world workflow, showing you exactly how to apply tape emulators on individual tracks and the stereo mix bus to gain an edge in your productions, moving beyond guesswork to master genuine analog character.
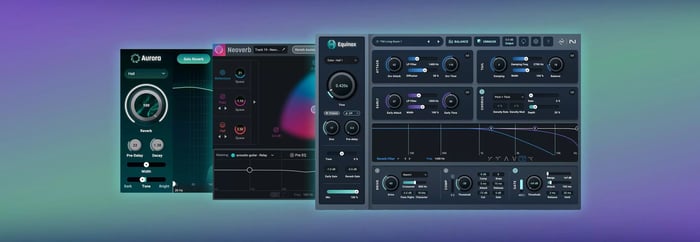
Follow along with this tutorial using Ozone 12 , a powerful mastering suite with intuitive tape emulation.
A personal prelude
When I was first starting out, I largely dismissed tape emulation. My reference for "tape" was the cassette, which offered a sound inferior to the CD, and by the time I entered the professional world, most studios had transitioned to digital systems like Pro Tools. The early tape emulation plugins I encountered didn't impress me; I simply didn't understand the hype. The praised "tape compression" felt overly restrictive, and the touted "warmth" often sounded like mud. For years, the concept just didn't click.
One of the benefits of gaining experience is that your tastes evolve. For me, the perspective shift on tape emulation happened unexpectedly in 2020 while watching a video online. An engineer simply bypassed a plugin, and in that specific moment, a switch finally flipped.
The effect of the emulation – the subtle density, the musical saturation – became beautifully clear. Tape emulation is not about a perfect sound; it's about a specific, desirable imperfection. I hope that same switch flips for you as you explore this article.
What is tape emulation?
Tape emulation is a digital process that recreates the complex sonic characteristics – including harmonic richness, gentle compression, and specific frequency responses – that analog audio tape and its associated circuitry impart onto a sound.
Tape emulations are a form of distortion, particularly of the saturating kind.
But technically speaking, that means absolutely nothing. Anything that changes a sound’s harmonic content or phase response is distortion, since you are literally “distorting” the properties of the original sound.
Right off the bat, we can say tape emulations and saturators both fall under the umbrella of distortion – but big whoop, so do most compressors (harmonic distortion) and equalizers (phase or harmonic distortion).
What is saturation, then? Or rather, what kind of distortion is saturation?
There’s no dictionary for audio engineering in which you can flip to the S page and lay a finger on the precise definition. People have their own interpretations of what saturation is, and you, as a learner, have to connect what I say to your own brain.
I define “saturation” as “a pleasant and musical distortion that exists before the point of audible breakup.” If you’re a guitar player, think of a tube amp that isn’t clean, but isn’t fuzzing out on you either. It’s full, it's harmonically rich, and it allows you to get a warm tone without playing too hard.
Indeed, you might find that when playing through a saturated tube amp, you get more sustain out of your instrument. You might experience the ability to move faster without working so hard.
This is because of the second characteristic one finds in saturation – a slight compression effect. It’s an evening out of tone outside of your playing abilities, a little dynamic help from the saturated system.
So, saturation equals subtle distortion plus subtle compression. Okay, got it.
Does tape emulation fall within that category? Yes, certainly it does. But here’s the thing: not all the time. At least not to the human ear.
When using a tape emulation plugin, you're usually introducing two main sonic effects:
- Subtle harmonic distortion: The signal is enriched with new harmonics (overtones) that are musically related to the original sound, which can be perceived as warmth or thickness.
- Slight compression: A gentle dynamic shaping occurs, evening out peaks and troughs in the audio, which contributes to a sound feeling fuller and having more sustain.
Again, the definitions and understandings of all these concepts are subjective. You simply have to find a way to plug yourself into them.
The way I see it, there are three separate phases of tape emulation – all distortion – that a signal can pass through, depending on how you handle the gainstaging.
1. Reactive glue (subtle)
This is the most subtle application, where you rely on the inherent characteristics of tape to create a "congealing" effect across a mix or group of tracks. The result is a mix that feels more cohesive, inviting, and effortlessly put together, without being noticeably compressed or having its transients drastically altered.
This "glue" effect is often attributed to a combination of tape's unique sonic properties:
- Musical harmonic saturation: The introduction of musically related overtones that subtly enrich the sound and help blend elements together.
- Zero-crossing influence: A less common, but interesting, theory suggests that the magnetic process of tape subtly influences the waveform, particularly as it passes through the zero-crossing point, creating a unique smoothness unlike other forms of distortion.
Ultimately, the goal is the "what," not the "why" or "how." This subtle application is what separates this effect:
To this:
You’re hearing a live recording that I am mixing for the band Adjective Animal. It was not recorded onto tape. There is no tape emulation in the initial example.
The second example introduces Kiive Tape Face as the last plugin on every track, using these relatively subtle settings.
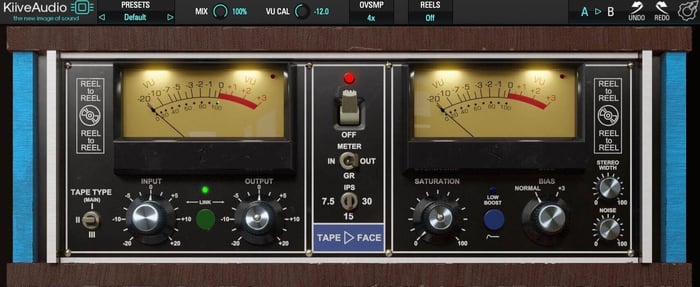
Kiive Audio Tape Face plugin
The result is that softness I’m talking about, but you could hardly call it saturated. The highs seem silkier, the lows seem warmer, but the mix doesn’t sound full of harmonic overtones when compared to the previous example.
2. Saturation (less subtle)
At this stage, we move into more noticeable harmonic coloration and dynamic effects, though the sound is still far from overt distortion. This is the sweet spot for classic tape saturation.
Driving the signal moderately harder into the tape emulation achieves a few key results:
- Change in EQ (coloration): The increased drive highlights the tape's natural frequency response. This often includes a characteristic "tape bump" (a subtle lift in the low end) and a softening, yet still sparkling, high end.
- Introduction of overtones: New, musically-related harmonics are generated, enriching the signal and contributing to a sense of warmth and depth.
- Dynamic rounding and loudness: Hitting the tape harder subtly restricts the dynamic range by softening the signal's peaks. This grants you more headroom to push the overall RMS (average loudness) higher, resulting in a denser, rounder, and more apparently loud sound.
Observe how it sounds when we drive into saturation in the following video. The output gain will be linked to the input, but I’ll only drive it a little. I’ll also play with the saturation knob, which prepares the distortion in a slightly different way, and can be counterbalanced against the input and output drive controls.
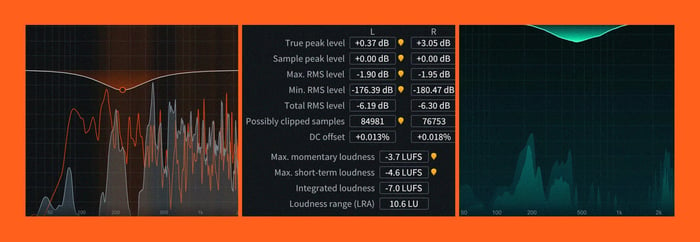
One sounds louder, right? But look at the stats:

No tape statistics

Tape statistics
Surprise! They’re exactly the same.
We can get similar effects, too, by using Ozone’s Vintage Tape module, or Ozone’s tape-style Exciter in broadband applications.
Using tape for stereo width
Another way we can use tape is to create enhancements to the stereo width of the mix. We can do that in a couple of ways. Kiive Tape Face will push the differences between left and right signal paths in their tape model, resulting in one type of wide feel:
With Ozone’s Exciter, on the other hand, you can use different levels of tape saturation for the sides and mid channels, respectively.
In general, this type of application works well on the mix bus. It might also find its way to vocals and bass instruments from time to time.
Here’s a DI bass.
And here it is being driven thus through Kiive and Ozone with these kinds of settings:
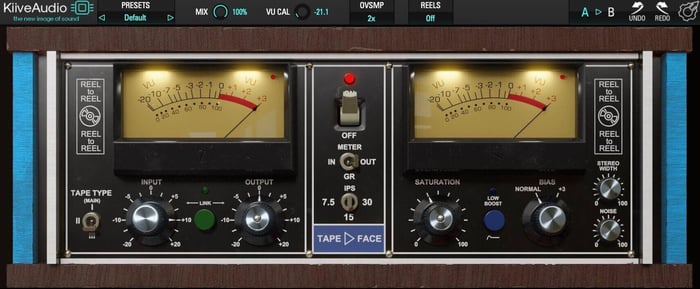
Kiive Audio Tape Face on DI bass
Ozone tape on DI bass
3. All out distortion (not subtle at all)
This is the final and most extreme application: pushing the signal so hard that the tape emulation transitions from a subtle effect into an overt, audible distortion effect in its own right. At this stage, the tape is intentionally slammed to achieve a crushed, aggressive, or completely transformed sound.
What kind of distortion is this? Let’s have a listen, this time on a drum bus.
Here are some drums without tape saturation:
And here we're adding tape for a real crushing effect.
We can get even more extreme with it using Ozone, or even SPL Machine Head, a plugin emulation of a digital tape emulation.
I had so much fun on that one, I saved myself a preset. Indeed, this is a unique kind of analog warmth – one that really only comes from tape. Think of it as another aggressive color in your palette.
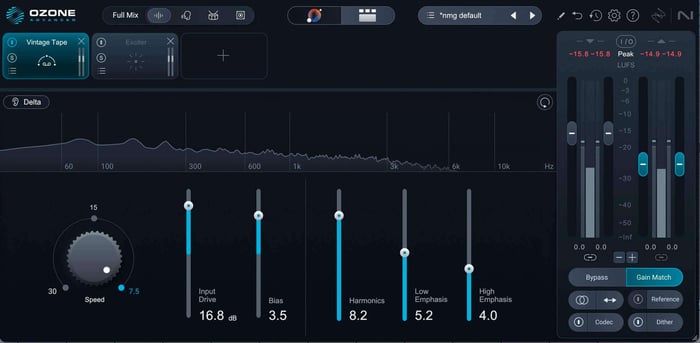
Common controls on tape emulators
Tape emulation plugins frequently include the following controls to dial in the desired sound:
- Input (Drive): Controls the level at which the audio hits the simulated tape. This is the primary control for determining the amount of saturation and compression.
- Output: Sets the final signal level leaving the plug-in. It is often linked to the Input control to maintain a consistent volume while you adjust the drive.
- Bias: Adjusts the magnetic signal applied to the tape to optimize recording fidelity.
- Low Bias: Can result in harsh highs and increased distortion.
- High Bias: Can result in a duller sound.
- Use Bias to find a clean, balanced tone with minimal unwanted fuzz.
- Saturation: A dedicated control that allows you to increase the saturation effect without necessarily increasing the input level or volume jump.
- Speed (IPS - Inches Per Second): Selects the simulated speed of the tape machine, which changes the frequency response and compression characteristics.
- 30 IPS: More transparent and better high-frequency response.
- 15 IPS: Standard setting, offers a balance of warmth and fidelity.
- 7.5 IPS: Lo-fi, bass-forward sound with more pronounced saturation and high-frequency loss.
- Wow and Flutter: Introduce speed variation and pitch modulation inherent in mechanical tape systems.
- Wow: Slower pitch variations.
- Flutter: Faster pitch variations.
- Used to add a realistic, vintage, or "analog" character to the sound.
- Emphasis: Controls the pre-emphasis and de-emphasis equalization curves (such as NAB or IEC) applied during the recording and playback process.
- These curves were historically used to reduce noise and optimize tonal balance, but are often offered as creative EQ controls in modern emulations.
How to use tape emulation in your workflow
Every engineer's workflow is different, and methods often change from session to session. While I once rarely used tape emulations, they are now a staple in my mixing template.
Individual track applications
I typically don't put tape emulation on every track. Instead, I use it selectively to achieve a specific effect:
- Roundness and saturation: Apply to instruments like bass or lead vocals to lend a desired fullness, density, and saturation.
- High-end taming (de-essing): Use tape emulation on a bright or harsh vocal to gently soften the high frequencies. This method often sounds more natural and less "tweaked" than using a traditional EQ or de-esser.
Note how tape treatment softens the harshness of a bright vocal without losing presence below.
Mix bus application (the primary use)
My most consistent use of tape emulation is on the stereo mix bus, which I apply to nearly every mix.
- Set up static mix: Once the levels and panning are generally in place, I turn to my mix bus processing.
- Audition emulations: I cycle through several pre-loaded tape plugins (such as iZotope's Vintage Tape, Kiive, or SPL's Machine Head) to see which one best complements the song's vibe and sound.
- A/B test: I flip different emulations in and out until one is found that provides the right combination of saturation, stereo enhancement, and gentle compression. If a plugin enhances the mix, it stays.
Watch me audition several options on the mix bus.
Ultimately, the best choice is always subjective and depends entirely on the specific mix.
Get going with tape emulation
Tape emulation isn’t a magic bullet. Used badly, it can really mess up a mix. But use it well, and you can create inviting soundscapes filled with rich character and musical glue. From enhancing low end to adding a distinct lo-fi texture, tape has versatile applications in your mix, some of which I hope you internalize from this article.