Exploring the Neoverb Advanced Panel
Neoverb can give you the right reverb in a flash, but you might want to dive deeper. In this article, we explore advanced controls in Neoverb’s Advanced Panel.


Neoverb
But what if you’re a mild-to-severe control freak (like I am) when it comes to your audio? You might want to dive a bit deeper than the visible tools allow. Thankfully, Neoverb not only lets you do so, but even offers some reverb-warping options you won’t find in many other reverb plug-ins.
In this article, we’ll dive into the Neoverb Advanced Panel and cover some scenarios where it can be helpful to tweak your reverb sound further. Let’s go!
How to access Neoverb’s Advanced Panel
You’ve probably already stumbled across the Advanced Panel if you’ve spent any time in


Neoverb
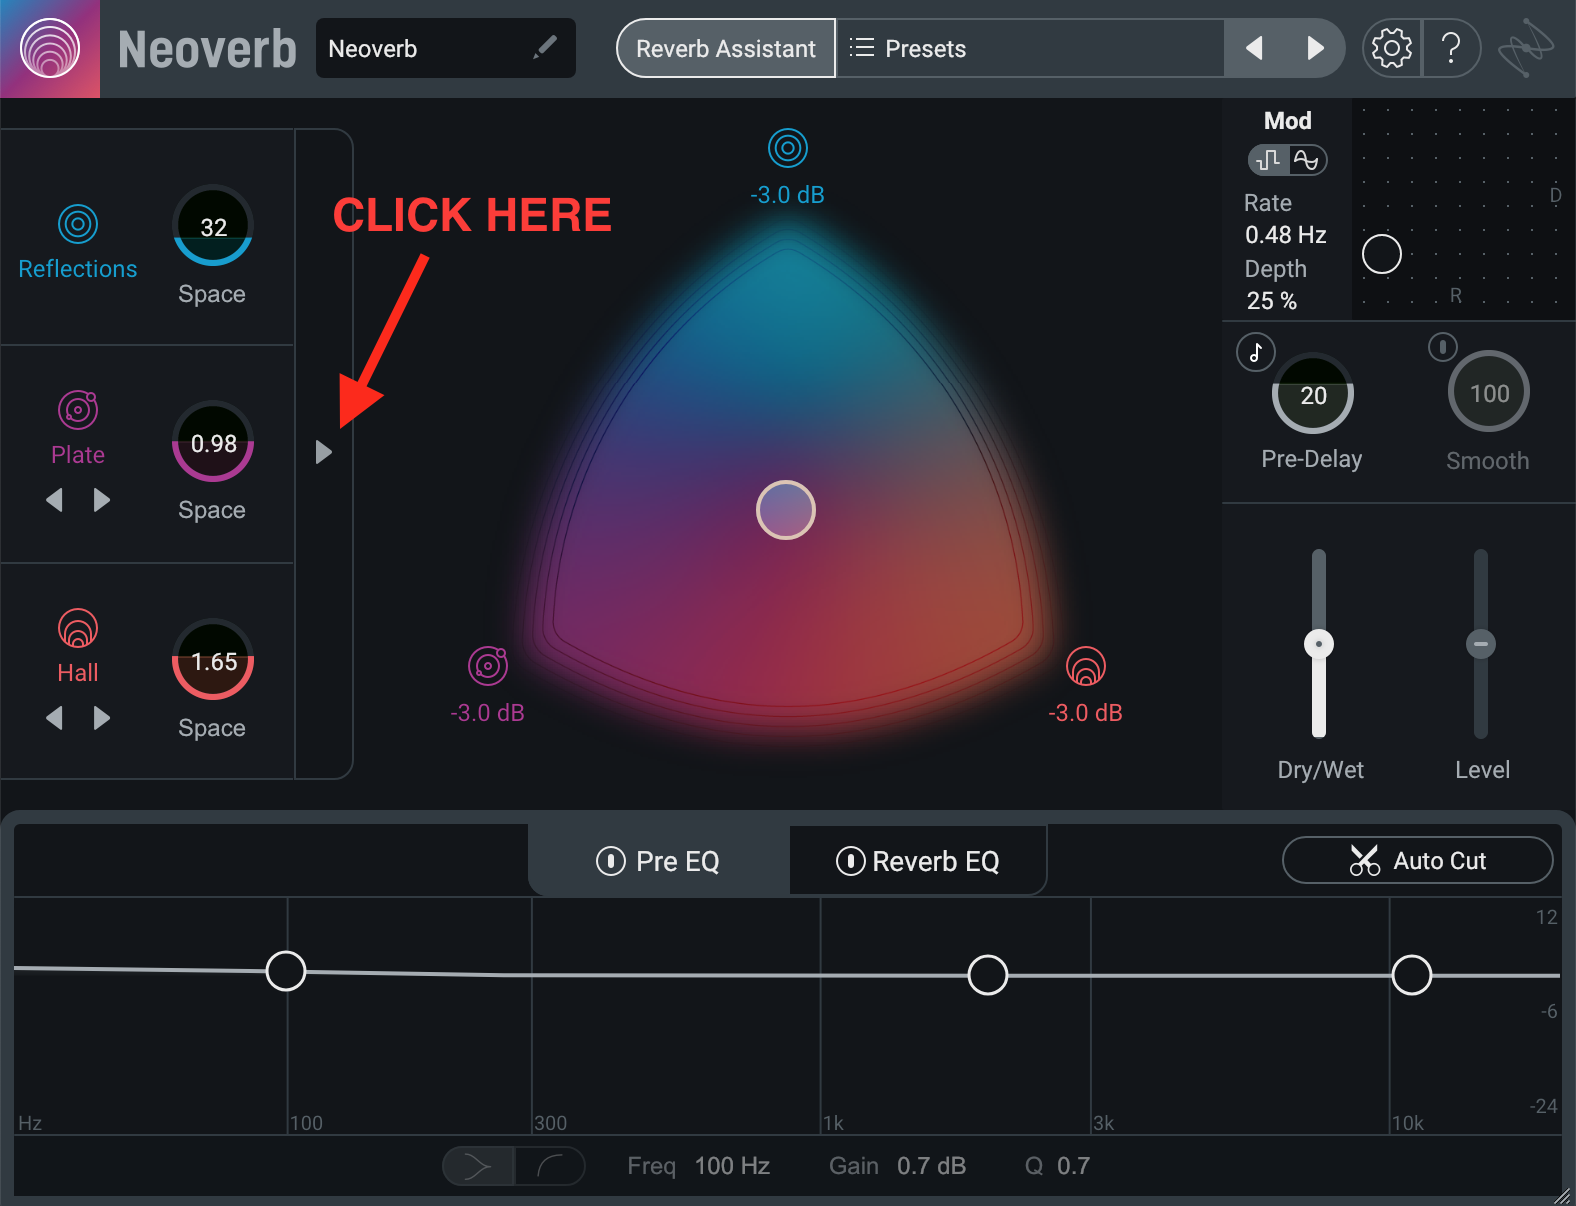
Click here to open the Neoverb Advanced Panel.
How to use Neoverb’s Advanced Panel
The Advanced Panel is like an extension of the Reverb Engine Quick Edits section, offering additional controls for each of the three reverb engines. Here, we can fine-tune each of the reverb sounds to mesh as we’d like.
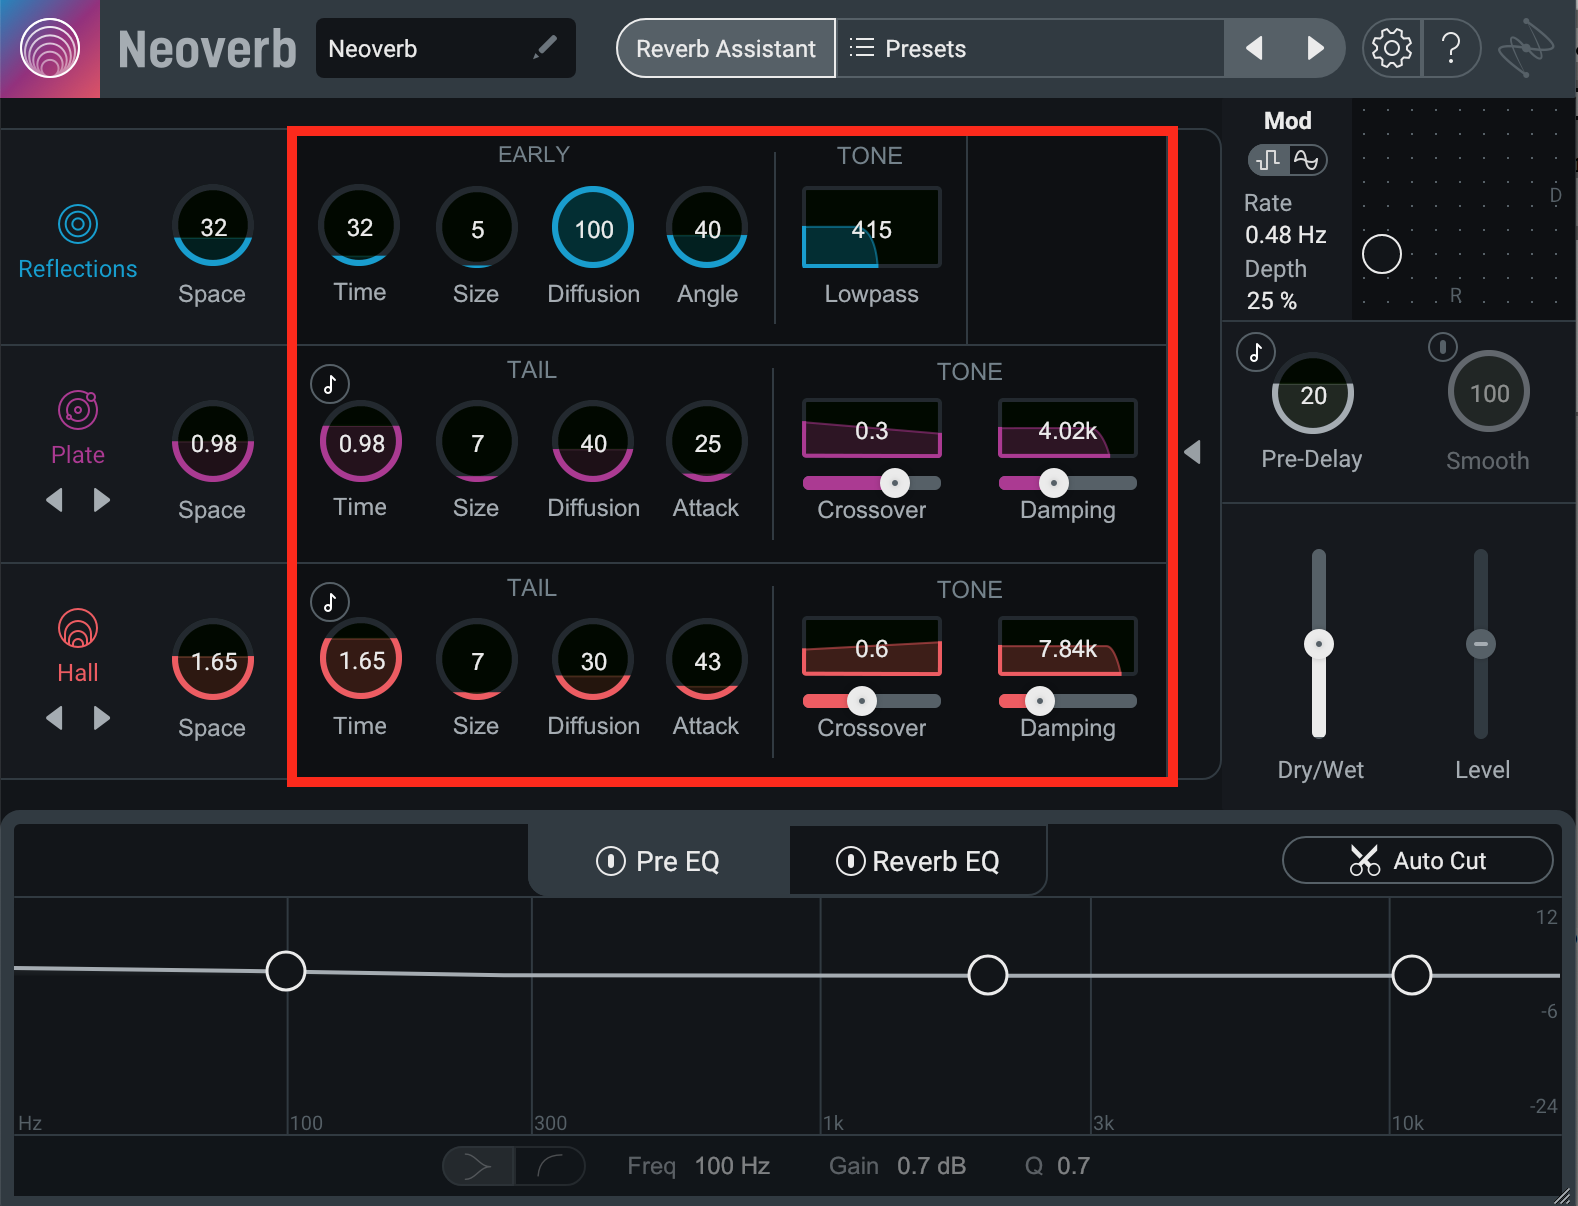
Neoverb Advanced Panel
Some of these parameters act differently from engine to engine. But before we jump into that, let’s quickly cover how the Space, Time, and Size parameters work across all three reverb engines. To use Neoverb most effectively, it’s important to understand the interaction between these three and how they affect the reverb sound.
Space, Time, and Size
You’ll notice that the Space control is accessible without even opening the Advanced Panel, and you should also notice that the Time and Size controls change together as you adjust the Space parameter.
The size of a space determines the time it takes for reflections to travel through the space. The Time and Size controls set the duration of reflections and the size of the room, respectively.
Because these two factors of a reverberant space are linked, the Time and Size controls should be adjusted together to maintain a realistic reverb sound. Space is a macro control that does just that.
The full range of the Space control is mapped to the full range of the Size control. If you set Space to minimum or maximum, it also sets Size to minimum or maximum. Space adjusts Time relative to Size, so the ratio of Time to Size remains constant.
Once you’re happy with the ratio of Time to Size, you can simply use the Space control to adjust the overall behavior of the room.
The following screenshots of measurements in


Insight 2
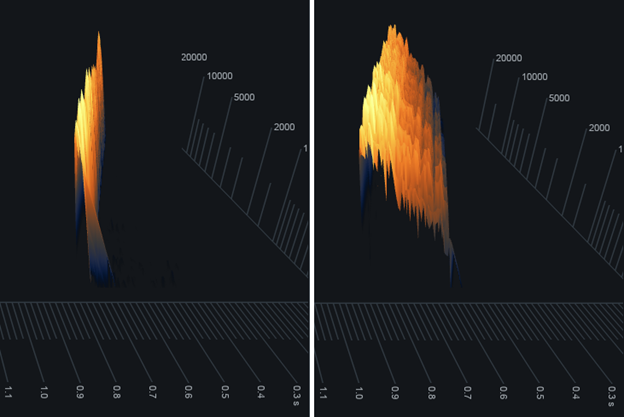
Insight 2’s Spectrogram results for the lowest (left) and highest (right) possible settings for Space, Time, and Size
Now that we understand how these three parameters behave across the three engines, let’s dive into the details of each engine and when you may want to adjust each of their parameters.
Engine 1: Reflections

Neoverb Engine 1
The first, blue reverb engine—Engine 1, for our purposes—is called “Reflections” and is responsible for the early reflections of your reverb signal. All parameters therefore relate to the earliest part of the reverb signal. Not sure what an early reflection is? Check out our reverb learning hub.
Time and Size
Not to be confused with Pre-Delay, found on the right side of


Neoverb
As we mentioned before, the Size parameter sets the size of the reverberant space, and does so in meters. Increasing or decreasing this control changes the underlying algorithm to reflect a larger or smaller space.
Diffusion
A relatively common parameter in reverb plug-ins, Diffusion changes the dispersion and density of reflections, in this case early reflections. Lower settings create fewer early reflections with more time between them. As a result, each early reflection is more pronounced, making the reverb almost chatter.
Higher settings of the Diffusion control will create more reflections that are more closely spaced in time. This smears the reflections into each other, creating a smoother wash of reverb.
You may want to stick with higher Diffusion settings for percussive instruments. Lower settings can create more distinct reflections that, unless timed to tempo, might conflict with the groove.
The following image shows a signal with low Diffusion on the left, and high Diffusion on the right. You can see that the right image looks smoother. Note how the divisions between the colored bands aren’t as pronounced.
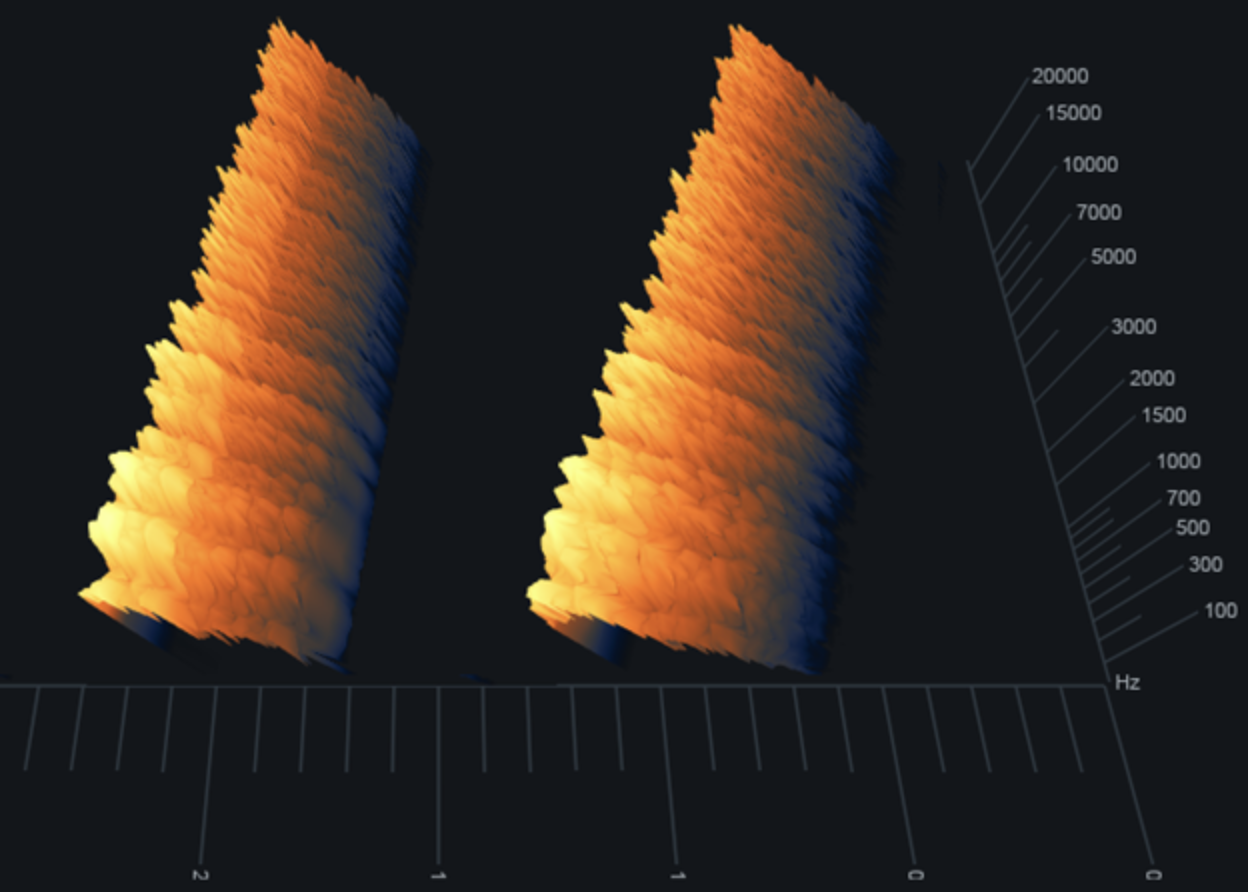
Spectrogram results for minimum (left) and maximum (right) Diffusion settings
Angle
It’s a bit easier to understand what the Angle parameter does once you see the spectrogram view. Here are three settings: at 0, 50, and 100.
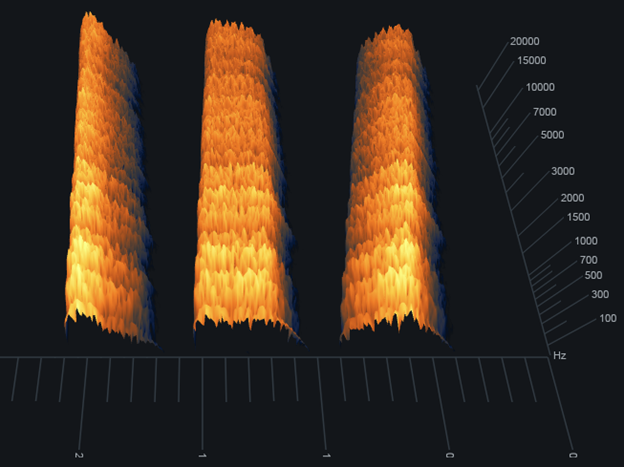
Spectrogram results for Angle settings of 0 (left), 50 (center), and 100 (right)
Notice that the overall energy across the early reflections stays about the same. But as we increase the Angle parameter, amplitude shifts from the earliest early reflections to later early reflections.
Notice that at lower settings the earliest reflections are the loudest, which gives us the standard, tapered reverb tail we’d expect.
At medium settings, the reverb signal stays around the amplitude of the initial transient for longer. This has the effect of smearing the reverb tail, making it sustain in an unnatural but interesting way.
At the highest settings, later early reflections are actually louder than the earlier ones, creating a zipper-like effect in which the earliest reflections swell up into later early reflections. This is certainly more of a creative effect, but at lower settings could be used to push the reverb out of the way of the dry signal a bit.
Low Pass
This is a low-pass filter specifically for the early reflections, and is generally used for tone-shaping. It mostly acts how you’d expect, but it only filters later reflections and leaves the first few unscathed. You can accentuate this effect by increasing the Angle, shifting more amplitude to these later reflections.
Engine 2 and Engine 3: Room, Plate, Hall, and two Chambers
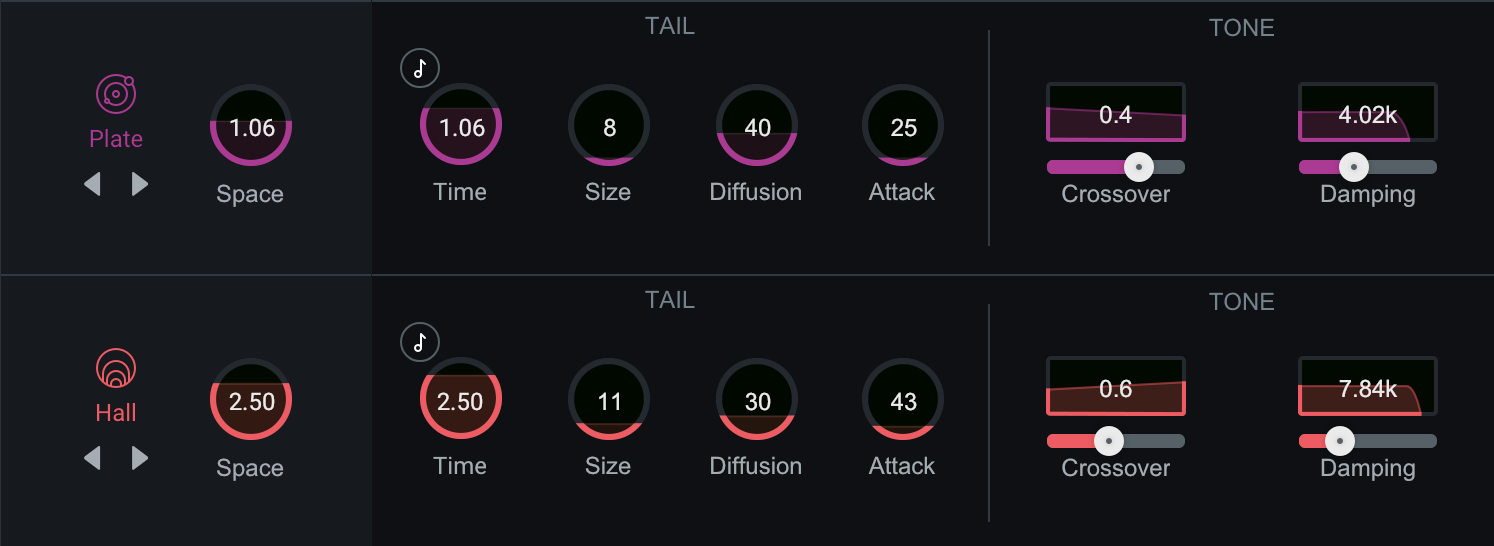
Neoverb Engine 2 and Engine 3
In addition to the Reflections engine, which generates the early reflections,


Neoverb
The magenta engine—Engine 2—is for medium-length reverb tails. You can select between a Room sound, a Plate sound, and a medium Chamber sound. The red engine—Engine 3—is for long reverb tails. You can select between a Hall sound and a large Chamber sound.
The parameters in Engine 2 work the same as those in Engine 3, and all follow the reverb type you’ve selected. You can always turn engines off to focus on the sound of one or two, but a benefit of Neoverb is the option to easily find the right combination with the Blend Pad.
The Space, Time, and Size controls in Engines 2 and 3 work exactly the same as in Engine 1, but there are some differences in the remaining controls that are worth calling out.
Diffusion
Diffusion largely works the same in these engines as in Engine 1, but remember: a reverb tail is longer than its early reflections. Because of this, the settings you select for your reverb tail will likely have a larger impact on the overall ‘sound’ of your reverb.
With diffusion, lower settings will create a more sparse reverb tail, while higher settings will create a denser series of reflections.
Long, sustained sounds may work better with lower Diffusion settings, as the sparser reflections will leave more room for the dry signal to fill. And like early reflection diffusion, higher Diffusion settings are helpful to create smoother reverb, especially for percussive sounds.
Below is a screenshot of a sound with low and high Diffusion settings, on the left and right respectively. Notice the additional peaks introduced in the screenshot on the right, as more reflections were introduced and packed together with higher diffusion.
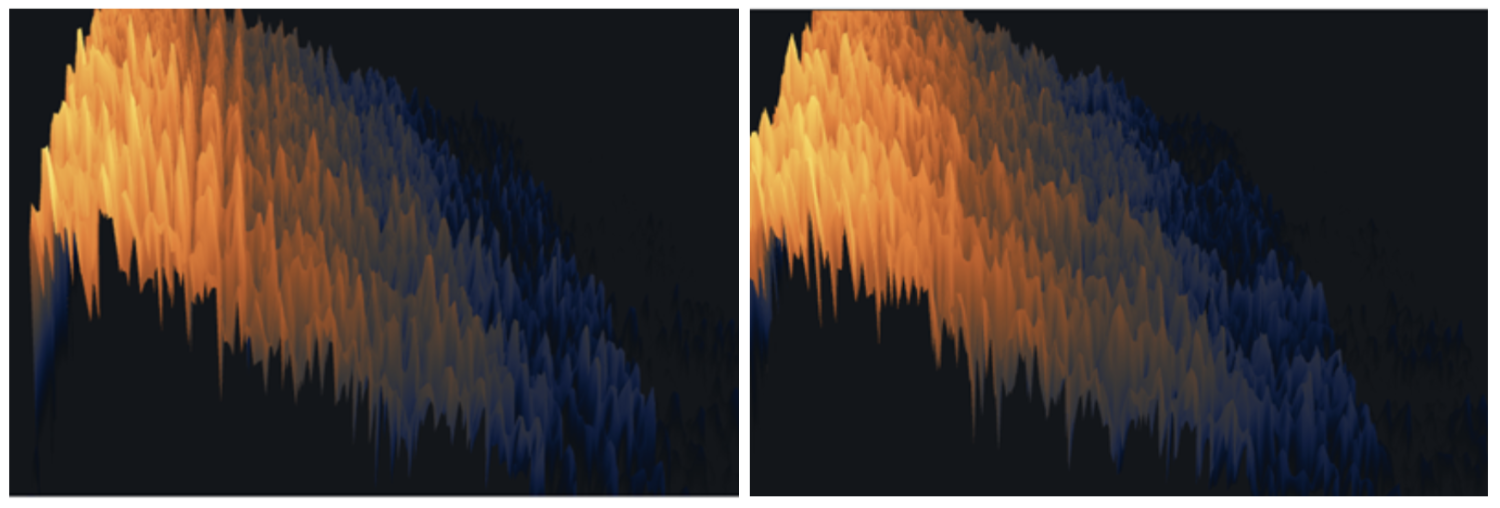
Spectrogram results for low (left) and high (right) Diffusion settings
Attack
Again, this could be easily confused with Pre-Delay, but it’s a bit different. Increasing the Attack control doesn’t delay the input from reaching the reverb, but rather spreads reflections before they reach the reverb. Reverb signal will still begin at the same time, but with reflections reaching the reverb over a longer period of time, the reverb signal will subtly build during the reverb tail.
The Attack control therefore shifts the peak amplitude of the reverb tail forward in time, by up to 250 ms. This creates a reverb tail that develops a bit longer after the dry audio, preventing the reverb from muddying the sound it’s affecting. It can also produce an audible reverb “swell,” which can be used to dramatic effect in many musical genres.
Below are some screenshots of the reverb response with minimum and maximum Attack settings. Note how the reverb peaks immediately with low Attack, and then decays. With high Attack, the reverb takes a short while to build to its peak before decaying.
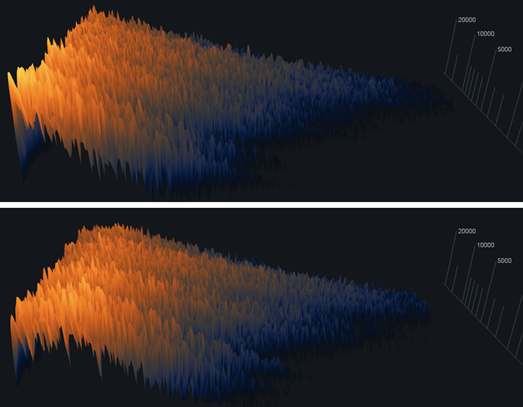
Spectrogram results for minimum (top) and maximum (bottom) Attack settings
Crossover
With the crossover controls in Engines 2 and 3, we can make the reverb effect more prominent in lower or higher frequencies. This isn’t just a static filter: reflections are organically attenuated at different rates, maintaining a natural sound.
Crossover consists of two controls: the Balance control and a horizontal crossover slider. With the slider, we set the crossover point between lower and higher frequencies for the engine. With the Balance control, we can give more of the reverb effect to frequencies below or above our crossover frequency.
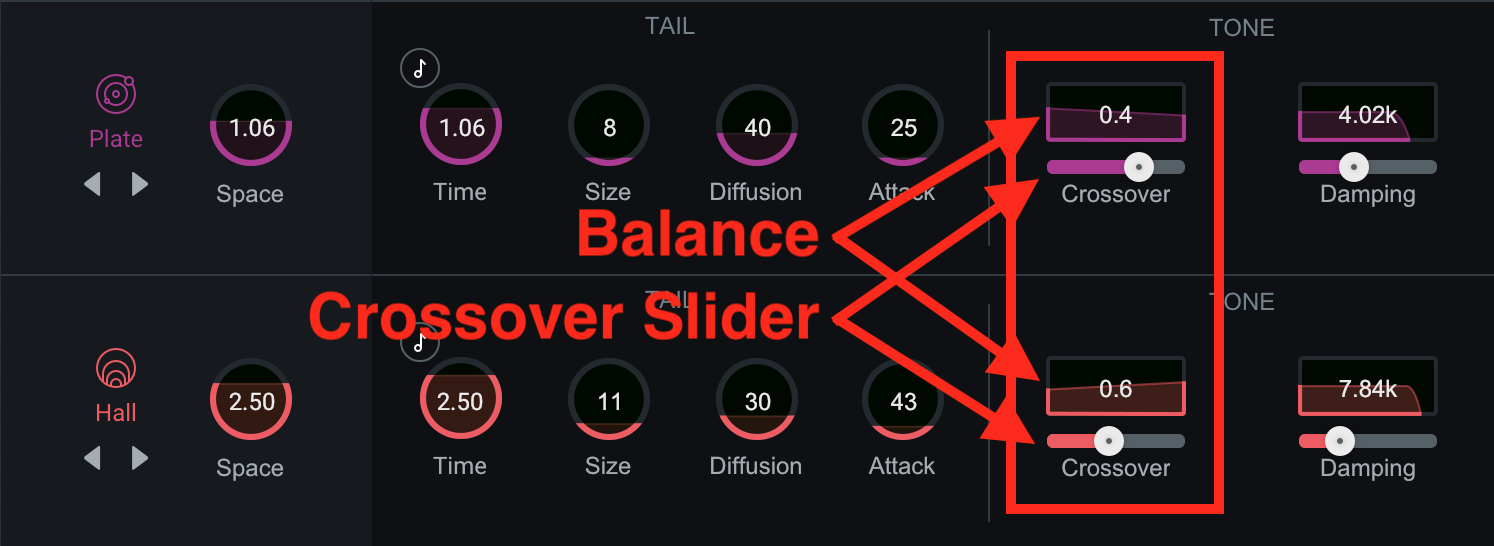
Controls in Crossover
The reverb effect is equally prominent across the frequency spectrum with a Balance setting of 0.5, with all prominence given to the low or high band at 0 or 1.0, respectively.
In the following illustrations, the crossover frequency is 2 kHz. The top image has a Balance of 0 and the bottom image has a Balance of 1.0. Notice how frequencies lower than and higher than 2 kHz, respectively, have longer tails, as reverb decays more slowly in those areas of the frequency spectrum.
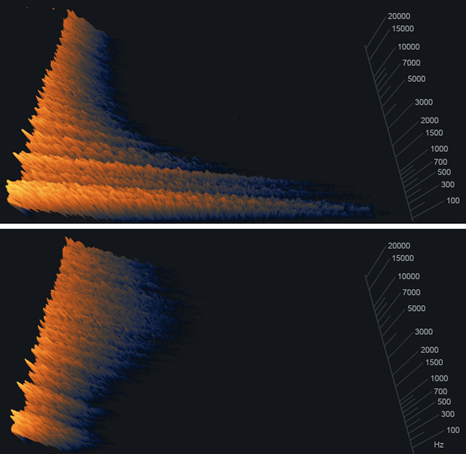
Spectrogram results for 0 (top) and 1.0 (bottom) Balance settings with a Crossover frequency of 2 kHz
Damping
Another common reverb parameter, Damping controls the way that high frequencies die off across the reverb tail. There are a couple variables here: which high-end frequencies die off, and how quickly they do so.
Like Crossover, Damping does this with two controls. The Damping Frequency control (the top one) sets the frequencies that will actually be damped; those above this setting will decay faster.
Paired with Damping Frequency is the Damping Amount slider, which adjusts how quickly these higher frequencies decay. Lower values set a shorter decay, higher values set a longer decay.
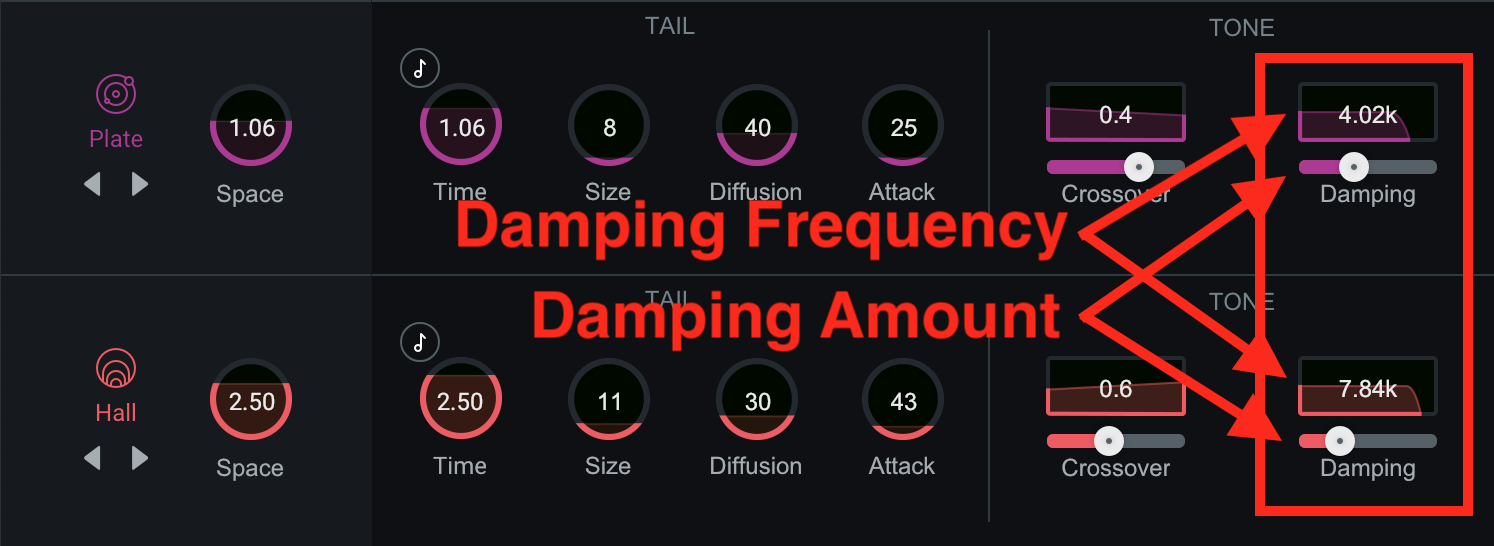
Controls in Damping
In the illustrations below, all three images have a 2 kHz Crossover, 0.5 (equal) Balance between high and low frequencies, and a Damping Amount of 1 (shortest high-frequency decay).
The top image shows a 1 kHz damping frequency, which is an extreme amount of damping. Frequencies above 1 kHz decay very quickly. The next image down shows a 5 kHz damping frequency. The third image down shows a 20 kHz damping frequency.
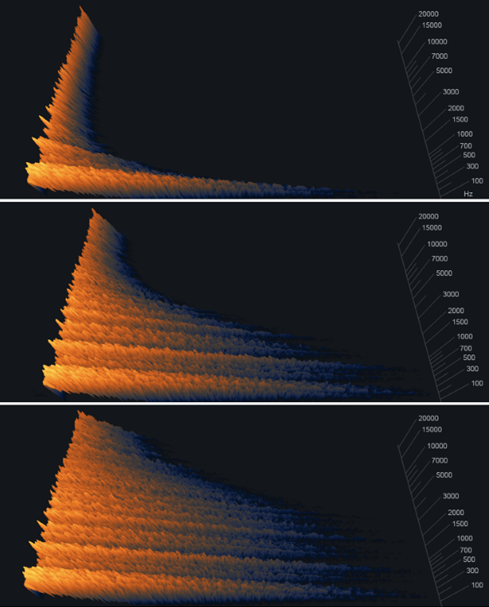
Spectrogram results comparing a 1 kHz (top), 5 kHz (middle), and 20 kHz (bottom) Damping Frequency
This final image has the same parameter settings as the third one above, but Damping Amount is set to 11 (longest high-frequency decay).
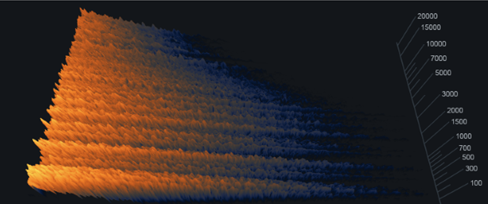
Spectrogram result with a 20 kHz Damping Frequency and a Damping Amount of 11
You’ll likely use Damping in general tone-shaping for your reverb signal, as it’s a more realistic way of adjusting the reverb character than a simple EQ. The Damping control effectively lets you “change the material” of this space, as more absorbent surfaces would have this effect on higher frequencies in a real reverberant space.
The takeaways
As you can see, you can find a whole lot under-the-hood in


Neoverb

