Mastering for Vinyl: Tips for Digital Mastering Engineers
Learn the unique characteristics of vinyl and the strategies used by cutters and engineers in effectively mastering for vinyl, including listening examples.
Since the resurgence of vinyl in the mid-2000s, vinyl sales have shown no signs of slowing down. But with its return comes a new set of challenges for the aging medium—new genres with increasingly complex production styles, the major paradigm shift from analog to digital production, and evolving audio mastering standards (just to name a few). How does the old medium fare in a brave new world? Has mastering for vinyl evolved since its recent resurgence?
This article dives into the unique characteristics of the vinyl format. We also discuss the decades-long strategies used by cutting facilities and mastering engineers to ensure the best representation of modern music on vinyl.
To help you gain a better understanding of these unique characteristics in action, we’ve included audio clips of an actual vinyl record with & without the appropriate vinyl mastering treatment (for A/B comparison). What better way to effectively hear the quirks of the format than through electronic music? Featured in this article is Hark Madley’s 2020 LP The Future is the Question!
Learn how to:
How do you choose a tool when mastering?
A great rule of thumb when determining whether a tool is best served when mastering or mixing is to consider the UI and how you engage with it. The tools themselves aren’t that different between mixing and mastering, but how you engage with them is.
Mixing and mastering are two different workflows, something mightily apparent when you consider Neutron and Ozone. There is a noted difference in scale between measurements, and in how the tools are laid out.
There are many tools that are helpful for mastering vinyl included in iZotope’s


iZotope Music Production Suite Pro: Monthly


RX 11 Advanced


Ozone Advanced


Tonal Balance Control 2
Quirks of the format and strategies to address them
Vinyl has notable characteristics that cutting and mastering engineers need to be aware of when mastering for the format. The strategies below have all been time-tested and are even more useful for today’s diverse selection of music. However, thoughtfulness and nuance are key.
One such nuance is the relation between level and length of time. Simply put, the louder the signal, the bigger the groove...the bigger the groove, the more space is used, hence less total time can be fit on a side. Other instances of vinyl-isms deal with factors such as sibilance, low-end stereo imaging, music programming, etc. which we’ll explore in detail below.

Modern music on vinyl. Photo by Phillip Blocker.
Before you read any further, it’s important to remember as a music creator that creative freedom in the production process remains a top priority. The tips below serve as a guide and should not limit your workflow and production techniques. Depending on the music, any of these nuanced ‘vinyl-isms’ could behave differently and are best handled at the discretion of professional vinyl-cutting engineers. However, understanding them will help in all stages of production towards achieving a great sounding record.
Sibilance
Due to the physical constraints of the format, severe sibilance on modern records tends to manifest itself as distortion on turntables. Sibilance distortion can also be caused by a worn stylus or cartridge misalignment, among other things. But if excessive sibilance in your music isn’t properly addressed before the cutting of your vinyl master (also known as lacquer/acetate), you can expect your vinyl record to distort.
What causes sibilance distortion?
Sibilance distortion happens when your playback cartridge can’t physically keep up with the rapid, complex modulations of severely sibilant grooves.
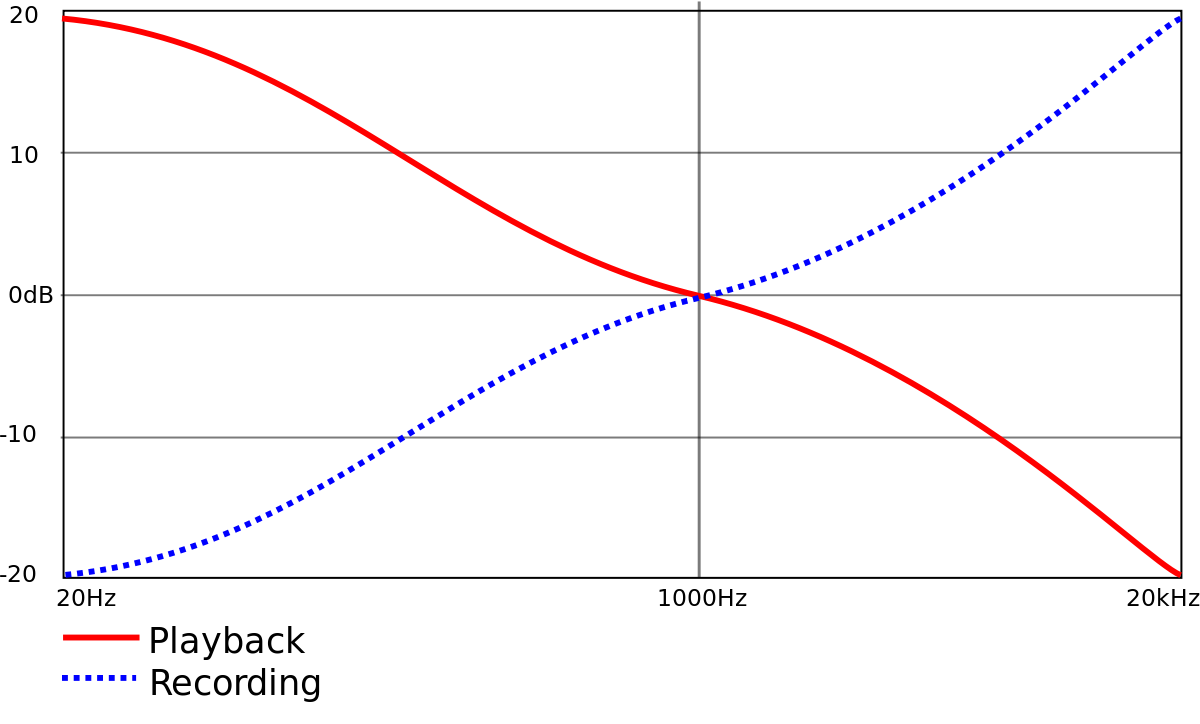
This is especially apparent because of vinyl’s RIAA EQ curve standard. Without going into its entire history, audio signals are cut into the vinyl master with a reduced low end and boosted highs. Consequently, turntables have an inverse EQ curve which results in flat frequency response on playback, like in the image below.

The RIAA EQ curve for recording/cutting vinyl masters and for playback on turntables
The RIAA curve allows for more music to fit on a vinyl record resulting in a longer runtime, among several other advantages. One downside, however, is that this boosted top end can also cause extremely fast, complex grooves that even the finest turntable can’t accurately trace. The result is a broken, distorted sound anytime the stylus plays over severely sibilant parts of the record.
How to avoid sibilance distortion
Vinyl mastering facilities rely on de-essers that are built for this particular problem. Several known outboard de-essers through the years include the Maselec MDS-2 and the Orban 536-A. But many vinyl cutters have been benefitting from the constant development and growing versatility of the plug-in world. Peter Hewitt-Dutton of The Bakery takes advantage of de-esser plug-ins particularly for half-speed vinyl cutting.
“Real-time sibilance adjustments while the cutting lathe does its job keeps the session efficient.”
Manual de-essing of a digital cutting source is also a preferred method for many vinyl cutters and mastering engineers. The


RX 11 Advanced

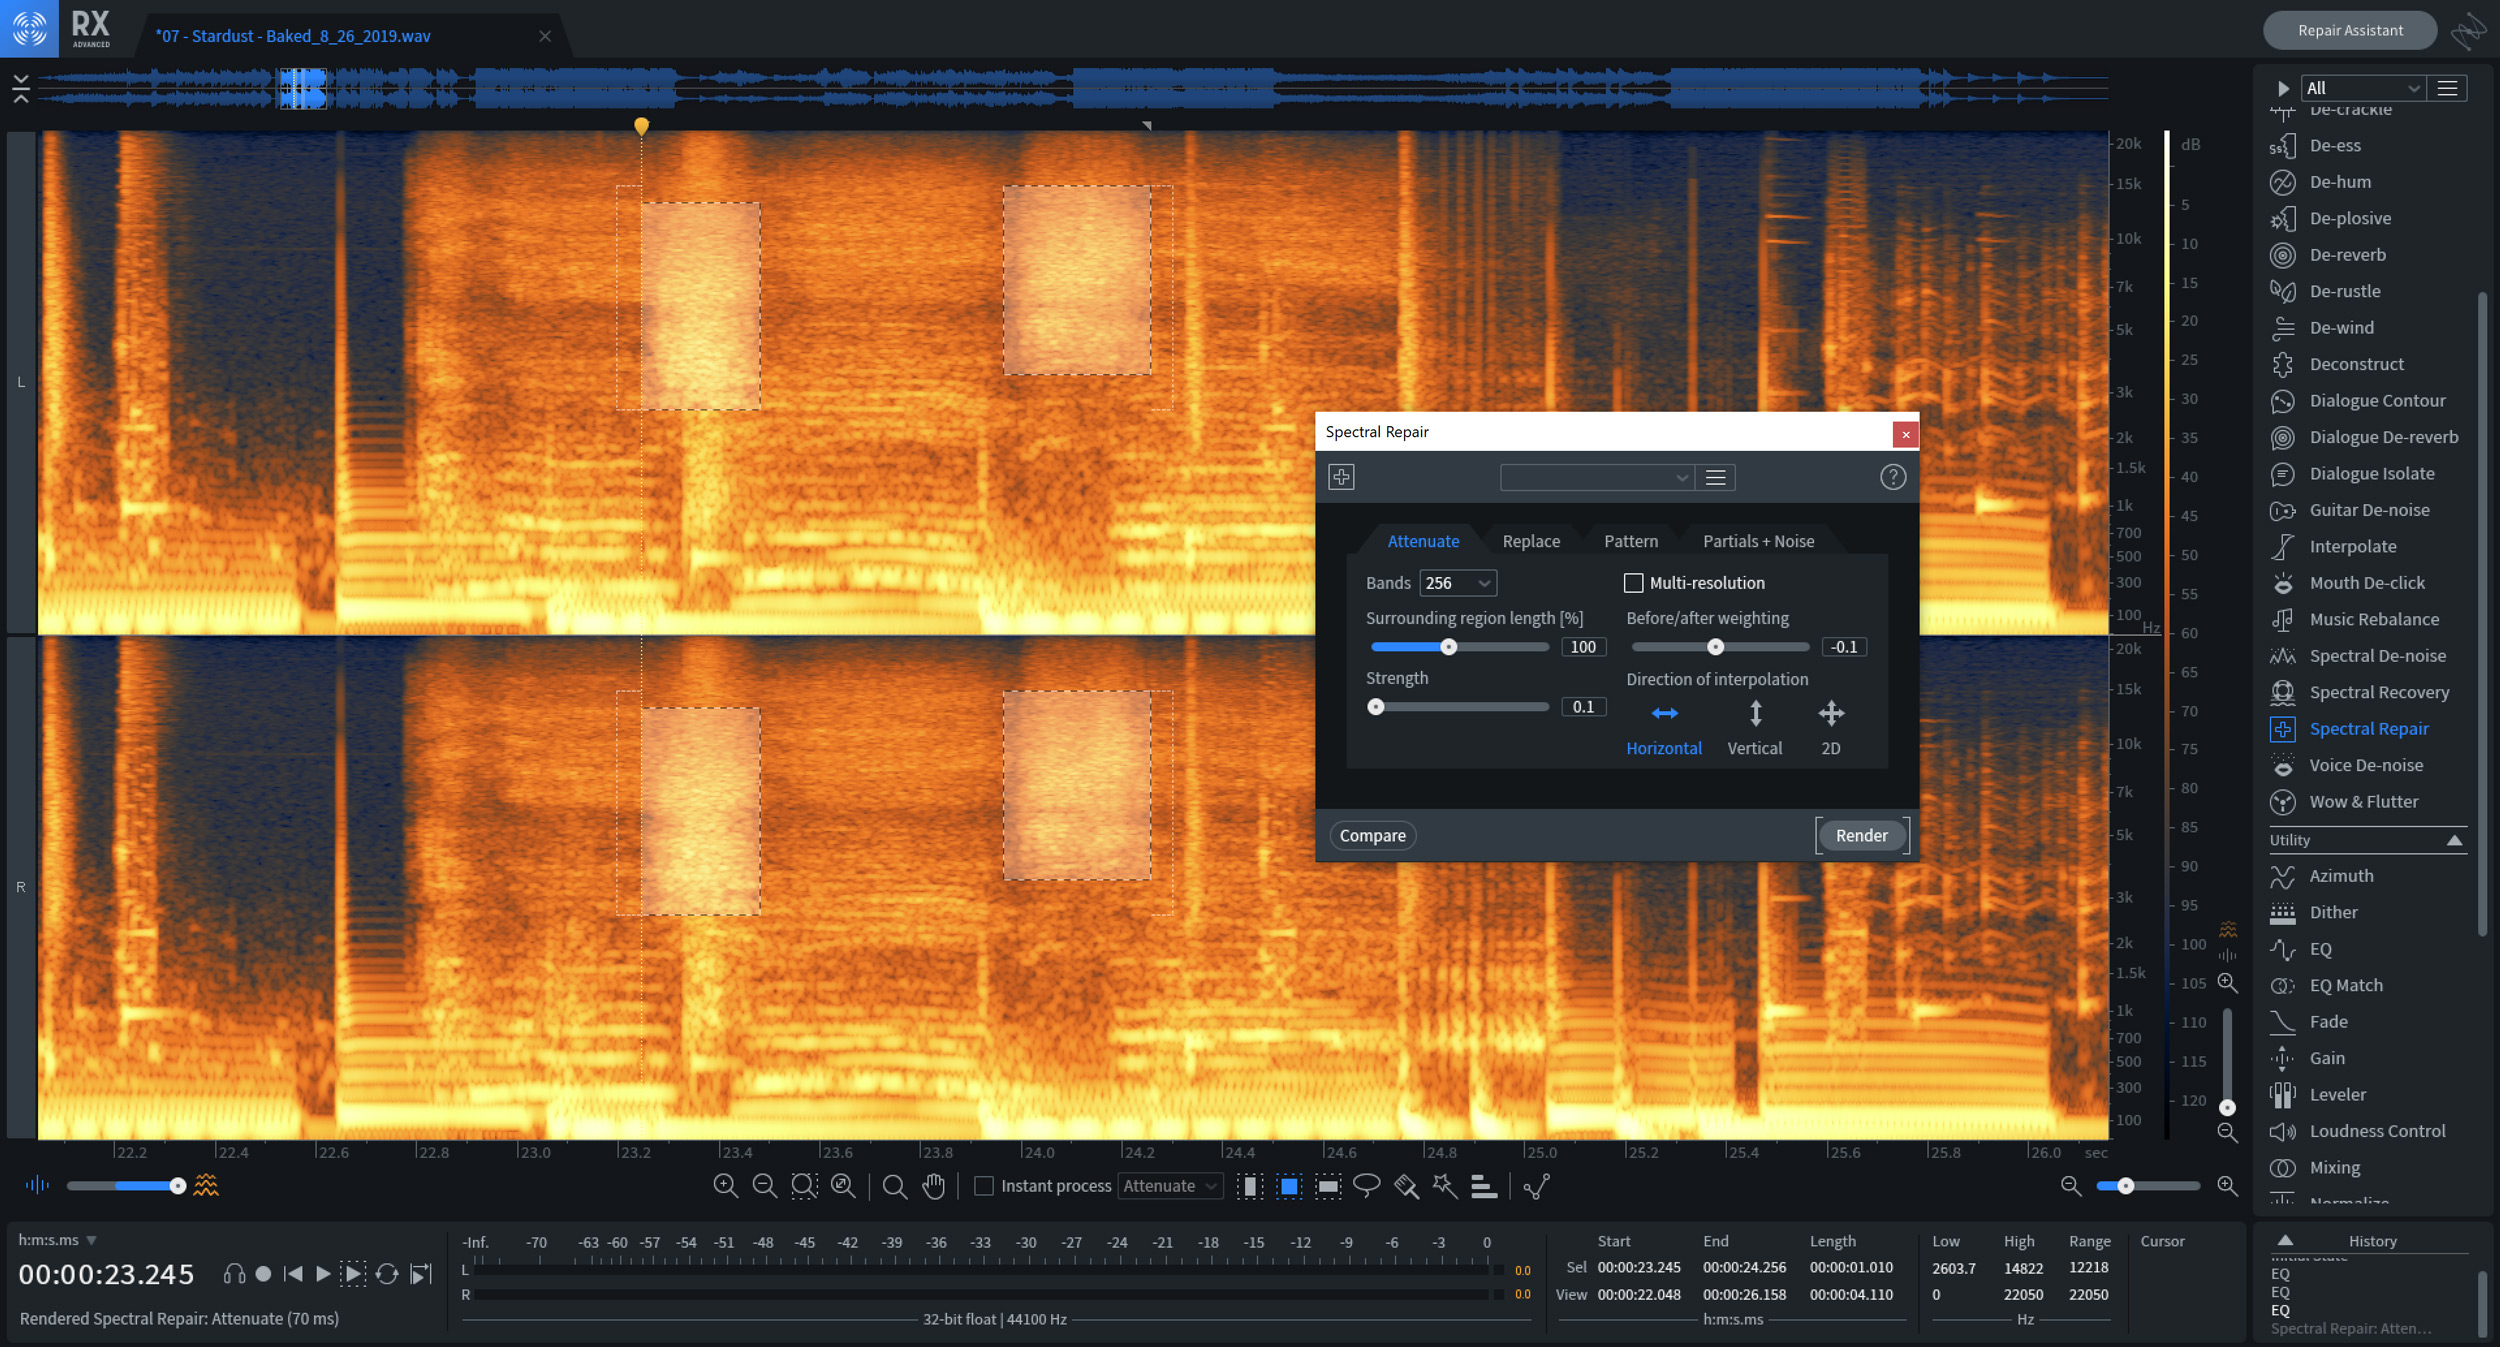
Using iZotope RX's Spectral De-ess module to minimize harsh sibilance on a master
Listening example: before and after de-essing
Many records today have a prominent sibilant quality that lends itself well to the sound of modern day music. Pop, electronic, and hip-hop are just a few among multiple genres that are known for this sonic quality, and this can be a challenge when it comes to the vinyl format. Let’s listen to a vinyl audio recording of the song “Stardust” by Hark Madley without de-essing. Pay attention to how the sibilance translates on vinyl. Take note of the distortion in the “S” caused by the inability of the stylus to accurately trace the fast, complex grooves of the sibilance.
Now let’s listen to the same vinyl recording of “Stardust” but with the de-essing treatment using Spectral Repair in RX. Instead of a broken, distorted sound caused by too much sibilance, there’s a much smoother quality now that we’ve tamed this high frequency energy, allowing the playback stylus of your turntable to accurately trace the grooves on the record.
Low frequency stereo imaging
Music with spatial effects that reach all the way to the low end of the frequency spectrum may potentially run into vinyl-cutting challenges. Although it’s more prone on genres such as electronic or hip-hop, even orchestral recordings can run into similar problems. When not given proper attention, you may end up with a record that’s prone to skipping.
The cause of low frequency stereo imaging
Grooves represent the mono/center information as lateral movement and the stereo/side component as vertical movement. If there’s an extreme amount of low-end stereo imaging on your music, it is more likely to produce out-of-phase information. This may cause the cutting stylus to cut with excessive vertical movements, alternating between deeper grooves and severe groove lifts. An out-of-phase low end may cause groove lifts with depths less than 1 mil (the minimum accepted depth of a modulating groove). It could even cause grooves to momentarily disappear.

LEFT: Groove with severe out-of-phase information (less than 1 mil), versus RIGHT: the same groove with LFX
This phenomenon is much less common and doesn’t occur as often as sibilance distortions. Different cutting engineers rely on purpose-built tools in varying amounts to address this, so don’t let this vinyl constraint prevent you from being creative in the production process.
How are severe groove lifts avoided?
More often than not, applying a steep high pass filter around the 20 Hz range is enough to prevent severe groove lifts from happening. But if absolutely necessary, vinyl cutting facilities rely on tools such as the low frequency crossover (LFX)—also known as EE (elliptical equalizer), “blend,” “mono-maker,” “wuss box,” etc. Simply put, it takes low-frequency stereo information and sums it to a mono signal, thus preventing excessive vertical modulations on the grooves. Before the digital revolution, LFX was built into a cutting facility’s mastering console. Nowadays, engineers have access to more digital options when mastering for vinyl.
Before the digital revolution, LFX was built into a cutting facility’s mastering console. Nowadays, engineers have access to more digital options when mastering for vinyl.


Ozone Imager V2
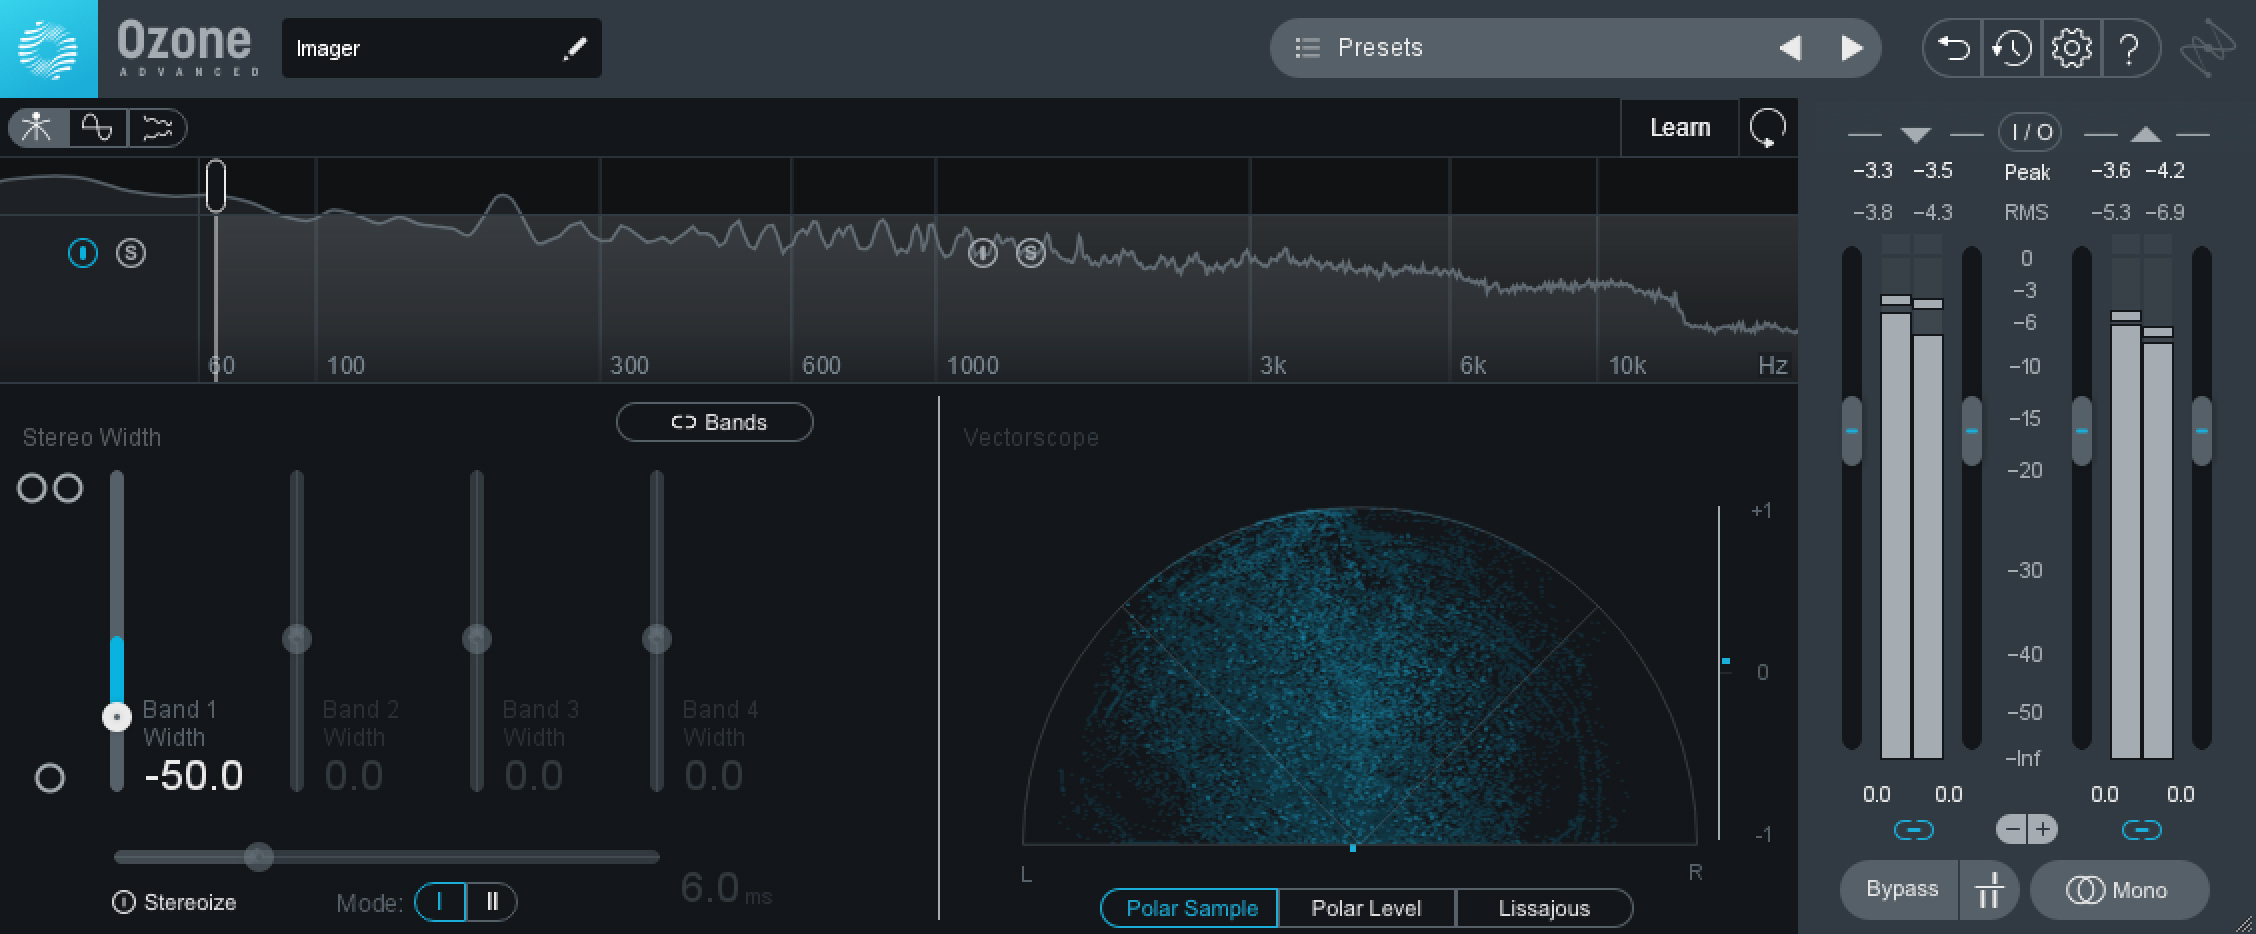
Please take note that there needs to be absolute care when applying LFX. It can significantly alter the sound when not used properly. In fact, it’s best to leave this step in the capable hands of the vinyl experts (cutters & mastering engineers). However, it helps to be aware of this phenomenon especially if you know from the get go that you’re releasing your music on vinyl. The Vectorscope in Ozone Imager is a helpful visual aide to ensure that you’re not compromising your production with too much unnecessary out-of-phase information in the low end.

Using Ozone Imager to control extreme out-of-phase low end information
Listening example: before and after stereo imaging LFX
As we’ve mentioned earlier, if extreme low end stereo effects aren’t checked before vinyl cutting, there’s a likelihood that your vinyl record could skip because of the severe groove lifts caused by an extremely out-of-phase low end. Take the song “Miami Beach,” for example. There’s a particular section in the song with phasey bass effects that would be impossible to cut without the necessary low frequency crossover treatment. Let’s listen to the music without LFX just to give you an idea.
It didn’t take long for the stylus to jump! Now let’s listen to the same vinyl recording of “Miami Beach” with the LFX treatment using the Ozone Imager. Keep in mind, the mono-summing of the low end frequencies is best left to the experts (vinyl cutter / mastering engineer). But with metering tools like the Vectorscope in Ozone Imager in your toolkit, you have the ability to ensure that any production choice you make wouldn’t lead to the unnecessary build-up of out-of-phase information in your music.
Music programming (length & track order)
Even the duration and order of songs can greatly influence your record’s sound quality. Both of these factors come into play in the inner diameter of the record, where sound quality starts to deteriorate. The farther in you are, the more brittle the highs sound. The overall sound becomes less pronounced at the top end compared to other parts of the disc.
Longer music content takes up more groove space, bringing you farther inside the disc causing the deterioration to become more noticeable. These sonic characteristics are also more apparent depending on the music. Music with a lot of energy and pronounced highs (e.g. fast upbeat songs, loud rock tracks, etc.) are more prone to these issues.
What causes sound deterioration on the innermost grooves?
Sound deterioration on the innermost grooves is caused by the slower groove speed as the stylus moves towards the center of the record. Keeping a constant revolution (either 33 ⅓ RPM or 45 RPM), the length of the groove for one revolution varies in relation to where it is on the disc. At 33 ⅓ RPMs, the outermost groove has a groove speed of 20 inches per second while the innermost diameter runs at a mere 8.3 inches per second.
This slow groove speed causes both cutting losses and tracking losses. The cutting stylus ends up having to fit much more sonic information in a shorter, smaller amount of groove space, causing more complex and rapid groove modulations. Because the playback stylus struggles to accurately trace these grooves, you end up compromising the fidelity of your top end.

Similar music cut in the outer versus innermost diameter
How can you avoid this noticeable deterioration?
The nature of the format means you can never completely eliminate this deterioration. You can, however, lessen its impact. By keeping the running time per side at an optimal length, you can avoid the innermost diameter. Although it will ultimately depend on the musical content, keeping the length of each side of your record to 20 minutes or less would usually provide the best results. You can get away with having a longer side, especially if the musical content is dynamic and not loud throughout.
Another strategy to prevent the noticeable deterioration on the innermost diameter is by making sure that the last track on each side is less intense with a more mellow high-frequency range (e.g. a ballad, a laid-back instrumental track, acoustic song, etc.).
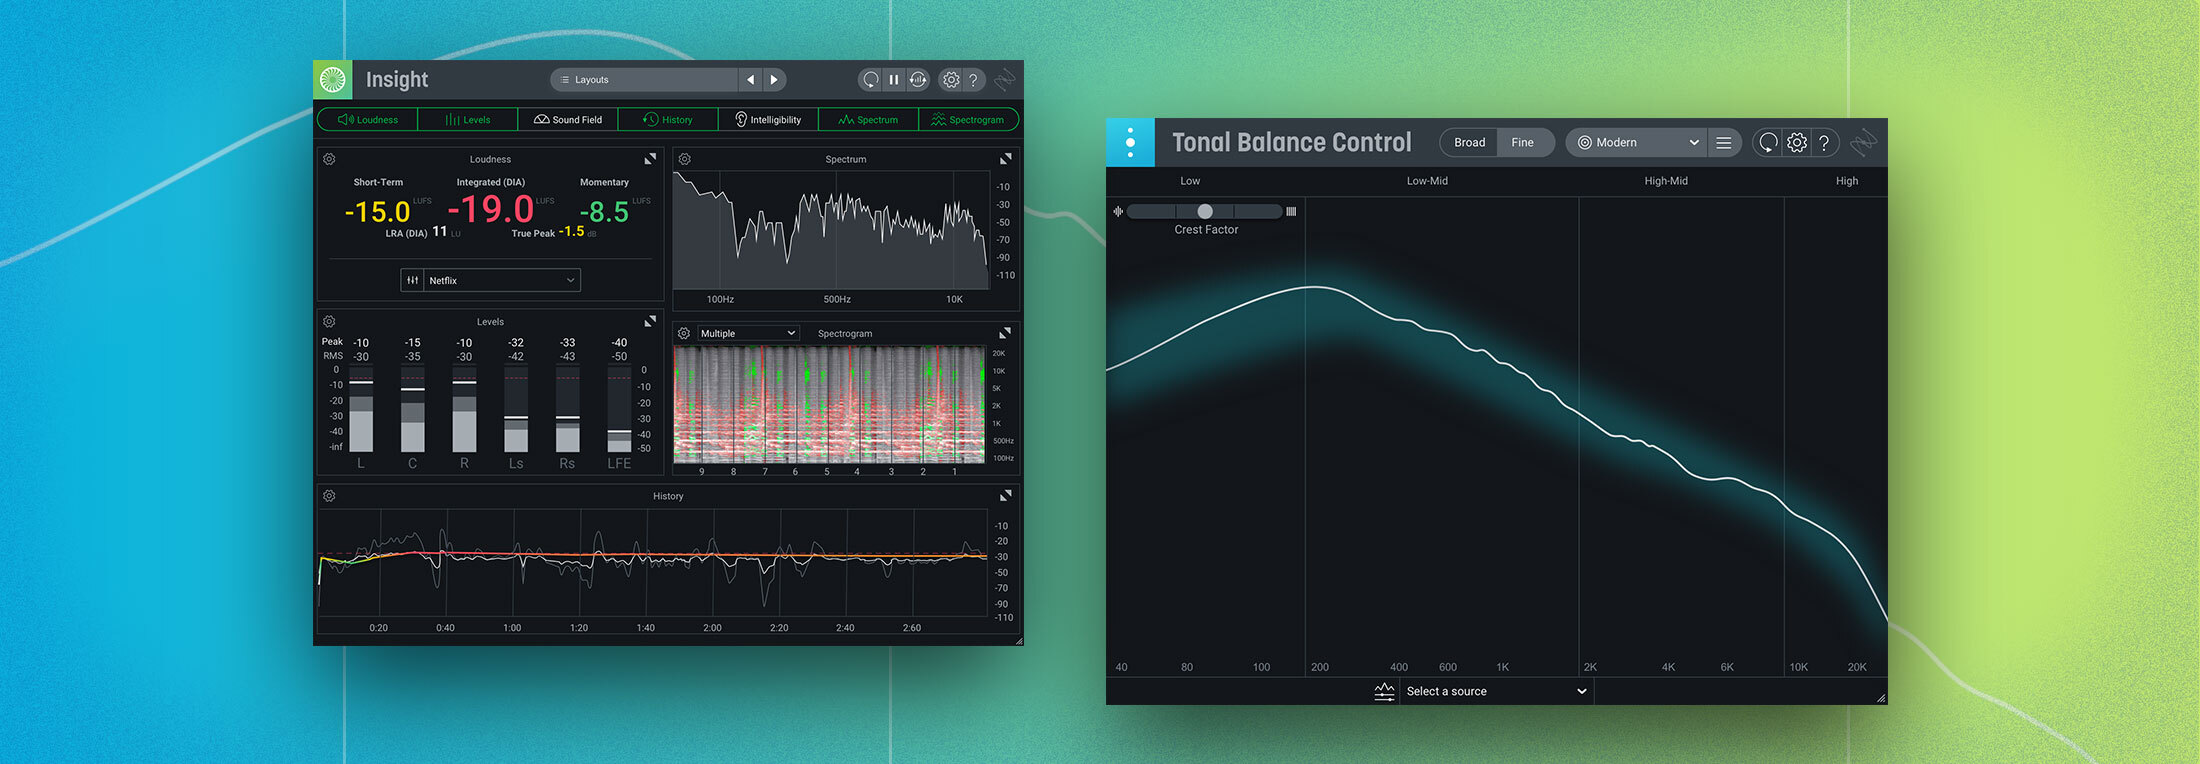
Optimizing the length of your music per side and keeping an eye on the optimal frequency makeup of your music is possible with tools like


Tonal Balance Control 2

Using Tonal Balance Control to keep an eye on low end build-up that could cause your music to take up more space than necessary on a vinyl record
Listening example: High-energy music in the innermost diameter vs. the outer diameter of your vinyl record
Knowing that length of music and track order plays a significant part in the quality of your vinyl record, let’s listen to this phenomenon in action. Let’s take the high-energy drop from Hark Madley’s “Stardust” and cut it in both the innermost and outermost diameter of the vinyl record. Starting with cutting the music in the innermost diameter, closest to the center of the record. Then listen and compare it to the same music, but cut in the outermost diameter of the vinyl record.
Pay attention to the change in quality, particularly in the high frequency range.
After several listens, you’ll notice a deterioration in the top end the farther your music goes into the center of the record. We lose a significant amount of clarity and air. This is most noticeable in the cymbals and high-frequency synths particularly with this song.
As we’ve explained above, this is simply due to the nature of the physical format itself, and although you can’t completely eliminate this phenomenon from happening, you can lessen it by keeping a nominal length for the entire music per vinyl side (18–20 minutes at most is a safe target). It helps to place your high-energy productions earlier in the album sequence so it doesn’t go too far into the vinyl record where the top end starts to degrade in fidelity.
Addressing vinyl constraints with level reduction
Ultimately, a quick and easy way to deal with these quirks in the vinyl format is to reduce the level from the cutting master. But it comes with major caveats if not done responsibly.
Reducing the cutting level lessens the risk of sibilance distortion. Less amplitude means less stress on the playback stylus, giving it a better chance of tracing grooves more accurately and avoiding distortion. You can also avoid the undesirable characteristics of the innermost diameter. Reducing the cutting level decreases the overall groove width, requiring less space to cut, thus avoiding the inner surface of your record. You also reap the same benefits when dealing with music that has a lot of low-end vertical information. There’s less risk of severe groove lifts when cutting your vinyl master at a lower level, or in a similar vein, applying a steep high pass filter at the low end to lessen the cutting level of the bass frequencies.
Despite all these advantages, significantly lowering the cutting level can potentially bring down your record’s signal-to-noise ratio to unacceptable levels. The surface noise could increase dramatically, therefore compromising the overall fidelity of your music.

Colored vinyl records.
Mastering for vinyl (additional thoughts)
There are additional ways for engineers to properly prepare their masters for vinyl. It’s worth noting that it’s incredibly common for vinyl cutting facilities to cut lacquer masters straight from a standard digital master source. But taking these extra steps can only add to the efficiency and overall audio quality of the vinyl cutting process.
Exporting: Export fully-assembled SIDE A & SIDE B masters. Rather than delivering the individual files, exporting each side as its own cutting master lessens the margin of error on both the sequence and spacing.
PQ Logs: Including a proper PQ log for each side lessens the time it takes for the vinyl cutter to identify where the band marks (track starts) are throughout the record. You can obtain a PQ log from any standard mastering DAW or from DDP programs like the Sonoris DDP Creator.
Catalog/Scribe numbers: Scribe numbers are a unique string of alphanumeric characters determined by the client that is etched on to the lacquer master to help identify a vinyl record throughout the manufacturing process. Numerous vinyl cutting sessions have had unnecessary delays because of scribe numbers not being ready on time. The sooner your clients have their scribe numbers ready, the smoother the vinyl manufacturing process will go.
Digital cutting master: If the client’s budget permits, having a separate digital cutting master that bypasses the limiter has added benefits in the vinyl world, where the loudness wars aren’t as pervasive. The transients in your music would benefit from the headroom of the format.
Native sample rate: Once again, if the client’s budget permits, deliver your cutting master at the native sample rate the music was mixed at, but at 32-bit. This helps reduce the loss in quality moving from one system (the mix) to another (the master).
Despite vinyl being an aging medium with notable constraints as a format, there are numerous strategies being taken that allow modern music to thrive on vinyl. Regardless of these constraints, vinyl still continues to grow and disprove naysayers on their perceived notion of the format’s lack of longevity.
Read this supplementary article featuring interviews with vinyl pros as we delve deeper into the thriving world of vinyl through each of their perspectives. In addition to a few listening examples, we also dive into a conversation about current trends, standards and innovations in the vinyl industry.


