Have you ever wondered what producers actually mean when they talk about "analog warmth"?
While the term is often used as a vague industry cliché, achieving that rich, harmonic character in a modern DAW is about understanding the specific physics of vintage hardware. In this guide, we’ll demystify the analog sound and show you how to recreate those sought-after textures using the latest virtual tools from iZotope, Plugin Alliance, and more.
For this workflow, we lean on two complementary toolsets. Plugin Alliance plugins bring the weight, saturation, and nonlinear character that help digital tracks feel convincingly analog.
Tools in Music Production Suite handle the precision work, letting you shape tone, control dynamics, and fix problems with surgical accuracy before or after the color is applied. Together, they strike a balance between analog vibe and modern control, so your sound can feel analog and clean at the same time.
What is analog sound?
At its core, analog sound is defined by the physical behavior of electrical signals moving through hardware – a process that introduces subtle nonlinearities, harmonic saturation, and a distinct sense of depth. While digital audio aims for perfect linear reproduction, analog equipment adds a "musical" character through these microscopic imperfections.
However, pinning down a single definition is tricky because the lines between these worlds have been blurred for decades. In fact, the theories governing digital reproduction, such as the Nyquist-Shannon theorem, were established at Bell Labs long before the first rock record was even pressed.
By the time NHK debuted the first digital recording system in 1967—the same year Sgt. Pepper’s Lonely Hearts Club Band was released—the transition had already begun. Throughout the 70s and 80s, recording studios became a marriage of formats as digital hardware from EMT, Eventide, and Lexicon became industry standards. Today, while the pendulum has swung toward software-only mixes, the "analog sound" we chase is often a nuanced blend of both worlds.
So what are we actually doing here?
We’re identifying aspects, sounds, and behavior of tools from the pre-DAW days and attempting to recreate them within the DAW.
Recreating an analog sound in a digital environment means identifying the specific behaviors of vintage hardware and translating them into your modern workflow. Because audio character is subjective, the "groove" or "feeling" of a classic record might mean something different to every producer.
To master this, you need to develop your own connection with these sounds. Here is how you can practice and refine your ears without a massive budget:
- Practice your mixes: Apply these techniques to your tracks frequently to see how saturation and nonlinearities solve specific mixing problems.
- Experience the hardware: If you can’t buy gear, book a few hours at a local studio to hear the equipment in person.
- Use remote hardware services: Use online platforms to process audio through real gear – this is a great way to focus purely on the sound without the tactile distraction of physical knobs.
By making these personal associations with hardware, you’ll be able to crystalize exactly what characteristics you want to bring into your in-the-box projects.
The song we’re using today
We’re going to be using a mix I did for Pete Mancini last year called “Monument.” The original song can be found here:
And here's our rough mix, taken from the stems:
And here’s where we’ll get to today, trying to keep a more “old school” analog flavor:
How to achieve a true analog sound in your mix
Our first tricks address ways of organizing our thoughts to mix in a more analog-inspired headspace. As we continue onward we’ll dive into the weeds of analog mixing as well as some potentially controversial mixing tips that can take your sound to the next level.
1. Avoid tools that are obviously modern
Many wonderful tools only exist in the realm of the DAW. Some of them have obvious sonic hallmarks. Let’s go into it now.
Drag and drop equalizers
Here's something to keep in mind: back in the pre-DAW days, engineers didn’t carve up their tracks with equalizers like chefs looking to trim off bad bits of the vegetable. Not that they didn’t want to – sometimes an external piece of gear was inserted for that task specifically – but patching gear into the console requires time, money, and extra gear.
But by and large, you worked with what you had: an SSL, Neve, or API desk with a basic equalizer. Engineers had to work around problems more than they could solve them surgically.
I'm not saying you can't cheat a little. But the emphasis is very much on “little.” Too much surgical equalization will tip your hand into obviously digital territory.
I’ll take Pete’s vocal here, offered raw:
Now you tell me, which treatment sounds more modern, A or B?
Example A is Neutron 5’s channel strip with the Assistant. Very capable, but not what we’re going for. Example B is the track in context.
Hear the difference? One sounds much more chiseled, the other sounds much more relaxed.
Spectral tools resonance suppressors
Resonance suppressors and similar spectral processors are a strictly digital invention. We’re talking about plugins like Ozone’s Clarity and Stabilizer modules, Neutron’s Sculptor module, and offerings from other companies.
Without getting super nerdy about it, they usually employ FFT processing (Fast Fourier Transform), a task only accomplishable in the digital domain.
These tools aren’t bad at all, but they can have an obviously modern fingerprint. You can use them in less obvious ways. For now, think of this kind of tool like an ingredient that doesn’t fit in a specific cuisine – melted cheese in Chinese food, cumin in Italian food.
Transient sustain processing
Likewise, we didn’t have fancy transient/sustain processing in the days before digital – minus a clever contraption by SPL called the transient designer, which was used as an insert piece, very deliberately.
This brings us to our next tip.
2. Adopt a hardware mindset: Strips, buses, and inserts
To capture an authentic analog feel, try approaching your digital session like a vintage studio floor. This means working within the purposeful constraints of the pre-DAW era.
Use a "console" workflow
Treat your channel strip as your primary tool. In an analog studio, every track passed through the console’s built-in EQ and dynamics. Instead of using dozens of different plugins, pick one high-quality channel strip – like the Solid Dynamics or Brainworx bx_console series – and use it across your entire session. This creates a cohesive "sonic glue" that defines the character of the mix.
Simplify your spatial effects
Modern DAWs allow for infinite instances of reverb, but classic studios often had only two or three high-end units, like a Lexicon or an EMT plate. That’s not to say they didn’t have toys. Guitarists often brought in all sorts of fun things that ended up in places they shouldn’t have (here’s looking at you, Binson Echorec).
Limit yourself to a few dedicated sends for your entire project. This creates a shared physical "space" for your tracks, making the mix feel more natural and less cluttered.
Make your inserts matter
In the analog world, patching in an external compressor or effect was a deliberate choice that risked signal degradation. Apply that same intentionality in your DAW. Before adding an insert, ask if it’s truly solving a problem or adding necessary character.
Group with purpose
Use bus processing to sum related elements together – like drums or backing vocals – but do so with caution. Not every bus emulation reacts the same way, so test your settings to ensure they are adding the warmth and cohesion you’re looking for rather than just adding noise.
Let’s look at how this philosophy applies to a drum mix.
3. Prioritize vibe over perfection
Don’t be afraid of broad strokes of colors – and don’t do too much to any one track. In fact, do as little as possible. Make quick vibe decisions on your tracks, move to your submixes, and shape the overall sound.
When I’m mixing like this, I get my static balances up fast, and I try to solo as little as possible. I may build the drums up from scratch, but that’s because phase relationships there are important and need to be monitored and adjusted (in the analog world, this was done with polarity switches, or taken care of at the time of recording).
I’m using my console equalizers to get the sounds I want as quickly as possible. I’m thinking instinctually and trying to do as little as possible to make things work.
Then, I’m going to my buses and thinking about my overall vibe. That’s where I audition different color boxes as though they were insert pieces. Observe the big difference between our tracks with the bus processing bypassed and without.
4. Pick one console and stick to it (generally)
Find the right console emulation that fits your sound and commit to it. This is how it worked in the real world: you booked time at a studio, and whatever console they had was what you mixed on. You didn't bounce between an SSL, a Neve, and an API all in the same session – you learned the desk in front of you, and you made it work for your music.
That said, this is where you can take advantage of modern, digital features to get closer to an analog sound. The Brainworx console emulations have tolerance modeling built in, which means each instance of the plugin can sound slightly different from the next – just like how each channel on a real analog console had its own quirks and component variations.
This is the kind of effect that actually gets you closer to that analog behavior without you having to do anything. So pick your console, load it up across your tracks, and let those little variations do their thing.
Observe the difference between tolerance modelling in the drums. Here’s the audio with all of the consoles in the drums set to “digital mode.”
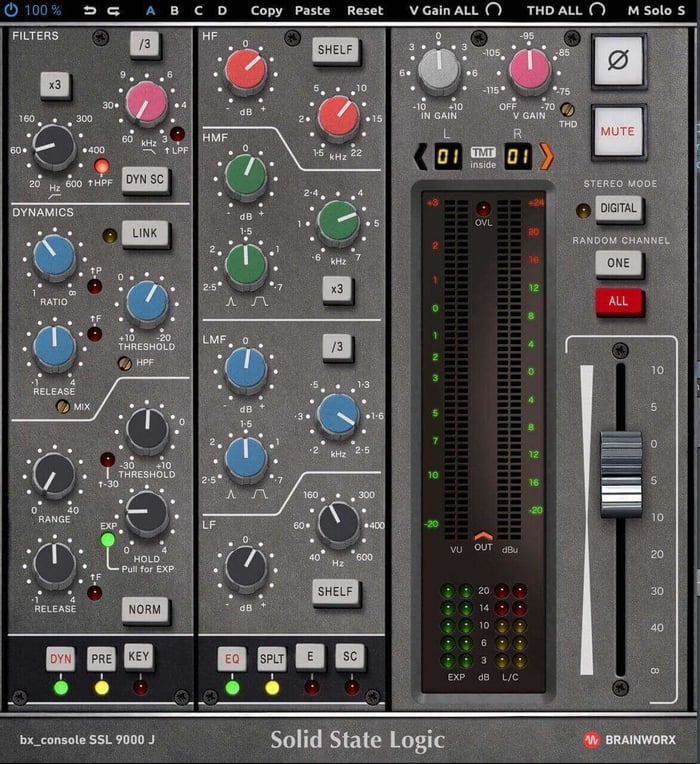
Console set to digital mode
Now, here’s the audio where each drum track has been randomly sent to console channels with different tolerances:
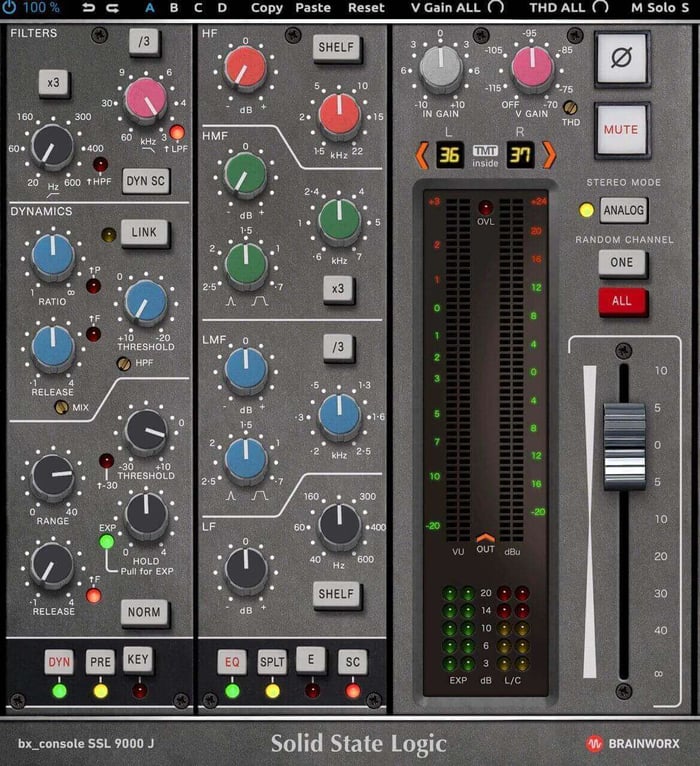
Console on analog
It’s subtle, but the differences add up to something wider and more independent between the left and right channels.
This is the delta (just the differences) between those previous two bounces. Notice how a reverby snare seems ever-so-slightly delayed on the left-hand side? In creating a “fake room” channel for this mix, I loaded one of my favorite drum room impulse responses in Guitar Rig’s Reflektor.
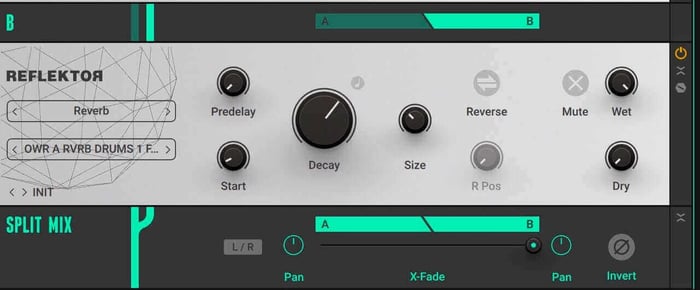
Reflektor in Guitar Rig
This processing is done before the SSL console emulation. Because this 100% reverb has been split between the left and right channels, it creates a specific variance in sound on each channel, which, in this delta, reveals itself as a difference in tonal character on the left and right. This is a clever way of showing you how this processing can create a sense of subtle left and right with minimal effort on your part.
Now, sometimes it might make sense to deviate from the “one console per mix” rule in a song. In this song, I have used the bx_focusrite on elements that needed softening, for example. But here I’m treating the bx_focusrite as an insert effect. I’m “inserting” the equalizer from the Focusrite before hitting an SSL channel strip on the output.
5. Don’t kill transients, but do try to round them out
It’s quite easy to use modern tools to obliterate the shape of transients, thus achieving mixes that read and play louder than ever before. For instance, hard-clipping each drum element and the bus to smash peaks is common practice these days. So is deploying saturation to beef up harmonic sounds, all in the name of decreasing peak to loudness ratio.
This is a technique that screams "digital manipulation," and it works against what we’re trying to accomplish.
I’d use compression, instead, as a means to shape your transients into something rounder – something with more bounce than punch.
Think about what something like the Purple Audio MC 77 does to the attack and release time of a transient.
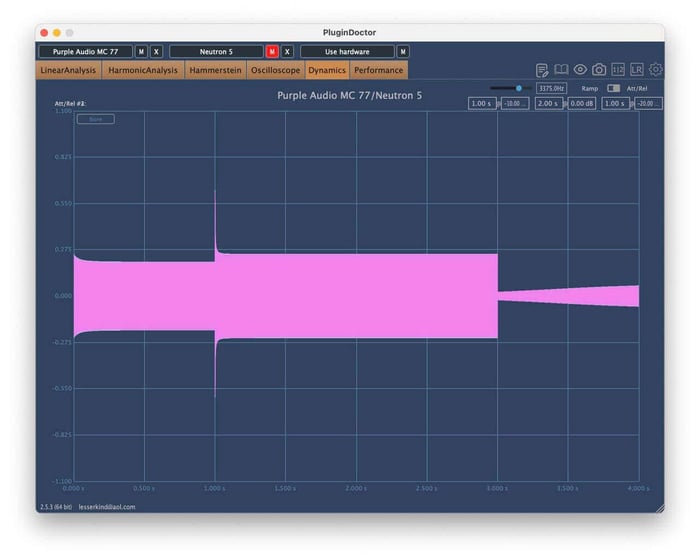
Plugin Doctor on Purple MC77
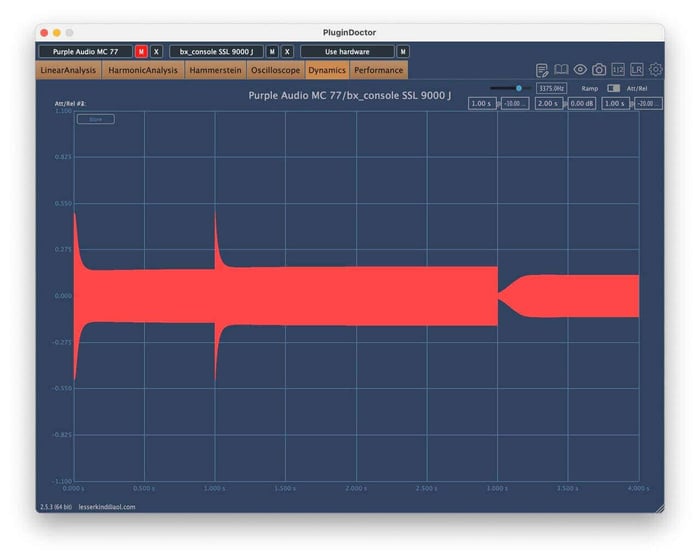
Check out how that differs from the VCA compressor inside a 9000-series SSL channel strip.
Plugin Doctor on SSL channel strip
Very different, right? These are not only different attack and release curves, but different behaviors within the curves themselves.
Now consider what hard clipping is going to do to the transients:
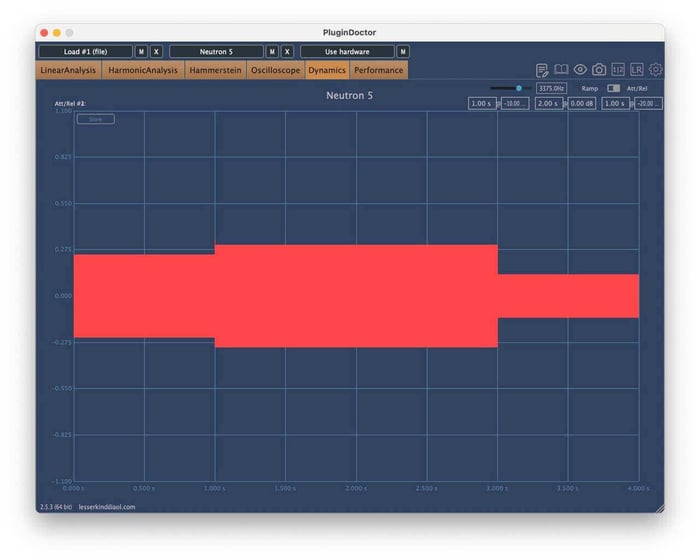
Plugin Doctor on hard clipper
Just flattened. No reshaping to the transient.
What the analog emulations net you is a way to soften the edges of spiky material in a manner that can feel more inviting. Observe what I’m talking about in action.
Here is our drum bus with no dynamics processing on the bus itself:
Here’s straight hard clipping on the drum bus:
Now, I’ll switch the compressors back on – a Purple Audio 77 and the optical section of the Shadow Hills:
These have been loudness normalized. Consider how much more groove the compressed version has over the clipped one – it swings and moves more.
Indeed, this is why in certain situations I prefer using plugins with an analog approach. I get the bounce, swing, groove, and life I’m looking for.
6. Don’t forget about automation
Automation was absolutely crucial to analog console work – and you better believe it can provide the human touch in digital workflows.
Back in the console days, engineers would constantly ride faders throughout the mix, make notes of where they had ridden the faders for their next pass, and bring in their assistants to ride what their 10 fingers could not reach. Even the band helped at times as the consoles grew: a fitting punishment for the drummer that the lead vocalist would ride their volume automation.
This made mixing itself a performative act, and the console a sort of instrument.
You can still do this in your DAW, and the best often do.
“But I only have a laptop,” I can hear you complaining through the screen. “I don’t have a fancy faderbank control surface, and I don’t want one either!"
That’s fine. The trackpad on modern laptops is a beautiful, expressive instrument all its own. You’re limited to riding on one thing at a time (no 10 fingers to move around), but you can still bring a sense of performance into your mix.
7. Decorrelation can equal depth
This one’s gonna get me in trouble, but it should be said anyway:
Decorrelation can absolutely be a shortcut to dimensionality in mix. You change the relationship between the left and right channels even a little, and things feel drastically different. Same for mid/side relationships.
Even in the most fancy spec-perfect analog gear, no two channels were ever exactly identical – and they always aged into imperfection. This lent the analog realm a kind of variance that people chase in digital.
You can replicate this variance with decorrelation. This can work on compression, in mid/side, like so:
It can work with mid/side harmonic saturation, like so:
Left/right dual mono compression can also be very subtle and cool, so long as the settings are not changed between the left and right sides. For instance, the Purple Audio MC 77 doesn’t link the sidechain path between the left and right, making it effectively a dual mono compressor.
Observe what it’s doing to my overheads here:
Left and right equalization is a different affair – but not one to avoid!
Observe the following snippet of the mix.
I’ll slap these equalization settings onto the stereo bus, using the AMEK 200 EQ.

Stereo settings, EQ
Now, I’ll take the frequency centers of the middle two bands – roughly 1.5 and 8 kHz – and tweak them a little on the right side.
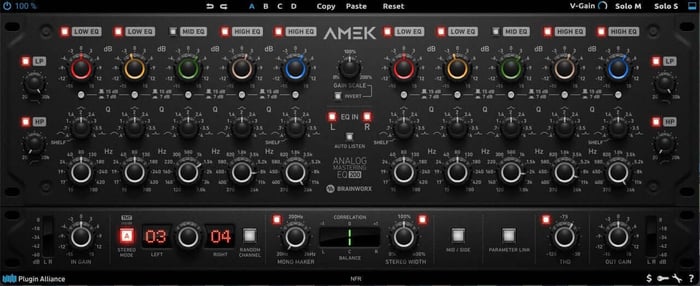
Dual mono different settings in two bands of upper mids
Here are the results.
Flip between the different results, and ask yourself what’s happening to the stereo image here? What’s happening to the back-to-front picture as well?
It’s subtle, but it’s clear to me which one feels more expansive – and we’re not losing much in the way of transient definition to get this effect.
8. Our most dangerous tip: different models on one channel
Okay, if the previous one got me in trouble, this one’ll get me fired. It’s not an everyday tip – and it's definitely not something I'd recommend on elements that need to maintain transient coherence, like drums.
But you can get a really exciting, imperfect, lively feel on transient-lacking material by implementing the following steps:
- Choose what analog equalizer you want on the instrument
- Choose one brand’s version of the equalizer and route your track’s left channel through it
- Choose another brand’s version of the equalizer and route your track’s right channel through it
Yes. You heard me. Sounds crazy. And it is.
It also works – take our mix, for instance:
Here I’m using the Lindell 69 Series console’s equalizer on the right side of my guitar bus, and another brand's version of this classic console on the left. The idea is to create that natural asymmetry I was talking about earlier, but taken to a more extreme degree.
Different emulations have different harmonic profiles, different phase responses, slightly different equalization curves – and when you split them left and right, you get this beautiful, chaotic imperfection that can sound incredibly seductive. I'll A/B it against just using the 69 Series on both sides so you can hear the difference. Sometimes it's too much. Sometimes it's perfect. But it's always interesting, and that's the kind of thing that can really help an element stand out.
Here’s our guitar bus, with none of the processing I’m talking about:
Now, I’ll put the equalizer in the 69 Series plugin across the guitar bus.
And finally, here’s the trick I’m talking about, with the 69 Series equalizer on the right channel, and another brand’s plugin on the left:
Frequently asked questions
Do I need console emulations for an analog-style mix?
The short answer is: it depends on your workflow. Not all emulations are built the same, even within the Native Instruments and iZotope ecosystems.
While some plugins offer a simple channel strip for individual tracks, others provide a complex interplay between channel and bus processors. These advanced emulations recreate the nonlinear behavior of a physical desk, where the signal on one channel can subtly affect the summing at the bus. Others function as dedicated layers of harmonic distortion and waveshaping.
When choosing your tools, consider whether you need a simple tonal shift or a complete, interactive console workflow.
How many instances of a console emulation should I use?
To capture an authentic analog feel, try using a channel strip plugin on every individual track. Working with a consistent strip – like the bx_console 9000 J or bx_console Focusrite SC – recreates the sonic character and helpful limitations of a physical mixing desk, giving your session a cohesive sound.
For your buses, you can experiment with adding further coloration using the Lindell Audio series. Because these processors focus heavily on harmonic saturation, you may find that you only need them on key groups or even not at all. The goal is to use only as much processing as necessary to achieve the right vibe for your mix.
What is the difference between saturation and distortion?
Saturation is a specific type of distortion. While distortion technically refers to any change made to an original signal – including equalization or compression – it is most commonly used to describe the intentional or unintentional degradation of audio as it passes through a circuit.
In a mixing context, saturation is distortion that adds pleasing harmonic content just before the point of audible "break up" or "crackle." Think of it as a way to add warmth and presence to your tracks without the aggressive grit of full-on distortion.
What is the best way to add tape saturation to my master bus?
If you’re looking for a subtle movement enhancer to glue your mix together, try using a single tape emulation at the very end of your master chain.
It’s helpful to remember that while we love the vibe of tape today, old-school engineers often fought against its limitations just as much as they embraced them. Use tape saturation where it suits the track, but avoid overdoing it – a little goes a long way in adding professional warmth without sacrificing clarity.
Get the analog style with digital tools
At the end of the day, remember why you're doing this. For me, this approach brings life and movement to a mix in ways that other techniques sometimes don't. I'm also doing this because I like to mix mobile and take my work outside – it’s fun! Finally, I'm doing this because these tools and approaches still sound better than anything else out there, even with all the advancements we've made in digital processing.
And in this article, I'm doing it all with Native Instruments gear – proving you don't need to spend thousands on outboard equipment or chase down vintage hardware to get somewhere in this ballpark. You just need to understand what you're actually reaching for, be intentional about your choices, and spend time developing your own relationship with these tools. The "analog sound" isn't about perfection or some objective standard. It's about finding what feels right to your ears, what serves the music, and what helps you connect with the work you're doing.
So take these tips, experiment with them, break the rules when it feels right, and make them your own.