9 Tips for Managing a Large Session in your DAW
Whether you’re recording, producing, or mixing music, learn concrete tips for managing large sessions in your DAW.
In our current epoch, large sessions are unavoidable. You know the kind I’m talking about: a hundred tracks — and maybe more — of drums, ancillary percussion, literal bells and whistles, keyboards both analog and synthetic, and piles upon piles of background vocals.
Perhaps you’re just getting your first large session, and you’re swearing at the sheer number of elements you have to deal with. Maybe you’ve been handling them for years, but aren’t happy with your (dis)organizational results; your CPU tends to conk out, your sessions crash, and your data management is so chaotic that you don’t know where your last viable session lies whenever you get the dreaded beach ball.
If that sounds like you, then this article will give you some hope. Not just hope, but concrete tips for managing today’s larger sessions in your DAW.
1. Decide which tracks are necessary upon import
Often times, producers or musicians will send you more tracks than you’d ever need, regardless of the genre of the song. Take your usual rock, country, Americana, or indie mix: you might get three mics on a guitar cabinet—say an SM57, a Sennheiser MD 421, a ribbon, and/or a condenser. Sure, the producer covered the bases, leaving it to you to blend the tracks in post. But this can hog real estate, both in screen space and processing power.
I’d advise in this case to give a quick listen to the guitar parts, as well as the rough mix (one is usually supplied) for comparison; you’ll note you might not actually need all those mics. If the arrangement is dense, the 57 or 421 close miked on the cab might give you all you’d ever want to use.
The same is true for programmed, synthetic elements, but in a different way: a producer might’ve programmed a mono kick or snare drum, but bounced down all the tracks as stereo. However, you don’t need the stereo stem; it serves its purpose in mono.
I would make sure to import the audio as mono in this case, or else you’ll wind up instantiating stereo processing every time you add a plug-in. If you do this, you’ll hog extra processing—which you don’t want! So audition the track outside the session, before actual import, to see if it’s truly stereo. If it’s not, dump one side, or bring it over it as a mono file.
This also helps you avoid needless menu diving through the realms of stereo or dual mono plug-ins, which can sometimes be found in different places within Pro Tools, and can be annoying to track down.
2. Organize and edit your sessions
I used to leave my large projects unedited and disorganized, but that always proved problematic. Over time, I realize I worked much faster when my sessions were organized in a way that makes sense.
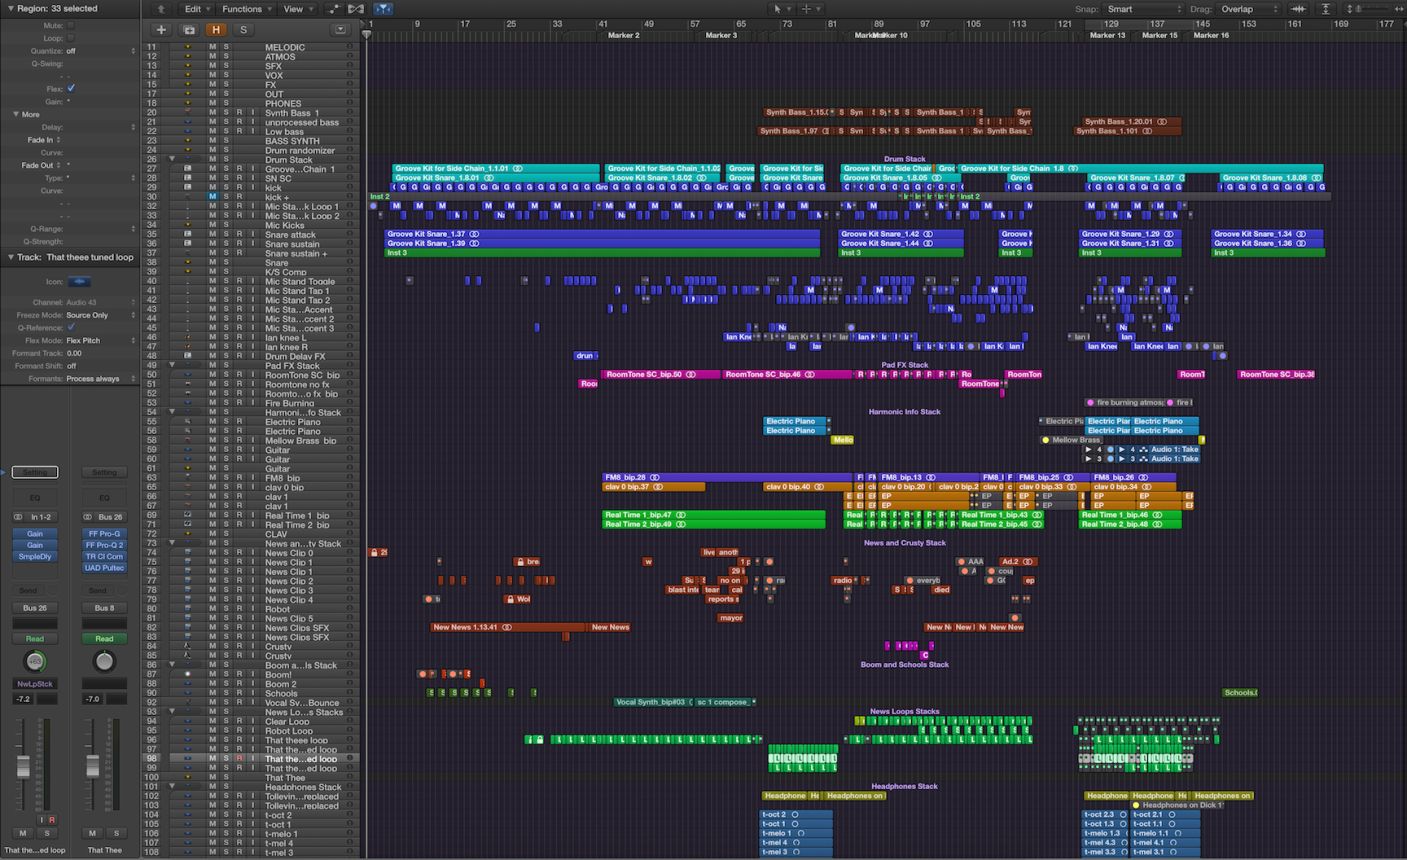
For instance, in a large session, I have all of my auxiliary submixes listed first, from drums to bass and all the way through my main outputs. Then come my individual instruments, starting with basses, followed by drums, guitars, keys, any wildcard instruments (horns or strings), and then, vocals and background vocals. Busses are either grouped with the applicable instrument or at the end of the session, depending on what makes sense with the workflow. Everything is color coded by track. Basses are brown. Drums are dark blue. Guitars are green, keys are light blue, synths are purple, vocals are pink, strings are yellow.
Then comes treatment of the actual regions themselves: they are trimmed neatly and faded where appropriate. Tracks are also labeled in a way I can understand from both the arrangement and mixer windows.
It can take an hour to organize a session like this. But it saves me two hours on the backend, as I don’t have to hunt and peck for things. Since I’ve set up the template, I know where everything is. I move faster throughout the mix, and am more likely to nail down pesky technical issues. I slap on a podcast for background noise while I knuckle down for the process; that seems to make the time go faster.
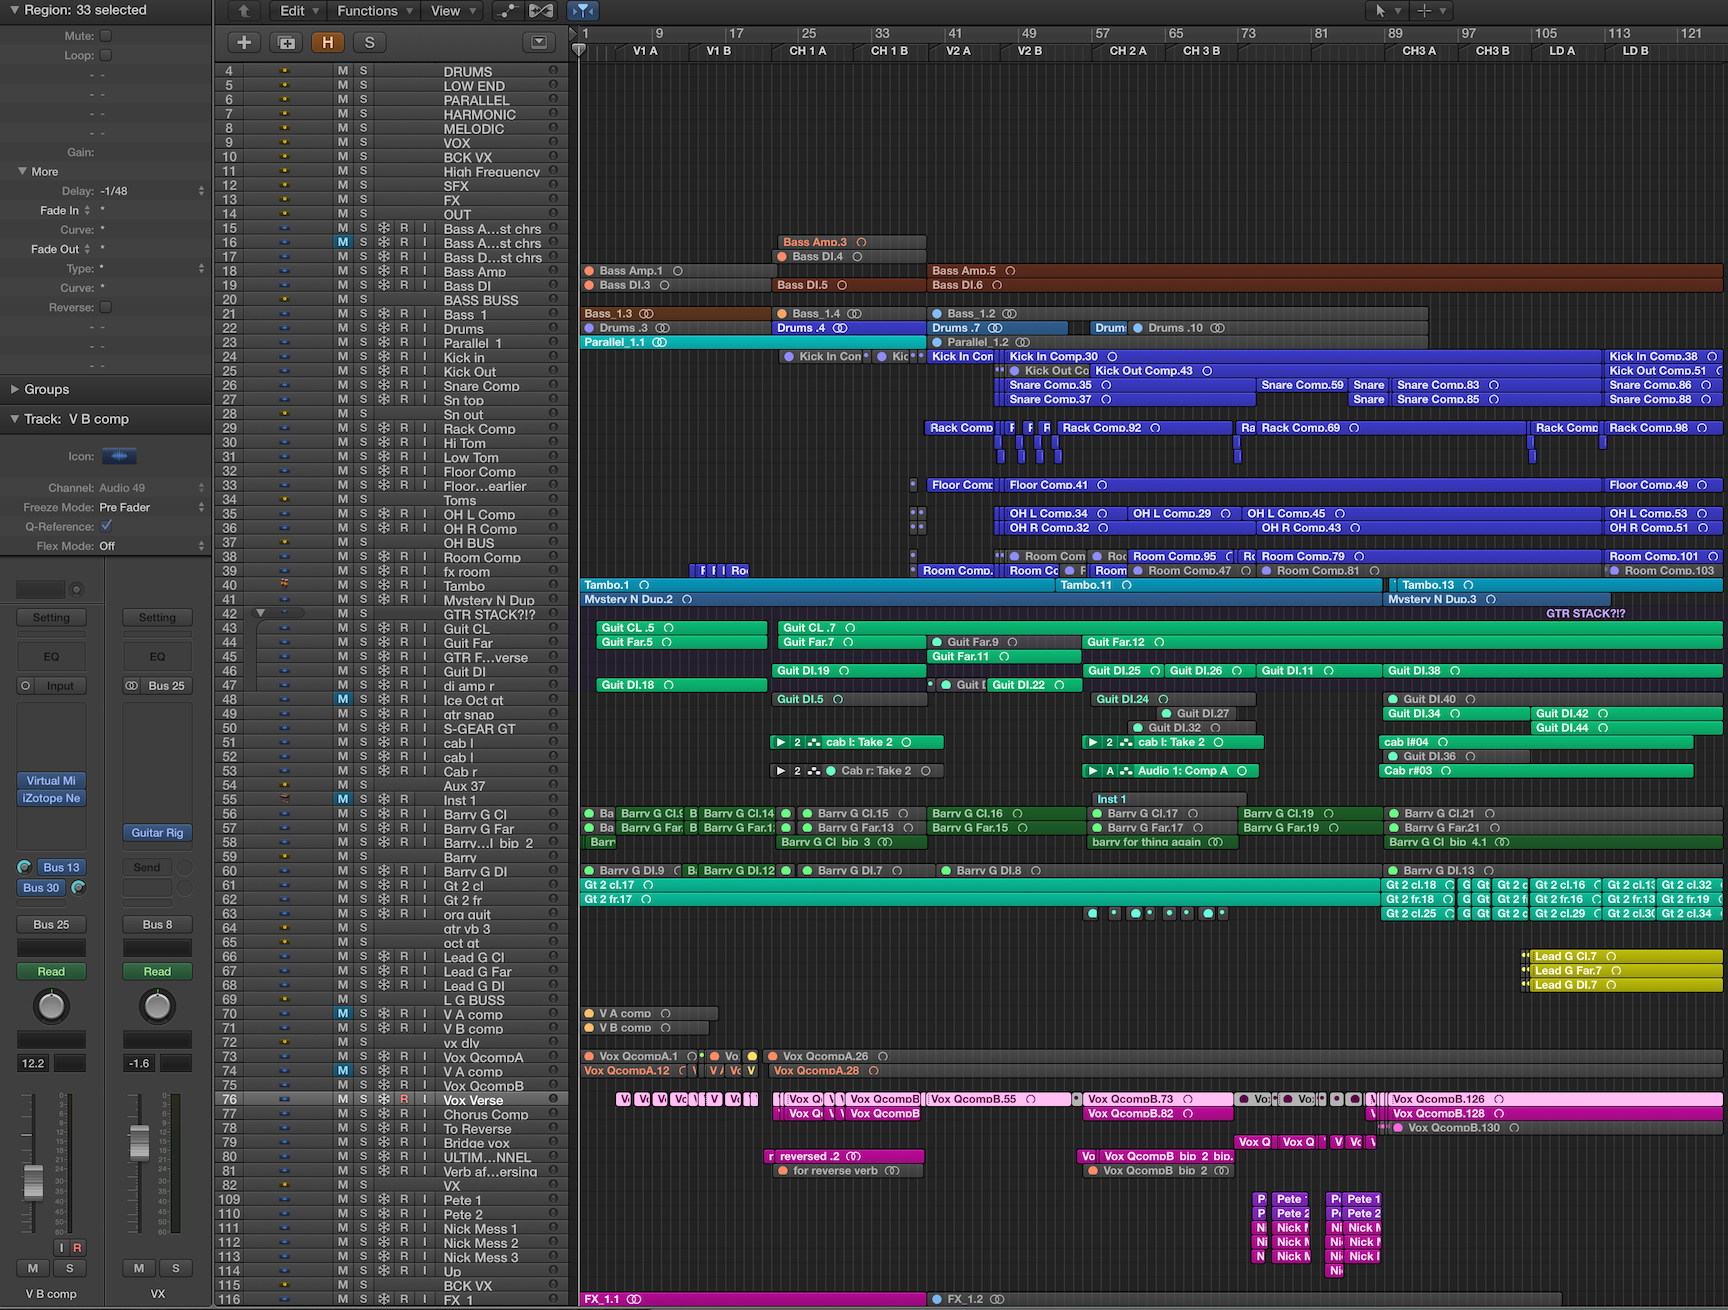
Color-coded session
3. Commit: freeze or bounce-in-place when possible
If you’re working on a machine with limited processing power, this tip is especially apropos. Once you lock a sound in place, freeze it or bounce it in place, then bypass plug-ins and hide the original track (If this makes you nervous, save as a new session when it comes time to do this).
Not only will this allow your computer to process more information—it will also help you make solid, confident choices, as you’re basically committing to the sound, immortalizing it. Having this kind of attitude helps you move faster, as you’re not giving yourself the opportunity to criticize yourself too harshly.
If your DAW sports a freeze function (Logic Pro X and Pro Tools 12.4 and higher both do), you can also freeze a track rather than bounce it in place. This can be useful if you need to free up processing power for other tracks, but don’t plan on committing just yet.
4. Balance the bus processing
Many similar articles will tell you to send groups of instruments to a bus for processing, the idea being that this will save CPU, as you’re distributing processing over a group of tracks.
This, in my experience, doesn't turn out to be as expedient you’d think.
Sure, there are certainly instances in which this advice makes sense. Reverbs come to mind, and overall drum-bus or background-vocal processing is generally a good idea.
However, this is an approach I believe should be taken with a balanced hand, because you cannot freeze or bounce bus-processing in place. So the more of it you use, the more resources you’ll be devoting to elements that cannot be managed offline.
So be careful and considerate when it comes to bus processing for large sessions.
5. Assign tracks to easily-hidden groups
When mixing in Logic, I’ll create track stacks so I can quickly collapse groups of instruments. That way, they don’t take up screen real estate. In Pro Tools, I’ll group my tracks and show/hide those.
By implementing these systems, I can turn this conspiracy of tracks into something reasonable on the screen. It also helps with my focus: when you open a stack of tracks, it’s more like stepping through a door and dealing with the contents of the room. Having things lying around willy-nilly, on the other hand, is like trying to live out of boxes in an unkempt apartment.
Here are 50 tracks collapsed into three track stacks.

And here they are unravelled into 50 tracks (or so).

6. Keep a text document or notepad with scribble changes
I’ve said it before, and I’ll say it again: Nothing comes more in handy than a notepad or a text document for keeping yourself organized. In this instance, the name of the game is keeping track of small level adjustments or panning moves—the things for which you cannot hit Command Z.
If you have a sense that a slight level adjustment you’re about to make will wind up being important, it may behoove you to jot the original level down in said notepad or document to make sure you have a zero point that you can come back to. This is one of the many instances where having a notepad around will help you while managing a large session.
7. Work with submixes
You may have heard of the Michael Brauer technique, or the multiple bus technique. If not, here’s a refresher: before you hit your main stereo output, your instruments are all routed to a variety of auxiliary channels called “submixes.” The classic case of this involves four such submixes: Drums, Music, Vocals, and Effects—with the bass grouped with either Drums or Music depending on the production. Ideally, you’d apply global processing to these submixes, compressing and EQing them to better complement the stereo output’s processing.
At the front of my session, I break it down further: Drums, Bass, Parallel Processing, Harmonic Instruments, Melodic Instruments, Vocals, Background Vocals, Sound Effects and Effects. I don’t do this for mixing possibilities, though they are there if I need them. No, I do this for organization.
If I need to troubleshoot a mix because of, say, a random noise issue (a wayward analog modeler whose hiss emulation has been left on, for example), I can just mute my submixes one after the other until the issue disappears. Then I know where the troublesome offender lies more quickly.
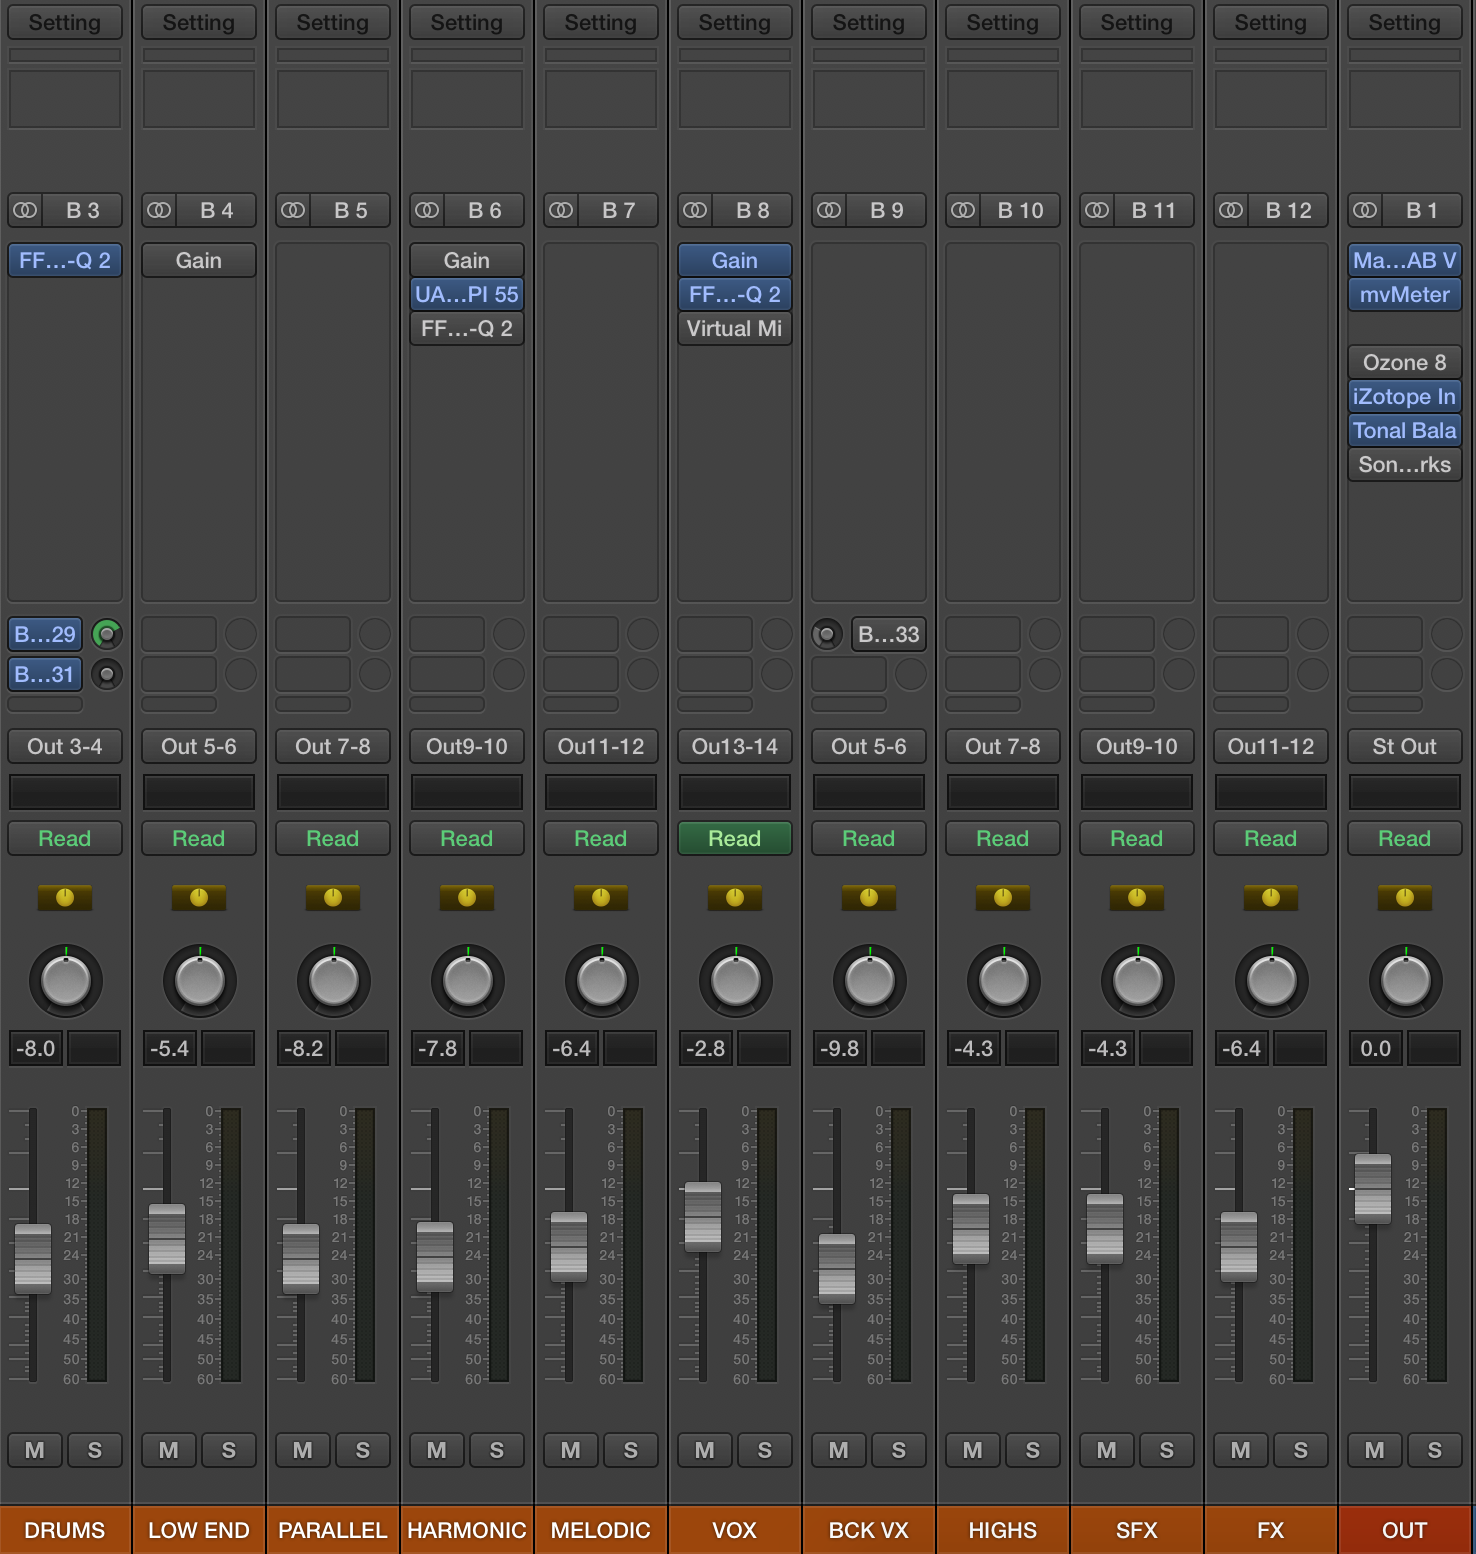
working with submixes
8. Save often
Yes this is conventional advice, but it bears repeating, as it is the most important thing when it comes to managing large sessions. You must save often. Get in the habit of hitting save every two to three minutes. Develop OCD and pour your new malady into this endeavor.
For a variety reasons, large sessions are inherently unstable, especially on systems unadorned with additional DSP. Larger sessions are far more likely to crash. So save often and save yourself the heartache.
9. Know when to “save as”
Equally important as saving is the concept of “save as.” Every day you work on a session, consider saving a new file with the date appended to it. This way, you have archives in case you need to go backwards, or in case a session becomes corrupted. Many people prefer to put the date in front on the project when labeling, going by year, month, and day. So a song called “Point Break” could be called “2018430_point break.” I put the date afterwards because it looks better to me, but the former way allows your browser to sort by date at the same time as you’d sort by name.
I also save iterations of the project as different documents, with different appellations. Arranging a session into my DAW is labelled “.arrange”; editing is “.edit”; mix is “.mix,” and tweaks are “.tweaks.”
Conclusion
Large sessions seem intimidating at first, what with all the potential for CPU to run out on you, for the stability of the DAW to be threatened, and for disorganization. But they don’t have to be. Follow these nine simple tips, and they’ll be easier to manage with each passing project.