
One way to drastically improve the consistency and quality of your work is to use reference tracks to help guide your decision making when mixing. A reference track is a professionally produced song representative of how you want your own work to sound and it can help you achieve the loudness and tonal balance of your favorite productions. Referencing is something you can do in both mixing and mastering, but this article will focus on using reference tracks with Ozone and Tonal Balance Control within the context of mixing.
1. Choose the right reference tracks for your project
First thing's first: you need to decide which tracks you’re going to let guide your mixing decisions. Here are a few different approaches you can take:
Use the rough mix as a reference track
As mix engineer Ike Schultz made clear in our interview with him, always utilize the rough mix as a reference track. This is true even if you’re working on mixing your own production––either the rough mix is a starting point you need to beat or a yardstick to measure how far you’ve come.
In either case, you need the rough mix to make sure your new mix doesn’t make things worse. Nothing is more disheartening than A/B-ing your mix with the rough mix after hours of work, only to find you’ve killed the vibe––missing the forest of emotionality for the technical trees.
Drop it into Ozone’s referencing section and let it live amongst your other references.
Use the reference tracks your client provides
Anytime you mix or master a project, it’s always good to ask for a reference track from the client. While you want to use your own favorite reference mixes, they should always be informed by the reference tracks your client provides.
Why? Because the client also knows what they want to hear—they have an idea of where the project is going. The client reference gives you a peek into their predilections and goals for your final result. It is your first genre-specific guide as well.
Try to get a WAV file of your client’s preference––it’s always better than the lossy version––and drop it into Ozone 9’s reference section next to the rough mix.
Use your favorite mixes as reference tracks
My first batch of personal reference tracks is compiled from the music of my childhood. There’s some Soundgarden in there, some Nine Inch Nails, Mos Def, Radiohead, Alan Parsons Project, Tool, D’Angelo, Talking Heads, Porcupine Tree, Alanis, Jeff Buckley, Hawksley Workman, and many others.
Your list will be different—I grew up in the nineties. Whatever they are, choose reference tracks that move you the most. You must admire the music and sonic aesthetic; this is as much for inspiration as it is for matching.
2. Level match the reference tracks to the mix
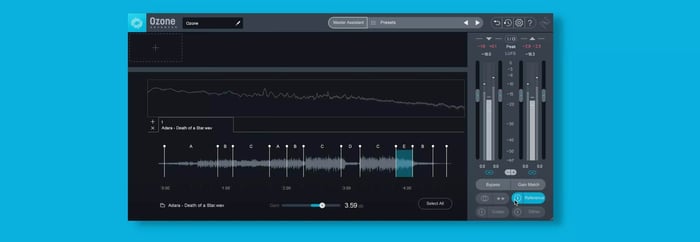
When you load in your reference tracks, you’ll notice that they’re louder than your mix because they’ve already been mastered. To compensate for the level difference, match the level of your reference track to your mix so you’re not mistakenly boosting too many frequencies or over compressing in an attempt to achieve the loudness of a mastered track.
You’ll want to do this after you gain stage your audio and set your level balance. After setting up your static mix to hit the desired target, bring your reference mixes down to this same level.
Note how the reference has been dropped -4.1 dB to get it to a reading of -17 LU, short term.
3. Keep your monitors at 85 dB SPL
The equal-loudness contour shows us how our perception of frequency changes at different volume levels. If we monitor too low, the midrange feels more prominent while the bass and treble sound weaker. If we monitor too loud, on the other hand, the low and high frequencies begin to stand out more than the midrange—and we risk ear damage.
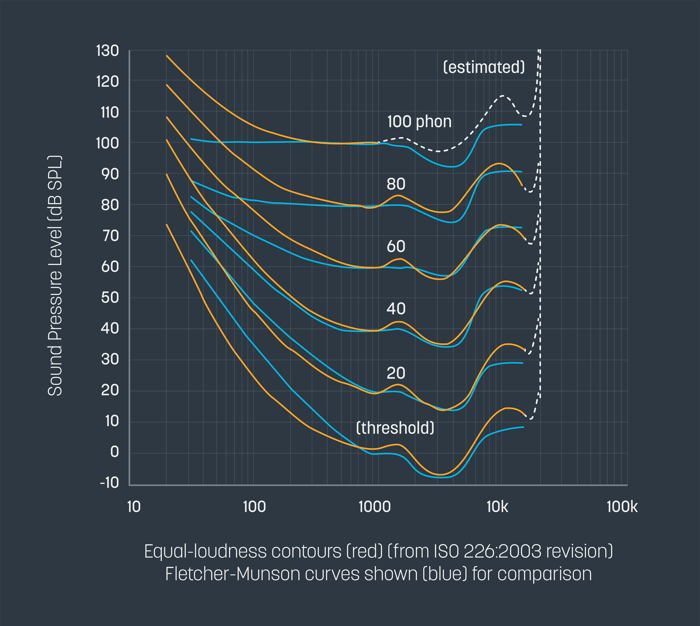
Equal loudness curve
A sweet spot is needed, one where we can take an accurate accounting of bass, mid-range, and treble frequencies. 85 dB SPL is the average monitor level recommended, though you should still take frequent breaks at this level.
Use an SPL meter—even one on your mobile device is good enough for these purposes—to ensure your mix and reference mixes are all playing back at around 85 dB SPL on your loudspeakers. Note that 85 dB is not always correct for every room. Smaller rooms may require lower levels.
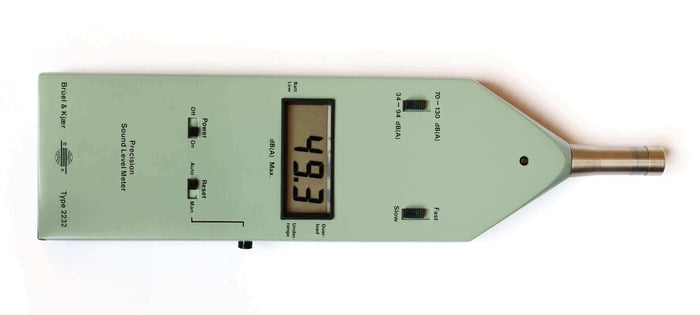
An SPL meter
Do this at the start of your mixing session. Place the SPL meter in your listening position and adjust your monitor gain until the loudest parts of your mix and reference tracks all average around 75 or 85 dB SPL depending on room size.
The important thing is to select a consistent level to make decisions, especially while utilizing reference mixes.
4. Avoid ear fatigue
After setting up initial balances—or after working on a mix for an hour or two—take a ten-minute silence break to rest your ears and avoid ear fatigue. When you come back, play five seconds of the reference and switch immediately to five seconds of your mix. You’ll have an immediate idea of how far you are from the real thing—and what you must do to steer the mix home.
Something about the silent break and the quickness of comparison makes the difference here—you’ll catch things you hadn’t noticed when mired in the mix previously. But if you listen to each mix for too long, you will convince yourself that your mix is not so far off as it immediately seemed. Make no mistake, your first impression is correct in this circumstance. Don’t let your brain trick you. You must instead trick your brain.
5. Make EQ moves to match the reference track’s tonal balance
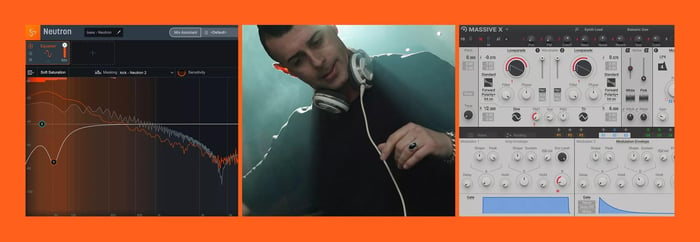
Once you have loaded your reference tracks into your session, calibrated your monitors to around 85 dB, and have set proper levels, try activating an instance of Tonal Balance Control at the end of the processing chain of your master bus. Tonal Balance control will display the frequency distribution of your reference track and show where your mix lies in comparison. The white lines will update to show how your track compares to the target curve and you can begin to make adjustments to Neutron EQ instances to modify your mix to fall within the blue target ranges of your reference mixes. For example, if you notice your reference tracks are brighter than your mix, find the elements of your mix that are responsible for the high end and address the issue with EQ.
Don’t be afraid to make drastic moves to match the EQ. Many times when matching a mix to a reference track, I’ll think, “Am I really going to have to boost this element so much to match it?” This is followed by, “That can’t be a good idea, can it?” I’ll never know unless I try, and that’s what using a reference is all about, focusing your effort and will into worthwhile arenas.
Speaking of arenas, I’m working on an arena rock mix presently for a band who worship at the altar of Pantera and Ted Nugent—the reference is literally Pantera’s cover of Cat Scratch Fever. They want the snare drum to sound as close as possible in particular.
This article references a previous version of Neutron. Learn about Neutron 5 and its powerful features including Assistant View, Target Library, Unmask, and more by clicking here.
Left to my own devices, I would not add machine-gun snare samples to a kit, nor would I boost it all in the highs. But I had the reference to guide me. I wouldn’t have been able to make the call without the reference track. It just so happened the call was correct, no matter what a screenshot of the EQ looked like.
For the record, here’s what it looked like before referencing in Neutron :
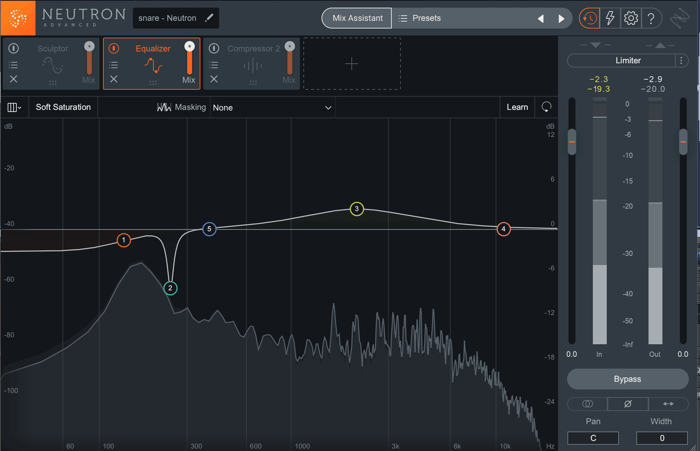
Snare before referencing Pantera
And here’s what it looked like after:
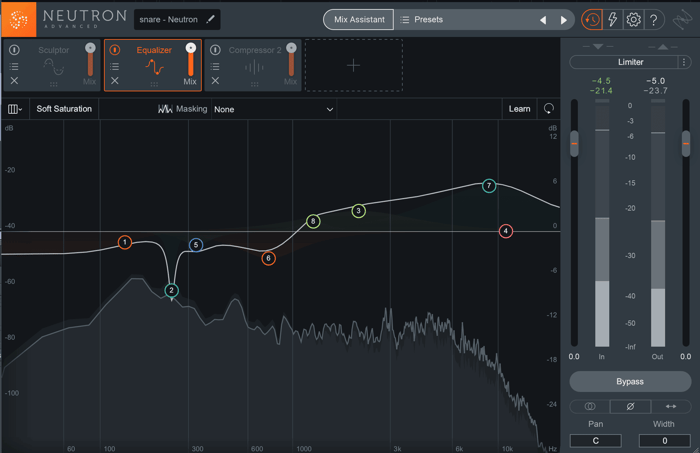
Snare after referencing Pantera
6. Focus on one element at a time
When comparing against the reference master, try to focus on one element of the music at a time. Listen to your snare and quickly compare it to the reference. It’s not hard: if you tell yourself you’re listening to that snare, you’ll find you’re listening to that snare.
Here are three circumstances where this technique is especially useful:
- Scenario 1: If you want to see whether your last bit of processing got you closer to the ballpark, engage in critical listening between your mix and your references. This works for any instrument that you’re sculpting.
- Scenario 2: If you want to see whether you made something worse, engage in focused listening between your mix and the rough mix. Again, this holds true for all instruments.
- Scenario 3: If you are making stereo bus or mastering decisions, again, use focused listening in reference to the rough. Say, for instance, you’re going for transparency in limiting. Spend a minute A/B-ing the limiters of Ozone against the rough mix, and you’ll hear right away if the kick, snare, bass, or vocal isn’t playing well against the limiter. Level matching is an absolute necessity here, as you want no perceived loudness jump to influence your decision.
7. Listen for level relationships within the reference track
Now, instead of locking onto one instrument, listen to the level relationships between two or three. It could be the kick, snare, and vocals. You could choose the bass and the kick. Perhaps the vocals and their respective reverberation/effects occupy your focus. Whichever pair or trio you choose, you’ll quickly arrive at the correct balance if you compare the relationship in your mix with the relationship in the reference mixes.
Think of the vocal/effects balance, this is always hard to clock at first—for instance, this relationship sounds inherently different in cans than in loudspeakers. So you may not know where to start unless you have a reference track. If you have faith that the reference is the right anchor for your mix, then comparing the balance between your mix and the reference is exactly where you should start.
8. Ask questions every step of the way
Are my trebles as smooth as the reference or are they harsh? Is my bass sitting correctly or is it tubby and overwhelming? Is my percussion cracking through or is it muffled by other instruments? These are all questions you should ask yourself while you’re comparing your work to the references.
There’s more: is my track as wide? If not, how does it feel? Wider or less narrow? Be inquisitive here with any element that immediately doesn’t stack up against the reference; it will become apparent to you and you must suss it out.
9. Reference similar sections (chorus with chorus, verse with verse)
When judging the impact, depth, width, and weight of your chorus, try to line the section up with similar parts of a reference. Make sure you’re switching between these comparable song sections, and keep the goals of your mix in mind while you listen.
Is your chorus supposed to be wide, open, and soaring? Or should it be impactful, dense, and in your face? Does your reference achieve the same goal? And if so, how? Is your mix achieving this goal like the reference does? Or does it fall short in some way?
Using the tricks already provided—everything from level matching to homing in on a single detail—you can pinpoint how your mix falls short in this section.
10. Use meters while referencing
We all know that the ears serve you better than the eyes. However, sometimes the eyes can be informative, especially when referencing material—and especially when contrasted with your ears.
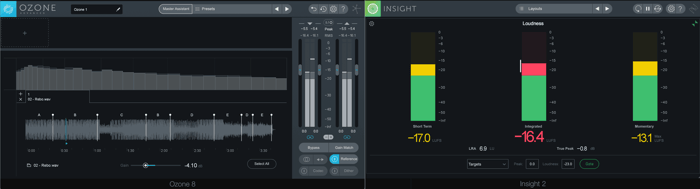
Take loudness metering, if the reference is playing back at -17 LU short term, and your mix is also hitting -17 LU, everything seems good, right?
Perhaps your ears provide a different story—your ears say the reference feels louder. This tells you something about the apparent loudness of your mix, and what you need to fix. Most likely, it’s a frequency-balance issue. Your mix could use more midrange or top to give it the same feeling.
Also, if you’re using Insight 2 , keep an eye on the correlation meter while referencing. If your mix feels as wide as the reference, but the correlation meter gives you a reading inching towards the negatives, that tells you something about what you’re not hearing—namely any phasing issues you may not notice.
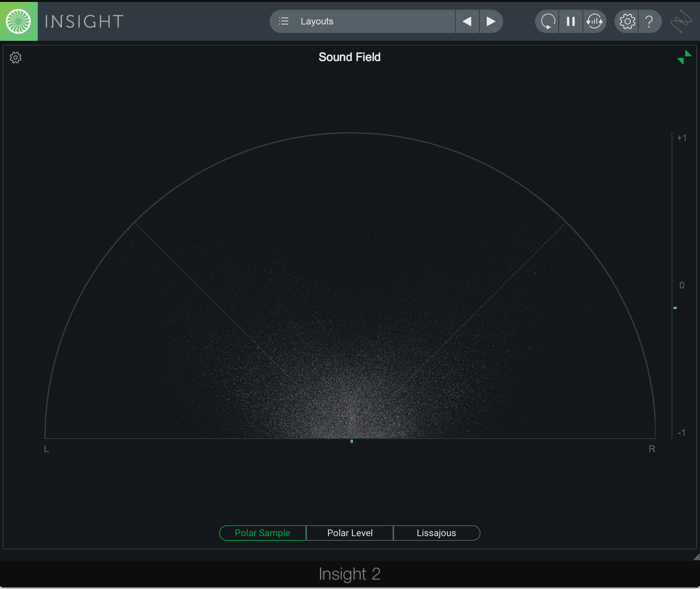
An out-of-phase-trending reading in correlation meters
Using something like the Loudness History Graph in Insight 2, get a feel for the dynamic range of the reference, and see how it stacks up against your mix.
Hours of mixing can leave your ears dull to dynamic range issues. A metrical comparison helps you see when you’re boringly flat in comparison to the reference.
Start mixing with reference tracks
Now that you're aware of the benefits and the process of using reference tracks when mixing, start keeping an ear out for mixes that embody the sound you're after. Try building a library of your favorite reference tracks and drop them in to your mixing projects so you have a north star to look to as you work. Happy mixing!