What is tube saturation? How to add tone to your mixes and masters
Discover the magic of tube saturation in audio production. Learn what it is, how it works, and how a tube saturation plugin can transform your mixes.
Tube saturation: the sound that launched a thousand songs and a hundred genres. In this article we’re going to answer the question of “what is tube saturation” as simply as we can. We’re also going to cover what a tube saturation plugin can do for your mixes.
Follow along in this tutorial with Plasma, the new dynamic tube saturator from iZotope.
What is tube saturation?
In the olden days, back when dinosaurs roamed the earth and people paid to own music, playback media relied on these steampunk looking doohickies called “vacuum tubes” for amplification:
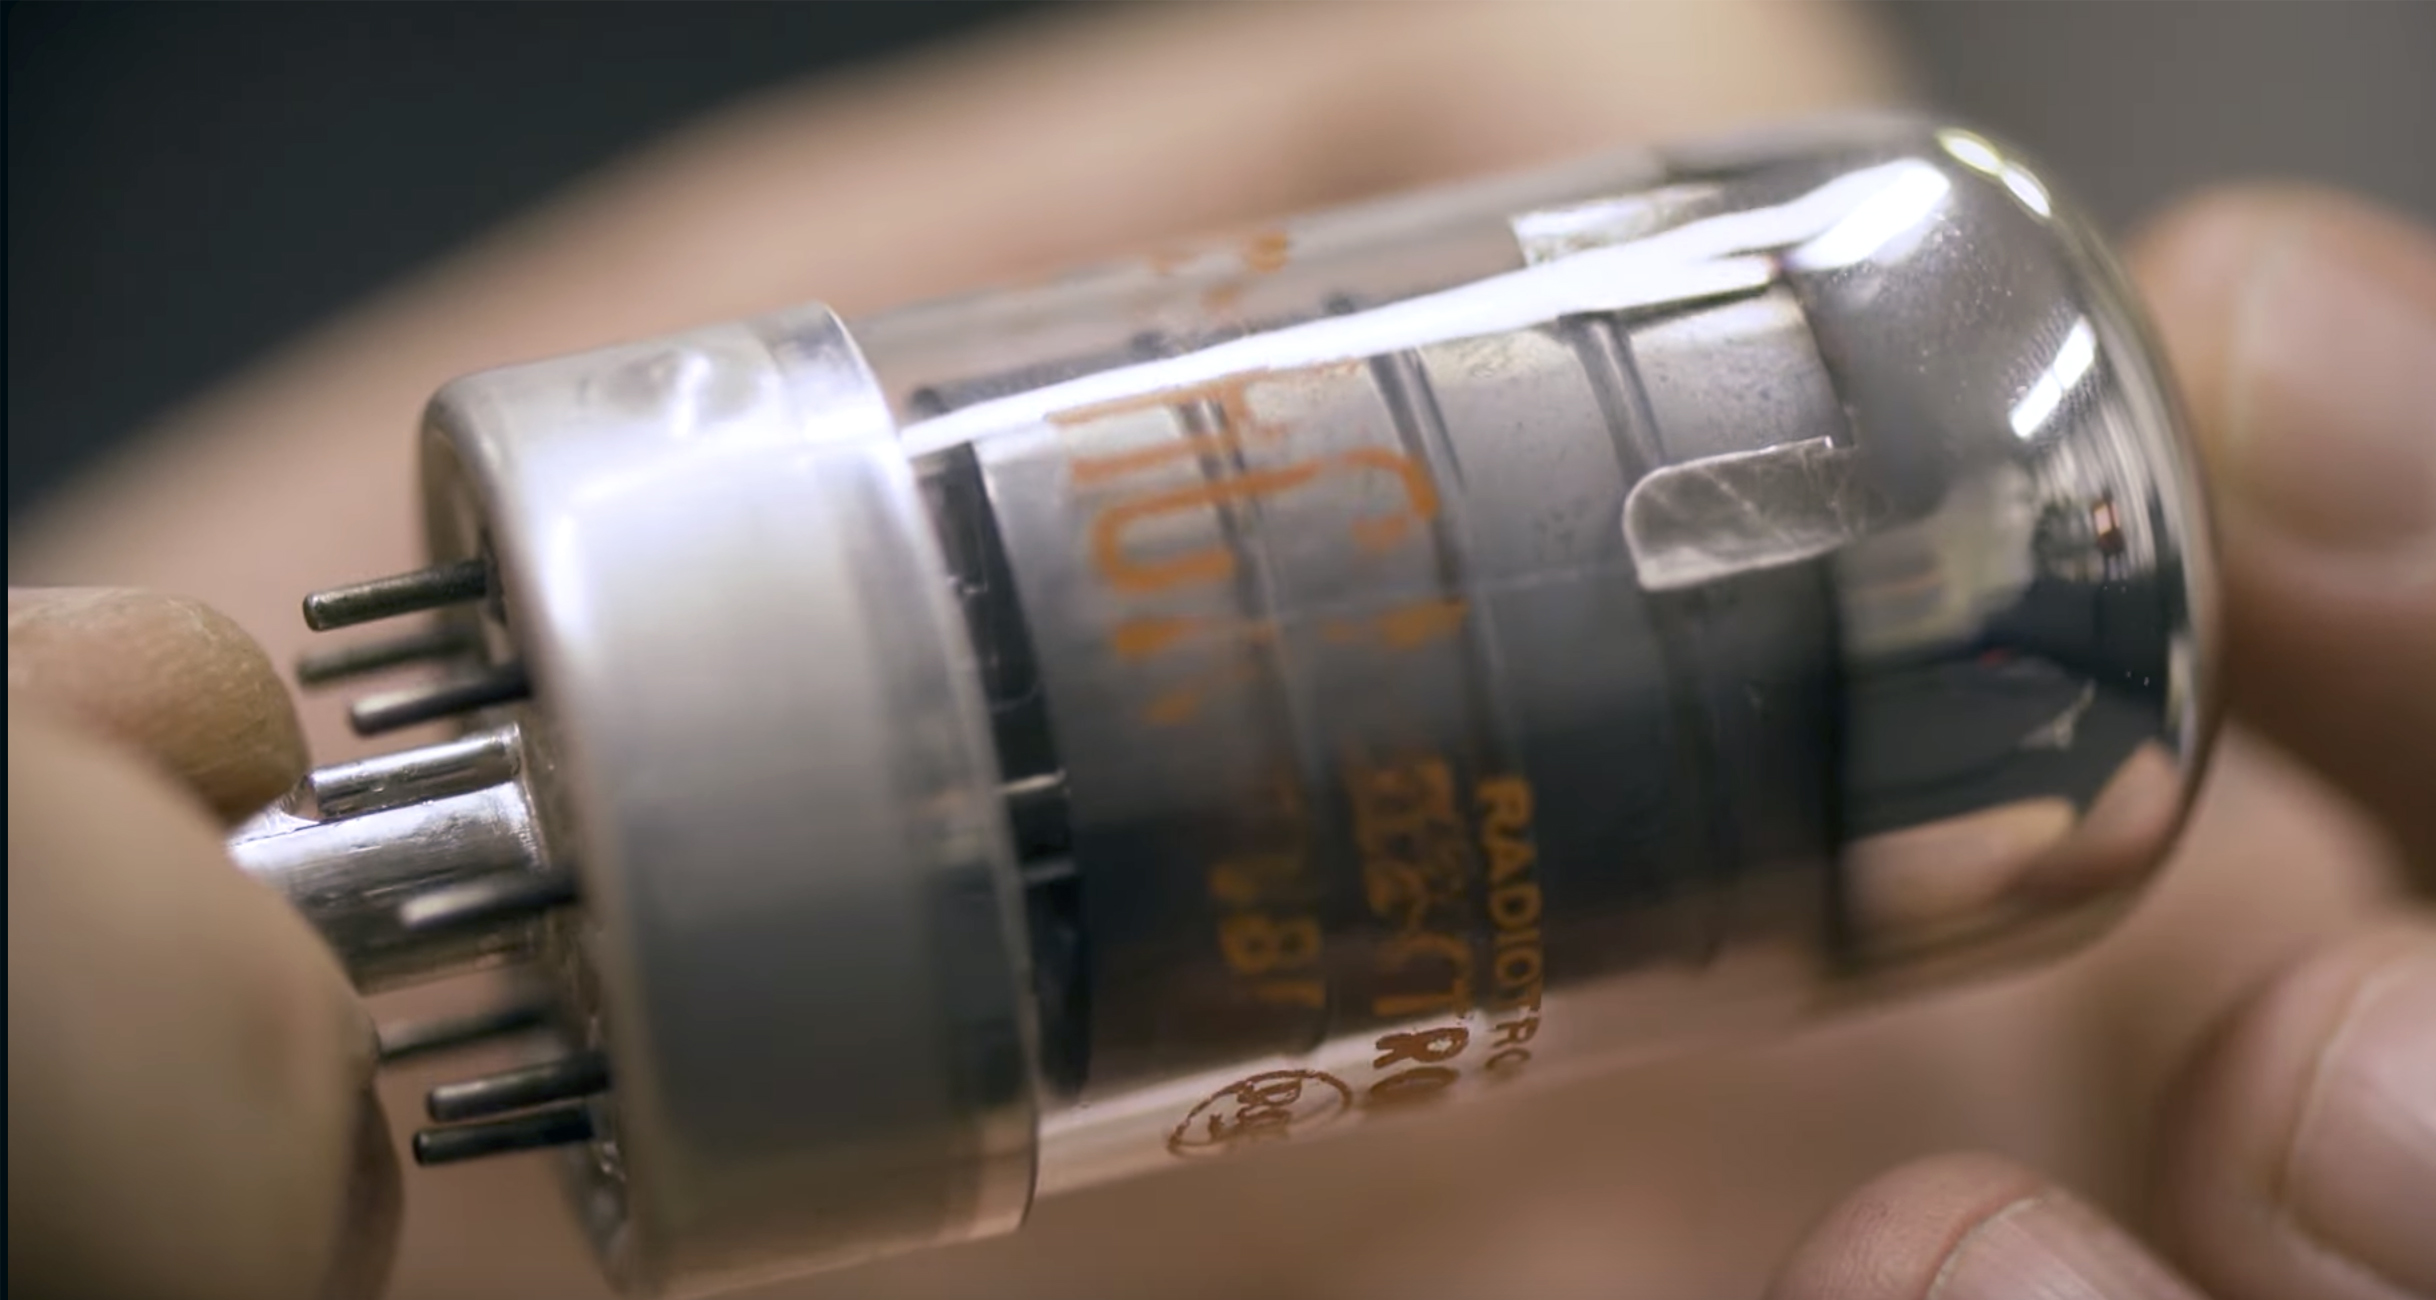
To explain how these little guys worked would involve getting into the nitty-gritty of electrical engineering. You’d need to understand the operating concepts of current and voltage. You’d need to look at words like “anode,” “diode,” and “cathode,” and somehow stay awake. You’d have to understand how electrons flow through a circuit, and what happens when their flow is disrupted and manipulated.
Gentle reader, I can’t get you to that place in the short space allotted. That’s the first chapter of a textbook.
But I can tell you this: drive tubes harder than they were intended to be driven, and you get clipping distortion. But not your garden variety clipping distortion – you get a very warm, pleasant sound right up to the point of breakage.
I can demonstrate the particular warmth and character of tube saturation in the following video:
The headline is this: tube saturation can often preserve the integrity and organic quality of your audio as you distort it.
What does a tube saturator plugin do?
You’re working with a computer in the 21st century, and 21st century computers pointedly do not make use of tubes. Yet we prize what tubes can do for our sound, so we use plugins that emulate the behavior of tubes.
But, here’s the thing: different tube circuits distort differently. Some don’t even really distort in the way you’d normally think – instead you get a pleasant glassy effect when you hit the circuit hard, right up until the point of obvious break up.
This is why iZotope, Plugin Alliance, and Native Instruments have various different tube plugins. Each one can get you a different kind of effect. The pleasure comes in knowing what each one might do for you.
In general, I often break tube saturation down into four distinct categories. This helps me figure out which plugin to use.
Here are the four categories:
- Harmonic breakup: Using tubes to achieve the pleasant saturation of overly-cranked tube distortion – the organic enhancement, as it were.
- Frequency balancing: We can bolster specific frequency ranges in a signal in a way that's more pleasant or less obvious than EQ.
- Holographic enhancement: Subtle tube saturation can often add a subtle, pleasant je ne sais quoi to the spatial relationships and depth of field in your mix.
- Loudness optimization: Tube saturation, done well, can reduce peak energy in a subtle manner without altering the mix’s behavior too noticeably.
Common uses for tube saturation
In this section, I’m going to take a static mix and use nothing but tube saturation to help get us to a more polished product. I’ll be using nothing but tube saturators and tube compressors (which bring heavy saturation in tow), all of them from the Native Instruments family of plugins.
I want to show off just how subtle tube saturation can be, so I’m going to use an acoustic mix as an example. We’ll be using an alt-country tune by my good friend Pete Mancini called “To Be Alive.” This is the static mix:
We’ve got drums, bass, acoustic guitars, a dobro, a mandolin, and a banjo. Let’s start with the drums.
1. Drums
Here are the drums with nothing on them:
All the tube processing will eventually get us here:
There’s a five decibel difference, but even loudness matched, the tubed-up drums have more character, heft, bounce, and drama.
Here were the individual moves:
Adding power to a kick with multiband tube-based excitement
Ozone Exciter, used in multiband, can juice up the power of the kick like so:
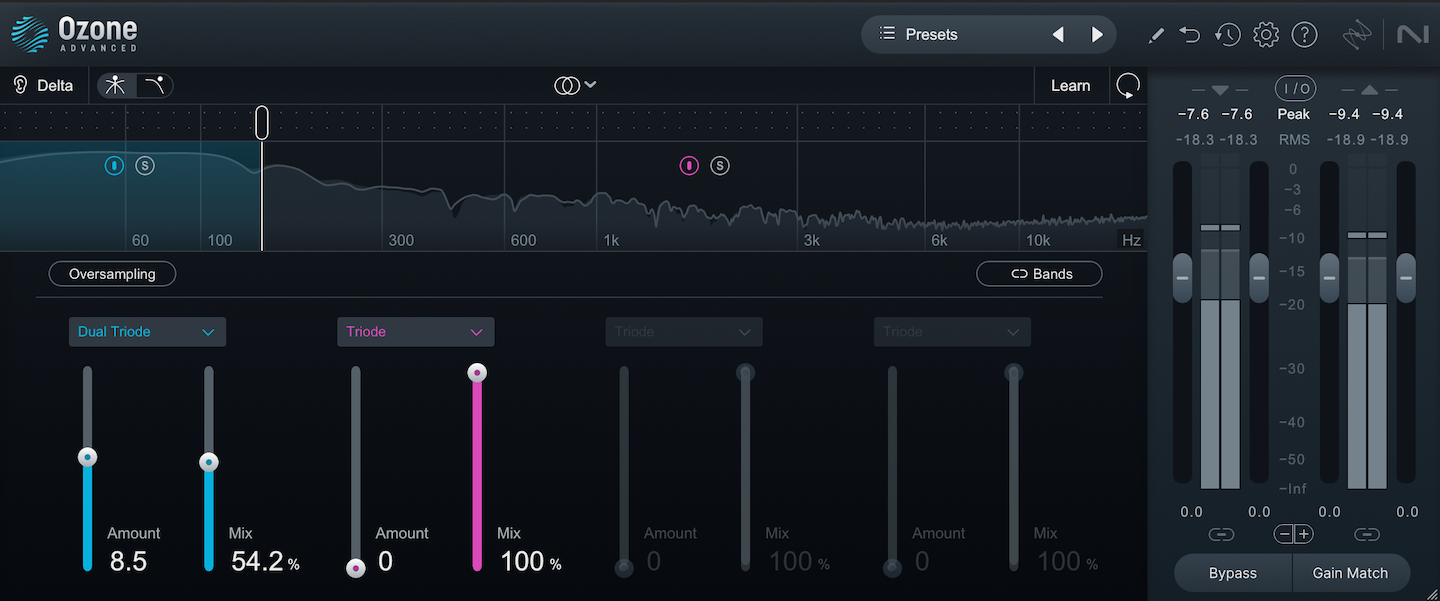
We’re just adding tube saturation to everything below 120 Hz. That’s it.
Helping the kick punch through the drums with heavy-duty tube compression
In the context of the mix as a whole, I noticed that the kick wasn’t punching through as much as I’d like. Here I used this goody from Native Instruments Guitar Rig 7:
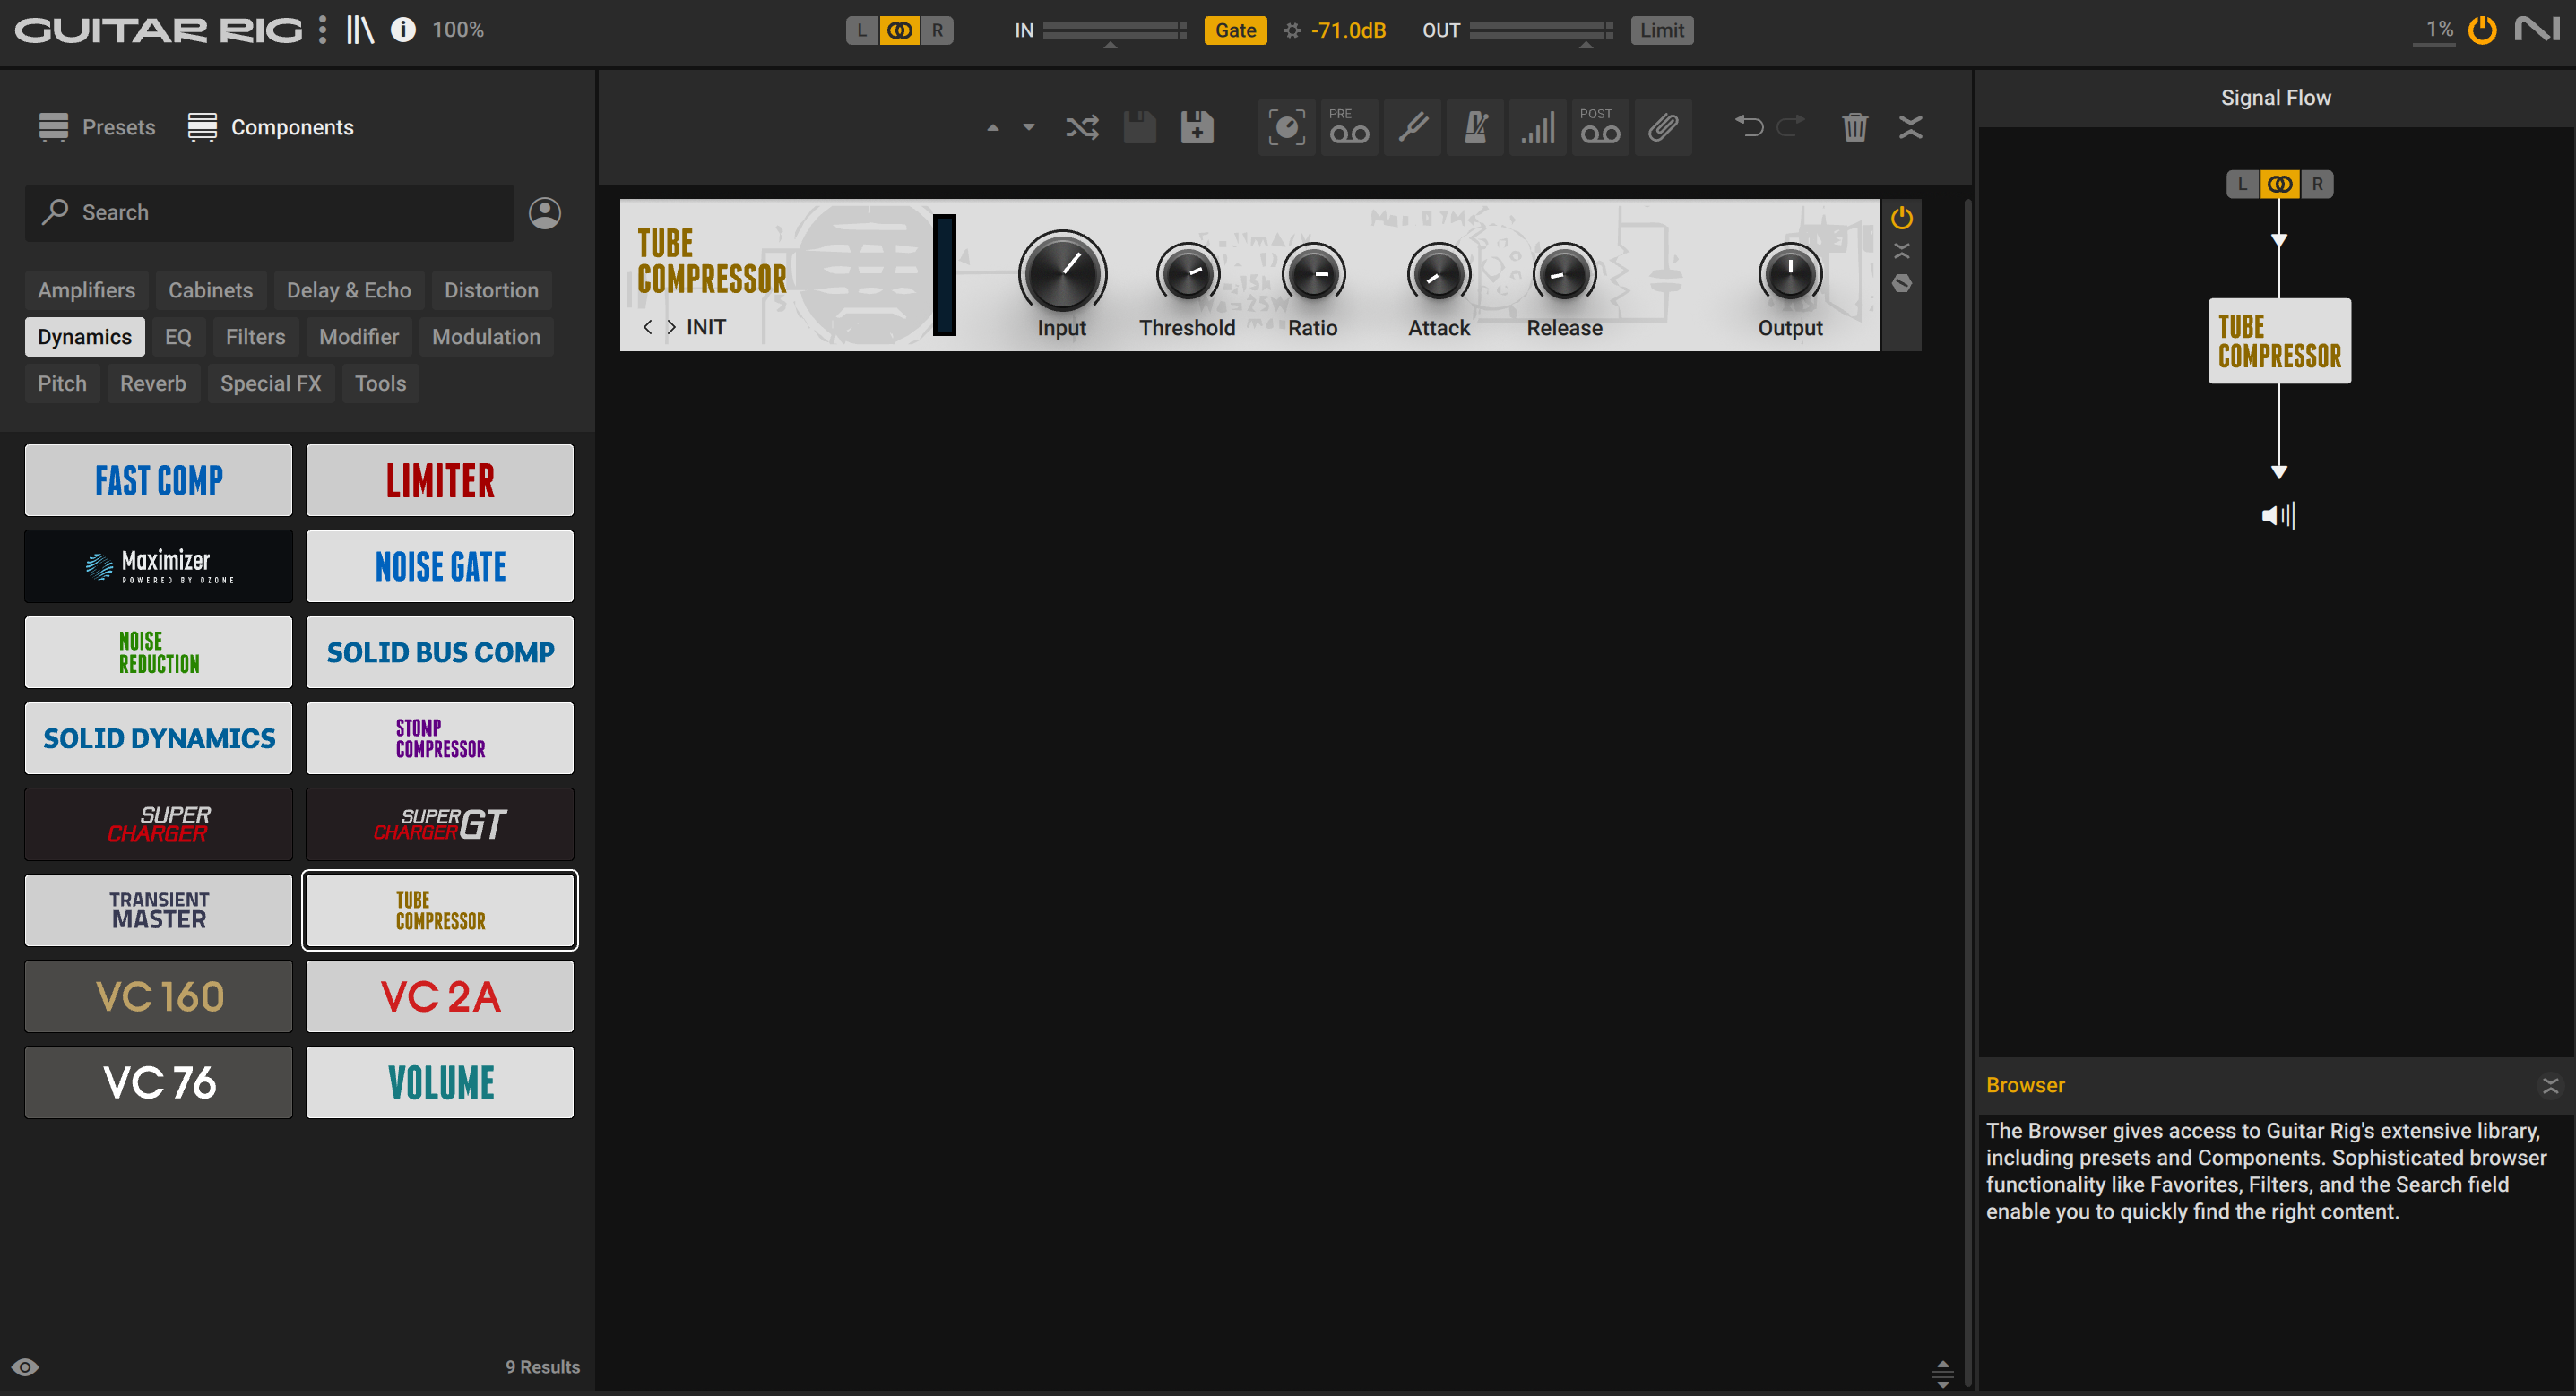
I sent the kick to a parallel aux and put this bad boy on the channel. I didn’t do it for any compression effect, no. This thing just has a heavily saturated sound perfect for kick-cut in a mix. I haven’t even touched the settings. It’s all default.
Here’s without, in context of the song:
And here’s with:
Note, I’m exaggerating the bus here; it’s 3 decibels higher than I wound up having it, so you could hear it more.
Making a “fake room sound” when no room mics were provided
A kick drum, a snare top mic, and two overheads – that’s how these drums were recorded. I wanted more room sound, so I used bus-routing and two tube processors to make a “fake room” channel.
First, I sent all the drums to a “fake room mic” bus. In solo it sounds like this:
First, I slapped SPL TwinTube on this “fake room” parallel aux. Here’s what the Plugin Alliance processor sounded like:
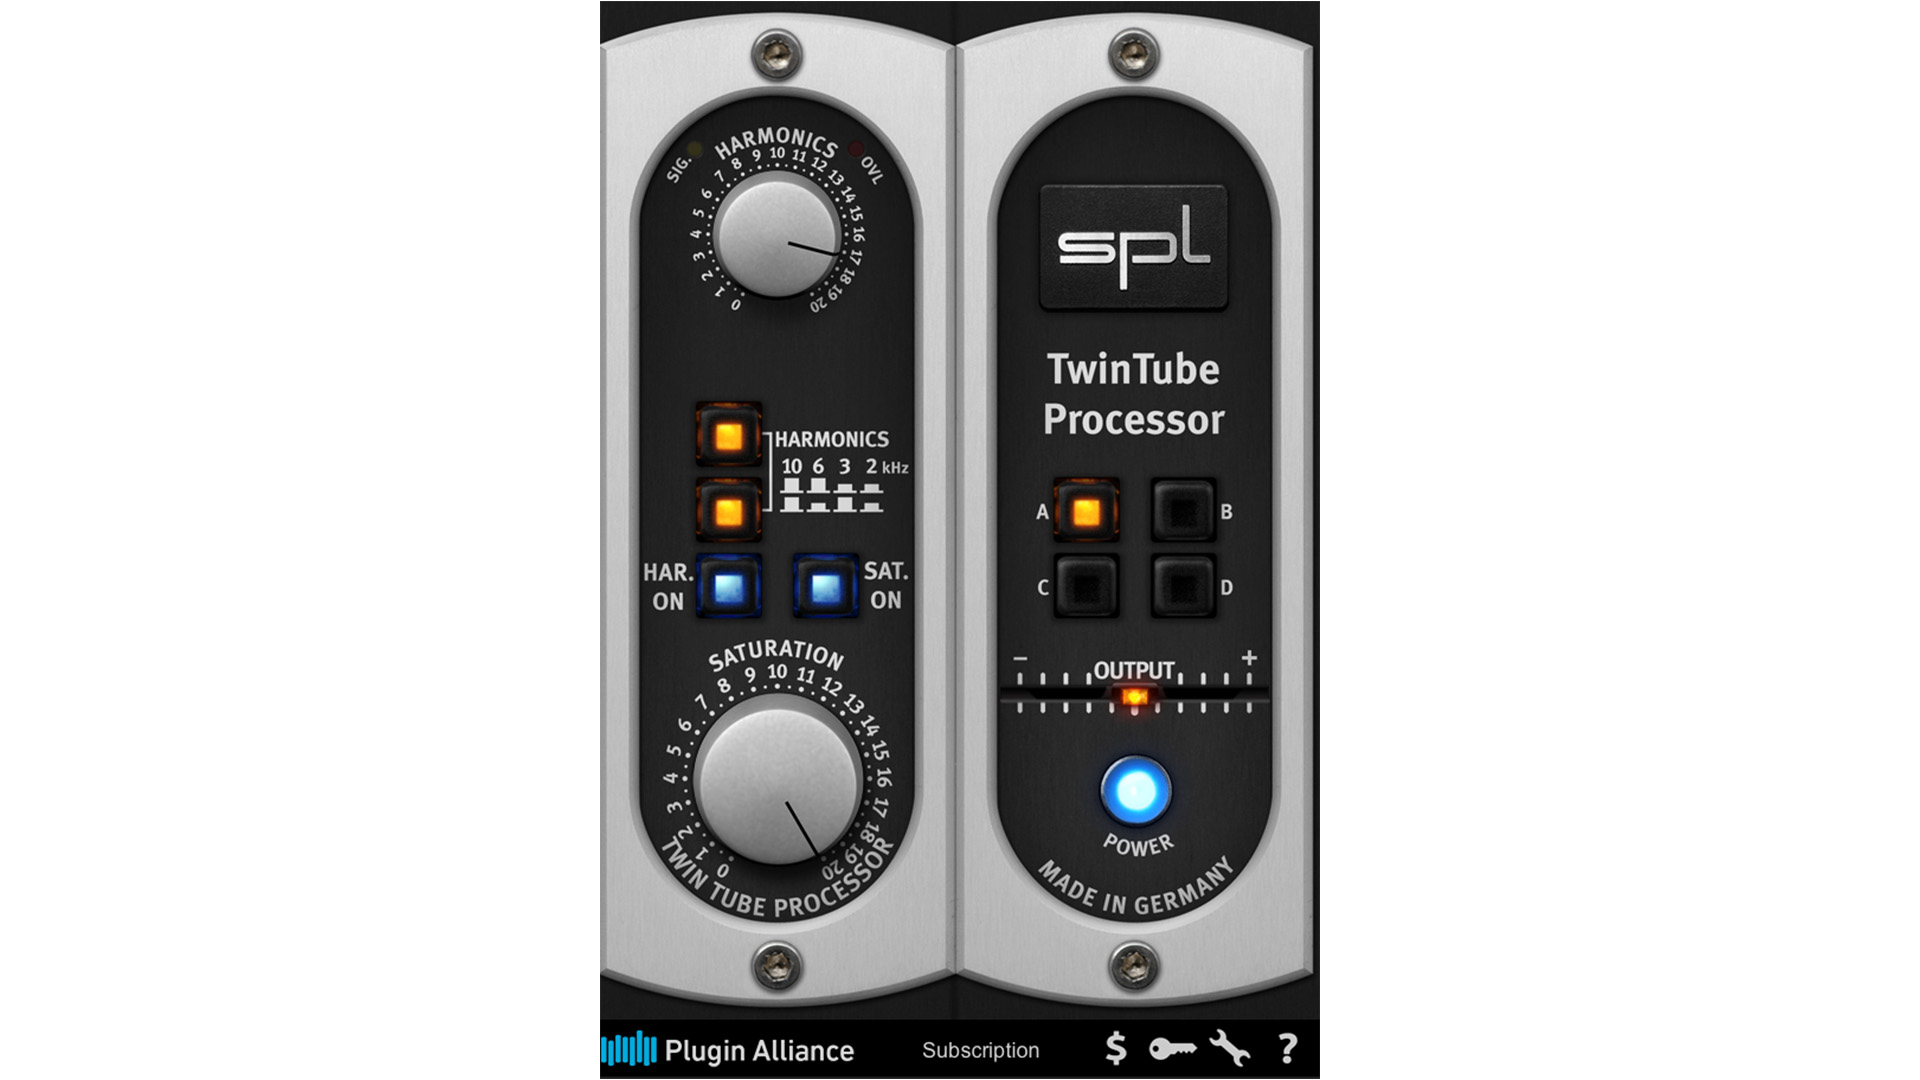
The level of harmonic saturation is already giving me that mid-forward room sound I want. But, there’s room for more, well, room. Do I reach for a reverb? Not this time:
When you slam something to hell with a Fairchild-style Vari-mu compressor and a fast time constant, three things happen:
- You get a certain kind of bouncing groove
- You get a lot of saturation
- You get a particular feeling of distance and roominess.
In this case, I reached for the Lindell Audio MU-66:
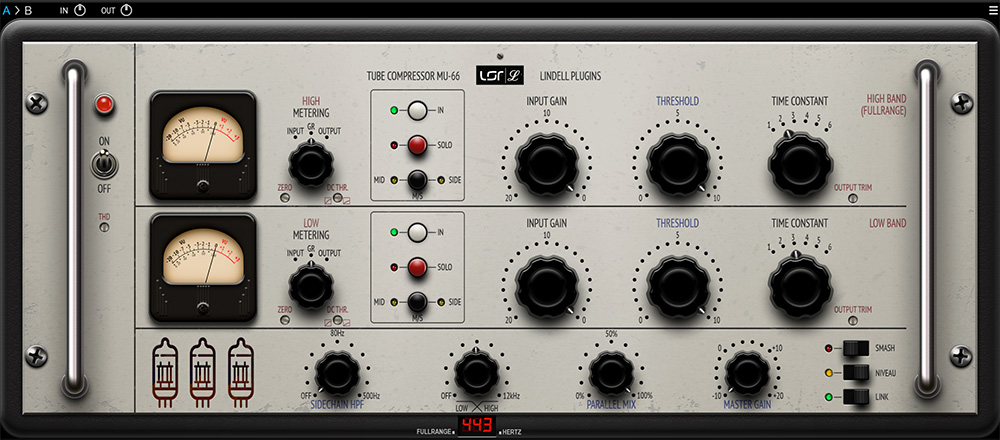
I’m using it in full band mode, and that gets us here:
Here’s our drums without the fake room mic:
And here’s with:
Works for me.
Adding more “snares” into the kit with Plasma
This snare is being played with brushes. On its own, I don’t feel like I’m getting enough paper out of the brushed snare part:
Here I’ll make use of a new iZotope plugin called Plasma – a subtle tube-saturator that works in a spectral way. It’s one of the more naturalistic tube plugins I’ve heard in terms of getting that “holographic tube vibe.”
I’ll mult the snare to a new track. Here’s what it sounds like on its own:
I’m going to really whack it with Plasma.
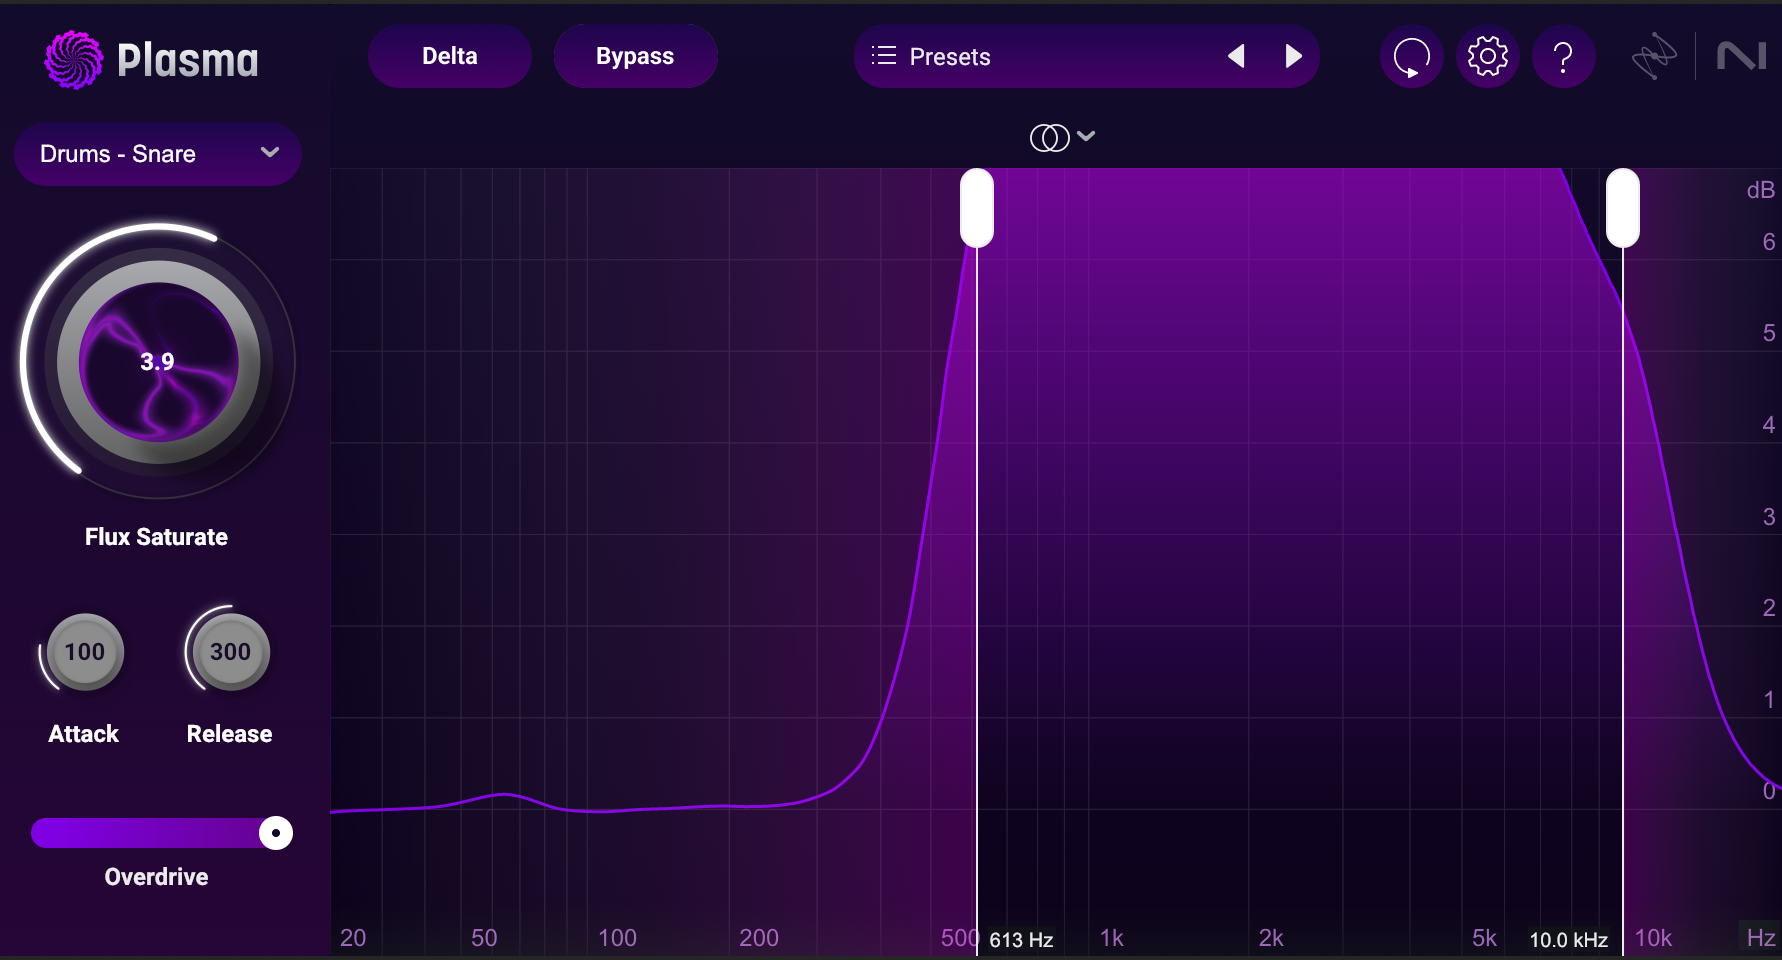
I’m pushing it overly hard, I’m utilizing the overdrive to the max, I’ve got the release slowed down a lot, and I’m concentrating the effect between 613 Hz and 10 kHz.
Sounds bizarre. Let’s listen to that in context, shall we?
This is what I wanted.
Shaping drum bus tone with The Oven
That’s all I’m going to do to the individual drum tracks. So let’s move onto the drum bus, where I’m going to use The Oven from Plugin Alliance:

This is another plugin that can be alternatively subtle or cutting. Here, I’m adding general saturation with the Temp and Cook controls, which are hard to describe. Easier to describe are the burners, which allow you to change the tonal balance of signal in a manner similar to – but not exactly like – EQ: yes, these controls introduce curves, but not in the linear manner of an equalizer.
I’m using the low burner to emphasize the kick a little and the high burner to bring out more snare and hat. But take a look at the mid-burn knob: no boost here. Instead, we’re attenuating some of the tom-tom resonances with this parameter.
Without The Oven vs. With The Oven
2. Bass
Onto the electric bass, which has three tube processors going on.
Adding roundness and finger noise with HG-2MS
The bass is a solid, clean capture:
It could use more attack or “finger noise,” as well as the organic harmonic enhancement tubes provide in spades.
I’ll turn to Black Box Analog Design's HG-2MS from Plugin Alliance, a fantastic emulation of a modern tube classic:
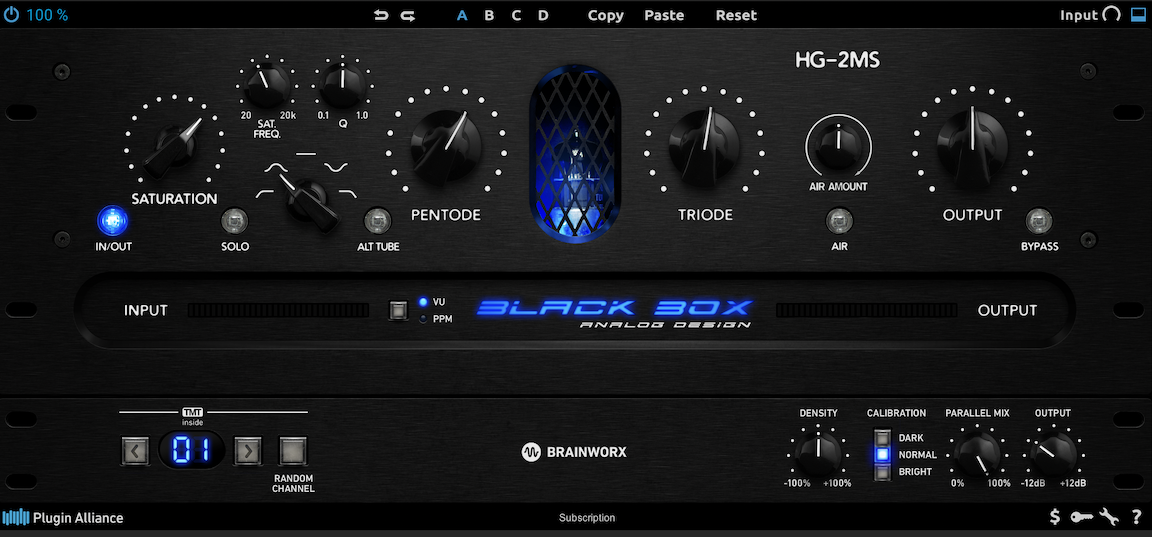
Triode is giving us plenty of roundness, thanks to its addition of even harmonics. Pentode helps add more “cut” to the signal, giving us some aggressive odd harmonic behavior. But look at the “saturation” section: this models an optional tube that you can put into the circuit in parallel. Here I’m driving it pretty hard, and I’m focusing it in a specific midband frequency:
Next, more of that holographic sound with Plasma:
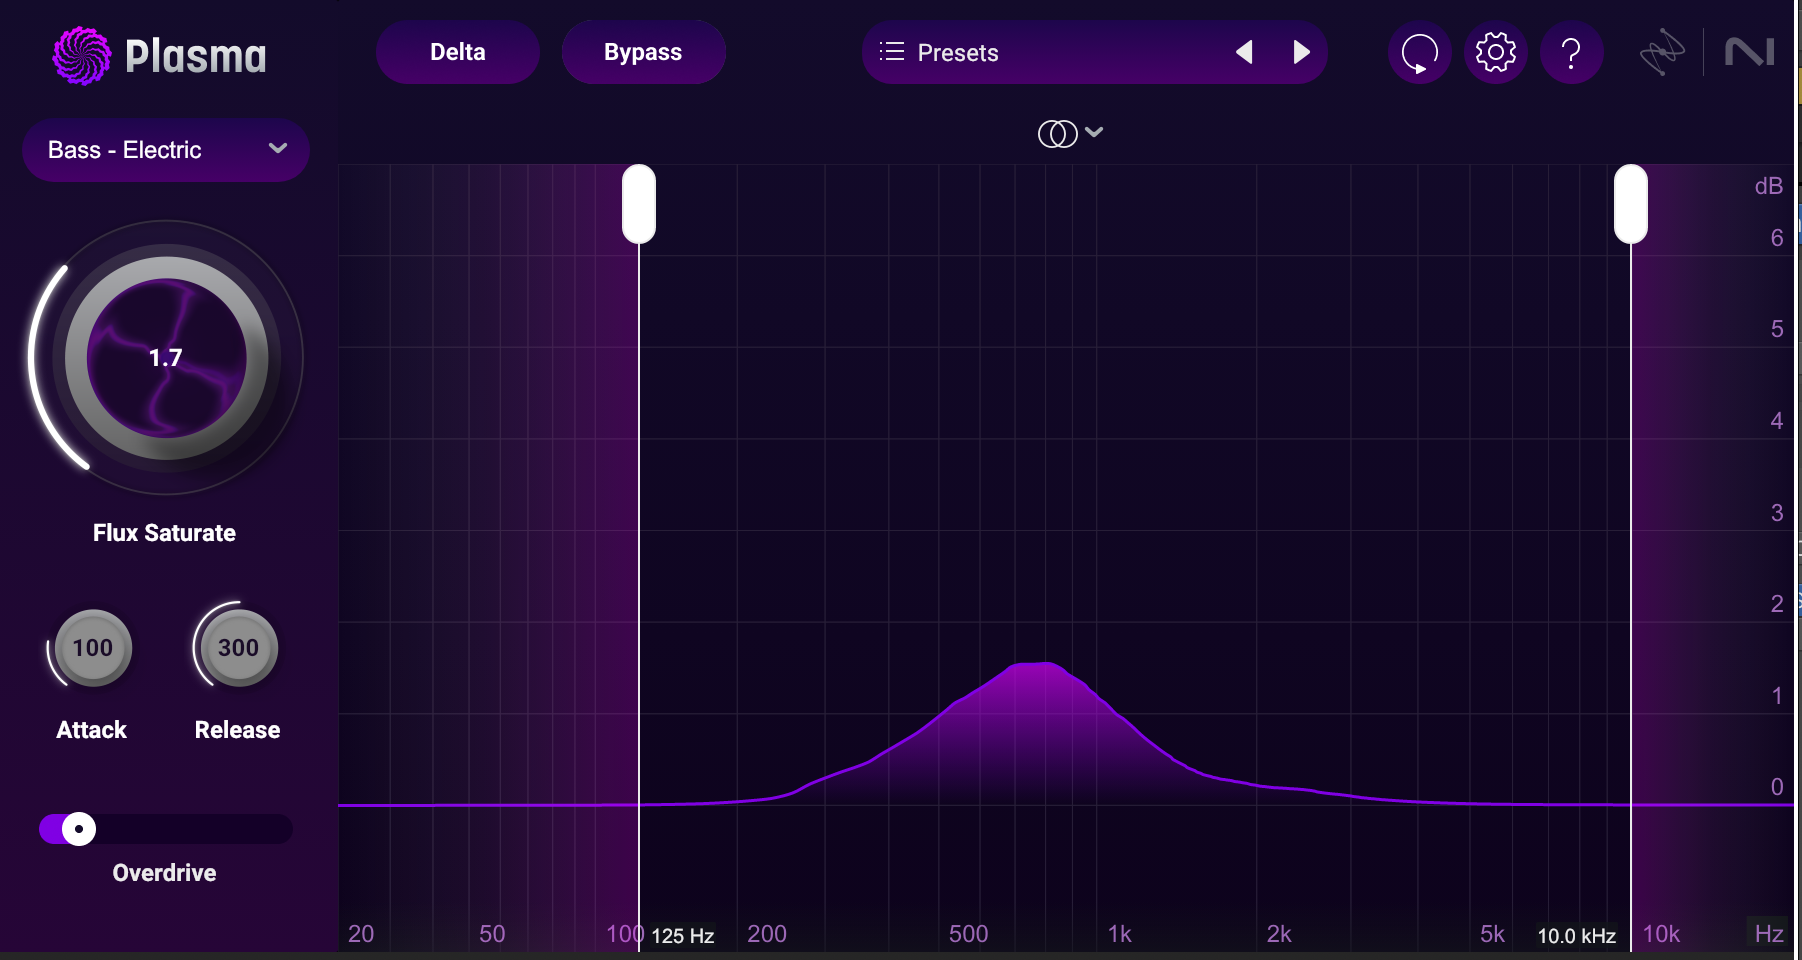
Note how I’m focusing the effect on the midrange. This helps reinforce the attack of the bass.
Finally, we’ll add some Ozone Exciter in Triode mode, but only on the lows. We’re doing this to add more low-end fullness:

3. Harmonic instruments
Let’s handle all the instruments at once in one fell swoop. Observe:
Adding Plasma on my instruments bus for more of that holographic effect
I’ve talked quite a bit about that “holographic” effect – and it’s a tricky thing to pin down. Perhaps I can show it off here, with Plasma, on the instrument bus.
4. Vocals
Vocals can often benefit from tube saturation. Here are three ways I used tube-emulated saturation to better the vocals in this mix:
Filling out frequencies with HG-2MS
We’ve got this vocal here:
It’s a bit dry and thin. Using HG-2MS again, we can fill out the frequencies a bit using a setting like this:
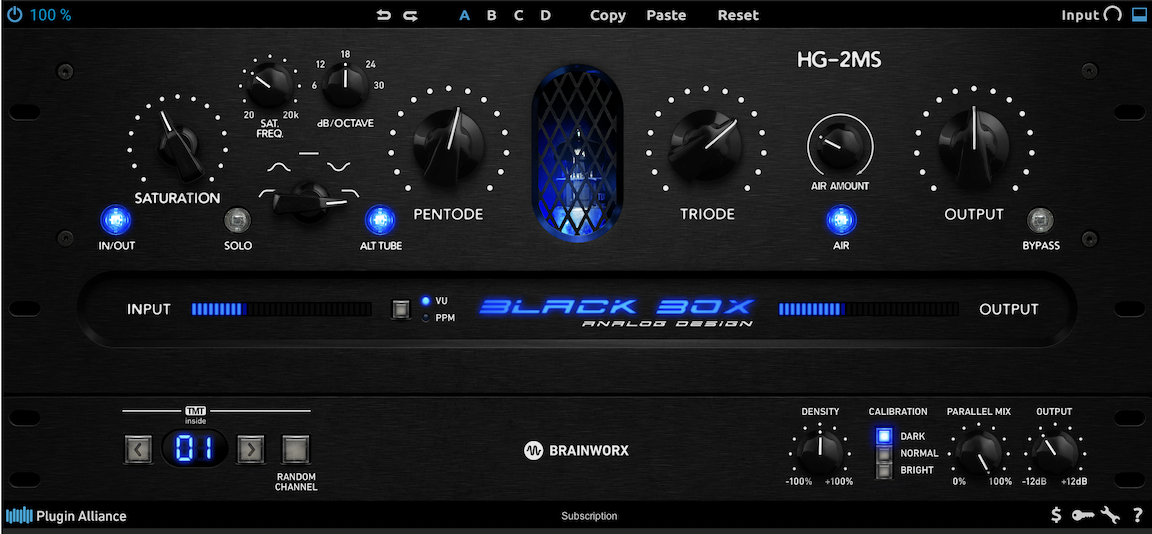
Triode is doing a lot of work, adding even harmonics, which tend to thicken without adding obvious edge. But also pay attention to the saturation knob: we have it cranked with an alternate tube (the less subtle variant), and it’s being filtered with a low-pass filter rolling off at 649 Hz. This helps bolster the low mids without obvious EQing or tonal rebalancing. And this is something tubes are especially good at.
Sounds good, but we are not finished.
Using multiband tube-style saturation for de-essing
This vocal could use de-essing – but de-essing here is a deceptively tricky. Too much, and we’ve either got a lispy mess, or something too dark for the track. Too little, and those esses are annoying.
I’m opting to use a multiband vari-mu compressor emulation to an interesting effect: we’ll be driving it into saturation, and the saturation will help reduce the spikiness of the sibilance range. Observe the following video:
That works for the purposes at hand – and it’s something made possible by a noticeable byproduct of tube compression: saturation.
One last vocal tip before we move on to the mix bus:
Characterizing vocal reverb with Plasma
We’re going to use Neoverb on this vocal to get some depth out of it. The plate will be good for the country character, the ambiance will add dimensionality, and the hall is nice as well – so we’ll blend for taste.
Neoverb, for all it’s benefits, is a very clean reverb by default. That’s totally fine, but for this song, we want to add some nonlinear characterization to the verb – to make it “vibey” in other words. Plasma will come to our rescue here. Observe:
5. Mix bus
Onto the full mix, where the magic of tubes can benefit us in many ways. Indeed, there’s a reason mastering engineers often have a prized tube piece or two in their collections.
Let me give you two reasons I might turn to tubes for saturation on the whole mix.
Obtaining the holographic effect with plasma
Yes, we’re back to speaking about that elusive holographic effect. But it’s something that really helps, especially on mixes done entirely in the box. Observe these plasma settings on the mix:

Now listen to the mix with and without plasma on the mix bus, in a before and after comparison:
Mix Bus - Dry vs. Plasma
That’s a subtle, yet useful enhancement. We can also use this enhancement to excite the stereo field in equally subtle, yet useful ways.
I’ll run plasma in mid/side mode, with the following settings:


Because Plasma runs on a target-based system, we’ve got different saturation styles going for the mids and sides. Mids are receiving “Master - Warm”, while the sides get “Master - Bright.” We’re also using the curtains to restrict the processing to different parts of the frequency spectrum. We’re excluding the highs from the mids channel, and excluding the lows from the side channel.
Listen to the result in a before/after comparison:
Mix - Dry vs. Plasma (Mid-Side)
It’s subtle – but again, useful, especially in bridging that perceived gap between working strictly with software and working with hardware. We get an extra spatial and depth enhancement that isn’t too distracting or destructive.
Using HG-2MS to bring down peaks and increase RMS
Earlier in this piece, I demonstrated how tube distortion can preserve the original, organic quality of your signal. That phenomenon holds true for the mix as well – and it can get us to a very useful place. Thanks to tube saturation, we can reduce peak energy in the mix while preserving the same average level, measured in RMS.
Why does this matter? Because you’ll get a mix that plays louder in nearly every situation:
If I’m getting peak levels of -0.1 dB with an RMS value of -11 dB, that means I can’t push the tune louder than -11 dB RMS without incurring significant distortion.
If I’m getting peak levels of -3 dB with an RMS value of -11 dB, I can push the whole mix up 3 dB before getting distortion. We’ll have a tune that that reads -0.1 dB max peak, and averages somewhere near -8 RMS.
Here’s the problem, though: most processes we use to reduce peak energy like this have significant sonic trade-offs. To be brutally honest about it, all processes that reduce peak energy inevitably have a sonic trade off. But tube saturation is one process that you can use to great effect before the bad stuff becomes super audible.
Here’s our mix without any stereo processing:
The whole file has a true-peak max of -3.5 dB, and an RMS of -18.99 dB.
Now we’ll apply these HG-2MS settings to the mix:

Here are the results, presented again in a before and after comparison:
Mis Bus - Dry vs. HG-2MS
Tonally, it’s not all that different – if anything, it’s “the same but better.” Yet on the meters we’re getting a true peak max of -5.15, and an RMS value of -18.74. This means we can get an extra 1.65 dB of RMS level out of the tune. Consequently, your mastering engineer won’t have to work as hard to get a louder mix out of your song, one that sounds great on normalized and non-normalized playback scenarios.
Add tone and color to your sound with tube saturation
Hopefully we’ve shown you a lot of ways to use tubes to your advantage. Remember to experiment wildly in practice, and to pull back to subtle levels in your actual work! I find 10–25% less than what I think works is often the way to go.
