6 Ways to Share Your Music Using Spire
Spire Studio features many ways to share your songs and projects with friends, fans, and collaborators. Learn how to use each one of them.
One of the coolest features of Spire Studio is how easy it is to share your recorded songs and projects with friends, family, fans, and your collaborators.
In this step-by-step guide, I'll show you all the ways to share your music using the Spire App and why you'd want to use each one.
The Share menu
Spire Studio and its companion Spire App make recording, editing, and mixing easy. You can get some pretty exceptional results with minimal effort. Sooner or later, you'll want to share your masterpiece with others.
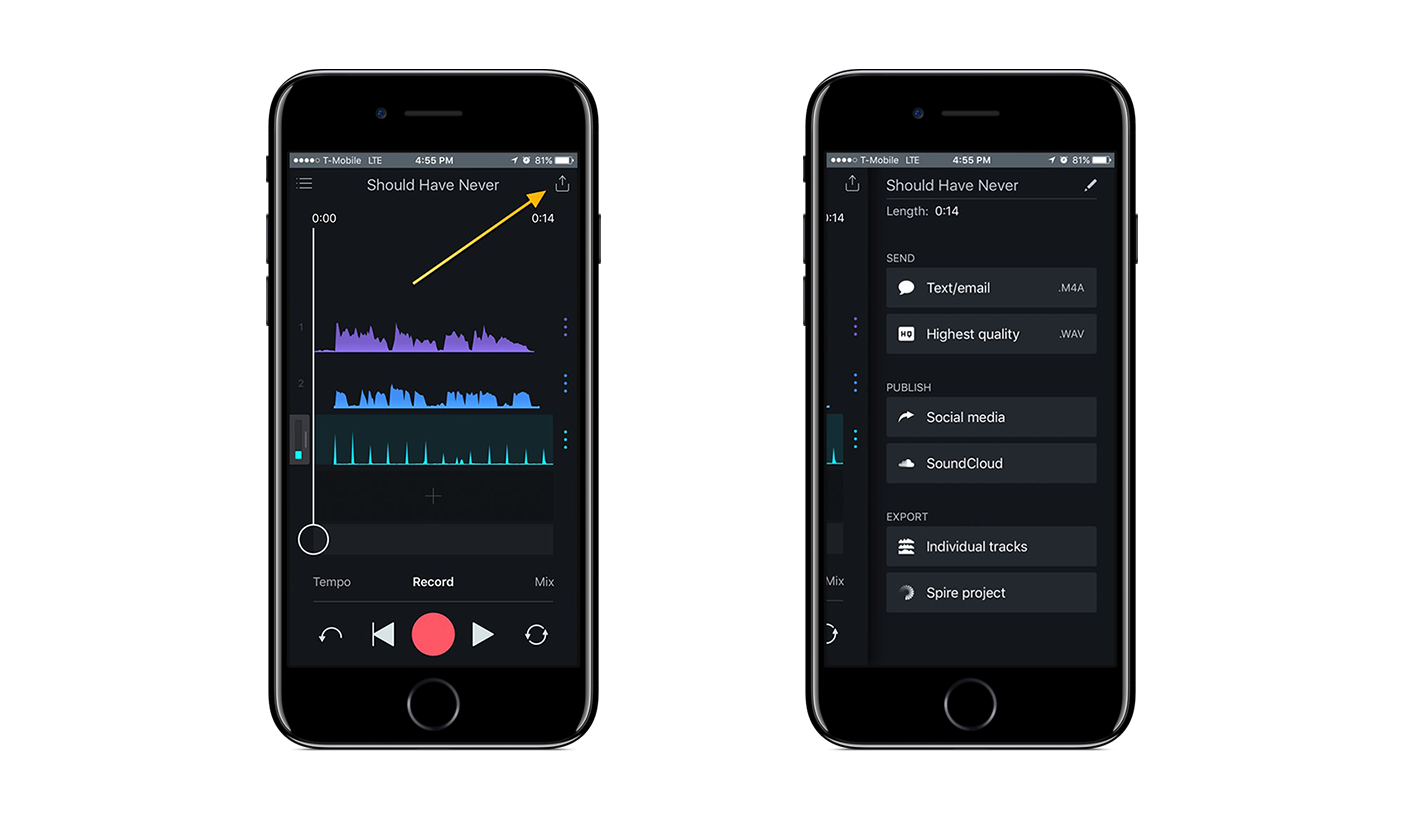
To do so, first click the Share icon in the top right corner of your project. This will bring up the Share menu.
1. Text/email
If you want to share something quickly, choose the text/email option. Choosing the Text/email option will allow you to send them a compressed M4A file (it's similar to an MP3). The great thing about M4A files is that they're small, so you can easily send them over text message or email without worrying about eating up too much data or overfilling someone's inbox.
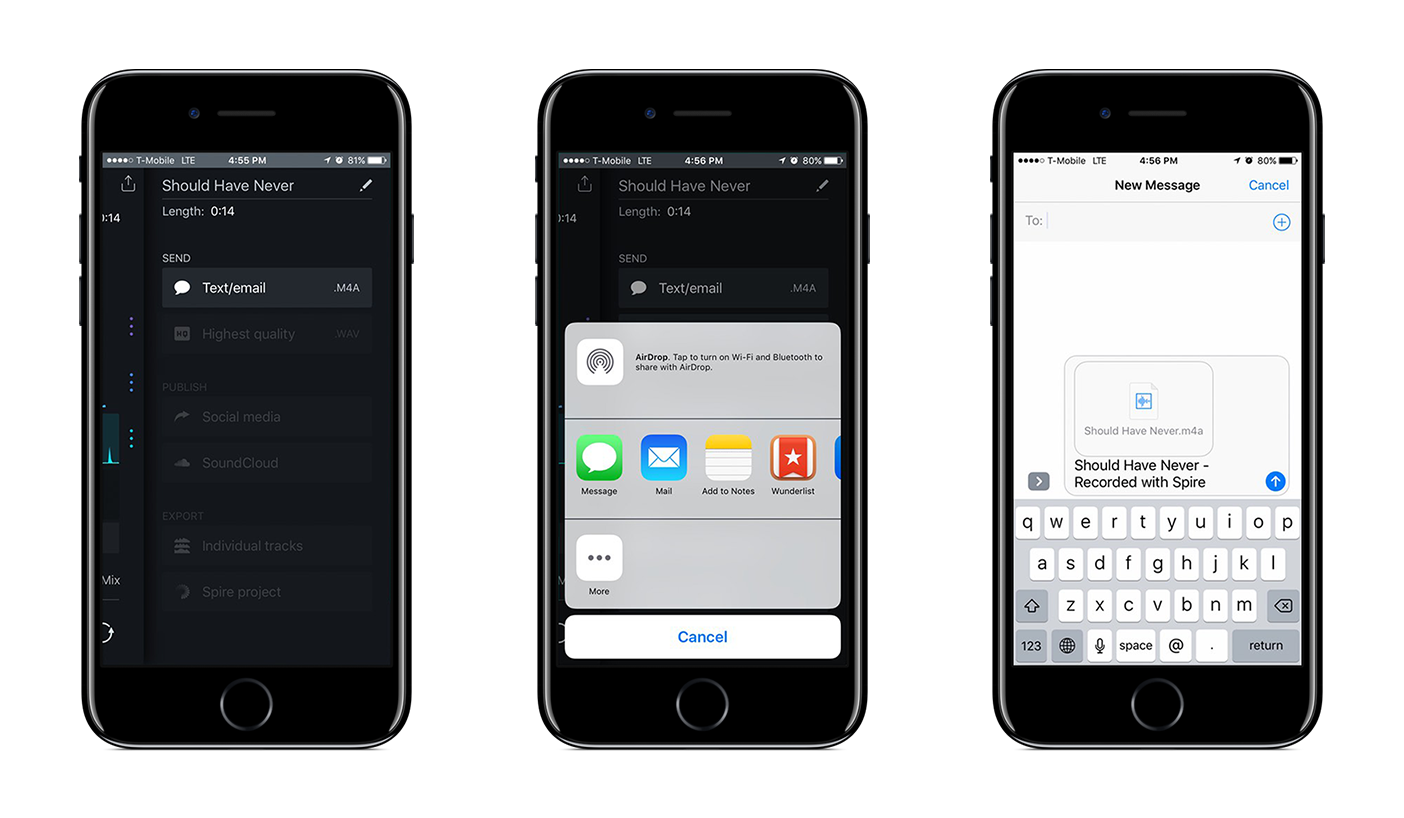
To share your song as a small, compressed audio file, follow these steps:
- Tap the Text/email option, which will bring up the iOS Share Sheet
- Click the Messages app, which will bring up the New Message screen
- Your audio file will be instantly attached to the message
- Add any additional text, and choose who you want to send your message to
2. Highest quality
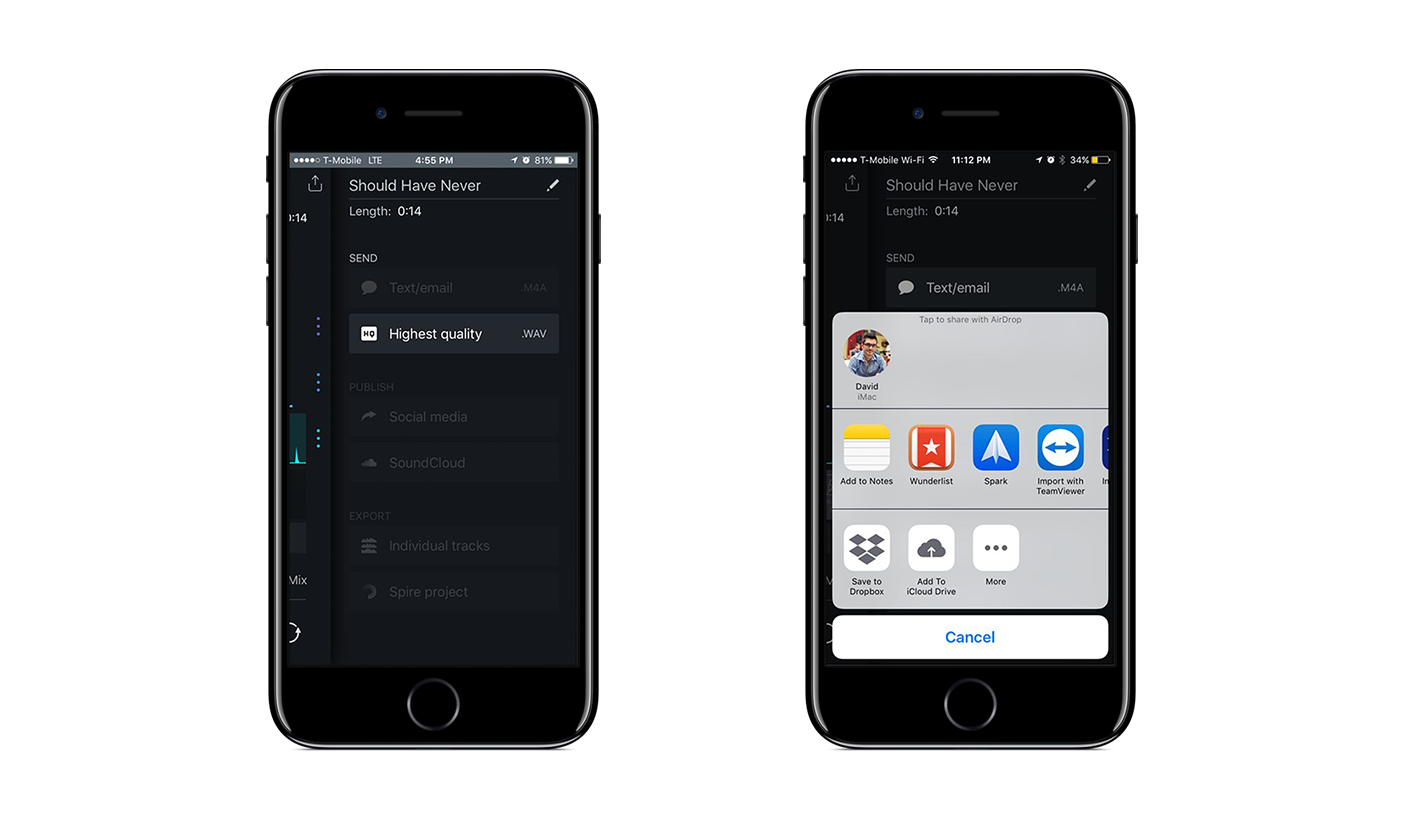
With Spire Studio, you can also share your song in highest-quality audio. Selecting the Highest quality option will allow you to send somebody an audio file in WAV format. Your song will be shared as the highest fidelity audio at 44.1 kHz and 24-bit depth.
Unlike compressed M4A files, which will weigh around 1 MB per minute of music, WAV files are uncompressed, so they’ll take up around 10 MB per minute of music. You can see that a 4-minute song will quickly add up to 40 MB, which is why these files aren't meant to be shared via text or email. Instead, use services like Dropbox, iCloud Drive, or Google Drive to share these files.
To send your song as an uncompressed high-quality audio file, follow these steps:
- Tap the Highest quality option, which will bring up the iOS Share Sheet
- Choose to share your audio file via Dropbox, iCloud Drive, Box, or any other file sharing service. Your options will vary depending on the apps you have installed on your phone
3. Social media
No sharing option would be complete without including the ability to publish to social media channels! Not only is social media sharing built right into the Spire App, but it's one of my favorite features of the app.
Unlike the previous two options where you were sending audio files, using Publish to Social Media will create a video with your song. The video can either include a default cover photo that's automatically created for you using the song's title, or you can upload your own custom cover art. You'll be able to publish your video to Facebook, Twitter, Instagram, Tumblr, Vimeo, or any other social media channel you have installed as an app.
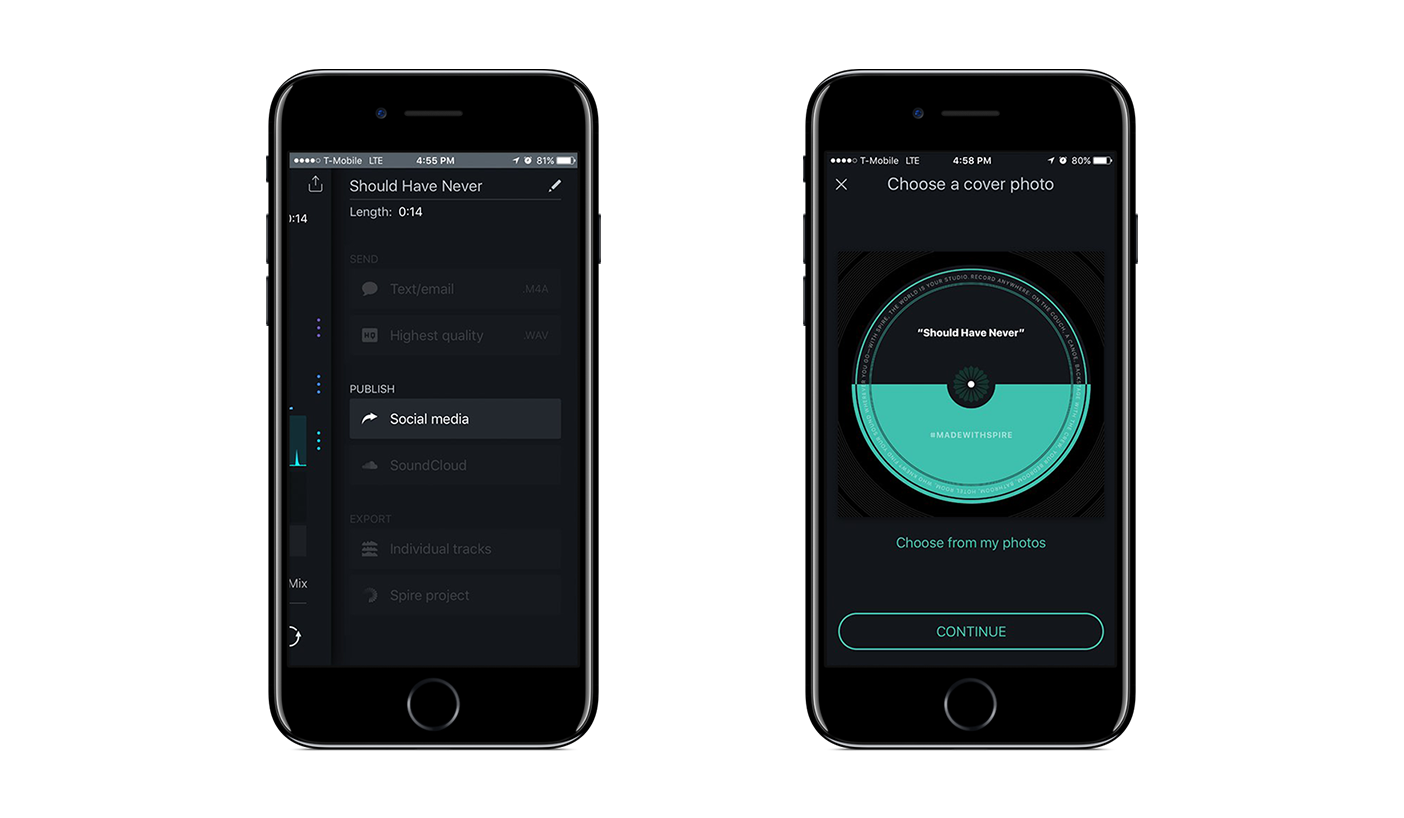
To share your song on Facebook, Twitter, Instagram, or another channel, follow these steps:
- Tap the Social media button
- On the next screen, you'll be presented the default cover image that was generated. Tap Continue, or choose a cover image from your photos
- Once you are satisfied with your results, your video will be prepared for sharing, which only takes a few seconds
- The Share Sheet will be brought up, and from here you can choose where you want to share your song video
As you can see below, I decided to choose my own cover image for my song “Should Have Never.” You'll be able to crop the photo to your liking.
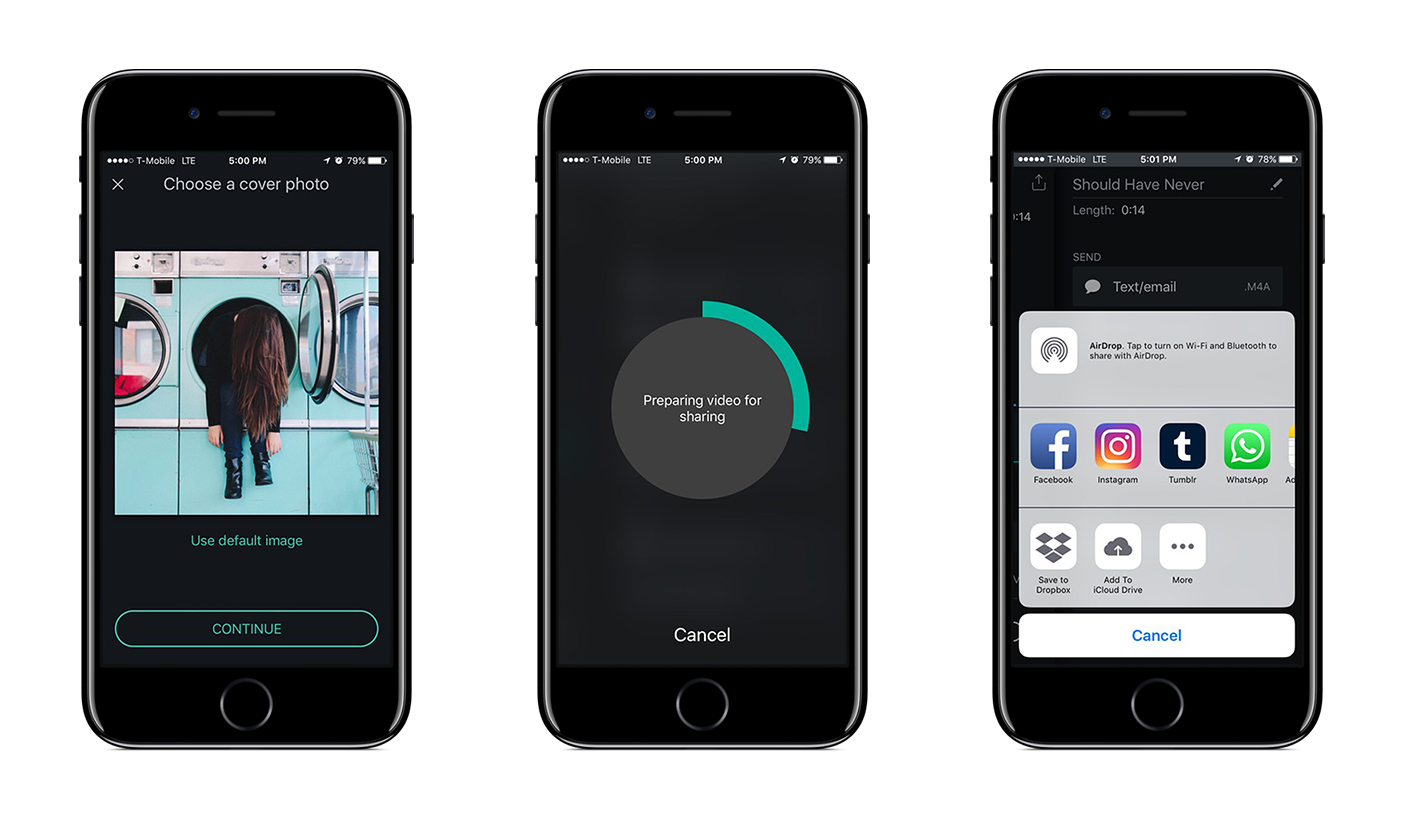
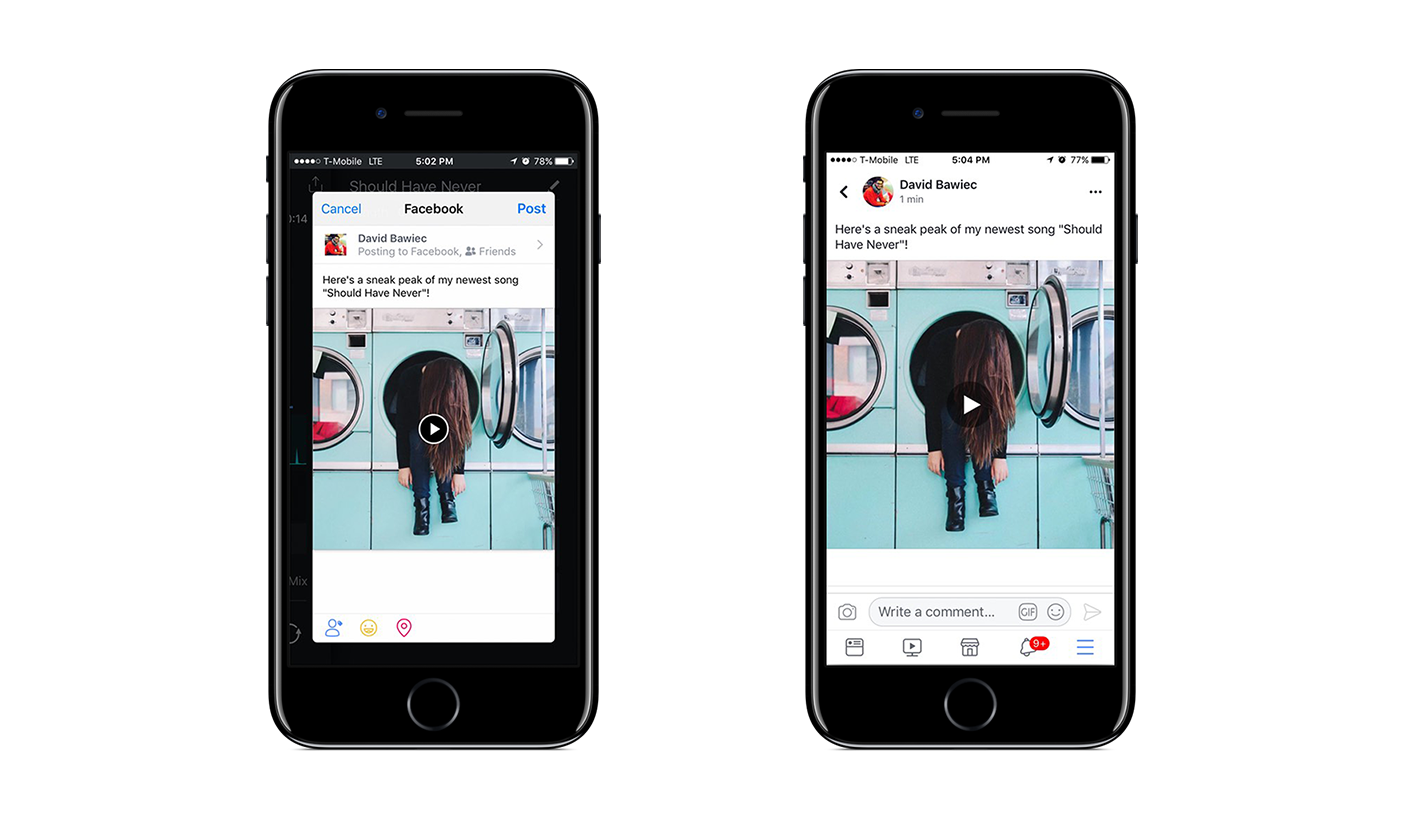
I decided to select Facebook. At this point, your video upload will begin and you'll be presented
with the post sharing options unique to that social media channel. In the case of Facebook, you'll be given the usual opportunities to add some text to your post, tag friends, or even check-in somewhere.
Once you're ready, tap Post and share your masterpiece with your fans! Now all you have to do is wait for those Likes and Comments to start rolling in!
4. SoundCloud
If you have a following on your SoundCloud channel, you're in luck, as the Spire App includes the option to share directly to SoundCloud.

Here are the steps:
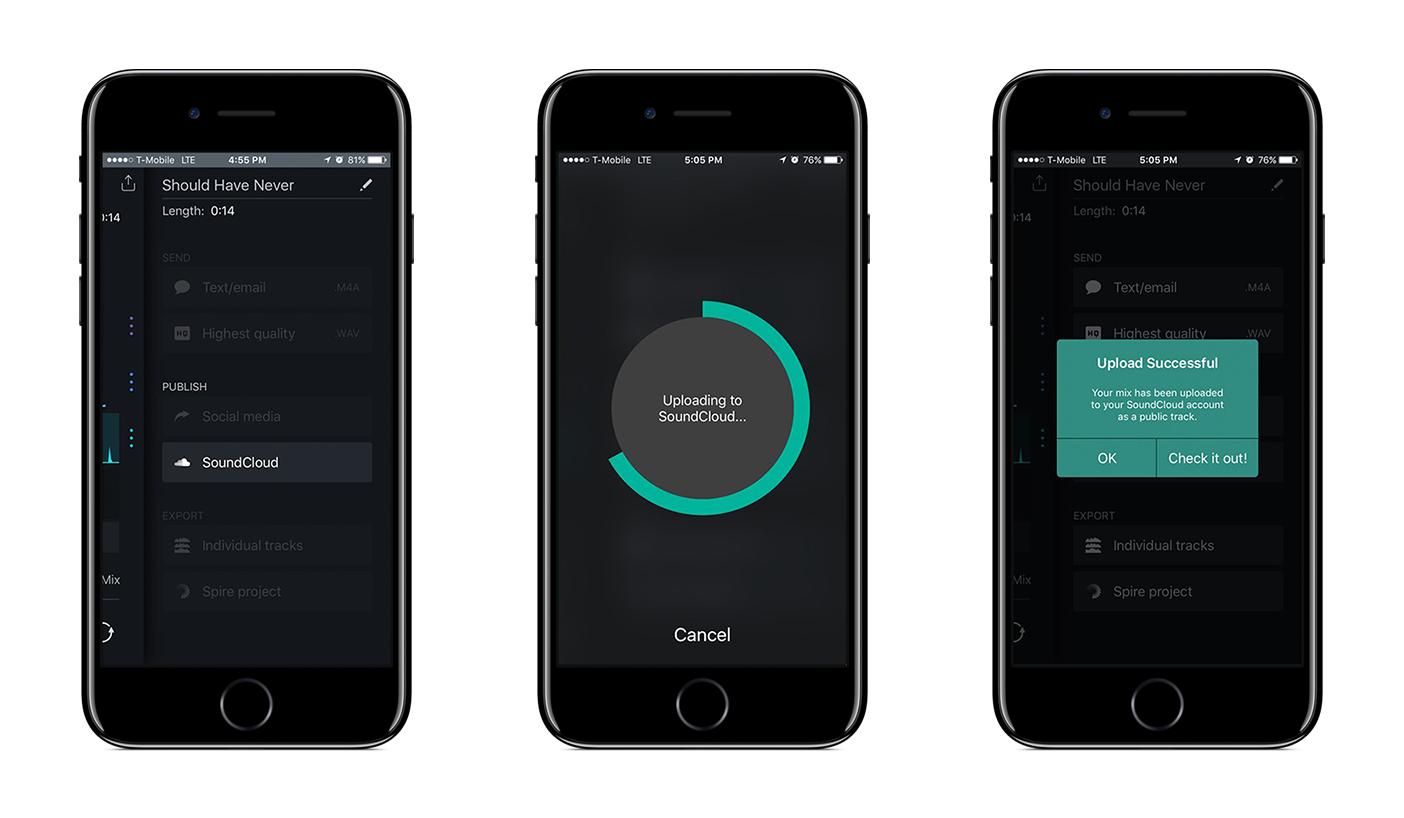
- From the share menu, tap the Publish to SoundCloud option. If this is your first time sharing via SoundCloud you'll be asked to log into your SoundCloud account.
- Once connected, your song upload will begin immediately
- Upon successful completion, you'll be shown a confirmation message along with a link to view song on Soundcloud
5. Individual tracks
On occasion, you may find that you want to move all the tracks you recorded from the Spire app to your computer for further editing/mixing. You may want to add some sampled instruments and loops to your song, or maybe you want to add grunge to those guitars by running your guitar tracks through Trash 2, or maybe you want to add more sweetening to your vocal with Nectar 2.
It's easy to export individual tracks from your song using the Spire app.
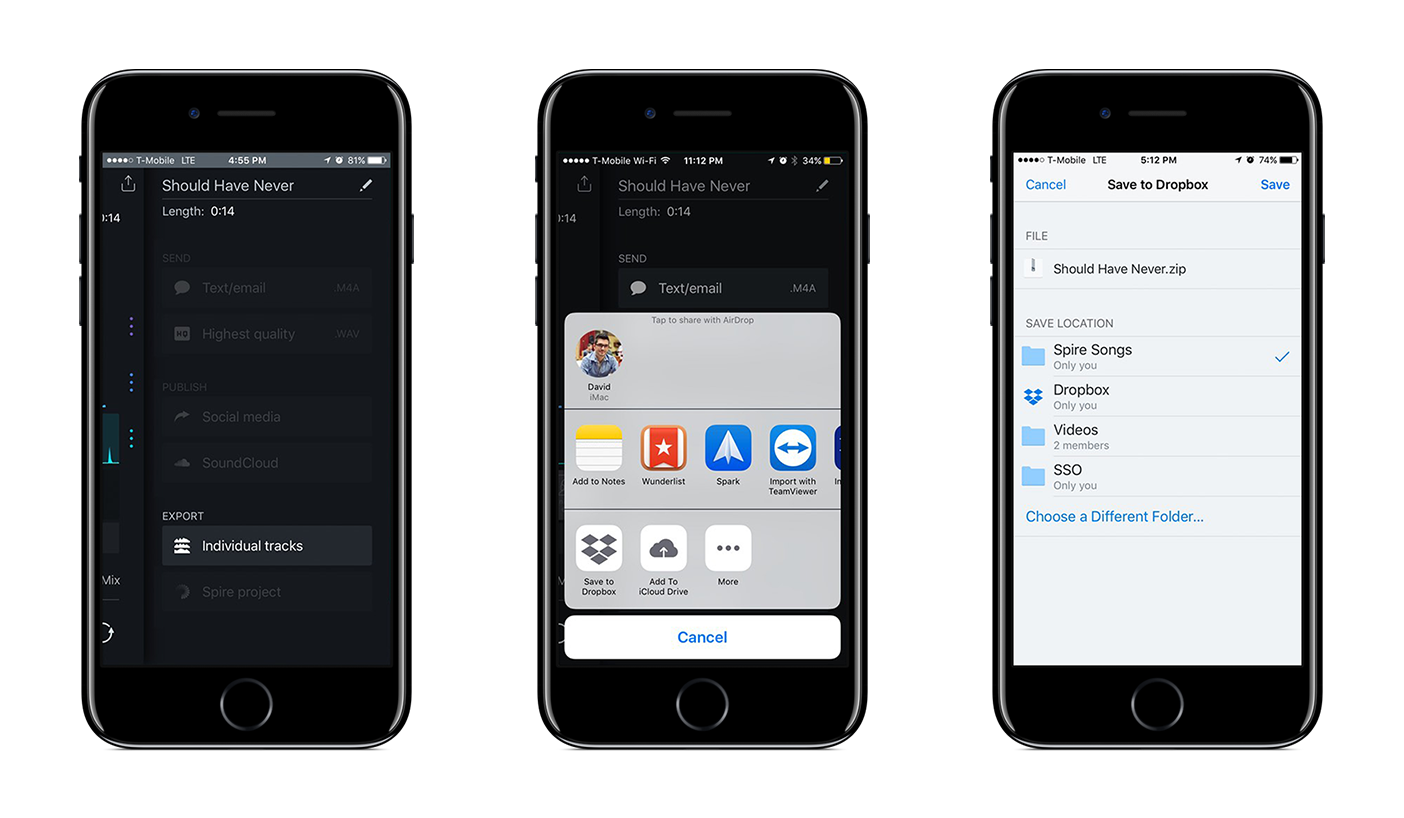
To export individual tracks:
1. Tap the Individual tracks button from the Share menu.
The Spire app will export all the individual tracks as highest quality wav files in 44.1 kHz and 24 bit. Since, as you previously learned, a single minute of uncompressed audio will roughly amount to 10 MB, exporting all the individual files will take up a lot of space. This is where the Spire app is smart, as it will then pack all those files for you in a zip file.
2. Once your zip package is ready, you will be shown the Share Sheet. Here you can choose where you wish to upload your tracks.
You can either send them directly to your computer using AirDrop, or upload them to a file sharing service like Dropbox, iCloud Drive, Box, or Google Drive. Again, your options will vary depending on the apps you have installed on your phone.
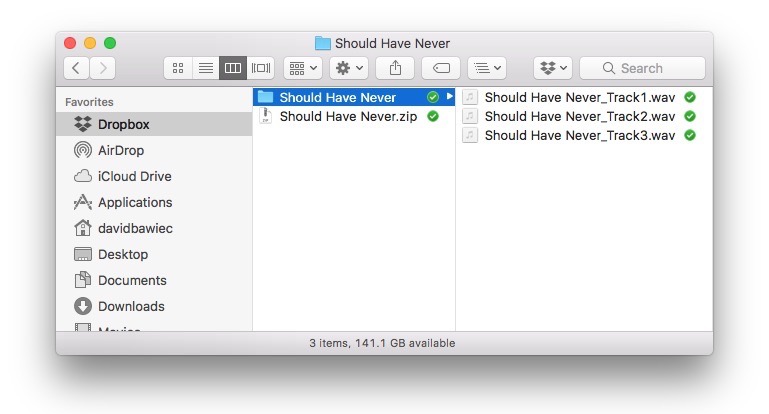
3. Once you save your zip file to your desired location you'll be able to access it on your other devices using that service.
I used Dropbox to upload my individual song track files. Since I have Dropbox installed on my Mac, the Should Have Never.zip package file synced to my computer within seconds. Double-clicking it unpacked the individual files into a folder. As you can see, all three of the tracks I recorded in my song showed up beautifully on my computer.
4. From here, you can import them into the DAW of your choice, like Logic Pro X, Ableton Live, or Pro Tools.
6. Spire project
The final and probably more exciting feature that the Share menu has to offer is the ability to export and share an entire Spire project. Let's say you recorded the three basic tracks for your song, including the lead vocal, guitar and tambourine. You really want trumpet on your song. But there's one major problem: You don't play the trumpet. The great news is that one of your friends does!
It doesn't matter if he/she lives on the other side of the world; Spire Studio makes collaboration easy! If your friend owns a Spire Studio, you can just share your entire Spire project with them so they can record additional tracks right into your session.
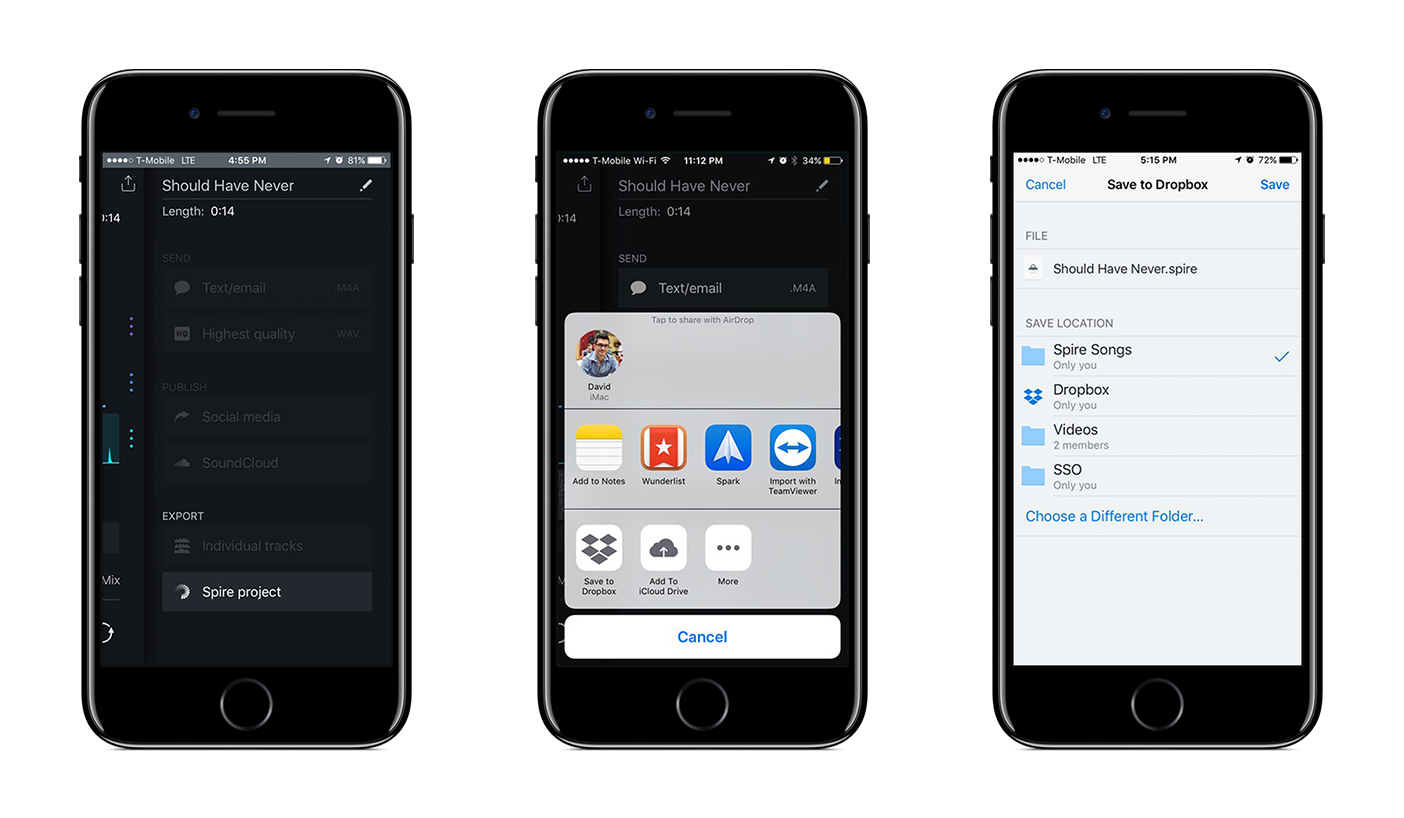
To share your entire session:
1. Tap the Spire project option from the Share menu
2. As usual, you will be presented with the Share Sheet. Here, choose the service you want to upload your session to.
As mentioned previously, since your session may end up being a little larger, I recommend you upload your session to a file sharing service, like Dropbox, iCloud Drive, Box, or Google Drive.
3. Select the exact location you want to upload to and tap Save.
Once your session file is uploaded (it will have the extension .spire) share it with your friend using the service itself.
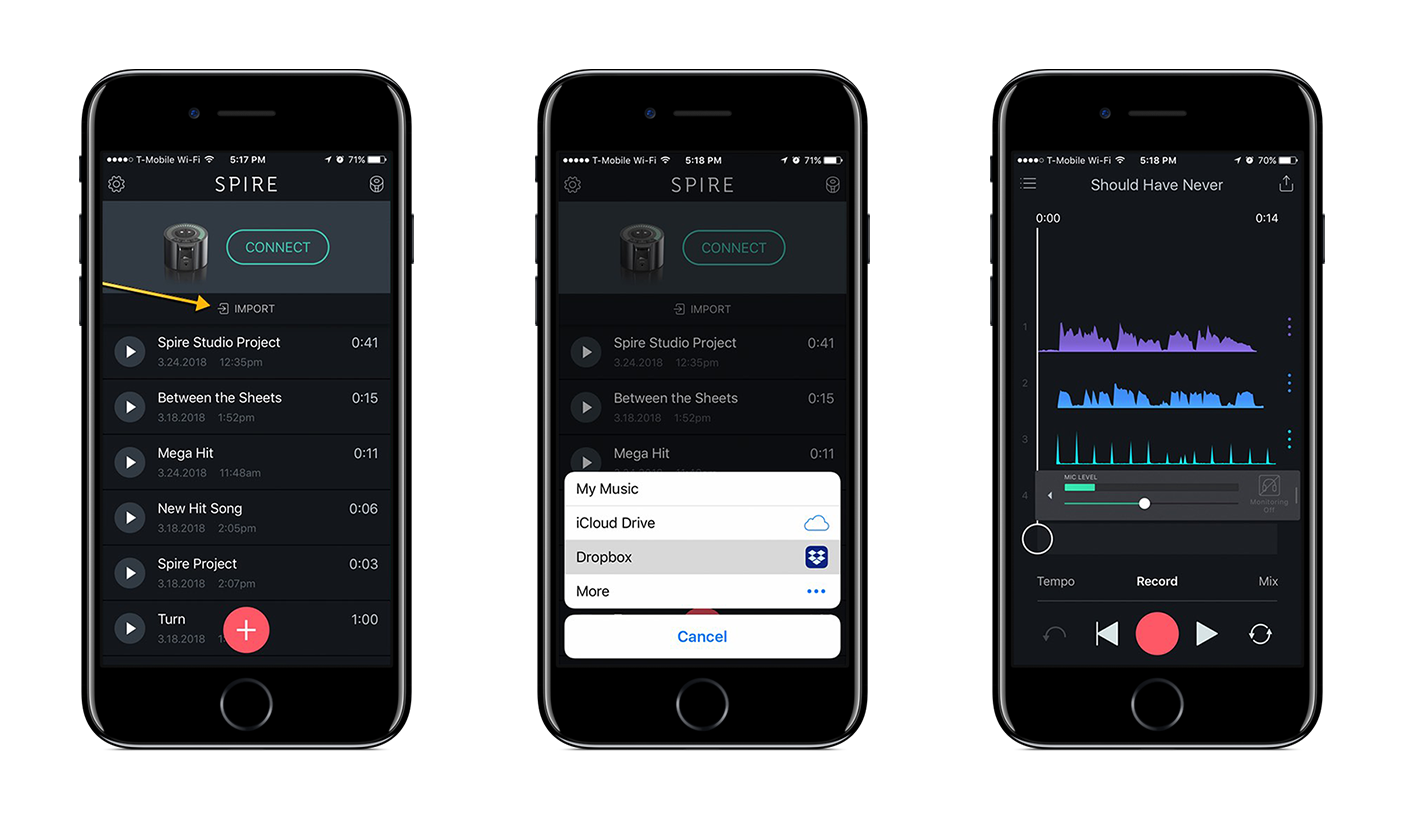
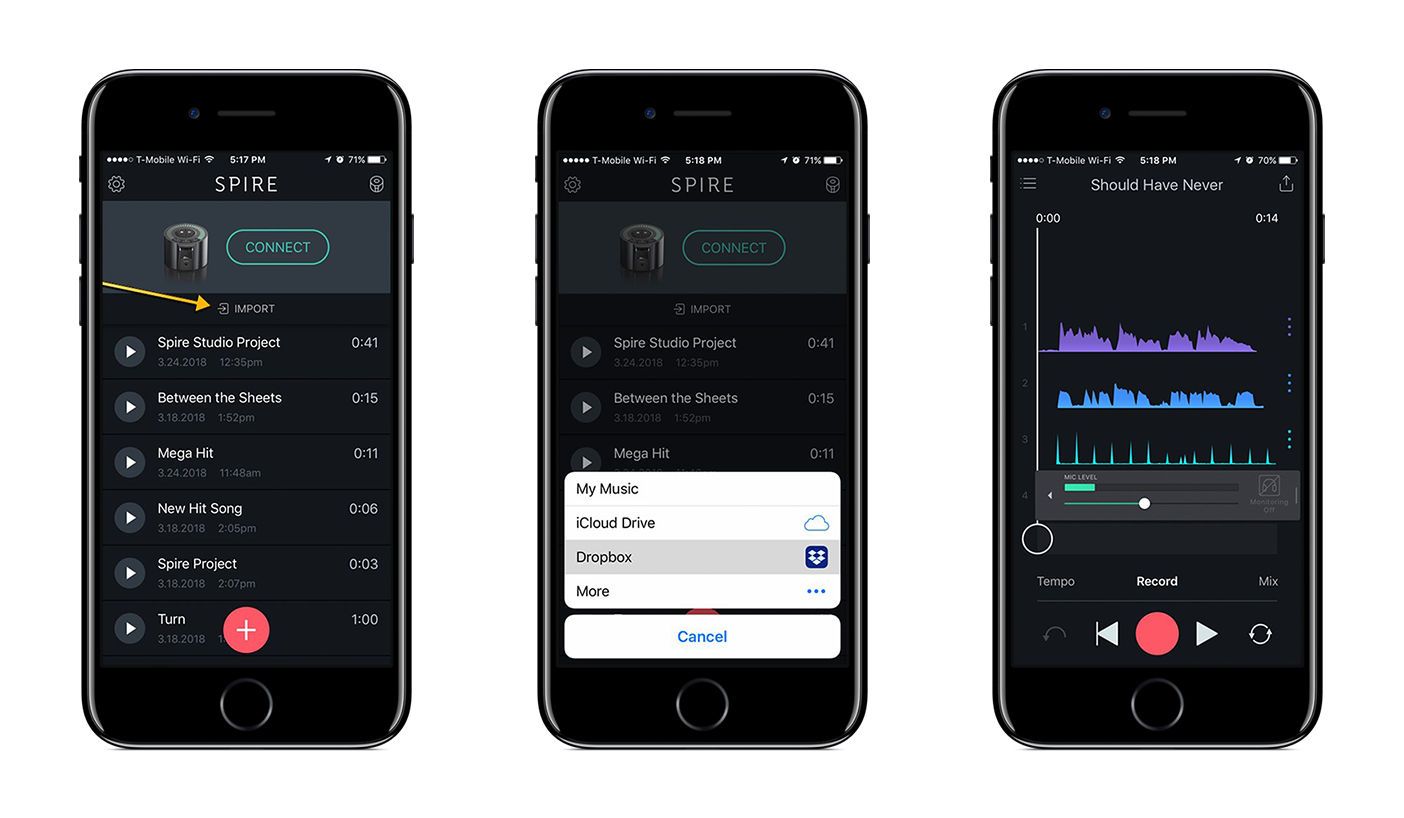
If someone sends you a Spire session, you will want to make sure you can access it from your phone. You can place it in our own Dropbox, iCloud Drive, Box or Google Drive account. Next, open the Spire app on your phone and tap the Import button on the home page. This will let you choose where you want to import a Spire session from.
Once you locate the session file, it will be imported into the Spire app, including all the original tracks that have already been recorded and edited in it. You can now record, edit and mix to your heart's content. Once you're happy with your results, follow the above "Export Spire Session" steps again to send your session back to your friend.
What will you do?
With so many ways of sharing your music, there's really no limit to what you can do. Whether you're trying to send a little preview to your mom, trying to collaborate with a friend, or trying to export all the tracks for further editing and mixing on your computer, the Spire app has got you covered!
