3 Ways to Approach Backing Vocals in a Mix
Learn tips on how to process backing vocals to tame overused processing, add timbral interest, and re-image vocals in a stereo mix.
Backing vocals are vital to modern mixes of most genres; they support the lead vocal and emphasize certain points in the song. They may seem simple at first glance, but to get them to balance with everything else and do their job effectively isn’t easy at first—and to go beyond this basic task into the realm of creative processing without destroying the mix can be even trickier.
There are no hard and fast rules concerning how to work with backing vocals. All that matters in the end is that they serve the song in general and the lead vocal in particular. Within those boundaries, it’s possible to get really creative and help your songs stand out. In this article, we’ll look at three ways to creatively process backing vocals with three different iZotope plug-ins:


Nectar 3 Plus


VocalSynth 2


Vocal Doubler
Our example, “Say Yes” by Adara
The example we’re using in this article is a pretty little modern pop song called “Say Yes” by Adara as a multitrack project, and I’ll be using its backing vocal tracks for these examples. Here’s the full mix:

“Say Yes” vocal tracks, with the backing vocals from the first chorus highlighted in blue.
As you can see in the screenshot from Ableton Live’s Arrangement view above, the vocals are organized in seven tracks. The first three, in pale yellow, are the lead vocals at various points in the song, each of which has been treated slightly differently. At the bottom, in bright yellow, are little vocal extras like the “radio voice” at the start of the track. And in the middle, in shades of green, are the three tracks of backing vocals we’ll be playing with.
For these examples, we’ll focus on the two chorus sections. The first chorus (C1) establishes the basic structure of the backing vocals; it’s highlighted in blue above. Here’s what it sounds like as a full mix, and as an isolated 3-track stem:
Chorus 2 (C2), has a lot more going on already, and will want different treatment. Here it is as a full mix and as a stem:
Okay, our work’s all cut out for us and ready to go. Let’s have some fun!
1. If you receive a mix with backing vocals, tame any overused effects to reach a baseline for your own processing
Sometimes, when mixing a track that you’ve received from another engineer or producer, all it needs is a little cleanup—maybe an EQ tweak, maybe some noise reduction, maybe trimming out a skunk note or rogue breath. Other times, the person sending you the track decided it was a good idea to slap a really cool effect on as an insert, ignoring the rule of “set it so you can just hear it, then turn it down a little more,” and print it that way. That calls for sterner measures, and


Nectar 3 Plus


Nectar Elements
Track 7 of “Say Yes” contains a backing vocal with some spatial effects to really punch up the lead and make it soar. The problem is, the track has some bottom-end oomph, due to a heavily-tuned clone track a couple of octaves under the lead. It sounds like a slowed-down tape of a robot, and while it might work as part of Chorus 2’s kitchen-sink treatment, it grates a little in the slightly lighter atmosphere that I want for Chorus 1.
Our fix is super-simple, and it falls under the basic mix guideline of “if a frequency range isn’t helping the mix, get it out of the way.” Nectar 3 Plus offers a spectacularly clean EQ with fine control over frequency, boost/cut, and (in this case most importantly) bandwidth. It’s great for chopping out parts of a frequency spectrum that are piling up—for example, cleaning out stuff between the beater click and resonant boom of a kick drum to make more room for the bass.

“Say Yes” vocal tracks, with the backing vocals from the first chorus highlighted in blue.
to keep things surgical. Take a look at the screenshot above; we’ve tuned by ear to a cutoff frequency of about 350 Hz, and you can see from the helpful graphic display that we’ve sliced out some low-end frequencies while leaving the higher harmonics to do a much more subtle job, letting the chorus breathe. We’ve also dumped all the low-end mud that isn’t really contributing to the track.
Here is the isolated track before our fix, after our fix, and as part of the full mix:
2. Add heavy-hitting vocal moments to keep the listener intrigued, but not distracted
Track 6 provides a higher-register doubling of Track 5’s harmony backing vocals, leading to a much wider sound that fills the chorus under the ethereal lead. This works great in the first chorus, but when it comes to the second, why not add a bit of drama?


VocalSynth 2

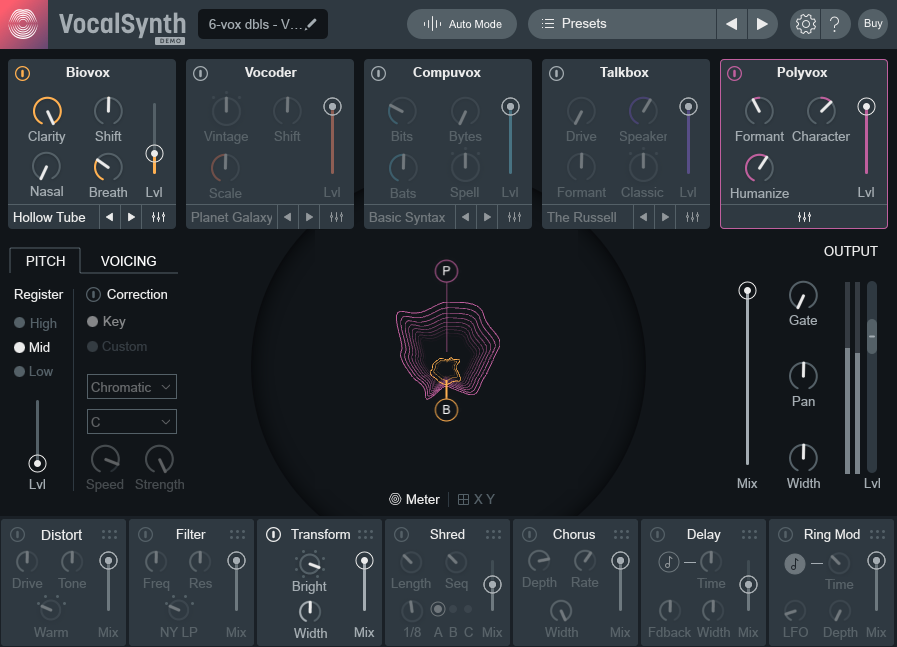
Biovox and Polyvox combine to give a burst of otherworldly angst to the second chorus.
As shown in the screenshot above, the effect starts with a tiny touch of the formant processing Biovox module. Its Hollow Tube preset gives us a down-a-tunnel effect that’s nice in small doses. We then push the result through the Polyvox module—the Character setting scales formants in the harmony vocals, and Humanize is cranked way up to add some warble. Finally, we back off the gain just a bit so the overall effect doesn’t rip the listener’s head off in the final mix.
Here’s the result: the solo track before and after, and the second chorus after.
You shouldn’t overuse stuff like this, but here it adds just that extra bit of power.
3. Be intentional about stereo width to vary song sections and provide ramps in momentum
There are so many tools in


Nectar 3 Plus


VocalSynth 2


Vinyl


Vocal Doubler
Not long ago, I went deep into how to use this clever and easy-to-use plug-in on non-vocals in this article. Now it’s time for us to actually (gasp!) use Vocal Doubler on vocals!

My settings for Vocal Doubler—as I take the risky step of doubling vocals that are already doubled!
The screenshot above shows the simple interface of Vocal Doubler. The two controls labeled Separation and Variation turn a single vocal into a spread-out and convincing double. What happens, though, if we use it on vocals that are already “doubled”?
In this case, the effect is a gluing together of the highly stereo-separated harmony vocals in Track 5 into a more coherent space. Because the Variation is set relatively high, you can more clearly hear the added doubles due to Vocal Doubler. And because the stereo-separated harmonies in Track 5 are basically hard-panned, the Separation being set to 73% adds these doubles in the empty space between the original harmonies.
In the second chorus, where we go big or go home, that separation works in the mix, but in the first chorus, we can create a more centered harmony that accentuates that separation later in the song.
Here’s what the settings shown in the screenshot above give us before, after, and in the mix.
Once again, we’re marrying the effect to the section of the song where it’s best demonstrated.
Reminder: only fix what’s broken!
As a final note, I would like to talk about one other section of the song. Here’s the second verse and pre-chorus, first as a full mix and then as that three-track stem:
This subtle treatment, with that one completely dry “to say” that punches up the lead a tiny bit, works exactly as it should (at least in my opinion)... so we’re not going to mess with it!
That’s perhaps the most important thing to remember about working with backing vocals—or with any other track. Know when to fix something that’s broken, know when to add something that actually helps, and know when to leave it alone—and when in doubt, leave it!
Few things in the mixing process are more annoying than second-guessing yourself into adding a bunch of tiny tweaks that make it worse, and few things are more embarrassing than spending hours fussing around with tweaks that end up not being audible in the full mix! Remember, if you’re not checking your tweaks inside the final mix and comparing them to where you were before you started tweaking—and doing so on a regular basis—you will end up having to redo something.
The takeaways
There are a wide variety of great tools that simplify creative processing of backing vocals. I hope that these three ways to creatively process backing vocals will prove as useful starting points for your own ideas, and inspire you to think out of the box when it comes to crafting the elements of a great song.


