
Table of Contents
Mastering is the final step in music production and the first step in distribution. It's the process of preparing a finished mix for release: adjusting loudness, shaping tonal balance, controlling dynamics, and removing noise so your track sounds consistent across an album, next to other tracks in its genre, and on any playback system.
Mastering is often called a "dark art," but many of its tools are the same ones you use when mixing. The difference is that mastering applies them to the whole track at once, not to individual instruments.
Follow along with Ozone, iZotope's mastering software, to get your tracks balanced and ready for release.
Mixing vs mastering: what's the difference?
Mixing and mastering use many of the same tools at different scales. Mixing shapes individual tracks into a cohesive whole. Mastering treats that finished stereo mix as one piece and prepares it for release.
| Mixing | Mastering | |
|---|---|---|
| What you work on | Individual tracks or stems | The finished stereo mix |
| Main goal | Balance and shape each element into a cohesive track | Make a track or album sound consistent and ready for every release format |
| Common tools | Level, equalizer, compression, noise removal, stereo imaging, reverb | Equalizer, compression, limiting, stereo imaging, saturation, noise removal |
| Timeline | Weeks to months | Much shorter |
| Who's involved | Mix engineer and artist | Mastering engineer and client |
What happens in mixing
Mixing is the step that commences after tracking; the different musical elements are shaped by a mix engineer into a cohesive work. This often means level adjustments, noise removal at a more granular level, tonal balance (in the form of EQ, or tone shapers), and dynamic range manipulation. Stereo imaging and reverb are usually incorporated at this stage as well.
What does a mastered song sound like?
Listen to a few audio examples mastered with plugins from iZotope Music Production Suite. What do you notice?
Hip-hop: “SUMMERTIME” by Antique Naked Soul before/after
EDM: “Shiver (remix)” by Sarah Blackner before/after
Loudness might be the most prominent indicator that the track has been mastered, but consider other elements that your ear is hearing. Are some instruments brighter? Do the levels sound more polished? Does the music feel more cohesive? These are all things to consider when mastering a song.
The history of mastering
Mastering began as a technical fix for cutting vinyl and grew into a creative craft. Knowing that history explains why it's its own step today.
The earliest forms of mainstream recording technology did not require the recording, mixing, and mastering processes to be separate disciplines.
Rather, the recording was cut directly to a wax disc via a stylus connected to a diaphragm, which was in turn driven by an acoustic horn through which the sound was captured. These wax discs were then used to make stampers, which themselves were used to press shellac-composite 78 rpm discs.
The introduction of the 33 ½ rpm long play (LP) vinyl record in 1948, and the 45 rpm in 1949 contributed to a change over time in the record making process. Recordings were being made to tape and engineers were tasked with preparing a master disc from the tape recording. When cutting master discs, these engineers now had to watch for and reduce loud transient peaks present in the tape recording. The energy of these peaks could potentially burn out the disc cutter head or cause the stylus to pop out of the groove when the record was playing.
To understand modern mastering for vinyl better - check out this link!
In order to detect and reduce these peaks, dynamics processing tools such as compressors and limiters were introduced. This was the first time sonic adjustments began to impact the audio after the recording and mixing processes. The need to monitor these tools and adjust the settings for an optimum playback experience without compromising the sound quality was the earliest form of mastering.
The introduction of the standardized RIAA curve meant that equalization (EQ) became part of the music mastering discussion. Intended to allow records to be cut with narrower, tighter grooves (and thus, a longer playing time), one side effect of this curve was that the pre-emphasis curve applied to the recording could enhance high-frequency transient peaks, and the de-emphasis applied upon playback could cause a boost in low-frequency energy that would cause the stylus to pop out of the groove.
Slowly but surely, the necessity of these tools to ensure a positive consumer experience meant that the skills of those who could utilize them effectively became highly prized. Some engineers (notably Doug Sax, Bob Ludwig, Bob Katz, Bernie Grundman, and others) began to focus exclusively not just on the practicality of these tools, but also ways in which they could be used to further enhance the listening experience. The engineers paved the way for the way we think about mastering in the time since.
What tools are used in mastering?
Most mastering comes down to five kinds of processing: dynamics, equalization, stereo imaging, harmonic processing, and noise removal.
Dynamic range processing
Compressors, limiters, and expanders control the difference between the loudest and quietest parts of a track. Engineers often keep several compressors on hand, hardware or plugin, and choose based on genre and context. A tube compressor, for example, adds a different color and feel than a solid-state one.
Limiters are an extreme form of compression. A true-peak limiter at the end of the mastering chain prevents digital overs. To go deeper, read our guide to dynamic range processing.
Equalizers
Equalizers (commonly referred to as “EQ”) are used to shape tonal balance, by cutting or boosting the amplitude of specific frequency bands.
Dynamic EQ - a sort of hybrid of EQ and compression - can be used to isolate and affect specific frequencies in a more targeted way. When a frequency exceeds a specific threshold, the compression kicks in. While similar to multiband compression, dynamic EQ allows the user to be more precise in their frequency choices, vs a “band” of frequencies.
Stereo imaging
Stereo imaging tools are used in different ways to help widen or narrow the stereo field. Widening a stereo image can make a recording sound bigger, and more encompassing – but too wide, and the center imaging will collapse.
Some stereo imaging processing affects the whole stereo image, regardless of frequency content, and others, such as Ozone’s Imager plugin, let you set the width of individual frequency bands. It not only offers the ability to widen and narrow the stereo image overall, but also affect the imaging of particular frequency bands. Some examples are widening high frequency content to widen the sense of “air” in a mix, or narrowing the low end to help prepare tracks for vinyl production.
Harmonic processing, exciters, saturation
During the music mastering process, the energy of the music is important to the cohesion of a record. Adding harmonics changes the energy and feel of a track, which helps a record sound cohesive. Different blends of even and odd harmonics create different characters.
Exciters work differently from an equalizer. Instead of boosting frequencies that are already there, they generate new harmonics based on the incoming signal. While the term saturation is sometimes used interchangeably with the term “exciter,” saturation usually refers to tape saturation. Tape saturation adds harmonic content as the audio signal is pushed the tape (depending how hard you press the signal, it can also affect transients, and provide a gentle clipping effect), but is full frequency bandwidth and is mainly what we’re discussing when we say analog sound.
Noise removal
While extraneous noises are often removed during the mixing process on individual tracks, there are many instances when noise removal on a stereo track can be helpful in the mastering stage. Since loudness adjustments are common in the mastering process, it’s not unusual for lower level sounds to be more amplified in the master - for example: hiss, buzz, mouth sounds, or chair squeaks. The main thing to be aware of in this instance is as you’re not working on the individual tracks, the processing you’re doing affects the whole stereo file.
Metering
Metering is any visual aid that helps mastering engineers measure various aspects of their mixes, helping them make better decisions about frequency content, stereo spread, levels, and dynamic range.
Dithering
Dither is used in cases when it is necessary to convert higher word-length recordings (e.g. 24 or 32 bit) to lower bit depths (e.g. 16 bit for CD) while maintaining dynamic range and minimizing quantization distortion.
With all these types of effects, you might wonder where to start. First off, remember, just because you have all these processors doesn’t require that you use them all. Only use as many as you need. In truth, there really isn’t any single “correct” order for effects when mastering, and you should feel free to experiment. Here’s an example of one step-by-step process.
How to master a track or album
Mastering balances technical checks with creative decisions. A consistent workflow – not identical processing on every track – helps you stay objective. Here's how to approach it.
1. Set up your listening environment
Most mastering engineers work in acoustically treated rooms and follow a similar framework from project to project. Treat your room as well as you can, and keep a good pair of headphones for double-checking. I rely on mine to catch problem sounds I might need to remove with iZotope RX.
If you’re mastering with speakers, calibrating your speakers to a fixed monitoring gain allows your ears to develop an internalized reference for loudness and tonal balance. Equally important, however, is the proper gain-staging of your signal chain – making sure each point of amplification is calibrated to ensure an optimal signal-to-noise ratio and minimal distortion. It could be as simple of a habit as feeding a test tone before every session (1 kHz sine wave) through your analog outboard gear to ensure that the left and right channels are balanced.
Choose a DAW that suits mastering. WaveLab, Sequoia, and Pro Tools are common choices. Some handle album metadata, multiple sample rates, and multiple versions of a single song better than others.
2. Gather project details from your client
Ask for the track order, track titles, and release formats (streaming, vinyl, and so on). Ask them what their goals are from mastering. Do they have any concerns? Mastering moves much faster than mixing, so you need to understand the client's expectations quickly – and manage them.
3. Check the files you receive
Once you get the files from the client, make sure they are delivered to you correctly. A good baseline:
- The mix session's native sample rate (the mix engineer doesn't need to upsample)
- 24-bit or 32-bit files. Avoid mastering mixes in lossy formats such as MP3s at any cost.
- Stereo files, or whatever format the client agreed to send vs. mono files
If anything doesn't match, ask the client to confirm before you start.
Begin any mastering session by listening to the music from beginning to end at the full, optimal level. This might seem like a mundane task but it’s especially important. This provides you with a head start on strategizing your mastering game plan. You get a more thorough picture of the musical content from the intro all the way to the explosive final chorus and outro, along with any unexpected changes in sections such as the bridge. Knowing all these details beforehand ultimately makes you more productive with your mastering decisions. Less time wasted course-correcting as you adjust to unexpected changes along the way.
4. Remove noise first
Hopefully the mix engineer did most of this work for you, but it’s quite common in mastering to notice things as you work. Dynamic range processing can bring out low level signals (such as chair squeaks, clicks, etc) so it’s best to remove them before starting on anything else.
5. Set the album order, spacing, and levels
If I’m working on an album, I will line up the files in order and figure out fades/spacing before I even start mastering. I’ll use clip gain to adjust mix levels if there’s a big discrepancy between a few tracks (common if files were mixed at different times or with different engineers). That way, once I get going I don’t have to stop the fun of adjusting the sonics to add a fade-out.
6. Process, compare, and refine
Work through equalization, dynamics, imaging, and harmonic processing as each track needs. Level match as you go so you're judging the processing, not the extra volume. The examples below show what this looks like on real projects.
Compare against references, too. Pick two or three commercially released tracks in the same genre, ideally ones the client loves, and check your master against them at matched levels. You’re not trying to copy another record, but references keep your ears honest about tonal balance, low end, and overall density, especially after hours of listening to the same song. It’s also worth asking the client for their own references back in step 2; it’s one of the fastest ways to understand what they’re hoping to hear.
Tools like iZotope’s Tonal Balance Control can help here by showing how your track’s frequency balance compares to a reference or a genre target. Use it as a visual check on what you’re hearing, not a replacement for your ears.
Get a starting point with Master Assistant
If you’re new to mastering, or just want a fresh perspective, Ozone’s Master Assistant can give you a head start. It listens to your track and suggests a starting signal chain, settings, and a loudness target, which you can then adjust to taste. Think of it as a first draft: it’s a great way to see how an experienced chain might come together, but your ears (and your client’s goals) should make the final call.
Mastering in practice: three real examples
Here are clips from three projects, before and after mastering. All are level matched - since mastering involves overall volume adjustment (most of the time), in order to properly hear the changes I brought down the level of the master to match that of the mix.
Loudness is usually the most obvious difference between a mix and a master, so with that out of the way, listen for the subtler changes: is the tonal balance clearer or brighter? Does the low end feel more controlled? Does the track sound more polished and cohesive, like all the parts belong together? At a lower level, the master should still sound balanced, dynamic, and improved.
1. Subtle mastering for an intimate track
I mastered "At a Diner" for artist Storey Littleton (remastered here for this article). It's an intimate track, so my goal was to enhance its feel, not change it. I didn't want to lose her close, personal sound or make it feel too in-your-face.
EQ: I didn’t add that much in the way of dynamics processing, but I did use the Ozone EQ in the mid/side processing mode to help tame some more “pokey” frequencies that became more audible as I raised the overall level of the track. She has a very intimate sound and I didn’t want to either diminish that or make it so it felt too much “in your face.” I also used the Side channel to add some openness to the stereo image.
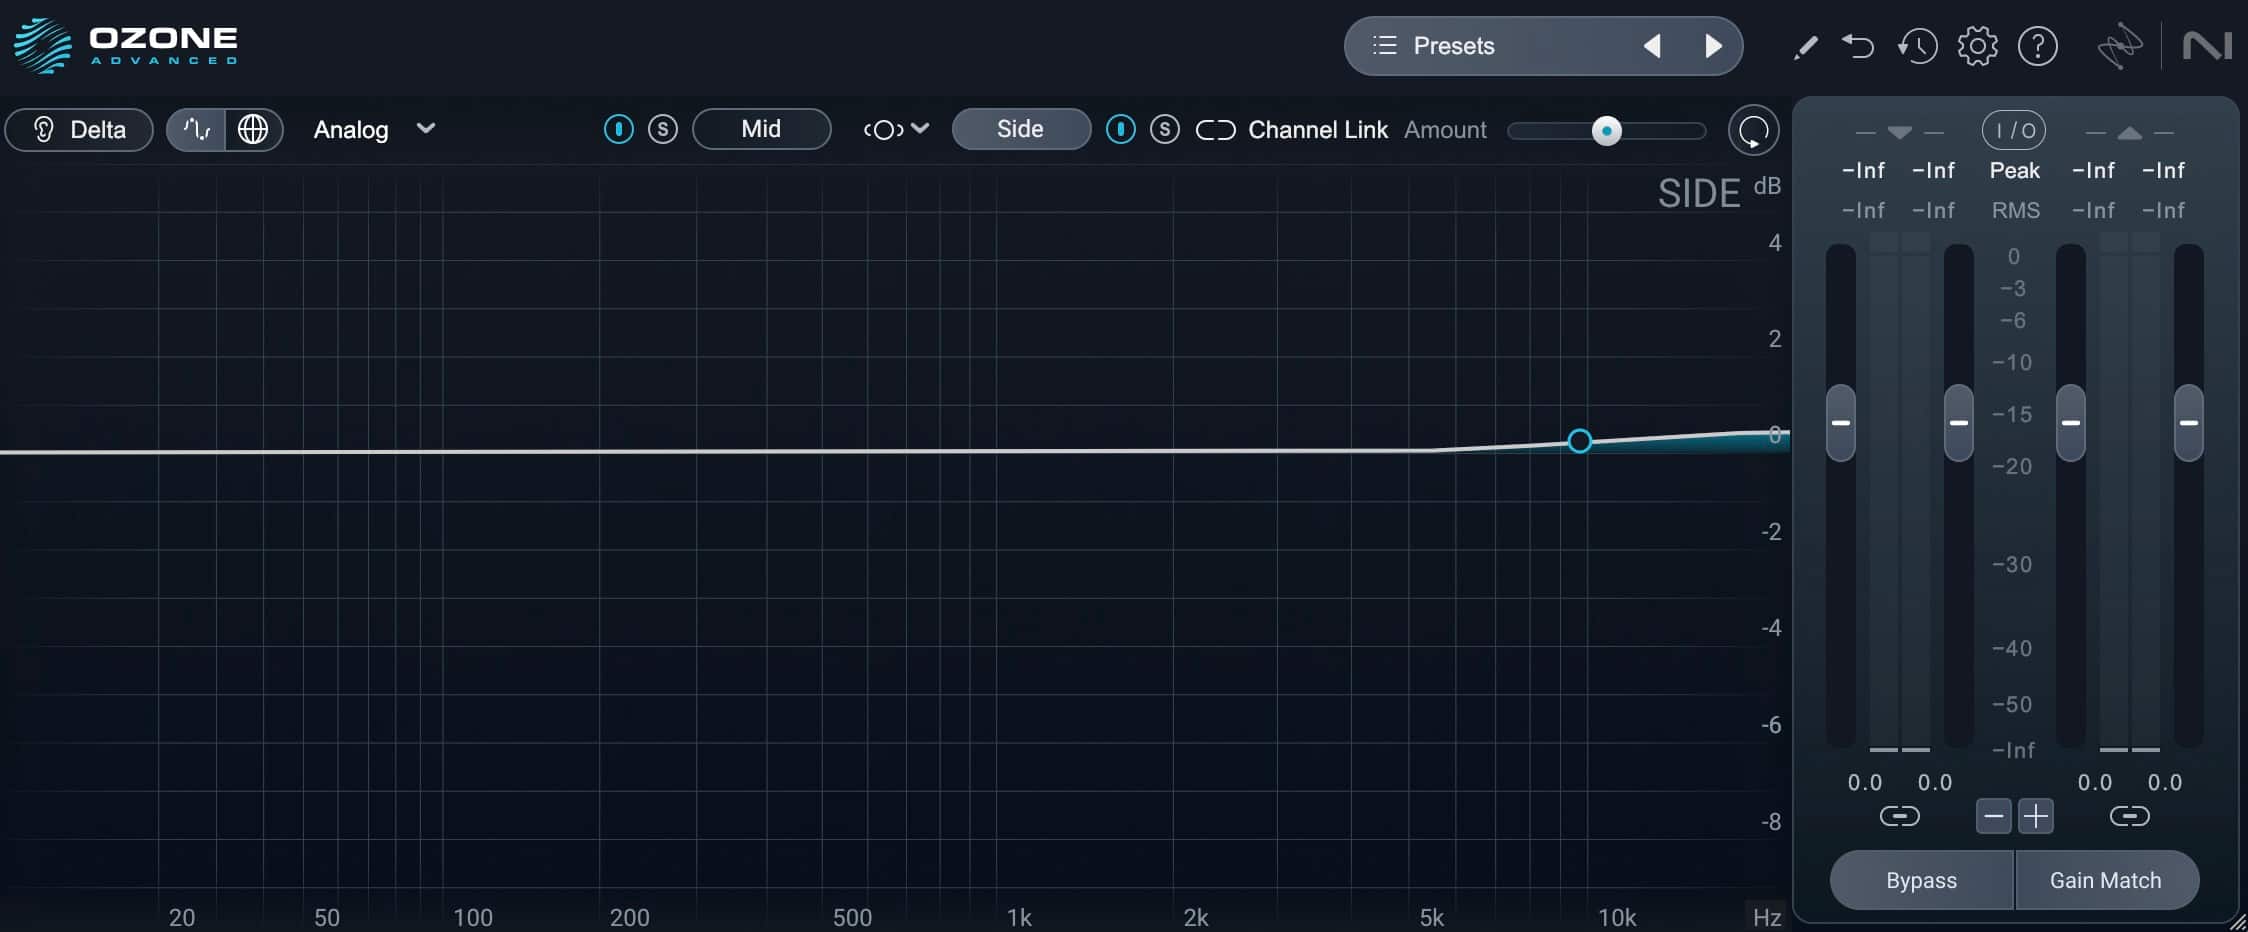 Using M/S mode, in side, to add some air to the stereo image
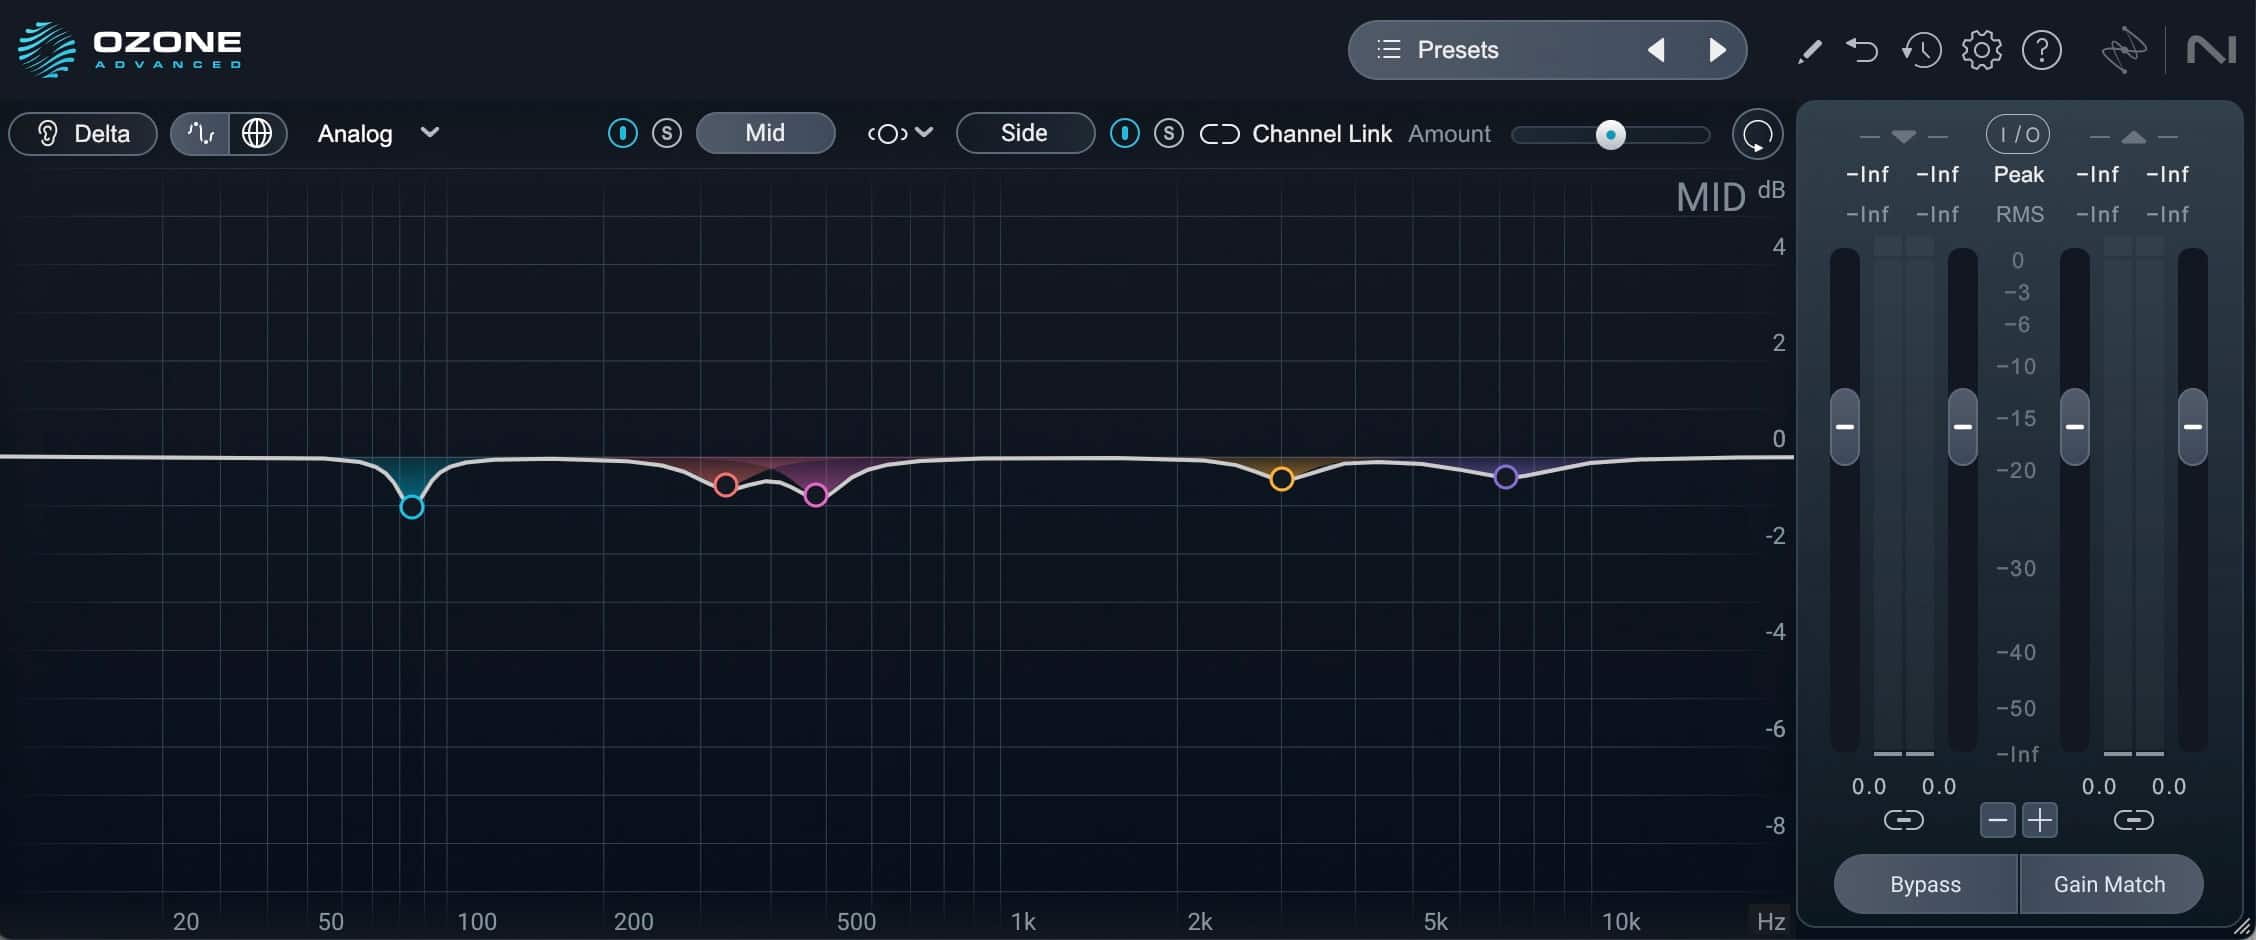 Using M/S mode, in mid, to smooth out some frequencies in the vocal part, in particular
Imager: I used the Imager to widen the high frequencies a bit to bring some air and width into the track.
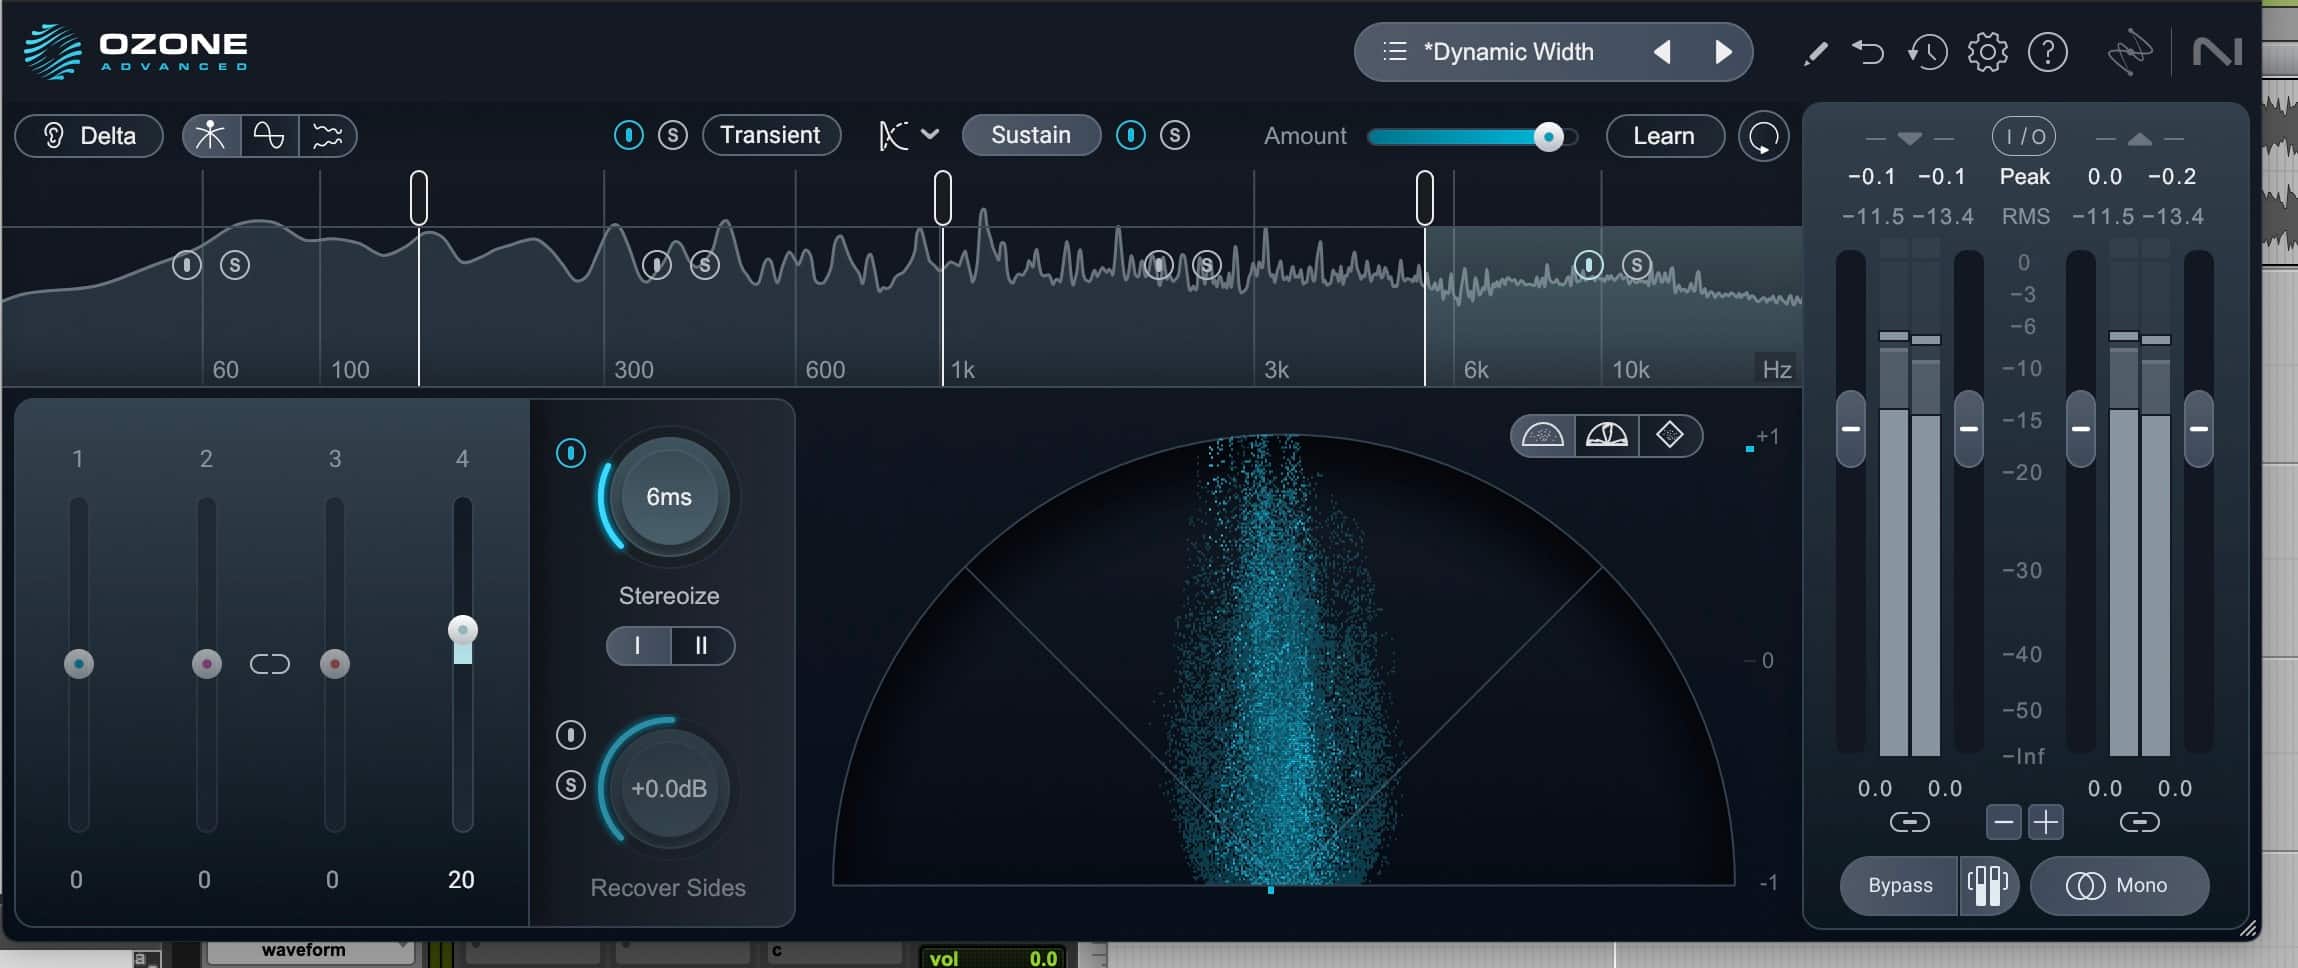 Widening the high frequencies with Ozone Imager
Compression and limiting: Gentle compression and limiting were used to bring the listener a bit closer to the nuances of the mix.
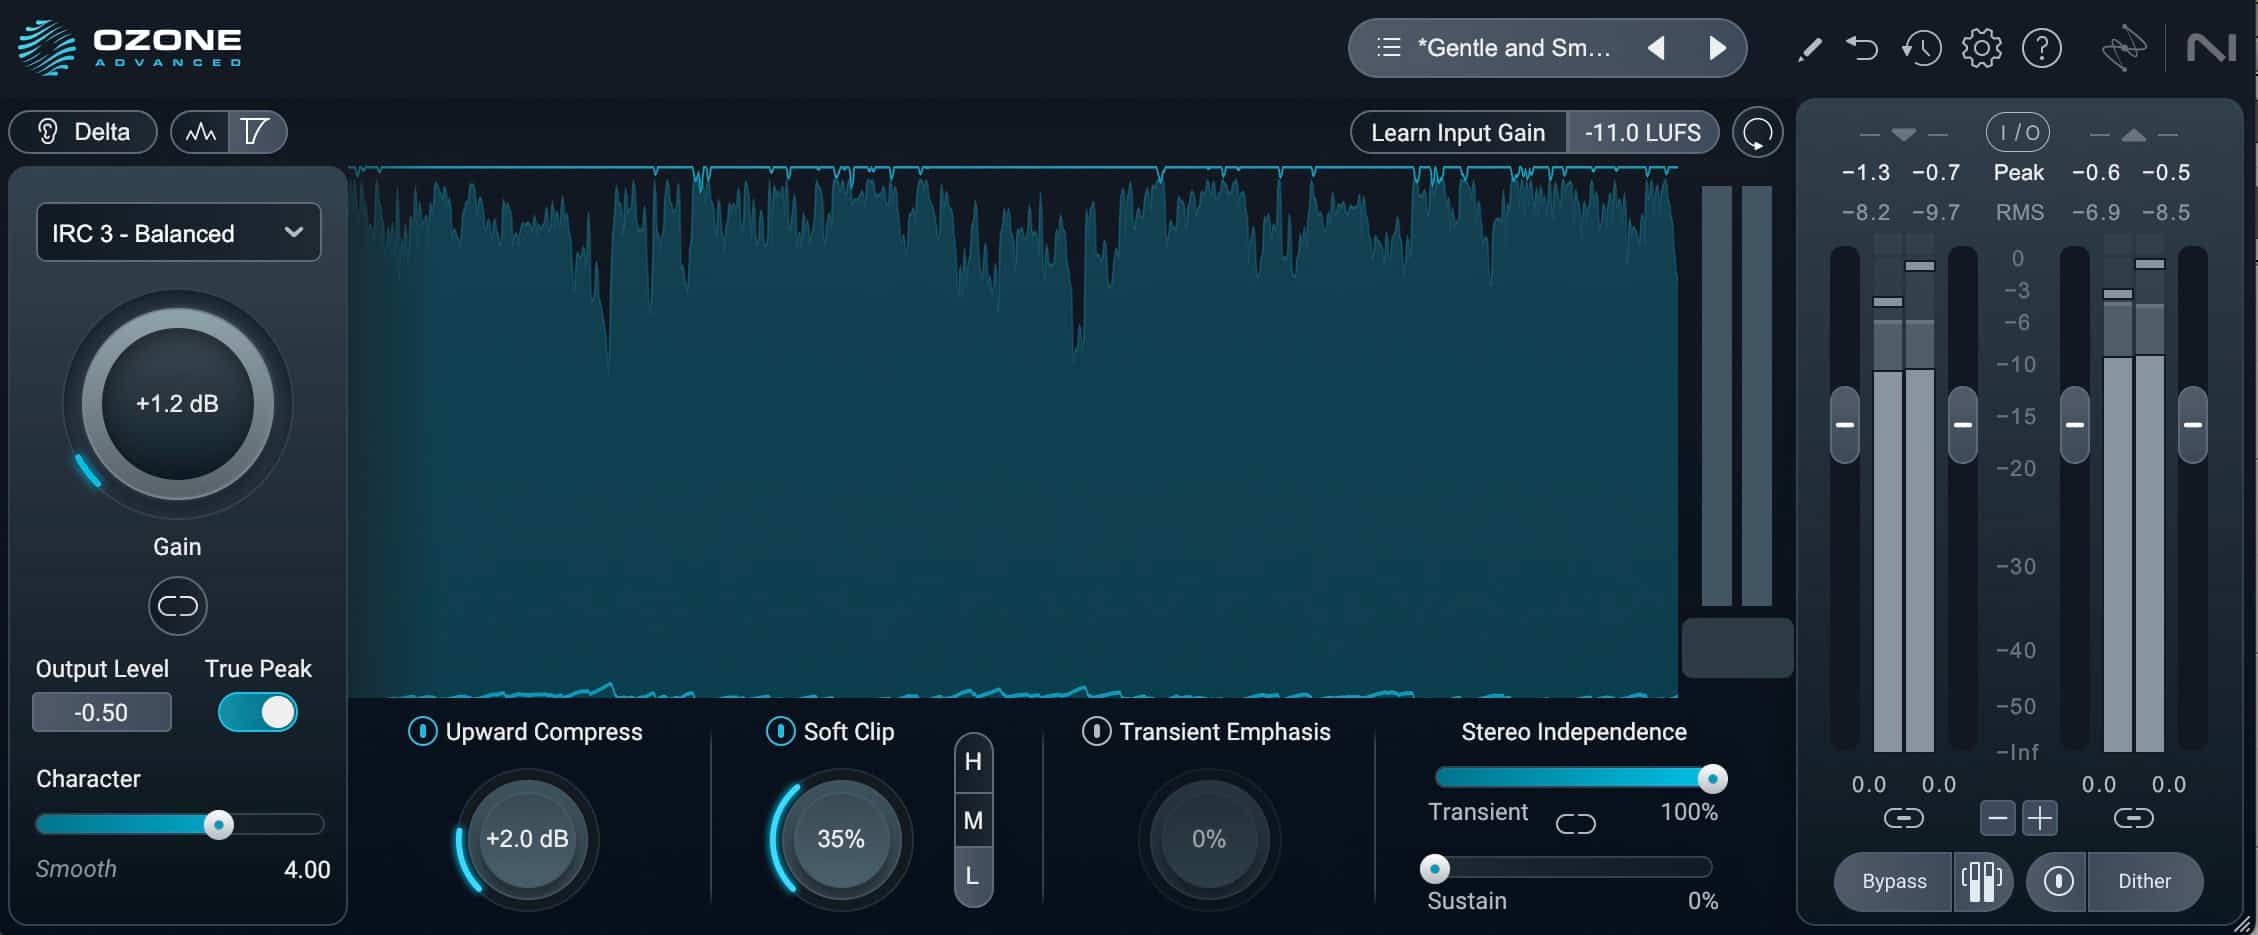 Using a limiter to catch any peaks and to glue the mix together
Noise removal: I also removed a click using de-click in RX - it became apparent after I began to work, and I could remove it without asking the mix engineer (you can see it a little bit after where the cursor is.)
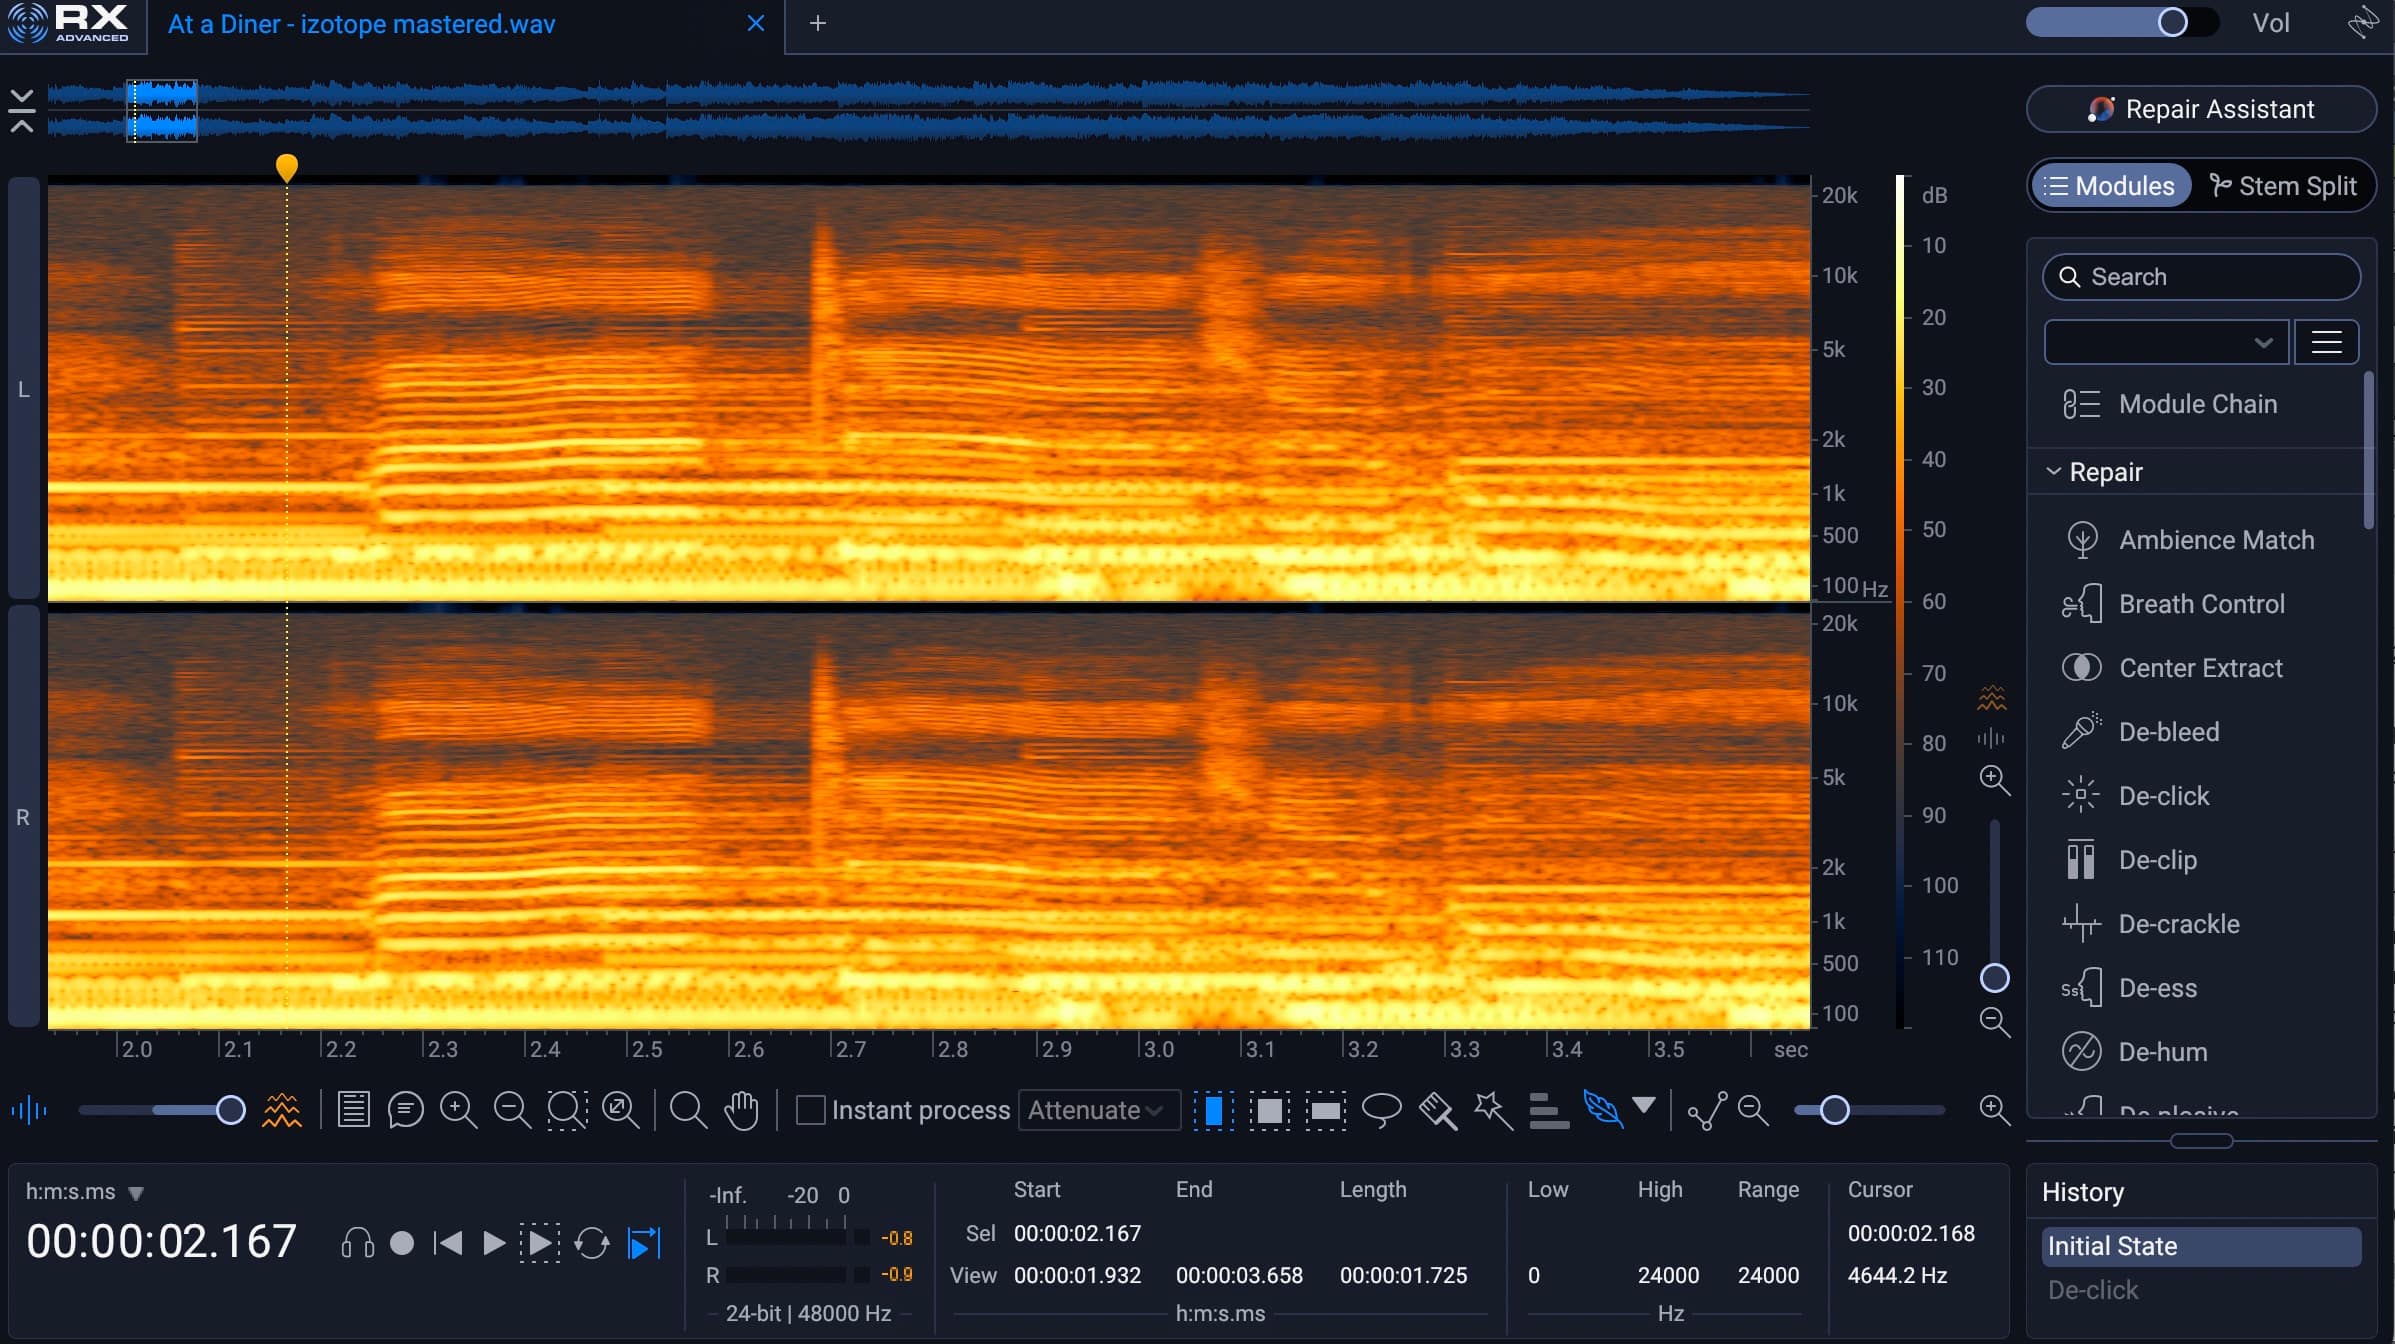 Removing the click in iZotope RX
Here are the two clips, level matched. I brought down the mastered file by about a few dB to level match. This was a good example of a more subtle mastering job! Not trying to change the tone, but tie everything together and bring it up to a good level for all listeners.
Before mastering
After mastering
2. Removing metronome bleed from a stereo mix with RX
Another example of iZotope RX being used on a stereo mix was an acoustic album I worked on in the last year - there was metronome bleed in the silence between hand claps and I was tasked to minimize it as much as possible.
The Spectral Repair and De-click modules were the main tools used to remove the sound. The trickiest part was keeping the decay of the claps intact while also removing the metronome bleed.
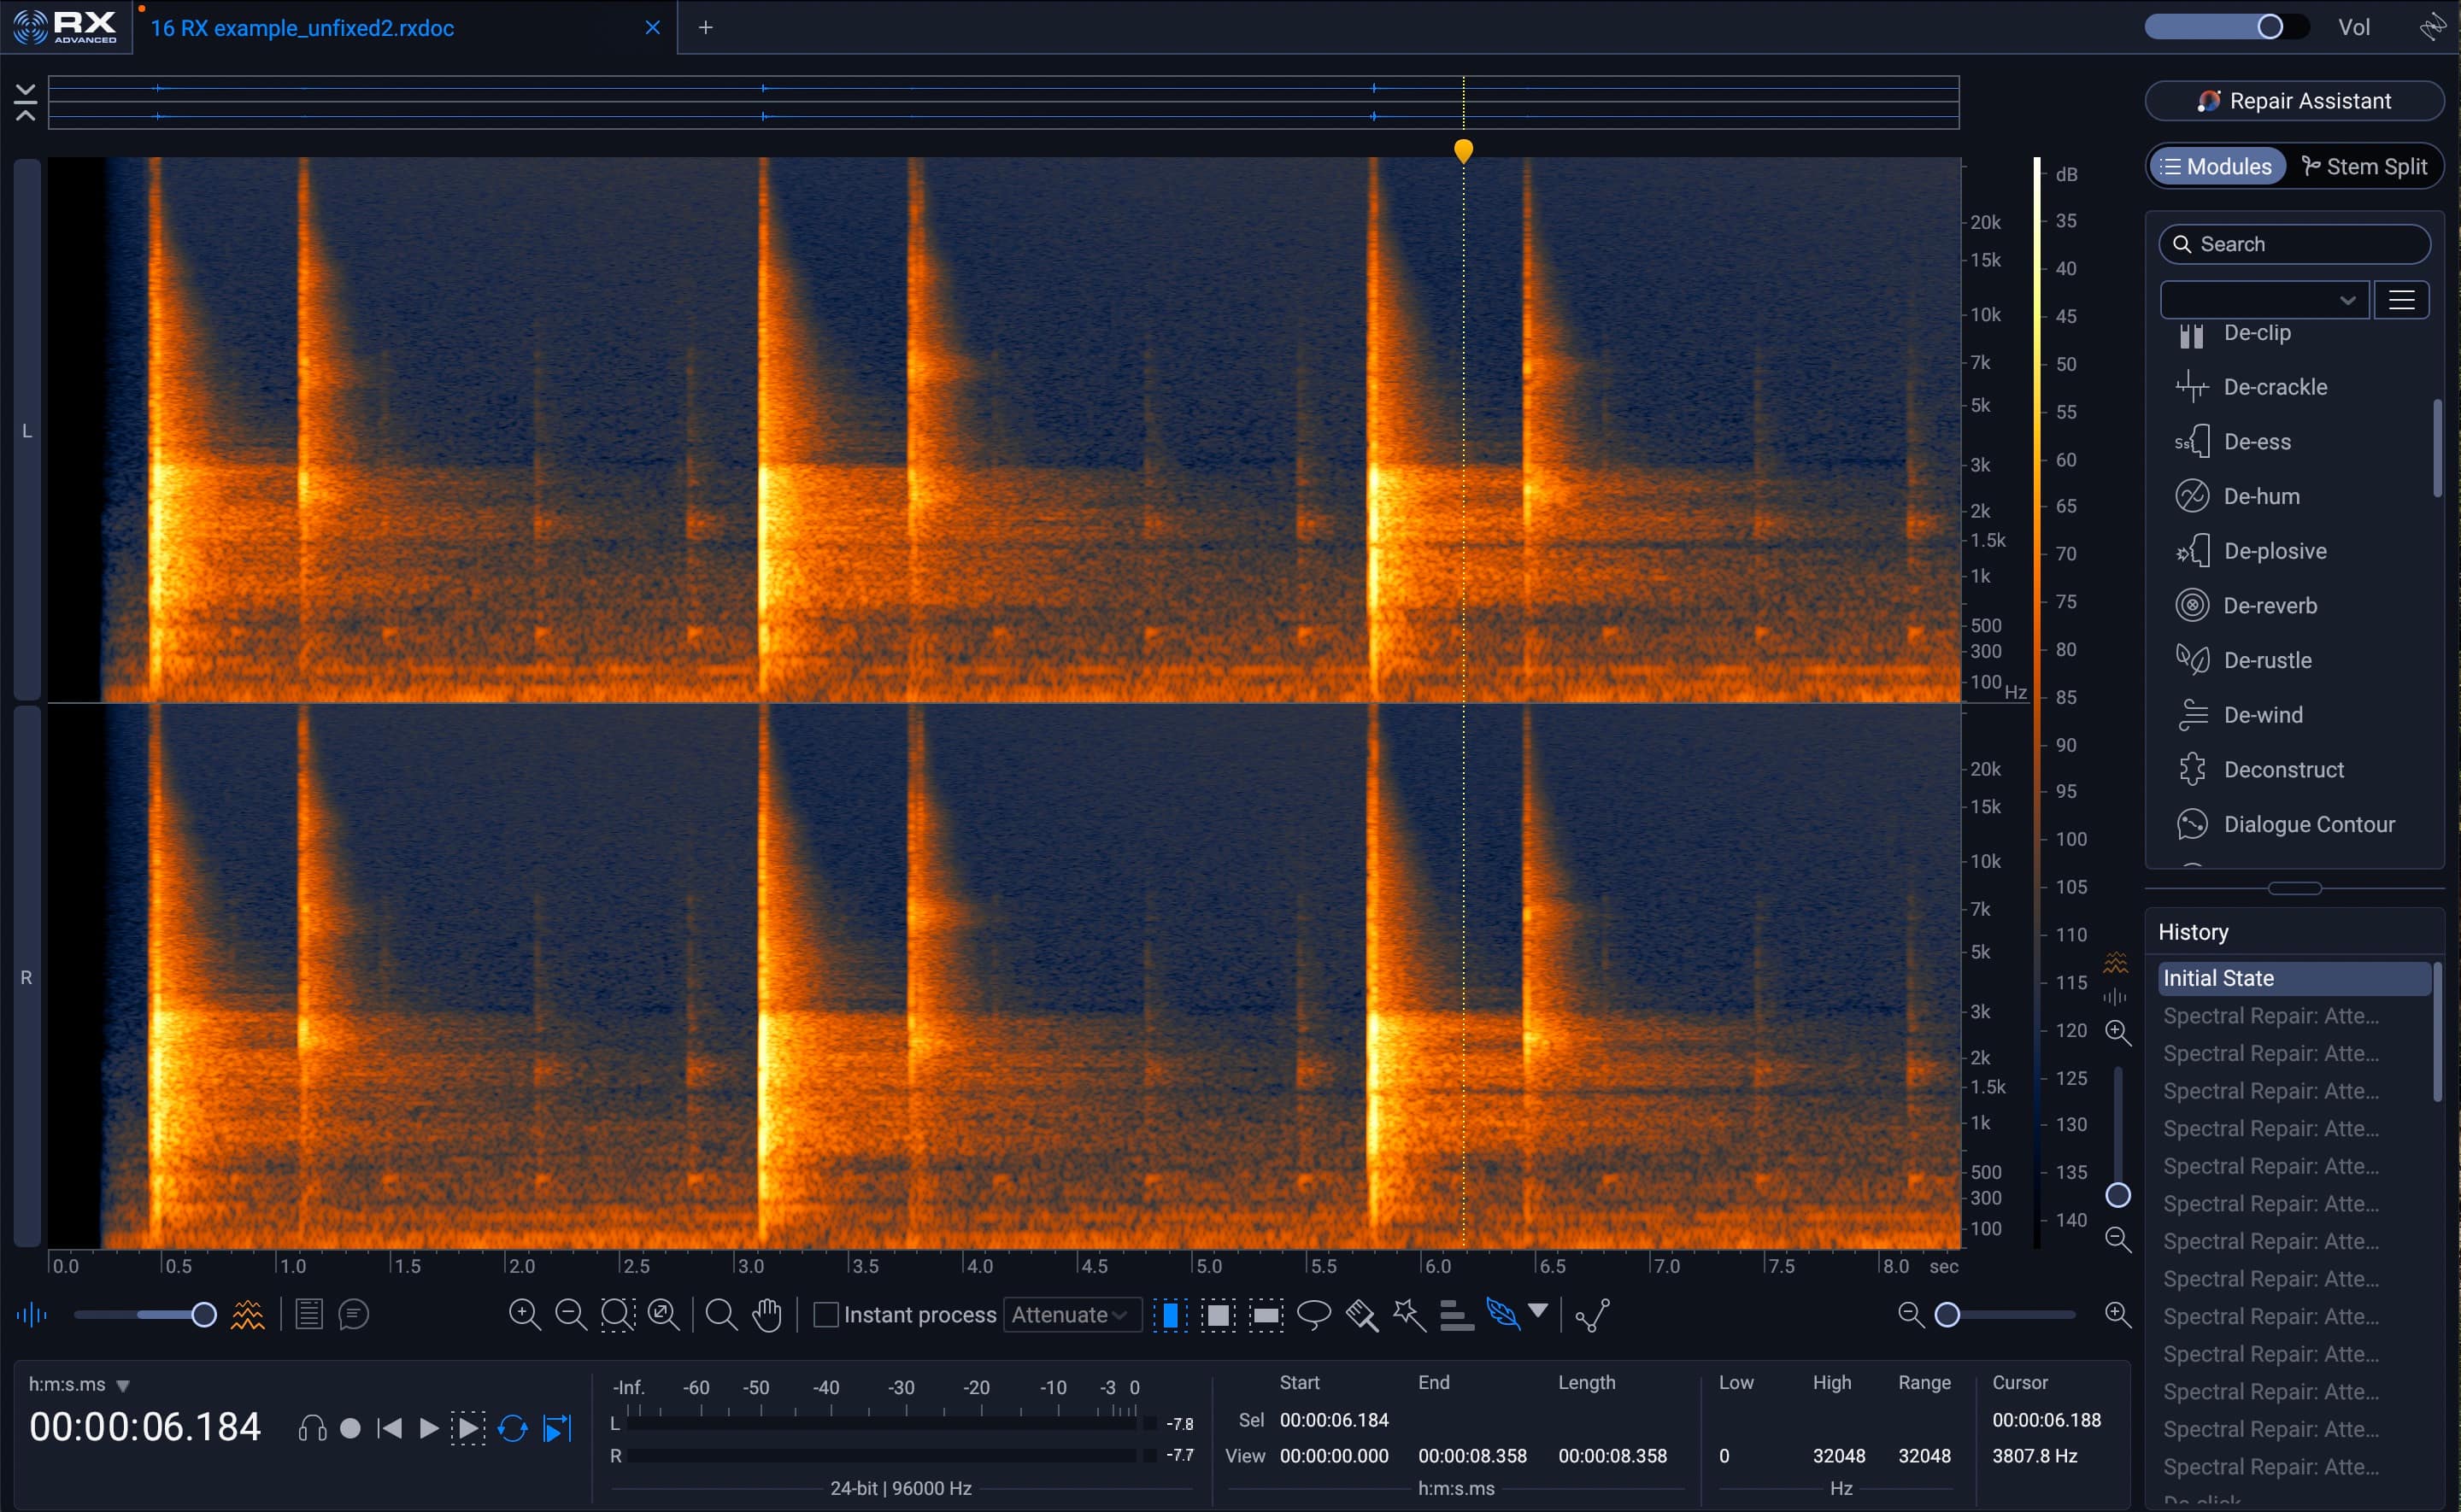 Metronome bleed is visible in the mix via the RX spectrogram
Here’s what the intro sounded like to begin with (watch your level if you’re on headphones – they are claps, so quite a piercing transient), and then what I ended up with.
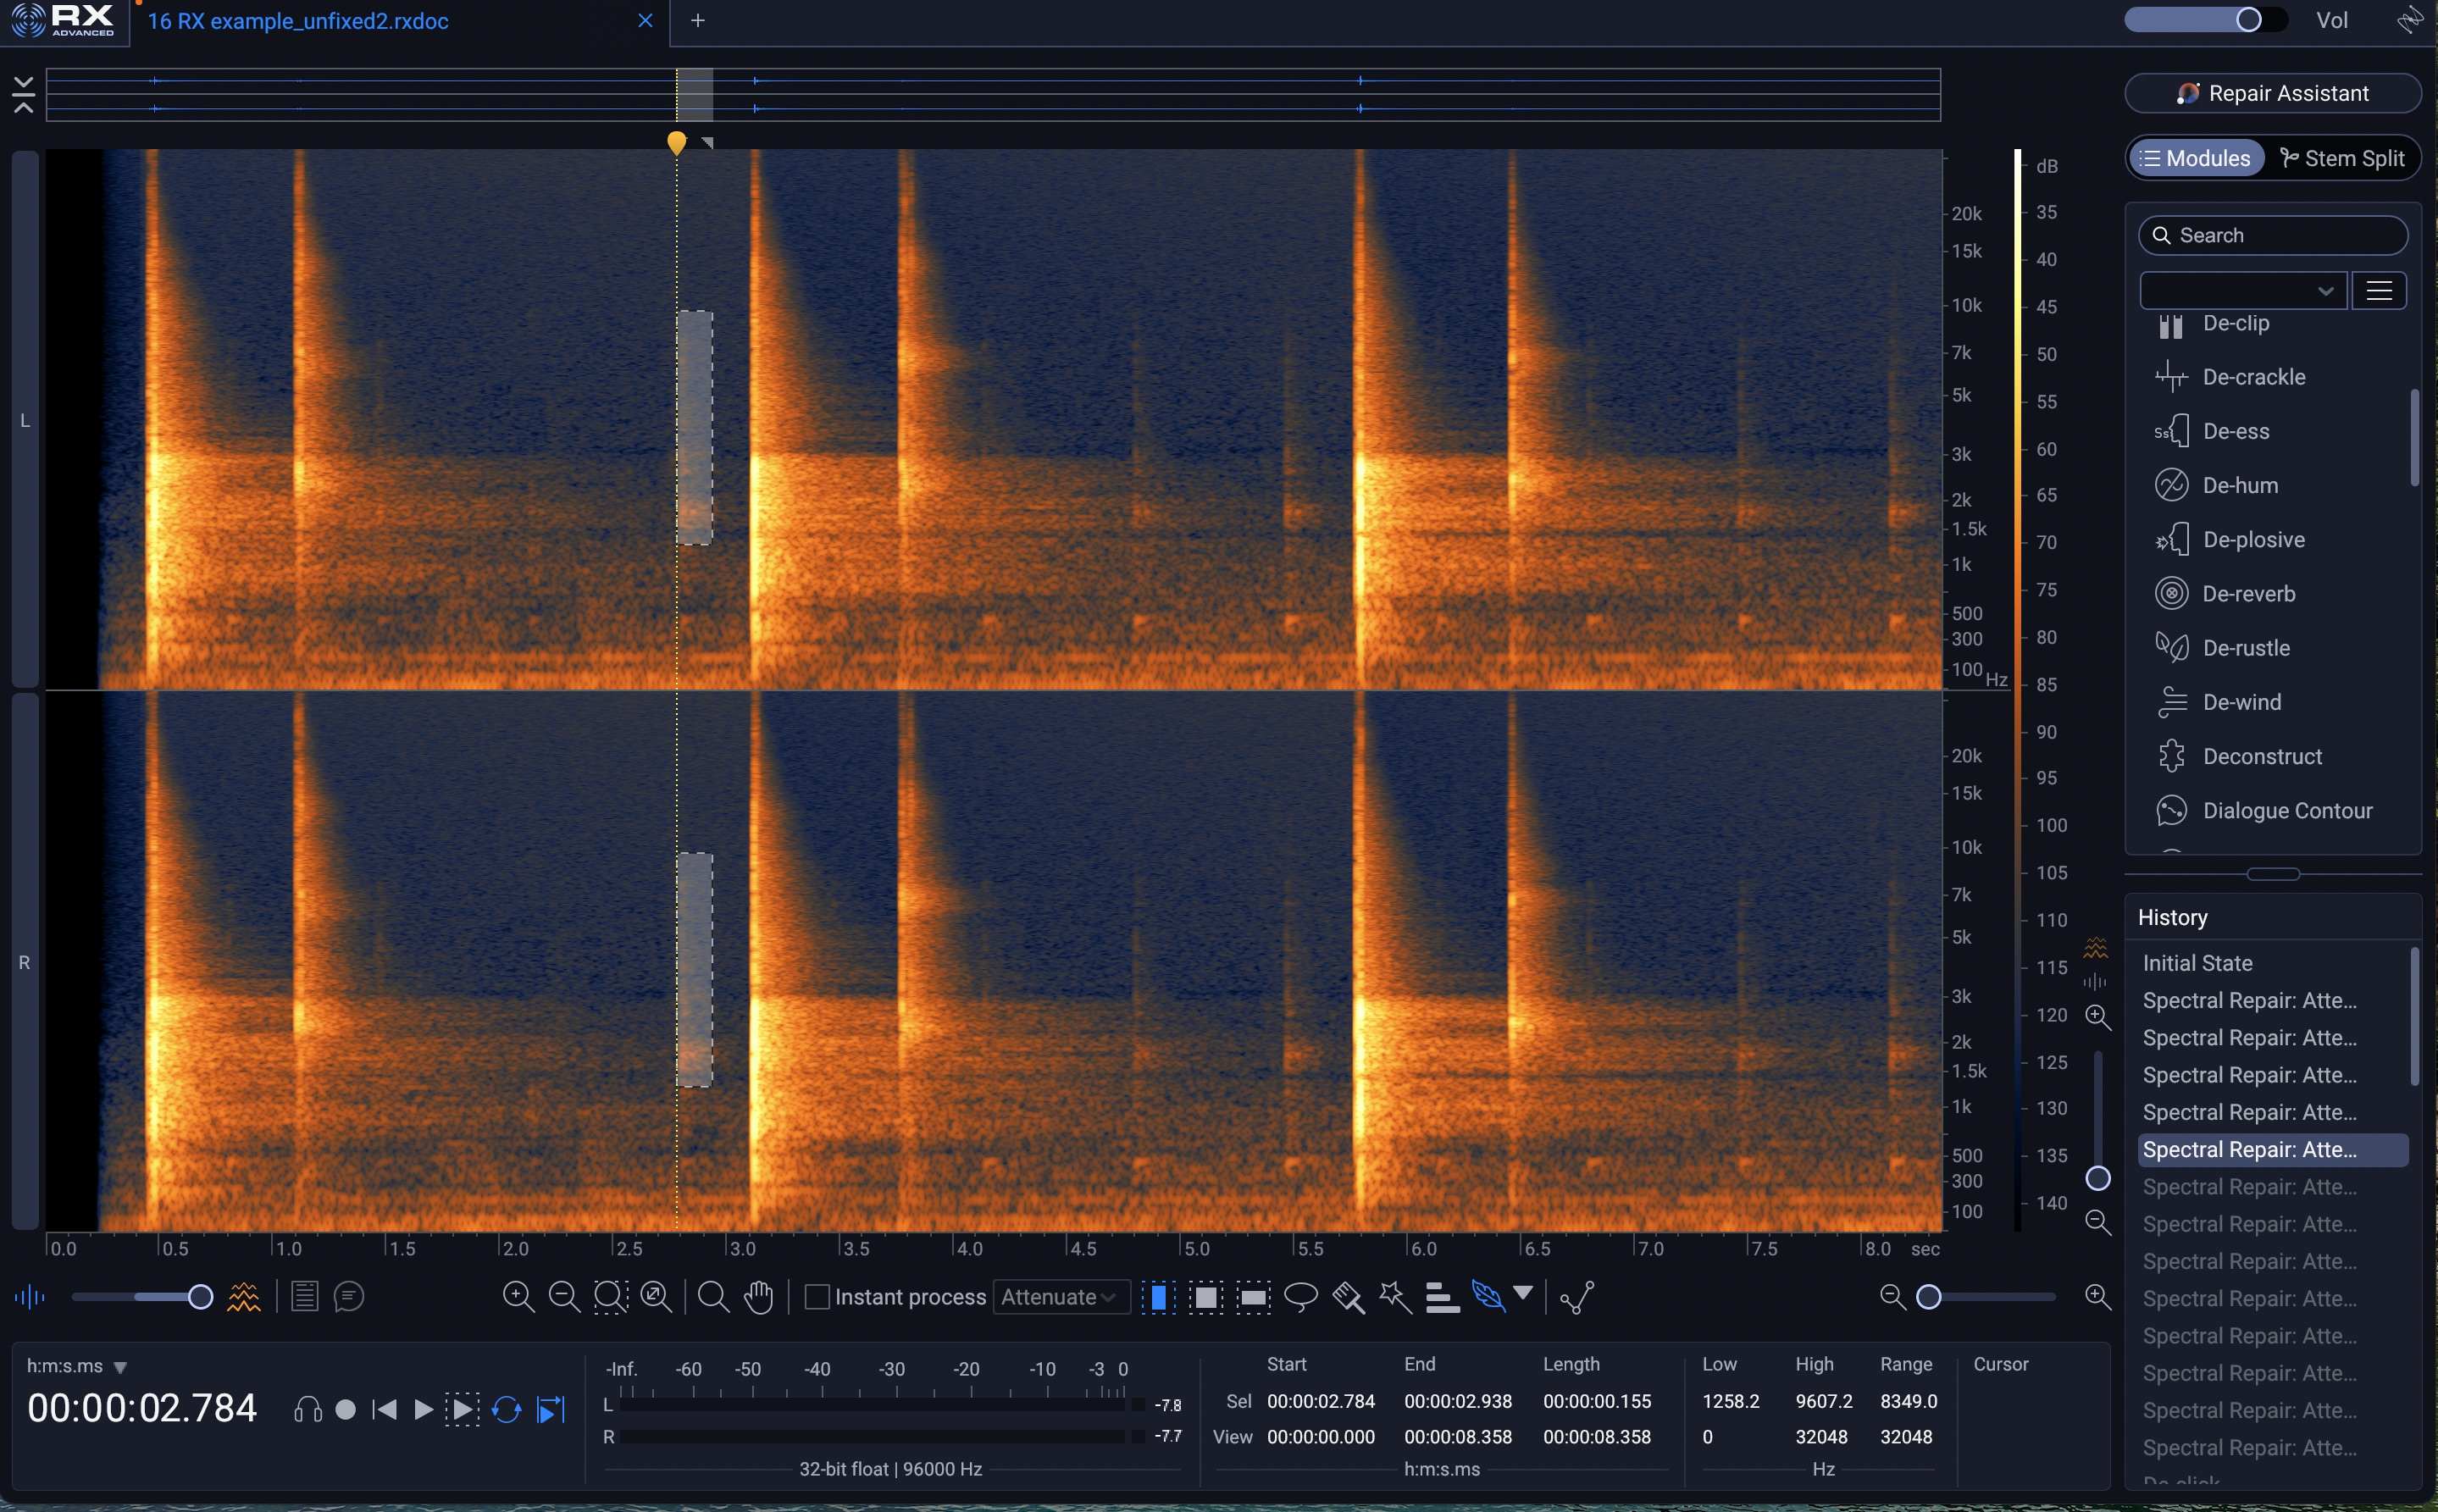 Using Spectral Repair attenuate in iZotope RX
Spectral Repair allows you to select a region (which can be a freeform square, blanket horizontal or vertical selection, as well as other shape suggestions) and remove noises in the selection with selectable degrees of sensitivity.
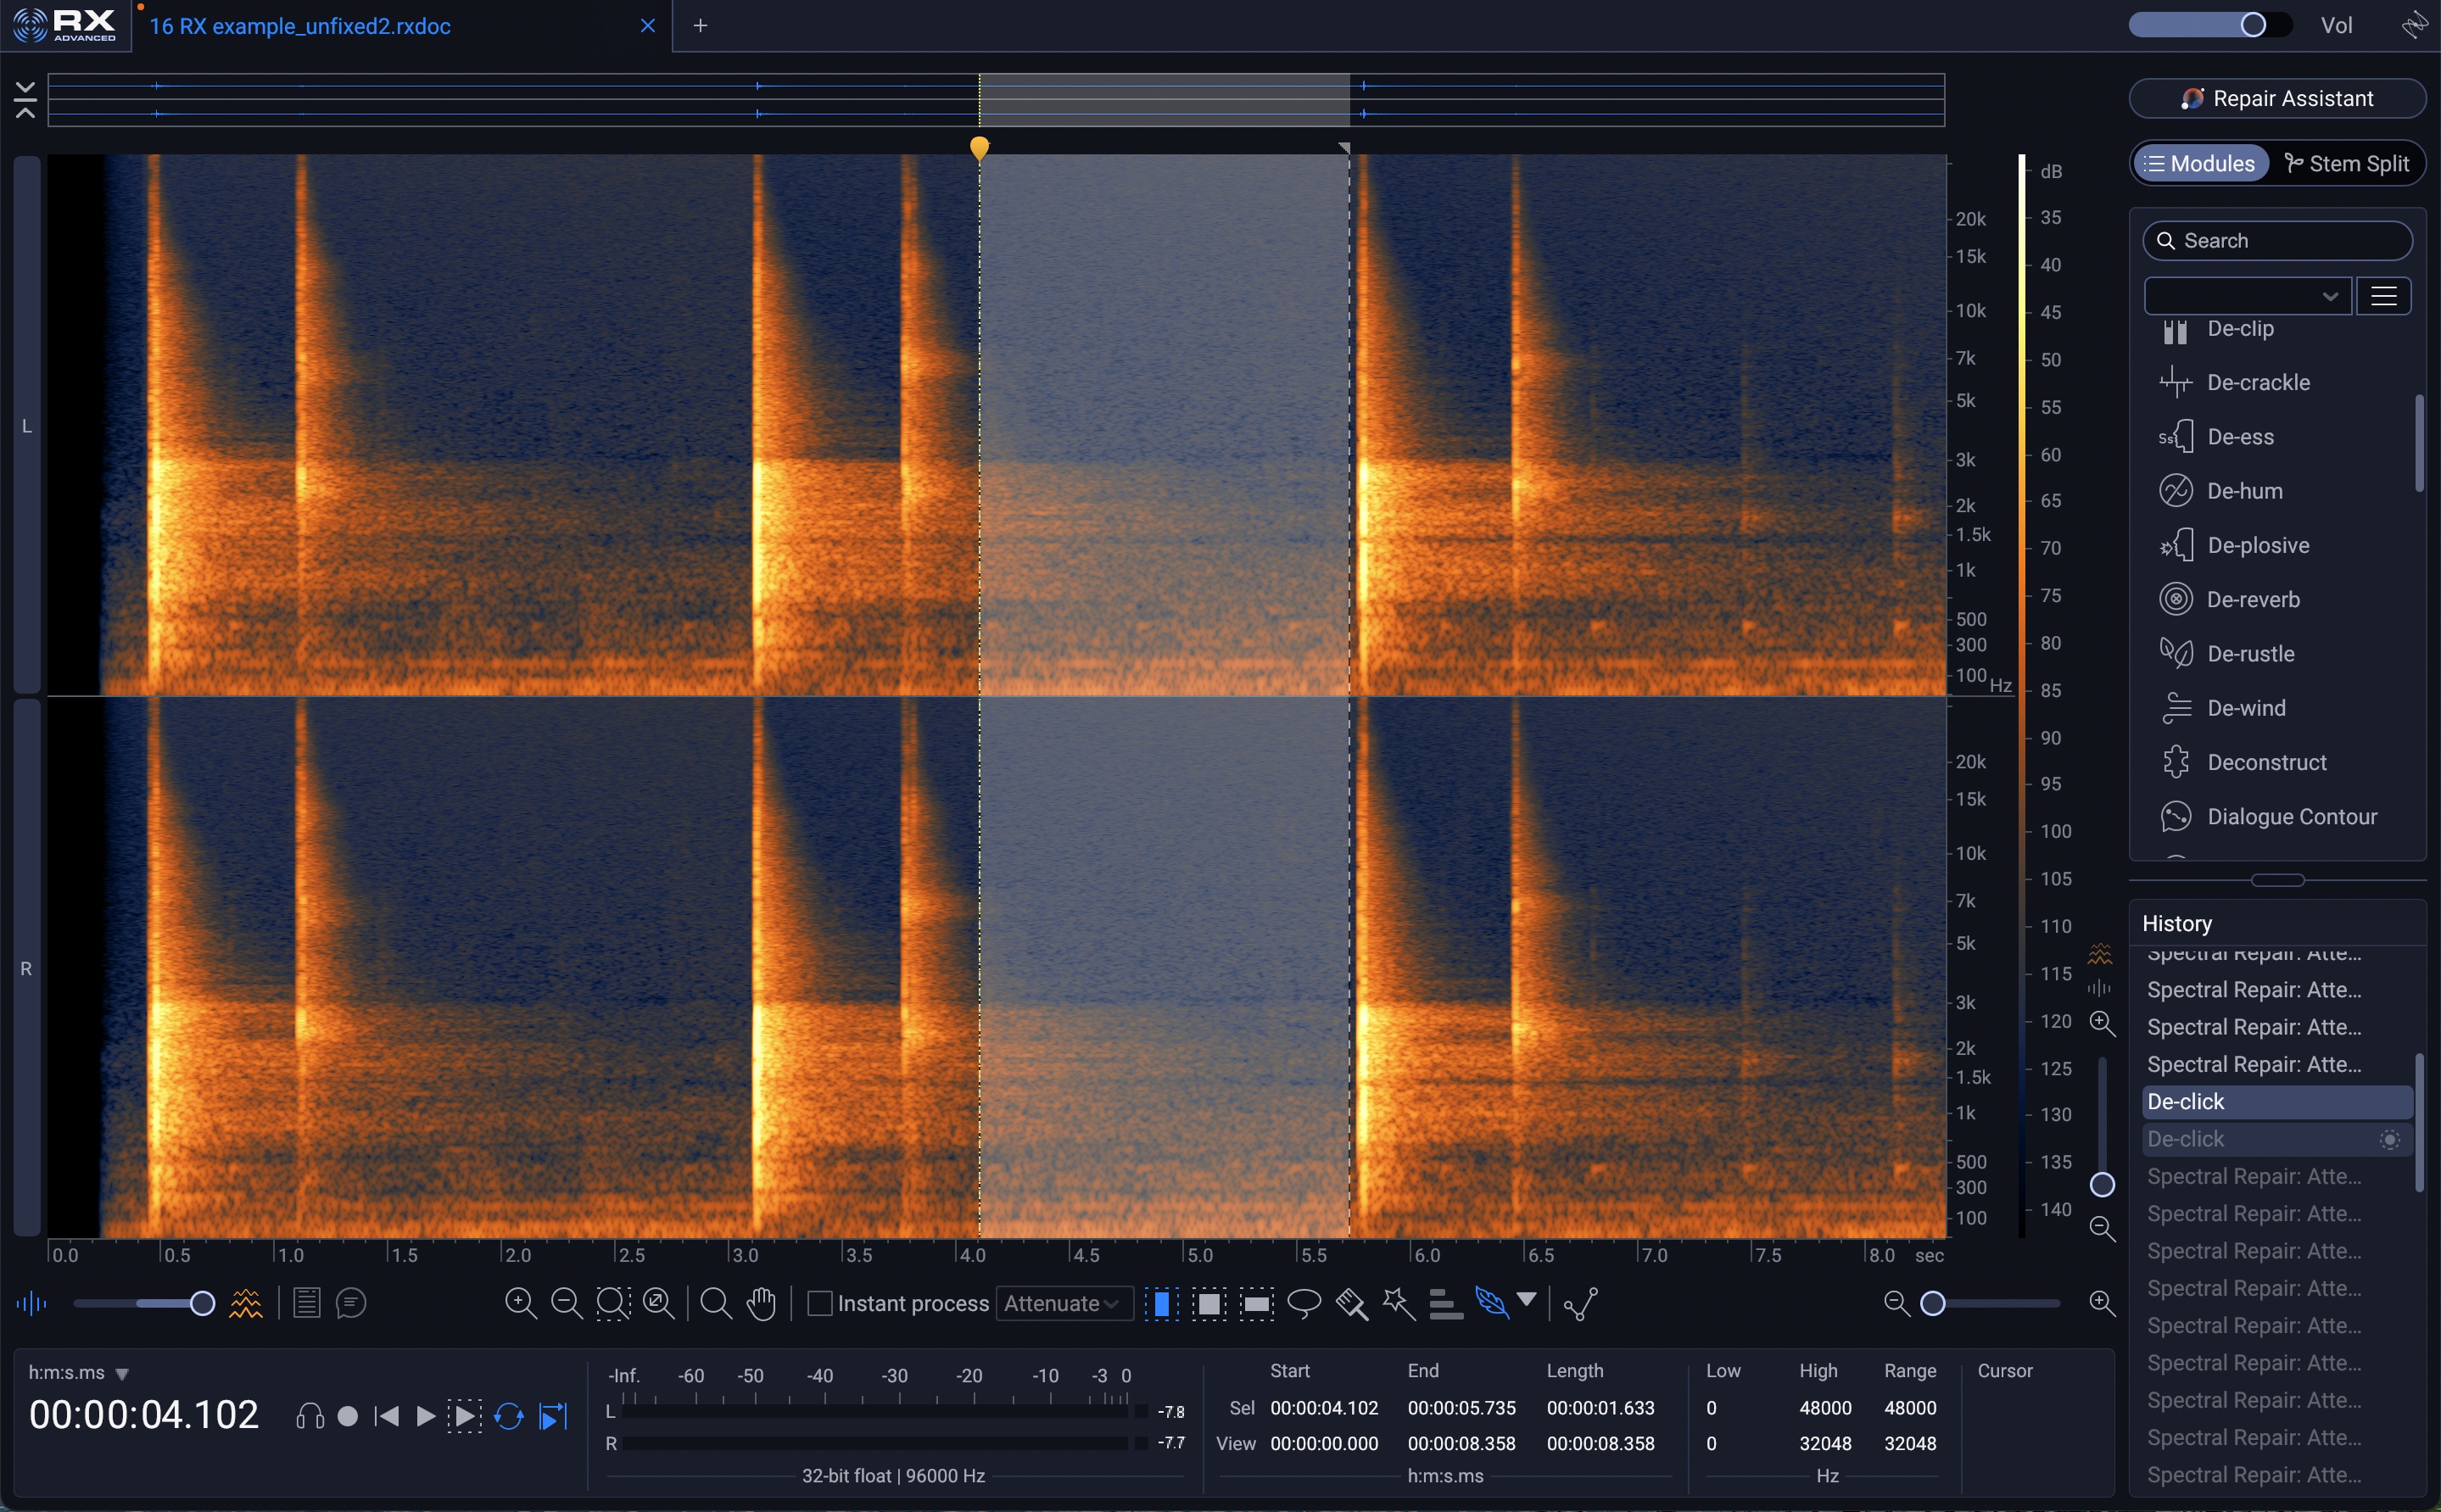 Using broad De-click processing in iZotope RX
I did a broad De-click on the sections after spectral repair to remove the last little “tick” of the bleed - spectral repair in this instance seemed to affect the decay of the clap too much.
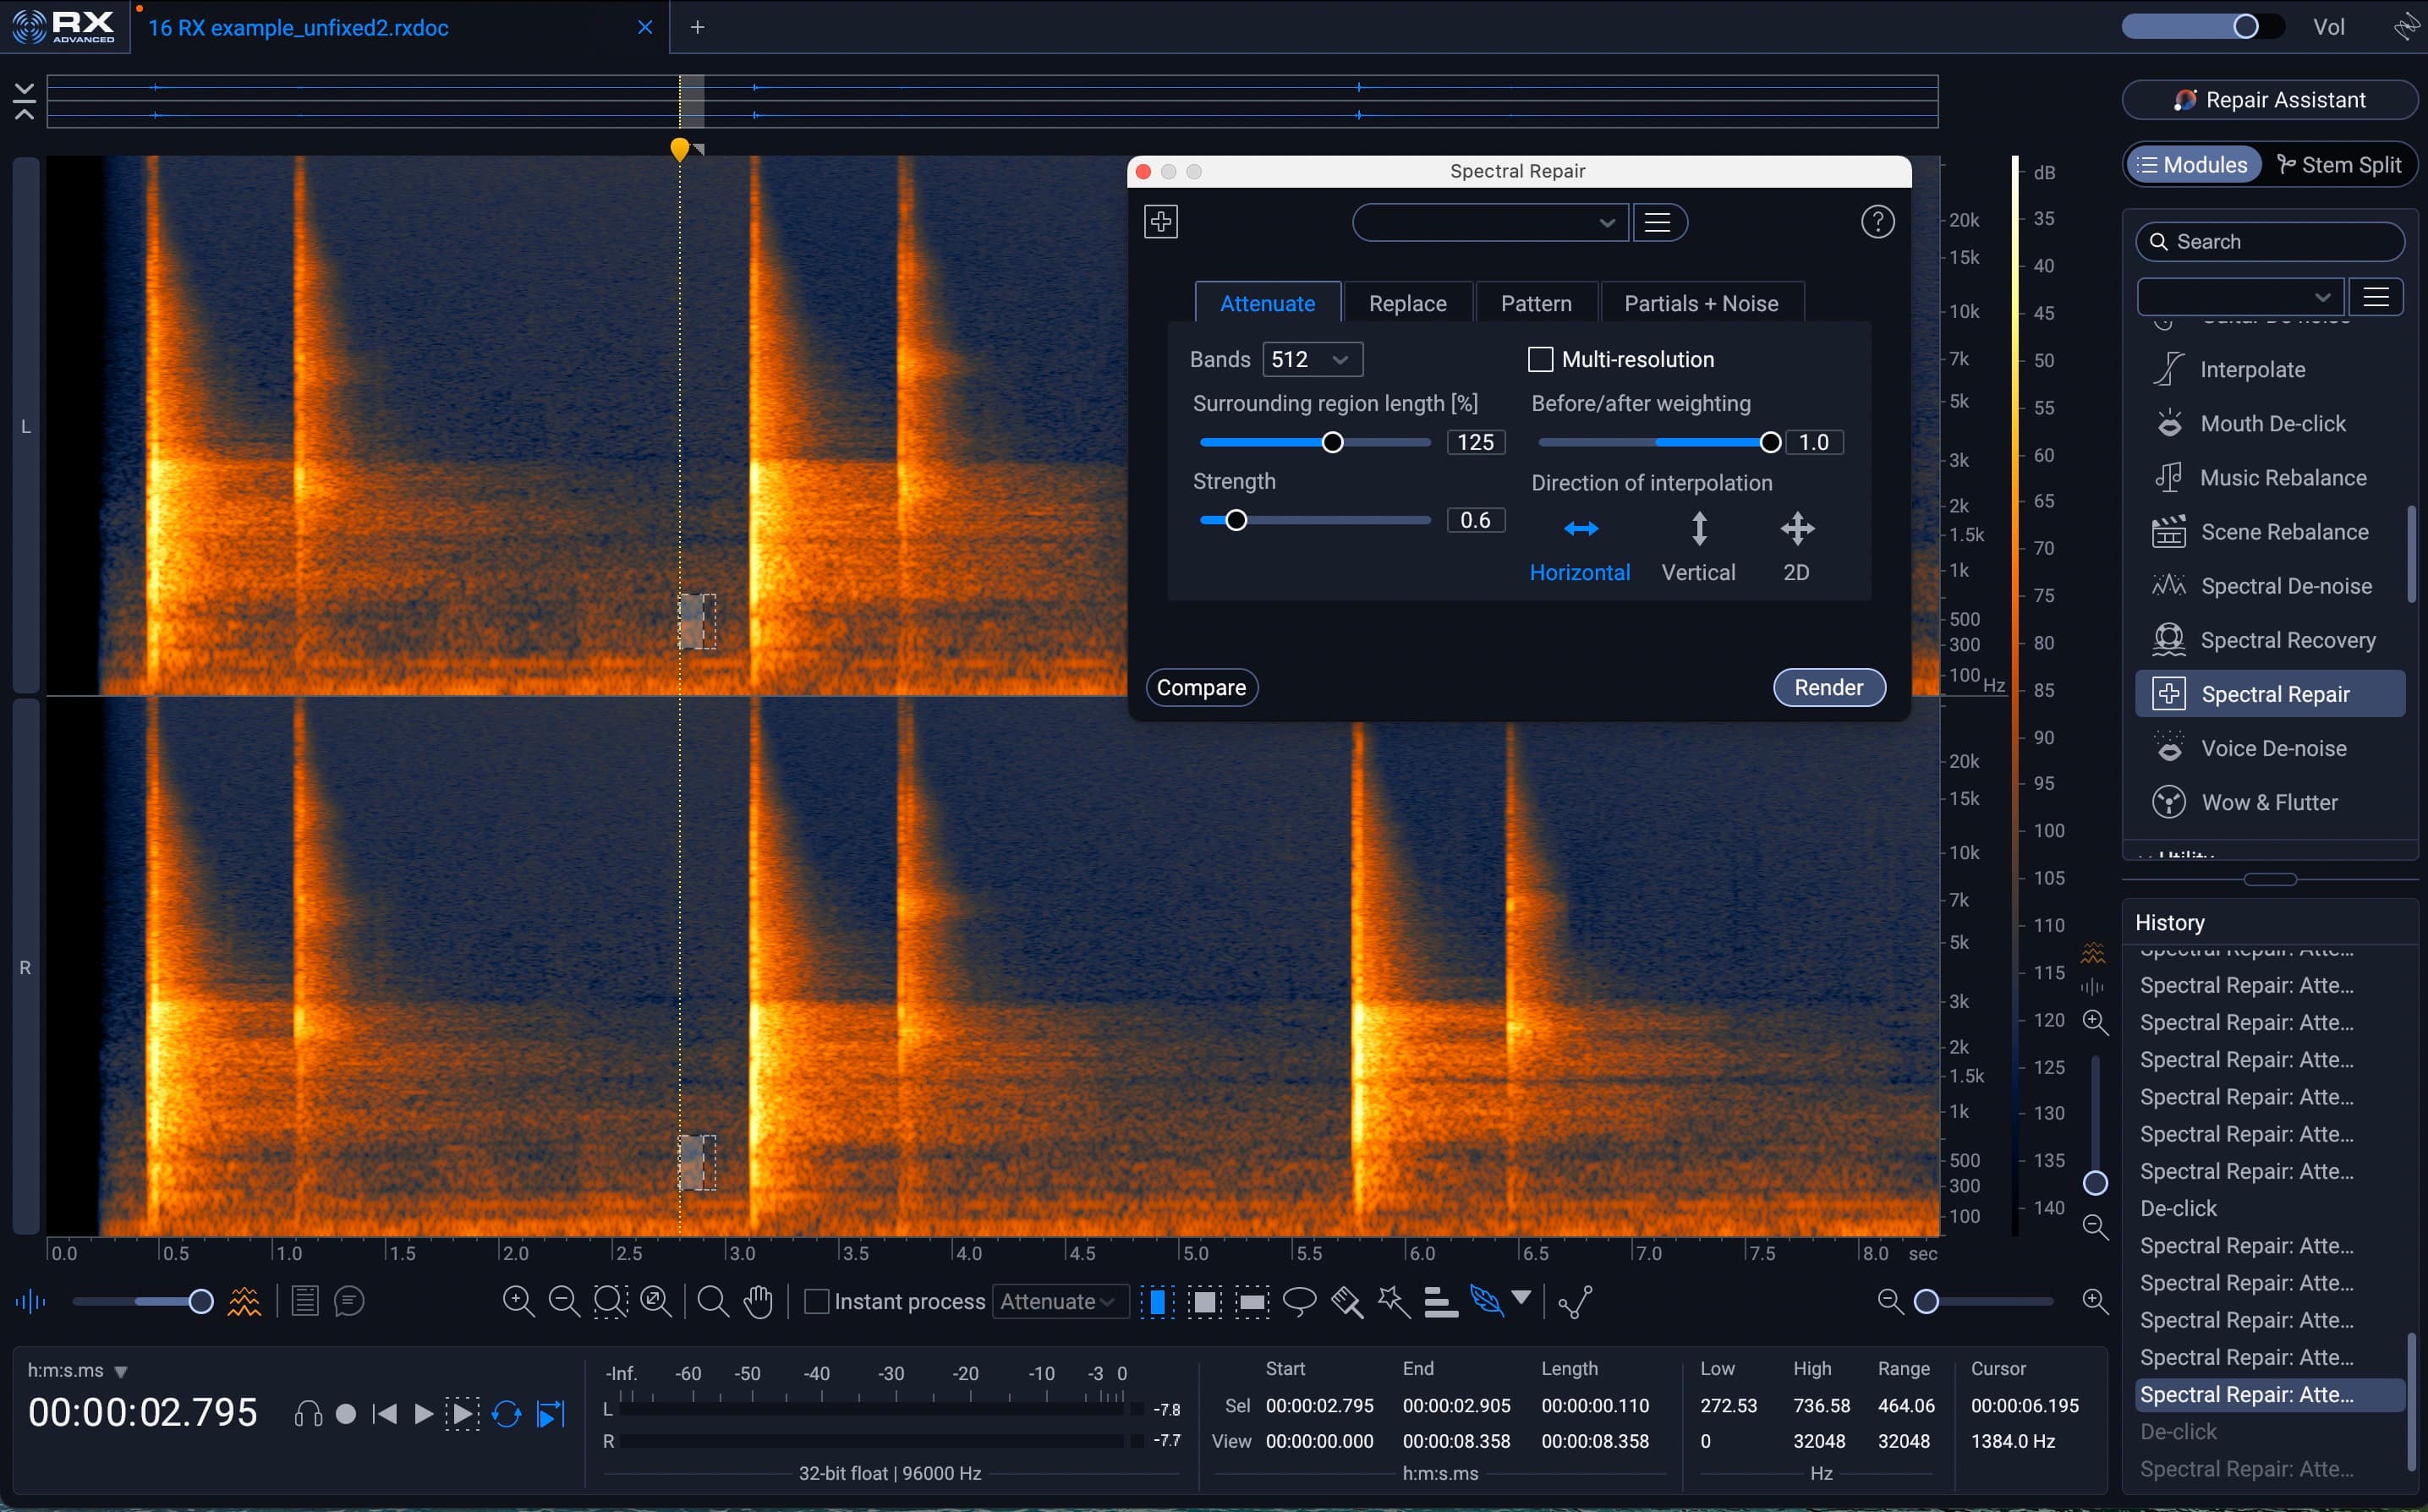 Before/after weighting in RX Spectral Repair
Before and after weighting is a neat feature of Spectral Repair. Using the selector slider you can have the algorithm weight audio information before or after the selection more importantly in how the module interpolates the processed sound. I find with sounds happening during a decay, usually the “after” part of the slider is more beneficial, although with noises, anything is possible. Use your ears and adjust what feels appropriate. As you can see in this example, I’ve done multiple passes on each part of the bleed. Often many little changes are more nuanced than one big stroke of the RX pen.
3. Remastering a 1972 soul recording for streaming and vinyl
Another project I worked on recently was the release of previously unheard tracks of the DC soul band, Choice Four, Inc., recorded at Sigma Sound Studios back in 1972.
Here's "Who Knows" before and after (clips remastered for this article):
Before mastering
After mastering
Learn more about this cool project put out by MAD Dragon Records, Drexel University’s record label.
These recordings had been transferred from tape and were released both on digital and vinyl. That meant I had to be mindful of distribution format, as well as aesthetics surrounding music of the time period! The stereo field was quite wide, which was nice, but at times felt too wide.
My main goals:
- Tighten the stereo image, which was wide – sometimes too wide
- Add control and punch to the low end
- Control sibilance, for overall balance and for the vinyl cut
- Raise the level without a modern approach to limiting that wouldn't fit the period
Beyond general compression and limiting, these made the biggest difference:
Imaging:I wanted to tighten up the spread on the low end, as well as the way the cymbals were spread across the stereo imaging. Would make it a bit easier to cut, as well as sound more cohesive on all stereo systems.
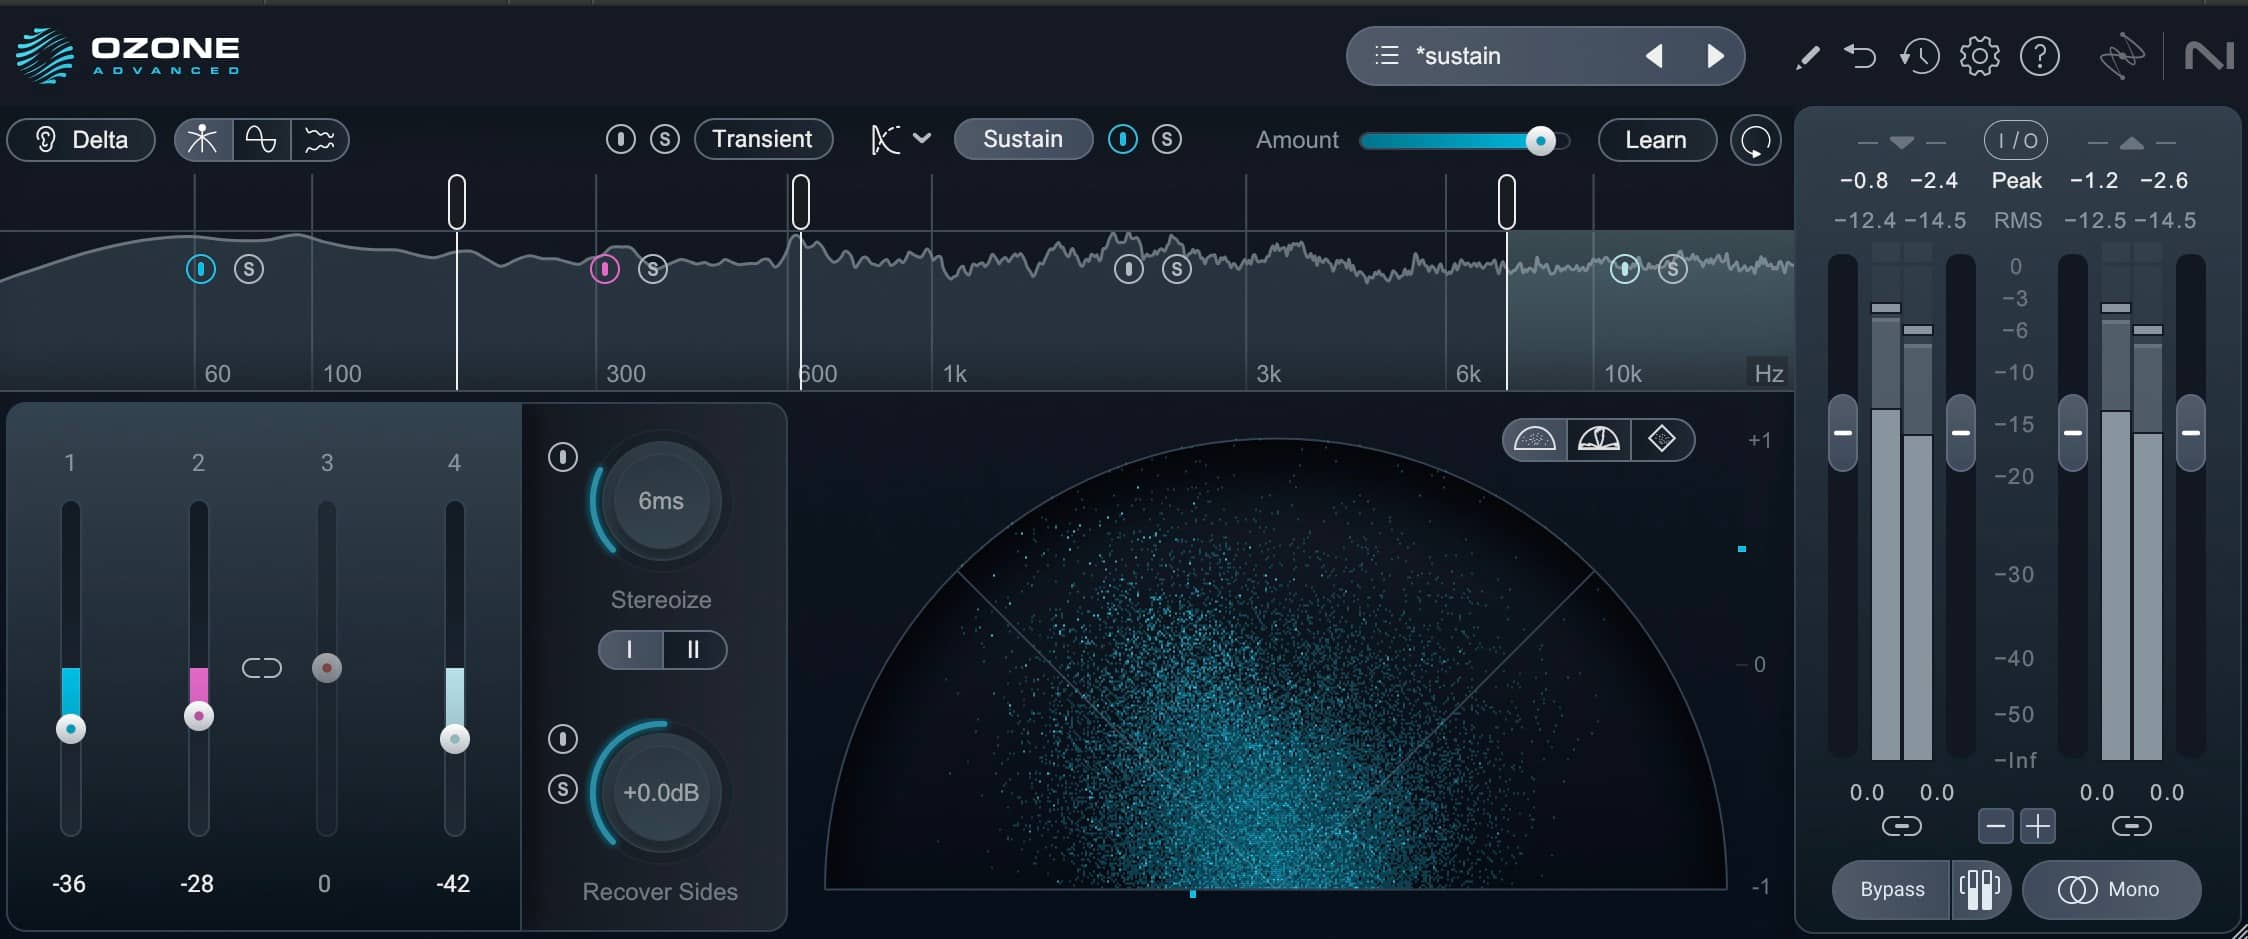 Tightening up the spread on the low end with Ozone Imager
Low End Focus: I also wanted to emphasize the punch of the low end a bit more, so using Low End Focus helped with that. It tamed the mud a bit more and allowed things to hit a bit more clearly.
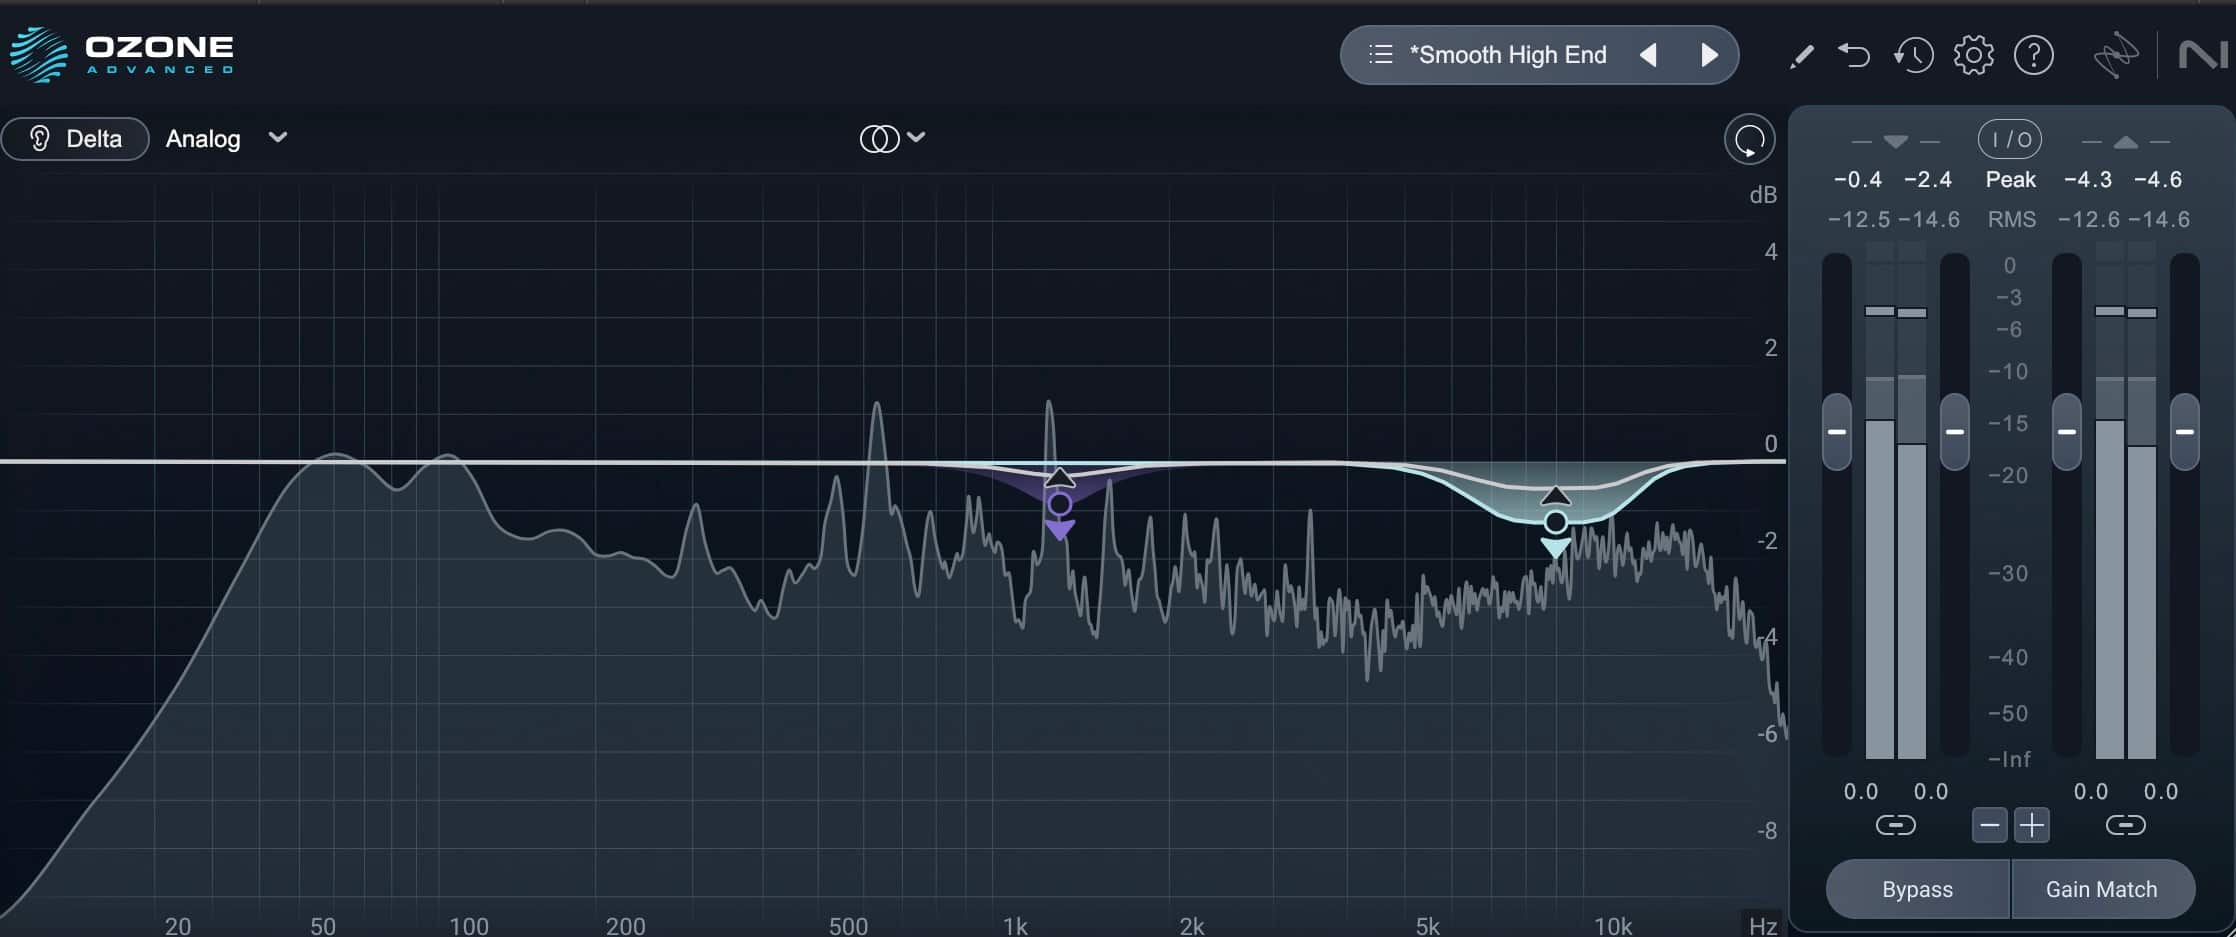 Emphasizing punch in the low end with Low End Focus in Ozone
Dynamic EQ: And then, of course, there were some protruding frequencies that were a bit much – as you can see, in the range of the cymbals and overall vocal sibilance, as well as the more nasal tones that often stick out as you make things louder. Dynamic EQ helped a lot with this.
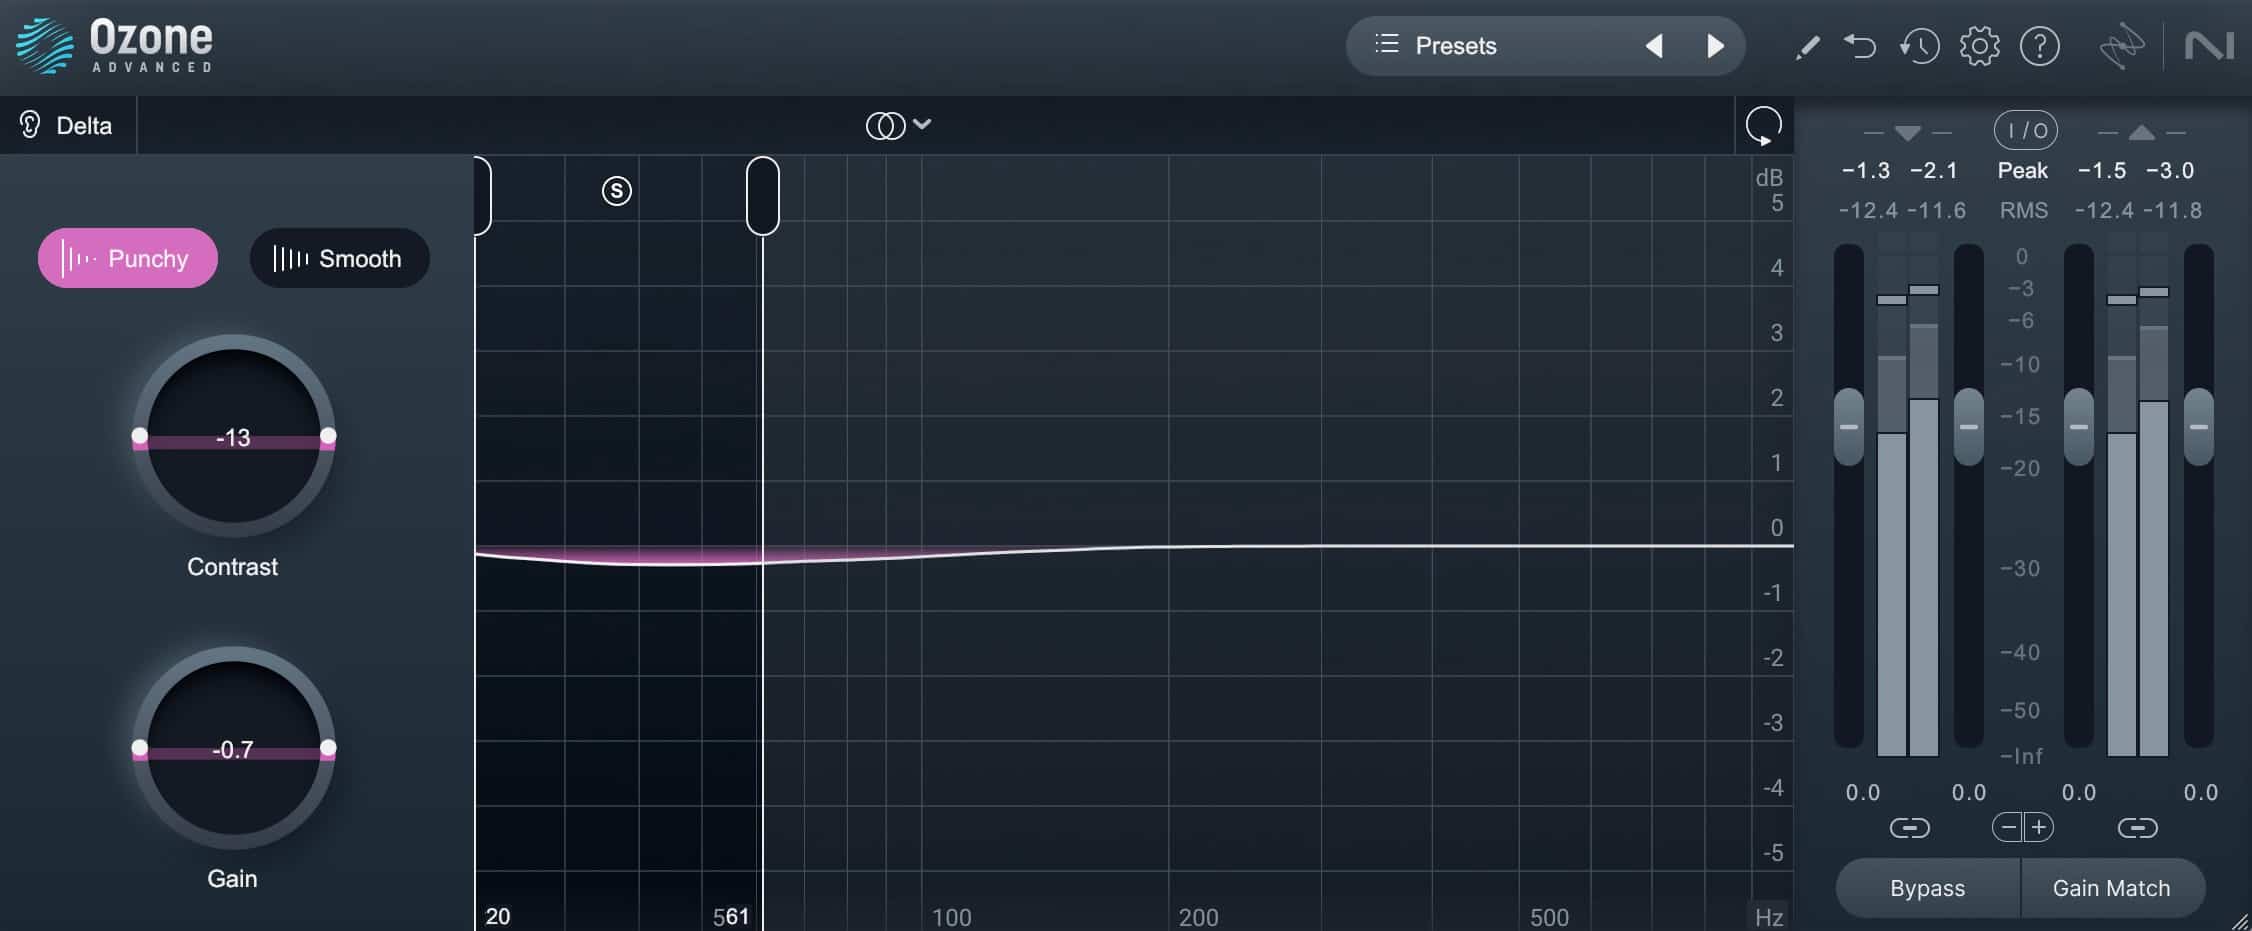 Using Dynamic EQ in Ozone to tame frequenciesI also did a bit of general EQ on the stereo file to clear things up, as well as some general compression and limiting.
When I cut the record, I also removed a bit more sibilance as well as low end - there’s plenty of it in the track, and adjusting the content helped solidify a clean, loud cut given the side lengths and material.
After mastering: references, revisions, and delivery
Send reference masters
After you’ve gotten the files (or file) to sound the way you think the client would like, then it’s time to send some reference files. I usually send 16 bit, 44.1kHz (CD quality) masters for evaluation, but this part of the process is more specific from engineer to engineer.
Handle feedback and revisions
The client will offer feedback, about the sonics or the spacing, or the metadata, etc. It’s important here to manage client expectations and what is technically appropriate - a lot of times the feedback is simply “more bass overall!” or “can we make it a little louder?” and those requests are usually easy to oblige. Some issues can't be fixed in mastering, though. A problem might need a remix, or it might come from the production, recording, or performance. When that happens, explain it in a way that makes the client feel heard while being clear about what's possible.
Revisions are normal; so many things in mastering are about getting things to the general ballpark and then tweaking your “answers,” so to speak. That’s part of the reason why having a well-treated room and a trustworthy pair of headphones are the most important things when getting started!
Export for distribution
Once everything's approved, export the final files for each format: digital distribution (requirements vary by service and client), CD or cassette (rare, but still requested), or vinyl.
Vinyl needs extra care. The best results require a skilled cutting engineer and a good relationship with them, as well as a good pressing plant! There are general guidelines, but if you’re mastering files to be sent to a cutter (and you’ve never done that before) please talk directly to the cutter - it’ll be a more accurate process. When I cut records regularly, talking with first-timers before they sent files always led to the best results.
Start mastering music
Mastering has changed over time from a transfer process into a more creative and aesthetic tool used to achieve the best sounding tracks for genre and format. The first step in the distribution process and the last step in the production process requires a consistent workflow, command of creative and utilitarian tools, a keen ear and a trustworthy room. Understanding what to use and how to use them will set a foundation for successful work!
FAQs
What is mastering in music?
Mastering is the final step in music production. A mastering engineer prepares the finished stereo mix for release by adjusting loudness, tonal balance, dynamics, and stereo width, and by removing noise, so the track sounds consistent on any system and alongside other tracks.
What's the difference between mixing and mastering?
Mixing balances the individual parts of a track, like vocals, drums, and bass, into one stereo mix. Mastering works on that finished mix as a whole, making it sound polished and consistent across an album and ready for each release format.
What tools do you need to master a track?
You need an acoustically treated room, a trusted pair of headphones, and a DAW suited to mastering. Core processing tools include an equalizer, compressor, limiter, stereo imager, saturation, and noise removal. iZotope Ozone combines these in one mastering suite, and iZotope RX handles noise removal.
Is mastering necessary?
Mastering makes the sound cohesive across the record and prepares the music for different distribution formats, such as Vinyl, MP3/AAC, streaming services such as Spotify, and broadcast. In today’s world, mastering is necessary to create that “finished” sound that you hear everyday in everything from television commercials to radio and streaming.
What files should you send for mastering?
Send stereo files at the mix session's native sample rate, ideally 24-bit or 32-bit, without a limiter on the mix bus. If the mix engineer made limited reference masters, send those too so the mastering engineer can hear what the client has been listening to.
How long does mastering take?
Mastering takes much less time than mixing, which can run for weeks or months. Turnaround depends on the number of tracks, the release formats, and how many rounds of revisions the client needs.